
P2648 & VTEC not engaging


Thread Starter
Advanced
Joined: Apr 2017
Posts: 50
Likes: 1
From: Mt. Juliet, TN
P2648 & VTEC not engaging
I've had this issue going on for about 6-7 months now and I can't seem to fix it. I've done every troubleshooting step in the service manual down to replacing the entire solenoid assembly and still no fix. I'm not sure if there's something else that would be causing this but I'm plum out of ideas. I have very recently been getting an intermittent P0137 code as well but that only started up a month ago and not sure why it'd be related.
I have also replaced my battery too before we go down that road. Any help would be appreciated.
I have also replaced my battery too before we go down that road. Any help would be appreciated.

next check this;
Ok so for the people that are having this issue and have come across this forum posting. Here is what the problem is looking like so far. This past weekend I dove into the car. First i drained the oil, then removed the three bolts holding on the piece the oil filter screws onto. That is where the VTEC solenoid is located. It is the metal silo looking piece. it has a green wire (covered in a black protective sleeve) coming off of it. Well this wire was some how broke. I remember reading the same answer in another forum where the guy drove through some river and down a dirt road. I didnt believe this was the issue since my wife was just driving a few miles from when it happened. But sure enough same problem. My plan was just disconnect the plug, repair the wire and put it back together. since the plug is in such a hard to locate area and you cant really see what you are doing i decided to order a new part to see what exactly the plug looked like, not that i break the piece that is still there and then where would i be....
I contacted the acura dealer and they wanted $95.34 for the part. the part number is 36171-P8E-A02. This is not the entire piece found on ebay used for $75 http://www.ebay.com/itm/250341333762...84.m1423.l2649 This is just the solenoid that is held on by 2 bolts. I should be receiving it in about 7 days and will attempt to repair the car again and let everyone know what happens. FYI from what we were attempting with removing the plug, it appears to be a two man job. one coming in from the top to push on the clip and another to pull the clip. i will include more detail once its replaced.
I contacted the acura dealer and they wanted $95.34 for the part. the part number is 36171-P8E-A02. This is not the entire piece found on ebay used for $75 http://www.ebay.com/itm/250341333762...84.m1423.l2649 This is just the solenoid that is held on by 2 bolts. I should be receiving it in about 7 days and will attempt to repair the car again and let everyone know what happens. FYI from what we were attempting with removing the plug, it appears to be a two man job. one coming in from the top to push on the clip and another to pull the clip. i will include more detail once its replaced.
Thread Starter
Advanced
Joined: Apr 2017
Posts: 50
Likes: 1
From: Mt. Juliet, TN
Yes oil level is correct. I've done about 2 oil changed since this problem as well. No issue with the wire as the resistance still shows correct and I've replaced that entire solenoid assembly.

Originally Posted by odyclub.com
How to Perform the "Jump the SCS Line With the HDS" Procedure Without the HDS
I recently did some troubleshooting of my radiator/condenser fan circuits using the Factory Service Manual. If you have the Factory Service Manual then you may have noticed that when you are troubleshooting an electrical problem that involves a connection to the PCM, the procedure will often have you check wiring between the component you're testing and the PCM. To do this you need to unplug the connectors to the PCM. When that is required the procedure always says to "Jump the SCS line with the HDS." It says that this step is required to prevent damage to the PCM when disconnecting. Even when the key is turned to LOCK (0) the PCM continues to monitor the EVAP system for up to 30 minutes. Honda says that if you disconnect a harness from the PCM during this window you risk damaging the PCM. To prevent this they tell you to jump the SCS line with the HDS. This is done after you turn the key to the LOCK (0) position. They instruct you to use the HDS to jump the SCS line and then remove your PCM connectors and do your testing. Once you're done, you reconnect the PCM and then un-jump the SCS.
Well, obviously most of us don't have the HDS bidirectional scan tool for doing this. After some Internet research it's clear to me that all this procedure does is short pin #9 (SCS line) to pin #4 (chassis ground) on the data link connector (DLC.) There are multiple ways you could do this. You can use a wire and hope you don't damage the the computer by connecting to the wrong pins, and/or if connecting to the front of the connector, hope you don't damage the connector. When diagnosing electrical problems, front probing a connector is always a big no-no due to possible damage to the connectors preventing the connector from making contact when you're done. If you put your wire on the back of the terminal (called backprobing) you still risk shorting the wrong pins, or the wire could fall out while you're conducting your test.
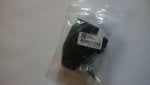
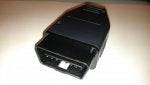
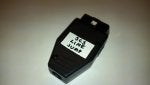
So, in order to make an easy way to do this while troubleshooting I decided to make myself a custom SCS Line Jump connector. For less than $6 shipped I bought a cheap DLC connector on eBay:

Link to pinouts for Honda DLC:
Honda OBD II diagnostic interface pinout diagram @ pinoutsguide.com
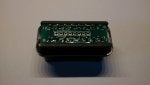
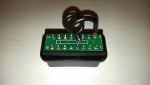
As you can see below, I simply soldered a jumper wire from pin 4 to pin 9 on the inside of the plug. So, for less than $6, and less than 10 minutes of time, I have an SCS line jumper connector to put the computer into test (apparently that's what jumping the SCS does) so that removing a PCM connector doesn't damage the PCM. If any of you watch the South Main Auto channel on YouTube, I asked Eric O (one of the top electrical diagnostic guys, and overall mechanic, on YouTube) if he ever did this in his diagnosing and he said no, and that if he needs to pull a connector he just pulls it and has never had an issue. Though, full disclosure, he always says the big three, Chrysler, GM, and Ford, are what keep him in the auto repair business--the Hondas, Toyotas, and Nissans just don't break as often. Anyway, there's probably only one very obscure instance where a PCM was damaged by pulling a connector and that led to putting the procedure in the book. However, for not even $6 it's cheap insurance if you find yourself needing to unplug the PCM during diagnostics. I simply tossed it in the bag with my scan tool and it will be ready the next time I hit that "Jump the SCS Line with the HDS" hurdle in the book.
Some pics:

I recently did some troubleshooting of my radiator/condenser fan circuits using the Factory Service Manual. If you have the Factory Service Manual then you may have noticed that when you are troubleshooting an electrical problem that involves a connection to the PCM, the procedure will often have you check wiring between the component you're testing and the PCM. To do this you need to unplug the connectors to the PCM. When that is required the procedure always says to "Jump the SCS line with the HDS." It says that this step is required to prevent damage to the PCM when disconnecting. Even when the key is turned to LOCK (0) the PCM continues to monitor the EVAP system for up to 30 minutes. Honda says that if you disconnect a harness from the PCM during this window you risk damaging the PCM. To prevent this they tell you to jump the SCS line with the HDS. This is done after you turn the key to the LOCK (0) position. They instruct you to use the HDS to jump the SCS line and then remove your PCM connectors and do your testing. Once you're done, you reconnect the PCM and then un-jump the SCS.
Well, obviously most of us don't have the HDS bidirectional scan tool for doing this. After some Internet research it's clear to me that all this procedure does is short pin #9 (SCS line) to pin #4 (chassis ground) on the data link connector (DLC.) There are multiple ways you could do this. You can use a wire and hope you don't damage the the computer by connecting to the wrong pins, and/or if connecting to the front of the connector, hope you don't damage the connector. When diagnosing electrical problems, front probing a connector is always a big no-no due to possible damage to the connectors preventing the connector from making contact when you're done. If you put your wire on the back of the terminal (called backprobing) you still risk shorting the wrong pins, or the wire could fall out while you're conducting your test.
So, in order to make an easy way to do this while troubleshooting I decided to make myself a custom SCS Line Jump connector. For less than $6 shipped I bought a cheap DLC connector on eBay:
Link to pinouts for Honda DLC:
Honda OBD II diagnostic interface pinout diagram @ pinoutsguide.com
As you can see below, I simply soldered a jumper wire from pin 4 to pin 9 on the inside of the plug. So, for less than $6, and less than 10 minutes of time, I have an SCS line jumper connector to put the computer into test (apparently that's what jumping the SCS does) so that removing a PCM connector doesn't damage the PCM. If any of you watch the South Main Auto channel on YouTube, I asked Eric O (one of the top electrical diagnostic guys, and overall mechanic, on YouTube) if he ever did this in his diagnosing and he said no, and that if he needs to pull a connector he just pulls it and has never had an issue. Though, full disclosure, he always says the big three, Chrysler, GM, and Ford, are what keep him in the auto repair business--the Hondas, Toyotas, and Nissans just don't break as often. Anyway, there's probably only one very obscure instance where a PCM was damaged by pulling a connector and that led to putting the procedure in the book. However, for not even $6 it's cheap insurance if you find yourself needing to unplug the PCM during diagnostics. I simply tossed it in the bag with my scan tool and it will be ready the next time I hit that "Jump the SCS Line with the HDS" hurdle in the book.
Some pics:
Trending Topics
^that's for YOU to figure out...we're just giving you the tools you need to figure it out.
in order to figure it out, you need to jump the SCS line, or risk the damage to the ECU/PCM.
Your choice
in order to figure it out, you need to jump the SCS line, or risk the damage to the ECU/PCM.
Your choice
Thread Starter
Advanced
Joined: Apr 2017
Posts: 50
Likes: 1
From: Mt. Juliet, TN
What I'm saying is, I've already checked for continuity there and there was none. I didn't jump the SCS line at the time of course but that seems to be more a precaution than a required step in actually being able to check continuity.
Thread Starter
Advanced
Joined: Apr 2017
Posts: 50
Likes: 1
From: Mt. Juliet, TN
Can anybody help on this? I've been at a complete loss for months and have no idea where to go from here. I can't really take it to a shop because they'll just charge me $400 to run a diagnostic and pull the same code I'm getting and try to convince me to replace the same part I've already replaced.

Burning Brakes


Joined: Sep 2001
Posts: 983
Likes: 124
From: HERE

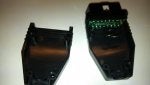
What solenoid assembly did you replace? please point it out in this picture. Because the pieces has a pressure switch and a solenoid. The piece on top detects oil pressure physically through the oil channels. And describe if the plunger inside is moving with the spring.

Did that fix the problem?
When I did a valve adjustment on my wife's Pilot, I had to disconnect the VTEC solenoid connection. I got the same code when I put everything together. After a few hours of diagnosis, cleaning the module, etc. I found that when I plugged it back in that I had inadvertently bent a pin. I straightened out the pin (carefully so it didn't break) then plugged it back in. Voila. Problem fixed. It's worth a look
When I did a valve adjustment on my wife's Pilot, I had to disconnect the VTEC solenoid connection. I got the same code when I put everything together. After a few hours of diagnosis, cleaning the module, etc. I found that when I plugged it back in that I had inadvertently bent a pin. I straightened out the pin (carefully so it didn't break) then plugged it back in. Voila. Problem fixed. It's worth a look
Thread Starter
Advanced
Joined: Apr 2017
Posts: 50
Likes: 1
From: Mt. Juliet, TN
No didn't change a thing. I'll check the pin though. My only guess is it could be the wire although it looks fine visually and tests fine with the multimeter. Not sure how I'd even go about replacing that whole wire since it's wrapped up with about 30 others and not easy to get to.
Burning Brakes
Joined: Sep 2001
Posts: 983
Likes: 124
From: HERE
The way that assembly works is very easy. Did you replace the oil pressure switch on top also or did you transfer that over from the old to the new? It's very easy to mis-connect that oil pressure switch on top because it's a major pain in the ass to get out. I would check that connection first. The assembly itself does nothing other than passing oil. If it's not clogged internally and the plunger bounces off the spring fine while pressing it with your finger when the control solenoid is off, then I can only see that the oil pressure switch is bad. VTEC does not engage without the proper oil pressure being detected. Another possibility is the oil pressure switch screwed into the rear upper portion of the oil pump. However, if that switch is bad, you would see the red oil pressure light at all times.
Last edited by t-rd; Jul 5, 2019 at 03:29 PM.
Thread Starter
Advanced
Joined: Apr 2017
Posts: 50
Likes: 1
From: Mt. Juliet, TN
Well for shits and giggles I ran a whole new wire to the solenoid and it's still doing the same thing. I probably caused more future problems with a new wire but it's not working anyways so might as well try whatever.
Senior Moderator


Joined: Feb 2006
Posts: 21,404
Likes: 2,184
From: Space Coast, FL
maybe it's a bad gasket? Did you put a new one on the assembly or did it come with one? If not, it could cause some issues with the oil pressure reading. Worse case seems to be ECM failure but I'd rule out the more simple things first.
Senior Moderator
Joined: Feb 2006
Posts: 21,404
Likes: 2,184
From: Space Coast, FL


Thread
Thread Starter
Forum
Replies
Last Post