Switchback LED's inside Headlights.... FINALLY!!!

 06-15-2007, 03:10 PM
#47
Be Patient... take your time...
TEST the LED lights before you silicone - (LED to Socket & Socket to Headlight) because some LEDs don't make proper contact and you have to adjust the wire leads on them...
GOOD LUCK... I know it's gonna go well...
TEST the LED lights before you silicone - (LED to Socket & Socket to Headlight) because some LEDs don't make proper contact and you have to adjust the wire leads on them...
GOOD LUCK... I know it's gonna go well...
06-15-2007, 03:39 PM
#48
Banned
Join Date: Apr 2007
Location: rain.com aka seattle
Age: 37
Posts: 215
Likes: 0
Received 0 Likes
on
0 Posts
wow you're making htis sound a lot easier than it seems.. but how do you addjust the LED to socket... beside pushing it in harder or wingling it around...
im not much of a tech as you can see... i just know you unplug one and attach the other...
im not much of a tech as you can see... i just know you unplug one and attach the other...
06-15-2007, 06:15 PM
#49
Originally Posted by buhhbuhh
wow you're making htis sound a lot easier than it seems.. but how do you addjust the LED to socket... beside pushing it in harder or wingling it around...
im not much of a tech as you can see... i just know you unplug one and attach the other...
im not much of a tech as you can see... i just know you unplug one and attach the other...
06-17-2007, 02:21 PM
#50
Banned
Join Date: Apr 2007
Location: rain.com aka seattle
Age: 37
Posts: 215
Likes: 0
Received 0 Likes
on
0 Posts
Originally Posted by jptl04
hey bro, i did this first but with an all white led not switchback, they are the same size. rodney used my soldering iron method to get the bulbs in. he said he used silicone to seal in the bulb. he prolly melted out the factory notches. when i melted the notches i melted them just to the side of the actual factory notches on the headlight housing. doing it like this allowed me to just twist them on. so there was no need for silicone. here is a link to my post https://acurazine.com/forums/showthr...9&page=1&pp=25 check the second page it shows what i did. hope that helps
mmm im kinad getting what you're talking about, maybe everything will be clearer when i actually do it.. but the only part tahts just kinda confusing is when you said " you just melted them to the actual side ?!?!? i mean if i don't have to use silicon WOW !!! this can be just a simple soldering MOD...
no chance for leaking.. but imma go chek out youre thread (maybe i shouldve before i posted thiS
 )
06-17-2007, 02:27 PM
)
06-17-2007, 02:27 PM
#51
Banned
Join Date: Apr 2007
Location: rain.com aka seattle
Age: 37
Posts: 215
Likes: 0
Received 0 Likes
on
0 Posts
Originally Posted by jptl04
after i got the bulbs i test fit them i noticed that the round led heads where what was not letting the bulb go in so....
to make the bulb fit in the housing i used a soldering iron to melt out a couple of small notches in the inner whole. the notches are to accomodate the led bulb heads
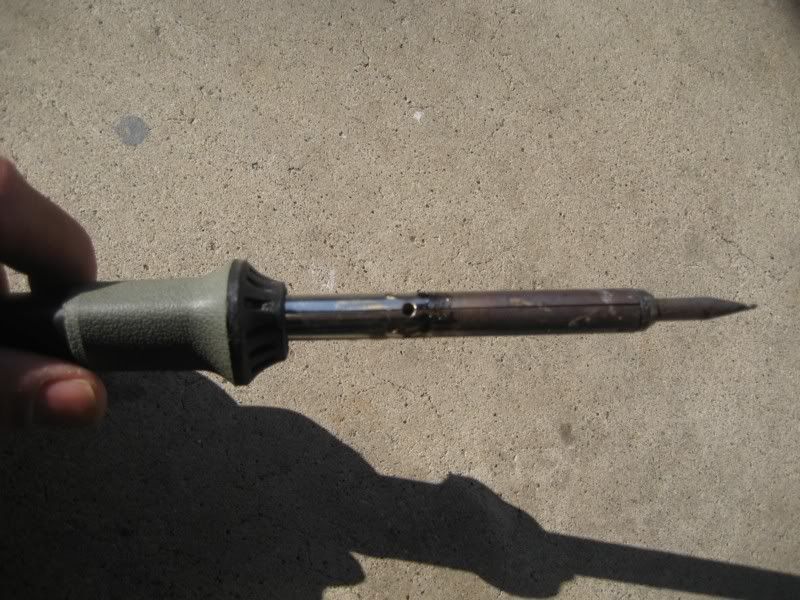

i melted out three small notches like this in the inner opening. you could hardley see them. don't use a dremil or file you'll get debris all in your housing then you'll hate yourself. dont hold it too long either use a swiping motion in and out
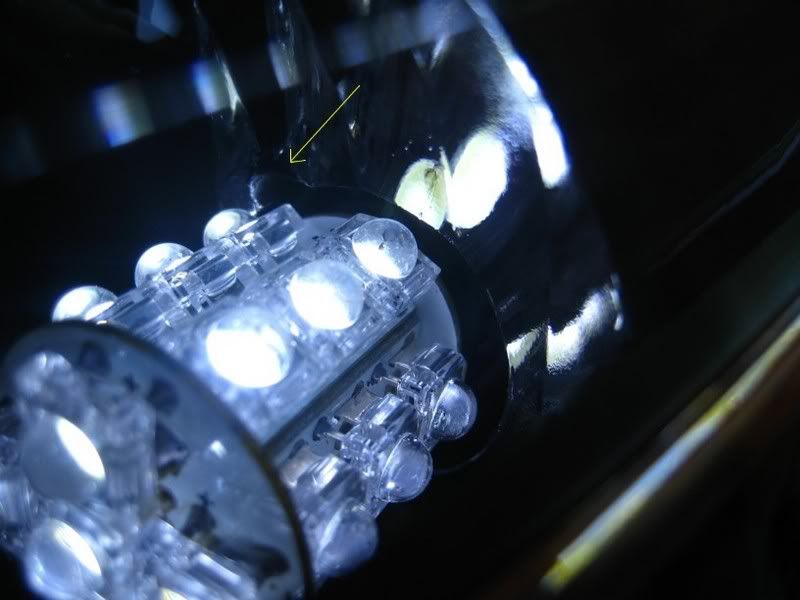
here you can see one of the notches one is on the bottom and the other is behind the bulb you can't see it. once you melt the plastic it'll be white i used a small brush and some black model paint to touch it up. in your case silver would do.
to get in a good position to do this you'll have to jack up one side of the car remove the tire and the wheel well plastic cover. not hard to do just time consuming if you have a couple of hours to kill you could easily do this mod.
to make the bulb fit in the housing i used a soldering iron to melt out a couple of small notches in the inner whole. the notches are to accomodate the led bulb heads
i melted out three small notches like this in the inner opening. you could hardley see them. don't use a dremil or file you'll get debris all in your housing then you'll hate yourself. dont hold it too long either use a swiping motion in and out
here you can see one of the notches one is on the bottom and the other is behind the bulb you can't see it. once you melt the plastic it'll be white i used a small brush and some black model paint to touch it up. in your case silver would do.
to get in a good position to do this you'll have to jack up one side of the car remove the tire and the wheel well plastic cover. not hard to do just time consuming if you have a couple of hours to kill you could easily do this mod.
ARE YOU JUST SAYING INSTEAD OF MELTING THE WHOLE NOTCH TO FIT THE LED, YOU JUST NEED TO MAKE SOME NOTCHES THAT CORRESPOND TO THE LED... LIKE IN THE PICTURES ABOVE RIGHT ?!?!?!?!??!
06-17-2007, 09:09 PM
#52
Originally Posted by buhhbuhh
THIS IS THE POST RIGHT ?!@?! MAKES REALLY CLEAR SENSE NOW...
ARE YOU JUST SAYING INSTEAD OF MELTING THE WHOLE NOTCH TO FIT THE LED, YOU JUST NEED TO MAKE SOME NOTCHES THAT CORRESPOND TO THE LED... LIKE IN THE PICTURES ABOVE RIGHT ?!?!?!?!??!
ARE YOU JUST SAYING INSTEAD OF MELTING THE WHOLE NOTCH TO FIT THE LED, YOU JUST NEED TO MAKE SOME NOTCHES THAT CORRESPOND TO THE LED... LIKE IN THE PICTURES ABOVE RIGHT ?!?!?!?!??!
06-18-2007, 08:01 AM
#53
jptl04... thanks for helping him out further...
I believe me... I tried to limit the size of the opening by doing the notch thing... but the switchback LED's are HUGE... They are actually larger, in diameter, than the tabs where you would twist on... IMO...
I believe me... I tried to limit the size of the opening by doing the notch thing... but the switchback LED's are HUGE... They are actually larger, in diameter, than the tabs where you would twist on... IMO...
06-18-2007, 01:47 PM
#54
Banned
Join Date: Apr 2007
Location: rain.com aka seattle
Age: 37
Posts: 215
Likes: 0
Received 0 Likes
on
0 Posts
Originally Posted by jptl04
exactly!!! just line up the bulb in the whole then you can see where the round led heads are touching the sides of the opening. mark those spots and use the iron to melt away some material to allow them to go in. remember dont just hold the iron on there use a swiping motion in and out. 3 notches sould do it. one on the top, bottom and inside wall toward the engine so you wont see it. once you do this you should be able to get it in there and simply twist it on. (you might need to wiggle it a bit but it will fit)
06-18-2007, 08:59 PM
#58
I wired in the Load Equalizers... So now I don't have the hyper speed blinkers... 

Per your Request... Rock On Ray!!!
http://img531.imageshack.us/my.php?i...shlightsl4.flv
Originally Posted by darksom1
Do another video Rod! Use "Flashlight" by Parliament for this one kid! Back in the day, but it fits ya feel me? 
http://img531.imageshack.us/my.php?i...shlightsl4.flv
06-18-2007, 09:13 PM
#60
I did... I got a shot of you and the Alcoholic... you getting out your car quick to see if your LIP was still there...  and the alky stumbling to get out the G... ... but I decided it was best to leave it in the editing floor...
and the alky stumbling to get out the G... ... but I decided it was best to leave it in the editing floor...

 06-20-2007, 10:55 AM
#64
Originally Posted by imrantl
rodney ur tl looks hot, hope one day i can make my wdp look as good as yours. the lower valence fogs look good need to check em out in person
... I know your car is gonna look crazy with time... and eventually surpass my hoptie...
'cause I'm getting bored...
06-22-2007, 02:41 PM
#65
Racer

Join Date: Mar 2007
Location: chiTOWN
Age: 39
Posts: 274
Likes: 0
Received 0 Likes
on
0 Posts
alright, im very illiterate with this kinda stuff lol... but
Do you just solder out the part where the bulb goes in, so it fits right, then you plug n play it into the socket, and then silicion it into the socket so it doesnt flick out? and what is with the resistor? do u have to solder anything or anything technical? sorry for the stupid questions if they are.
Do you just solder out the part where the bulb goes in, so it fits right, then you plug n play it into the socket, and then silicion it into the socket so it doesnt flick out? and what is with the resistor? do u have to solder anything or anything technical? sorry for the stupid questions if they are.
07-06-2007, 03:00 PM
#67
I used a load equalizer/resistor so that I wouldn't get the fast blinking when I hit my directionals... since the LED have less wattage than conventional halogen bulbs... the car thinks that you have a burned bulb and makes the blinkers go into hyper speed... lol... I used the 6 Ohm - 50 watt LED load equalizer... http://autolumination.com/equalizers.htm
You don't have to solder any wiring to install the load equalizers/resistors....
You don't have to solder any wiring to install the load equalizers/resistors....
07-20-2007, 01:53 PM
#72
The soldering idea worked! I did my rear tail-light signals. I lay down in the trunk instead of removing the tail-lights. I started pretty cautiously but it wasn't big enough. It was tough as there were 2 layers of plastic the bulb would have to pass through. I ended up going extreme and melting the notches clean off the socket and got the big bulb in. I planned to silicone them in but they amazingly snapped in place and they're staying there for now. Now I gotta get those switchbacks into the fronts!
07-20-2007, 02:21 PM
#73
Godfather of Chrome
Join Date: Dec 2006
Location: Santa Cruz, and yes I'm a hippie with retro 1970s sideburns and a chrome fetish
Age: 46
Posts: 1,297
Likes: 0
Received 1 Like
on
1 Post
Originally Posted by rockyfeller
The soldering idea worked! I did my rear tail-light signals. I lay down in the trunk instead of removing the tail-lights. I started pretty cautiously but it wasn't big enough. It was tough as there were 2 layers of plastic the bulb would have to pass through. I ended up going extreme and melting the notches clean off the socket and got the big bulb in. I planned to silicone them in but they amazingly snapped in place and they're staying there for now. Now I gotta get those switchbacks into the fronts!
 Pics. Now.
07-20-2007, 06:45 PM
Pics. Now.
07-20-2007, 06:45 PM
#76
Originally Posted by rockyfeller
The soldering idea worked! I did my rear tail-light signals. I lay down in the trunk instead of removing the tail-lights. I started pretty cautiously but it wasn't big enough. It was tough as there were 2 layers of plastic the bulb would have to pass through. I ended up going extreme and melting the notches clean off the socket and got the big bulb in. I planned to silicone them in but they amazingly snapped in place and they're staying there for now. Now I gotta get those switchbacks into the fronts!
chalk up another one w/ the LED mod
07-25-2007, 08:38 AM
#79
Tri State ViP Crew
Originally Posted by S1CK TypeS
does it match the stock 4300k headlights in person?
Rodney is running 10k HID bulbs on his headlights and fogs and they match that very well.