
Mzilvar's WDP Progress Thread


Mzilvar's WDP Progress Thread
Thought I'd start a progress thread, have a lot of mods done already, just going to start out with some photos 
Will update later with interior shots and a list of mods.
Will update later with interior shots and a list of mods.
Thanks! But your rear end is great! Just get some custom tail lights made from the guys on the forum! Other than that, your rear is great! I don't have a Type S rear. It's just Aspec for the 07/08 Base all around. I love the front Aspec for 04-06.
Enjoy your beauty!
Enjoy your beauty!


Trending Topics

Advanced
Joined: May 2013
Posts: 63
Likes: 2
From: Port Arthur Texas
Thnx but thats how I got the car lol cant leave it stock :P and damn thats the a-spec for the 07-08?
So the car is an '05 A-SPEC, the front and sides are the 04-06 underspoilers and the rear is the 07-08 Type-S underspoiler.
More photos and my list of mods
- RV6 V3 HFPCs
- RV6 V3 J-Pipe
- ATLP V2 Resonated Quads
- UR Stock Diameter Crank Pulley
- Skunk2 UCAs
- SPC Rear Camber Arms
- Big 3 + Grounding Star (Kolossus 0 gauge flex cable)
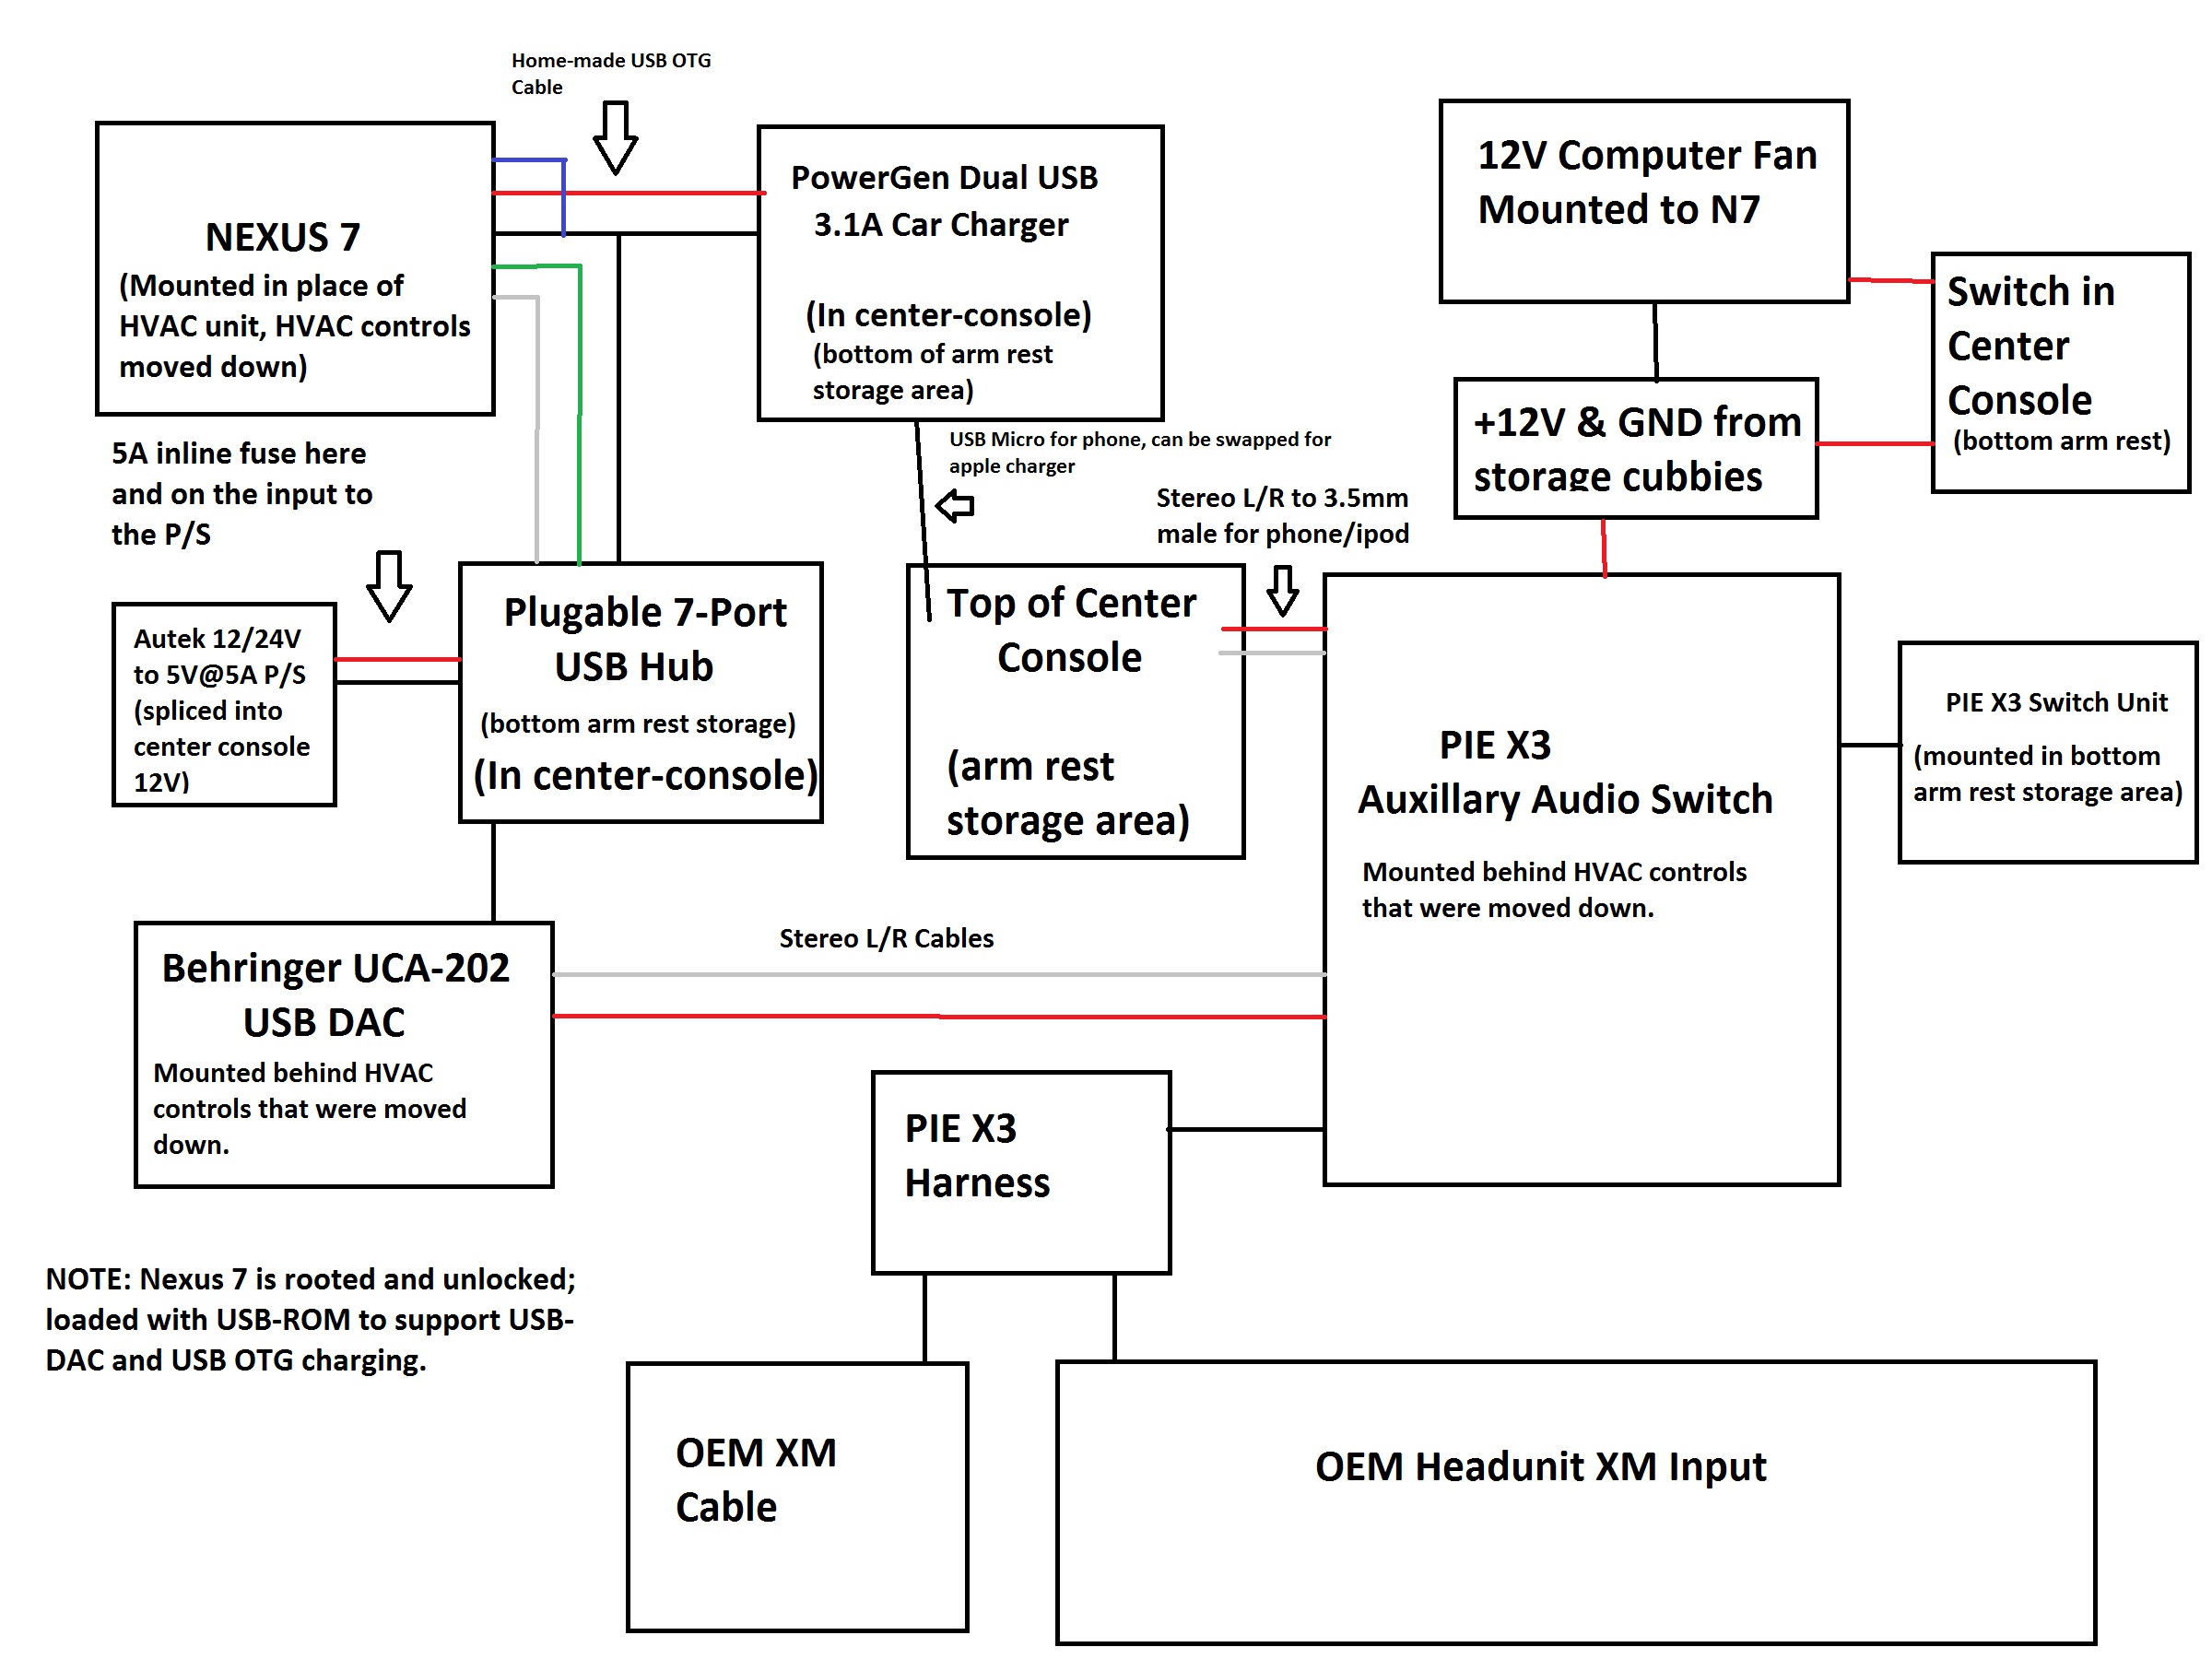
- N7 Tablet Integration
-- Rooted, Bootloader unlocked running Timur's USB-ROM
-- USB Hub Integrated
-- Audio from USB DAC - PIE X3 - OEM XM Input
-- CPU Fan mounted to tablet
- Scantool OBD Link MX
- HVAC Moved Down
- Interior 3M 1080 Glossy CF Wrap
- Laser Interceptor, 4x heads (2 rear, 2 front w/ Parking switch)
-- Power/parking switch by the gear selector
-- CPU by the interior fuse box
- Tein SS Coil-overs
- TSW Mirabeau 18x9 +30 offset wheels, wrapped in 235/40 Mich Pilot SS Tires
- Extended studs on all 4 corners
- Front Fenders tab trimmed, slight pull
- Rear Fenders rolled
- Redline Racing ATF + Redline D4 ATF (about 65% racing fluid)
- Redline 5W-30 Oil
- Redline CV2 Grease in all the ball-joints
- Raxles
- Rockstar's modded tails
- Black emblems
- C-MOD grill, DIY painted gloss black
- Modified UCM
... I'm sure there's more, but that should be pretty close.
Some interior shots.

- RV6 V3 HFPCs
- RV6 V3 J-Pipe
- ATLP V2 Resonated Quads
- UR Stock Diameter Crank Pulley
- Skunk2 UCAs
- SPC Rear Camber Arms
- Big 3 + Grounding Star (Kolossus 0 gauge flex cable)
- N7 Tablet Integration
-- Rooted, Bootloader unlocked running Timur's USB-ROM
-- USB Hub Integrated
-- Audio from USB DAC - PIE X3 - OEM XM Input
-- CPU Fan mounted to tablet
- Scantool OBD Link MX
- HVAC Moved Down
- Interior 3M 1080 Glossy CF Wrap
- Laser Interceptor, 4x heads (2 rear, 2 front w/ Parking switch)
-- Power/parking switch by the gear selector
-- CPU by the interior fuse box
- Tein SS Coil-overs
- TSW Mirabeau 18x9 +30 offset wheels, wrapped in 235/40 Mich Pilot SS Tires
- Extended studs on all 4 corners
- Front Fenders tab trimmed, slight pull
- Rear Fenders rolled
- Redline Racing ATF + Redline D4 ATF (about 65% racing fluid)
- Redline 5W-30 Oil
- Redline CV2 Grease in all the ball-joints
- Raxles
- Rockstar's modded tails
- Black emblems
- C-MOD grill, DIY painted gloss black
- Modified UCM
... I'm sure there's more, but that should be pretty close.
Some interior shots.
Last edited by mzilvar; Jul 16, 2013 at 01:22 AM.
Thought I'd put up some pics of my Big 3 install since I haven't seen too many photos on the forum for them.
Used knukonceptz kolossus 1/0 gauge fleks cable. It's all their black cable, but they do make red as well.
My engine bay is pretty dirty.
Used knukonceptz kolossus 1/0 gauge fleks cable. It's all their black cable, but they do make red as well.
My engine bay is pretty dirty.
Thanks.
Couple new mods today.
Finally got around to installed my P2R ported & polished lower runners and the outlaw engineering thermoblock spacer.
I've got the intake manifold back on now, just need to finish up in the morning and put the idler pulley, serpentine belt & strut bar back on.
I also did a valve adjustment while I was installing these, cleaned up the cylinder head covers and replaced all of the seals in the cylinder head covers. Also replaced all of the O-rings on my fuel injectors and cleaned out all of the carbon deposits from the intake manifold and throttle body. Oh, new PCV valve too.
While I was doing the valve adjustment I found all of the intake valves were fine and all of the exhaust valves were a little tight, not much at all though.
Car has about 103k miles on it now.
Some pics
Last edited by mzilvar; Aug 4, 2013 at 06:01 AM.
All buttoned up and running great. Took it for about a 50 mile drive and no problems, no CELs or anything
Have a few more things going on with the car soon .. just waiting on parts.
Next mods are exterior, then after that I'll probably do the 3.7 mani/ZDX TB.
Have a few more things going on with the car soon .. just waiting on parts.
Next mods are exterior, then after that I'll probably do the 3.7 mani/ZDX TB.

Modded the flasher circuit today to prevent hyperflashing for the LED turn signals I have in now.
Resistor was only like 30 cents each, beats installing load resistors since this actually changes the sense on the circuit. Thanks to Roger555 for posting this one.
Pics of my new headlights already installed too Will wait until I finish up the rest of the exterior stuff to put pics of the car up again.
Resistor was only like 30 cents each, beats installing load resistors since this actually changes the sense on the circuit. Thanks to Roger555 for posting this one.
Pics of my new headlights already installed too
Will wait until I finish up the rest of the exterior stuff to put pics of the car up again.

Any videos of the exhaust? I'm looking into get the Rv6 HFPC for my car. I'm just curious if it's raspy at all. you Basically have the same setup as I do.
ATLP Base exhaust, RV6 V3 jpipe.
ATLP Base exhaust, RV6 V3 jpipe.
My setup may be a little different though since I have the quads and I had them put the resonator on it.
Is yours resonated?
Finished the driver's and passenger's side panels today.
Will get some pics with the LEDs on later once it gets a bit darker out.
Exhaust video is up too:
http://www.youtube.com/watch?v=fqSKC...ature=youtu.be
Will get some pics with the LEDs on later once it gets a bit darker out.
Exhaust video is up too:
http://www.youtube.com/watch?v=fqSKC...ature=youtu.be
All that's left is everything in the center and the cup-holder lighting. Probably do that part this weekend so I have more time since I'll be doing the radio as well.
Oops almost forgot have to do the steering wheel too.
Oops almost forgot have to do the steering wheel too.
Last edited by mzilvar; Aug 27, 2013 at 07:23 PM.
The steering wheel buttons were a PITA, definitely the most difficult part so far.
After about 5 or 6 iterations trying different things this is what I ended up with.
I aimed them a little better after the photos.
Didn't see any pics of the HFL switches in any threads so I took a few extra of those.
Getting the polarity right on this is the big part, don't want to do it once and then have to disassemble it and re-do it like I did.
Here it is lit up.
I had to turn the brightness down quite a bit, these are a little too bright.
Probably should've used a few white ones like deathmetal did here and there, oh well.
Fixed the one in the driver's door that was out too, had a bad solder.
I killed quite a few LEDs doing the steering wheel, good thing I bought more than I needed. I tried using a single resistor for two LEDs in one of my attempts with the steering wheel switches. It blew both LEDs immediately when I plugged it in.
Last edited by mzilvar; Aug 28, 2013 at 05:07 AM.
Thanks
Ran into a little problem today driving around, my cruise control got stuck on and I couldn't shut it off. It didn't try to change the acceleration or anything, just the mode button shorted to the resistor that was tied to ground and the light came on on the instrument cluster.
Fixed it now though, but photo shows a good example of what not to do with this one. I was thinking about it as I was re-assembling it, but was so sick of those switches I figured the tape would hold out, didn't even last a day until the pin poked through and hit the resistor.
Didn't take very long at all to fix it today.