
XLR8 Performance Engine Mounts - Acura TL '04-'08 ALL

 02-22-2010, 10:08 PM
#42
"Let's Do This"
Im getting mine installed next week, i got the 75a's coming in tomorrow. My father is too lazy to do it tomorrow LOL. he does all my work! ill post pics and write a review once installed


 03-02-2010, 11:16 PM
#47
94 DC4 RS LSV/Turbo
iTrader: (1)
Join Date: Jul 2007
Location: New York City | Stuck in Traffic
Age: 38
Posts: 11,734
Likes: 0
Received 11 Likes
on
11 Posts
Installed... Tid Bits

on to some tid bits about the install
REAR MOUNT VS FRONT MOUNT

Note: the bases are symmetrical BUT you will have to rotate the floating bracket for the rear mount (this may just have been on libert69's mounts) it is just how the manufacturer put them together...

SECONDLY... the passenger side mount has a 19mm extra long bolt w/ corresponding 19mm nut... NO IDEA WHY IT IS SOOOOO LONG, but the way it came assembled didn't allow for the chassis firewall side bolt to be installed, so we flipped the direction of the long bolt and then it was too close to the ps reservoir...
 ... libert69 and his dremel
AND THE FINAL SHOT

TEST DRIVE: wet pavement, zero wheel hop... we had fun finding new rattles every red light... 75a bushings by the way
Last edited by stillhere153; 03-02-2010 at 11:20 PM.
The following users liked this post:
breck569 (09-07-2013)
 , dam are the rattles annoying? I think I might go with the 62a if anything I really hate rattles. Now anybody got the 62a's on as yet?
03-02-2010, 11:54 PM
, dam are the rattles annoying? I think I might go with the 62a if anything I really hate rattles. Now anybody got the 62a's on as yet?
03-02-2010, 11:54 PM
#50
Wasnt that bad of an install. Thanks stillhere153. Even after cutting the bolt down on the side mount, we still had to literally twist the power steering reservoir bracket so the reservoir was not sitting directly on the bolt we cut.
Im getting rattles from my glove box, steering wheel and my keys. These rattles are only there when idling. Keys are an easy fix. When you apply a little pressure on the glove box the rattle goes away. So im going to wrap some felt around the metal that the latch connects to. The steering wheel rattle goes away when you grip the wheel firmly. However, once you do that the driver side dash rattles lol. Its just gonna take some time to isolate all the rattles but im not worried about that. There is a decent amount of vibration you can feel through the seat.
Im getting rattles from my glove box, steering wheel and my keys. These rattles are only there when idling. Keys are an easy fix. When you apply a little pressure on the glove box the rattle goes away. So im going to wrap some felt around the metal that the latch connects to. The steering wheel rattle goes away when you grip the wheel firmly. However, once you do that the driver side dash rattles lol. Its just gonna take some time to isolate all the rattles but im not worried about that. There is a decent amount of vibration you can feel through the seat.
03-03-2010, 12:26 AM
#52
this post is from the innovative mounts thread. it may help people with these mounts also
As posted Sunday night on the other board:
"Alright, I've done a little testing since I finished the initial install friday night. I determined the air ratchet tightened the through-bolt to about 45 to 50 ft-lbs, and I adjusted down from there. I made sure I stayed in each torque spec for at least three drive cycles, so that I could get an adequate feel for each. I've been doing alot of driving in the last 48 hours or so. My results (keep in mind, this is done by ass-dyno only):
45-50 lb-ft: Heavy vibration, sound magnified significantly through the frame.
40 lb-ft: Only slightly better than 45 lb-ft.
35 lb-ft: noticeably quieter, much less vibration, but still a good deal more of both than stock.
30 lb-ft: very close to stock vibration level, only slightly noticeable magnification of engine noise.
25 lb-ft: no discernible difference over 30 lb-ft.
Traction level stayed about the same across the board.
My conclusion: 30 lb-ft is the ideal torque setting for reduced vibration while maintaining the highest possible clamping value. I would recommend a light application of loc-tite on the bolt ends as extra insurance, but 30 lb-ft should be quite adequate to maintain this torque value.
Hope this helps people."
 03-03-2010, 12:58 AM
#54
The first video is my car at idle in park. There are no rattles but you can feel some vibrations through the seat into your back. Its mostly from the mounts but I also felt a slight vibration in the cabin from my exhaust before the xlr8 mounts
http://www.youtube.com/watch?v=Ibqcs2pshW8
Second video is my car in drive at idle. Lots of rattles. That very loud rattle that comes and goes is from my keys. Im grabbing them with my hand and it goes away. When the camera goes over to the driver side vent area, that area starts to rattle when I grab the steering wheel firmly
http://www.youtube.com/watch?v=bLDt5ziYN5o
03-03-2010, 07:51 AM
#55
Safety Car
Bert,
I think that your hose routing may be producing a vacuum leak when above idle.
If you notice that black round knob on the left side of the solenoid. That knob has a filtered opening that allows fresh air to enter. The purpose of this knob is to allow fresh air to enter into the lines to relieve the vacuum when the engine is above 1000 rpms.
So if I am thinking correctly, your solenoid is allowing air in the lines/intake when the engine is above 1000 rpms. At idle, you will not have a vacuum leak however because the solenoid is designed to create a vacuum in the hose.
I think it would be best to cut-off the vacuum at the source. Remove that whole solenoid unit. Use a ziptie to secure the wiring connector. This is how I did mine. The source is indicated by the red arrow (hose approx 3/8 OD). Just put a rubber plug over the nipple coming out of the manifold.
Make sure you do NOT remove that bigger hose (approx 3/4 inch OD) next to it. That bigger hose is for the brake booster.
 03-03-2010, 10:03 AM
#57

 03-03-2010, 04:14 PM
#61
Safety Car
Use a ziptie or wire to attach the plug (you mean the electrical connector, right?) to something else to prevent it dangling around.
The vacuum line looks functionally ok now. Remember that you will need a tight fitting plug. The turbo boost will blow the plug off if the plug does not fit tight enough.
If you find a plug and it fits slightly loose, I would put a little silicone sealant on it too. The rtv silicone sealant will "glue" the plug in place so that the turbo boost won't blow it off.
03-03-2010, 05:48 PM
#62
Use a ziptie or wire to attach the plug (you mean the electrical connector, right?) to something else to prevent it dangling around.
The vacuum line looks functionally ok now. Remember that you will need a tight fitting plug. The turbo boost will blow the plug off if the plug does not fit tight enough.
If you find a plug and it fits slightly loose, I would put a little silicone sealant on it too. The rtv silicone sealant will "glue" the plug in place so that the turbo boost won't blow it off.
The vacuum line looks functionally ok now. Remember that you will need a tight fitting plug. The turbo boost will blow the plug off if the plug does not fit tight enough.
If you find a plug and it fits slightly loose, I would put a little silicone sealant on it too. The rtv silicone sealant will "glue" the plug in place so that the turbo boost won't blow it off.
What is the that little gold pipe made of that comes out of the intake manifold that the hose attaches to? Maybe just weld it shut?
 03-03-2010, 06:32 PM
#63
You guys are brutal. When the Innovative mounts were released I didn't see this sort of scrutiny. However, in order to show how the XLR8 mounts are better for the TL we did dissect two mounts, one from Innovative and one from XLR8. Both these mounts are from a 2nd gen CL/TL - one is our prototype mount and the other is the Innovative side mount. Both mounts have 60-62A durometer bushings.
Here's a pic of both sample mounts side by side with the bushings removed:
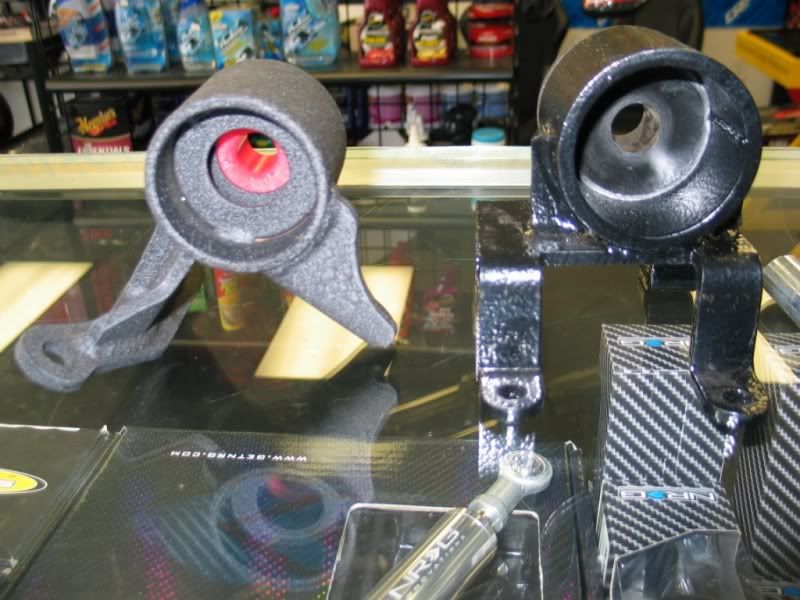
Our collar had to be pressed out. The Innovative collar came out with some force by hand and a socket.
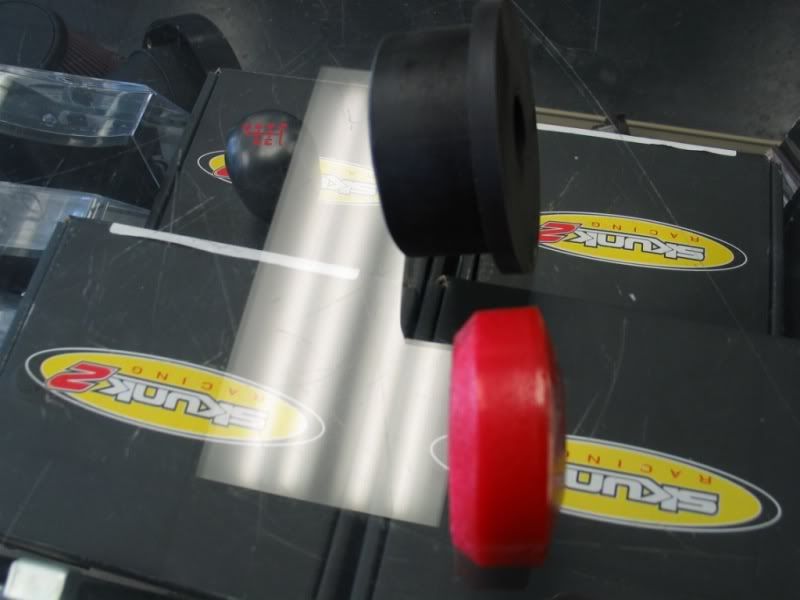
Pics of the bushings. Note that the XLR8 bushing is twice the width.

Even our collar is substantially larger:

Now here is why the Innovative mounts are doughing. I applied the same pressure to both bushings. The red bushing is the Innovative bushing; the black is the XLR8 bushing.
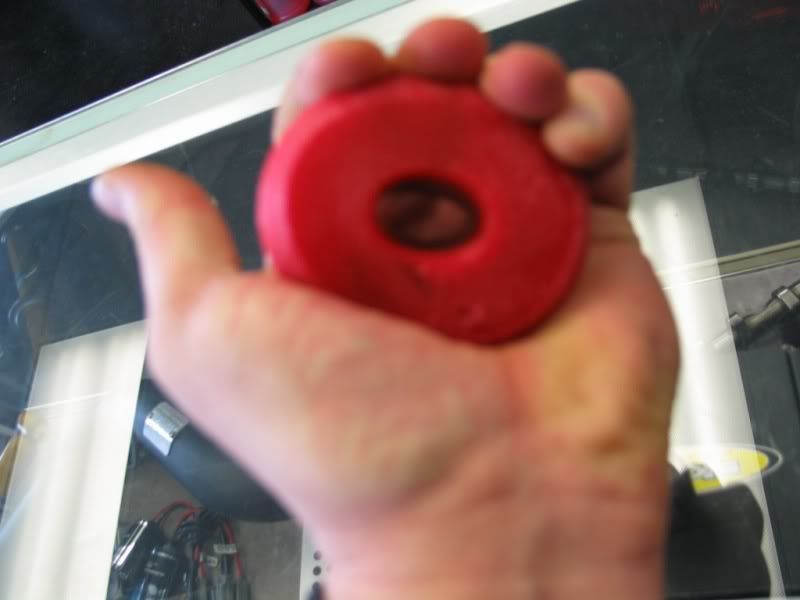

No wonder why the bushings are donuting b/c if I can compress it by hand, with my left hand which is weaker, then I'm sure a motor is doing much worse.
Also here is the pic of the inside of the XLR8 mount:

There is only a 10mm gap between the 2 bushings and that is so you have room to punch the bushing out of the mount.
Innovative makes a thinner bushing and therefore welds in circle plates on the inside of the mounts.

I sell Innovative mounts and I think for the most part they are good quality; however, we designed our mounts for the TL to improve on some of things we felt were lacking in the TL mounts, both for the 2nd gen and 3rd gen.
Here's a pic of both sample mounts side by side with the bushings removed:
Our collar had to be pressed out. The Innovative collar came out with some force by hand and a socket.
Pics of the bushings. Note that the XLR8 bushing is twice the width.
Even our collar is substantially larger:
Now here is why the Innovative mounts are doughing. I applied the same pressure to both bushings. The red bushing is the Innovative bushing; the black is the XLR8 bushing.
No wonder why the bushings are donuting b/c if I can compress it by hand, with my left hand which is weaker, then I'm sure a motor is doing much worse.
Also here is the pic of the inside of the XLR8 mount:
There is only a 10mm gap between the 2 bushings and that is so you have room to punch the bushing out of the mount.
Innovative makes a thinner bushing and therefore welds in circle plates on the inside of the mounts.
I sell Innovative mounts and I think for the most part they are good quality; however, we designed our mounts for the TL to improve on some of things we felt were lacking in the TL mounts, both for the 2nd gen and 3rd gen.
so where are are 2g mounts
, no postie or update in that thread in a while 
and never realized the im's bushings never went all the way through
 , thats a huge problem right there, gotta spread the load out, only thing though is that 65 on the im and 65 on yours will still have different amount of vibrations (more on yours), but as long as they actually last who cares (also yours are more "preloaded" so should help prevent that donughting from ever starting in the first place)
Last edited by friesm2000; 03-03-2010 at 06:34 PM.
03-03-2010, 08:12 PM
#64
Just a few notes:
1. 75A is not necessary for 90% of the people on this board. The 75A bushing is good over 600 HP. The trade off for a firmer bushing (which reduces wheel hop and withstands more abuse and hp) is more vibrations. That is why I think 62A is a much better suit for most of the people on this forum.
2. Also, the mount with the square tab is the front mount and the mount with the circle tab on top is the rear mount.
03-03-2010, 08:24 PM
#66
Well I believe you guys flipped the bolt so it should have gone the other way originally. Couldn't you have tightened the mount down first and then have installed the top bracket and bolt the original way? If not, I'll have to arrange for shorter bolts on the side mount.
03-03-2010, 08:36 PM
#67
^stillhere153 will have to answer that. I was working on something else when he put the side mount on.
Do have an idea of how much torque should be used to tighten the center bolt on each mount? We just went with 50 ft lbs. Im sure thats enough but do you think using around 35 ft lbs like the guys with innovative mounts use to reduce some of the vibrations is a good idea?
Does anyone know how many ft lbs are used to secure the bolts that hold the mount?
03-03-2010, 08:43 PM
#68
94 DC4 RS LSV/Turbo
iTrader: (1)
Join Date: Jul 2007
Location: New York City | Stuck in Traffic
Age: 38
Posts: 11,734
Likes: 0
Received 11 Likes
on
11 Posts
Well I believe you guys flipped the bolt so it should have gone the other way originally. Couldn't you have tightened the mount down first and then have installed the top bracket and bolt the original way? If not, I'll have to arrange for shorter bolts on the side mount.
ps. you won't need shorter bolts you can just cut off the excess, tighten one side mount and mark the end of it, then dremel all the ends off... I guess
03-16-2010, 02:27 PM
#70
I have about 500 miles on the 75a mounts at this point. Everything feels the same as the day they were put on. Im not saying thats a bad thing. Maybe they need more time to settle or maybe they are not supposed to settle. There is zero wheel hop so thats a plus. The vibrations are not really that bad IMO and I used some felt tape on the driver side vent and the glove box to eliminate the rattles. You can feel the vibrations through the seat and the steering wheel. Like the IM mounts, all the vibrations and rattles go away as soon as you start driving.
Overall im happy with them and I hope they stand up to the abuse Ill be giving them once the turbo gets installed.
Overall im happy with them and I hope they stand up to the abuse Ill be giving them once the turbo gets installed.
03-16-2010, 08:36 PM
#72
Three Wheelin'
I have about 500 miles on the 75a mounts at this point. Everything feels the same as the day they were put on. Im not saying thats a bad thing. Maybe they need more time to settle or maybe they are not supposed to settle. There is zero wheel hop so thats a plus. The vibrations are not really that bad IMO and I used some felt tape on the driver side vent and the glove box to eliminate the rattles. You can feel the vibrations through the seat and the steering wheel. Like the IM mounts, all the vibrations and rattles go away as soon as you start driving.
Overall im happy with them and I hope they stand up to the abuse Ill be giving them once the turbo gets installed.
Overall im happy with them and I hope they stand up to the abuse Ill be giving them once the turbo gets installed.
You say you had innovative mounts? What durometer? Could you also elaborate on any differences between the two?
Won't ask no more questions after these

 03-16-2010, 09:45 PM
#75
^I think it will be fine. I have always kept up with the maintenance/fluids etc. The car runs perfect now and has no issues. The only thing Im worried about is the transmission. Its a gamble that Im willing to take but with a proper tune the motor should be fine. Lots of the guys with superchargers that I know are closing in on the 100k mile mark with no issues.
03-18-2010, 04:18 AM
#78
Safety Car

i got the 62 i could use the 75's tho. and there is no comparison..... I gave these mounts such a beating i almost felt bad doing it.....because by the time i was done the IM's would been done.....but the only way ur gonna know if these hold up is only through that.... plus i did the damper.... theres so much more reinforcement going on there its insane. the damper n mounts work so beautifully together it sickens me to think Acura (honda whatever lol) would make such garbage parts for a car that needs so much more attention under the hood ESPECIALLY the 6MT.
03-18-2010, 09:21 AM
#79
Three Wheelin'
Thanks.
I knew just from looking at the assembly comparisons that XLR8's were the best way to go. The urethane is much higher quality and has nearly triple the contact surface internally. I say triple since the IM inserts are pretty slim & also poke out more than tolerance should allow. I don't understand how they ever sold these (at 60A) as a "fix" to bad mounts...........
Thanks Josh, I'll be getting these mounts some day!
Last edited by HQTL6SPD; 03-18-2010 at 09:26 AM.
03-18-2010, 03:48 PM
#80
Safety Car
dont get me wrong bro.....the IM ones are good too just not for the 6MT..... the one thing im thinking tho.....i bet if someone whos had stock mounts all along.....and installed the damper alone would make such a drastic difference in shifting and things breaking. the mounts wouldnt be needed, but since the car feels amazing with both.... id get both..... i havent driven the car in a very long time and i went to pick it up the other day and figured it was time for some parts to get fixed so i went to joshs shop n took care of all that. well the next day which was yesterday was my testing day..... i have taken the car through absolute hell....especially in nyc.... ive driven all around the highways before and the car felt like jello....now it feels like its on train tracks with no problems in turns and jus smashing the gas n going fast is s world of difference.