Innovative SIDE Mount Install Advice

 10-28-2008, 12:19 AM
#42
Project Motor Mount Mayhem Complete!
Princely Bug and myself threw this down this past Saturday on both our NBP's;
Took us around 8 hours to knock out borh our cars, including the removal and installation of my supercharger.
Overall this mod wasn't very difficult with the right tools; lowpro jack, jack-stands, long-ass 3/8 extensions, sockets with magnetic inserts , and swiveling sockets are extremely useful.)
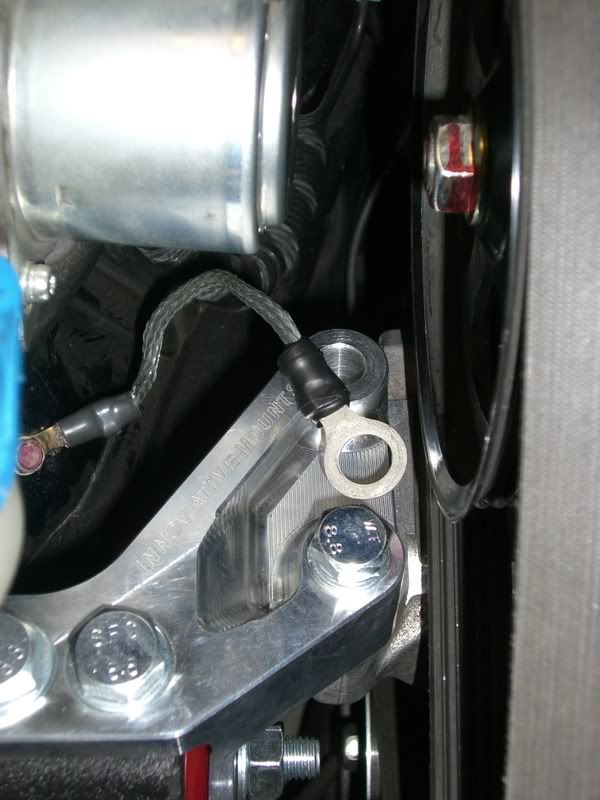
We pretty much did what Innacurate did;
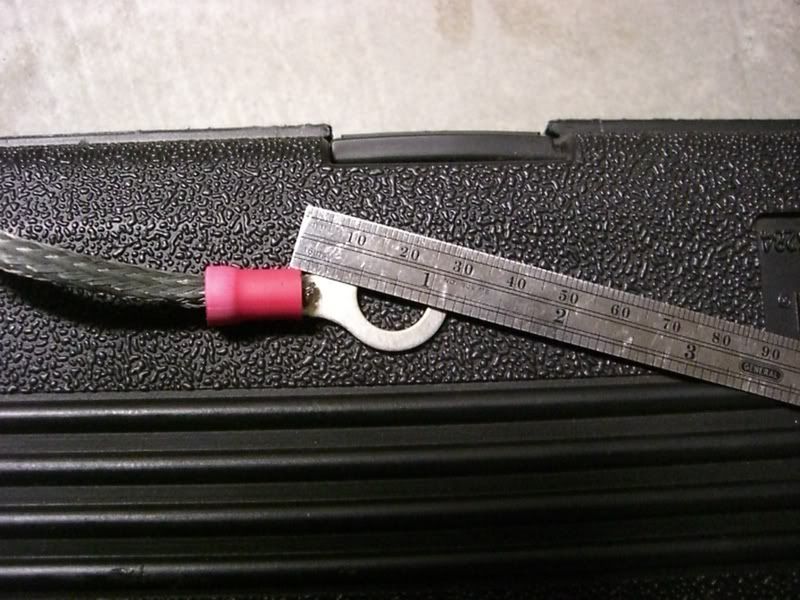
Except we utilized the OEM ground wire and Cut and crimped an 8 gauge, 1/2 inch ID ring terminal and placed it under the rear-most bolt;
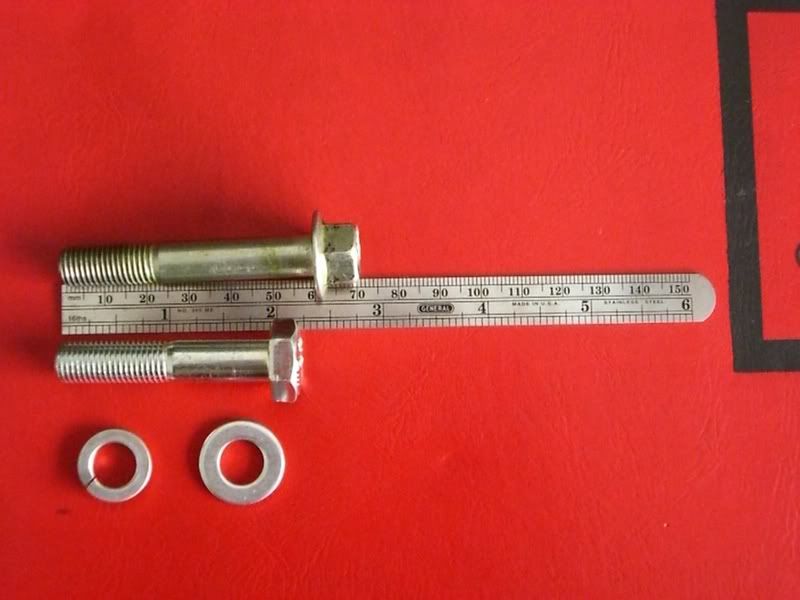
As for the bolts; we picked up some M10 50mm hex bolts with 1.25 pitch. These fit perfectly. I believe the 45mm lenght would have been too short if using an additional flat washer and lockwasher, like we did.
I still consider these bolts temporary, since they are low grade and I HIGHLY recommend GRADE 5 or better. (I believe the OEM bolts are at least grade 5). I'll be picking up some of these within several days.
Hope this info is useful!
Took us around 8 hours to knock out borh our cars, including the removal and installation of my supercharger.
Overall this mod wasn't very difficult with the right tools; lowpro jack, jack-stands, long-ass 3/8 extensions, sockets with magnetic inserts
, and swiveling sockets are extremely useful.)We pretty much did what Innacurate did;
Except we utilized the OEM ground wire and Cut and crimped an 8 gauge, 1/2 inch ID ring terminal and placed it under the rear-most bolt;
As for the bolts; we picked up some M10 50mm hex bolts with 1.25 pitch. These fit perfectly. I believe the 45mm lenght would have been too short if using an additional flat washer and lockwasher, like we did.
I still consider these bolts temporary, since they are low grade and I HIGHLY recommend GRADE 5 or better. (I believe the OEM bolts are at least grade 5). I'll be picking up some of these within several days.
Hope this info is useful!
10-31-2008, 09:41 PM
#45
'03 ABP YA4-S 6MT

Join Date: Mar 2007
Location: Edmonton, AB
Age: 37
Posts: 1,192
Likes: 0
Received 18 Likes
on
18 Posts
i assume it's like the 2g hydro mounts; if so it's a vacuum tube that adjusts the hydraulics inside of the mount itself. you can plug that with some bolt or cap. make sure you do or you'll have a leak though
10-31-2008, 09:54 PM
#46
Safety Car
cut-off the vacuum at the source. The source is indicated by the red arrow (hose approx 3/8 OD). Just put a rubber plug over the nipple coming out of the manifold.
Make sure you do NOT remove that bigger hose (approx 3/4 inch OD) next to it. That bigger hose is for the brake booster.

The ECU uses a solenoid (via a 12v signal) to control the softness of the oem mounts by sending vacuum to the mounts. That metal tube that you see is the vacuum hose.
You can see the hose running from the manifold to the solenoid. There are hoses running from the solenoid going to the mounts (front and rear, but not the side mount).
I plugged the nipple at the manifold and removed everything (all hoses and solenoid). I used a nylon tie-wrap to secure the electrical connector that had went to the solenoid.
 11-17-2008, 02:26 AM
#48
NOT my TL or ME
Join Date: Jul 2008
Location: AtLaNtA, GA
Age: 44
Posts: 75
Likes: 0
Received 0 Likes
on
0 Posts
I originally relocated mine also, decide to go back on the mount though as that way I only spend $.50 on a single washer instead of $1..... 
I should have enough to grab the SC with that being saved>>>>
and the beefed up gnd cables was already in the garage.....
I should have enough to grab the SC with that being saved>>>>
and the beefed up gnd cables was already in the garage.....
11-17-2008, 09:15 AM
#49
Safety Car

my side mount bolts were snapped when i did my install and had 2 super heavy duty bolts made.....suckers still havent broken or bent like the stock ones. but after about a month i bought new stock ones so i dont get my balls busted at acura about something stupid. if u would take the strut tower bar off...the rear mount would take a lot less time. funny thing is....its hard to torque the rear mount top bolt down so after some driving.....pay close attention and go back to retighten the bolts just incase anything comes loose....its happened to me and it sucks. i was confused for about 20 mins going wtf is that damn noise? then i popped the hood and saw movement and knew what it was.
 10-25-2013, 01:35 PM
#52


Thread
Thread Starter
Forum
Replies
Last Post
Soul_Deamon
Audio, Video, Electronics & Navigation
7
11-13-2018 04:44 PM
BobbyGraham388
4G TL (2009-2014)
12
10-22-2015 05:05 PM
sockr1
Car Parts for Sale
22
10-01-2015 01:31 AM
DiamondJoeQuimby
Car Parts for Sale
1
09-10-2015 11:40 AM
60a, acurazine, ground, hydro, innovative, install, installation, installing, motor, mount, mounts, rear, relocation, tl, wire