DIY: Dom's Pnp W/ Pictures!!! 3G Garage #I-157
 05-23-2006, 07:05 PM
#1
Instructor
Thread Starter

DIY: Dom's Pnp W/ Pictures!!! 3G Garage #I-157
Alot of threads on the non-pnp...Some people had question regarding PNP install so here's a DIY: THIS ONES FOR YOU DATMRMAN!!!
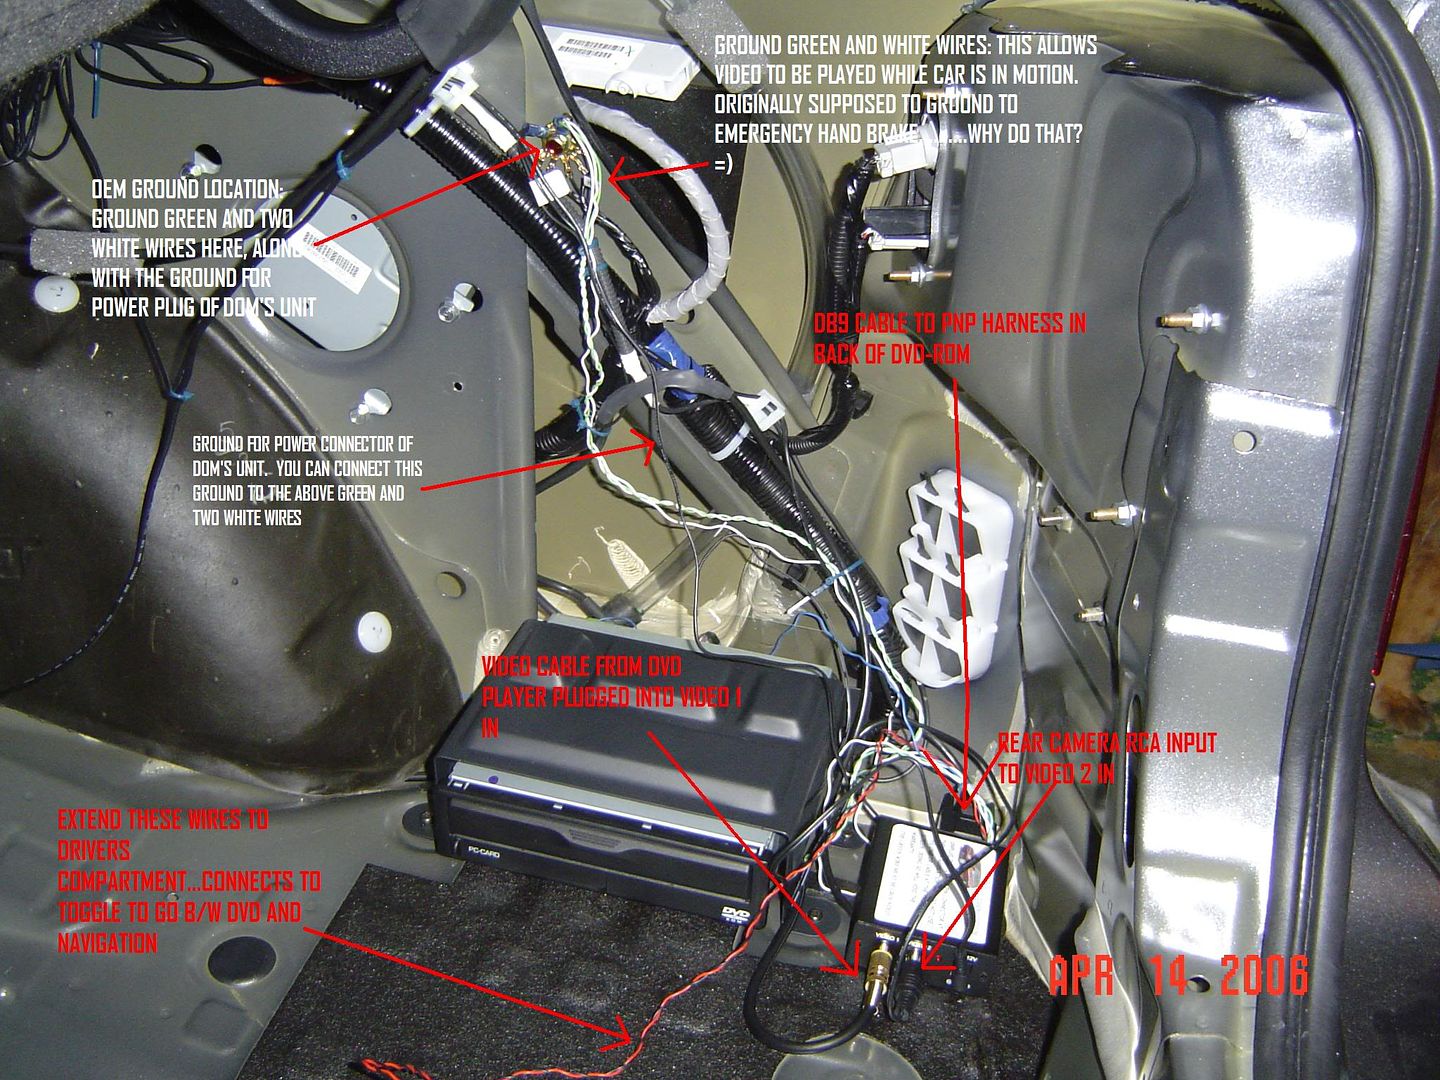
There are 4 wires to ground (sorry..I said three in a different post). 1 black wire for the power harness to DOM's unit, 2 white wires and 1 green wire.
-Green twisted with White wire: Ground to allow DOM's to play while car is in motion.
-Black: ground to power harness of DOM's box
-Other white wire: this one is twisted with the blue wire and must be separted. The blue wire attaches to reverse light so camera will turn on automatically. I wired mine to a switch so that I could control the camera at will.
There is a power wire that can connect to any switchable power source. I used a tap and connected it to the cigarette lighter wire in the center console.
Video 1 location on DOM's box is for your video source/dvd player. Video 2 location is for rear camera.
DB9 cable goes to "Y" splitter cable = pnp harness.
The only wire not described above is the power wire to DOM"s box. The power wire needs to be extended along with the red and black wires from the toggle switch to the center console.
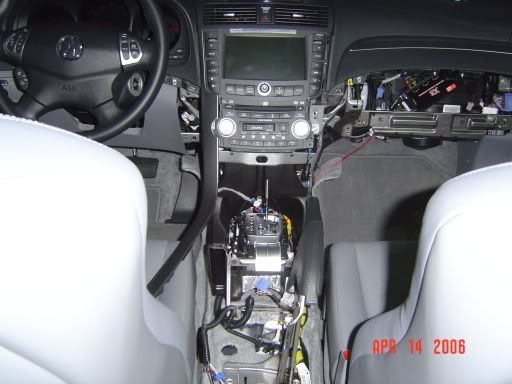
Center console shot...I swear I thought I would never be able to put all that back together!!! You can see the PIE x3 located in the glove box location. I forgot who submitted install pics for the PIE DIY but thanks for the idea whoever you are...no rattles and wires long enough to reach the XM cable.
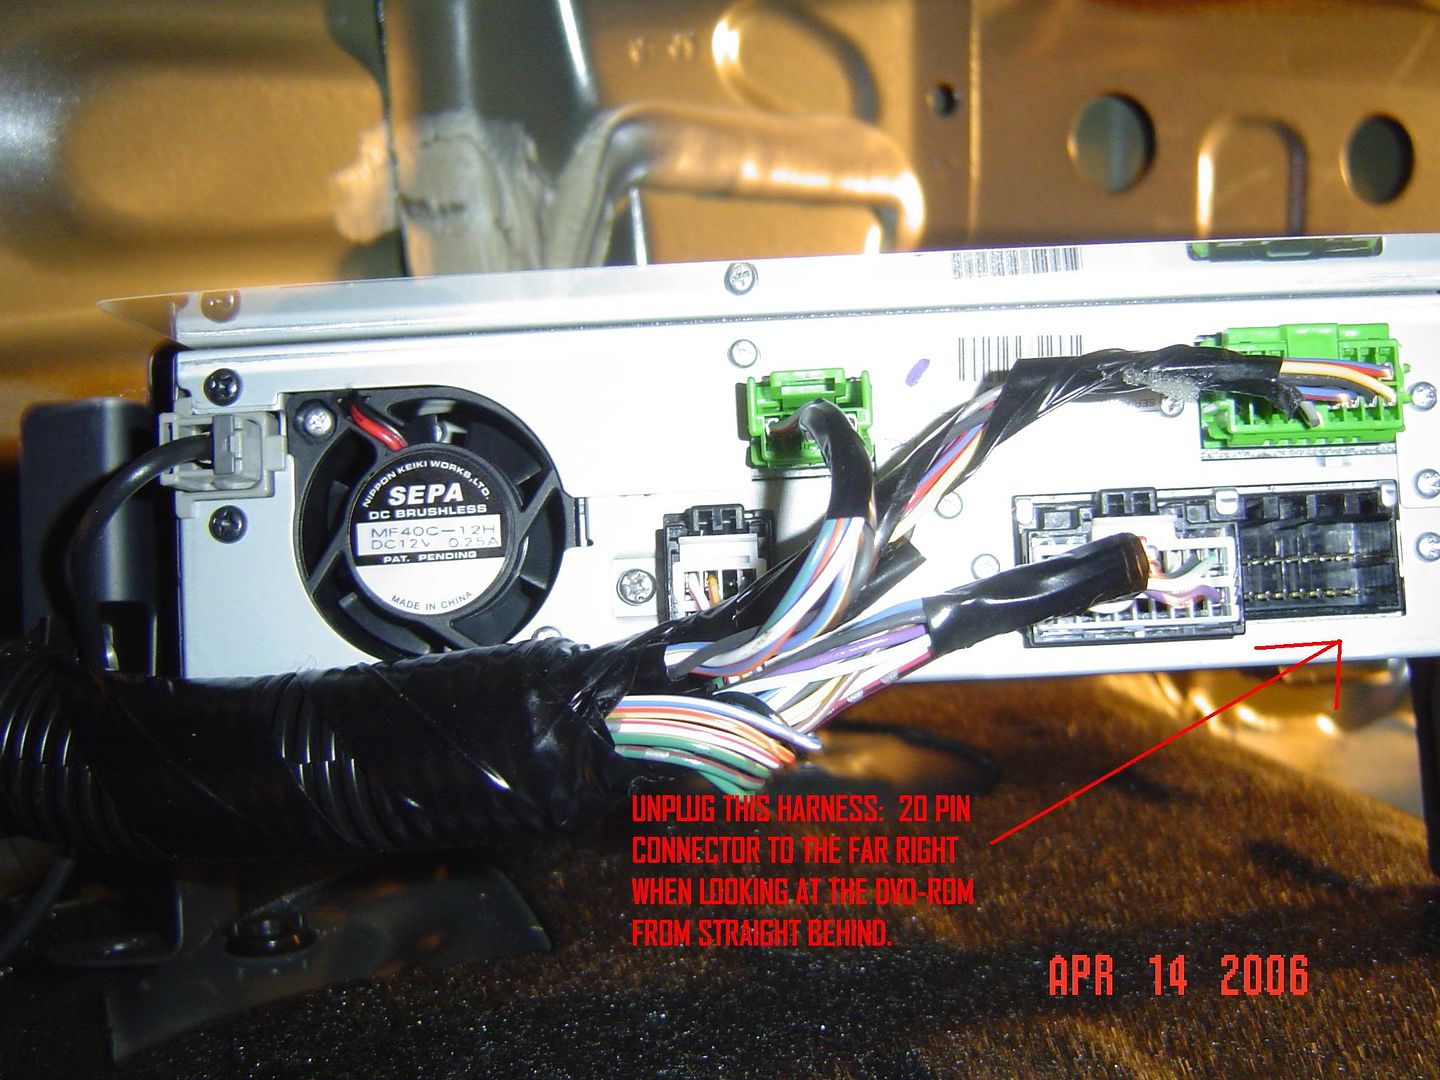
View looking at the back of the DVD-rom. You need to unplug the 20 pin at the far right...it's a black connector.
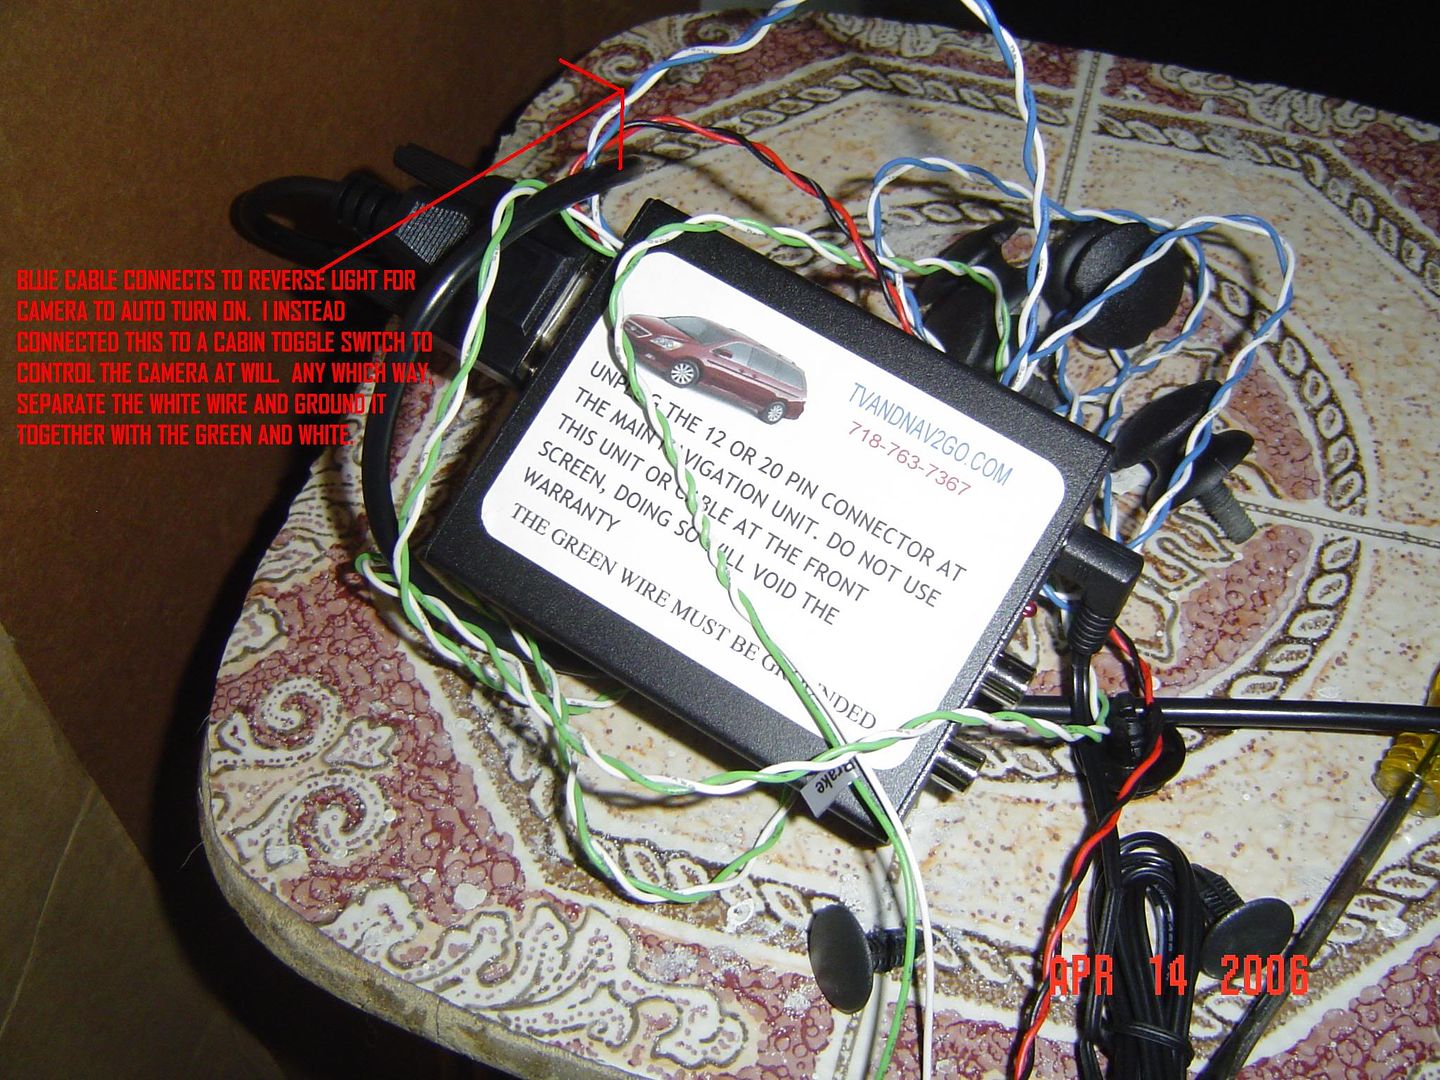
You'll need to untwist the white from blue cable. Bundle this white wire to the other white and green wire and connect them all using an eyelet connector to be grounded together.
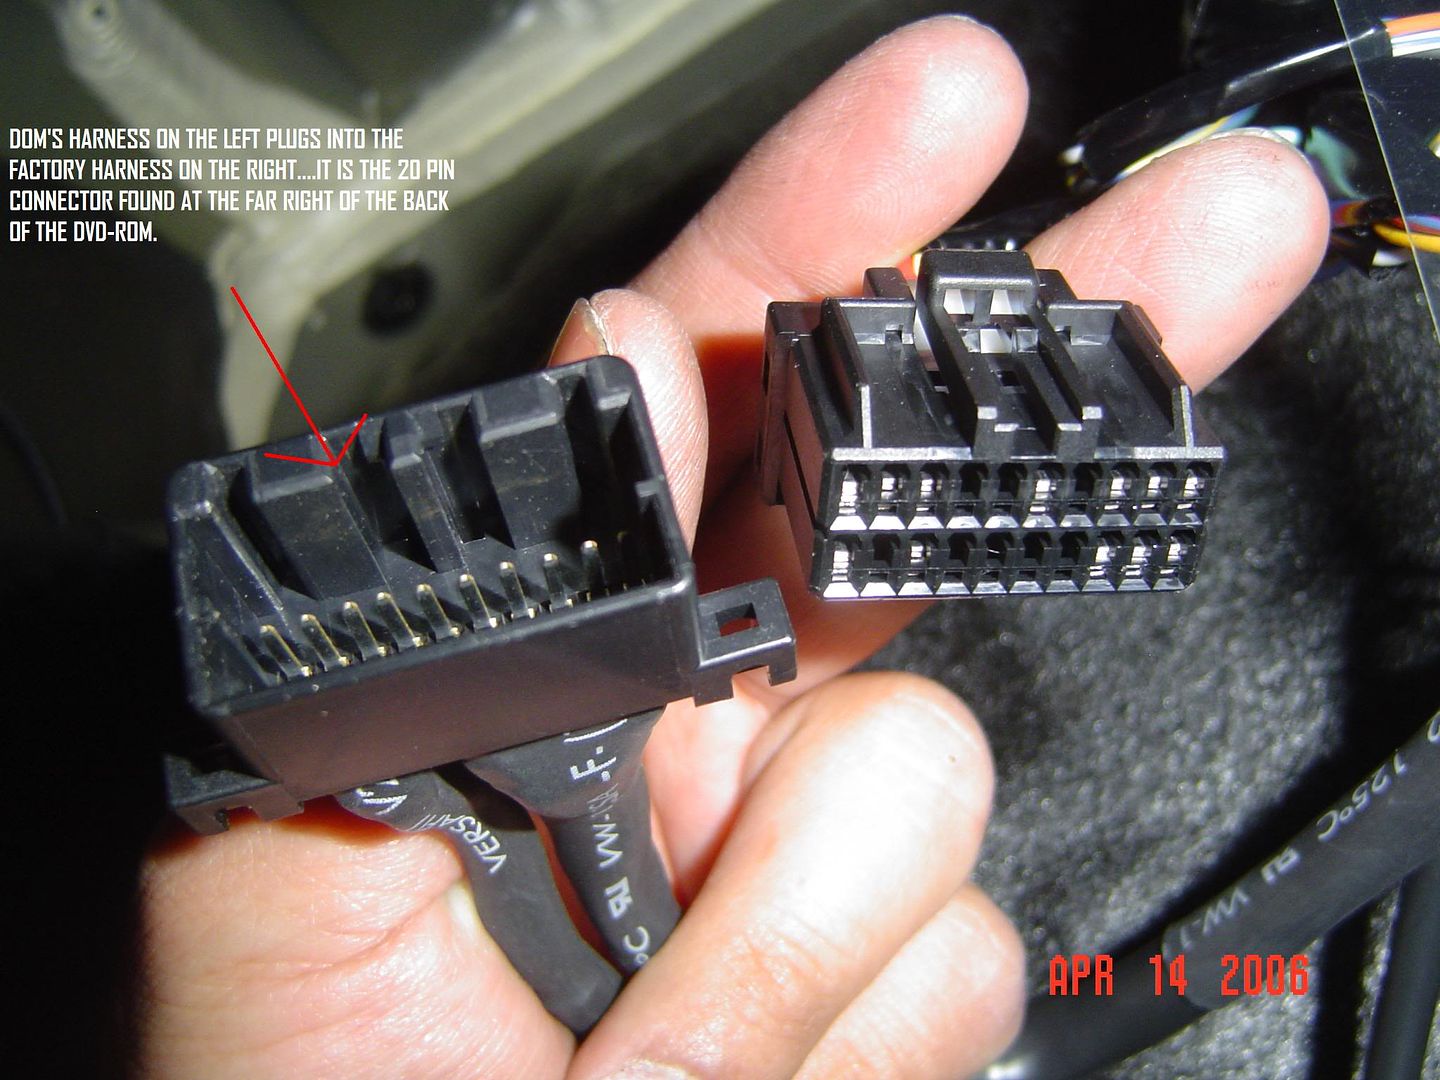
On the right is the OEM navi harness you unplugged from the dvd-rom. Plug that into the DOM 20 pin harness...
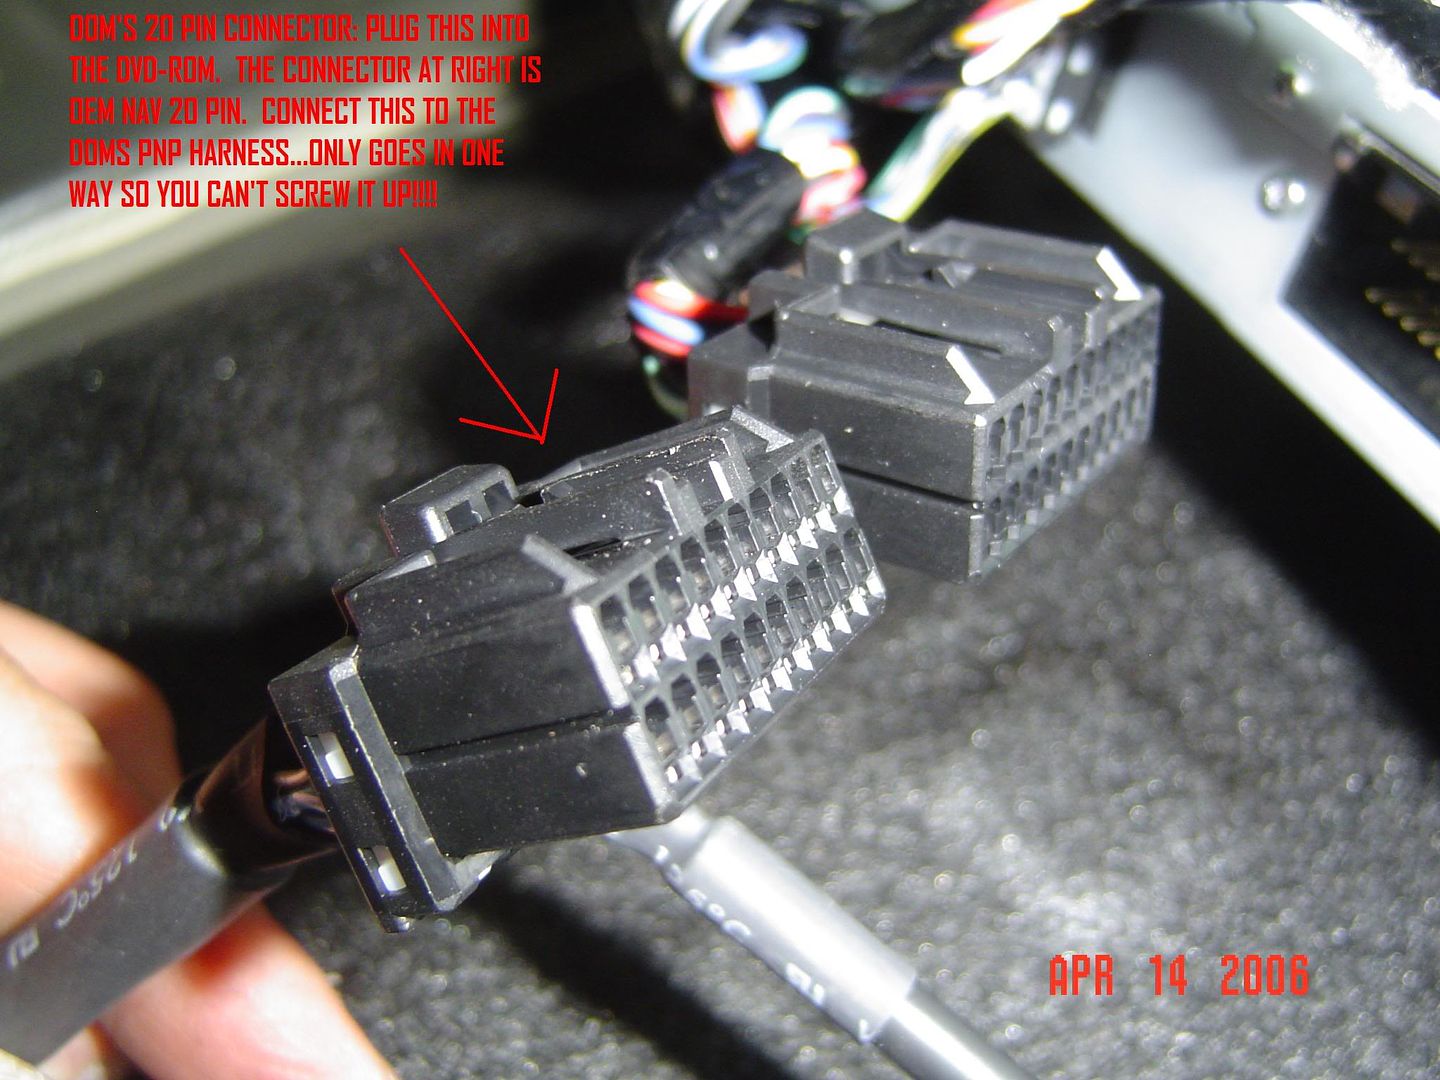
Plug this end of DOM's harness into the 20 pin of the dvd-rom unit. You'll feel/hear it snap in...I love the OEM connectors DOM used on these units...fits like a glove!
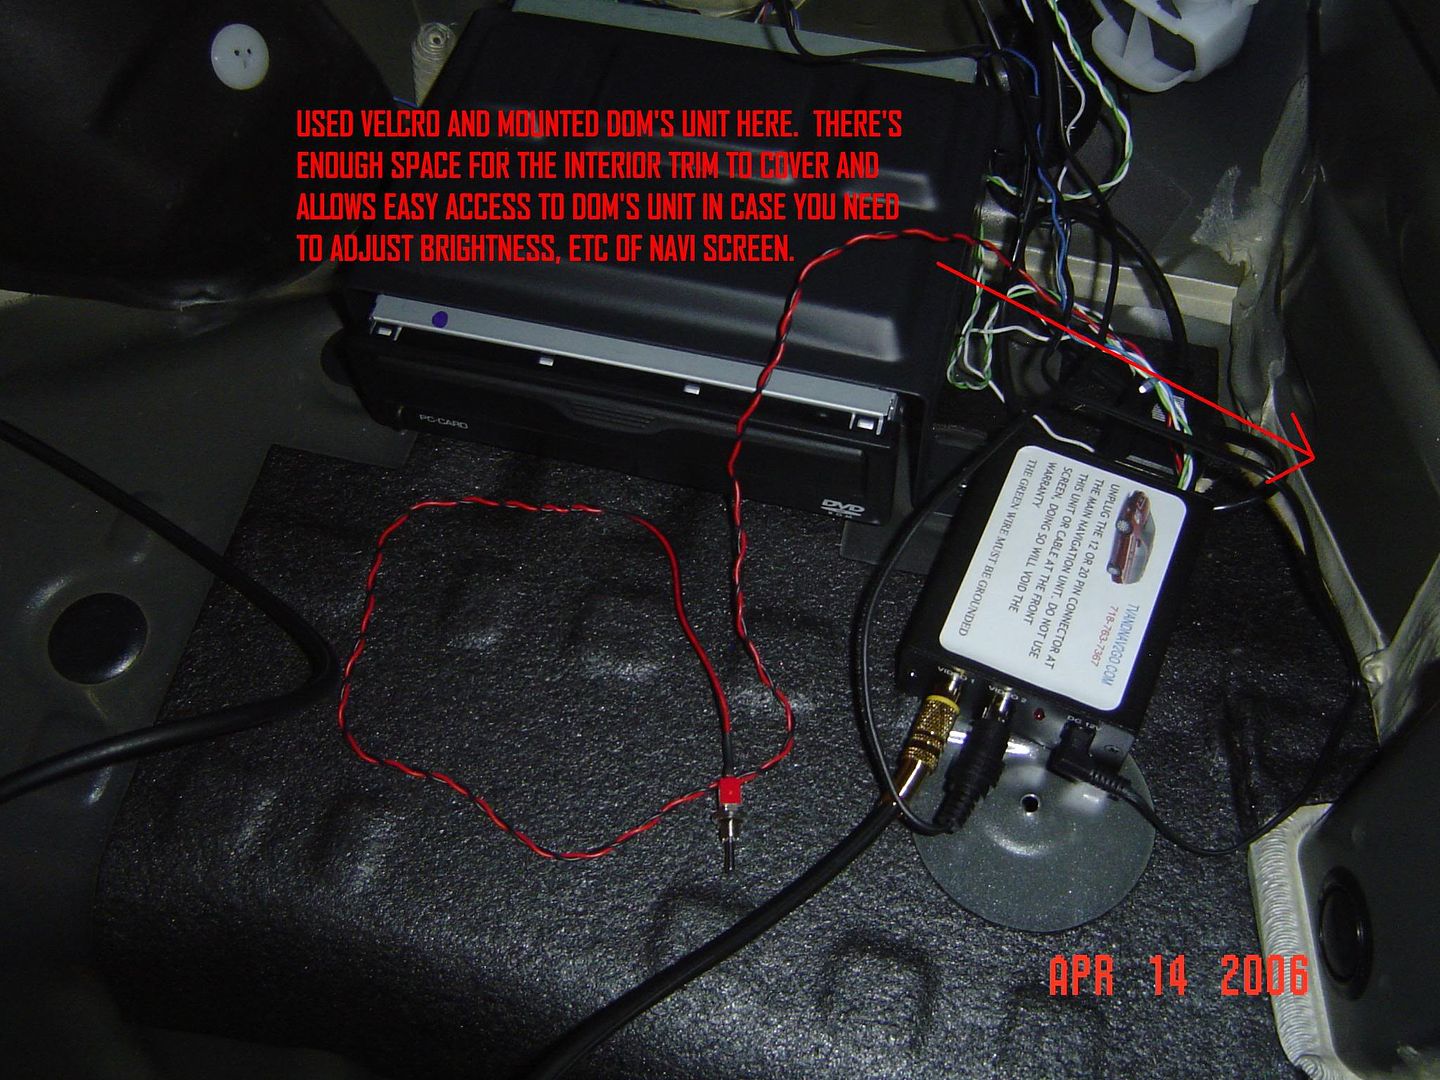
Final location of DOM's unit.....
Final notes. Remember to extend the red and black toggle wires to the front along with the power wire for DOM's unit. Some people tap power from the trunk but DOM said not to and find a clean source. Cigarette lighter it is! For you datmrman, I'd use fuse number #32 if you are going the add-a-circuit route. This I believe this is a switched source. In this case, you'll need to extend DOM"s power wire from the trunk all the way to the fuse box.
If at all possible datmrman, try to install the camera at the same time, unless you like to remove everything in the trunk all over again! Just trying to save you the hassle...
As far as my dvd to nav toggle switch, check out my thread "VSA switch to switch b/w dvd and nav". I think the blank location next to the VSA switch is the best place to put it.
Any other questions...PM me!
dave
There are 4 wires to ground (sorry..I said three in a different post). 1 black wire for the power harness to DOM's unit, 2 white wires and 1 green wire.
-Green twisted with White wire: Ground to allow DOM's to play while car is in motion.
-Black: ground to power harness of DOM's box
-Other white wire: this one is twisted with the blue wire and must be separted. The blue wire attaches to reverse light so camera will turn on automatically. I wired mine to a switch so that I could control the camera at will.
There is a power wire that can connect to any switchable power source. I used a tap and connected it to the cigarette lighter wire in the center console.
Video 1 location on DOM's box is for your video source/dvd player. Video 2 location is for rear camera.
DB9 cable goes to "Y" splitter cable = pnp harness.
The only wire not described above is the power wire to DOM"s box. The power wire needs to be extended along with the red and black wires from the toggle switch to the center console.
Center console shot...I swear I thought I would never be able to put all that back together!!! You can see the PIE x3 located in the glove box location. I forgot who submitted install pics for the PIE DIY but thanks for the idea whoever you are...no rattles and wires long enough to reach the XM cable.
View looking at the back of the DVD-rom. You need to unplug the 20 pin at the far right...it's a black connector.
You'll need to untwist the white from blue cable. Bundle this white wire to the other white and green wire and connect them all using an eyelet connector to be grounded together.
On the right is the OEM navi harness you unplugged from the dvd-rom. Plug that into the DOM 20 pin harness...
Plug this end of DOM's harness into the 20 pin of the dvd-rom unit. You'll feel/hear it snap in...I love the OEM connectors DOM used on these units...fits like a glove!
Final location of DOM's unit.....
Final notes. Remember to extend the red and black toggle wires to the front along with the power wire for DOM's unit. Some people tap power from the trunk but DOM said not to and find a clean source. Cigarette lighter it is! For you datmrman, I'd use fuse number #32 if you are going the add-a-circuit route. This I believe this is a switched source. In this case, you'll need to extend DOM"s power wire from the trunk all the way to the fuse box.
If at all possible datmrman, try to install the camera at the same time, unless you like to remove everything in the trunk all over again! Just trying to save you the hassle...
As far as my dvd to nav toggle switch, check out my thread "VSA switch to switch b/w dvd and nav". I think the blank location next to the VSA switch is the best place to put it.
Any other questions...PM me!
dave

The following users liked this post:
triax37 (02-05-2012)

 05-23-2006, 10:58 PM
#5
Safety Car
A writeup, huge detailed pictures, and a shoutout! Awesome DCC! 
Let me digest this for a while, and I'll post questions if there are any.
Thanks again!
Let me digest this for a while, and I'll post questions if there are any.
Thanks again!
05-24-2006, 04:08 AM
#6
Safety Car
So I had some time to digest and I think I am pretty much clear on the install.
Got one question for anyone, where is this reverse light wire that the Dom's blue wire taps into (to allow the backup camera to turn on when car placed in reverse)? Any pictures of its location and/or color?
I just wanted to add a few things I've found helpful.
To use the add-a-circuit method to provide switched power, something like this will be needed. I found this in Kennyc's rear camera thread and was posted by Crook.

mini fuses:

From DeadLock in AcurasGhost's DOM install thread:
I believe both are talking about the same fuse box location #32, but can someone clarify?
BTW, I nominated this thread to be garaged!
Got one question for anyone, where is this reverse light wire that the Dom's blue wire taps into (to allow the backup camera to turn on when car placed in reverse)? Any pictures of its location and/or color?
I just wanted to add a few things I've found helpful.
To use the add-a-circuit method to provide switched power, something like this will be needed. I found this in Kennyc's rear camera thread and was posted by Crook.
mini fuses:
Originally Posted by Crook
Fuse 32 which is power for your radio, HFL, NAV etc., It's powered with ignition. Pull the fuse in slot 32 and plug the add-a-fuse in that slot. The 7.5A fuse that you just removed gets plugged into the add-a-fuse and another fuse is added to it for your extra circuit that your are trying to send power to.
Originally Posted by DeadLock
For the power, yes you need power for dom's unit, and the dvd player, also for the tvt tuner antena if you are planning on using an amplified antena.
Basically, what you do is go to autozone, get a "mini fuse add a circuit" pig tail, run it from the ACC fuse port all the way in the back on the very top row, which would power the DVD and Dom's unit, run the power to the trunk or wherever you need it, and you are done.
I opted not to tap into the OEM navi wires at all, even for power, and I grounded everything on the sheet metal on the side by the navigation unit in the trunk.
Using the ACC for power, also cuts power when the keys are removed......so you dont have to worry about it draining the battery dry over long periods of time, or forgetting to turn the DVD player off, it goes off with the keys.
BTW, I nominated this thread to be garaged!
05-24-2006, 12:12 PM
#7
Originally Posted by datmrman
Got one question for anyone, where is this reverse light wire that the Dom's blue wire taps into (to allow the backup camera to turn on when car placed in reverse)? Any pictures of its location and/or color?

I ran my camera wiring into the trunk through the plastic hinge covering on the right along side the trunk release cable.

Trending Topics
05-24-2006, 12:25 PM
#8
Safety Car
Very nice Crook! Thanks!
I'm trying to pull all my parts together now...
Another question :
:
What is the gauge rating on the wires everyone is using to extend the switch and power tap from the fuse/center console?
I'm trying to pull all my parts together now...
Another question
:What is the gauge rating on the wires everyone is using to extend the switch and power tap from the fuse/center console?
05-24-2006, 01:31 PM
#9
Probably no thinner than 22ga wire. For my switch I used some old speaker wire that came with some aftermarket speakers. For the remote/12v wire go for 18-20 at least just because you might end up tapping into it in the future for other components.
05-24-2006, 03:27 PM
#10
Instructor
Thread Starter
Originally Posted by datmrman
Very nice Crook! Thanks!
I'm trying to pull all my parts together now...
Another question :
What is the gauge rating on the wires everyone is using to extend the switch and power tap from the fuse/center console?
I'm trying to pull all my parts together now...
Another question
:What is the gauge rating on the wires everyone is using to extend the switch and power tap from the fuse/center console?
I used 16 gauge wire because that's what I had extra of...IMO, that's a little too thick but it still works fine. You may want to buy a spool of 18 gauge for the job. That'll work for both the switch wires and the power wire to DOM's unit.
05-24-2006, 03:56 PM
#11
Safety Car
Crook and DCC,
Thanks for all your responses. You guys are awesome!
Just ordered the backup camera from Wendy on eBay - who is still providing discounts if you mention you're from Acurazine and KennyC referred you. I think I may have just bought the only one she posted though. I'm sure she'll have more.
Still need to gather a few more items and then build the courage to open the car up and use a dremel . I will definitely post when everything is done... or if I have anymore questions.
Thanks again!
Thanks for all your responses. You guys are awesome!
Just ordered the backup camera from Wendy on eBay - who is still providing discounts if you mention you're from Acurazine and KennyC referred you. I think I may have just bought the only one she posted though. I'm sure she'll have more.
Still need to gather a few more items and then build the courage to open the car up and use a dremel
. I will definitely post when everything is done... or if I have anymore questions. Thanks again!
05-24-2006, 04:34 PM
#13
Instructor
Thread Starter
Originally Posted by Kennedy
Good thread...
What's the preffered technique for getting the camera wire throught the trunk?
What's the preffered technique for getting the camera wire throught the trunk?
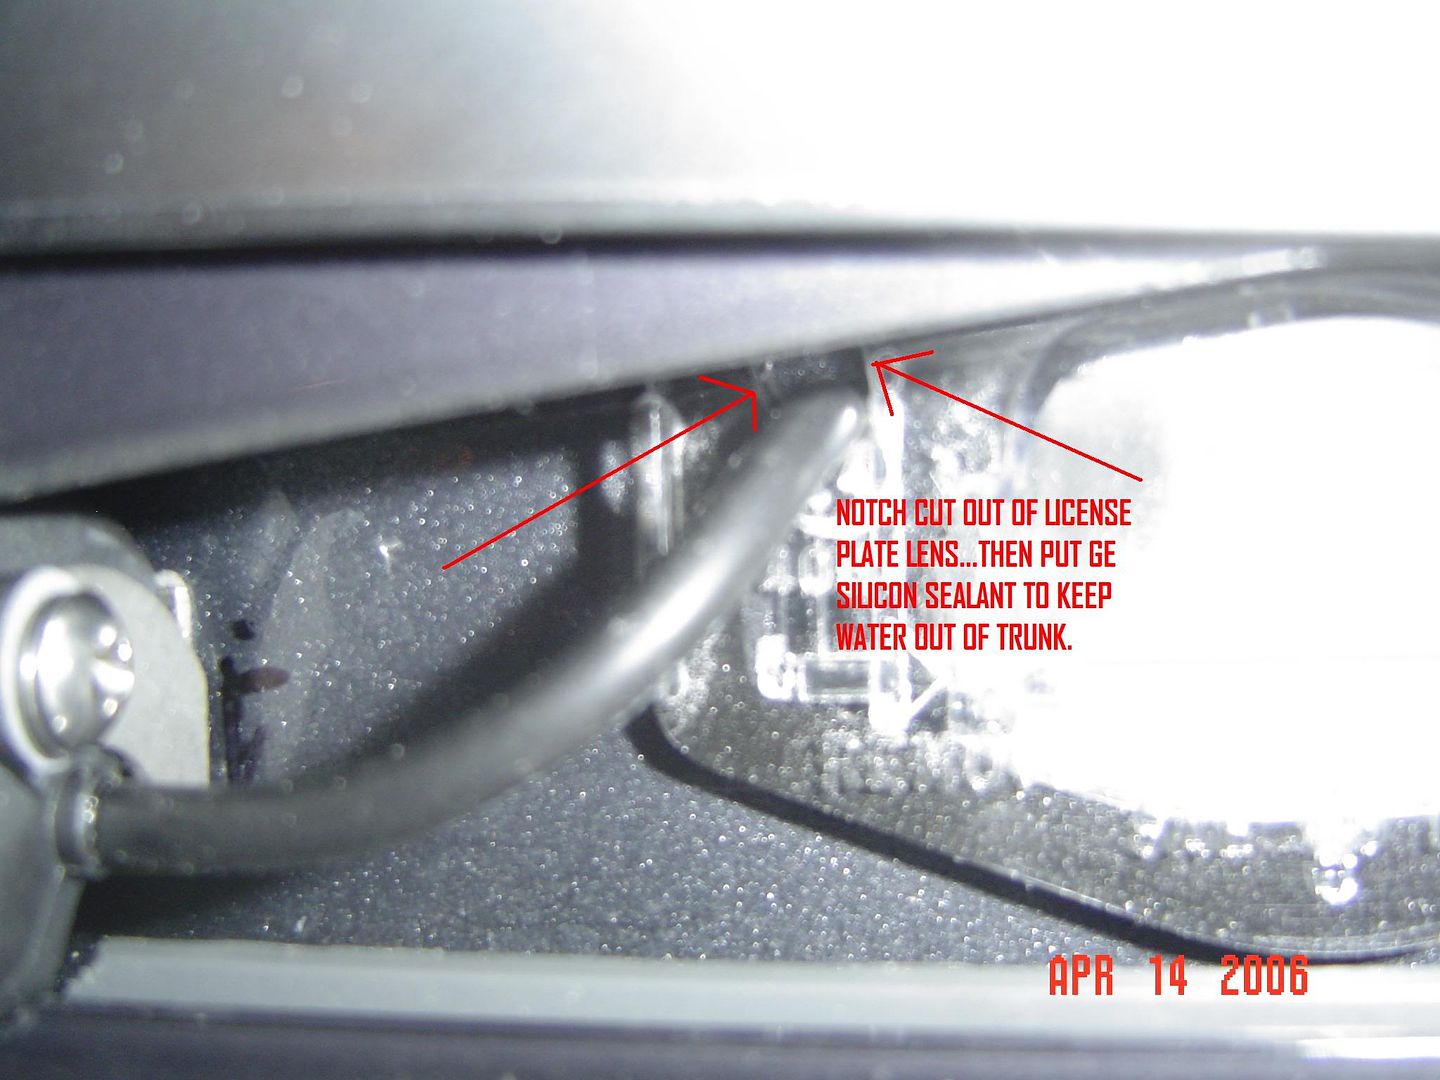
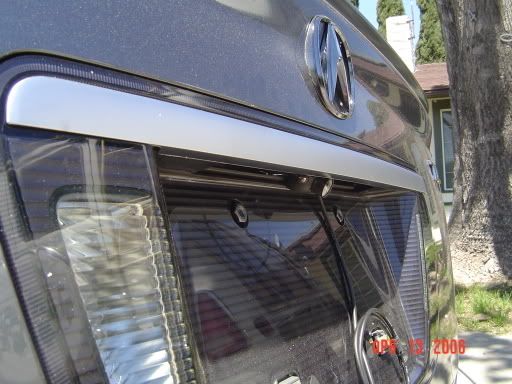
I'll post some pics of mine when I get a chance. Instead of drilling through the metal trunk portion, I just made a small cutout in the plastic housing of the license plate light. I figured if I ever needed to take the camera out, I wouldn't have a gaping hole in the metal....cheaper to replace the light than it is the trunk! Plus, there's no rust issues if you notch out the plastic. I also used ge silicon to seal it up from water. You'll know what I mean when you see the pics.
05-24-2006, 05:06 PM
#14
Perfect Idea...
I was about to attack the underside of the licens plate and drill a hole, and use a rubber grommet.
Those plastic lenses can't cost but a few dollars. Buy an extra as a just in case.
Can't wait to see that pic.
I was about to attack the underside of the licens plate and drill a hole, and use a rubber grommet.
Those plastic lenses can't cost but a few dollars. Buy an extra as a just in case.
Can't wait to see that pic.
Originally Posted by DCC
KENNEDY,
I'll post some pics of mine when I get a chance. Instead of drilling through the metal trunk portion, I just made a small cutout in the plastic housing of the license plate light. I figured if I ever needed to take the camera out, I wouldn't have a gaping hole in the metal....cheaper to replace the light than it is the trunk! Plus, there's no rust issues if you notch out the plastic. I also used ge silicon to seal it up from water. You'll know what I mean when you see the pics.
I'll post some pics of mine when I get a chance. Instead of drilling through the metal trunk portion, I just made a small cutout in the plastic housing of the license plate light. I figured if I ever needed to take the camera out, I wouldn't have a gaping hole in the metal....cheaper to replace the light than it is the trunk! Plus, there's no rust issues if you notch out the plastic. I also used ge silicon to seal it up from water. You'll know what I mean when you see the pics.
05-26-2006, 04:19 AM
#15
Instructor
Thread Starter
KENNEDY,
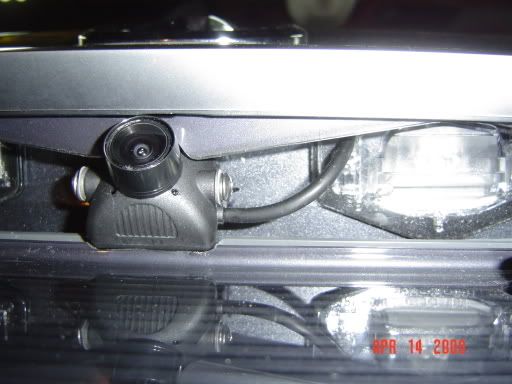
Here's the pics of where I passed the wire for the camera through to the trunk.
Datmrman,
Below is a pic of where you need to use GE SILICON BATH AND TILE SEALANT : CLEAR on the camera lens. Kenny C talked about sealing his...this is where I sealed mine and haven't had a problems just yet...
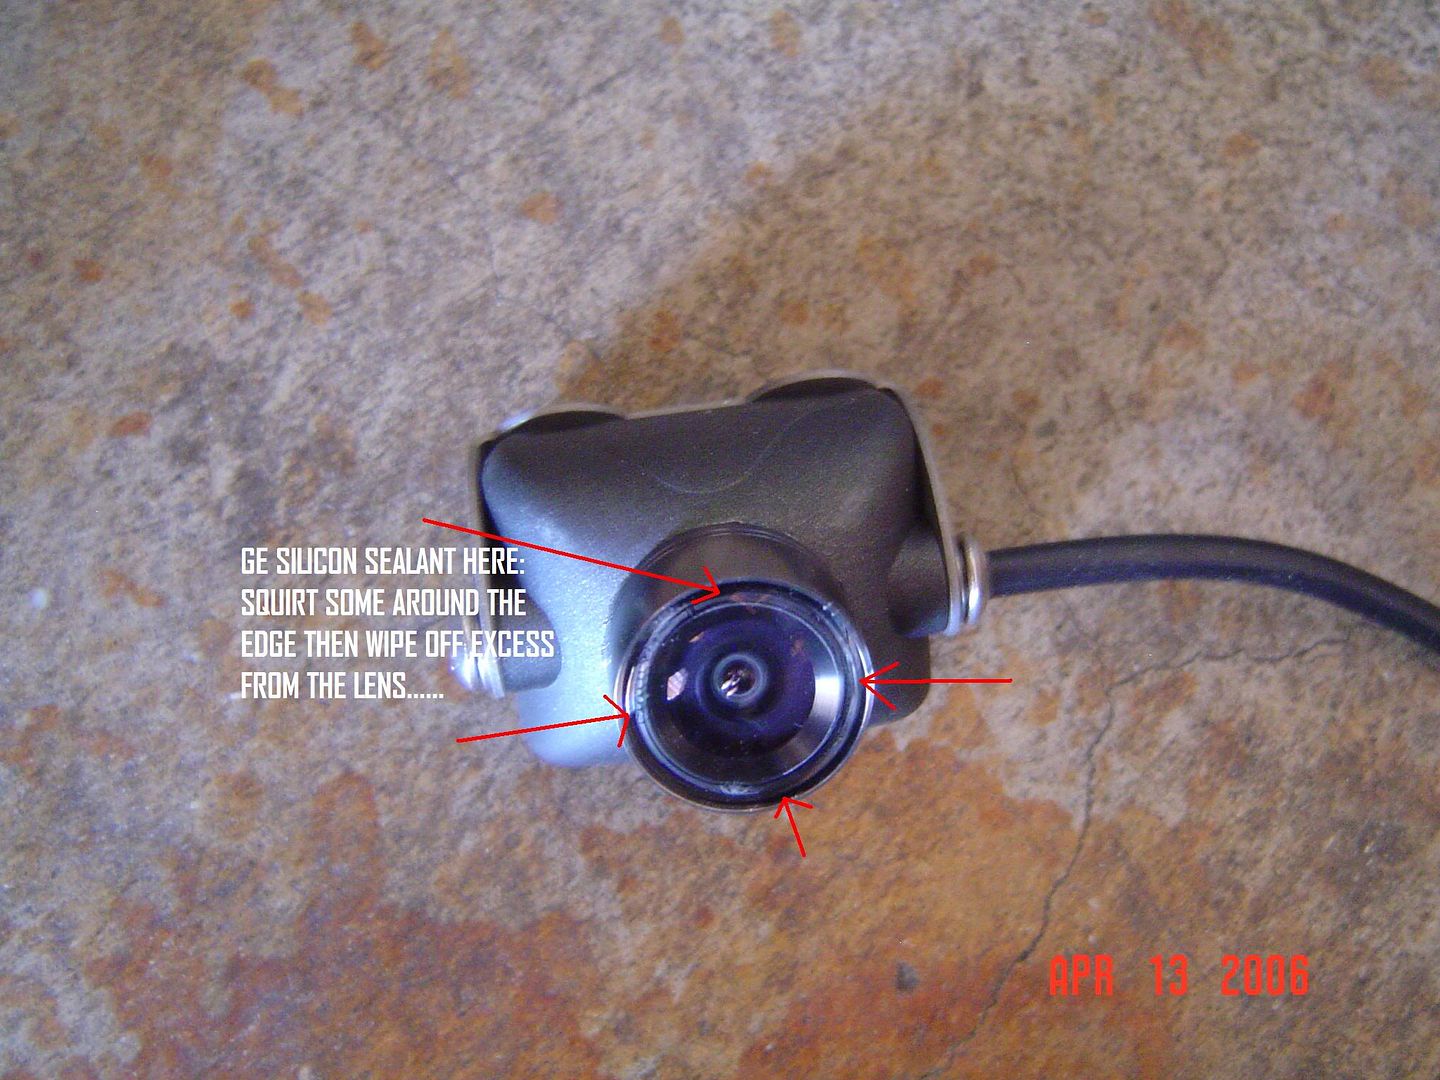
Hope this helps...
Here's the pics of where I passed the wire for the camera through to the trunk.
Datmrman,
Below is a pic of where you need to use GE SILICON BATH AND TILE SEALANT : CLEAR on the camera lens. Kenny C talked about sealing his...this is where I sealed mine and haven't had a problems just yet...
Hope this helps...
05-26-2006, 04:35 AM
#17
Safety Car
DCC, another informative post. You rock! 
I never would have thought about cutting/drilling a hole in the backup light cover instead of drilling a hole in the trunk. Now I guess there isn't a need for dremel.
I didn't know that you put sealant on the lens. I thought it was between the lens casing and the body of the camera. Good thing you and Kennedy brought this up!
Thanks again!
BTW The pictures appear like how you post them.
Looks like photobucket isn't always resizing the pictures. I usually preview my posts so I know that everything looks right.
Edit: Looks like I still need to use the dremel to shave a piece off of the plastic/metal so the lens fits.
 06-13-2006, 11:19 PM
#21
Safety Car
DCC, Crook, or anyone..
How many devices can I connect to a tapped switched 12V power source without running into interference and noise? For instance, would it be ok to tap the front power outlet (or fuse slot 32 via add a circuit) to power the PIE X3 and a device requiring 5V/2A? I have a feeling there would be no problems, but just wanted to double check with the gurus.
As for cables, are you using auto specific brand cables that are shielded (HotWires, Stinger, Monster Audio, etc) or any generic household RCA cables? Any suggestions on length of video cable from Dom in the trunk through the center console to the head unit? These shielded cables sure add up.
06-14-2006, 03:42 AM
#22
Instructor
Thread Starter
DATMRMAN,
I have two sources tapped into the front cig lighter and two sources to the rear one...no noise, no problems! I just replied to ANY2FORU re: his post about his own install and I said in there that I don't know how many loads you can add and what AMP fuse to add, but I just installed an inline fuse to everything just in case. Better to be safe than sorry you know? Also, I'm not too sure but I think if you input that load requiring 5v into a 12v source, you're going to overload it....I've never tried that myself, but in case you feel gutsy and want to, then make sure you've got that fuse inline...it'll pop the fuse first before anything. Again, I wasn't the best at amperage/voltage calculation when I took physics, but I'm not sure if your 5v source will be too happy with a 12v input.
As far as the cables are concerned...yes..I spent a ton on those! BUT, I dont really think you need the harcore shielded stuff because you're not running external amps and such, so there shouldnt be a great deal of electrial noise as long as you ground everything properly. I just bought radio shack's so called 'premium' cable because they were on sale, but don't know if those cost at regular price the same as monster cable. I also only bought the good shielded stuff for the audio/video for my dvd player. For my aux inputs, I only used standard RCA cable, which in my set up...sounds and looks as good as the premium stuff. I personally purchased 20 foot cable to be sure and I ended up having about 2-3 feet extra, only becuase I zip tied it to existing factory lines to prevent any rattles/noise. Hope that helps...can't wait to see pics of your install and that "SECRET MEDIA PLAYER!!!"
Hurry up..I wanna know what it is!
dave
06-14-2006, 04:00 AM
#23
Safety Car
Ha ha.. thanks Dave for the reply!
I actually have a power adapter that will convert 12V to 5V, so I won't have to worry about overloading the device. I think I will either try to move the cig adapter in the front or just tap into it and add another cig adapter thats "hidden" in the back.
I've been collecting my parts, but it seems like its neverending. I read a little more, and decide to buy this.. read more.. oh, I need to buy that. I'm waiting for a few products to arrive in the mail still so this weekend is definitely a no go. Hopefully the weekend after I'll be ready. I've been itching to get everything installed.
I was reading the other thread and I didn't know you make house calls. Maybe its something I should consider.
Only part I'm scared about is taking apart the car, especially the center console.
06-14-2006, 04:27 AM
#24
Instructor
Thread Starter
Originally Posted by datmrman
Ha ha.. thanks Dave for the reply!
I actually have a power adapter that will convert 12V to 5V, so I won't have to worry about overloading the device. I think I will either try to move the cig adapter in the front or just tap into it and add another cig adapter thats "hidden" in the back.
I've been collecting my parts, but it seems like its neverending. I read a little more, and decide to buy this.. read more.. oh, I need to buy that. I'm waiting for a few products to arrive in the mail still so this weekend is definitely a no go. Hopefully the weekend after I'll be ready. I've been itching to get everything installed.
I was reading the other thread and I didn't know you make house calls. Maybe its something I should consider.
Only part I'm scared about is taking apart the car, especially the center console.
I actually have a power adapter that will convert 12V to 5V, so I won't have to worry about overloading the device. I think I will either try to move the cig adapter in the front or just tap into it and add another cig adapter thats "hidden" in the back.
I've been collecting my parts, but it seems like its neverending. I read a little more, and decide to buy this.. read more.. oh, I need to buy that. I'm waiting for a few products to arrive in the mail still so this weekend is definitely a no go. Hopefully the weekend after I'll be ready. I've been itching to get everything installed.
I was reading the other thread and I didn't know you make house calls. Maybe its something I should consider.
Only part I'm scared about is taking apart the car, especially the center console.
I usually don't do house calls because of my work schedule but ANY2FORU happens to live in Vegas which is where I"m going this weekend to RELAX! I figured it'll save on shipping and is one less thing he has to worry about doing his install. Besides..the switch install takes only 10 minutes, if that to do and he lives close to where I'll be staying for the weekend! Although, I occasionally have a day off here and there...hardest part is knowing when! When people get sick, it usually isn't planned! Anyway, keep us updated on your progress...I'll give my help whenever I can!
06-14-2006, 05:02 AM
#25
Datmrman,
I'm still using the tap at fuse32 and ran a single wire to my trunk which is supplying power to the camera, Dom unit and the remote signal for an Alpine amp. Never had any problems. These devices are drawing so little current that I doubt the fuse will blow. You could probably connect at least three more devices like this and still be ok. Fuse32 will blow and let you know if you have too many devices connected to it.
Having inline fuses attached to each device may help with a little added protection but just make sure that the inline fuse amperage rating is equal to or lower than the fuse rating in slot 32. I think it was 7.5A.
It is usually devices that have motors or illuminate/heat up that draw a lot of current an may cause interference or noise. I don't have any interference or noise at all. I'm using a Streetwires RCA cable that I ran from under the driver's seat to the Dom unit in the trunk. I bought this cable in 1995 and it still works fine. Get some decent RCA cable, 12-15 feet probably depending on how far up the center console you need to go and the route you take.(along the middle or around one of the door sills) I'm guessing $15.00-$25.00 for the RCA cable. You don't need that $50.00 super gold "special" stuff. The reason I would avoid the "household" thin rca cables is because the wiring is thin and can easily be broken by tugging too hard while you try and fish it throughout the car. It would suck to get it wired up and later find out you have no signal. It's also less insulated which would leave it more susceptible EMI's. (Interference)
A couple of questions:
What is getting connected the the RCA cable that you are running from Dom's unit to the head unit?
What device are you using that is requiring a 5V input?
06-14-2006, 05:16 AM
#26
Originally Posted by Crook
Datmrman,
A couple of questions:
What is getting connected the the RCA cable that you are running from Dom's unit to the head unit?
What device are you using that is requiring a 5V input?
A couple of questions:
What is getting connected the the RCA cable that you are running from Dom's unit to the head unit?
What device are you using that is requiring a 5V input?
You can afford one of those?!!!
 06-15-2006, 02:46 AM
#28
Safety Car
Thanks again DCC and Crook.
Looks like I will go for the fancy 12-15 feet shielded cable for video from Dom in the trunk and maybe shielded 10 feet cable for audio from PIE X3 in glove to the "secret device" in one of the front compartments. As for the other 2 free aux from PIE X3, probably just standard RCA.
I think I will tap Fuse 32 to add an additional cig/power outlet in the rear of one of the small compartments to power the device and keep wires hidden.
Debating about the aux in the trash tray. Not sure if I'll be using it.
Crook, I will reveal the "secret" device when my install is complete. Hopefully that will be soon. 
Xpditor, I'm a night owl if you can't tell from the majority of time stamps on my posts.
Looks like I will go for the fancy 12-15 feet shielded cable for video from Dom in the trunk and maybe shielded 10 feet cable for audio from PIE X3 in glove to the "secret device" in one of the front compartments. As for the other 2 free aux from PIE X3, probably just standard RCA.
I think I will tap Fuse 32 to add an additional cig/power outlet in the rear of one of the small compartments to power the device and keep wires hidden.
Debating about the aux in the trash tray. Not sure if I'll be using it.
Crook, I will reveal the "secret" device when my install is complete.
Hopefully that will be soon. Xpditor, I'm a night owl if you can't tell from the majority of time stamps on my posts.
06-23-2006, 10:30 AM
#30
Hey DCC,
I'm in the mist of gathering everything I will need to do my installation. So far I've collected :
USAspec
DOM unit w/PNP
Media unit
Charger for unit
Infrared piece for media unit (so I can hide the media unit)
Can you tell me what other items I will need to do an install. I have to wait for Wendy to get the camera back in so I know that. I'm talking about cables, crimps and such. I noticed you saying that you used good rca's in parts and normal ones in others. Could you link me to the ones you purchased?
06-23-2006, 02:32 PM
#31
Maybe some zip ties, 3M Super33+ electrical tape, 10+ ft. of rca video cable to run from Dom's unit in the trunk to wherever you decide to install your media player, RCA audio cable extension if the included cable with your media device won't reach the USAspec wherever decide to install it.
Don't forget you camera and lots of Mountain Dew, Power Aid will work.
Don't forget you camera and lots of Mountain Dew, Power Aid will work.
06-23-2006, 02:56 PM
#32
Originally Posted by Crook
Maybe some zip ties, 3M Super33+ electrical tape, 10+ ft. of rca video cable to run from Dom's unit in the trunk to wherever you decide to install your media player, RCA audio cable extension if the included cable with your media device won't reach the USAspec wherever decide to install it.
Don't forget you camera and lots of Mountain Dew, Power Aid will work.
Don't forget you camera and lots of Mountain Dew, Power Aid will work.
06-23-2006, 03:18 PM
#33
Originally Posted by lembowski
lol.......what quality of rca's will I need to get?
06-23-2006, 05:41 PM
#34
Instructor
Thread Starter
lembowski,
I used the 'premium' radio shack cables (that was hard for me to say in the same sentence: premium and radio shack =)) but the radio shack cables I used for the dvd player are the double shielded gold plated kind. You don't really need to use those but they were on sale so what the heck. As far as the other rca cables, I just bought the standard stuff you can get at any electronics store...since I won't be using these rca's too much, I didn't really mind the quality of them. You'll also need vampire taps (I bought them on partsexpress.com) wire crimper/stripper, wire connector crimp on type for 16-20 gauge wire, extra 18 gauge wire (cheaper if you just buy a spool) and eyelet connectors for all your grounds (eyelets are good because you can use existing body bolts to screw them down. I'll see if I can get a picture of those vampire taps tonight...they work WAY better then traditional wire tap connectors because they are quick disconnect in case you need to. plue they tap the wire more reliably than the standard ones.
I used the 'premium' radio shack cables (that was hard for me to say in the same sentence: premium and radio shack =)) but the radio shack cables I used for the dvd player are the double shielded gold plated kind. You don't really need to use those but they were on sale so what the heck. As far as the other rca cables, I just bought the standard stuff you can get at any electronics store...since I won't be using these rca's too much, I didn't really mind the quality of them. You'll also need vampire taps (I bought them on partsexpress.com) wire crimper/stripper, wire connector crimp on type for 16-20 gauge wire, extra 18 gauge wire (cheaper if you just buy a spool) and eyelet connectors for all your grounds (eyelets are good because you can use existing body bolts to screw them down. I'll see if I can get a picture of those vampire taps tonight...they work WAY better then traditional wire tap connectors because they are quick disconnect in case you need to. plue they tap the wire more reliably than the standard ones.
06-23-2006, 07:45 PM
#36
Instructor
Thread Starter
LEMBOWSKI,
Here's the wire taps I used:
http://www.partsexpress.com/pe/showd...number=082-140
but you'll also need these:
http://www.partsexpress.com/pe/showd...number=095-310
And these are the ring/eyelet connectors for your ground wires:
http://www.partsexpress.com/pe/showd...number=095-208
here are the radio shack RCA's that i bought on sale:
http://www.radioshack.com/product/in...entPage=family
If you need smaller quantities, your local autozone/kragen should carry them.
And if you purchase wires for power/ground, radio shack is a good source for those. Make sure to color code your wires or label them properly as this will avoid confusion if you ever have to make modifications to your system. Radio shack also sells cable labels that help tremendously...takes longer to do but remember...do it right the first time or else do it again! Good luck with your install...are you installing w/ datmrman? If you guys have questions..post them up or PM me and I"ll get back to you as soon as I can.
06-24-2006, 06:26 PM
#37
Instructor

Join Date: Sep 2005
Location: Pa
Age: 42
Posts: 128
Likes: 0
Received 0 Likes
on
0 Posts
I've read through all the responses here but I just have one easy question.
I think for now, I'm only going to be installing a backup camera, no dvd player.
So, ive bought Doms unit, and I'm working on the camera, (probably go with Wendys)
Do I need to purchase any extra cabling or will Doms unit and camera come with all necessary parts?
Besides the electrical tape/wire ties, im just asking about cabling.
Thanks
06-25-2006, 12:06 AM
#38
Instructor
Thread Starter
Originally Posted by becker800
I've read through all the responses here but I just have one easy question.
I think for now, I'm only going to be installing a backup camera, no dvd player.
So, ive bought Doms unit, and I'm working on the camera, (probably go with Wendys)
Do I need to purchase any extra cabling or will Doms unit and camera come with all necessary parts?
Besides the electrical tape/wire ties, im just asking about cabling.
Thanks
I think for now, I'm only going to be installing a backup camera, no dvd player.
So, ive bought Doms unit, and I'm working on the camera, (probably go with Wendys)
Do I need to purchase any extra cabling or will Doms unit and camera come with all necessary parts?
Besides the electrical tape/wire ties, im just asking about cabling.
Thanks
If you plan on tapping power from the fuse box, then you'll need enough wire to reach from the trunk to the interior fuse box on the drivers side. Also, you'll need some wire connectors that I mentioned above for the ground and the wire taps to do the power. Hope this helps...let me know if you have any other questions.
06-28-2006, 11:32 AM
#39
Well I installed the first leg of the install last night. I installed the DOM and ran the wires up to the console. It has power and it worked for awhile until one of the Grounds came undone while moving the unit around, so I have to go back in tonight to re-ground all the wires and mount the unit itself.
After that I plan on installing the USAspec and mounting the rocker switch somewhere. Apparently the rocker I bought is too big for the blank in the dash, so I'm looking at either trying to find the smaller one or finding a different place somewhere in the center console, so I don't that to take the dash apart or run the wire up front. i wish I had one of those DVD buttons you made DCC, that looks so amazing. I might install one there as a filler until I can save up alittle scratch for one of the ones you make!
After that I plan on installing the USAspec and mounting the rocker switch somewhere. Apparently the rocker I bought is too big for the blank in the dash, so I'm looking at either trying to find the smaller one or finding a different place somewhere in the center console, so I don't that to take the dash apart or run the wire up front. i wish I had one of those DVD buttons you made DCC, that looks so amazing. I might install one there as a filler until I can save up alittle scratch for one of the ones you make!
06-28-2006, 02:55 PM
#40
Instructor
Thread Starter
awesome..glad the install is so far going as planned. Make those grounds tight...worst thing is to be playing a movie and you lose your picture because one of those buggers came loose!