
DIY: Backup Camera with Dom's TVandNav2Go PNP Install
 05-30-2011, 12:31 PM
#121

Ok I turned the switch on the unit back to RBGGS and that fixed it. But the color is still a little off. Its tinted yellow a little. All the connections are good. Harness seems ok. Weird.
And I did pull apart the console for power from the cig outlet.
And I did pull apart the console for power from the cig outlet.
 05-31-2011, 08:06 PM
#122
Ok I think my problem is a loose wire in the harness. Today while I was driving my audio and nav went unresponsive. I couldnt even control the audio from the steering wheel. So I pulled the trunk panel and pushed all the connectors in a little snugger and wiggled the wires around. Guess what. Everything worked when I started the car back up. Good now I know the problem. So I"ll see what Dom wants to do.. or I'll just hot glue everything into place, which is my solution to 99% of the worlds problem.
06-02-2011, 10:32 PM
#126
8th Gear

Join Date: Oct 2010
Posts: 8
Likes: 0
Received 0 Likes
on
0 Posts
Yay! Could someone give me another link to any of Wendy's backup camera's; the link above is not listed anymore.. 
ps. my summer just started and I want to get started as soon as possible.
Thanks, in advance
ps. my summer just started and I want to get started as soon as possible.
Thanks, in advance
06-09-2011, 05:06 PM
#128
Ok so I spent some time to figure out what's going on. Its definitely the harness, it doesnt fit properly into the back of the navi. If I apply pressure the navi screen changes back to its normal color, but when I let go it develops a yellowish tint. And this was repeatable many times over so I know its that. Right now I have it held in with electrical tape, but it still has a yellow tint..
02-12-2012, 12:52 PM
#129
Racer
iTrader: (1)

For anyone intimidated to remove their rear seats to route the power wire, I found a simple solution. You can thread the wire through the rear seat-back, and pull it into the trunk. The pictures (including my stellar artwork) should tell the story, but here's a more detailed explanation:
1. Pull power from the Fuse box near the driver's foot, using a "Add-a-Fuse" device on #32.
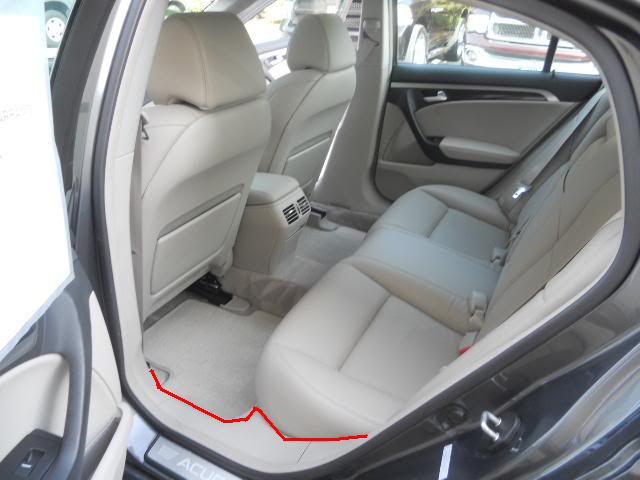
2. Route the power wire (see red line in picture) along the foot baseboards to the rear seat.
3. Thread wire along the crack between the leather/vinyl seat and the plastic baseboards, then pull the seats forward slightly to create some space, and push 3-5 feet of the wire into the trunk.
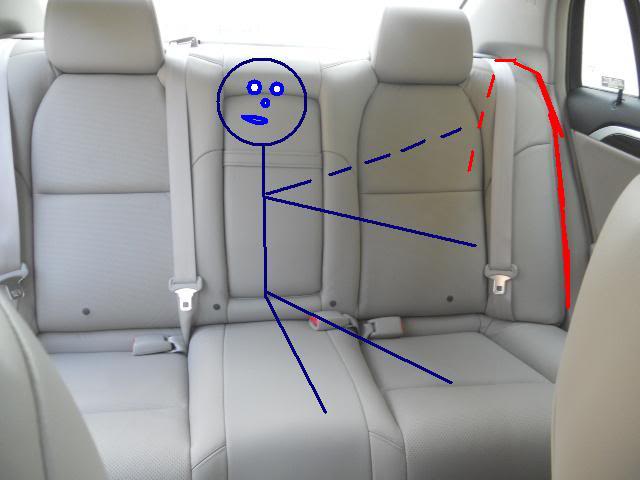
3. Put your arm (see dotted blue line in picture) through the rear trunk pass through, find the power wire, and pull it through into the trunk.
It took me about 30 minutes to do this, and most of the time was spent tucking the wire into the foot baseboards to hide it. Super easy solution. Let me know if you have any questions.
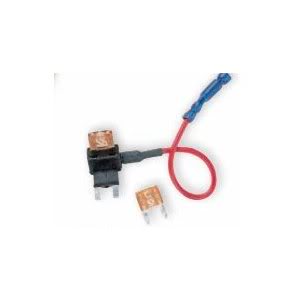
1. Pull power from the Fuse box near the driver's foot, using a "Add-a-Fuse" device on #32.
2. Route the power wire (see red line in picture) along the foot baseboards to the rear seat.
3. Thread wire along the crack between the leather/vinyl seat and the plastic baseboards, then pull the seats forward slightly to create some space, and push 3-5 feet of the wire into the trunk.
3. Put your arm (see dotted blue line in picture) through the rear trunk pass through, find the power wire, and pull it through into the trunk.
It took me about 30 minutes to do this, and most of the time was spent tucking the wire into the foot baseboards to hide it. Super easy solution. Let me know if you have any questions.
The following users liked this post:
triax37 (10-17-2012)
 07-09-2014, 04:47 PM
#133
1st Gear

Join Date: Jul 2014
Posts: 1
Likes: 0
Received 0 Likes
on
0 Posts
Awesome
I have a question...aside from a doms nav2 go module n camera do u need to buy the audio module to connect to iphone devices? I am so confused on what I need to buy to do this n is there a recommendation on where I can go to get it done instead?

Thread
Thread Starter
Forum
Replies
Last Post
BoricuaTL
Car Parts for Sale
138
04-08-2016 01:08 PM