
The $200 Subwoofer Project. Install instructions & Pics
 01-28-2014, 12:19 PM
#1
Teenage TL
Thread Starter
The $200 Subwoofer Project. Install instructions & Pics
The $200 Subwoofer Project

----------------------READ ME----------------------
First off, I would like to say, you read the title, so you know what to expect. This is a BUDGET build. The whole entire project can be done on $200 + sweat and tears. Please DO NOT post about how such and such brand is better, or better materials will work/sound better, or too much trunk room is taken blah blah blah. This is NOT a competition build. You WILL lose trunk space. It WILL NOT impress your friends when you open up your trunk. But you will get some good bass for low cost
NOW with all that said, I feel that there can never be too many writeups on something for people to get a full understanding before they dive into a project. On AZ theres only 5 or so good guides on how to do this, so I'm trying to get people to understand this in simple terms. I'm 18. Did this over a course of the day with the help of a friend. Taking the seats off is the most time consuming. Don't be scared to do it! you'll be pleased with the results
----------------------READ ME----------------------
Materials & Tools
- MTX Magnum 10" Subs in box with amp ( )
- Boss 8gauge wiring kit ( )
- Line out converter *** ( )
- ATM add a circuit ( )
- Flathead screwdriver
- Socket wrench
- Zip Ties (a few come in boss wiring kit but are small)
- Scissors
- Flashlight
These are the BASICS. If you want different subs, you can get different subs. Just make sure you have subwoofers, a box, an amp, and a wiring kit.
Trust me when I say the prices will fluctuate. I bought the Magnum set for 145 on friday the 17th of january. Since then I've seen them for 150, and now at the time of writing this they are 179. They will go back down. Sellers are crazy.
For extra protection of your wires, you may want to buy wire loom. I bought 100ft of it and it was way too much. But it makes it look nice beside the factory wires
***if your amp can take speaker wire as input, you don't need one of these. The one linked above does need a LOC to work.
Know what you're about to do
This is a rough diagram of how you are to wire your subs in:
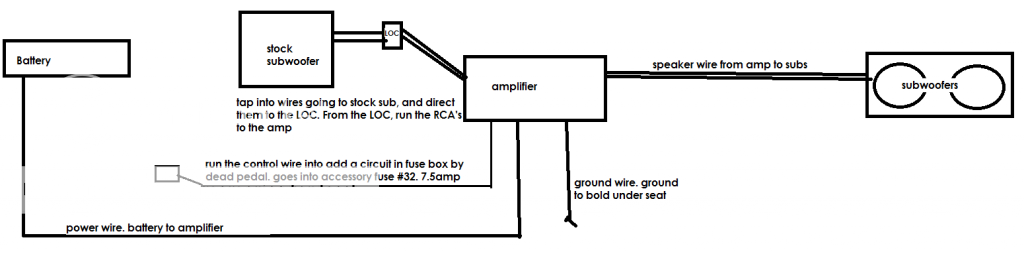
Basically you have power going to your amp from the battery. Then the amp must be grounded to a bolt on the body. The signal for the amp to draw power is why the control wire is tapped into the accessory fuse. The frequencies for the subs to play are from tapping into our stock headunits signal sent to the stock sub. Once we tap those, hook it all together, bam! A sub set controlled by the stock headunit.
Install
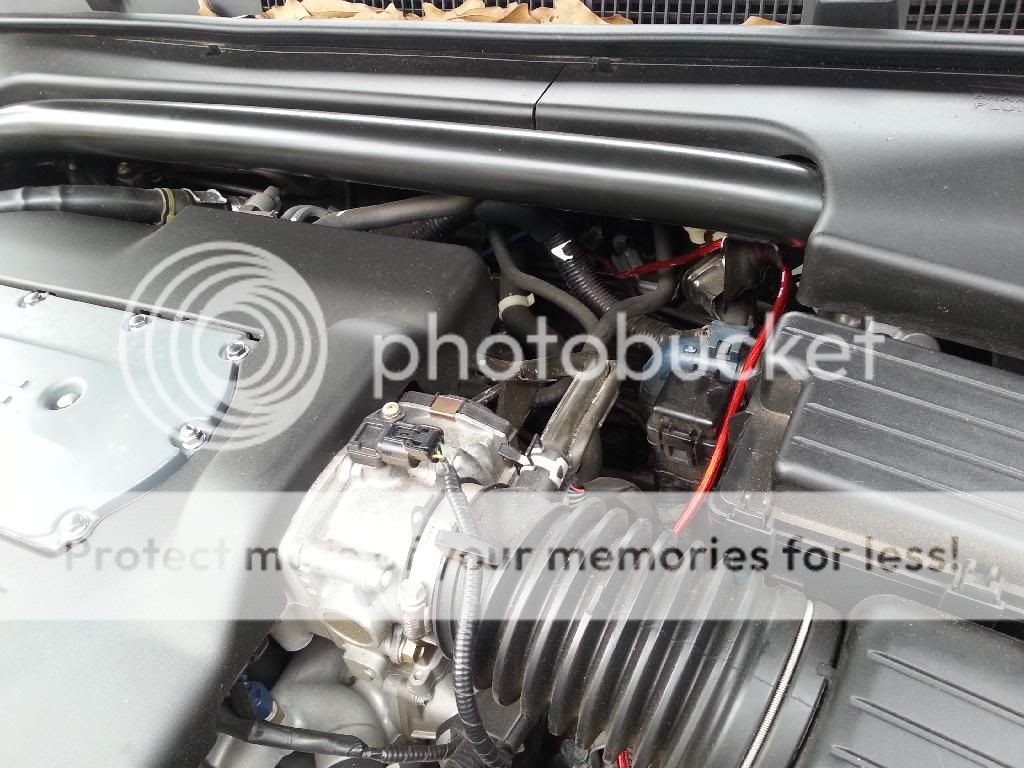
Ok so now unplug your battery. I ran the power wire first (not connected, just put it in position). There is a little grommet thing in the firewall where you can pop it out and get through to the cabin. The entrance point in the cabin is behind the center console. Here are some pictures. I used a straightened wire hangar to poke through and also to snake the wires.
=
=
Here is where it ends up (I have my inside loomed.. have yet to do whats in the bay lol) So look at the black thing coming out from behind the center console.

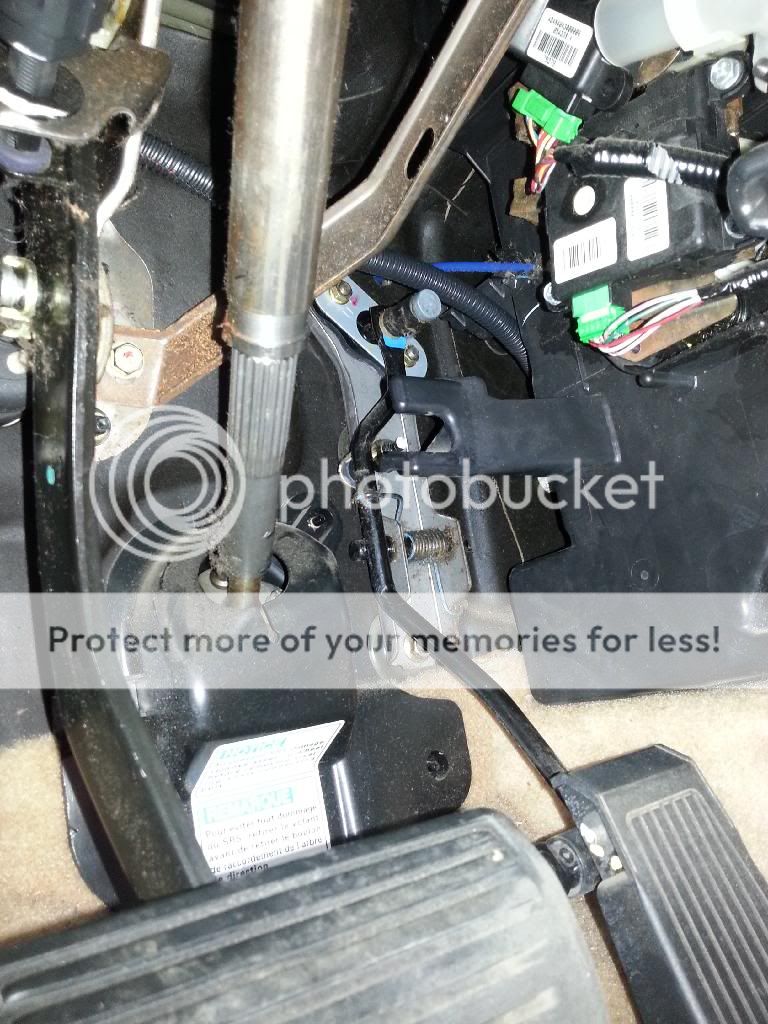
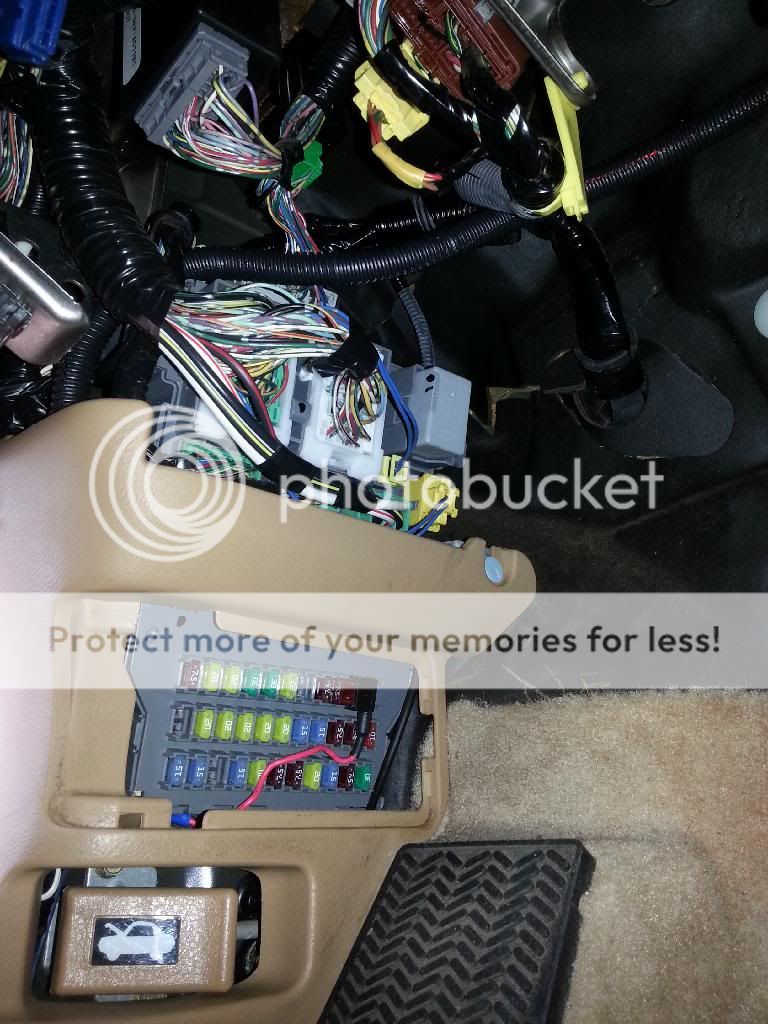
After that, I ran it high and around to where the other wires run down the driver side trim. Take off the slider over the fuse box. It is easier to pop off the trim piece in between the B pillar piece and the larger piece by the fuse box. Pop that middle piece off, and then pop the one over the fuse box off. You want to now tap your control wire into the add a circuit #32
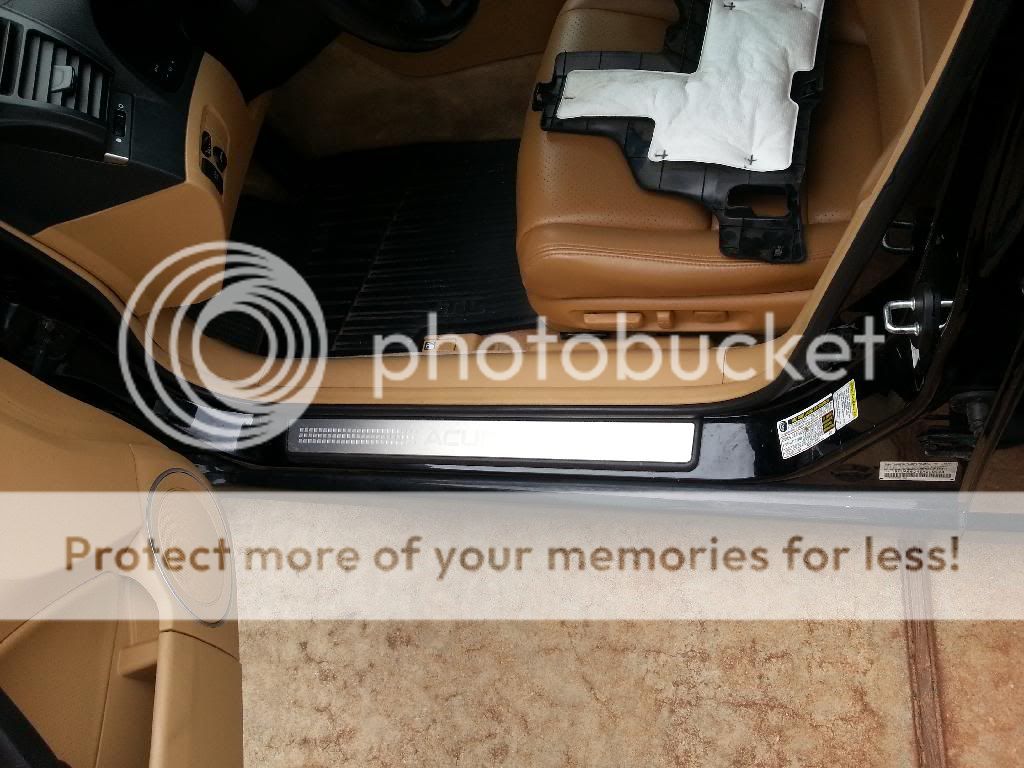
From here, pop off the piece of trim by the rear seats. I snaked my wires through the trim piece that is on the b pillar. These are the pieces I am talking about, and where my wires end up
look at the random loomed wire coming down behind that trim piece, and notice that my fuse is tapped.
From there it runs underneath this trim panel
To the rear seat panel

AT THIS POINT YOU HAVE TO REMOVE THE TOP OF YOUR REAR SEATS.
There are bolts to the side of the seats, and through the little overlapping piece of leather under the headrest. If you drop the bolt while taking it out in this little headrest spot, it wont go anywhere.

((for more info on seat removal see Ron A's post here https://acurazine.com/forums/showpos...28&postcount=3))
Okay now that the rear seat is out, run your control and power wires in this position (again, it's the black loom)
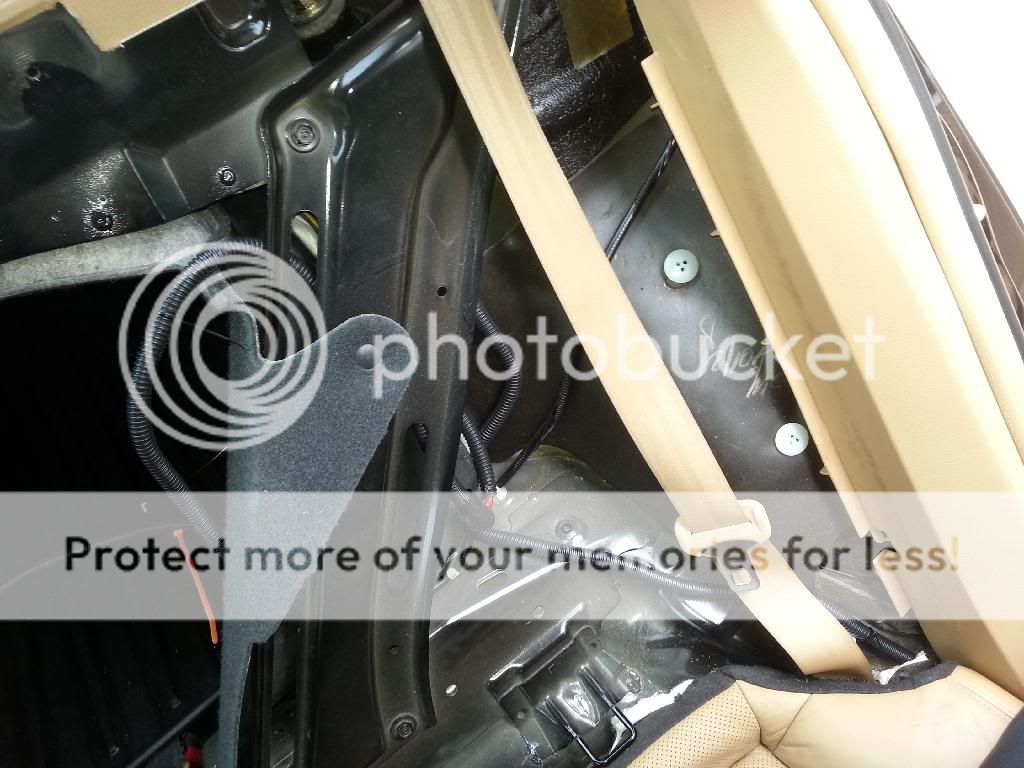
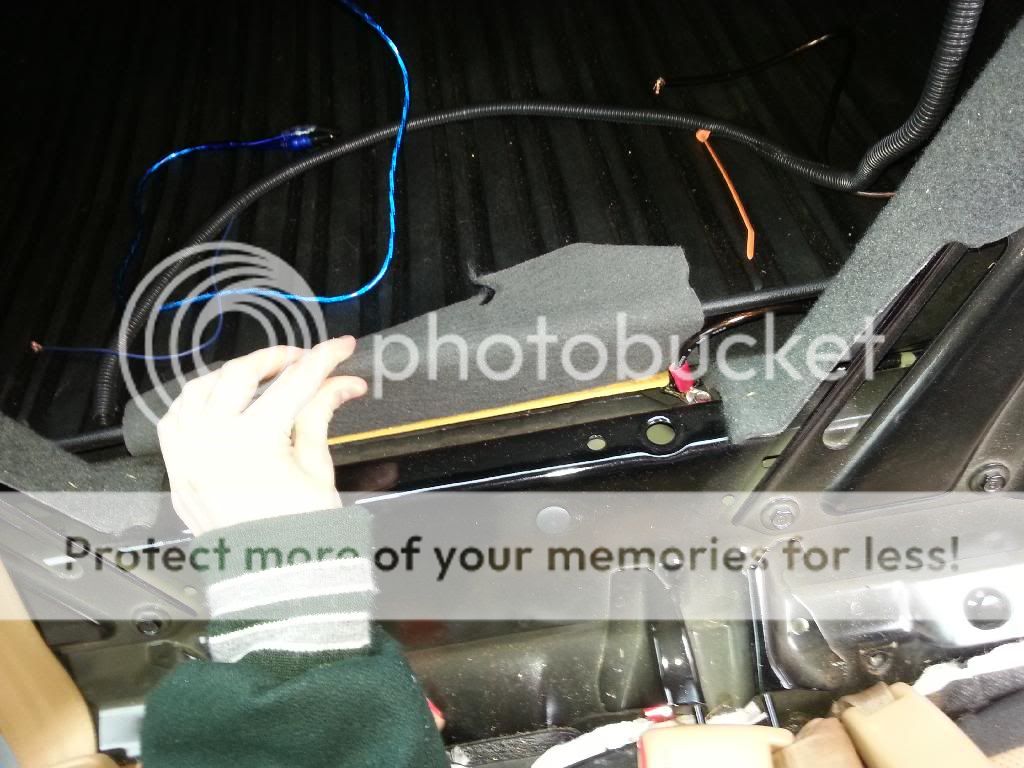
That was the hardest part of the whole project. Feel accomplished yet? Pull out the two clips holding the trunk fabric. (one of mine is broken here) theyre right above the blue wire

You might have to pull out some other clips in the trunk I can't remember, but let the trunk liner fall. You now have access to the bottom of the rear deck. Look how tiny that stock sub is! It should have a connector attached to it. If you are sitting on the rear seat facing the rear windshield, you can reach through the right hole and feel the connection.
Now we need to tap into that wire. You can either connect into the connector, t tap the wires, idc how you do it really. I'm not that great with electronics I had some help in this situation. Run the positive and negative speaker wire from this wire to the LOC. They can be ran directly to your amp if your amp accepts this wire.
Your LOC should have a left and right for the pos and negatives. This is the case of adding more speakers to your car. Since we are adding subs, you only need the left of each or right of each. Doesn't matter.
I attached the speaker wire to the loc, attached the rcas, bundled it all up, threw it in this hole. Doesn't really budge should be fine. Secure it if you'd like. when you put the trunk liner back on, there is already a hole in which to run the rca's through. Leave a foot or a little more depending on where you want to mount your amp. These wires go to the amp.
Here's my wires coming through, with a classy orange zip tie up in there

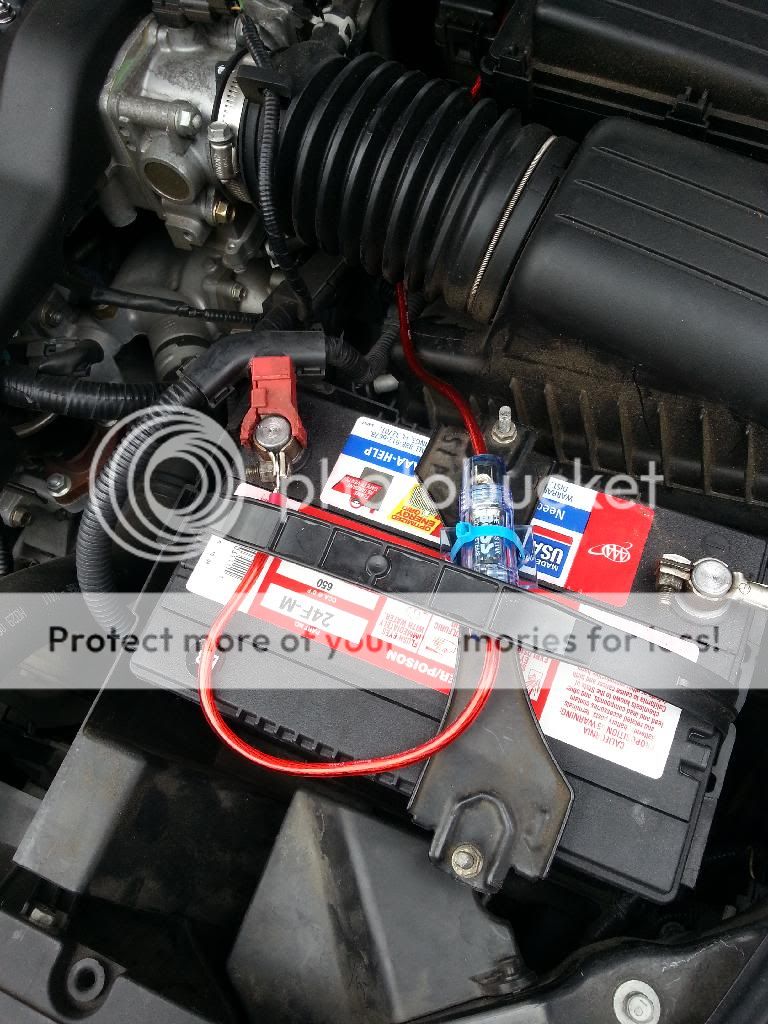
At this point every wire is where it needs to be. Place your amp and subs, figure out the length you need each wire to be, and secure slack somewhere. Crimp your connectors onto the ends of the power and ground. Cut the ground 6"-20" or so from the battery to put the in line fuse. I did it 6" away and mounted on top of the tie down. In one of the first pictures.
Right under the trunk carpet is a place to secure your ground to a bolt
AT THIS POINT PLUG EVERYTHING UP BEFORE YOU PUT ANY PANELS BACK ON. SEE IF THE SYSTEM WORKS. IF IT TURNS ON WHEN YOU TURN TO THE ACCESSORY SLOT, AND THE BASS HITS, YAY YOU DID EVERYTHING CORRECTLY
You can now begin to secure everything. Before you pop panels back on, make sure theres some slack and zip tie stuff so it really won't move. Reinstalling the back seat will be a pita, but it will be well worth it.
As far as mounting your amp, tuning your gain and such, idk I'm just a kid. lol. I hope this helps anyone who is looking. I tried to add pictures in some parts where I was confused before. For more looks at how to install subs, take a look at these other links of posts here on AZ.
https://acurazine.com/forums/3g-tl-audio-bluetooth-electronics-navigation-94/diy-aftermarket-amp-install-speaker-install-audiocontrol-matrix-install-w-pics-580314/
A BUNCH OF USEFUL PICTURES
https://picasaweb.google.com/rody084...at=directlink#
Last edited by Steven Bell; 01-28-2014 at 10:14 PM.

The following 2 users liked this post by Jklaz:
triax37 (09-15-2014),
Vlad_Type_S (01-28-2014)
01-28-2014, 01:15 PM
#3
Registered Bike Offender
iTrader: (3)
Awesome write up! This is essentially a guide on how to add an aftermarket subwoofer to the factory system: you don't have to use the same parts as Jklaz did, but the procedure is identical. I'm sure many will find this very useful.
The following users liked this post:
justnspace (01-28-2014)
01-28-2014, 01:45 PM
#4
Teenage TL
Thread Starter
Thanks man! I just wanted people to not bash me about my setup being cheap lol. I hope it helps. It's easier than i thought it would be
01-28-2014, 03:09 PM
#5

Nice job. I just went through this recently myself. I've seen a few others on here which are similar. Question. What camera did you use? Pics are solid quality and i'm in the market for something better than my 8mp smartphone.
I thought I'd add a couple of things here too:
There is another great ground location in the trunk just under the center of the carpet towards the rear seat (not rear end of car). It has no paint and is a stock bolt. Many of us use it and it works well.
Secondly, you can run both the power and remote wires down the left side of the car and into the trunk from the floor w/o taking out the back seat. There is a small hole that you can fish through pretty easily into the trunk area provided you peel back the left side of the trunk liner to get at it. It cuts down on the install time by not having to completely remote and reinstall the back seat. Just a tip as I haven't seen it posted anywhere else.
FWIW I'm in an '07.
01-28-2014, 06:50 PM
#6
Teenage TL
Thread Starter
Nice job. I just went through this recently myself. I've seen a few others on here which are similar. Question. What camera did you use? Pics are solid quality and i'm in the market for something better than my 8mp smartphone.
I thought I'd add a couple of things here too:
There is another great ground location in the trunk just under the center of the carpet towards the rear seat (not rear end of car). It has no paint and is a stock bolt. Many of us use it and it works well.
Secondly, you can run both the power and remote wires down the left side of the car and into the trunk from the floor w/o taking out the back seat. There is a small hole that you can fish through pretty easily into the trunk area provided you peel back the left side of the trunk liner to get at it. It cuts down on the install time by not having to completely remote and reinstall the back seat. Just a tip as I haven't seen it posted anywhere else.
FWIW I'm in an '07.
I thought I'd add a couple of things here too:
There is another great ground location in the trunk just under the center of the carpet towards the rear seat (not rear end of car). It has no paint and is a stock bolt. Many of us use it and it works well.
Secondly, you can run both the power and remote wires down the left side of the car and into the trunk from the floor w/o taking out the back seat. There is a small hole that you can fish through pretty easily into the trunk area provided you peel back the left side of the trunk liner to get at it. It cuts down on the install time by not having to completely remote and reinstall the back seat. Just a tip as I haven't seen it posted anywhere else.
FWIW I'm in an '07.
 That is the worst part lol. And these pics are straight off my 8mp Galaxy s3. Stock camera app.
01-28-2014, 07:14 PM
That is the worst part lol. And these pics are straight off my 8mp Galaxy s3. Stock camera app.
01-28-2014, 07:14 PM
#7
Did you mean the worst part by it's in the worst location when running cable through the open hole I'm talking about or just that it's a major PITA? Personally, I was able to fish it through rather easily. Used a flashlight on one end and fished from the other. You do need to lift the drivers side passenger seat corner and stuff the flashlight under. This can be tedious but only for a minute or so.
I ran both the remote and power at same time. I didn't notice any debris or catches that could fray the wires in the vicinity of where i ran it either. It's a pretty clear shot.
Let me know. Thanks.
Trending Topics
01-28-2014, 08:39 PM
#8
Teenage TL
Thread Starter
I have a Galaxy Nexus and man, it just doesn't do the lighting around the pics as well as yours. I'm due for an upg so I'll be looking into something hopefully better. If not, I'll probably just splurge for a dedicated camera in the future.
Did you mean the worst part by it's in the worst location when running cable through the open hole I'm talking about or just that it's a major PITA? Personally, I was able to fish it through rather easily. Used a flashlight on one end and fished from the other. You do need to lift the drivers side passenger seat corner and stuff the flashlight under. This can be tedious but only for a minute or so.
I ran both the remote and power at same time. I didn't notice any debris or catches that could fray the wires in the vicinity of where i ran it either. It's a pretty clear shot.
Let me know. Thanks.
01-28-2014, 09:50 PM
#9
I hear ya. I was planning to remove the seat, as pretty much every DIY I'd seen recommended it as the best approach. I still don't deny it's likely the easiest and least fussy way to deal with getting the cables into the trunk, but some thin gloves, a flashlight and a bit of fishing is really all that's needed. Wish I took a pic of that now. Then again, it would have come out terrible :/
01-28-2014, 10:14 PM
#10
Team Owner
iTrader: (2)
Join Date: Jan 2008
Location: Kansas City, MO (Overland Park, KS)
Posts: 36,545
Received 6,470 Likes
on
5,162 Posts
Great job.
01-29-2014, 09:34 AM
#11
Teenage TL
Thread Starter
I hear ya. I was planning to remove the seat, as pretty much every DIY I'd seen recommended it as the best approach. I still don't deny it's likely the easiest and least fussy way to deal with getting the cables into the trunk, but some thin gloves, a flashlight and a bit of fishing is really all that's needed. Wish I took a pic of that now. Then again, it would have come out terrible :/
When I put the seat back in im gonna look hard to see how it fits through and admire your work lol.
Thanks SB! I want to put up some pics of the whole system but it's currently snowing
01-29-2014, 11:48 AM
#12
Team Owner

A couple things I would change that won't cost a penny....
The sub enclosure. You can build your own cheaper and you're not stuck with a high tuned prefab box. Or there's IB that costs practically nothing except more time and you would trade some output for much better sound quality.
A single larger sub. Usually more efficient than the smaller models (sometimes making up for the 3db gain of dual subs) and with better sound quality and an overall space and money savings.
If in the future you feel like upgrading or changing it, especially the move more toward the sound quality and deeper bass end of things, the box would be the place to start
The power wire is tiny. I would guess there's an actual 200w at most so it's ok but if you upgrade amps, the power wire and probably ground will have to be upgraded.
Don't take this the wrong way, my first system cost about $50 with a Cerwin Vega 15 and an amp that was so cheap there was no brand name anywhere on the amp. Luckily the sub was very efficient because the amp would be luckily to do 30w. I built a huge enclosure to help make up for the lack of power. Once you've done it a few times you begin to know what you like and cheaper ways of getting there.
01-29-2014, 06:16 PM
#13
Teenage TL
Thread Starter
A couple things I would change that won't cost a penny....
The sub enclosure. You can build your own cheaper and you're not stuck with a high tuned prefab box. Or there's IB that costs practically nothing except more time and you would trade some output for much better sound quality.
A single larger sub. Usually more efficient than the smaller models (sometimes making up for the 3db gain of dual subs) and with better sound quality and an overall space and money savings.
If in the future you feel like upgrading or changing it, especially the move more toward the sound quality and deeper bass end of things, the box would be the place to start
The power wire is tiny. I would guess there's an actual 200w at most so it's ok but if you upgrade amps, the power wire and probably ground will have to be upgraded.
Don't take this the wrong way, my first system cost about $50 with a Cerwin Vega 15 and an amp that was so cheap there was no brand name anywhere on the amp. Luckily the sub was very efficient because the amp would be luckily to do 30w. I built a huge enclosure to help make up for the lack of power. Once you've done it a few times you begin to know what you like and cheaper ways of getting there.
The sub enclosure. You can build your own cheaper and you're not stuck with a high tuned prefab box. Or there's IB that costs practically nothing except more time and you would trade some output for much better sound quality.
A single larger sub. Usually more efficient than the smaller models (sometimes making up for the 3db gain of dual subs) and with better sound quality and an overall space and money savings.
If in the future you feel like upgrading or changing it, especially the move more toward the sound quality and deeper bass end of things, the box would be the place to start
The power wire is tiny. I would guess there's an actual 200w at most so it's ok but if you upgrade amps, the power wire and probably ground will have to be upgraded.
Don't take this the wrong way, my first system cost about $50 with a Cerwin Vega 15 and an amp that was so cheap there was no brand name anywhere on the amp. Luckily the sub was very efficient because the amp would be luckily to do 30w. I built a huge enclosure to help make up for the lack of power. Once you've done it a few times you begin to know what you like and cheaper ways of getting there.
If I could do it all over again I really would like to fab my own box. But next time I probably will!
01-29-2014, 06:53 PM
#14
Team Owner
I'm always open to advice! I'm actually returning a 0gauge kit I bought because this tiny amp can only take a power wire of up to 8gauge thickness. And the main reason I bought the package is just because I didn't want to do any work.
If I could do it all over again I really would like to fab my own box. But next time I probably will!
If I could do it all over again I really would like to fab my own box. But next time I probably will!
How do you like it so far?
01-31-2014, 08:29 AM
#15
this is the same way i did my system. i used 4gauge power wire and all kicker products.
dont forget to remove the rear noise canceling microphone. located on the headliner by the 3rd brake light. 04-06 may be different. But i had to do it on my 08 type s!
dont forget to remove the rear noise canceling microphone. located on the headliner by the 3rd brake light. 04-06 may be different. But i had to do it on my 08 type s!
02-02-2014, 08:15 PM
#16
:what:
Good write up. You can actually save money on the LOC and just pull the sub signal pre amp. I agree with MekoTL. You can fish the wires under the seat into the trunk without removing the seat. I just stuck my hand under the corner of the back seat and shoved wire up in as far behind the back as possible. Then, I reached in from the trunk area between the back seat and the trunk and fished them out. It's tight, and I can't guarantee you won't bruise the back or your hand, but it beat pulling the seats out any day!!!!!
02-03-2014, 02:15 PM
#17
Teenage TL
Thread Starter
At least you have a working system. I understand the work part as well. With that said, we all get bored with our systems at some point and I think you would really like a lower tuned box when that time comes. If you get brave, there's infinite baffle and the $40 Pyle 15" subs sound good in that configuration but it's a lot more work. It's an addiction, I bet you're here within a year with more upgrades. I used to laugh at people who spent as much as I did and now I'm one of the people I used to laugh at. I said no more and that lasted for a few months. Now I have a new amp on the way.
How do you like it so far?
How do you like it so far?
Good write up. You can actually save money on the LOC and just pull the sub signal pre amp. I agree with MekoTL. You can fish the wires under the seat into the trunk without removing the seat. I just stuck my hand under the corner of the back seat and shoved wire up in as far behind the back as possible. Then, I reached in from the trunk area between the back seat and the trunk and fished them out. It's tight, and I can't guarantee you won't bruise the back or your hand, but it beat pulling the seats out any day!!!!!
02-03-2014, 08:07 PM
#18
Teenage TL
Thread Starter
Here's some pics:
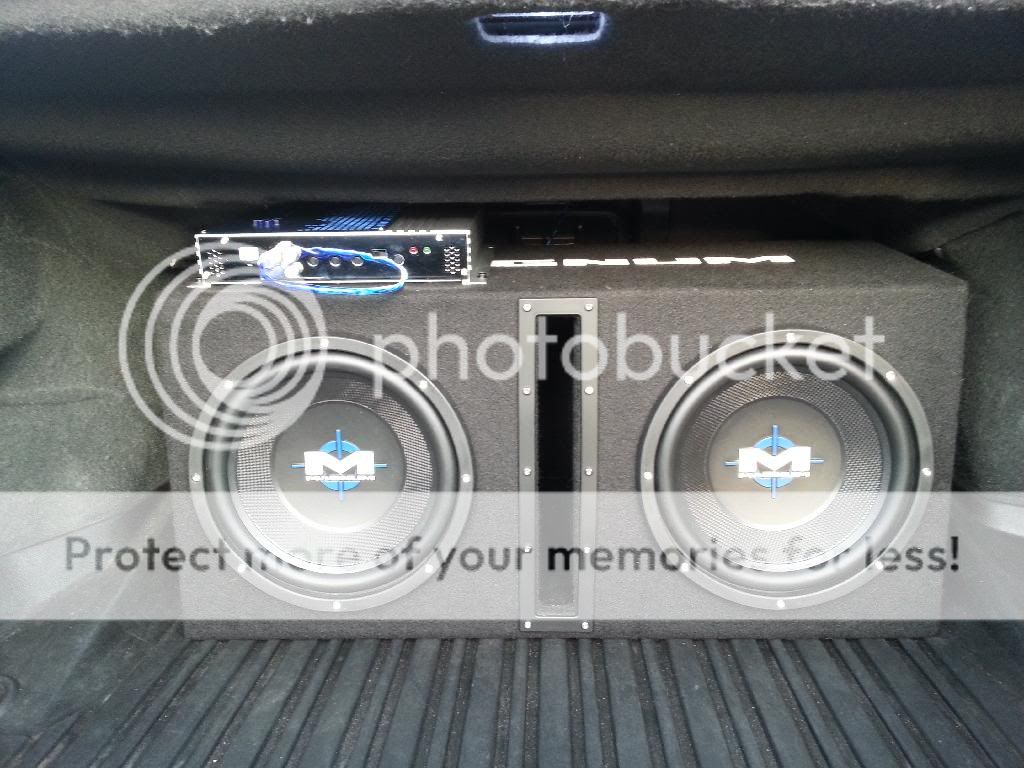
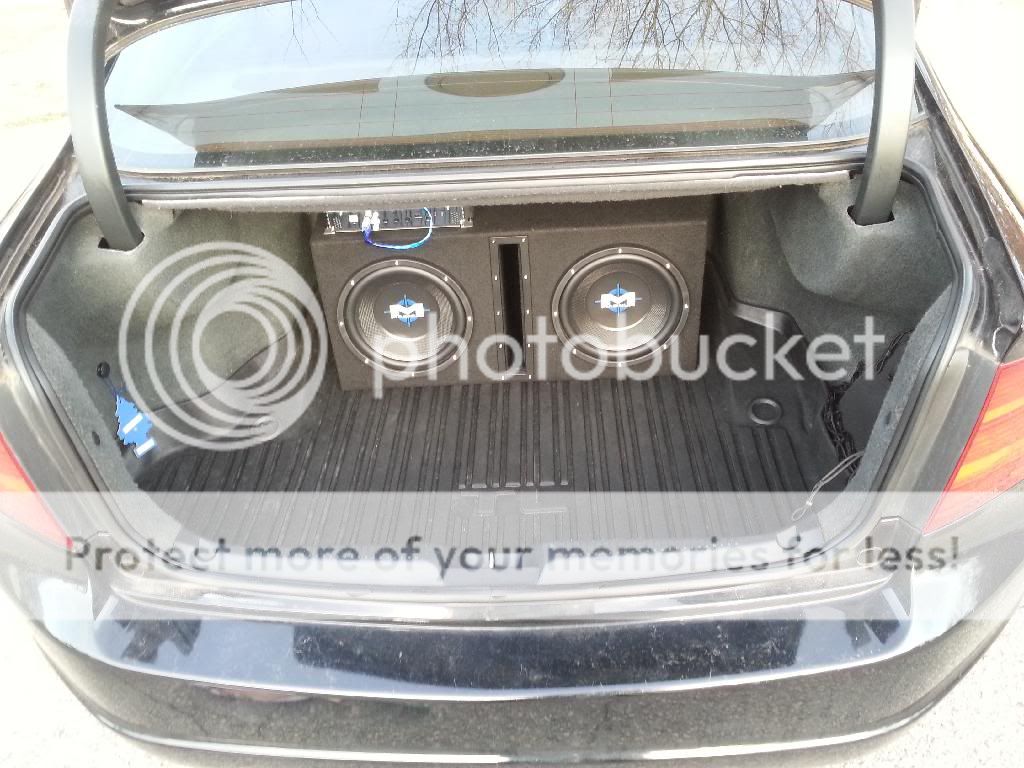

SORRY MY CAR IS EXTREMELY DIRTY FROM SNOW
secured just by two strips of hooking industrial velcro underneath. The sticky side is on the trunk mat and should peel off easily maybe with some goo gone if ever completely remove everything. The hooking side is on the carpet of the sub. I don't expect it to move around. Has fared well so far
02-03-2014, 08:14 PM
#19
I like the install and think it looks pretty good.
If you want to add a little more beauty to it, you could grab some cardboard (find some for free) and create a trim plate for for the speaker box and surrounding area of the trunk. Then hit up your local lumber store and pick up some hardboard to flush mount it with the box and speaker rings. It would look pretty clean. Hardboard is only a few bucks., easy to work with. You could go MDF if you wanted something a little more sturdy. Don't forget the carpet to match the trunk liner
Thanks again for the DiY. You can never have enough of these.
Last edited by MekoTL; 02-03-2014 at 08:21 PM.

Thread
Thread Starter
Forum
Replies
Last Post
cycdaniel
1G TSX Performance Parts & Modifications
8
12-17-2019 10:58 AM
3GTLOwns
3G TL Audio, Bluetooth, Electronics & Navigation
1
09-09-2015 09:51 PM
alan_rich
3G TL Audio, Bluetooth, Electronics & Navigation
3
09-09-2015 11:38 AM