DIY: Aftermarket Amp Install, Speaker Install, AudioControl Matrix Install w/ PICS!
 08-07-2005, 01:43 AM
#1
Pro
Thread Starter

Join Date: May 2004
Location: Southern Cali.
Age: 51
Posts: 534
Likes: 0
Received 8 Likes
on
2 Posts
DIY: Aftermarket Amp Install, Speaker Install, AudioControl Matrix Install w/ PICS!
Well here we go. I have been asking A LOT of questions of A LOT of people. Some of you may have noticed me posting several new threads at once!
Anyway, I have not seen a total DIY for adding aftermarket amps and new speakers to the �05 TL with pics, so I thought I would document my journey through this crazy adventure.
With the addition of the 5.1 ELS Surround into the TL, I know it has been hard to get all 5 channels PLUS sub to work with an aftermarket amp and STILL be able to use the headunit for all the controls. Plus most of all, keep the great sound.
Well after lot of search, calling companies, and more then anything the SMART, HELPFUL and RESOURCEFUL people on this board, there have been a few solutions to this issue.
The path I chose was this.
What I am installing is the following:
Diamond Audio s600s Components
Diamond Audio M361i Rears
Diamond Audio D65.2 560 Watt 7 Channel Amp (60 x 5, 70 x 2)
AudioControl Matrix
Rockford Fosgate 10� Phase 2 Subwoofer (soon to be replaced with something )
Well to start with, let�s get the car torn apart so we can work without distraction. There are several threads showing how to tear apart the car. I will not repeat the information but will just provide links to those threads.
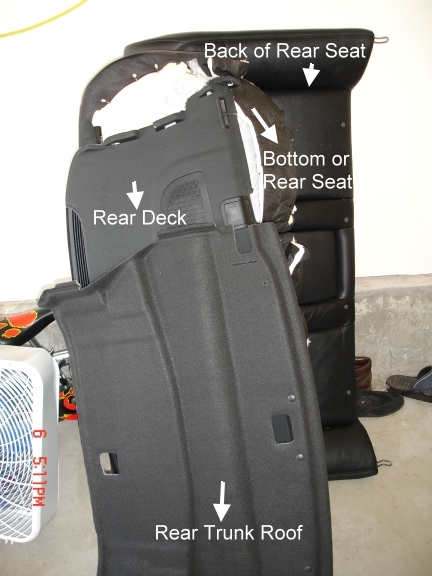
First you have to take out the back seats and rear deck to get to the rear speakers, the subwoofer, and also to run the wires easily. Thanks to the resourceful and helpful moderator, RON A for the scans!!
https://acurazine.com/forums/showthread.php?t=107568
Please read those warnings about the SRS system seriously. You don�t want one of those suckers going off in your face!!
Please note that this is the ONLY way to remove the stock sub and rear speakers. You can GET to them from underneath, but they have to be removed from above.
Once all that is removed, set everything aside:
Next take apart the side pillars and moldings on both sides of the car. The driver�s side will be used to run the power wire from the battery. The passenger side is where the stock amp is and the Matrix is going to be installed.
Here is a link with instructions for removing the B-Pillar and side trims. Thanks again to RON A. Once again please take note of the SRS warnings.
https://acurazine.com/forums/showthr...light=b-pillar
Once all that is removed, it is time to run the power wire from the battery.
The hardest thing I had to do in my �02 TL-S was to find a grommet to run the power cable through. The �05 is SIMPLE.
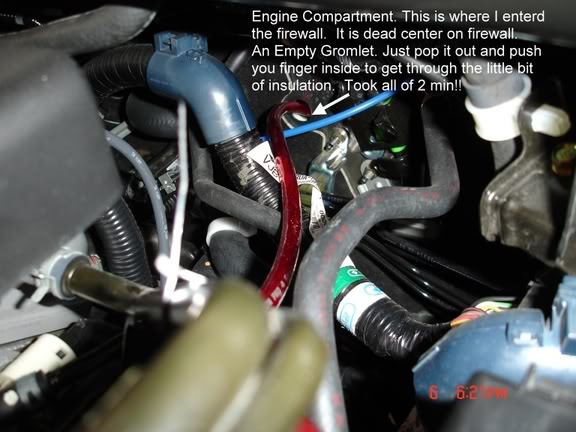
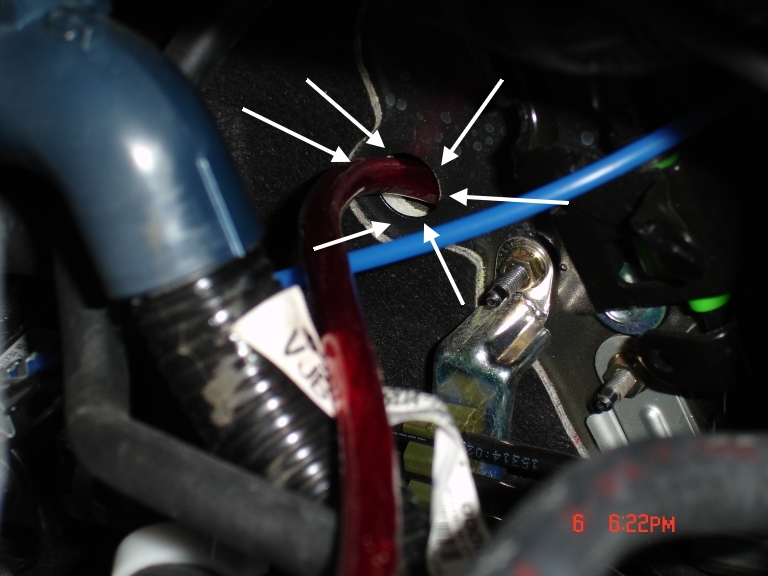
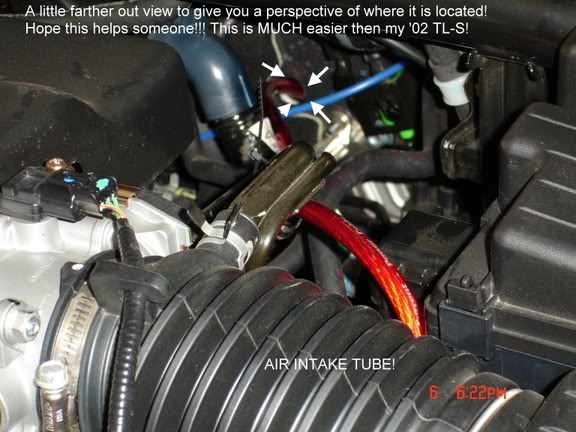
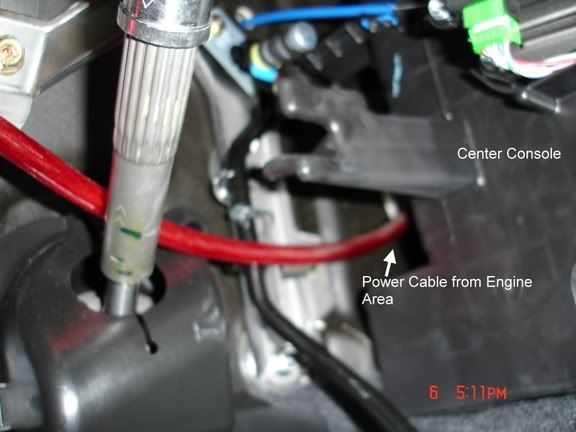
In the middle of the Engine Compartment about 8-9� down from the top you will see am empty grommet. Just pluck it out. Then push your finger in the grommet and you will feel the insulation. Once you rip a little hole in the insulation, just feed the wire through.
Below are a couple of pics showing the location of the grommet.
Once you thread the wire through, you go into the driver�s floor area and look up to the center middle console. My wire was just hanging out of the side there. Depending on how you thread it, you may have to fish around behind the middle console to grab it.
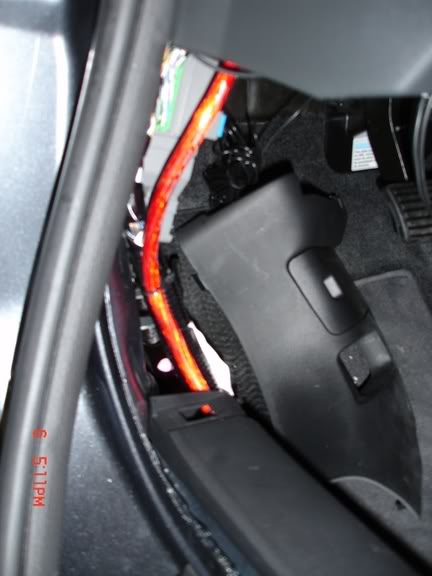
Once you find the wire, just pull it around to the drivers kick panel area, running it over other wires to keep it out of the way of the foot well.
Run the power wire down the kick panel and use ties to make it run with the flow of the current wire setup.
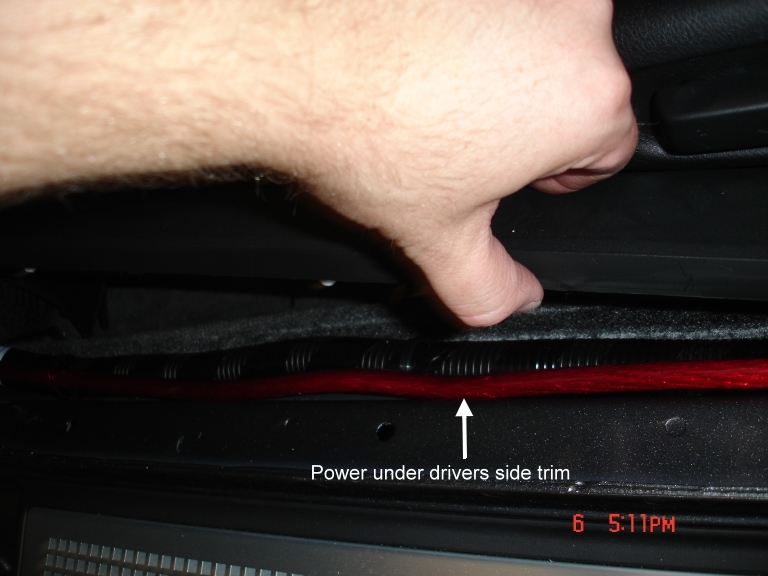
Next run the wire through the trim panels, the b-pillar and rear trim until you reach the rear cabin area.
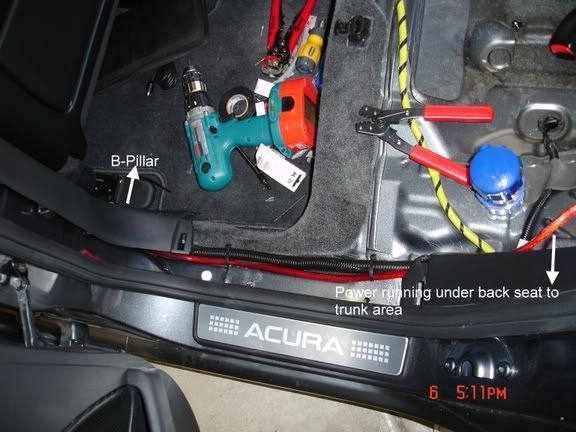
Once that is completed, I suggest you run the wire into the trunk through the rear seat area where your amp is going to have the POWER input. This is all random as we are all using different amps.
The power wire can run under the seat as it will not cause any problems at all.
Since my amps power area is going to be on the driver�s side, the picture below shows my running the cord along that pattern.

Leave the wire running into the trunk and use some electrical tape on the end for safety.
I don�t have the amp yet (2 more days) so I am just going to leave it sitting in the trunk until then.
In the next segment I will show how I replaced the rear speakers, replaced the wiring for the rear speakers so that they can be ran by the new amp in the trunk.
But the best part is how I learned to utilize the OEM rear speaker and sub wiring for the front speakers and center channel, WITHOUT running any new wires to the new amp in the trunk.
DANG I wish I could take credit for that�but that idea goes to chusteveb.
Please see the following link for exactly the process: (I am not going to repeat the whole concept here as it would just be as easy for everyone to hear it from chusteveb himself)
https://acurazine.com/forums/showpos...0&postcount=31
I need some sleep and will post the rest tomorrow. Hope you all enjoy it. I have to admit it is fun writing this.
Anyway, I have not seen a total DIY for adding aftermarket amps and new speakers to the �05 TL with pics, so I thought I would document my journey through this crazy adventure.
With the addition of the 5.1 ELS Surround into the TL, I know it has been hard to get all 5 channels PLUS sub to work with an aftermarket amp and STILL be able to use the headunit for all the controls. Plus most of all, keep the great sound.
Well after lot of search, calling companies, and more then anything the SMART, HELPFUL and RESOURCEFUL people on this board, there have been a few solutions to this issue.
The path I chose was this.
What I am installing is the following:
Diamond Audio s600s Components
Diamond Audio M361i Rears
Diamond Audio D65.2 560 Watt 7 Channel Amp (60 x 5, 70 x 2)
AudioControl Matrix
Rockford Fosgate 10� Phase 2 Subwoofer (soon to be replaced with something )
Well to start with, let�s get the car torn apart so we can work without distraction. There are several threads showing how to tear apart the car. I will not repeat the information but will just provide links to those threads.
First you have to take out the back seats and rear deck to get to the rear speakers, the subwoofer, and also to run the wires easily. Thanks to the resourceful and helpful moderator, RON A for the scans!!
https://acurazine.com/forums/showthread.php?t=107568
Please read those warnings about the SRS system seriously. You don�t want one of those suckers going off in your face!!
Please note that this is the ONLY way to remove the stock sub and rear speakers. You can GET to them from underneath, but they have to be removed from above.
Once all that is removed, set everything aside:
Next take apart the side pillars and moldings on both sides of the car. The driver�s side will be used to run the power wire from the battery. The passenger side is where the stock amp is and the Matrix is going to be installed.
Here is a link with instructions for removing the B-Pillar and side trims. Thanks again to RON A. Once again please take note of the SRS warnings.
https://acurazine.com/forums/showthr...light=b-pillar
Once all that is removed, it is time to run the power wire from the battery.
The hardest thing I had to do in my �02 TL-S was to find a grommet to run the power cable through. The �05 is SIMPLE.
In the middle of the Engine Compartment about 8-9� down from the top you will see am empty grommet. Just pluck it out. Then push your finger in the grommet and you will feel the insulation. Once you rip a little hole in the insulation, just feed the wire through.
Below are a couple of pics showing the location of the grommet.
Once you thread the wire through, you go into the driver�s floor area and look up to the center middle console. My wire was just hanging out of the side there. Depending on how you thread it, you may have to fish around behind the middle console to grab it.
Once you find the wire, just pull it around to the drivers kick panel area, running it over other wires to keep it out of the way of the foot well.
Run the power wire down the kick panel and use ties to make it run with the flow of the current wire setup.
Next run the wire through the trim panels, the b-pillar and rear trim until you reach the rear cabin area.
Once that is completed, I suggest you run the wire into the trunk through the rear seat area where your amp is going to have the POWER input. This is all random as we are all using different amps.
The power wire can run under the seat as it will not cause any problems at all.
Since my amps power area is going to be on the driver�s side, the picture below shows my running the cord along that pattern.
Leave the wire running into the trunk and use some electrical tape on the end for safety.
I don�t have the amp yet (2 more days) so I am just going to leave it sitting in the trunk until then.
In the next segment I will show how I replaced the rear speakers, replaced the wiring for the rear speakers so that they can be ran by the new amp in the trunk.
But the best part is how I learned to utilize the OEM rear speaker and sub wiring for the front speakers and center channel, WITHOUT running any new wires to the new amp in the trunk.
DANG I wish I could take credit for that�but that idea goes to chusteveb.
Please see the following link for exactly the process: (I am not going to repeat the whole concept here as it would just be as easy for everyone to hear it from chusteveb himself)
https://acurazine.com/forums/showpos...0&postcount=31
I need some sleep and will post the rest tomorrow. Hope you all enjoy it. I have to admit it is fun writing this.
 08-07-2005, 09:16 AM
#2
Pro
Thread Starter
Join Date: May 2004
Location: Southern Cali.
Age: 51
Posts: 534
Likes: 0
Received 8 Likes
on
2 Posts
Part 2:
Ok after some much needed rest I am ready to start finishing the DIY part 1.
There is going to be a few more parts to this little episode as I still have not received the Diamond Audio Amp and the AudioControl Matrix yet.
Once you have the power cable ran, you need to secure the ground wire. I found the best place to mount the ground cable is with a bolt that is right to the left of the pass-through for the trunk. It is actually located in the trunk and you will have to remove the part of the trunk lining that covers the spare tire.
Here is a pic of the area:
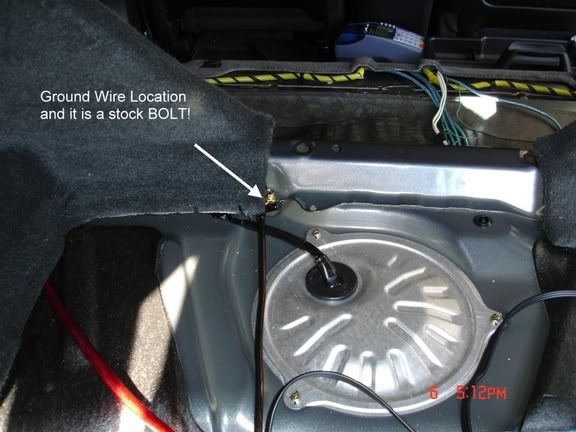
Just use a size 10 socket to loosen it and place your ground wire terminal and underneath it and you will be great!
Next I just used some electrical tape to cover the other end of the wire and left it sitting in the trunk until I am ready to hook up the amp.
Now to replace the rear speakers.
From sitting inside the rear seat area you are faced with the old 6.5 factory speakers. All you need to do is unscrew the 3 screws and disconnect the clip to remove the speakers.
Don�t worry if the clip/wire adapter falls back into the rear deck when disconnected. They don�t really give you a lot of slack on the wire. The speaker mount area is enclosed so you can grab the wire again very easily.
I am not enclosing pics of my unscrewing the speakers�..if you don�t know how to do that, stop right now and go to an install ship to finish what you started!
Here is a picture of the new Diamond Audio M361i�s installed and a few pictures of the factory 6.5�s that I removed.
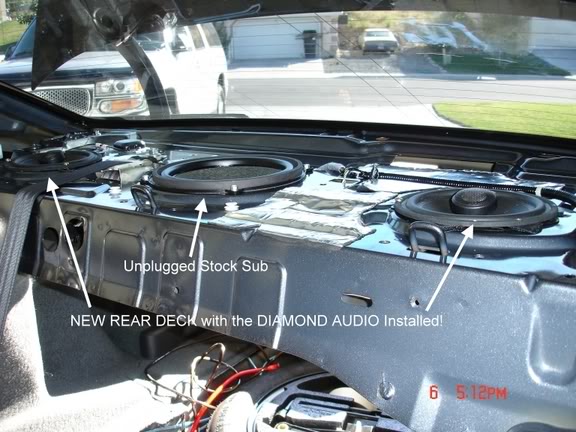
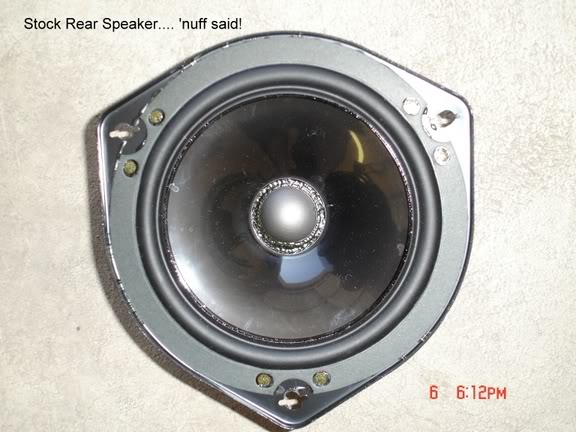
Now mounting the new speakers were not a perfect DROP IN situation. Of course there is some sort of custom mount that is on the factory speakers that is integrated into the speaker so it cannot just be removed and used for new speakers!! (Thanks Acura!!)
Most of the time I would just drill new holes�easy right? NOT�. There is not a way under heaven I was going to be able to get my drill in there with the downward curve of the rear window. SO it was time to be inventive.
I was only able to get 2 out of three screws back into the factory mount areas. That is not enough to make me feel secure. Also the next issue was the fact that the bare metal of the Diamond Audio speakers was touching the bare metal of the rear deck. Can anyone say RATTLE!!!
So after some thought and experimentation, here is what I decided to do.
I placed electrical tape around the edge of the whole hole for the speakers on the rear deck. This provided a bit of protection for the metal to metal situation I was worried about, but it was not the perfect solution. I searched my house and my wife�s scrapbooking stuff (shhhh don�t tell) for some felt dots with the sticky side but could not find any.
So I thought some more and found some of those Velcro squares. Hmmm this might work.
I put the speakers back into the rear deck and screwed in the two screws only about half way. Just enough to grab and then I took 4 pair of the Velcro squares and slipped them in the side of the speaker between the speaker and the rear deck equally.
Now I know some of you are opposed to Velcro, and so I am. Ugly, Strong enough to hold, etc. Well let me tell you something, if it can withstand the vibration of the Space Shuttle entering and reentering the earth�s atmosphere, it can handle the rattling of the speakers!!
It not only helped secure the speaker, it stopped ANY and ALL rattling because of the cushion it created. Plus for the ugly factor�umm nobody is going to see it.
I did that for both rear speakers and it worked great. If you have some better ideas, please post them!
Now for the pics�.oh wait, I was so dang busy and frustrated trying to figure this out that I forgot to take pics!!! I hope I explained this well enough. If not, just post your questions.
Now the pic below is a picture of what my speaker wire ends looked like after I removed the factory clip ends (with a wire cutter) and replaced them with some simple Radio Shack quick disconnect ends.
Ok this part is not tricky, just takes some thought. You have to look at connectors on your speakers and decide how best to connect the speaker wire to your speaker. Some people like soldering, I personally do not as you never know when you are going to need to remove them. I used the quick disconnects because:
A: They fit perfectly over the connector that Diamond Audio puts on their speakers. (I purchased the 22-18 gauge quick disconnects)
B: Easily removable if needed.
Like I said above, you can do what you think is best for your situation.
BUT BEFORE YOU DO THAT!!!
IF you have your aftermarket amp ready to go sitting in a box, I suggest you do the following:
Run new speaker wire from the Right rear and Left rear speakers deck area into the trunk. This is the ACTUAL wire that is going to connect to your amp for the appropriate L and R rear speakers into the amp.
All you need to do is take the new speaker wire you purchased (you have some right?) and run a length from underneath the rear deck area into the trunk. Very easy. Make sure that you give yourself enough length to go behind the trunk lining and into the side of your amp.
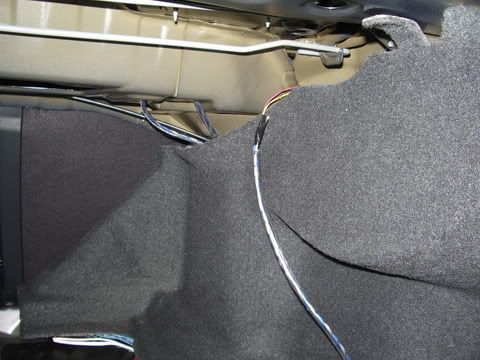
Below is a pic of my wiring for the rear deck:
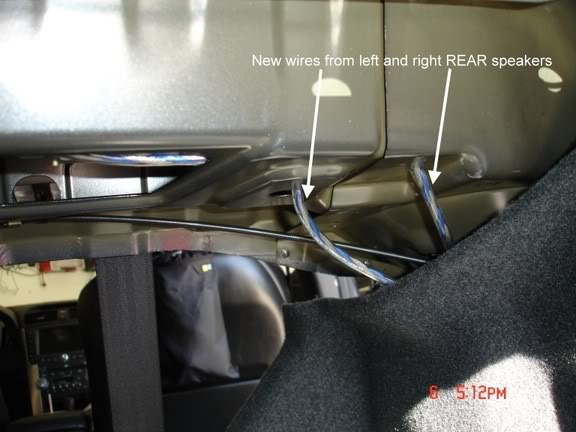
I have mine running to the right side of the trunk and then through the lining on the right side of the trunk, and out the bottom into the trunk.
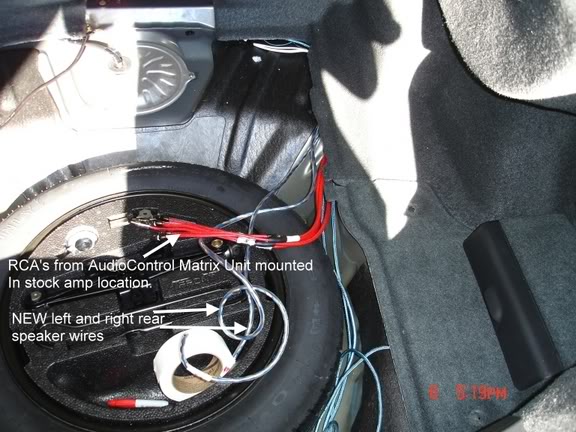
(I will get to the RCA�s in a few min�.)
OK now to use the GREAT idea of fellow member chusteveb
We are going to use the OEM L&R rear wires for the L&R front speaker connections into the amp in the trunk.
(Side note: Even though I didn�t have my amp yet, should be here Wednesday, I was not in the mood to have to take everything else apart again, so I ran everything as if I had the amp ready to go. I can live without rear sound for 3 days.)
Ok here we go:
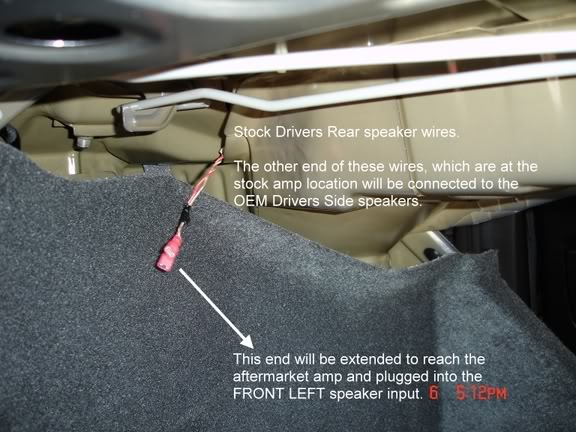
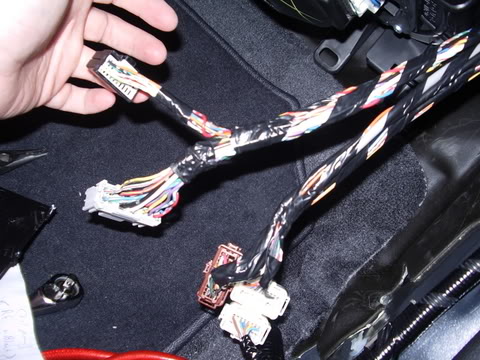
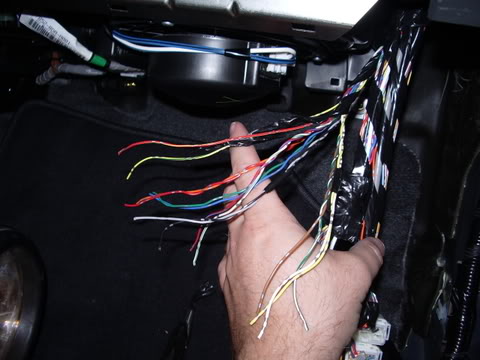
First take the Drivers side rear OEM wires that and get them into the trunk area. There is not a lot of slack at all. You will have to cut the factory adapter off and then strip the tons of tape and tubing they have on it off. I removed about 5 inches of it. The pic below is the same as a previous one, but illustrates the way I did it. (Please disregard the ends on this wire)
To get these into the trunk well I put them through a little hole that was between where the rear deck is welded onto the side of the car. There is also a little white clip holding the wires to the rear deck, just use some wire cutters and remove that, it gives you a few more inches of length! This pic is not perfect, but you can get perspective by using the right shoulder belt for reference.
 .
.
Ok for now, I left those wires hanging there.
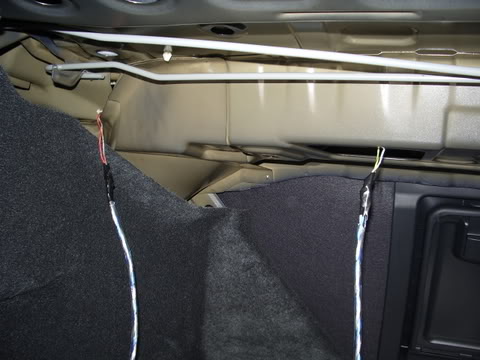
Now for the passenger side. Same concept. Run the OEM speaker wire into the trunk well to be used as the Front Right speaker wire into the aftermarket amp.
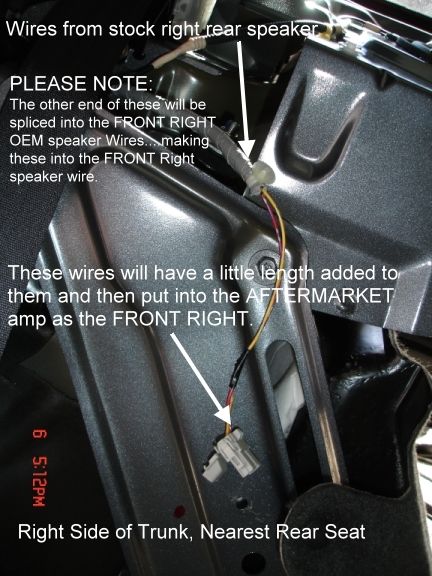
I found a similar spot to run the factory rear passenger speaker wires into the trunk area.
Follow the same steps as you did for the left side.
Strip some of the tape and tubing. And find a good spot to thread it into the trunk area.
Once this is completed, we are done right? WRONG. We still have to disconnect or remove the sub.
I chose to just disconnect the sub and not remove it, why? I don�t know why, I just did. You are not going to want to run the stock sub with an aftermarket amp so there is no further use for it.
I went into the trunk and got my hand into the whole below the stock sub and disconnect the clip attached to it.
Once you have done that cut the connector off and leave the two wires hanging in the trunk well.
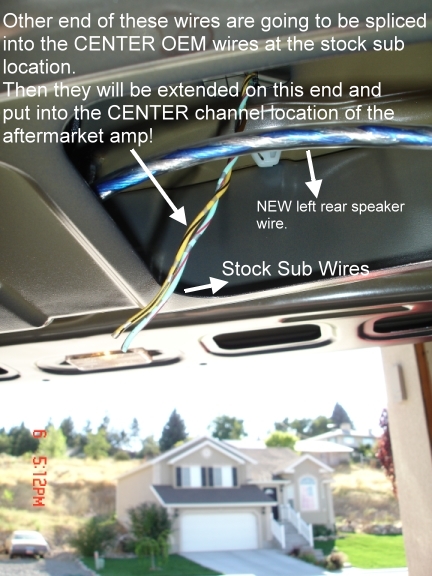
Once again we are going to utilize these wires as the center speaker hook up into our aftermarket amp.
The aftermarket sub you are going to use will be connected into the amp after the aftermarket amp is installed.
Once again we are going to utilize the OEM sub wiring at the stock sub and connect it to the OEM center channel wire. This will create access to the center channel in the trunk area without running any new wire!
Don�t worry about keeping track of wire colors just yet, I found another thread that has all that mapped out, so no worries!!!
Ok, Up to now the following has been completed:
Aftermarket Power and Ground cable installed and ready to be put into aftermarket amp.
Rear Speakers replaced
OEM rear wires threaded into trunk well area for utilization as front speaker wire in AF amp.
OEM Stock sub disconnected and sub wiring ran into trunk well to be utilized for center speaker in AF amp.
Well time for Church, I will finish this up later today. Once again thanks for everyone who has helped and I how someone else finds this useful!
Ok after some much needed rest I am ready to start finishing the DIY part 1.
There is going to be a few more parts to this little episode as I still have not received the Diamond Audio Amp and the AudioControl Matrix yet.
Once you have the power cable ran, you need to secure the ground wire. I found the best place to mount the ground cable is with a bolt that is right to the left of the pass-through for the trunk. It is actually located in the trunk and you will have to remove the part of the trunk lining that covers the spare tire.
Here is a pic of the area:
Just use a size 10 socket to loosen it and place your ground wire terminal and underneath it and you will be great!
Next I just used some electrical tape to cover the other end of the wire and left it sitting in the trunk until I am ready to hook up the amp.
Now to replace the rear speakers.
From sitting inside the rear seat area you are faced with the old 6.5 factory speakers. All you need to do is unscrew the 3 screws and disconnect the clip to remove the speakers.
Don�t worry if the clip/wire adapter falls back into the rear deck when disconnected. They don�t really give you a lot of slack on the wire. The speaker mount area is enclosed so you can grab the wire again very easily.
I am not enclosing pics of my unscrewing the speakers�..if you don�t know how to do that, stop right now and go to an install ship to finish what you started!
Here is a picture of the new Diamond Audio M361i�s installed and a few pictures of the factory 6.5�s that I removed.
Now mounting the new speakers were not a perfect DROP IN situation. Of course there is some sort of custom mount that is on the factory speakers that is integrated into the speaker so it cannot just be removed and used for new speakers!! (Thanks Acura!!)
Most of the time I would just drill new holes�easy right? NOT�. There is not a way under heaven I was going to be able to get my drill in there with the downward curve of the rear window. SO it was time to be inventive.
I was only able to get 2 out of three screws back into the factory mount areas. That is not enough to make me feel secure. Also the next issue was the fact that the bare metal of the Diamond Audio speakers was touching the bare metal of the rear deck. Can anyone say RATTLE!!!
So after some thought and experimentation, here is what I decided to do.
I placed electrical tape around the edge of the whole hole for the speakers on the rear deck. This provided a bit of protection for the metal to metal situation I was worried about, but it was not the perfect solution. I searched my house and my wife�s scrapbooking stuff (shhhh don�t tell) for some felt dots with the sticky side but could not find any.
So I thought some more and found some of those Velcro squares. Hmmm this might work.
I put the speakers back into the rear deck and screwed in the two screws only about half way. Just enough to grab and then I took 4 pair of the Velcro squares and slipped them in the side of the speaker between the speaker and the rear deck equally.
Now I know some of you are opposed to Velcro, and so I am. Ugly, Strong enough to hold, etc. Well let me tell you something, if it can withstand the vibration of the Space Shuttle entering and reentering the earth�s atmosphere, it can handle the rattling of the speakers!!
It not only helped secure the speaker, it stopped ANY and ALL rattling because of the cushion it created. Plus for the ugly factor�umm nobody is going to see it.
I did that for both rear speakers and it worked great. If you have some better ideas, please post them!
Now for the pics�.oh wait, I was so dang busy and frustrated trying to figure this out that I forgot to take pics!!! I hope I explained this well enough. If not, just post your questions.
Now the pic below is a picture of what my speaker wire ends looked like after I removed the factory clip ends (with a wire cutter) and replaced them with some simple Radio Shack quick disconnect ends.
Ok this part is not tricky, just takes some thought. You have to look at connectors on your speakers and decide how best to connect the speaker wire to your speaker. Some people like soldering, I personally do not as you never know when you are going to need to remove them. I used the quick disconnects because:
A: They fit perfectly over the connector that Diamond Audio puts on their speakers. (I purchased the 22-18 gauge quick disconnects)
B: Easily removable if needed.
Like I said above, you can do what you think is best for your situation.
BUT BEFORE YOU DO THAT!!!
IF you have your aftermarket amp ready to go sitting in a box, I suggest you do the following:
Run new speaker wire from the Right rear and Left rear speakers deck area into the trunk. This is the ACTUAL wire that is going to connect to your amp for the appropriate L and R rear speakers into the amp.
All you need to do is take the new speaker wire you purchased (you have some right?) and run a length from underneath the rear deck area into the trunk. Very easy. Make sure that you give yourself enough length to go behind the trunk lining and into the side of your amp.
Below is a pic of my wiring for the rear deck:
I have mine running to the right side of the trunk and then through the lining on the right side of the trunk, and out the bottom into the trunk.
(I will get to the RCA�s in a few min�.)
OK now to use the GREAT idea of fellow member chusteveb
We are going to use the OEM L&R rear wires for the L&R front speaker connections into the amp in the trunk.
(Side note: Even though I didn�t have my amp yet, should be here Wednesday, I was not in the mood to have to take everything else apart again, so I ran everything as if I had the amp ready to go. I can live without rear sound for 3 days.)
Ok here we go:
First take the Drivers side rear OEM wires that and get them into the trunk area. There is not a lot of slack at all. You will have to cut the factory adapter off and then strip the tons of tape and tubing they have on it off. I removed about 5 inches of it. The pic below is the same as a previous one, but illustrates the way I did it. (Please disregard the ends on this wire)
To get these into the trunk well I put them through a little hole that was between where the rear deck is welded onto the side of the car. There is also a little white clip holding the wires to the rear deck, just use some wire cutters and remove that, it gives you a few more inches of length! This pic is not perfect, but you can get perspective by using the right shoulder belt for reference.
.Ok for now, I left those wires hanging there.
Now for the passenger side. Same concept. Run the OEM speaker wire into the trunk well to be used as the Front Right speaker wire into the aftermarket amp.
I found a similar spot to run the factory rear passenger speaker wires into the trunk area.
Follow the same steps as you did for the left side.
Strip some of the tape and tubing. And find a good spot to thread it into the trunk area.
Once this is completed, we are done right? WRONG. We still have to disconnect or remove the sub.
I chose to just disconnect the sub and not remove it, why? I don�t know why, I just did. You are not going to want to run the stock sub with an aftermarket amp so there is no further use for it.
I went into the trunk and got my hand into the whole below the stock sub and disconnect the clip attached to it.
Once you have done that cut the connector off and leave the two wires hanging in the trunk well.
Once again we are going to utilize these wires as the center speaker hook up into our aftermarket amp.
The aftermarket sub you are going to use will be connected into the amp after the aftermarket amp is installed.
Once again we are going to utilize the OEM sub wiring at the stock sub and connect it to the OEM center channel wire. This will create access to the center channel in the trunk area without running any new wire!
Don�t worry about keeping track of wire colors just yet, I found another thread that has all that mapped out, so no worries!!!
Ok, Up to now the following has been completed:
Aftermarket Power and Ground cable installed and ready to be put into aftermarket amp.
Rear Speakers replaced
OEM rear wires threaded into trunk well area for utilization as front speaker wire in AF amp.
OEM Stock sub disconnected and sub wiring ran into trunk well to be utilized for center speaker in AF amp.
Well time for Church, I will finish this up later today. Once again thanks for everyone who has helped and I how someone else finds this useful!
08-07-2005, 11:33 AM
#4

Hey hey hey I love the set up! Don't forget when you run the rca's from your Matrix in the passenger kick to the D6 in the trunk to run a remote turn on lead with it for the D6. Anyways... loving the set up!!! Great pick on components.
What were you going to do for a speaker for the center channel?
What were you going to do for a speaker for the center channel?
08-07-2005, 12:22 PM
#6
Pro
Thread Starter
Join Date: May 2004
Location: Southern Cali.
Age: 51
Posts: 534
Likes: 0
Received 8 Likes
on
2 Posts
Originally Posted by chusteveb
Now I'll have to take pics of mine up and we'll post them up together!
Can you possibly measure the size of the board that the D6 sits on.
Once I get that done I think I am going to call Chris and have him build me a cover plate with the plexiglass that you have.
I guess I should probably get back to paying attention on church. lol
08-07-2005, 12:31 PM
#7
Pro
Thread Starter
Join Date: May 2004
Location: Southern Cali.
Age: 51
Posts: 534
Likes: 0
Received 8 Likes
on
2 Posts
Originally Posted by chusteveb
Hey hey hey I love the set up! Don't forget when you run the rca's from your Matrix in the passenger kick to the D6 in the trunk to run a remote turn on lead with it for the D6. Anyways... loving the set up!!! Great pick on components.
What were you going to do for a speaker for the center channel?
What were you going to do for a speaker for the center channel?
It just needs a switched power source right?
As for the center channel I have not decided yet. Any suggestions?
I am most concerned about WHERE to put these dang crossovers for the S600s. They are not small.
Once again I am open to suggestions!
Thanks
Trending Topics
08-07-2005, 02:38 PM
#8
Pro
Thread Starter
Join Date: May 2004
Location: Southern Cali.
Age: 51
Posts: 534
Likes: 0
Received 8 Likes
on
2 Posts
Part 3
Ok Here we go, the next installment.
You may have noticed RCA cables being ran throughout the car. Well we all know that our head unit does not have any RCA preouts. From the research I have found the HU puts out 1v. Not enough to really pump into an aftermarket AMP and run throughout the RCA cables throughout the whole car.
At 1v the signal is going to be so weak that it should not be any type of really quality signal for an aftermarket amp anyway.
PLEASE Note: I am in no way someone who does this for living, an expert, etc. So if I am incorrect on things PLEASE reply in the post so we can all know the correct answers.
So most people need to use some sort of line driver to amplify the signal. Well the issues are that there are 6 channels which is unusual for most cars. So unless you want several line drivers hanging out everywhere, our choices are limited. Also they are not putting out the cleanest signal so that makes it more difficult of a decision.
There is the option of the JL Audio Cleansweep. A JL Audio employee comes to this site often to talk about this product and several people seen to have gotten it and are satisfied.
The one downside is that it is only a 4 channel piece of equipment. So that solves about 2/3 of the problem.
You can see more information on this at http://www.jlaudio.com and also do a search in the forums for tons of information.
The other option is the AudioControl Matrix. It is a 6 channel line driver. This is best when trying to BOOST the output signal before heading to the aftermarket amplifier.
The other product they offer is the LC6. After speaking to their tech support several times I have been told that the LC6 is best when trying to TONE DOWN a signal, not boosting it.
For my purposes the Matrix is the one to choose from AudioControl. As always it is up to you as to what you want to do.
The website is http://www.audiocontrol.com Under the mobile electronics section.
How does this relate to our install is this?
When removing the stock amplifier we are going to have a PERFECT place for the Matrix to fit. Once you install the Matrix you are not going to have to mess with it again. So having it hidden is no big deal. You also want to have the Matrix as close to the main signal (head unit) as possible for the best signal.
Anyway, the inputs and the outputs are RCA�s. Well as most can imagine there are no RCA�s on our stock system at all.
So in another part of this little adventure we are going to remove the stock amplifier and solder on RCA�s to the head unit ends of the speaker wires.
But I digress. The reason for us running RCA�s from the front of the car to the rear is so that the signal coming out of the Matrix is transferred to the Aftermarket amplifier in the rear of the car.
I don�t know of any modern amplifiers that do not accept RCA�s. So that is the reason for the RCA�s
Took me a while to get there, but I did!!
Now some advice. Do not get RCA�s that are longer then about 15�. Mine are 17� and are way too long. I have a lot of excess. It is not a huge deal, just very annoying. You cannot stuff it behind the trunk lining as the lining will not fit.
I am just going to place it in the spare tire well wrapped up.
You want to install the RCA�s down the passenger side of the car. You will want to run them the same exact way you did the power for the amplifier. Under the trims and under the back seats into the trunk.
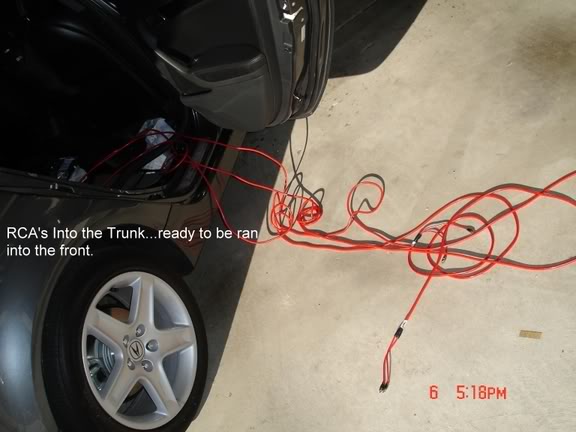
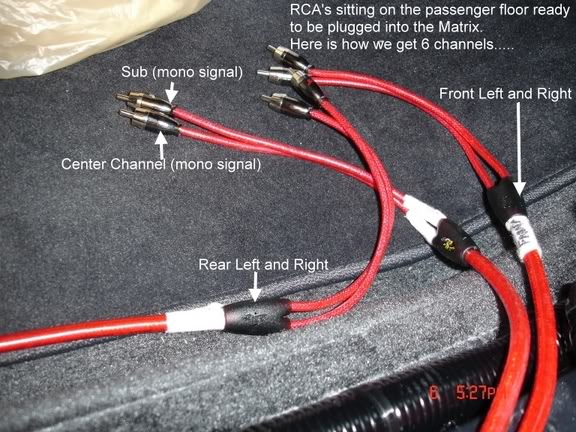
Here is a pic of the RCA�s sitting out of the car ready to be installed.
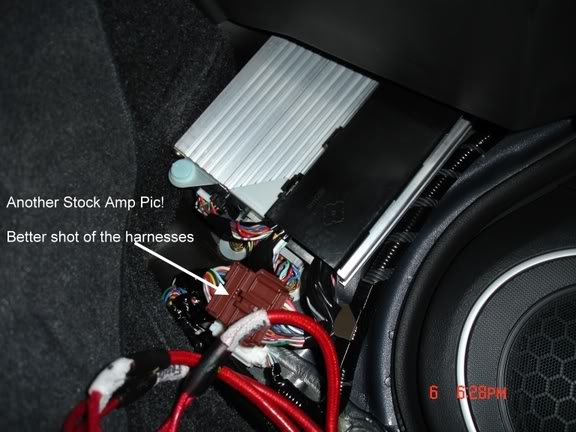
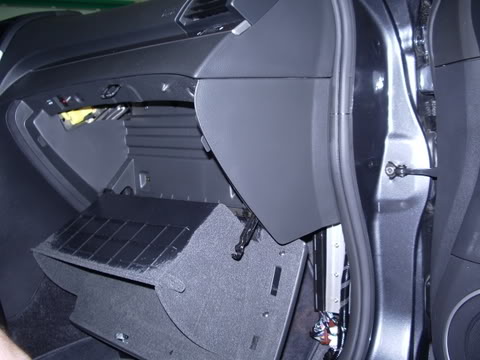
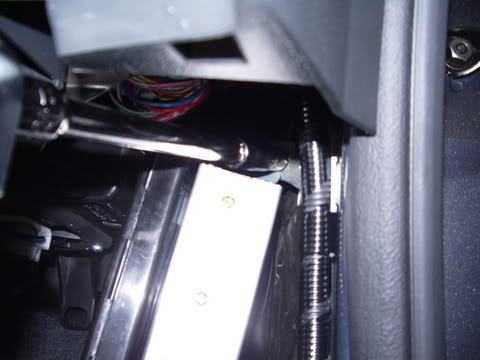
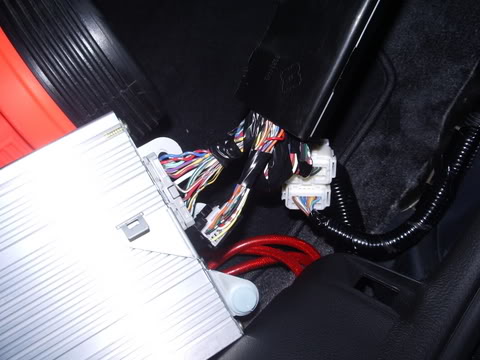
Here is a pic of the stock amp in the passenger kick panel with the RCA�s sitting there.
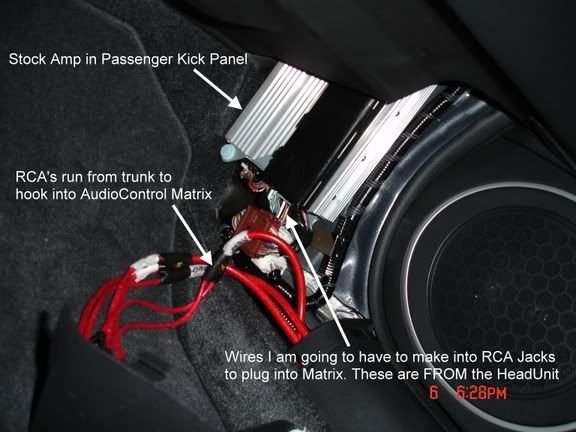
In this pic you will see a better pic of the adapter that once removing the stock amp will have to be spliced into RCA�s.
Not a lot of room in there!!
Here is how we get 6 channels again!
Well that is all I have for now.
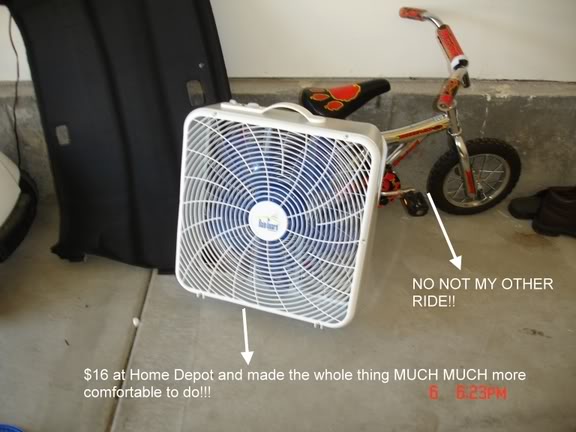
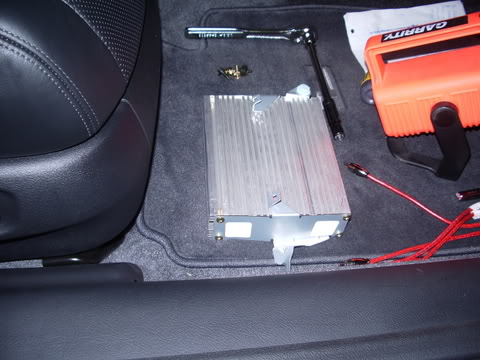
Here are some allies and casualties of this journey so far!!

Hope you all enjoyed this!!
Still left to do and document:
Installing front component speakers
Installing Matrix
Converting the speaker level lines to RCA�s
Installing Amplifier and Sub.
I should be able to get the rest of this finished by Wednesday or Thursday. The amp and Matrix should be here Wednesday.
Thanks everyone.
Ok Here we go, the next installment.
You may have noticed RCA cables being ran throughout the car. Well we all know that our head unit does not have any RCA preouts. From the research I have found the HU puts out 1v. Not enough to really pump into an aftermarket AMP and run throughout the RCA cables throughout the whole car.
At 1v the signal is going to be so weak that it should not be any type of really quality signal for an aftermarket amp anyway.
PLEASE Note: I am in no way someone who does this for living, an expert, etc. So if I am incorrect on things PLEASE reply in the post so we can all know the correct answers.
So most people need to use some sort of line driver to amplify the signal. Well the issues are that there are 6 channels which is unusual for most cars. So unless you want several line drivers hanging out everywhere, our choices are limited. Also they are not putting out the cleanest signal so that makes it more difficult of a decision.
There is the option of the JL Audio Cleansweep. A JL Audio employee comes to this site often to talk about this product and several people seen to have gotten it and are satisfied.
The one downside is that it is only a 4 channel piece of equipment. So that solves about 2/3 of the problem.
You can see more information on this at http://www.jlaudio.com and also do a search in the forums for tons of information.
The other option is the AudioControl Matrix. It is a 6 channel line driver. This is best when trying to BOOST the output signal before heading to the aftermarket amplifier.
The other product they offer is the LC6. After speaking to their tech support several times I have been told that the LC6 is best when trying to TONE DOWN a signal, not boosting it.
For my purposes the Matrix is the one to choose from AudioControl. As always it is up to you as to what you want to do.
The website is http://www.audiocontrol.com Under the mobile electronics section.
How does this relate to our install is this?
When removing the stock amplifier we are going to have a PERFECT place for the Matrix to fit. Once you install the Matrix you are not going to have to mess with it again. So having it hidden is no big deal. You also want to have the Matrix as close to the main signal (head unit) as possible for the best signal.
Anyway, the inputs and the outputs are RCA�s. Well as most can imagine there are no RCA�s on our stock system at all.
So in another part of this little adventure we are going to remove the stock amplifier and solder on RCA�s to the head unit ends of the speaker wires.
But I digress. The reason for us running RCA�s from the front of the car to the rear is so that the signal coming out of the Matrix is transferred to the Aftermarket amplifier in the rear of the car.
I don�t know of any modern amplifiers that do not accept RCA�s. So that is the reason for the RCA�s
Took me a while to get there, but I did!!
Now some advice. Do not get RCA�s that are longer then about 15�. Mine are 17� and are way too long. I have a lot of excess. It is not a huge deal, just very annoying. You cannot stuff it behind the trunk lining as the lining will not fit.
I am just going to place it in the spare tire well wrapped up.
You want to install the RCA�s down the passenger side of the car. You will want to run them the same exact way you did the power for the amplifier. Under the trims and under the back seats into the trunk.
Here is a pic of the RCA�s sitting out of the car ready to be installed.
Here is a pic of the stock amp in the passenger kick panel with the RCA�s sitting there.
In this pic you will see a better pic of the adapter that once removing the stock amp will have to be spliced into RCA�s.
Not a lot of room in there!!
Here is how we get 6 channels again!
Well that is all I have for now.
Here are some allies and casualties of this journey so far!!
Hope you all enjoyed this!!
Still left to do and document:
Installing front component speakers
Installing Matrix
Converting the speaker level lines to RCA�s
Installing Amplifier and Sub.
I should be able to get the rest of this finished by Wednesday or Thursday. The amp and Matrix should be here Wednesday.
Thanks everyone.
08-07-2005, 03:20 PM
#10
Pro
Thread Starter
Join Date: May 2004
Location: Southern Cali.
Age: 51
Posts: 534
Likes: 0
Received 8 Likes
on
2 Posts
Originally Posted by VelfarreClubber
This is fun and enjoyable to read, can't wait for a review of the finished system
 08-08-2005, 12:46 AM
#11
Hey I've got no regrets but I do understand the nervousness you have while undergoing the project.
As to the remote on for your amp you are right as to an ignition switched source. Your amp will be on anytime the car is on even if you are not running the sound system since the navi and bluetooth both come out of our stereo speakers.
I'll take pics of my center channel so you can see the madness!!!! It's awesome!
08-13-2005, 02:18 AM
#13
9.5+10.5 22m=Hella Flush
Nice work and nice post to share with us all. My only question is running so many RCA's cables and at the same time over 17ft long might cause a problem where it might pick up some distortion along the way. I hope I am wrong tho but look forward in seeing more pics and post up to completion of your system.
08-13-2005, 03:36 AM
#14
Advanced

AWESOME INSTALL!! what's the specs and measurements on the sub? do you think i can put an aftermarket sub in......with ease (yah right!) also will the stock amp be enough to power the aftermarket sub?
 08-13-2005, 11:46 AM
#16
Pro
Thread Starter
Join Date: May 2004
Location: Southern Cali.
Age: 51
Posts: 534
Likes: 0
Received 8 Likes
on
2 Posts
Originally Posted by ed99
Nice work and nice post to share with us all. My only question is running so many RCA's cables and at the same time over 17ft long might cause a problem where it might pick up some distortion along the way. I hope I am wrong tho but look forward in seeing more pics and post up to completion of your system.
Yeah my thoughts also, that is why I chose the high quality stinger helix cables.
All distortion, engine noise, etc came from BEFORE the cables. Where I spliced in the RCA ends to the factory wiring.
I will be posting the rest of the install later today and tomorrow.
More pics...although I have to admit I was more frustrated with taking pictures at certain times then the actual install
 08-13-2005, 11:53 AM
#17
Pro
Thread Starter
Join Date: May 2004
Location: Southern Cali.
Age: 51
Posts: 534
Likes: 0
Received 8 Likes
on
2 Posts
Originally Posted by HAWAIIS FINEST
AWESOME INSTALL!! what's the specs and measurements on the sub? do you think i can put an aftermarket sub in......with ease (yah right!) also will the stock amp be enough to power the aftermarket sub?
It works nicely.
I am thinking of upgrading though.
FYI: You cannot replace the OEM sub with another sub. There really is not much out there for a free air 8" sub.
People have played with the idea forever, but I don't think many have got it to work correctly and sound good.
Better off having someone build you a custom box or just getting a premade box.
I am either getting the Diamond Audio D65.2 7 channel amp or the Phoenix Gold Ti900.7 another 7 channel amp.
One amp to run the whole thing.
08-13-2005, 11:57 AM
#18
Pro
Thread Starter
Join Date: May 2004
Location: Southern Cali.
Age: 51
Posts: 534
Likes: 0
Received 8 Likes
on
2 Posts
Originally Posted by Sarushibai
whoz awesome thread, you really know your stuff. I have always wanted to tinker with my car, but I fear I may screw things up lol
That is how I learn.
Everything I learned about this shiz, I learned form this site and a few others on the net.
To be honest it really is not that hard. If you have some questions PLEASE POST THEM.
That is how we all learn.
My downfall is this. I don't sometimes have the patience to pull the panels, remove the clips as nicely as I am supposed to.
So I end up breaking clips and such. Not a big deal as they are pennies at the dealership, just very annoying.
08-13-2005, 04:53 PM
#19
Pro
Thread Starter
Join Date: May 2004
Location: Southern Cali.
Age: 51
Posts: 534
Likes: 0
Received 8 Likes
on
2 Posts
Ok, now for the next installment of:
HOW TO SCREW UP PUTTING AN AMP, SPEAKER, and an AudioControl Matrix in your car!!!
LOL Just kidding.
Today we are going to document how to remove the stock amp, find all the OEM speaker wires from the head unit, make RCA�s onto the ends. Then we are going to show how to utilize the OEM run speaker wire to get to all the front speakers without running any new wires.
As a BONUS for BUYING in the next 12 min and 35 seconds we will throw in how to make custom tweeter mounts in the stock locations!!!
In the last installment we took pics of the stock amp and saw the RCA�s run to the front of the car.
Now let�s remove the stock amp. Now please be careful doing this and note that once you do this you are NOT going to have ANY music or sound from your speakers until you replace it with an after market amp.
Consider this the POINT OF NO RETURN!!!!!
Follow the link to a post by our great RON A, showing how to remove the glove box. This is needed because it adds a lot of room to work down there on the floor.
https://acurazine.com/forums/showpos...9&postcount=14
Here are some pics of me removing mine:

Ok, once that is removed, place it aside. Now you should have a lot more room to work with.
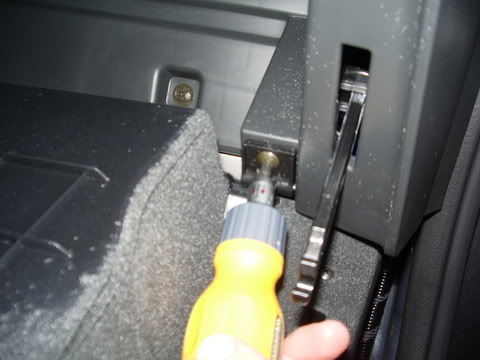
When look at the stock amp you will find two bolts holding it on. One at the top and one on the bottom.
The one on bottom is in the middle. I believe that it is a 10mm socket size, but I am not positive.
Remove that bolt. Now the top bolt is a BIATCH!!!! Here is a pic of it:
Now I was NOT able to remove the bolt as the end you have to hook onto is facing the firewall of the car. So what I did was very scientific. I just moved it backwards and forwards until it was loose enough to fall off
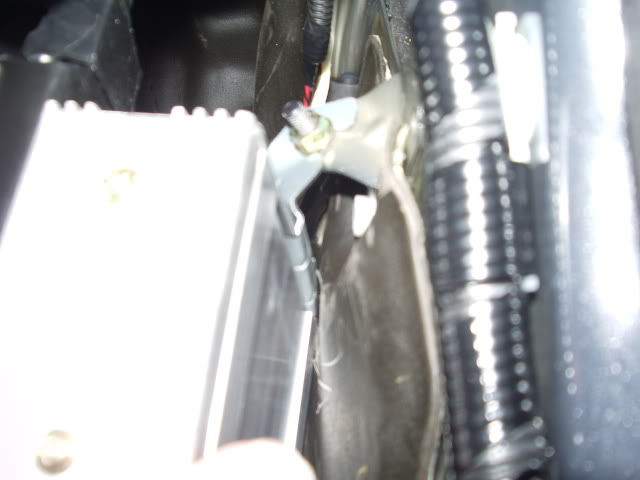
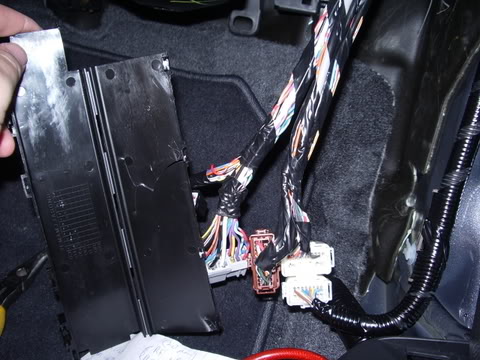
Now that the stock amp is off the bolts�.here is a pic of what you should see:
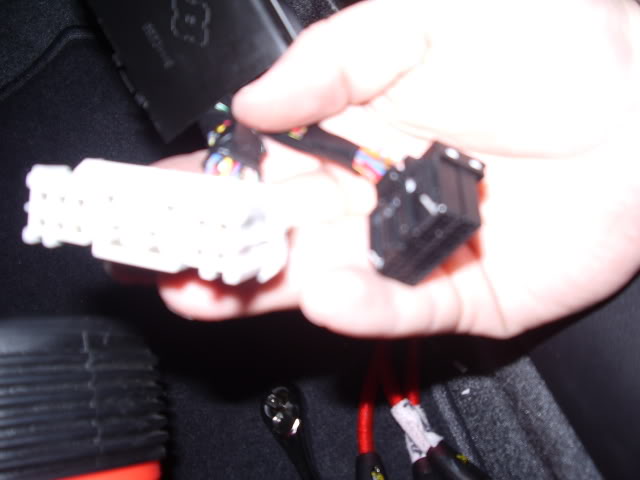
On the end with all the connections you should see too connectors:
Let�s define what you are seeing:
The 20 pin Grey connector is from the Head unit TO the Amp. These are the wires that you are going make into RCA ends.
The 14 pin Black connector is TO the factory speaker wires. These are the connections that you are going to use when tying in the rear left and right speakers INTO the front speakers, and the sub wires into the center channel.
Once you remove the amp from the car, you will notice this black plastic piece over the wire, you can remove it safely by just carefully cutting it off. It is just protecting the wires.
You will be left with:
Once you cut the ends off, this is what you have.
Now I suggest that you remove most of the electrical tape, about 5-6 inches, from those wires. Why you ask�. Because if you notice, you will see that the wires for each speaker (positive and negative) are WRAPPED together.
Now how NICE of ACURA to do this for us!!!!
Anyway it seems to make things be a little easier to find the corresponding wire for each speaker.
Now to see the specs of WHAT wire color is goes to what, please see this post:
https://acurazine.com/forums/showthr...7&page=2&pp=25
That who first half of that page is VERY invaluable.
Once you LABEL each wire, which I suggest, you can cut off the ends.
Alrighty�got everything labeled correctly?? If not STOP and do it�if you screw this part up, you will just get very ticked later in the process
Now I went to radio shack and bought RCA ends that I can solder wire onto. There are two ways to do this.
The easiest way to so purchase some SHORT RCA cables and cut all four ends off. Then strip the wire. What you will find is this.
Some bare wire and another wire inside. The outside BARE wire is the Negative the inside covered wire is the positive wire. When stripping the inside wire, be careful, as it is VERY thin and you can rip those strands inside very easily.
Now take a speaker wire from the head unit and solder on the appropriate wires together. Negative to Negative / Positive to Positive. Now to answer some of your questions�.
Can you use Butt Connectors instead of soldering�.yes. Is it as good as soldering�no.
It is your choice.
Ok here is how I did it: (remember these are the wires from the 14 pin BLACK connector)
I connected the OEM LEFT REAR speaker wires to the OEM LEFT FRONT speaker wires
Then I did the OEM RIGHT REAR speaker wires to the OEM RIGHT FRONT speaker wires.
Next were the OEM SUB speaker wires to the OEM CENTER speaker wires.
Remember to match the positive and negatives together otherwise things will sound horrible!
Now once that is done, connect the RCA�s (the ones you ran to the trunk) from the first part of the DIY to the appropriate headunit wires:
Now, in the first parts of the DIY, I mentioned placing the Matrix in the kick panel where the stock amp was. Well after plugging in all the RCA�s I realized it won�t fit. So I am just placing it in the trunk.
So just use some couplers to connect the two male ends of the RCA�s together. The other ends of the RCA�s go to the trunk into the Matrix mounted there.
Now believe it not. We are mostly DONE!!!
Now back to the trunk for a few min. Don�t forget to extend the wires in the trunk for the rears and sub.
Now I suggest you follow the instructions from AudioControl for how to setup and hook up the Matrix.
Then follow your amp instructions for connecting the Matrix to the Amp.
Now some side notes.
I had some terrible engine noise and weird noises from the speakers after everything got installed. I tried some noise filters on both ends of the Matrix, and on the Amp�didn�t do any good. Then I thought of something. I then put the noise filters in between where the head unit RCA�s that we created and the Stinger RCA ends meet.
BINGO that solved the problem.
I used the PIE versions. They were $20 from my local shop. You will obviously need 3 of them.
People say grounding is the issue, etc. Well I re-grounded everything�nothing helped but these, so whatever�sounds SOOOOOOOOOO much better now.
I have not gotten my 7 channel amp amp so I don�t have all the channels up and running, but with a 4 channel amp, it sounds just as good as before. With the new 7 channel amp, it will be GREAT!!!
Now since you purchased within the first 12 min 35 seconds you get the tweeter tutorial for free. Please look for the tweeter post coming tonight.
Thanks for watching!!!
As always any comments. PLEASE speak up!!
HOW TO SCREW UP PUTTING AN AMP, SPEAKER, and an AudioControl Matrix in your car!!!
LOL Just kidding.
Today we are going to document how to remove the stock amp, find all the OEM speaker wires from the head unit, make RCA�s onto the ends. Then we are going to show how to utilize the OEM run speaker wire to get to all the front speakers without running any new wires.
As a BONUS for BUYING in the next 12 min and 35 seconds we will throw in how to make custom tweeter mounts in the stock locations!!!
In the last installment we took pics of the stock amp and saw the RCA�s run to the front of the car.
Now let�s remove the stock amp. Now please be careful doing this and note that once you do this you are NOT going to have ANY music or sound from your speakers until you replace it with an after market amp.
Consider this the POINT OF NO RETURN!!!!!
Follow the link to a post by our great RON A, showing how to remove the glove box. This is needed because it adds a lot of room to work down there on the floor.
https://acurazine.com/forums/showpos...9&postcount=14
Here are some pics of me removing mine:
Ok, once that is removed, place it aside. Now you should have a lot more room to work with.
When look at the stock amp you will find two bolts holding it on. One at the top and one on the bottom.
The one on bottom is in the middle. I believe that it is a 10mm socket size, but I am not positive.
Remove that bolt. Now the top bolt is a BIATCH!!!! Here is a pic of it:
Now I was NOT able to remove the bolt as the end you have to hook onto is facing the firewall of the car. So what I did was very scientific. I just moved it backwards and forwards until it was loose enough to fall off
Now that the stock amp is off the bolts�.here is a pic of what you should see:
On the end with all the connections you should see too connectors:
Let�s define what you are seeing:
The 20 pin Grey connector is from the Head unit TO the Amp. These are the wires that you are going make into RCA ends.
The 14 pin Black connector is TO the factory speaker wires. These are the connections that you are going to use when tying in the rear left and right speakers INTO the front speakers, and the sub wires into the center channel.
Once you remove the amp from the car, you will notice this black plastic piece over the wire, you can remove it safely by just carefully cutting it off. It is just protecting the wires.
You will be left with:
Once you cut the ends off, this is what you have.
Now I suggest that you remove most of the electrical tape, about 5-6 inches, from those wires. Why you ask�. Because if you notice, you will see that the wires for each speaker (positive and negative) are WRAPPED together.
Now how NICE of ACURA to do this for us!!!!
Anyway it seems to make things be a little easier to find the corresponding wire for each speaker.
Now to see the specs of WHAT wire color is goes to what, please see this post:
https://acurazine.com/forums/showthr...7&page=2&pp=25
That who first half of that page is VERY invaluable.
Once you LABEL each wire, which I suggest, you can cut off the ends.
Alrighty�got everything labeled correctly?? If not STOP and do it�if you screw this part up, you will just get very ticked later in the process
Now I went to radio shack and bought RCA ends that I can solder wire onto. There are two ways to do this.
The easiest way to so purchase some SHORT RCA cables and cut all four ends off. Then strip the wire. What you will find is this.
Some bare wire and another wire inside. The outside BARE wire is the Negative the inside covered wire is the positive wire. When stripping the inside wire, be careful, as it is VERY thin and you can rip those strands inside very easily.
Now take a speaker wire from the head unit and solder on the appropriate wires together. Negative to Negative / Positive to Positive. Now to answer some of your questions�.
Can you use Butt Connectors instead of soldering�.yes. Is it as good as soldering�no.
It is your choice.
Ok here is how I did it: (remember these are the wires from the 14 pin BLACK connector)
I connected the OEM LEFT REAR speaker wires to the OEM LEFT FRONT speaker wires
Then I did the OEM RIGHT REAR speaker wires to the OEM RIGHT FRONT speaker wires.
Next were the OEM SUB speaker wires to the OEM CENTER speaker wires.
Remember to match the positive and negatives together otherwise things will sound horrible!
Now once that is done, connect the RCA�s (the ones you ran to the trunk) from the first part of the DIY to the appropriate headunit wires:
Now, in the first parts of the DIY, I mentioned placing the Matrix in the kick panel where the stock amp was. Well after plugging in all the RCA�s I realized it won�t fit. So I am just placing it in the trunk.
So just use some couplers to connect the two male ends of the RCA�s together. The other ends of the RCA�s go to the trunk into the Matrix mounted there.
Now believe it not. We are mostly DONE!!!
Now back to the trunk for a few min. Don�t forget to extend the wires in the trunk for the rears and sub.
Now I suggest you follow the instructions from AudioControl for how to setup and hook up the Matrix.
Then follow your amp instructions for connecting the Matrix to the Amp.
Now some side notes.
I had some terrible engine noise and weird noises from the speakers after everything got installed. I tried some noise filters on both ends of the Matrix, and on the Amp�didn�t do any good. Then I thought of something. I then put the noise filters in between where the head unit RCA�s that we created and the Stinger RCA ends meet.
BINGO that solved the problem.
I used the PIE versions. They were $20 from my local shop. You will obviously need 3 of them.
People say grounding is the issue, etc. Well I re-grounded everything�nothing helped but these, so whatever�sounds SOOOOOOOOOO much better now.
I have not gotten my 7 channel amp amp so I don�t have all the channels up and running, but with a 4 channel amp, it sounds just as good as before. With the new 7 channel amp, it will be GREAT!!!
Now since you purchased within the first 12 min 35 seconds you get the tweeter tutorial for free. Please look for the tweeter post coming tonight.
Thanks for watching!!!
As always any comments. PLEASE speak up!!
08-13-2005, 06:34 PM
#20
9.5+10.5 22m=Hella Flush
Nice work!!! Can't wait to see your subs hooked up to your aftmkt amp. Just one sugestion is to make sure you dynomat your trunk because it will rattle. Would be cool if you document that too with pics if you do proceed with dynomatting.
08-13-2005, 07:07 PM
#21
Pro
Thread Starter
Join Date: May 2004
Location: Southern Cali.
Age: 51
Posts: 534
Likes: 0
Received 8 Likes
on
2 Posts
Originally Posted by ed99
Nice work!!! Can't wait to see your subs hooked up to your aftmkt amp. Just one sugestion is to make sure you dynomat your trunk because it will rattle. Would be cool if you document that too with pics if you do proceed with dynomatting.
I am just going to do one sub... right now I have a 10" maybe might do a 12".
I am planning on dynamatting....so we will see when... lol
08-15-2005, 01:09 PM
#23
Team Anthracite Member
Wow, this is an awesome post! Holy cow. Good for you man! I'm planning on doing this next summer or this winter depending on funds. But I'm curious about the engine noise. I wonder where it's coming from and why you're experiencing it. It's a little bit disconcerting. I'm always wondering where you're putting the Matrix and the amp so I can hardly wait to see that. I want to maintain as much functionality and trunk space as possible.
I'll be watching this post very carefully. Thanks for your hard work! Keep it up.
I'll be watching this post very carefully. Thanks for your hard work! Keep it up.
 08-29-2005, 05:26 AM
#25
Speed Addict
Great post!
I was told the same thing about the noise... My installer just tapped after the factory amp, and uses that clean unfiltered sound to feed my aftermarket amps... Have to adjust the line outs carefully as to not overload the amps at high volume levels, already done that... Its about right though now and sounds incredible! I will post pics of my finished install as soon as I get my amp back from service... damn overloaded LOCs!
I was told the same thing about the noise... My installer just tapped after the factory amp, and uses that clean unfiltered sound to feed my aftermarket amps... Have to adjust the line outs carefully as to not overload the amps at high volume levels, already done that...
Its about right though now and sounds incredible! I will post pics of my finished install as soon as I get my amp back from service... damn overloaded LOCs!
09-02-2005, 06:51 PM
#26
Intermediate

Join Date: Aug 2005
Age: 43
Posts: 48
Likes: 0
Received 0 Likes
on
0 Posts
Want to replace the amp
I'm not really big into car stereos but I love to listen to music loud. I want to replace the factory amp with something more powerful but I do not want to replace anything else ( speakers, sub woofer and head unit ). I certainly do not want to lose any functionality on the head unit or the navigation system. For those who know car stereos is this doable or should I just leave the factory system as is.
Thanks In advance,
Derek
Thanks In advance,
Derek
09-04-2005, 05:22 PM
#27
321 whp SAE
Join Date: Jul 2004
Location: Matawan, NJ
Age: 45
Posts: 1,090
Likes: 0
Received 0 Likes
on
0 Posts
Originally Posted by DerekZoolander
I'm not really big into car stereos but I love to listen to music loud. I want to replace the factory amp with something more powerful but I do not want to replace anything else ( speakers, sub woofer and head unit ). I certainly do not want to lose any functionality on the head unit or the navigation system. For those who know car stereos is this doable or should I just leave the factory system as is.
Thanks In advance,
Derek
Thanks In advance,
Derek
09-05-2005, 08:43 AM
#28
Intermediate
Join Date: Aug 2005
Age: 43
Posts: 48
Likes: 0
Received 0 Likes
on
0 Posts
Stock Speakers
My previous car was a 97 BMW 318. I had stock speakers with aftermarket head unit, sub and amps and it sounded amazing. Are you really sure that the speakers are that bad? You just have to give them a little more power.
09-05-2005, 08:46 AM
#29
Pro
Thread Starter
Join Date: May 2004
Location: Southern Cali.
Age: 51
Posts: 534
Likes: 0
Received 8 Likes
on
2 Posts
Originally Posted by DerekZoolander
My previous car was a 97 BMW 318. I had stock speakers with aftermarket head unit, sub and amps and it sounded amazing. Are you really sure that the speakers are that bad? You just have to give them a little more power.
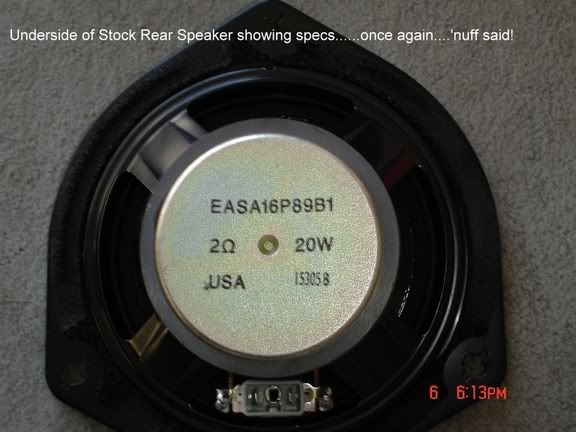
Max wattage is 20 watts on the speakers....you decide....
09-05-2005, 10:13 AM
#30
Speed Addict
Originally Posted by bklynpanman
not worth it.. you want louder, then do speakers and amp.. you can't amp the stock speakers any more.. they are weak
 09-05-2005, 10:35 AM
#31
Pro
Thread Starter
Join Date: May 2004
Location: Southern Cali.
Age: 51
Posts: 534
Likes: 0
Received 8 Likes
on
2 Posts
Originally Posted by 2LOW4U
I've got a 4 x 75 PG Ti amp on my stockers and they sound AWESOME! I know I am giving them 5X the power they need at 2 ohms, but that's only when you crank it, and its too damn loud to listen to for longer than 5-10 minutes at a time... I am sure the stockers will smoke in a few months, but so far so good..
09-06-2005, 07:30 AM
#32
Intermediate
Join Date: Aug 2005
Age: 43
Posts: 48
Likes: 0
Received 0 Likes
on
0 Posts
2low4u question?
Was the only modification you made the amp?? Did you have any problems loosing functionality on anything else factory cd player, navi (if you have it) etc...
thanks,
derek
thanks,
derek
09-06-2005, 08:18 AM
#33
Pro
Thread Starter
Join Date: May 2004
Location: Southern Cali.
Age: 51
Posts: 534
Likes: 0
Received 8 Likes
on
2 Posts
The system is 5.1 so unless he is still using the stock amp for 2 speakers, he lost something. I suggest you do a search. I have written 2 other LONG DIY FAQ's on my install. You will see what I did and why....plus there is alot of knowledge on here.
09-07-2005, 01:57 PM
#34
My suggestion is that if you don't want to replace both speakers and the amp at the same time would be to replace the amp first. This way you can buy some time and be reactive to if/ when your stock speakers go bad then replace them at that time. You will notice a sound difference in replacing the amp where as you may not hear as much of a difference in just replacing the speakers.
09-12-2005, 10:00 AM
#36
Speed Addict
Originally Posted by DerekZoolander
Was the only modification you made the amp?? Did you have any problems loosing functionality on anything else factory cd player, navi (if you have it) etc...
thanks,
derek
thanks,
derek
The CD, DVD-A, XM all work like factory, surround sound is there, etc etc... they tapped the front and rear speakers for the LOCs to go to my 4 ch amp, and the sub is tapped for the sub, naturally. The factory crossovers/eqs remain, so its basically like stock, with 10x the sound quality.
DeathtoToasters, I agree, I was not thinking it was going to sound much better, but with a 12W7, and 900 watts RMS, cap and 1/0 gauge, I figured the stock speakers were going to sound much too soft to crank the sub up, but in actuallity, the highs keep up with the sub all the way. It is extremely loud and clean. My friend at the dealer whom does the delivery, listened to it and asked me what speakers I had in the front, and I said stock, and he didn't believe me. My best friend who is a car audio installer, asked the same question, and I asked him if it sounded good, and he said, hell yes, espicially for stock speakers!
09-12-2005, 10:34 AM
#37
Pro
Thread Starter
Join Date: May 2004
Location: Southern Cali.
Age: 51
Posts: 534
Likes: 0
Received 8 Likes
on
2 Posts
Originally Posted by chusteveb
My suggestion is that if you don't want to replace both speakers and the amp at the same time would be to replace the amp first. This way you can buy some time and be reactive to if/ when your stock speakers go bad then replace them at that time. You will notice a sound difference in replacing the amp where as you may not hear as much of a difference in just replacing the speakers.
Great suggestion.....my issue is that I have a OCD and get obsessed with this until I finish it!
09-12-2005, 10:38 AM
#38
Pro
Thread Starter
Join Date: May 2004
Location: Southern Cali.
Age: 51
Posts: 534
Likes: 0
Received 8 Likes
on
2 Posts
Originally Posted by zax123
Toasters... just wondering if you have any other additions to your already awesome DIY
I just have the MP3, the TV Nav setup through the stock screen w/ the dvd under the passenger seat facing forward, the amps, new speakers, new sub, moonroof spoiler......
Nah so far that is it
Need to get a new sub and box....cannot decide between custom made fiberglass box or a ported box....

