
Use of cargo nets with trunk liner?
 02-19-2011, 11:49 AM
#1
2007 TL Type-S NBP
Thread Starter
Join Date: Jan 2011
Location: Rexburg, Idaho
Age: 49
Posts: 317
Likes: 0
Received 7 Likes
on
6 Posts
Use of cargo nets with trunk liner?
I bought the OEM trunk liner for my car but would still like to use the cargo nets on occasion. How have people handled this? I saw one thread where they just cut a X in the liner and fed the cargo net through but that seems like a bit of a hassle if the cargo net isn't left installed all the time. I'd like to maintain as much spill protection as possible. I had a tragic incident involving a slow cooker full of beer brats and onions tipping over in my old Maxima so I invested in Weathertech floor liners and a trunk tray for my TL before I even picked up the car! Thanks for any creative ideas! 
 02-19-2011, 12:13 PM
#2
AZ Community Team

Join Date: May 2007
Location: N35�03'16.75", W 080�51'0.9"
Posts: 32,488
Received 7,770 Likes
on
4,341 Posts
Well, that's pretty much what I did - poked a small hole where the pegs screw in and then attached the cargo net.
OTOH - I wouldn't carry a full slow-cooker in the trunk.
OTOH - I wouldn't carry a full slow-cooker in the trunk.
02-19-2011, 12:27 PM
#3
@ bearcat - thats not what you did, the op is referring to cutting a giant x and then forcing the pegs through.
@ OP - Do what bearcat did, unscrew the pegs, poke a hole for the screw, then screw the pegs in over the liner.
@ OP - Do what bearcat did, unscrew the pegs, poke a hole for the screw, then screw the pegs in over the liner.
02-19-2011, 12:35 PM
#4
2007 TL Type-S NBP
Thread Starter
Join Date: Jan 2011
Location: Rexburg, Idaho
Age: 49
Posts: 317
Likes: 0
Received 7 Likes
on
6 Posts
Thanks for the advice. How hard are the pegs to unscrew? I had thought about that but what happens when I get a flat and need to get under the liner? Will the pegs stay in if they're just hand tight?
 02-19-2011, 12:55 PM
#6
AZ Community Team
Join Date: May 2007
Location: N35�03'16.75", W 080�51'0.9"
Posts: 32,488
Received 7,770 Likes
on
4,341 Posts
In case you don't have an engineering degree, here's a thread on arranging the cargo net (pic on page 1 & 3 may be useful):
L-040: Cargo Net
https://acurazine.com/forums/showthread.php?t=65547
Edit: I'll repost 'em here (in a much more current thread).
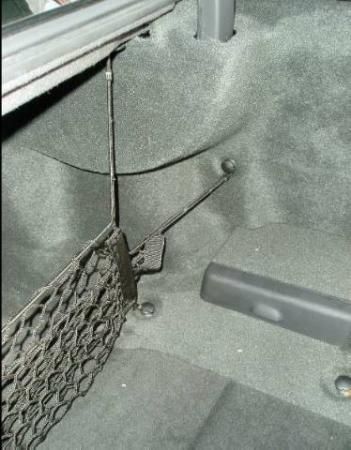
DON"T SLICE YOUR TRUNK TRAY - I almost made that mistake until a fellow Acurazinite told me this....
Unscrew the black buttons from the floor - place the tray back in the trunk - make a small, small hole in the tray and screw the button back in. The button screws right through the tray and helps hold the tray in place. Plus you are not creating slices into you rexpensive mat this way.
Unscrew the black buttons from the floor - place the tray back in the trunk - make a small, small hole in the tray and screw the button back in. The button screws right through the tray and helps hold the tray in place. Plus you are not creating slices into you rexpensive mat this way.

Last edited by Bearcat94; 02-19-2011 at 01:01 PM.
The following users liked this post:
ProfessorFunk (03-09-2019)
Trending Topics
02-19-2011, 01:09 PM
#8
AZ Community Team
Join Date: May 2007
Location: N35�03'16.75", W 080�51'0.9"
Posts: 32,488
Received 7,770 Likes
on
4,341 Posts
 02-19-2011, 01:11 PM
#9
Suzuka Master
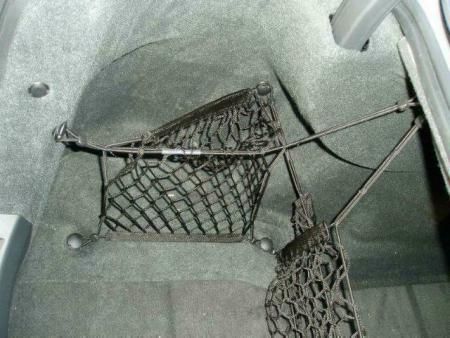
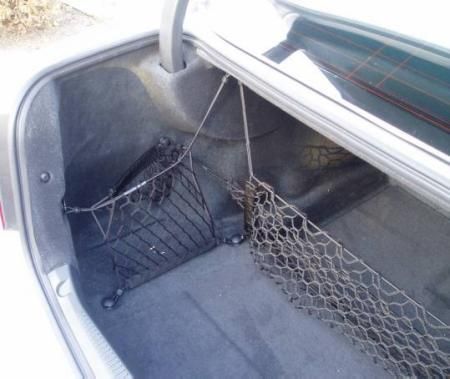
Actually the main net is installed in my mind incorrectly in the pictures, the other two cords that are currently shown stretching left and right should return straight up to the hooks that the other two are connected two thereby creating the divider like is shown but also creating a full width pocket also. That is how I have mine.
02-19-2011, 01:18 PM
#10
AZ Community Team
Join Date: May 2007
Location: N35�03'16.75", W 080�51'0.9"
Posts: 32,488
Received 7,770 Likes
on
4,341 Posts
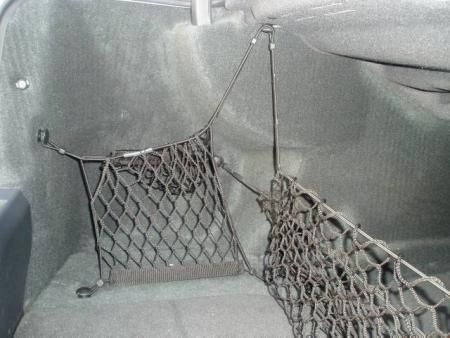
You mean more like:
That's more like how mine is as well. I think in the first set of pics the net is facing the "wrong" way.
That's more like how mine is as well. I think in the first set of pics the net is facing the "wrong" way.
The following 2 users liked this post by Bearcat94:
ProfessorFunk (03-09-2019),
Sohan24 (01-07-2018)
02-19-2011, 01:18 PM
#11
Actually the main net is installed in my mind incorrectly in the pictures, the other two cords that are currently shown stretching left and right should return straight up to the hooks that the other two are connected two thereby creating the divider like is shown but also creating a full width pocket also. That is how I have mine.
02-19-2011, 01:20 PM
#12
Nope, the middle net should all be going to the same 2 pegs up top. like a folder. Its a little tricky with 3 cords going to the same top left peg...
Last edited by leedogg; 02-19-2011 at 01:23 PM.
02-19-2011, 01:35 PM
#13
Registered Member
Join Date: Jun 2009
Location: Long Island N.Y.
Age: 58
Posts: 376
Likes: 0
Received 2 Likes
on
2 Posts
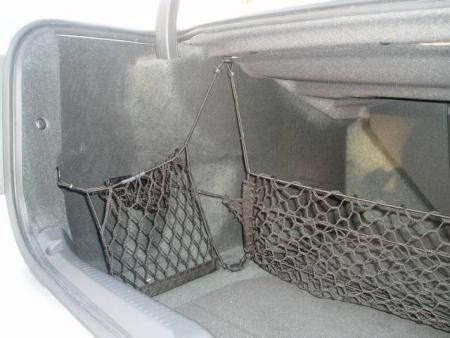
Sounds like a big hassle if you need to get the spare tire out. I cut small circles out where the pegs go. Keep in mind I don't think that is for everybody just in my case. I don't ever have any food or stuff that might leak in my car ever, I also noticed that in that pic there are only 2 nets. I have a net for each side, one net across the back that is like a pocket, and another one that is stretched across the bottom of the trunk above the liner.

The following users liked this post:
ProfessorFunk (03-09-2019)
02-19-2011, 02:06 PM
#15
Suzuka Master
02-19-2011, 03:01 PM
#16
9th Gear

Join Date: Jan 2011
Posts: 9
Likes: 0
Received 0 Likes
on
0 Posts
ive messed around with different settings for this thing numerous times and i still cant decide the best option. ive never drilled holes thru the trunk liner either. its a new ball game now
 02-19-2011, 07:46 PM
#18

My liner experience
When I did my trunk liner I found that the buttons are attached to a double threaded screw.
Sometimes the button comes out with the screw attached, sometimes the button comes off leaving the screw in the car.
I was able to remove a button-less screw by tightening two nuts on the protruding screw and backing off the bottom nut against the top nut. Then you can remove the nuts and put the button back on.
With the button with screw attached you try to find the hole for the screw beneath the trunk liner and screw the screw through the liner to the car.
I found that the depression where the button goes would buckle the trunk liner if tightened to tight so you can put thick plastic or rubber washer between the liner and the car in each depression.
02-19-2011, 10:33 PM
#19
AZ Community Team
Join Date: May 2007
Location: N35�03'16.75", W 080�51'0.9"
Posts: 32,488
Received 7,770 Likes
on
4,341 Posts
Never had that problem, but I don't really bear down when screwing the buttons in. Just until they are lightly hand tight.
02-19-2011, 10:57 PM
#20
2007 TL Type-S NBP
Thread Starter
Join Date: Jan 2011
Location: Rexburg, Idaho
Age: 49
Posts: 317
Likes: 0
Received 7 Likes
on
6 Posts
Thanks for all the advice. I just went out and used the awl on my leatherman to cut small holes in the liner for the tie downs to screw through, unscrewed each of the tie downs and then reinstalled them over the trunk liner. I had the passenger side screws come all the way out but the driver side ones the black plastic unscrewed off the metal "stud". Still worked fine though. It looks like they seal up pretty well that small spills shouldn't leak through too quickly. That corner net is perfect for my battery jumper pack, I love it! As for the big net, I have no idea what I'll use that for so it'll probably get taken down and stowed back in its spare tire cubby.


Thread
Thread Starter
Forum
Replies
Last Post
DiamondJoeQuimby
Car Parts for Sale
1
09-10-2015 11:40 AM
asahrts
Member Cars for Sale
0
09-04-2015 05:55 PM