
A-SPEC kit install with PICS!!! on my 06'
 06-16-2007, 02:01 AM
#1
Advanced
Thread Starter
A-SPEC kit install with PICS!!! on my 06'
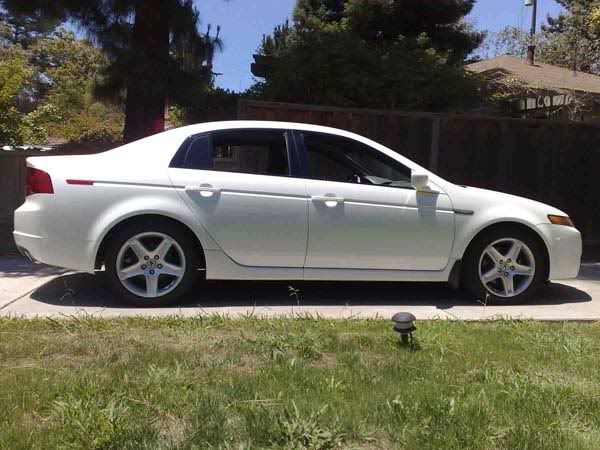
I dont know if this is the right forum to post but i just thought i'd share my install pics with ya guys/girls...
this was done all by myself and wasnt hard at all, just time consuming.
I thank Hakik for lending me his driveway while he was at work...
Anyway, here are the pics, If anyone has any questions, just ask me
b 4 pic:
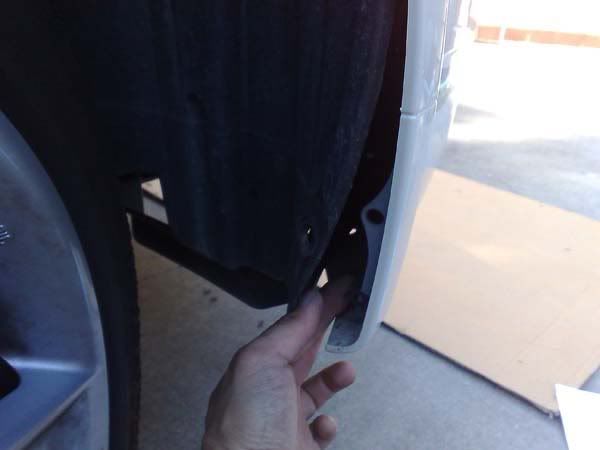
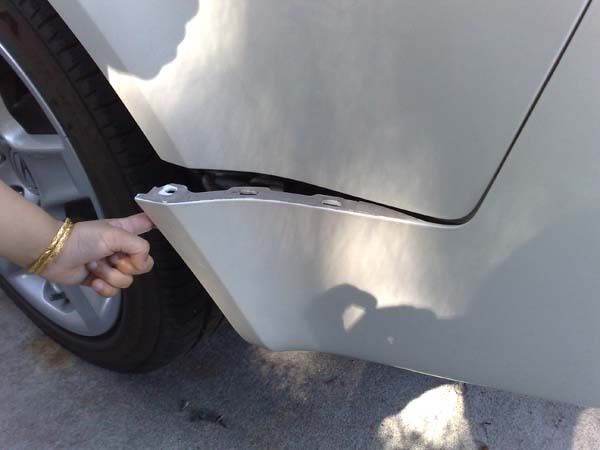
removed inner well screws and pried the upper edges of the side skirts out, two clips at the rear and 1 clip on the front. remove the 3 clips on the bottom as well. then the rear piece slide back and out, front slides forward and comes off:
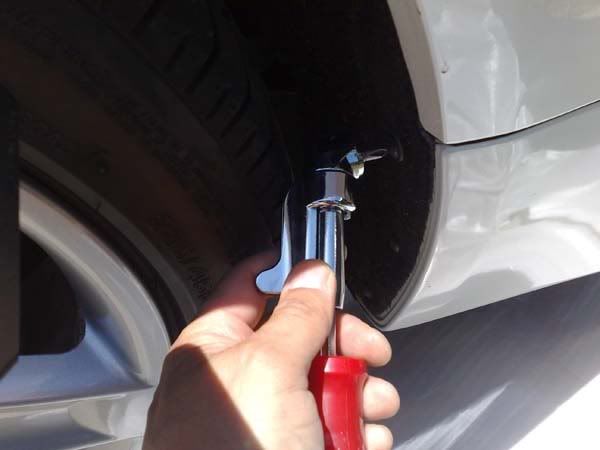
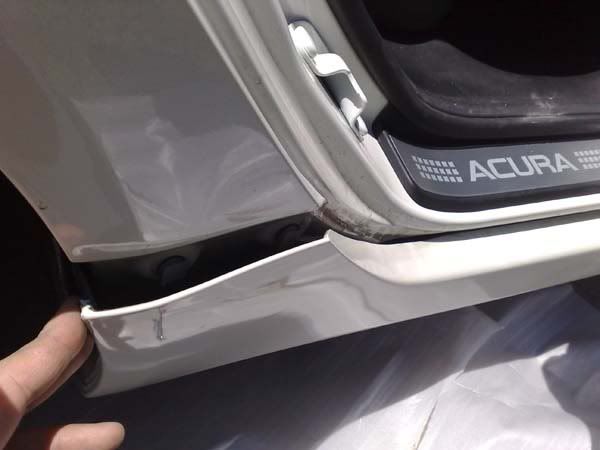
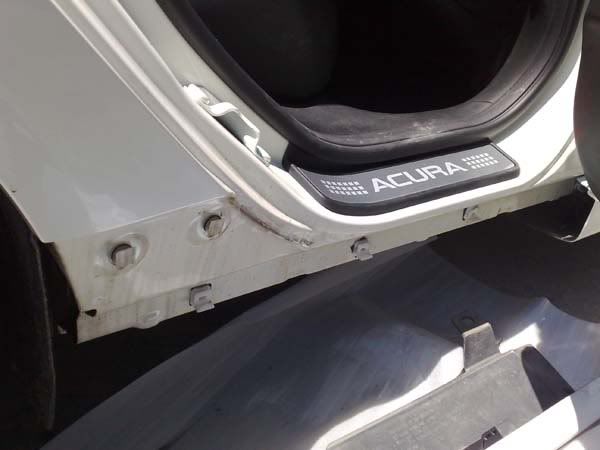
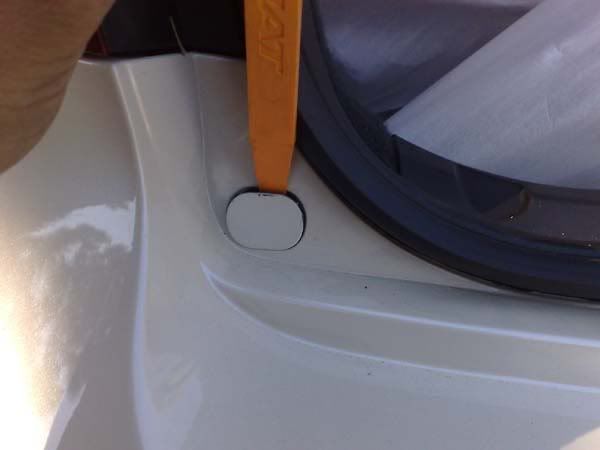
remove the 9 clips from the car by turning them 45 degrees and out.
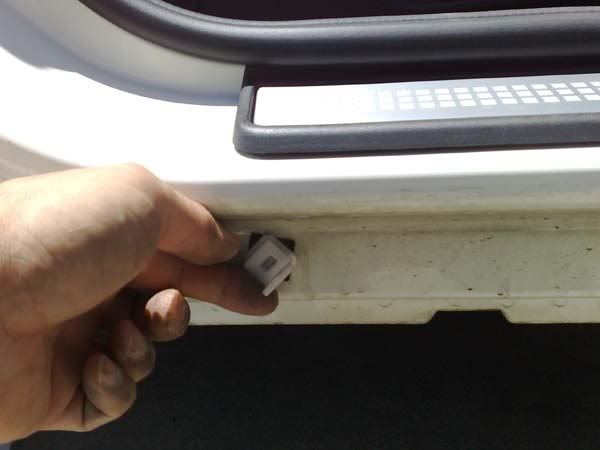
reinsert clips to the new lower skirts and apply new rubber washers, dont forget to put the retainer screws from each end on to the new skirts:
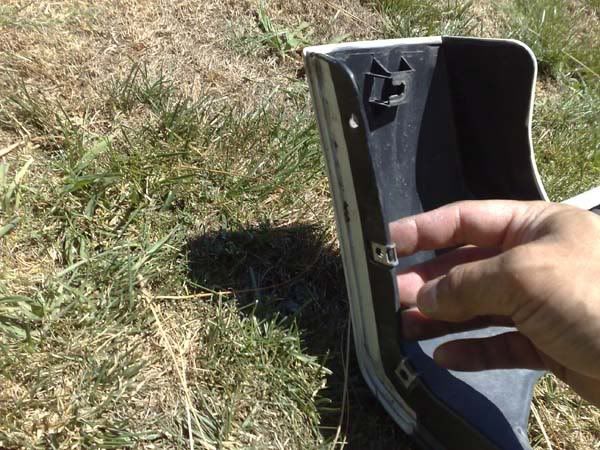
attach the skirts together and pop em on the car, make sure it snaps on. then put the 3 clips back on the bottom and the screws back on in the wheel well.
do the same thing on the otherside of the car.
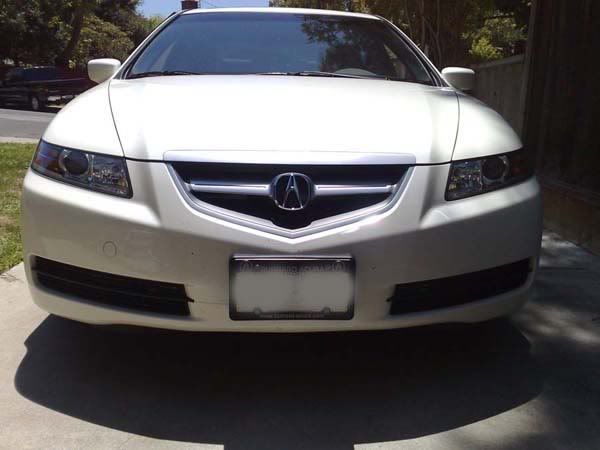
Next for the front lip...
i had to jack up the car a bit to drill the holes on the bottom.
remove the bolt and one clip underneath the car on both sides. then get the cut out and tape in on the factory bumper, drill the 3 holes and put the supplied clips in.
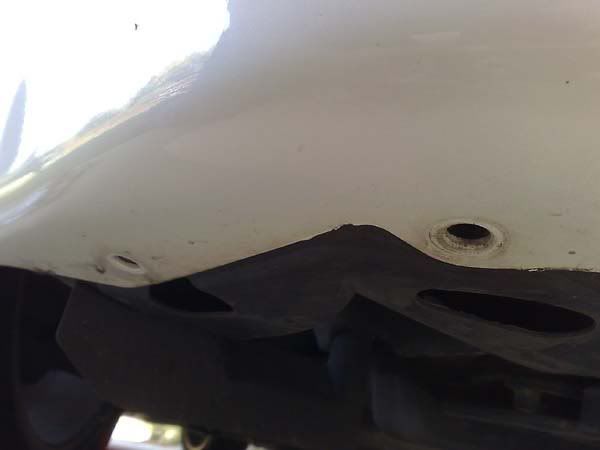
line up the paper stencil and drill a hole in the inner fenders on both sides slip the retainer clip on and put on the supplied brackets.

Next is to put on the plastic inserts that were supplied (still dont know the purpose of this). place them on mark, drill, clip them on as shown.
do this on both sides.
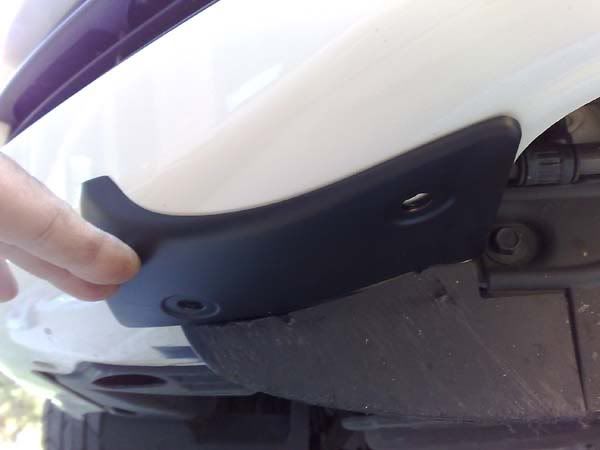
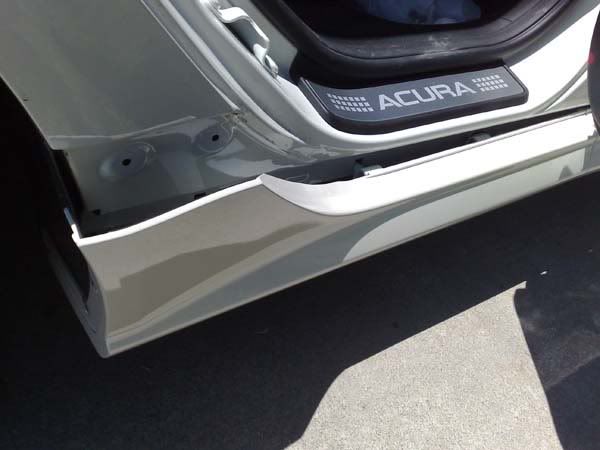
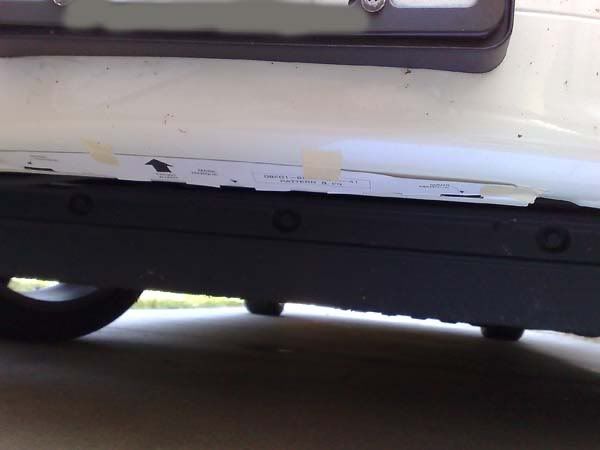
Place lower skirt as shown, screw the 3 screws on the front bottom as well as the bolts on the sides, line it up and remove the tape slowly.
put in the rest of the screws as the instructions say.
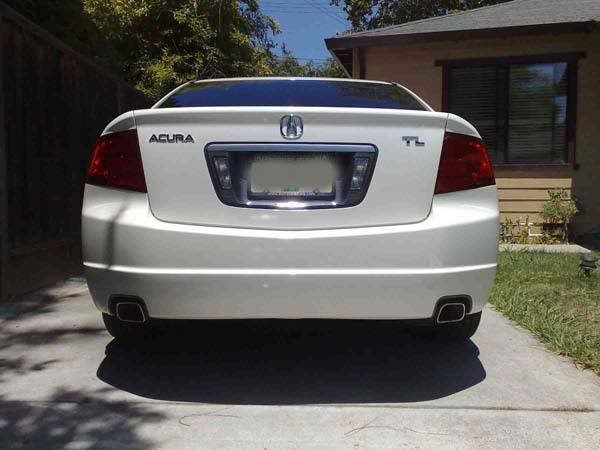
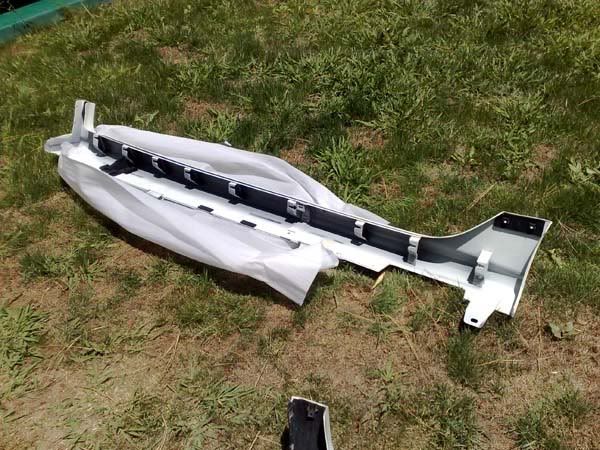
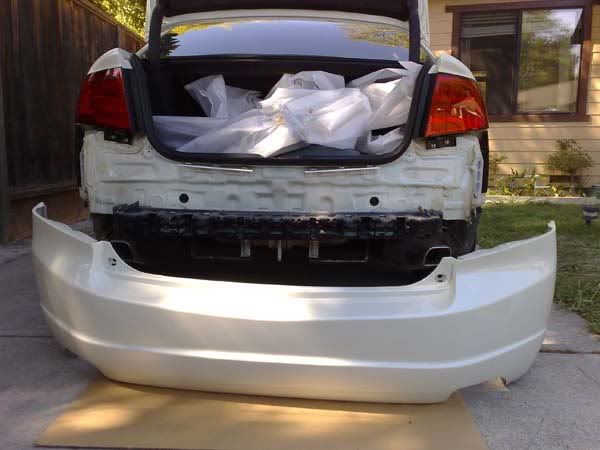
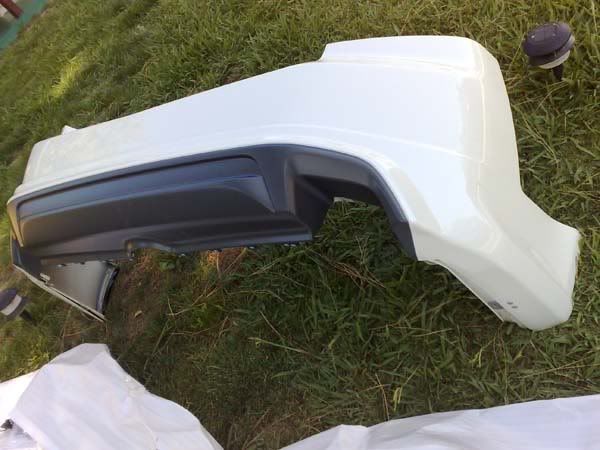
Rear bumper is a little more tricky but i managed to still do it on my own.
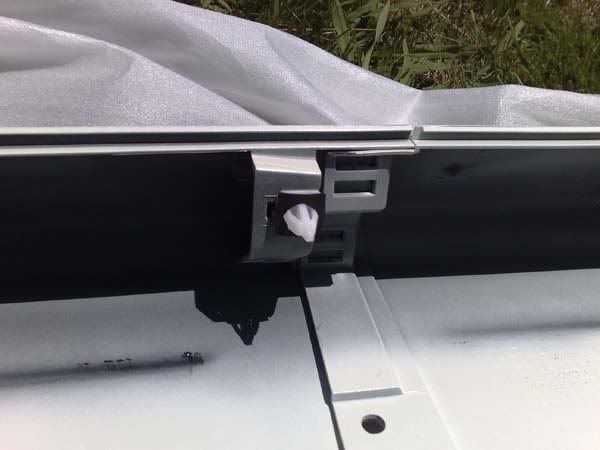
first is to pry off the caps from under the trunk lid and undo the 10mm bolts
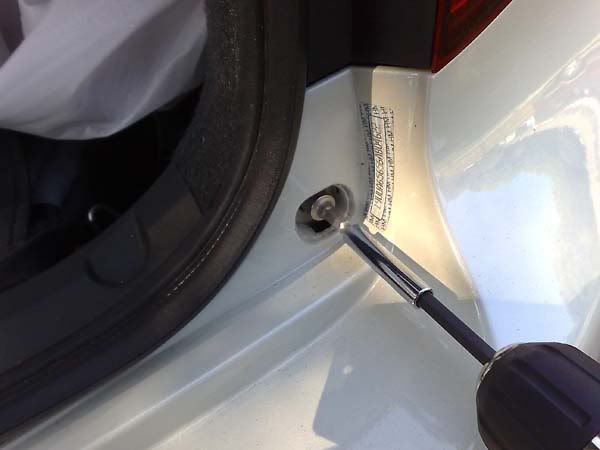
next is to unscrew the 3 screws in the wheel well
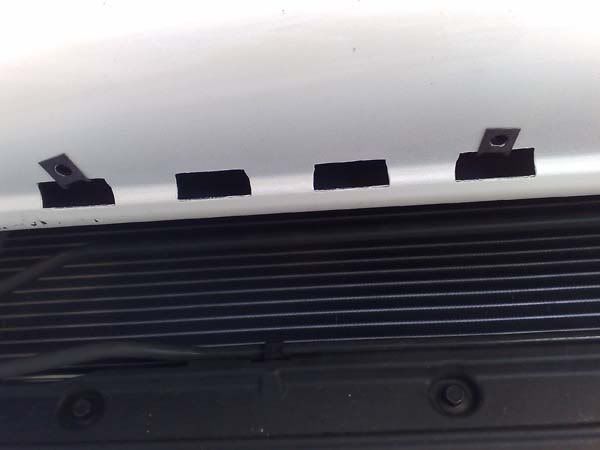
remove the covers over the exhaust by unclipping the 2 clips on each side and sliding it out
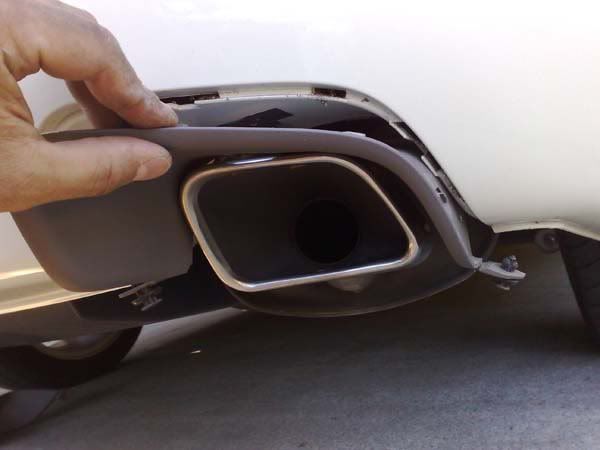
after that, remove the single clip above that.
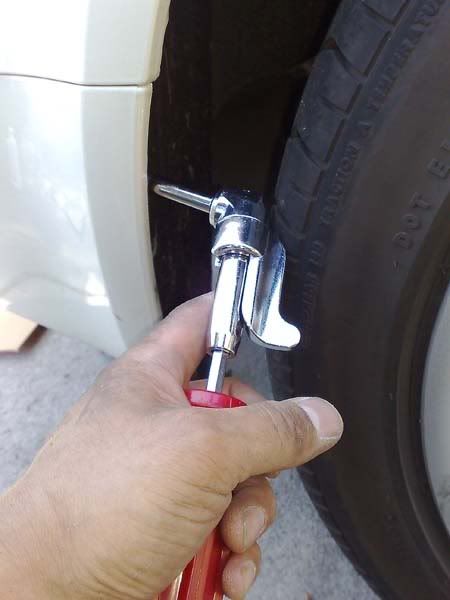
remove the 6 other clips on the bottom of the bumper.
pry out each side of bumper and pull back, dont be scared to break anything.

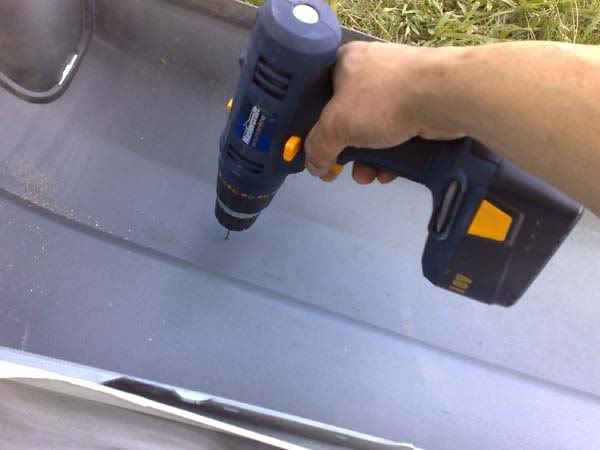
i used a thumb tack to mark the holes i was gonna drill, it is marked on the inside of the bumper with a circle with a cross through it.
makes sure they are the ones one the lower half. then drill them out (6mm). your also gonna have to drill a 10mm hole on each end of the lip (this is to screw in the bracket later on)
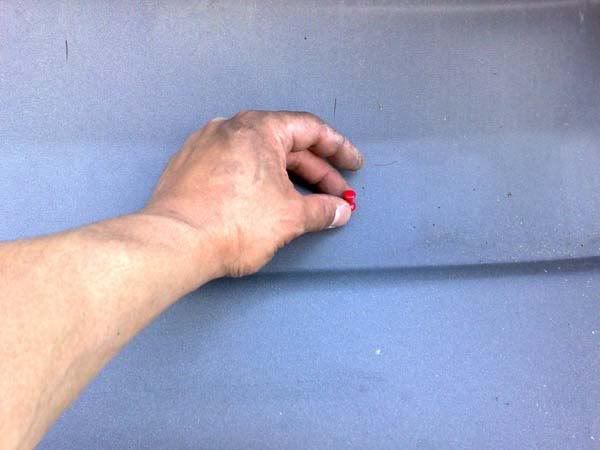
i lined it up just to make sure
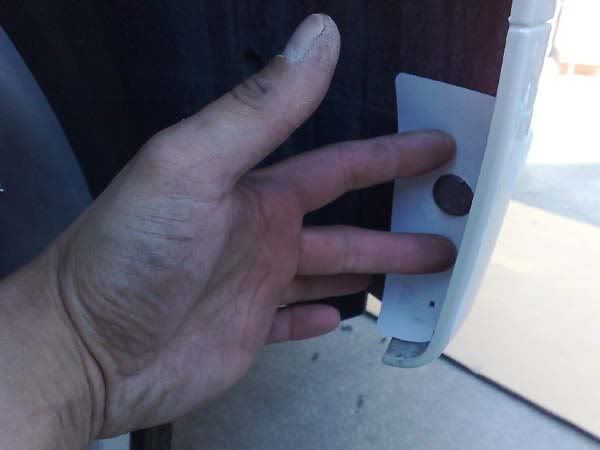
pull the tabs out a little of the double sided tape, put the screws in from the back side and put the 2 bolts that are supplied on each side as shown
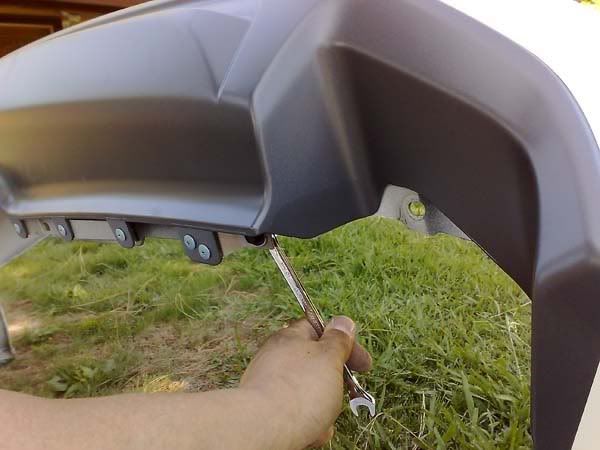
sorry i havent got any of the pics of the brackets that i put under the wheel well, but im sure u can figure that out
slip on the bumper (with the lip) make sure u dont peel off the double sided tape till last.
anyway, everything should click in and use the new clips and bolts (supplied) for underneath the bumper
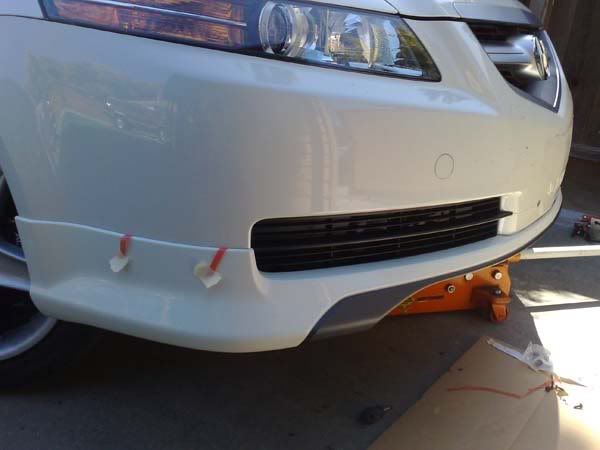
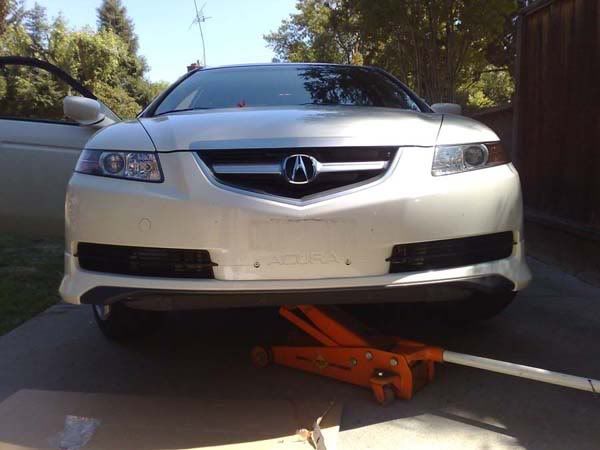
Sorry that i have left a lot of parts out, but, at least u get the picture... heheh.
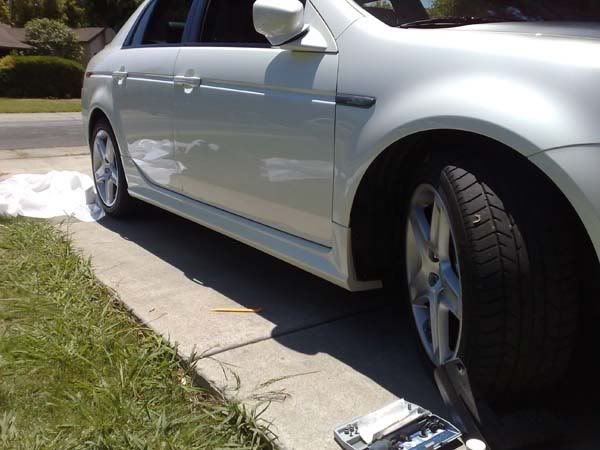
before and after pics...
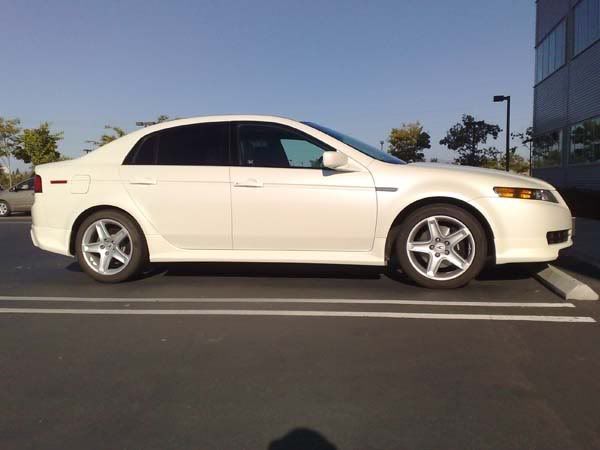
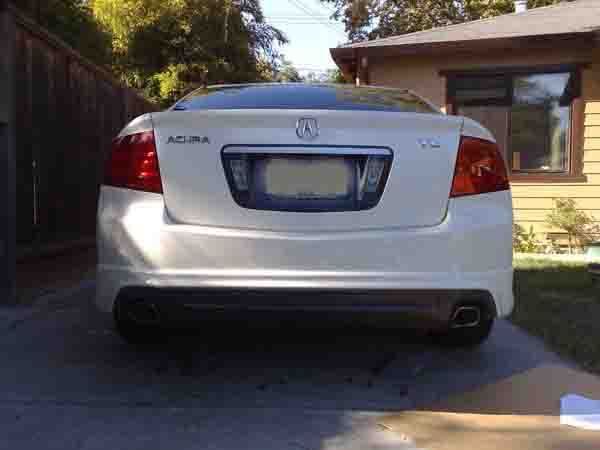
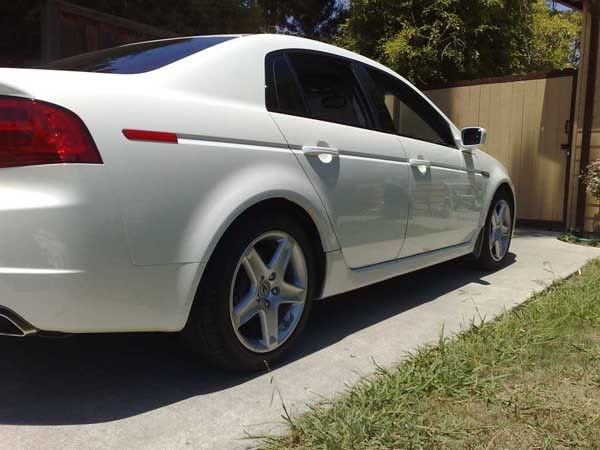
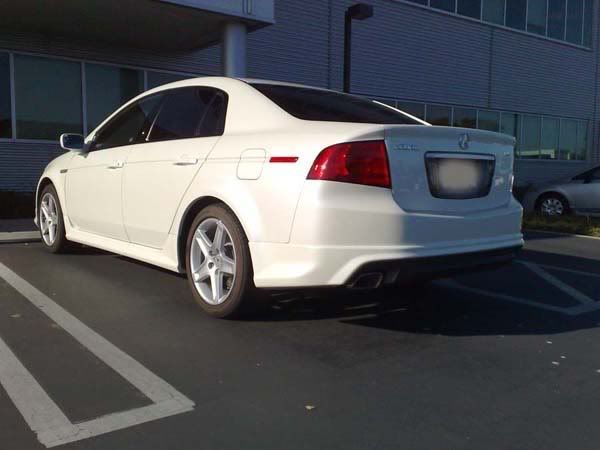
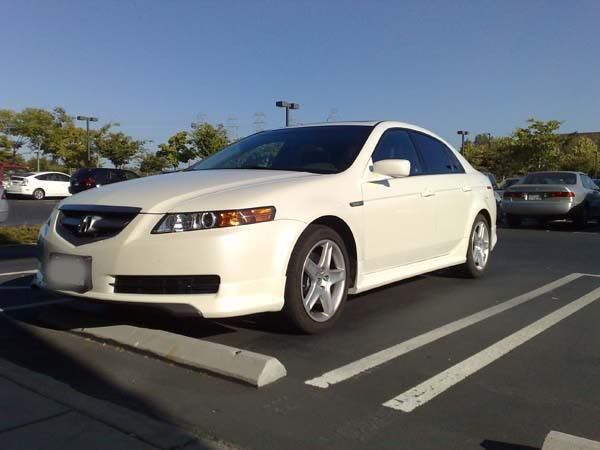
and yes i know it needs rims and lowered a bit.
enjoy!
this was done all by myself and wasnt hard at all, just time consuming.
I thank Hakik for lending me his driveway while he was at work...
Anyway, here are the pics, If anyone has any questions, just ask me
b 4 pic:
removed inner well screws and pried the upper edges of the side skirts out, two clips at the rear and 1 clip on the front. remove the 3 clips on the bottom as well. then the rear piece slide back and out, front slides forward and comes off:
remove the 9 clips from the car by turning them 45 degrees and out.
reinsert clips to the new lower skirts and apply new rubber washers, dont forget to put the retainer screws from each end on to the new skirts:
attach the skirts together and pop em on the car, make sure it snaps on. then put the 3 clips back on the bottom and the screws back on in the wheel well.
do the same thing on the otherside of the car.
Next for the front lip...
i had to jack up the car a bit to drill the holes on the bottom.
remove the bolt and one clip underneath the car on both sides. then get the cut out and tape in on the factory bumper, drill the 3 holes and put the supplied clips in.
line up the paper stencil and drill a hole in the inner fenders on both sides slip the retainer clip on and put on the supplied brackets.
Next is to put on the plastic inserts that were supplied (still dont know the purpose of this). place them on mark, drill, clip them on as shown.
do this on both sides.
Place lower skirt as shown, screw the 3 screws on the front bottom as well as the bolts on the sides, line it up and remove the tape slowly.
put in the rest of the screws as the instructions say.
Rear bumper is a little more tricky but i managed to still do it on my own.
first is to pry off the caps from under the trunk lid and undo the 10mm bolts
next is to unscrew the 3 screws in the wheel well
remove the covers over the exhaust by unclipping the 2 clips on each side and sliding it out
after that, remove the single clip above that.
remove the 6 other clips on the bottom of the bumper.
pry out each side of bumper and pull back, dont be scared to break anything.
i used a thumb tack to mark the holes i was gonna drill, it is marked on the inside of the bumper with a circle with a cross through it.
makes sure they are the ones one the lower half. then drill them out (6mm). your also gonna have to drill a 10mm hole on each end of the lip (this is to screw in the bracket later on)
i lined it up just to make sure
pull the tabs out a little of the double sided tape, put the screws in from the back side and put the 2 bolts that are supplied on each side as shown
sorry i havent got any of the pics of the brackets that i put under the wheel well, but im sure u can figure that out
slip on the bumper (with the lip) make sure u dont peel off the double sided tape till last.
anyway, everything should click in and use the new clips and bolts (supplied) for underneath the bumper
Sorry that i have left a lot of parts out, but, at least u get the picture... heheh.
before and after pics...
and yes i know it needs rims and lowered a bit.
enjoy!

The following users liked this post:
06_TL_A-Spec (04-03-2018)
06-16-2007, 07:38 AM
#7
Registered Nutsack
Join Date: Mar 2007
Location: Southern NJ
Age: 40
Posts: 171
Likes: 0
Received 0 Likes
on
0 Posts
Looks awesome!  I recently put an A-Spec on my NBP. It really isn't all that hard but is time consuming. Contemplating where to drill and whether you really WANT to drill into your car makes you triple check the directions before putting holes in it. I bougth ramps from Pepboys for the install - 35$ and you can crawl under the car worry-free and usem later on to change your oil/filter
I would like to add a couple more tips. Make sure you have a screwdrive that can pivot into tight spots for the sidewell screws and get some double sided tape for the rear and front lips - especially the front. I had to take the front off again because the tape provided left too many gaps. K-mart/ Sear sells 3M OEM Certified Double sided tape that HOLDS for like 5 bucks - works like a charm.
I recently put an A-Spec on my NBP. It really isn't all that hard but is time consuming. Contemplating where to drill and whether you really WANT to drill into your car makes you triple check the directions before putting holes in it. I bougth ramps from Pepboys for the install - 35$ and you can crawl under the car worry-free and usem later on to change your oil/filter I would like to add a couple more tips. Make sure you have a screwdrive that can pivot into tight spots for the sidewell screws and get some double sided tape for the rear and front lips - especially the front. I had to take the front off again because the tape provided left too many gaps. K-mart/ Sear sells 3M OEM Certified Double sided tape that HOLDS for like 5 bucks - works like a charm.
Trending Topics
06-16-2007, 09:03 AM
#8
Senior Moderator
iTrader: (1)
good work and it looks great!

 06-18-2007, 06:38 PM
#16
Advanced
Thread Starter
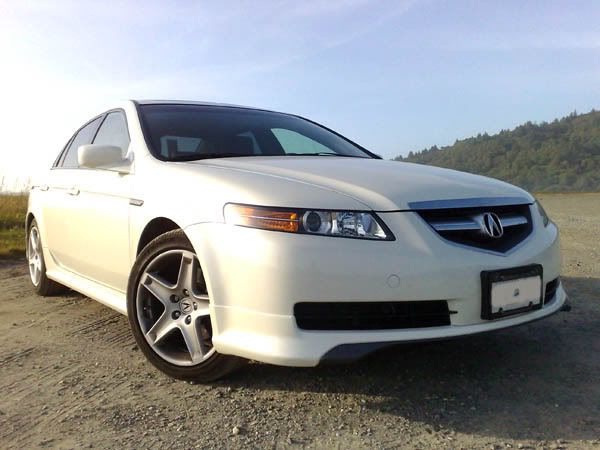
Thanx for all your positive comments guys.
the kit does match almost perfectley in color and yes i'd rather have done it myself than let some morron touch my car!!! lol.
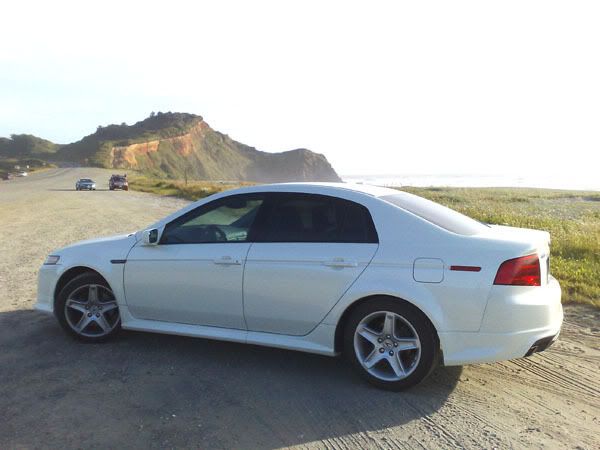
So i took the long way back to vancouver and went up the Oregon coast (101)
and thought id share a couple of pics...
the kit does match almost perfectley in color and yes i'd rather have done it myself than let some morron touch my car!!! lol.
So i took the long way back to vancouver and went up the Oregon coast (101)
and thought id share a couple of pics...
 03-09-2008, 05:27 PM
#21
Your Friendly Canadian
Join Date: Dec 2007
Location: Toronto, Ontario
Age: 31
Posts: 17,430
Received 1,484 Likes
on
1,048 Posts
Nighthawk Black Pimp
 03-09-2008, 06:35 PM
#24
Originally Posted by 91octane
oh smack. so it does fit. i woulda never thought. how much dough did you drop for the whole set?
nice color dude!
nice color dude!
AZ official vendor - Tim @ www.hondacuraworld.com sometimes has GB on the kit.
03-09-2008, 08:09 PM
#25
Cruising in my
Nice I think this belongs in the 3G Garage!
What kind of tool do you use to remove those plastic push rivots?
When I installed my intake I think I broke about 5 of them in the wheel well removing the liner, I can't stand those things but that's cause I don't know how they come off properly.
What kind of tool do you use to remove those plastic push rivots?
When I installed my intake I think I broke about 5 of them in the wheel well removing the liner, I can't stand those things but that's cause I don't know how they come off properly.
03-09-2008, 10:33 PM
#31
There we go! We needed a nice complete DIY like that. There are a few on the forum already but I like this one the best. (I ended up using the service manual) I just did my kit 3 months ago so I remember all those steps. For those who are researching and gathering data they need as much info as they can get. Thanks for your efforts, looks great by the way.
Garage it!!!!!
Garage it!!!!!
 03-10-2008, 12:16 PM
#34
Originally Posted by rockyfeller
There we go! We needed a nice complete DIY like that. There are a few on the forum already but I like this one the best. (I ended up using the service manual) I just did my kit 3 months ago so I remember all those steps. For those who are researching and gathering data they need as much info as they can get. Thanks for your efforts, looks great by the way.
Garage it!!!!!
Garage it!!!!!
I did the same thing, used the service manual. The 07 TL-S rear lip was different and alot of guesstimation happened with that, but this is def. detailed.
I LIKES!!!!

 03-31-2016, 07:54 AM
#37
Race Director
iTrader: (1)

 03-31-2016, 09:56 AM
#39
Race Director
iTrader: (1)
^That would only apply if it was anything but a compliment. Lol
03-31-2016, 10:17 AM
#40
Instructor
