

Resistor install for led blinkers pics....
 02-03-2008, 12:53 PM
#1
200,000 mile club
Thread Starter
Join Date: Jul 2007
Location: Charlotte, NC
Age: 49
Posts: 1,774
Likes: 0
Received 35 Likes
on
15 Posts
Resistor install for led blinkers pics....
OK, a lot of guys on here are saying they don't want to modify there blinkers to led in fear that the resistors are to hard to install. This is far from the truth. You do need to install them in a place that is not going to touch anything else. Make sure it has room to breath.
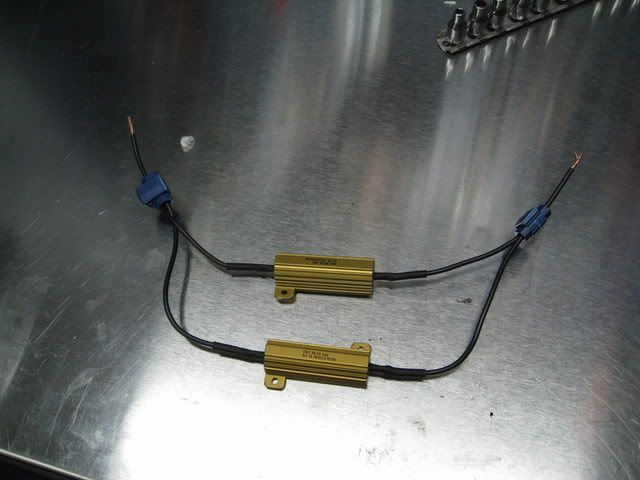
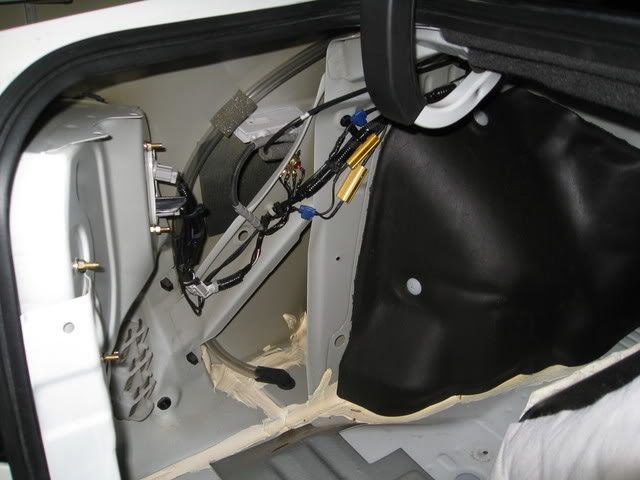
You will see where I mounted the 6 ohm/50 watt resistors that I purchased online. There is no reason to mount one resistor in the front bulb and then do another one in the rear bulb. The flashers in the car work in series so as long as it's inline, it doesn't matter where you put them.
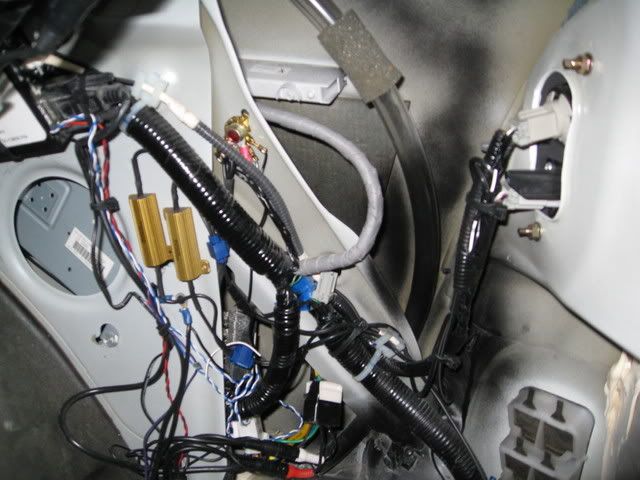
You will see in the pictres that I connected two resistors together and then installed them in the trunk of the car. I made sure to mount them away from the insulation of the trunk liner or anywhere else that could melt. The resistors don't get hot unless you leave them on for long extended period of time. I only use the blinkers for short periods of time on lane changes so it's not a factor.
By locating the resistors in the trunk, it keeps them out of the elements and this will prolong them. I drilled some small holes and mounted them as shown in the pics. I also extended the wires about 8-10 inches and tapped it right into the blinker wires. I hope this helps all the guys on here that are scared to try this. It is as simple as it get!
The first picture is of the resistors that I connected together.....
The scond is a picture of the resistors mounted on the passenger side.......

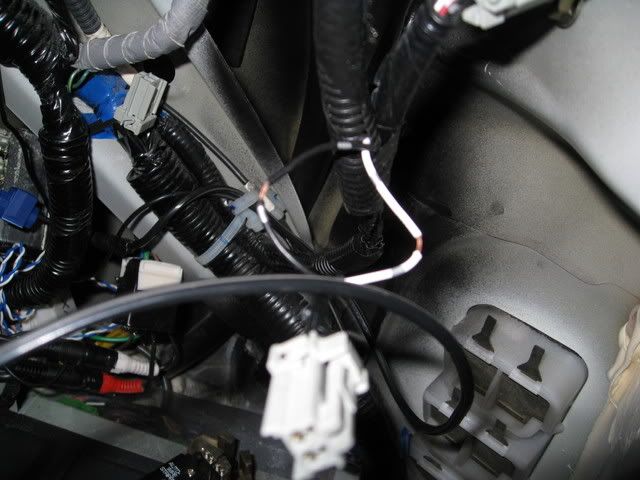
Here is a picture of the two wires you need to tap into passenger side.....
Here is a further away picture to see where I mounted them.......
Drivers side...........
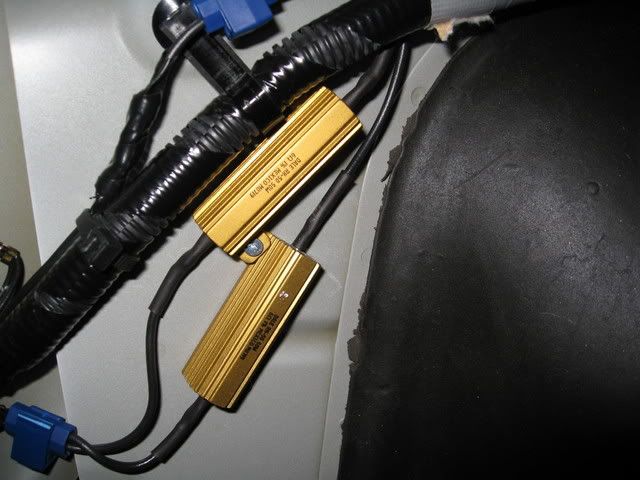
Farther away.........
You will see where I mounted the 6 ohm/50 watt resistors that I purchased online. There is no reason to mount one resistor in the front bulb and then do another one in the rear bulb. The flashers in the car work in series so as long as it's inline, it doesn't matter where you put them.
You will see in the pictres that I connected two resistors together and then installed them in the trunk of the car. I made sure to mount them away from the insulation of the trunk liner or anywhere else that could melt. The resistors don't get hot unless you leave them on for long extended period of time. I only use the blinkers for short periods of time on lane changes so it's not a factor.
By locating the resistors in the trunk, it keeps them out of the elements and this will prolong them. I drilled some small holes and mounted them as shown in the pics. I also extended the wires about 8-10 inches and tapped it right into the blinker wires. I hope this helps all the guys on here that are scared to try this. It is as simple as it get!
The first picture is of the resistors that I connected together.....
The scond is a picture of the resistors mounted on the passenger side.......
Here is a picture of the two wires you need to tap into passenger side.....
Here is a further away picture to see where I mounted them.......
Drivers side...........
Farther away.........

 02-03-2008, 02:07 PM
#3
Instructor

Join Date: Dec 2007
Age: 47
Posts: 105
Likes: 0
Received 0 Likes
on
0 Posts
Why did you install 2? I thought that if you got the 3 ohm 50 watt units you only had to install 1 per side if you did LEDs both front and rear.
Considering those get hot, it would worry me about burning my trunk liner. To bad you couldn't install them on the inside portion of that support.
Good write up never the less.
Considering those get hot, it would worry me about burning my trunk liner. To bad you couldn't install them on the inside portion of that support.
Good write up never the less.
02-03-2008, 02:43 PM
#4
200,000 mile club
Thread Starter
Join Date: Jul 2007
Location: Charlotte, NC
Age: 49
Posts: 1,774
Likes: 0
Received 35 Likes
on
15 Posts
That could be true about one per side. I thought it was one per light since normally if one light was out, it would blink fast. If so I will remove the two extra and sell them.
Trending Topics
02-03-2008, 07:08 PM
#8
Banned

Join Date: Apr 2007
Location: NJ
Age: 41
Posts: 68
Likes: 0
Received 0 Likes
on
0 Posts
any reason not to use these... http://www.partsexpress.com/pe/showd...number=019-020
I think I can do the math... 13.5 volts @ 8 ohms should be 22.78 watts... which is a little higher then the stock bulb which is 21 watts.... and since this can handle 100 watts it should dissipate the heat pretty well.
hmmm?
I think I can do the math... 13.5 volts @ 8 ohms should be 22.78 watts... which is a little higher then the stock bulb which is 21 watts.... and since this can handle 100 watts it should dissipate the heat pretty well.
hmmm?
02-03-2008, 09:22 PM
#10
200,000 mile club
Thread Starter
Join Date: Jul 2007
Location: Charlotte, NC
Age: 49
Posts: 1,774
Likes: 0
Received 35 Likes
on
15 Posts
Originally Posted by RedHOT411
any reason not to use these... http://www.partsexpress.com/pe/showd...number=019-020
I think I can do the math... 13.5 volts @ 8 ohms should be 22.78 watts... which is a little higher then the stock bulb which is 21 watts.... and since this can handle 100 watts it should dissipate the heat pretty well.
hmmm?
I think I can do the math... 13.5 volts @ 8 ohms should be 22.78 watts... which is a little higher then the stock bulb which is 21 watts.... and since this can handle 100 watts it should dissipate the heat pretty well.
hmmm?
02-03-2008, 09:24 PM
#11
Banned
Join Date: Apr 2007
Location: NJ
Age: 41
Posts: 68
Likes: 0
Received 0 Likes
on
0 Posts
Originally Posted by mmade22
Not sure as your link is a dead one. I used the resistors that were talked on other threads. No need to show me other options. My blinkers work. End of story. No need for your 2 cents.
02-04-2008, 07:09 AM
#13
200,000 mile club
Thread Starter
Join Date: Jul 2007
Location: Charlotte, NC
Age: 49
Posts: 1,774
Likes: 0
Received 35 Likes
on
15 Posts
Maybe someone else can tell us. I am not going to take the car apart and take one out to find out the answer. It works as is so I am going to leave them in there. I would like to know the answer if someone else can chime in.
02-04-2008, 07:15 AM
#14
200,000 mile club
Thread Starter
Join Date: Jul 2007
Location: Charlotte, NC
Age: 49
Posts: 1,774
Likes: 0
Received 35 Likes
on
15 Posts
Originally Posted by RedHOT411
ok... i will start a new thread... i'm looking to get some that wont be as hot. sorry.
02-04-2008, 10:43 AM
#15
Nice, someone finally did a semi-DIY on this. I have some pics I will post later too for tips on installing the front ones, particularly those that are going to do switchbacks.
I thought of that same place to mount my resistors but it was still a little to risky for me. I chose a slightly different spot away from all the wiring around there. One thing that irritates me is that the leads to the resistor are too short.
Yeah I too was wondering why you used 2 per side. You only need them wired to the signal leads.
 02-08-2008, 08:46 PM
#17
Intermediate

Join Date: Nov 2007
Location: Kansas City, KS
Age: 43
Posts: 31
Likes: 0
Received 0 Likes
on
0 Posts
Originally Posted by mmade22
They only get hot when you leave the blinkers on for several minutes in a row. I never do that so I am not worried.
02-09-2008, 01:03 AM
#18
The front turn signal lights have 3 wires; ground, flashing, and one when for when headlights are on. Tap into the flashing wire, that way its not on constantly and only way it will work
02-10-2008, 05:53 PM
#19
Intermediate
Join Date: Nov 2007
Location: Kansas City, KS
Age: 43
Posts: 31
Likes: 0
Received 0 Likes
on
0 Posts
Originally Posted by Fulani has a TL
The front turn signal lights have 3 wires; ground, flashing, and one when for when headlights are on. Tap into the flashing wire, that way its not on constantly and only way it will work
02-10-2008, 07:15 PM
#20
200,000 mile club
Thread Starter
Join Date: Jul 2007
Location: Charlotte, NC
Age: 49
Posts: 1,774
Likes: 0
Received 35 Likes
on
15 Posts
Doing it in the rear of the car takes all the guess work out of which wires to tap into. There are only two going to the blinker as it is seperate from the running lights. Another reason to tap it from the trunk.
02-10-2008, 07:17 PM
#21
200,000 mile club
Thread Starter
Join Date: Jul 2007
Location: Charlotte, NC
Age: 49
Posts: 1,774
Likes: 0
Received 35 Likes
on
15 Posts
Doing it in the rear of the car takes all the guess work out of which wires to tap into. There are only two going to the blinker as it is seperate from the running lights. Another reason to tap it from the trunk. By the way, only one resistor is needed per side. I haven't taken out the extra one on each side. I am going to leave them as the load is going across two so there will be less heat building up.
 05-24-2008, 05:09 PM
#23
Pro

I keep seeing ohms volts and watts being thrown around when trying to figure this out but I have yet to see anyone mention amps. Maybe the use of an electrical calculator would help such as this one.
http://www.angelfire.com/pa/baconbacon/page2.html
BTW you only have to plug in 2 values to get the others.
D
http://www.angelfire.com/pa/baconbacon/page2.html
BTW you only have to plug in 2 values to get the others.
D
05-24-2008, 05:39 PM
#24
200,000 mile club
Thread Starter
Join Date: Jul 2007
Location: Charlotte, NC
Age: 49
Posts: 1,774
Likes: 0
Received 35 Likes
on
15 Posts
I have no idea what greasy stuff you are talking about. if there are some white glue on the rsistor, that is ment to disperse the heat out to keep the resitor cooler.
06-30-2008, 12:03 AM
#25
some update...
i've put one per side and my signals still hyper flash while my hazard were normal...
i have LED switchback fronts and red LED rears with type s side mirrors...
i took both resistors off, tried again and my hazard were hyper flashing as well....
so basically i think we need 2 per side to make this happen since one per side was working with the hazard blink...they were blinking normal rate, so the resistors were doing their job....just not enough to slow down the flashing for the signals.....
any suggestion or anyone who can confirm they have only one per side?? because it didn't work for me.....
06-30-2008, 01:11 AM
#28
Originally Posted by lights
6 ohm 50 watt version from v-leds just like mmade22 except one per side.
06-30-2008, 02:17 AM
#29
Originally Posted by Buda
From what I've seen in this thread and the other one, you would need two of those per side. I just installed the 4 ohm 100 watt version friday night (1 each side) and it works fine ('06 TL). I got them from partsexpress.com
06-30-2008, 11:04 AM
#30

thats interesting. when I was installing the resistors, i put in 2 on the drivers side and tested.. the hazards were flashing at a normal rate so I thought maybe I just need to install resistors on one side, but then I checked my turn signals and they were hyper flashing so I just installed another 2 resistors on the passenger side and now everything is performing the way they should be. the resistors do get pretty hot tho.
using 2 6 ohm 50 watt in parallel
using 2 6 ohm 50 watt in parallel
06-30-2008, 02:24 PM
#31
200,000 mile club
Thread Starter
Join Date: Jul 2007
Location: Charlotte, NC
Age: 49
Posts: 1,774
Likes: 0
Received 35 Likes
on
15 Posts
Lights, do you know how to use an ohm meter? Put an ohm meter across each resistor and see if it reads the same. It should. I thought you only needed one perside but my brain was telling me, two led lights, two resistors. It made sense to me so I just left all four hooked up. Let me know what happens.
To test it out, connect the two you have inline to one side exactly as I did. Turn the signal on and see what happens.
To test it out, connect the two you have inline to one side exactly as I did. Turn the signal on and see what happens.
 06-30-2008, 06:36 PM
#33
200,000 mile club
Thread Starter
Join Date: Jul 2007
Location: Charlotte, NC
Age: 49
Posts: 1,774
Likes: 0
Received 35 Likes
on
15 Posts
Originally Posted by mmade22
That could be true about one per side. I thought it was one per light since normally if one light was out, it would blink fast. If so I will remove the two extra and sell them.
Thanks lights for confirming this. So I wasn't crazy when I said this back in February........
06-18-2009, 09:40 PM
#35
Instructor
Join Date: Mar 2008
Location: Norse Dakohta, Yah
Age: 35
Posts: 118
Likes: 0
Received 0 Likes
on
0 Posts
Please excuse my ignorance on the matter, guys - my knowledge is rudimentary at best. Is it possible that I might only need one resistor if I only have LED turn signals in the front? I'm thinking you might require two because of the additional decrease in power consumption from your rear LED signal lamps...
06-19-2009, 02:42 AM
#36
Your need for resistors depends on how many LEDs you currently have. If you have switchbacks (in the front) and LED turn signals in the back you will need ONE 6 ohm resistor. If you only have one LED (either switchbacks or rear LED turn signals), you need a 3 OHM resistor. V-LEDs sells these in a kit for cheap (i think 9.99) Regardless of where you have your LEDs, most members have mounted them in the trunk since the lines run to both signal markers. In terms of heat, I installed mine and they get REALLY hot. I was able to easily install one of them out of the way of the liner but the other one I drilled incorrect holes. This was due to me using a mounting plate (which you should get), which dissipates the heat from the resistor more evenly so it will not heat up your frame. I ran out of time but still need to mount the other resistor behind the frame so it is out of touch with the trunk liner. I was thinking about possibly buying some sort of heat shield and take the lazy approach but it is not worth it
P.S. there is already a detailed thread about this install in the 3G garage!
Copperbottoms: you are correct you will only need one 3 OHM resistor (on each side) with only one pair of LEDs.
Overall super easy to do. Just make sure you have a metal drill bit and a ratchet set that can get behind the frame to secure the resistors.
06-19-2009, 03:47 AM
#38
Instructor
Join Date: Mar 2008
Location: Norse Dakohta, Yah
Age: 35
Posts: 118
Likes: 0
Received 0 Likes
on
0 Posts
Now I just have to work up enough courage to clear my headlights so I need LED signals at all...
 06-19-2009, 04:46 PM
#39
Cruising in my
This thread gave me the confidence to try this myself. I'm going to black out my headlights and use switchbacks with the resistors with the instructions on this thread. Thanks mmade22 and everyone else.