
Resistor Install Help

Resistor Install Help
hey guys, so i been reading on the led and resistors, got my switchback and installed them. Trying to install resistors but dont know how to connect them. It comes with 2 blue things where you can plug in the wires... not sure how you connect them. Do i have to cut the wire and plug it in the blue thing? Will take pics when I get home incase you dont know what im talking about, but if you do please help. Which two wires do i connect them two? Can anyone pin point them out, did a search on it but the pic does not pin point which two wires.
I'll be doing mine in a few weeks after I get my headlights cleared, but this is how I interpret the wiring harnes is wired to deal with the 7443 dual filament bulbs.
Those blue plastic pieces are known as "wire taps" and their purpose is to tap into wires. without cutting them.
In our case, because the 7443 bulbs\switchbacks have 2 positive (+) and one (-) due to the dual filament bulbs for turn signal\parking lights, you will have to run the resistors in "parallel" with the 7443 LED (that is, to tap into both positive (+) wires before they enter the bulb, and then only ONCE into the single negative (-) again after it exits the 7443 LED. It needs to be done this way only if the TL has a dashboard indicator about the parking lights. Could someone please advise?
Well, assuming that both positive wires need tapped, continue reading:
If you will notice, a tap has 2 channels for two wires to slide through. Lets start by sliding one of the (+) wire from the wiring harness into the innermost position on the tap. Then, strip the insulation off of the other positive (+) wire on the harness and attach a few inches of wire to work with (go out and buy some 14-16 guage if you dont have any) and pair it with one of the pre-cut resistors wires. Now, take this pair of wire you have just paired together and slide it in the outer channel of the tap. Now carefully "clip" the door shut on the clip. This is done by bandingthe flimsy blue tab toward the metal piercing blade.
By doing this, you are now putting a current load on both the turn signal and the parking light. As mentioned, Im not sure if there is any type of annoying warning that a parking light is burnt out on your dashboard or rather the turn signal blinking twice as fast. If there isnt a parking light dash indicator then you can disregard having to tap into BOTH positive wires and just simply tap into ONE of them without any stripping of the 2nd positive wire.
Again, just my someone correct me if im wrong and also advise on the console indicator for parking lights.
Those blue plastic pieces are known as "wire taps" and their purpose is to tap into wires. without cutting them.
In our case, because the 7443 bulbs\switchbacks have 2 positive (+) and one (-) due to the dual filament bulbs for turn signal\parking lights, you will have to run the resistors in "parallel" with the 7443 LED (that is, to tap into both positive (+) wires before they enter the bulb, and then only ONCE into the single negative (-) again after it exits the 7443 LED. It needs to be done this way only if the TL has a dashboard indicator about the parking lights. Could someone please advise?
Well, assuming that both positive wires need tapped, continue reading:
If you will notice, a tap has 2 channels for two wires to slide through. Lets start by sliding one of the (+) wire from the wiring harness into the innermost position on the tap. Then, strip the insulation off of the other positive (+) wire on the harness and attach a few inches of wire to work with (go out and buy some 14-16 guage if you dont have any) and pair it with one of the pre-cut resistors wires. Now, take this pair of wire you have just paired together and slide it in the outer channel of the tap. Now carefully "clip" the door shut on the clip. This is done by bandingthe flimsy blue tab toward the metal piercing blade.
By doing this, you are now putting a current load on both the turn signal and the parking light. As mentioned, Im not sure if there is any type of annoying warning that a parking light is burnt out on your dashboard or rather the turn signal blinking twice as fast. If there isnt a parking light dash indicator then you can disregard having to tap into BOTH positive wires and just simply tap into ONE of them without any stripping of the 2nd positive wire.
Again, just my
someone correct me if im wrong and also advise on the console indicator for parking lights.
Originally Posted by gerzand
I'll be doing mine in a few weeks after I get my headlights cleared, but this is how I interpret the wiring harnes is wired to deal with the 7443 dual filament bulbs.
Those blue plastic pieces are known as "wire taps" and their purpose is to tap into wires. without cutting them.
In our case, because the 7443 bulbs\switchbacks have 2 positive (+) and one (-) due to the dual filament bulbs for turn signal\parking lights, you will have to run the resistors in "parallel" with the 7443 LED (that is, to tap into both positive (+) wires before they enter the bulb, and then only ONCE into the single negative (-) again after it exits the 7443 LED. It needs to be done this way only if the TL has a dashboard indicator about the parking lights. Could someone please advise?
Well, assuming that both positive wires need tapped, continue reading:
If you will notice, a tap has 2 channels for two wires to slide through. Lets start by sliding one of the (+) wire from the wiring harness into the innermost position on the tap. Then, strip the insulation off of the other positive (+) wire on the harness and attach a few inches of wire to work with (go out and buy some 14-16 guage if you dont have any) and pair it with one of the pre-cut resistors wires. Now, take this pair of wire you have just paired together and slide it in the outer channel of the tap. Now carefully "clip" the door shut on the clip. This is done by bandingthe flimsy blue tab toward the metal piercing blade.
By doing this, you are now putting a current load on both the turn signal and the parking light. As mentioned, Im not sure if there is any type of annoying warning that a parking light is burnt out on your dashboard or rather the turn signal blinking twice as fast. If there isnt a parking light dash indicator then you can disregard having to tap into BOTH positive wires and just simply tap into ONE of them without any stripping of the 2nd positive wire.
Again, just my someone correct me if im wrong and also advise on the console indicator for parking lights.
Those blue plastic pieces are known as "wire taps" and their purpose is to tap into wires. without cutting them.
In our case, because the 7443 bulbs\switchbacks have 2 positive (+) and one (-) due to the dual filament bulbs for turn signal\parking lights, you will have to run the resistors in "parallel" with the 7443 LED (that is, to tap into both positive (+) wires before they enter the bulb, and then only ONCE into the single negative (-) again after it exits the 7443 LED. It needs to be done this way only if the TL has a dashboard indicator about the parking lights. Could someone please advise?
Well, assuming that both positive wires need tapped, continue reading:
If you will notice, a tap has 2 channels for two wires to slide through. Lets start by sliding one of the (+) wire from the wiring harness into the innermost position on the tap. Then, strip the insulation off of the other positive (+) wire on the harness and attach a few inches of wire to work with (go out and buy some 14-16 guage if you dont have any) and pair it with one of the pre-cut resistors wires. Now, take this pair of wire you have just paired together and slide it in the outer channel of the tap. Now carefully "clip" the door shut on the clip. This is done by bandingthe flimsy blue tab toward the metal piercing blade.
By doing this, you are now putting a current load on both the turn signal and the parking light. As mentioned, Im not sure if there is any type of annoying warning that a parking light is burnt out on your dashboard or rather the turn signal blinking twice as fast. If there isnt a parking light dash indicator then you can disregard having to tap into BOTH positive wires and just simply tap into ONE of them without any stripping of the 2nd positive wire.
Again, just my
someone correct me if im wrong and also advise on the console indicator for parking lights.From seeing this: https://acurazine.com/forums/ramblings-12/my-500th-post-175698/ is appears that you dont have to tap into both (+) . Saves some work
 I knew i had seen this post somewhere before.
 Unfortunately I still dont know which (+) is which...unless using a voltmeter with the turn signal on to see the voltage bouncing around.
Originally Posted by xoulu
damn.... harder then i thought it would be.... any step by step diy?
As quoted by mmade22 in the thread above.
"Doing it in the rear of the car takes all the guess work out of which wires to tap into. There are only two going to the blinker as it is seperate from the running lights. Another reason to tap it from the trunk. By the way, only one resistor is needed per side. I haven't taken out the extra one on each side. I am going to leave them as the load is going across two so there will be less heat building up."
And again, reference the link that I posted above. It shows pics of which color wires to tap (1 black and 1 white) in the taillight turn signal harness. Thats it, all answers are in that thread.
got the wire part, but how would you wire it with the wiretaps? do u cut the cable? since the image shows u have to connect it, how would u connect it? glue it? circle it? tie it? this is the part im confuse. do i have to cut the cables that i need to tap it on, if so, how would i attach it because it seems the wire tap...i dont know how to use the wire tap
Originally Posted by xoulu
got the wire part, but how would you wire it with the wiretaps? do u cut the cable? since the image shows u have to connect it, how would u connect it? glue it? circle it? tie it? this is the part im confuse. do i have to cut the cables that i need to tap it on, if so, how would i attach it because it seems the wire tap...i dont know how to use the wire tap
Besides drawing a picture, thats the only way I can explain to you how you do it. I think thats a pretty detailed description.
Trending Topics
200,000 mile club
Joined: Jul 2007
Posts: 1,774
Likes: 37
From: Charlotte, NC
If you look at my old thread on this, you can blow the picture up and see that the resistors just tap into the existing wires... Do not cut the wires. You can use the blue clips to tap into the existing wires. The resistors run in series with the blinker wires and the resistor takes the load that the bulb would normally take. It's not hard at all. Just make sure you mount these away from anything that could get hot. I don't think we could make it any easier for you.

they are necessary no matter where you have switchbacks but it is easiest to put the resistors in the trunk even if you are only putting switchbacks in your headlights, for instance.
200,000 mile club
Joined: Jul 2007
Posts: 1,774
Likes: 37
From: Charlotte, NC
Here's were I put mine..............
https://acurazine.com/forums/car-parts-sale-361/comptech-exhaust-used-headers-new-nex-used-173947/
https://acurazine.com/forums/car-parts-sale-361/comptech-exhaust-used-headers-new-nex-used-173947/
alright guys so i tried to install it, and i didn't kno which wires to tap....
looked at http://i17.photobucket.com/albums/b6...2/IMG_0368.jpg and i couldn't do it, i splice the bigger wire open and there was two white wires and two black wires. didn't know which to tap. any clues?
looked at http://i17.photobucket.com/albums/b6...2/IMG_0368.jpg and i couldn't do it, i splice the bigger wire open and there was two white wires and two black wires. didn't know which to tap. any clues?
I hate to be rude, but this does require some common sense when dealing with electrical stuff. Nonetheless, here should be the last of the help you could need.
The 4 wires you are seeing are 2 + and 2 - .... one pair of black/white for the corner lights and another pair for the blinkers. Simply follow which pair goes to which bulb and bridge the pair that go to the turn signal bulb using the resistor. Plain and simple.
The 4 wires you are seeing are 2 + and 2 - .... one pair of black/white for the corner lights and another pair for the blinkers. Simply follow which pair goes to which bulb and bridge the pair that go to the turn signal bulb using the resistor. Plain and simple.
200,000 mile club
Joined: Jul 2007
Posts: 1,774
Likes: 37
From: Charlotte, NC
The only easier way to do is show you in person and do it for you! I tried to make it as easy as possible but it sounds like you need someone who knows some things about basic electronics....... 
200,000 mile club
Joined: Jul 2007
Posts: 1,774
Likes: 37
From: Charlotte, NC
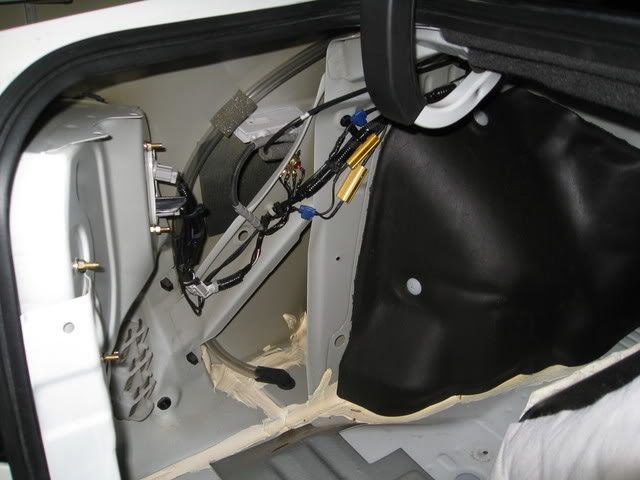
OK so a couple of guys have sent me a pm regarding the hookup of the resistors. Here are all of the pictures I have of the install of them.. One shows the wires I spliced into (white and black). I hope this will answer all of your questions.
I kept the pictures as big as possible so you could see everything.....
These connectios are all made in the trunk of the car not the front........


I kept the pictures as big as possible so you could see everything.....
These connectios are all made in the trunk of the car not the front........
Senior Moderator
Regions Leader
Regions Leader


Joined: Aug 2004
Posts: 8,896
Likes: 218
From: Dallas TX
Where did you get the resistors, what type are they?
Where exactly in the trunk are you in that pic? Looks like just forward of the tail lights
So its one for white and one for black?
Where exactly in the trunk are you in that pic? Looks like just forward of the tail lights
So its one for white and one for black?

AZ Community Team
Joined: May 2007
Posts: 32,488
Likes: 7,771
From: N35�03'16.75", W 080�51'0.9"
Originally Posted by trancemission
....
Where exactly in the trunk are you in that pic? Looks like just forward of the tail lights
....
Where exactly in the trunk are you in that pic? Looks like just forward of the tail lights
....
Don't know about the wiring E, but here's a wider shot from the original thread for location:
Originally Posted by mmade22
....
Farther away.........
Farther away.........


Thread
Thread Starter
Forum
Replies
Last Post
cycdaniel
1G TSX Performance Parts & Modifications
8
Dec 17, 2019 10:58 AM
Greengecko
3G TL Audio, Bluetooth, Electronics & Navigation
4
Sep 16, 2015 08:19 PM