

Replacing the Brakes (with pictures) 3G Garage #D-041
 08-13-2011, 08:15 PM
#81
Advanced

You're welcome dude. But, don't think we solved your problems, yet.
Good to hear about the grinding noise. Regarding dust, the inside of my wheels are black, too unless I clean them. When you referred to dusting - I was thinking more of it being brown/black on the outside of the wheels (like the BMW/Merc you see sometime). Otherwise, I think it's just regular dirt and normal... Take some pics when it's really bad. I'll take some from mine, too. See if it's what you're talking about.
Good to hear about the grinding noise. Regarding dust, the inside of my wheels are black, too unless I clean them. When you referred to dusting - I was thinking more of it being brown/black on the outside of the wheels (like the BMW/Merc you see sometime). Otherwise, I think it's just regular dirt and normal... Take some pics when it's really bad. I'll take some from mine, too. See if it's what you're talking about.
Will do man, thanks. I'm pretty OCD about cleaning my wheels at least once every 1-2 weeks, and I'll reach inside the wheel with a sponge and wheel cleaner, and thoroughly clean the inside. From 0-90,000 miles (original brakes) , the wheels never really got too loaded with brake dust. With since I put the CMAX's on, the dust has been at least double. I thought it would be half since these are good ceramic pads, so it's quite the dilemma.
I've got a road trip next week to Charlotte, so I'll take some pictures afterwards, and post up.
Thanks again!
 08-20-2011, 09:49 AM
#82
Advanced
Dust shots
(we had a hard rain last night, so you'll see some spots from that)

Uploaded with ImageShack.us

Uploaded with ImageShack.us

Uploaded with ImageShack.us

Uploaded with ImageShack.us
08-20-2011, 11:10 AM
#83
AZ Community Team

Join Date: May 2007
Location: N35�03'16.75", W 080�51'0.9"
Posts: 32,488
Received 7,771 Likes
on
4,342 Posts
Dude, paint your rotor hubs. Seriously.
:lol:

:lol:
03-28-2012, 10:57 AM
#85
tehLEGOman
Join Date: Dec 2004
Location: Charlotte, NC
Age: 41
Posts: 9,171
Received 1,983 Likes
on
1,336 Posts
I tried changing the rear pads yesterday and had a little trouble getting the piston to recess back into the caliper. I'm determined to do this myself so i'm about to go back out and try it again.
If i can't get the C-clamp to work i may ride my bike down to autozone and pick up this caliper tool a few people have mentioned. I'm curious to see how it works.
Thanks for the write up.
If i can't get the C-clamp to work i may ride my bike down to autozone and pick up this caliper tool a few people have mentioned. I'm curious to see how it works.
Thanks for the write up.
03-28-2012, 11:46 AM
#86
takin care of Business in
iTrader: (5)
Join Date: Jan 2008
Location: Kansas City, MO
Age: 40
Posts: 30,994
Received 4,732 Likes
on
4,064 Posts
^^^ I recently went thro the same bro....had to replace the caliper from Advance Auto Parts.....the piston was stuck/seized and wudnt budge....chewed up my rear pads 
03-28-2012, 01:31 PM
#87
My Cmax's starting dusting a lot too, I noticed after initial break in. Worse in the rear than the front! Hmmm....
Caliper should make it go in...try using the old pad though to try and distribute the pressure evenly...if you press one side of the caliper it'll get stuck. I do each side..little by little (of the caliper) once it starts sliding it'll go back in pretty easily. I think LISLE makes a hand compression tool that'll make it even easier though.
Caliper should make it go in...try using the old pad though to try and distribute the pressure evenly...if you press one side of the caliper it'll get stuck. I do each side..little by little (of the caliper) once it starts sliding it'll go back in pretty easily. I think LISLE makes a hand compression tool that'll make it even easier though.
03-28-2012, 01:39 PM
#88
tehLEGOman
Join Date: Dec 2004
Location: Charlotte, NC
Age: 41
Posts: 9,171
Received 1,983 Likes
on
1,336 Posts
Ok i'm back and this time around it was a breeze. The rubber seal had gotten stuck and wasn't allowing the piston to slide easily, so i yanked it out of there and sprayed some brake cleaner to clear out some of the junk. Then i took a wire brush and made some of the rust go away. Then i used the C-clamp and the old pad and sure enough it slid right back into the housing.
I'm very happy.
And then i put everything back together and gave her a wash.
I'm very happy.
And then i put everything back together and gave her a wash.
 03-28-2012, 02:46 PM
#90
takin care of Business in
iTrader: (5)
Join Date: Jan 2008
Location: Kansas City, MO
Age: 40
Posts: 30,994
Received 4,732 Likes
on
4,064 Posts
Ok i'm back and this time around it was a breeze. The rubber seal had gotten stuck and wasn't allowing the piston to slide easily, so i yanked it out of there and sprayed some brake cleaner to clear out some of the junk. Then i took a wire brush and made some of the rust go away. Then i used the C-clamp and the old pad and sure enough it slid right back into the housing.
I'm very happy.
And then i put everything back together and gave her a wash.
I'm very happy.
And then i put everything back together and gave her a wash.

ditto same problem i went thro....took the rubber seal off and sprayed some cleaner and nothing

so i pressed on the brake gently to see if the caliper moves out and nothing....shit was seized....bit the bullet and bought a new caliper from AAP for $45....
there was soooo much rust inside the caliper piston....i was like :jawdrop:
PS: Tyler was telling me his caliper got seized as well and so were many other members....so if i were you, i would keep a close eye/ear on the rear for some rubbing....and if you hear rubbing, change the caliper before it eats up your pads/rotors....
Last edited by swoosh; 03-28-2012 at 02:48 PM.
03-28-2012, 05:25 PM
#92
takin care of Business in
iTrader: (5)
Join Date: Jan 2008
Location: Kansas City, MO
Age: 40
Posts: 30,994
Received 4,732 Likes
on
4,064 Posts
^^^ hahah i tried that....i even started my car and pressed my brakes (slightly) to see is anything would change....i even took the caliper out, removed the brake line and hammered the piston and it didnt help.....damn rust !!!
03-28-2012, 08:58 PM
#94
Race Director
iTrader: (8)
I hate you guys who got your seized calipers replaced for cheap.
I went into my dealer after I noticed my rear passenger caliper was seized (made my wheel HOT!!!) and a few hours later they replaced the caliper, and replaced both rear pads and what not and it came to $720...
Most of the cost was from labour... wtf!
I could have gotten a cheap caliper like you guys and do everything MYSELF including changing the rear brake pads and use the leftover money to fix my damn rust!
The following users liked this post:
guitarplayer16 (03-28-2012)
03-28-2012, 09:06 PM
#96
takin care of Business in
iTrader: (5)
Join Date: Jan 2008
Location: Kansas City, MO
Age: 40
Posts: 30,994
Received 4,732 Likes
on
4,064 Posts
^^^ 
feel sorry for you buddy....well atleast you got an OEM caliper
I got the AAP caliper for $95 and got $50 back when i turned in my caliper
EDIT: post was directed to GP
feel sorry for you buddy....well atleast you got an OEM caliper
I got the AAP caliper for $95 and got $50 back when i turned in my caliper
EDIT: post was directed to GP
The following users liked this post:
guitarplayer16 (03-28-2012)
03-28-2012, 10:14 PM
#97
One on the right for me
you lucky bishhh
ditto same problem i went thro....took the rubber seal off and sprayed some cleaner and nothing
so i pressed on the brake gently to see if the caliper moves out and nothing....shit was seized....bit the bullet and bought a new caliper from AAP for $45....
there was soooo much rust inside the caliper piston....i was like :jawdrop:
PS: Tyler was telling me his caliper got seized as well and so were many other members....so if i were you, i would keep a close eye/ear on the rear for some rubbing....and if you hear rubbing, change the caliper before it eats up your pads/rotors....
03-28-2012, 11:51 PM
#98
takin care of Business in
iTrader: (5)
Join Date: Jan 2008
Location: Kansas City, MO
Age: 40
Posts: 30,994
Received 4,732 Likes
on
4,064 Posts
^^^ 
i looked inside the piston and looked like someone took a rust crap in there....and it wudnt come out even with the damn wire brush and wd40 or CRC brake cleaner or (forgot the name of the spray) spray
i looked inside the piston and looked like someone took a rust crap in there....and it wudnt come out even with the damn wire brush and wd40 or CRC brake cleaner or (forgot the name of the spray) spray
03-29-2012, 10:15 AM
#100
takin care of Business in
iTrader: (5)
Join Date: Jan 2008
Location: Kansas City, MO
Age: 40
Posts: 30,994
Received 4,732 Likes
on
4,064 Posts
^^^ TMI bro....TMI.....
03-29-2012, 11:39 AM
#101
^That's called blood. Have that checked out. 
As far as Calipers go, Centric (Stoptech) sells remaned calipers for TL. And since there are soooooo many Centric Parts dealers around the nation, prices can be insanely low. Google these part numbers to find good prices. And don't forget to look for discount coupons for the cheapest places. I know StockwiseAuto.com has outstanding prices on Centric parts (as well as coupon codes):
http://extranet.soleniuminc.com/Cent...05&m=58&mm=749
Brembo Front Left 142.40084
Brembo Front Right 142.40083
Base Front Left 142.40034
Base Front Right 142.40033
Rear Left 142.40538
Rear Right 142.40537
You can also sometimes find cheaper versions by subsituting a 141 prefix (instead of 142). These have a less expensive Premium brake pad instead of the Posi-Quiet compound. Last time I checked, the Brembo 141's had been discontinued.
BTW: Centric also makes replacment pistons & seal/boot kits too
Brembo seals: 143.63023
Base Front seals: 143.91013
Rear seals: 143.40012
Brembo Pistons: 146.38054 & 146.42023
Base Pistons: 146.57014
Rear Pistons: 146.38021
Last edited by 94eg!; 03-29-2012 at 11:43 AM.
05-06-2012, 01:25 PM
#103

Did the rear brakes today (rotors+pads) on my 2005 Base TL Automatic. The rotor screws were a royal PITA. Drilled the screw head off and screwed out the remainder of the screw using a nose plier. Thanks to this DIY, and ofcorse PB Blaster, everything else was easy to follow and do.
Did not have the "caliper stuck situation". A simple c-clamp helped with pushing it back.
Did not have the "caliper stuck situation". A simple c-clamp helped with pushing it back.
08-09-2012, 12:18 PM
#104
Intermediate

2006 TL, Automatic.
Two years ago I changed the front brakes (AKEBONO Part #ACT787 ProACT Ultra Premium Ceramic Pad). The rotors were still the OEM. The pads were worn down. This time around I decided to change the rotors and ordered new pads as well (CENTRIC Part #12040046 Premium Rotor and CENTRIC Part #30907870 StopTech Street Performance).
When I took the wheel off and removed the pads (these were the Akebono pads I installed two years ago), I noticed that there is only one shim per pad. These would be the wider shims. I'm now asking myself, did I forgot to put the smaller "outer" shim back on? Were there any outer shim at all? I don't remember. Looking at the scans of the shop manual (thanks Ron), I see two shims displayed, an inner and outer per each side of pads. I see it in op's pics as well. So now I'm asking myself, did I toss the smaller outer shim.
I don't recall what the Akebono came with, but the StopTechs came with the wider inner shims already snapped to the back of each pad. So now I'm thinking there must have been a full moon the night before that messed with my thinking.
Any feedback would help. Thanks.
08-09-2012, 12:23 PM
#105
The OEM shims are for the OEM pads only. You don't want to re-use them on different pads. The aftermarket pads "should" have their own shims. OEM pads are the only ones I've ever seen that stack multiple shims of different materials. Just service the sliding pins, throw the new pads & rotors in, and your good to go.
08-09-2012, 01:10 PM
#106
Intermediate
Thanks. For a second there, I was considering ordering the shim set (thinking I may have tossed out something I needed).
Thanks 94eg. I followed your advice on other posts and did check the sliding pins, cleaned and greased.
This is what I used:
Permatex Disc Brake Quiet Lubricant:
Use on brake shims and metal retainer clips (top and bottom) of caliper bracket.
Permatex Ultra Disc Brake Caliper Lube: use on slider pins and the part of the piston that is exposed.
Permatex Ultra High-Temp (Red label)/ (green label)
Sil-Glyde (Advance Auto Parts or AutoZone)*
I've read where some prefer Sil-Glyde over Permatex.
08-09-2012, 03:53 PM
#107
Yeah any silicone brake grease is fine for the pins. I use syl-glyde cause they are the cheap little packets you get at autozone by the register. I'm sure both are good products. One day I may invest in a tube of Honda silicone grease. But at $45, it's kinda hard to justify:
08C30-B0234M
08C30-B0234M
08-10-2012, 12:04 PM
#108
HOw did you push the pistons in on the Brembos?
Could you PM me if you have done your front pads brembos?
when you remove the old pads, This write up did not show how he kept the 2 pistons on the same side from pushing and pulling out while pressing the pistons back in?
anyone have a good way to push the pistons in on the Brembos?
08-10-2012, 01:24 PM
#110
You can use an old pad stuck in sideways, then lever it against the rotor. The problem is that if you push too hard, it causes the other pistons to come back out. You just have to work slowly so the other pistons stay put.
08-10-2012, 01:27 PM
#111
takin care of Business in
iTrader: (5)
Join Date: Jan 2008
Location: Kansas City, MO
Age: 40
Posts: 30,994
Received 4,732 Likes
on
4,064 Posts
and why are we not getting the caliper piston tool?
you guys know Autozone/Advance Auto Parts/etc rent the tool out for free right?
you guys know Autozone/Advance Auto Parts/etc rent the tool out for free right?
08-10-2012, 02:03 PM
#112
On Brembos, since they have 2 pistons on each side, you can't get the "press" side of a traditional caliper tool in to press in. Hard to explain, but it wont' work. Unless it's a different one that I'm not aware of.
08-10-2012, 02:18 PM
#113
takin care of Business in
iTrader: (5)
Join Date: Jan 2008
Location: Kansas City, MO
Age: 40
Posts: 30,994
Received 4,732 Likes
on
4,064 Posts
^^^ yes its a different one....
something like this one:

something like this one:
The following 2 users liked this post by swoosh:
mrsimeon (08-13-2012),
rockstar143 (08-10-2012)
08-10-2012, 02:35 PM
#115
takin care of Business in
iTrader: (5)
Join Date: Jan 2008
Location: Kansas City, MO
Age: 40
Posts: 30,994
Received 4,732 Likes
on
4,064 Posts
^^^ yeah the extra trip kills it but well....do call and check, only a few autozone carry it around here 
08-10-2012, 04:51 PM
#116
Brake Grease: Versachem Synthetic is good stuff.
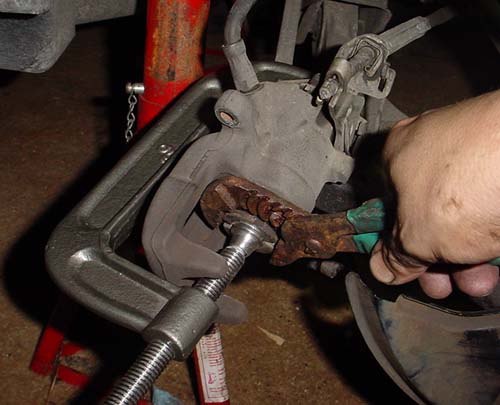
Compressing pistons: I open the bleeder and slowly squeeze both pistons back with the old pad + super big pliers. I'll just wrap the one claw that presses against the outer painted caliper surface with a shop rag or something to protect the paint. Super big pliers work great on brakes, and many other misc auto work.
Compressing pistons: I open the bleeder and slowly squeeze both pistons back with the old pad + super big pliers. I'll just wrap the one claw that presses against the outer painted caliper surface with a shop rag or something to protect the paint. Super big pliers work great on brakes, and many other misc auto work.
08-15-2012, 06:58 PM
#117
5th Gear

Join Date: Dec 2011
Posts: 5
Likes: 0
Received 0 Likes
on
0 Posts
A quick tip that seems to work for me. After remover the caliper bolts I work the caliper back so it's about 1/2 off and then I gently rock it back and forth. This gently pushes the caliper piston back into the frame. About 5 or 6 times and the piston is fully retracted. Don't know if someone smarter than me has ideas on how to do it better but this seems a lot quicker and simpler than using C clamps (which I had at the ready and never needed).
A really great sticky with excellent pictures and additional tips added. Thanks everyone.
A really great sticky with excellent pictures and additional tips added. Thanks everyone.
11-05-2012, 11:32 AM
#119
Advanced
Lessons Learned - Don't Go Duralast
With regard to pads and rotos, my advice is to NOT go with Duralast. About a year ago, I went with Duralast CMAX gold pads and Duralast rotors for the front.
After over a year of heavy dusting and rusty rotors, I switched out the front hardware.
Rotor Problems - Duralast Rotors
Pad Problems - Duralast CMAX Gold
Heavy dusting - I'd say 30% more dust than original Acura Pads.
So I replaced the rotors and pads and went with:
- Raybestos Advanced Technology Rotors. (The rotor hat and tops have a special coating so it doesn't rust)
- Akebono ProACT Ceramic pads.
Things are going much better, there's little to no dust, and the rotors matched up perfectly with the original rotors.
I also went ahead and replaced the rears, so I have a fresh set for all 4 wheels.
After over a year of heavy dusting and rusty rotors, I switched out the front hardware.
Rotor Problems - Duralast Rotors
- VERY rusty. Basically any rotor part that the pad didn't press against remained rusty.
- NOT OEM. The disc platters on this rotor are not as thick as the originals. And the space in between the 2 discs is larger than the original.
Pad Problems - Duralast CMAX Gold
Heavy dusting - I'd say 30% more dust than original Acura Pads.
So I replaced the rotors and pads and went with:
- Raybestos Advanced Technology Rotors. (The rotor hat and tops have a special coating so it doesn't rust)
- Akebono ProACT Ceramic pads.
Things are going much better, there's little to no dust, and the rotors matched up perfectly with the original rotors.
I also went ahead and replaced the rears, so I have a fresh set for all 4 wheels.
02-20-2013, 03:03 PM
#120
Intermediate

 ....the fronts were easy the rears are killing me....lemme know....am working on the car as i write for help
I know someone else who made an entire custom piece, but that is a different story.
From personal experience, I first tried to super human hulk strength the piston with heavy duty needle nose pliers with some electrical tape on the end.... well lets just say don't do that or you'll feel pain that resembles that full force punch of the knuckle into the frame. I then tried my oversized c clamp, and it actually spun the pistol itself while I torqued the handle of the clamp.
cheap and easy, otherwise do the rental.