
F-168 Steering wheel removal???????

Thread Starter
under renovations....
iTrader: (2)
Joined: Nov 2007
Posts: 1,473
Likes: 49
From: BX-YO
F-168 Steering wheel removal???????
Mods if this is Garage worthy please post it up.
I did this because I got the oem Carbon Fiber steering wheel. I didn't feel the need to shell out $100+ to the dealer for something I could've done myself.
This is a diy for the removal of the steering wheel. Of course the re-install is gonna be reverse of everything here.
****NOTE: YOU TAKE FOR RESPONSIBILTY FOR THIS DIY SINCE IT DOES REQUIRE REMOVING THE AIRBAG. IF YOU DON'T FEEL COMFORTABLE DOING IT THEN TAKE IT TO THE DEALER OR TO SOMEONE WHOSE TRUSTWORTHY WITH IT.****
Let's begin....
Tools needed: T30 Torx bit (for the airbag screws)
Phillips head screwdriver
Ratchet with a 10mm and 14mm socket
Black marker (sharpie)
Codes for your radio and navi(if equipped)
First make sure your on a flat surface and the car is straight. You don't want the wheels turned because when you put the steering wheel back on you might put it on out of alignment. So just move the car back and forth to straighten it out. Next remove the negative(-) terminal on the battery. Use the 10mm socket for this.
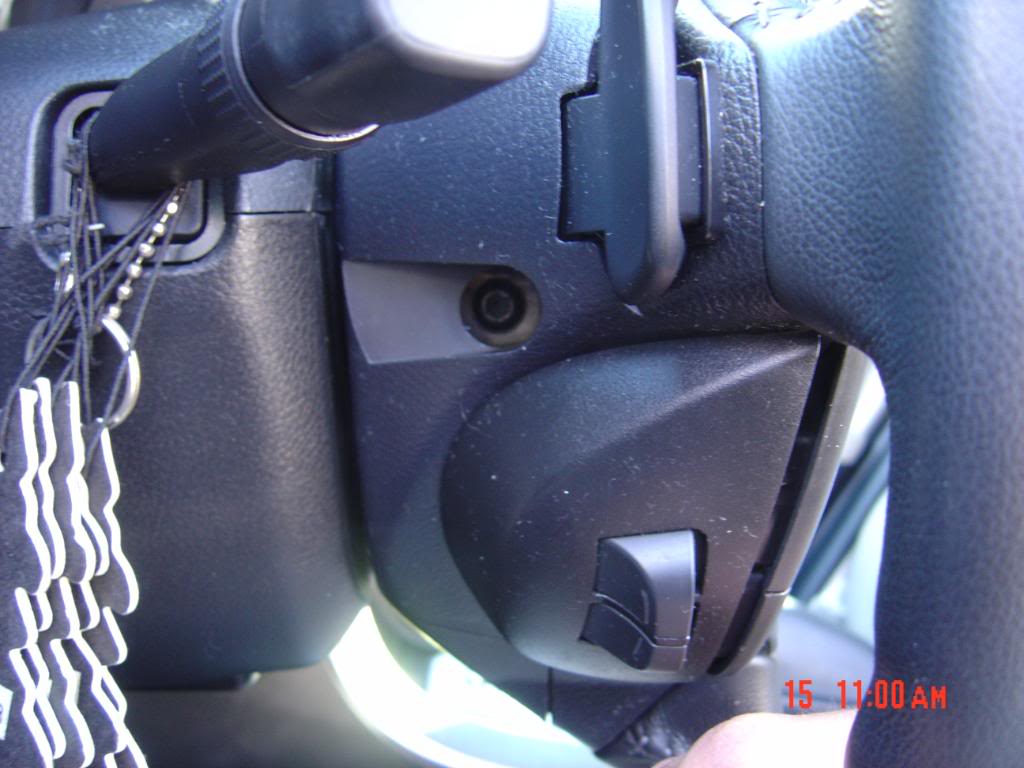
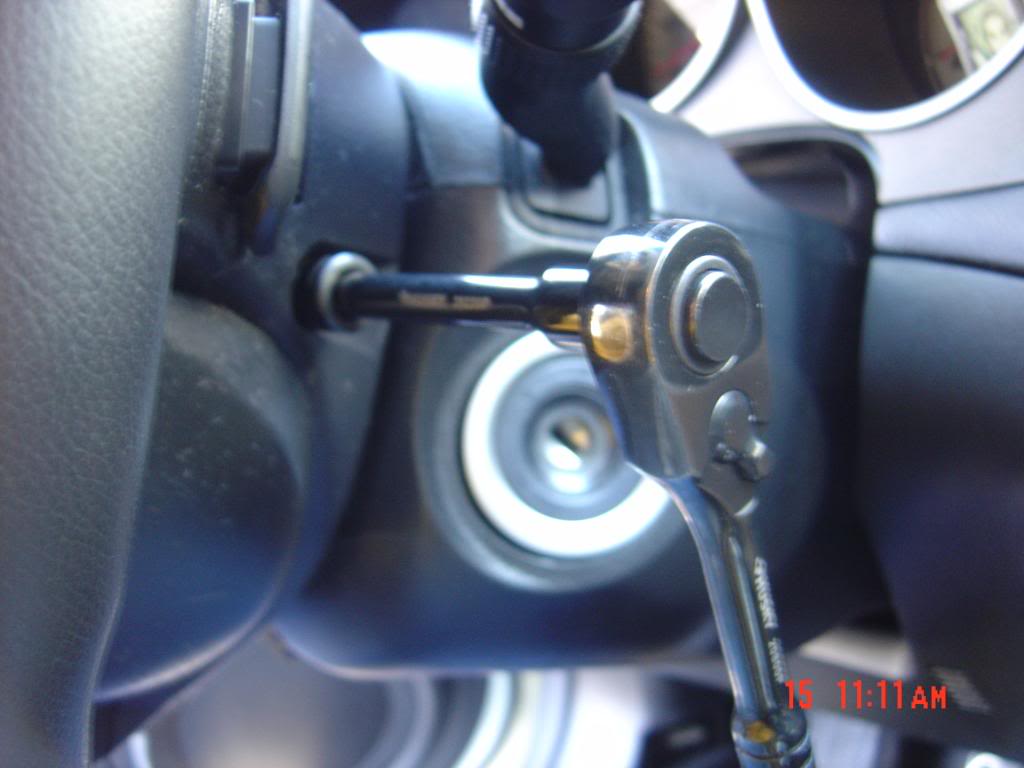
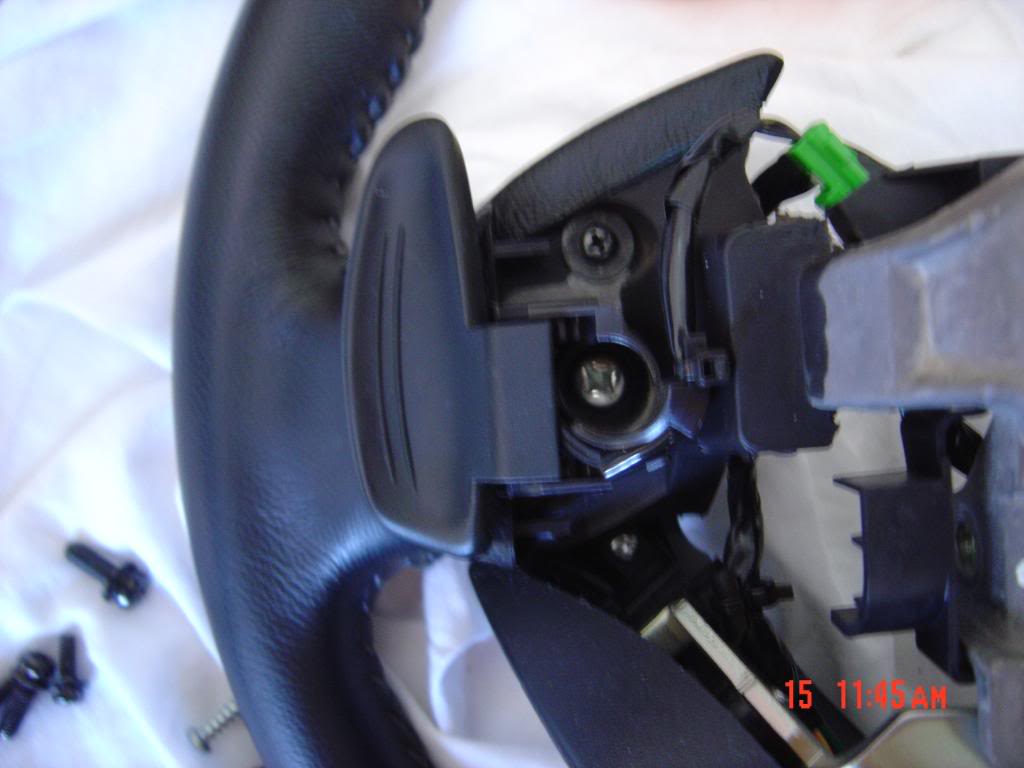
Now on to the steering wheel.... remove the 2 Torx screws, one on each side of the wheel.
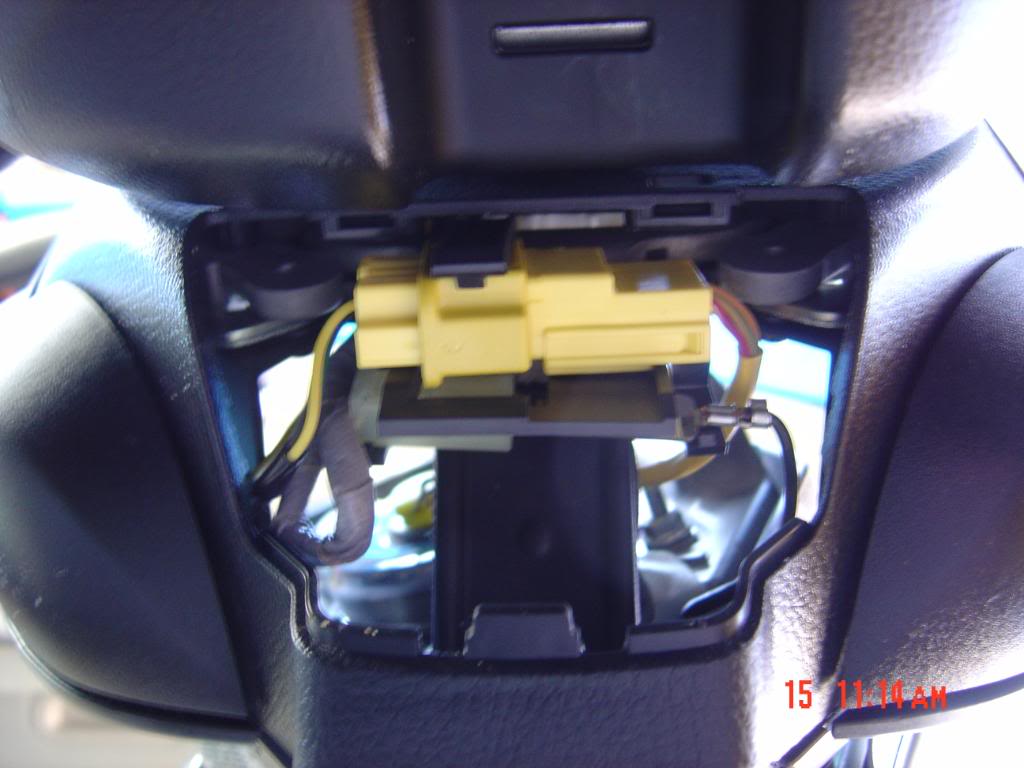
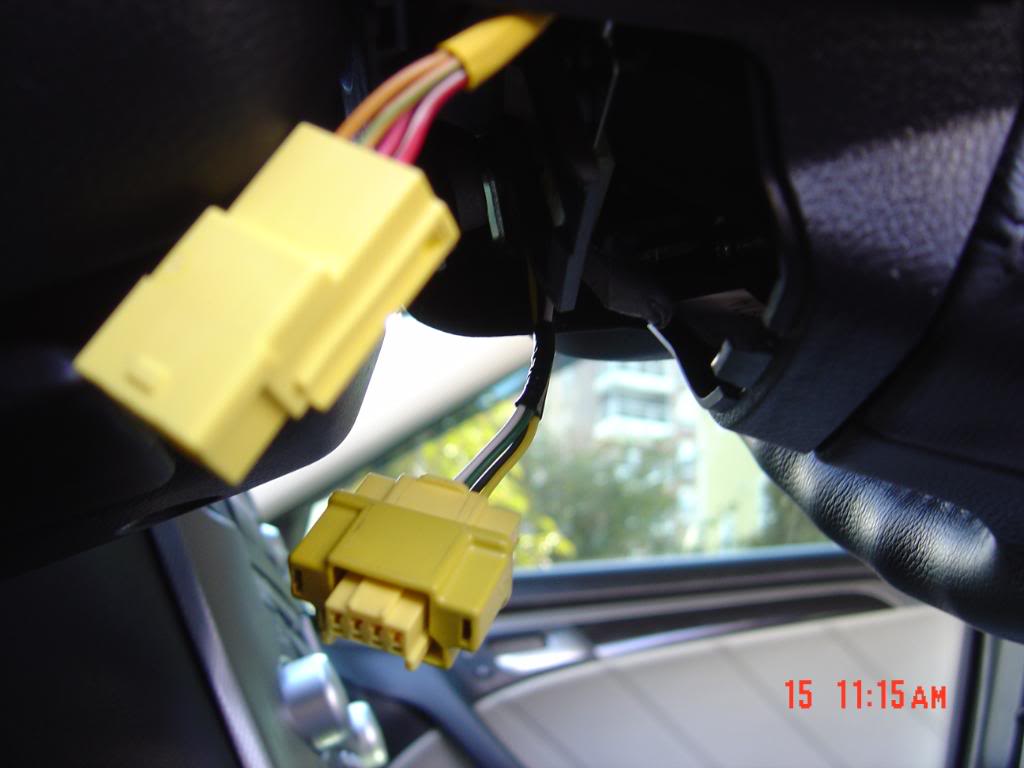
Next on the bottom backside of the wheel there's a plastic cover. remove this to access the SRS plug. There's 1 yellow plug which is the SRS plug and a clear white plug as well, this plug has a huge male spade connector unplug it and the airbag will come right out.
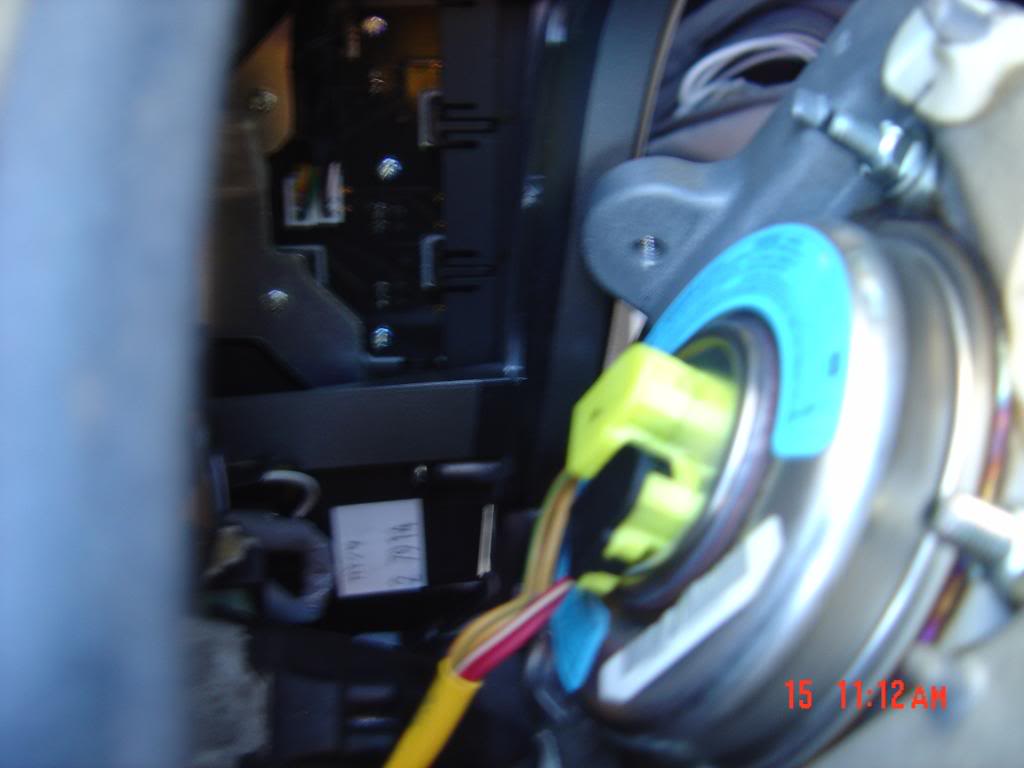
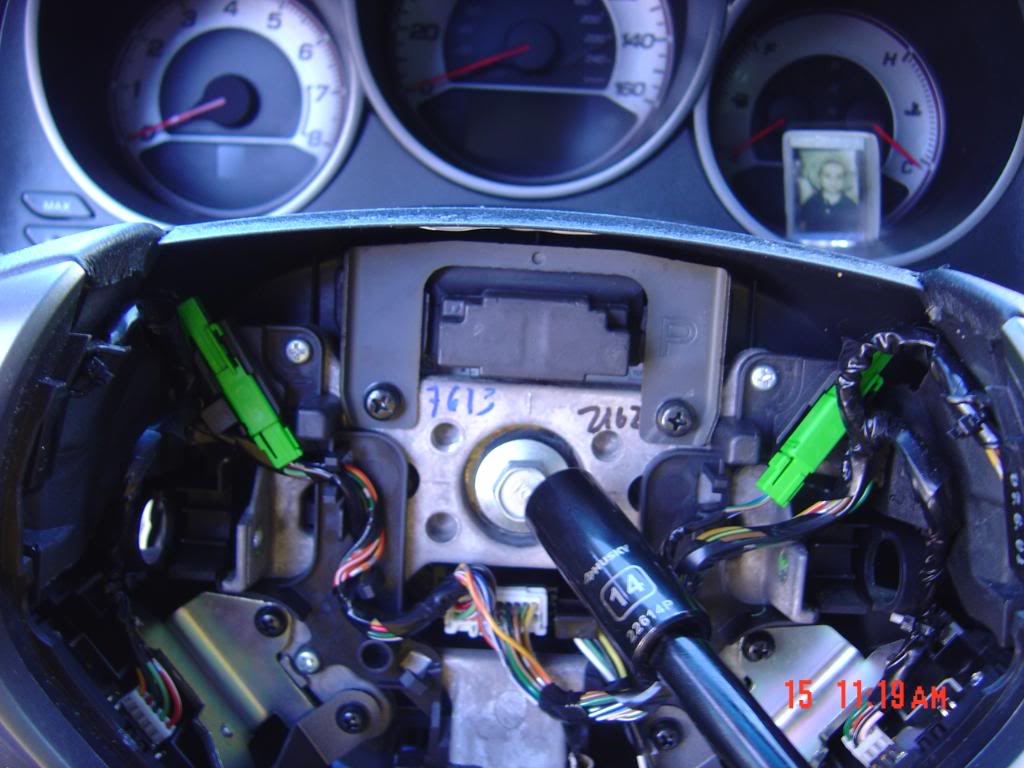
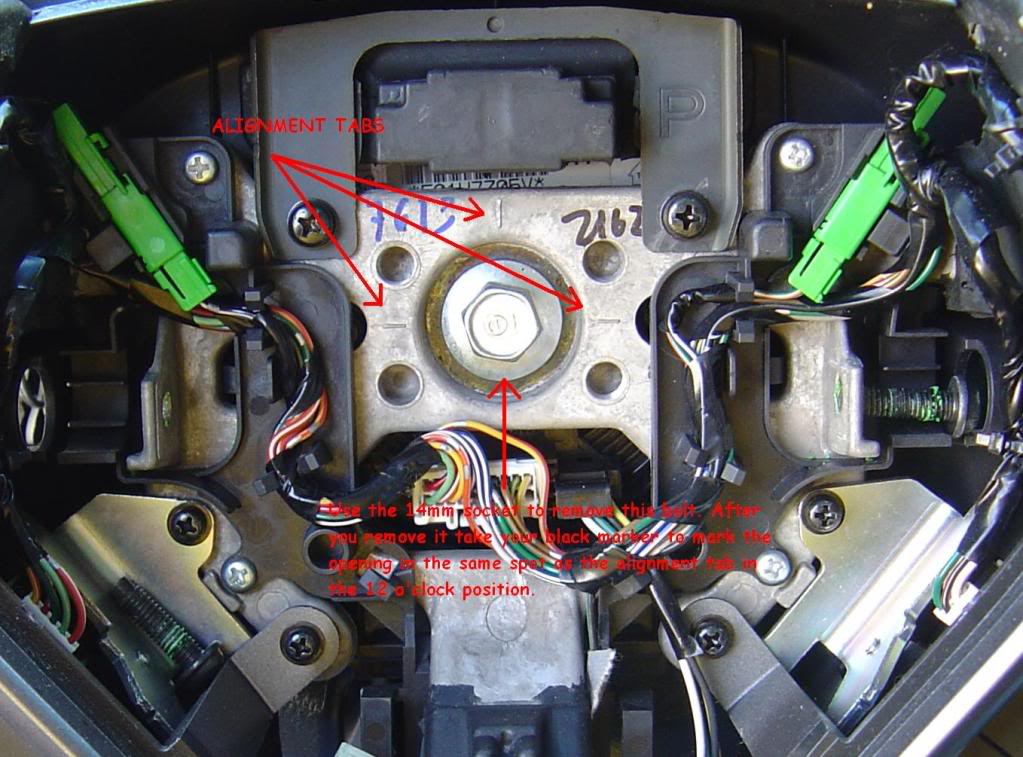
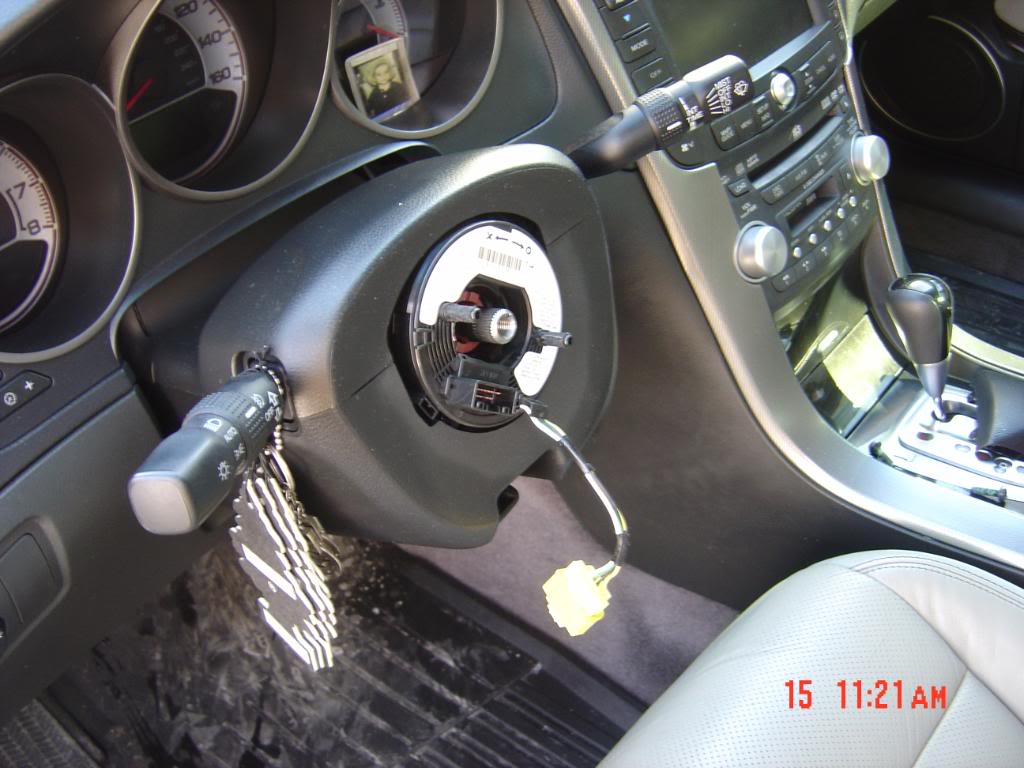
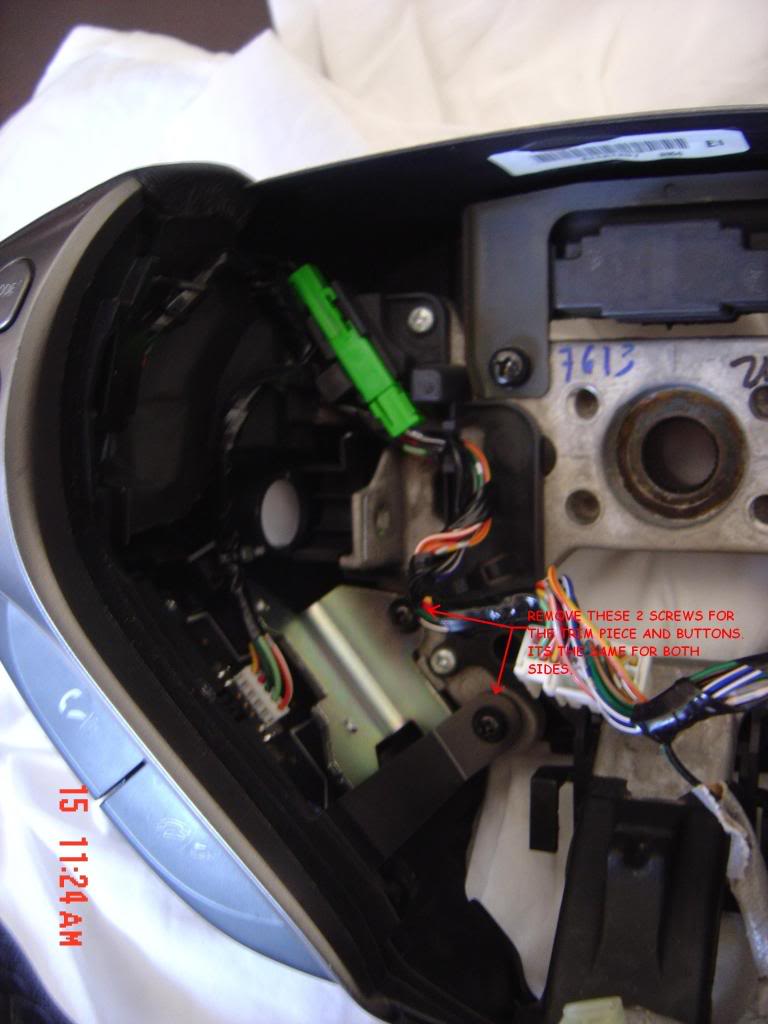
Now you can see the main bolt that holds the wheel in place. Also the white harness plug located right under the bolt, unplug it. Here's where you are going to use the 14mm socket. You can "lock" the wheel so you'll have leverage to undo the bolt and to pull the wheel as well. But before you pull the wheel use your black marker to make a marker where the 12 o'clock mark is on the wheel to right where the bolt goes so you don't lose where the wheel is in line on the splines of the column. To pull the wheel you might need to bang on it with your hand on the back of the wheel to loosen it out.
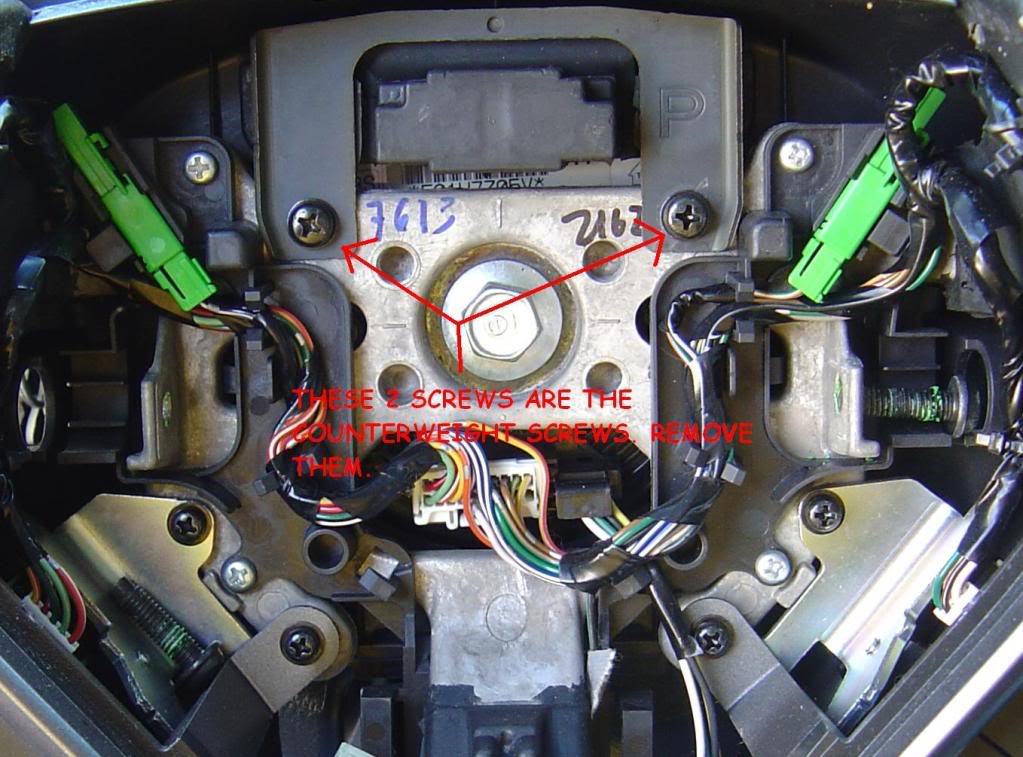
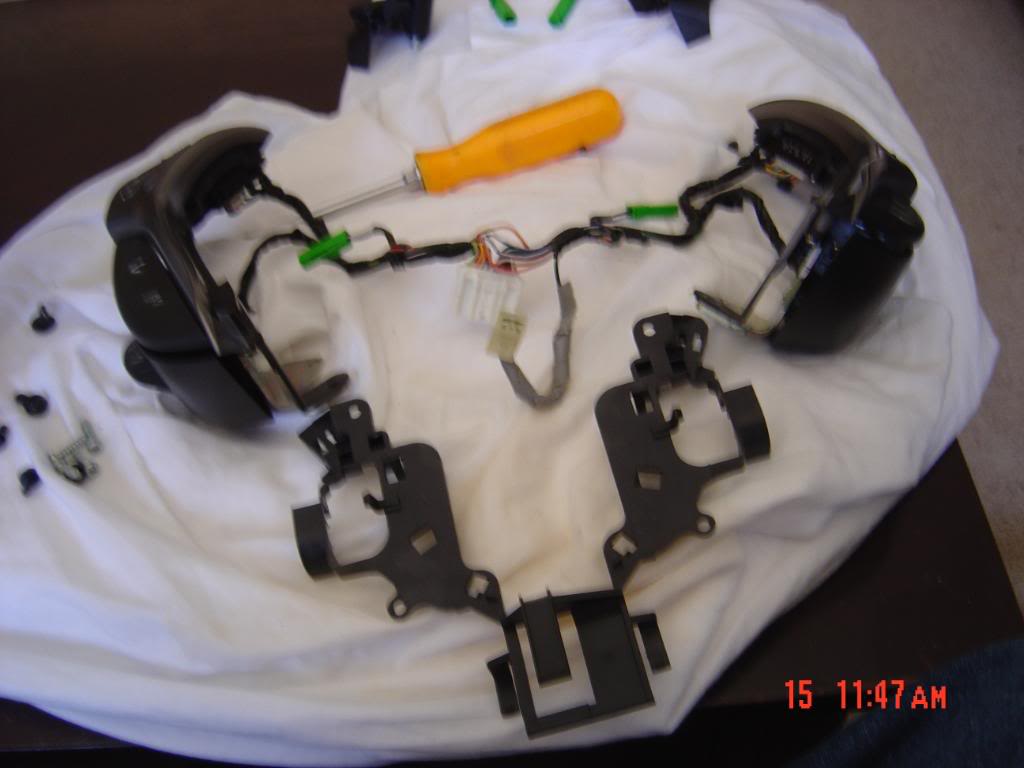
Now that the steering wheel is off take it over to a table to swap all of the pieces from the old wheel to the Carbon Fiber wheel. Take your time doing this because you are dealing with small screws and don't wanna loose any. You'll have 17 screws to take out and a plastic plate on the center of the wheel.
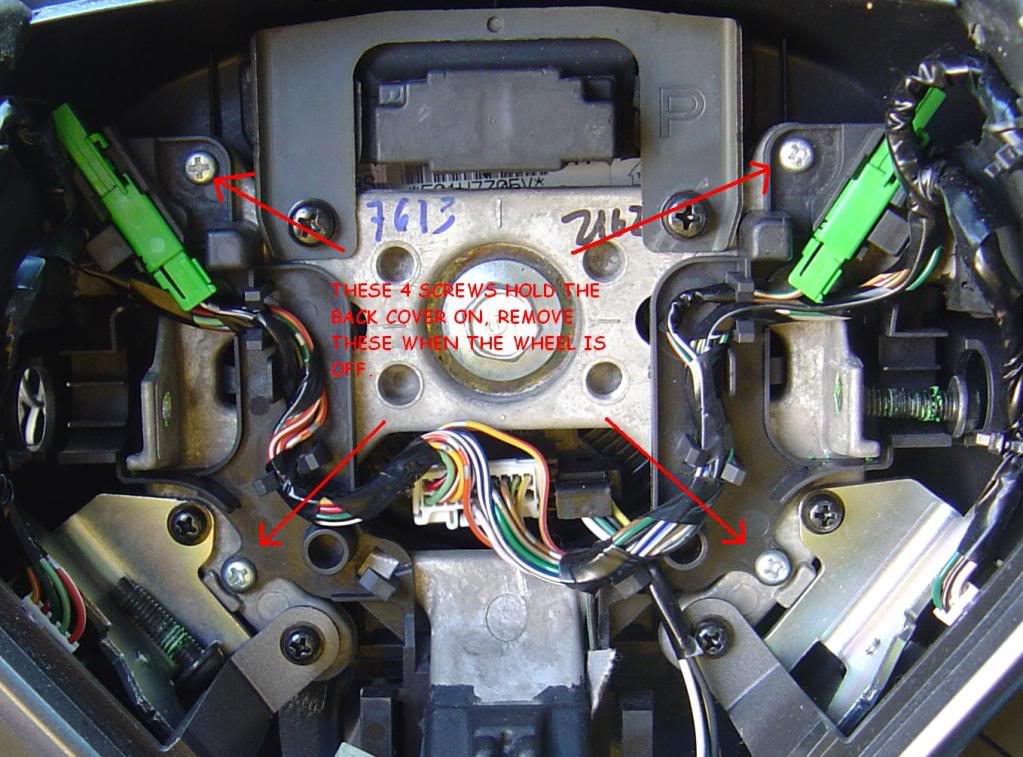
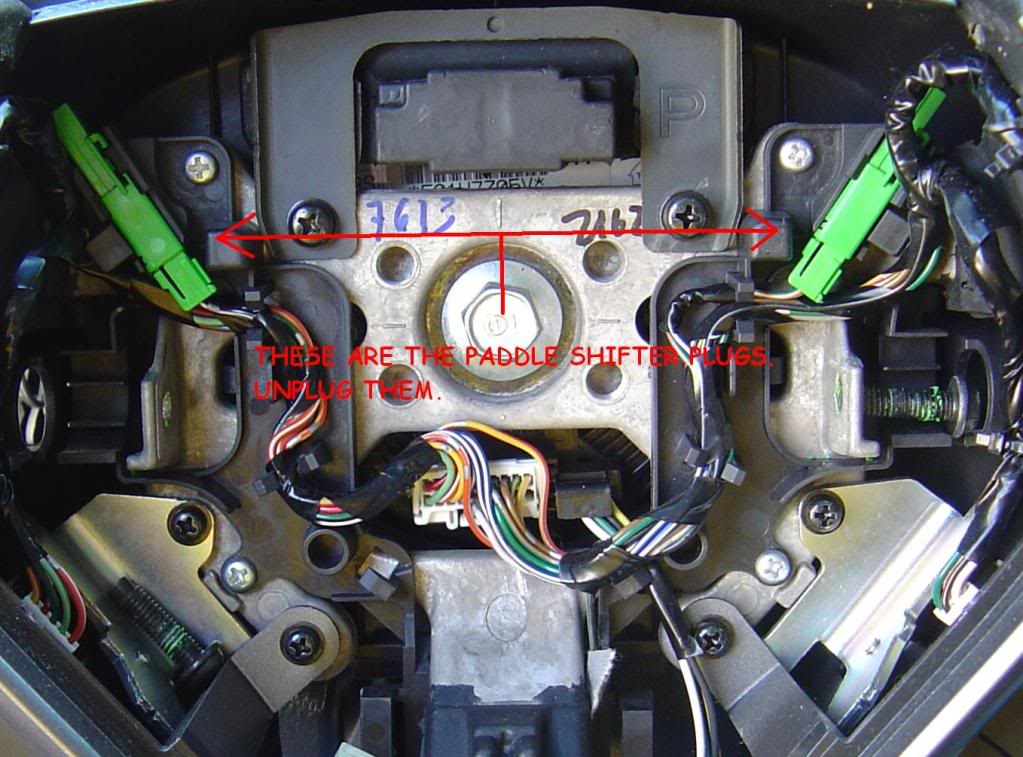
Here there is 4 silver screws that hold the back cover on. Remove these and you'll have access to the paddle shifter screws. Also the green plugs you see in the pics are for the paddle shifters those are the only 2 plugs you need to unplug inside the wheel itself.
We're almost done taking the wheel apart.....
Now on to the side trim and buttons. This part is real simple. I'll post a pic of the service exploded view of the internals of the wheel so you can get the idea of what screws to remove and where everything is.
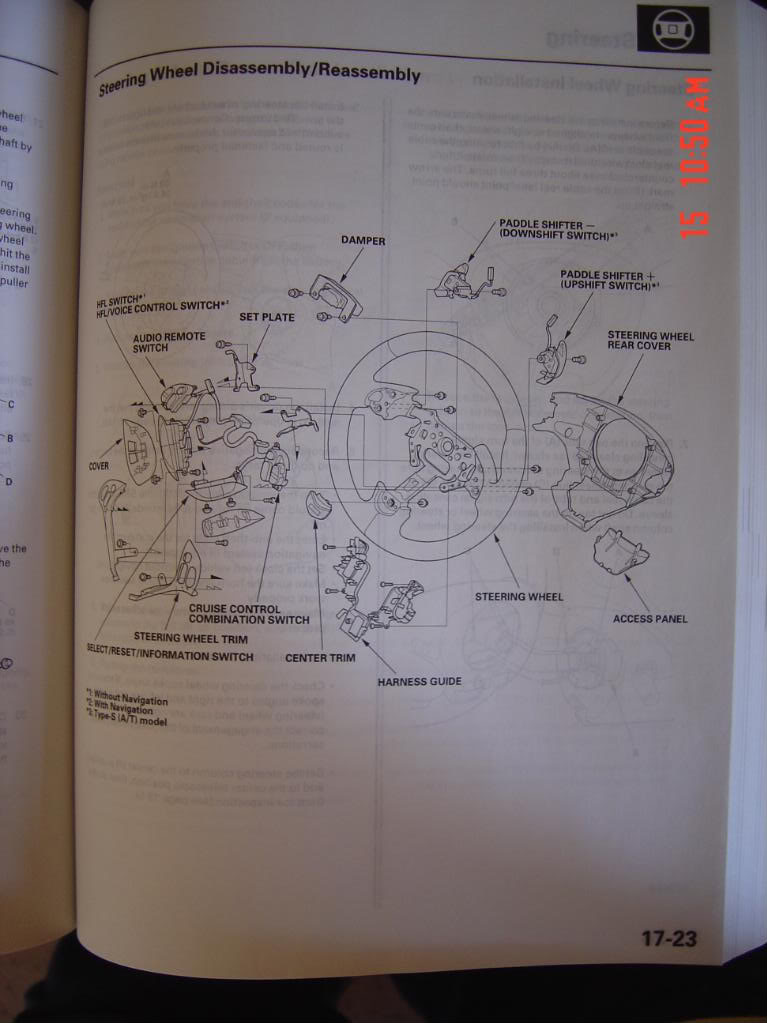
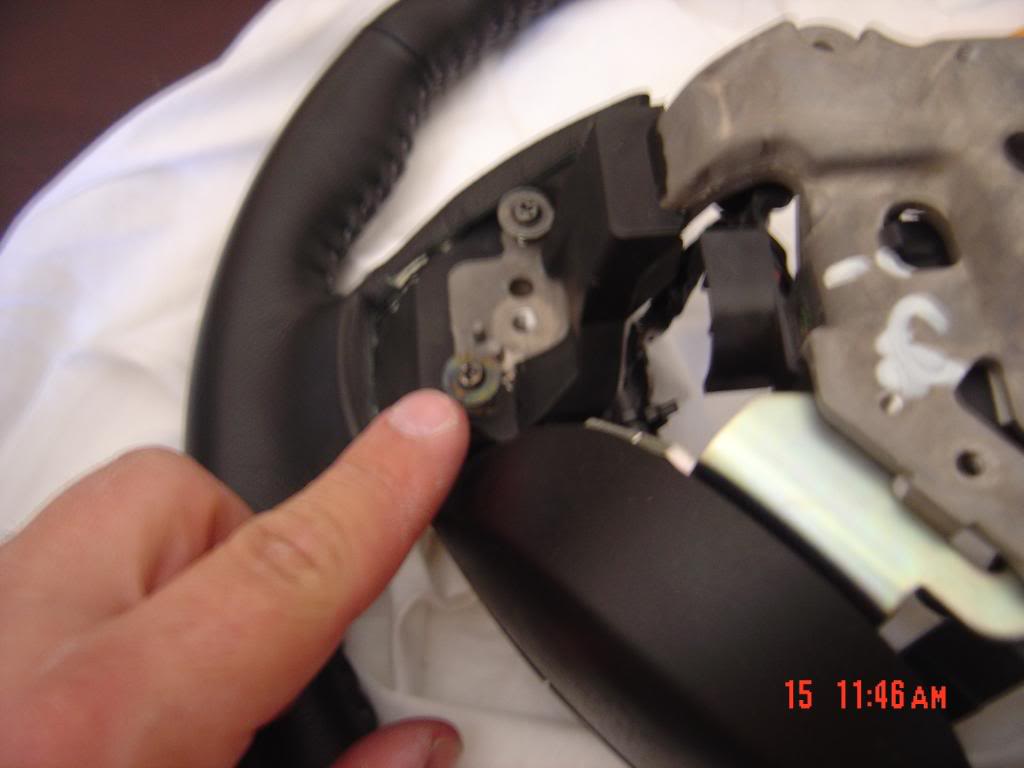
There is also a screw that holds the TYPE S logo trim in place but I didn't snap a pic of it but again the manual pic should help alot. When everything is removed you should be left with this....These parts just get swapped ove to the new wheel. Also if you wanna change any bulbs to leds use this diy to access them. And you can use DeathMetal's leds swap threads to do so.
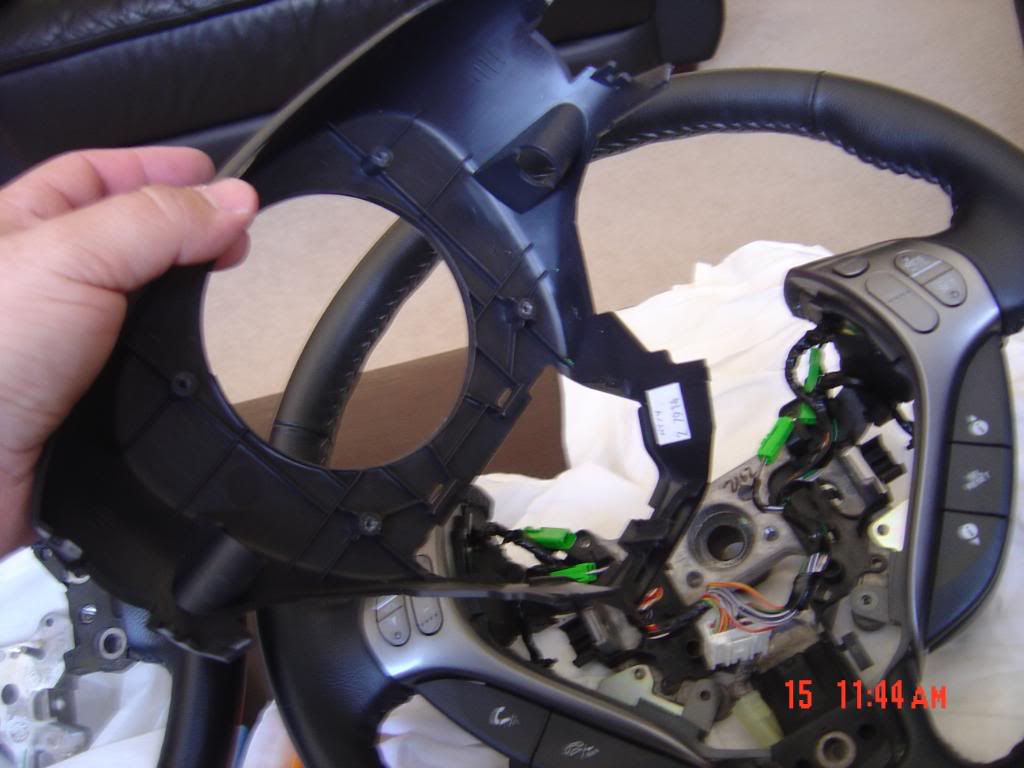
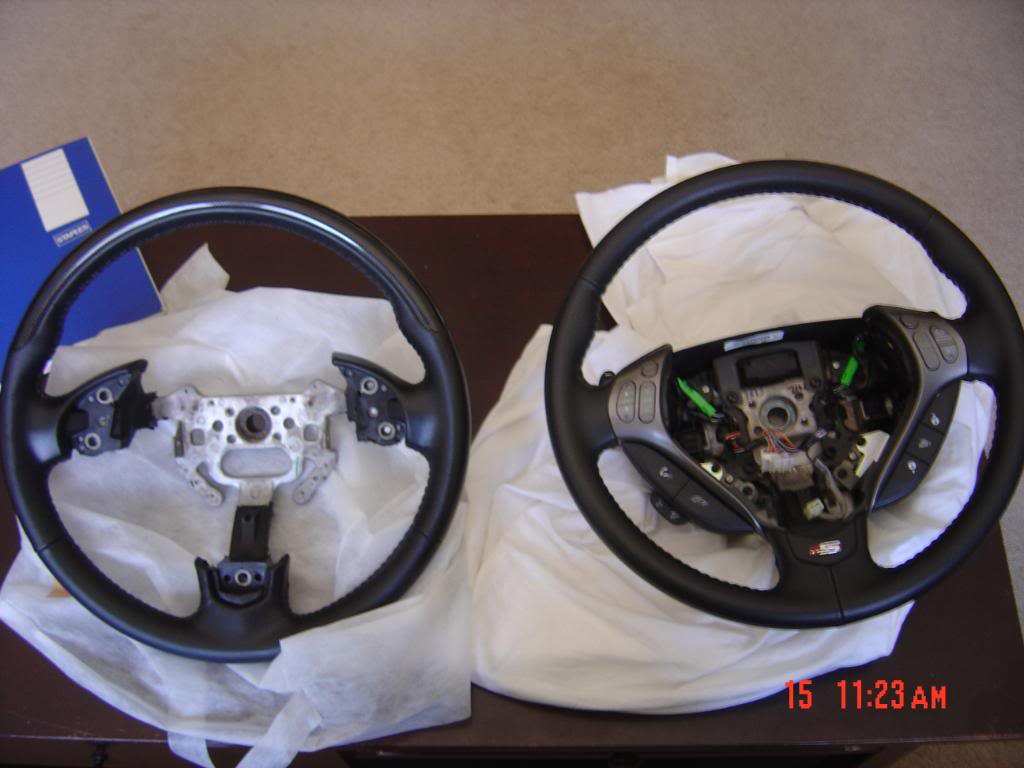
Here is a side by side of both wheels just to give you any idea of what the skeleton of the wheel looks like....
Ok now the install is just the reverse of everything here so if you need to snap so pics so you can remember where everything goes if you're unsure of it.
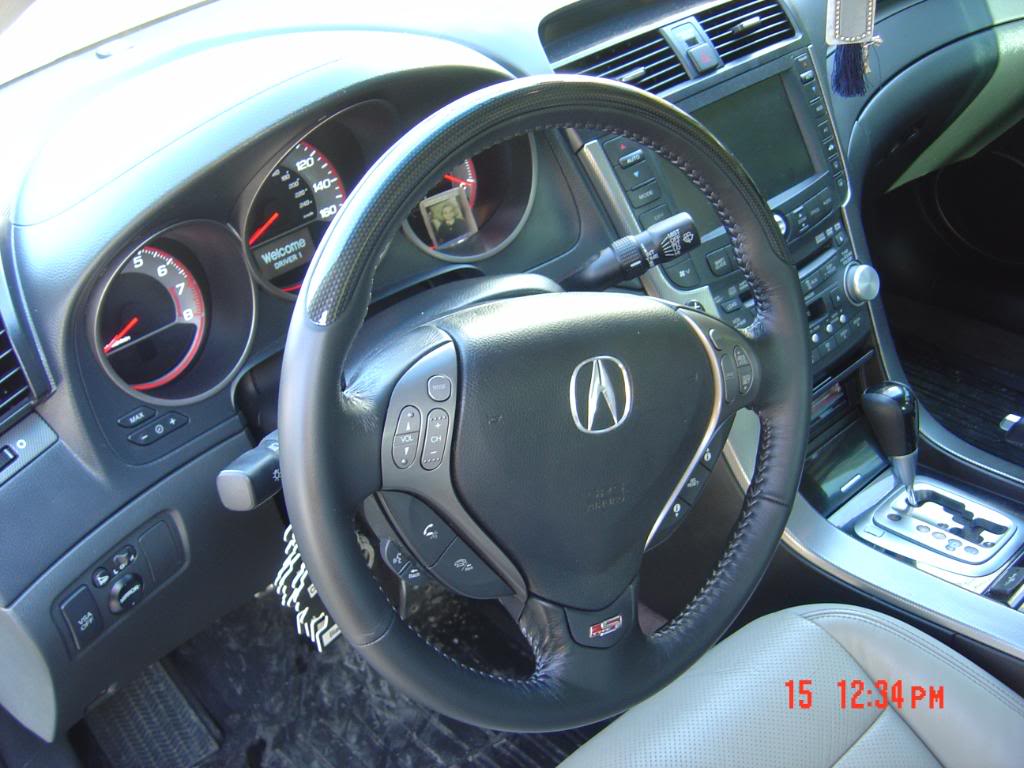
And here's a finished pic.....
Also I had a set of these made myself so Mods don't be mad I just thought this should be the logo sticker....

I did this because I got the oem Carbon Fiber steering wheel. I didn't feel the need to shell out $100+ to the dealer for something I could've done myself.
This is a diy for the removal of the steering wheel. Of course the re-install is gonna be reverse of everything here.
****NOTE: YOU TAKE FOR RESPONSIBILTY FOR THIS DIY SINCE IT DOES REQUIRE REMOVING THE AIRBAG. IF YOU DON'T FEEL COMFORTABLE DOING IT THEN TAKE IT TO THE DEALER OR TO SOMEONE WHOSE TRUSTWORTHY WITH IT.****
Let's begin....
Tools needed: T30 Torx bit (for the airbag screws)
Phillips head screwdriver
Ratchet with a 10mm and 14mm socket
Black marker (sharpie)
Codes for your radio and navi(if equipped)
First make sure your on a flat surface and the car is straight. You don't want the wheels turned because when you put the steering wheel back on you might put it on out of alignment. So just move the car back and forth to straighten it out. Next remove the negative(-) terminal on the battery. Use the 10mm socket for this.
Now on to the steering wheel.... remove the 2 Torx screws, one on each side of the wheel.
Next on the bottom backside of the wheel there's a plastic cover. remove this to access the SRS plug. There's 1 yellow plug which is the SRS plug and a clear white plug as well, this plug has a huge male spade connector unplug it and the airbag will come right out.
Now you can see the main bolt that holds the wheel in place. Also the white harness plug located right under the bolt, unplug it. Here's where you are going to use the 14mm socket. You can "lock" the wheel so you'll have leverage to undo the bolt and to pull the wheel as well. But before you pull the wheel use your black marker to make a marker where the 12 o'clock mark is on the wheel to right where the bolt goes so you don't lose where the wheel is in line on the splines of the column. To pull the wheel you might need to bang on it with your hand on the back of the wheel to loosen it out.
Now that the steering wheel is off take it over to a table to swap all of the pieces from the old wheel to the Carbon Fiber wheel. Take your time doing this because you are dealing with small screws and don't wanna loose any. You'll have 17 screws to take out and a plastic plate on the center of the wheel.
Here there is 4 silver screws that hold the back cover on. Remove these and you'll have access to the paddle shifter screws. Also the green plugs you see in the pics are for the paddle shifters those are the only 2 plugs you need to unplug inside the wheel itself.
We're almost done taking the wheel apart.....
Now on to the side trim and buttons. This part is real simple. I'll post a pic of the service exploded view of the internals of the wheel so you can get the idea of what screws to remove and where everything is.
There is also a screw that holds the TYPE S logo trim in place but I didn't snap a pic of it but again the manual pic should help alot. When everything is removed you should be left with this....These parts just get swapped ove to the new wheel. Also if you wanna change any bulbs to leds use this diy to access them. And you can use DeathMetal's leds swap threads to do so.
Here is a side by side of both wheels just to give you any idea of what the skeleton of the wheel looks like....
Ok now the install is just the reverse of everything here so if you need to snap so pics so you can remember where everything goes if you're unsure of it.
And here's a finished pic.....
Also I had a set of these made myself so Mods don't be mad I just thought this should be the logo sticker....
Thread Starter
under renovations....
iTrader: (2)
Joined: Nov 2007
Posts: 1,473
Likes: 49
From: BX-YO
I even gave you a shout out in the DIY DeathMetal. the whole thing took me about 30-40 minutes and thats going downstairs to the car and back up to my house to work in my living room and watching tv at the same time so I could probably do it faster then that if I wanted.
the whole thing took me about 30-40 minutes and thats going downstairs to the car and back up to my house to work in my living room and watching tv at the same time so I could probably do it faster then that if I wanted.
Thread Starter
under renovations....
iTrader: (2)
Joined: Nov 2007
Posts: 1,473
Likes: 49
From: BX-YO
I even gave you a shout out in the DIY DeathMetal. the whole thing took me about 30-40 minutes and thats going downstairs to the car and back up to my house to work in my living room and watching tv at the same time so I could probably do it faster then that if I wanted.
the whole thing took me about 30-40 minutes and thats going downstairs to the car and back up to my house to work in my living room and watching tv at the same time so I could probably do it faster then that if I wanted. Thanks!Can you clarify just a touch on the whole 'marking to ensure proper spline alignment' point? Obviously, this is hella important, and you got this spot on.

Trending Topics
Thread Starter
under renovations....
iTrader: (2)
Joined: Nov 2007
Posts: 1,473
Likes: 49
From: BX-YO
when you remove the main bolt that holds the wheel in place there's a little room on the metal to make a mark in line with the alignment tab on the wheel itself. I did that just to make sure the wheel went back on in the same place since I turned the wheel to lock it before I pulled it off. Some people will turn the wheel to lock it then pull the wheel off and when they go to put it back on they put it on with the wheel is pointing to the left once they unlock the column and turn the wheels straight.


I just put my CF steering wheel on 2 wks ago. I followed the old DIY and did it exactly like you did. Wow you have the EXACT black Husky tool set I have, lol!! Eerie! The removal/install is far easier than I ever expected, I used to think this is a "dealer only" level job. At this point I have the procedure down to 20 mintures, it's that easy. I'm not even so scared about working near the airbag anymore. BTW guys prebuy some Torx bolts for the airbag. They are soft and are easy to deform because they are tighted to 7lbs/torque with threadlock. I have to change mine, they are tightened but the star pattern is screwed.
Here is the main problem though: I torqued the center bolt to specs but it was WAAAY too tight!! I shouldn't have done that. My column is now majorly rubbing on the steering wheel. On top of that I was one gear tooth off on setting the steering wheel on straight so my steering is slightly crooked. I went to take the steering wheel off to correct all this......I kept threading THROUGH the aluminum on the steering wheel with the steering wheel puller. No matter how many times I tried the wheel is not budging and the threads lose grip and rip through. It is so tight. I went out and bought another type of puller. I put SOOO much force on it trying to take it off. I tried for about 3hrs believe it or not. I even tried heating up the bolt, trying to bang/tap the steering wheel off etc. I was scared to pull that spool out by accident.
I gave up for now because it was way too cold in my garage and I was pissed. The steering wheel rubs less than before but I have to correct this. I have to tackle this in a couple of months when it warms up. Anyone have any good ideas of how I can get the steering wheel off???

Thread Starter
under renovations....
iTrader: (2)
Joined: Nov 2007
Posts: 1,473
Likes: 49
From: BX-YO
I just put my CF steering wheel on 2 wks ago. I followed the old DIY and did it exactly like you did. Wow you have the EXACT black Husky tool set I have, lol!! Eerie! The removal/install is far easier than I ever expected, I used to think this is a "dealer only" level job. At this point I have the procedure down to 20 mintures, it's that easy. I'm not even so scared about working near the airbag anymore. BTW guys prebuy some Torx bolts for the airbag. They are soft and are easy to deform because they are tighted to 7lbs/torque with threadlock. I have to change mine, they are tightened but the star pattern is screwed.
Here is the main problem though: I torqued the center bolt to specs but it was WAAAY too tight!! I shouldn't have done that. My column is now majorly rubbing on the steering wheel. On top of that I was one gear tooth off on setting the steering wheel on straight so my steering is slightly crooked. I went to take the steering wheel off to correct all this......I kept threading THROUGH the aluminum on the steering wheel with the steering wheel puller. No matter how many times I tried the wheel is not budging and the threads lose grip and rip through. It is so tight. I went out and bought another type of puller. I put SOOO much force on it trying to take it off. I tried for about 3hrs believe it or not. I even tried heating up the bolt, trying to bang/tap the steering wheel off etc. I was scared to pull that spool out by accident.
I gave up for now because it was way too cold in my garage and I was pissed. The steering wheel rubs less than before but I have to correct this. I have to tackle this in a couple of months when it warms up. Anyone have any good ideas of how I can get the steering wheel off???
Here is the main problem though: I torqued the center bolt to specs but it was WAAAY too tight!! I shouldn't have done that. My column is now majorly rubbing on the steering wheel. On top of that I was one gear tooth off on setting the steering wheel on straight so my steering is slightly crooked. I went to take the steering wheel off to correct all this......I kept threading THROUGH the aluminum on the steering wheel with the steering wheel puller. No matter how many times I tried the wheel is not budging and the threads lose grip and rip through. It is so tight. I went out and bought another type of puller. I put SOOO much force on it trying to take it off. I tried for about 3hrs believe it or not. I even tried heating up the bolt, trying to bang/tap the steering wheel off etc. I was scared to pull that spool out by accident.
I gave up for now because it was way too cold in my garage and I was pissed. The steering wheel rubs less than before but I have to correct this. I have to tackle this in a couple of months when it warms up. Anyone have any good ideas of how I can get the steering wheel off???
Thread Starter
under renovations....
iTrader: (2)
Joined: Nov 2007
Posts: 1,473
Likes: 49
From: BX-YO
also guys I forgot to mention....
When you go to tighten the main bolt back don't overtighten it. The metal in that area is soft alloy and will strip fast or even crack. Once you get the bolt snug just go a 1/4 more on tightening it.
When you go to tighten the main bolt back don't overtighten it. The metal in that area is soft alloy and will strip fast or even crack. Once you get the bolt snug just go a 1/4 more on tightening it.
Thread Starter
under renovations....
iTrader: (2)
Joined: Nov 2007
Posts: 1,473
Likes: 49
From: BX-YO

Nice DIY!
WIll this wheel fit on an 04? I know I would need to buy ALL the buttons and the air bag. Just always wondered because I love the 3 spoke steering wheels.. Except when long driving.. I like the 4 spoke for long trips just because I can wedge my hand in one of the holes at the 3 oclock position.. lol
WIll this wheel fit on an 04? I know I would need to buy ALL the buttons and the air bag. Just always wondered because I love the 3 spoke steering wheels.. Except when long driving.. I like the 4 spoke for long trips just because I can wedge my hand in one of the holes at the 3 oclock position.. lol
Thread Starter
under renovations....
iTrader: (2)
Joined: Nov 2007
Posts: 1,473
Likes: 49
From: BX-YO
Nice DIY!
WIll this wheel fit on an 04? I know I would need to buy ALL the buttons and the air bag. Just always wondered because I love the 3 spoke steering wheels.. Except when long driving.. I like the 4 spoke for long trips just because I can wedge my hand in one of the holes at the 3 oclock position.. lol
WIll this wheel fit on an 04? I know I would need to buy ALL the buttons and the air bag. Just always wondered because I love the 3 spoke steering wheels.. Except when long driving.. I like the 4 spoke for long trips just because I can wedge my hand in one of the holes at the 3 oclock position.. lol
I have a manual and dont have the paddle shifters.. BUT I would figure out something cool to do with them if the steering wheel comes with them.. lol I can think of one thing I would do with it already.. lol
Thread Starter
under renovations....
iTrader: (2)
Joined: Nov 2007
Posts: 1,473
Likes: 49
From: BX-YO
Nah the wheel doesn't come with them you basically just transfer your stuff from your existing wheel so you might just have a cover for the back.
Your advice to not tighten the bolt too much is what everyone needs to hear. This is one situation you don't want to go to specs as in the manual. I wish someone had told me that.
Hey rocky if you can carefully drill through the stripped threaded holes. Get some smaller longer bolts and some nuts, here see these pics, this style puller, the two bolts and nuts two bigger sized nuts to told bolts through puller slots, (they don't need to thread, just go through and stop at the head of each bolt)
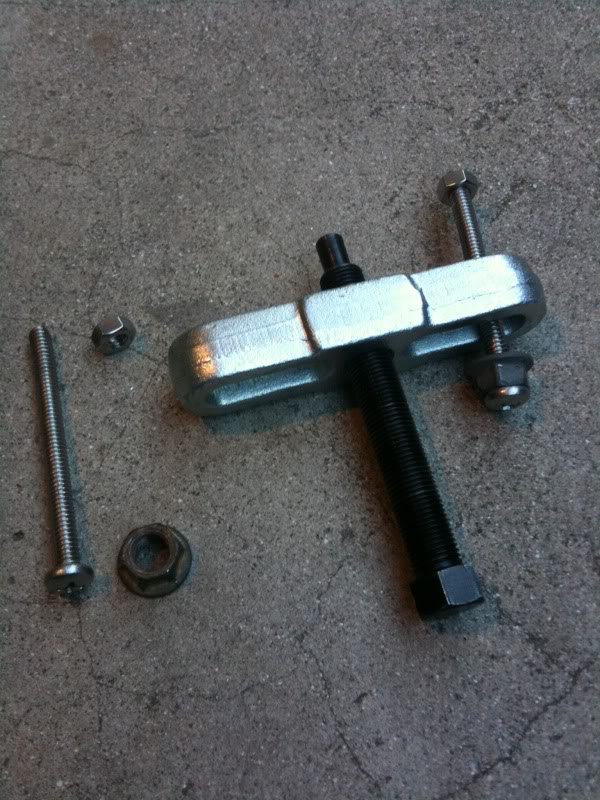
use some kind of wire to hold the nuts behind the wheel where the new drilled out holes are. Once screwed in remove like normal.
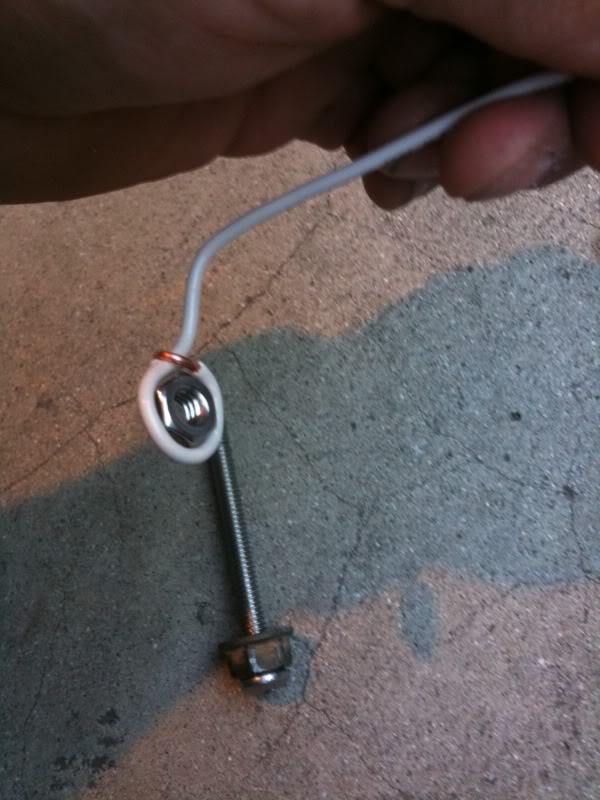
just an idea, worked for me. You're right the threads are weak on that soft metal.
use some kind of wire to hold the nuts behind the wheel where the new drilled out holes are. Once screwed in remove like normal.
just an idea, worked for me. You're right the threads are weak on that soft metal.
Thread Starter
under renovations....
iTrader: (2)
Joined: Nov 2007
Posts: 1,473
Likes: 49
From: BX-YO
Thanks dude, google CFType. They are in San Diego. They did it for me and my engine cover too, it wasn't cheap. You're gonna hate me when you see my new steering wheel.
Thread Starter
under renovations....
iTrader: (2)
Joined: Nov 2007
Posts: 1,473
Likes: 49
From: BX-YO
Thread Starter
under renovations....
iTrader: (2)
Joined: Nov 2007
Posts: 1,473
Likes: 49
From: BX-YO
Thread Starter
under renovations....
iTrader: (2)
Joined: Nov 2007
Posts: 1,473
Likes: 49
From: BX-YO
Figured I'd pull this from the dead for another bit of info. during the summer I pulled my wheel off a second time to di-noc the trim pieces on the wheel. I forgot to mention be careful when pulling the wheel off and make sure the cable reel harness is unplugged (reference picture 7 and 8 to see what I mean) other wise you'll pull the whole thing apart and it CANNOT be put back together at all. this happened to me but I know I unplugged it but somehting else must've caught it and snagged onto it.


Instructor
Joined: Jun 2008
Posts: 180
Likes: 0
From: Providence,RI
Help need!!!!
Ok, this seemed like a fairly simple job (was only going far enough to replace cruise switch on an '04) so I figured i'd give it a shot today. Big mistake, as I ended up stripping one of the torx bolts that holds the airbag in and breaking the head off the other 
Saw a youtube video just now where another guy was saying he had to use an extractor (the type that grabs the outside of screw head) to remove his. Any suggestions on which type of extractor I could use in this case and also anything I can do about broken screw?
Thanks
Saw a youtube video just now where another guy was saying he had to use an extractor (the type that grabs the outside of screw head) to remove his. Any suggestions on which type of extractor I could use in this case and also anything I can do about broken screw?
Thanks

I'm trying. Hit it with my rubber mallet A LOT it's still not coming off. I even went to autozone to rent the puller but the threads don't match. The autozone one comes with standard thread bolts