
Baking the Headlights
 05-03-2011 | 05:56 PM
#1
Thread Starter
Instructor
Joined: Jul 2010
Posts: 203
Likes: 7
From: Berlin, Maryland
Baking the Headlights
I guess this would be the right section.
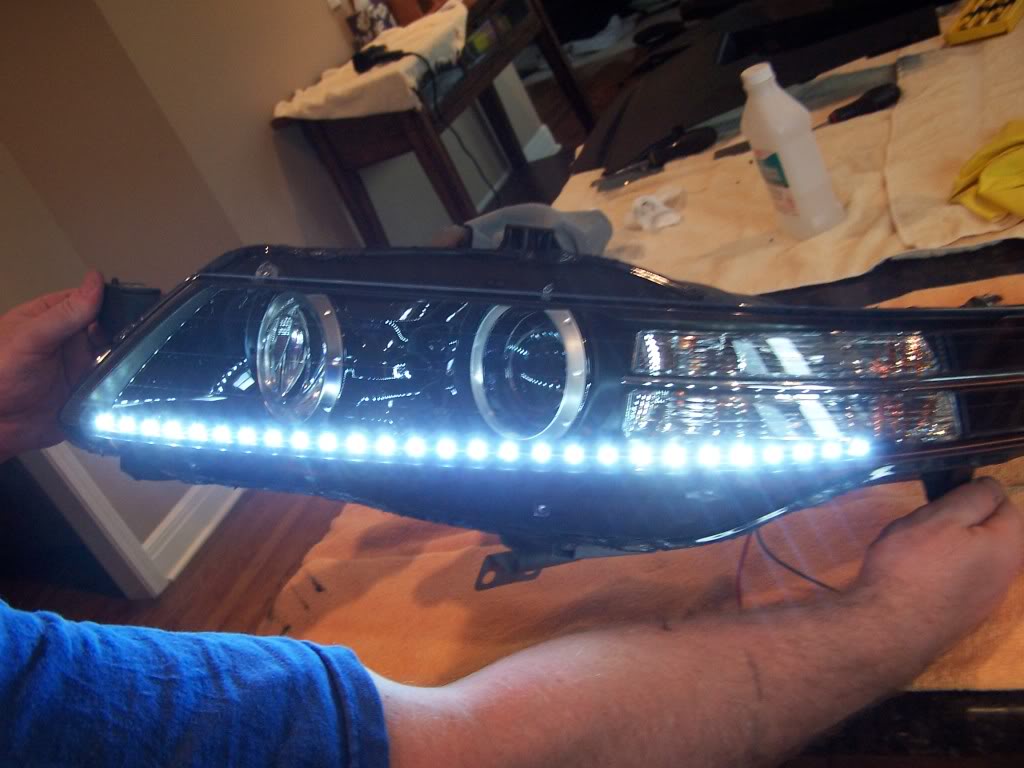
I am going to bake my headlights and remove all the bullshit inside and paint them black, however, I want someone who has already baked 3G TL headlights to tell me how difficult it is. Seems like i have the worst like with no matter what i do or how slow i go. I know its not the easiest thing in the world but once they have been in the oven for 20 min how difficult are the lens to separate but moreover how hard are they to get back together so there is not condensation?
Any incite would be nice. I watched the video on decalfx or whatever that website is and it look like a pain. I thought i saw a video on here once of a DIY on baking them but i only could find the text DIY but i could be wrong.
Thanks
05-03-2011 | 06:26 PM
#2
I haven't baked a set of headlights in a long time. I've recently have been using my heat gun which I think works a lot better than using the oven. When seperating your headlights start on the inner part towards your DRL. Take a flat head screwdriver to seperate the lenses from the housing, when I'm seperating I always have the screwdriver cut through the Butyl so it doesn't get onto anything, especially the chrome of the turn signals (it doesn't come off very easily). When putting the lenses back together you can heat up your black housing part to soften up the butyl then smoosh it all together so it looks nice and smooth, then I'd recommend putting new butyl in, NAPA sells 3M Butyl tape, I usually use this.
05-03-2011 | 08:09 PM
#3
Team Owner
iTrader: (2)
Joined: Jan 2008
Posts: 36,545
Likes: 6,470
From: Kansas City, MO (Overland Park, KS)
It's not that difficult. Bake for 20 minutes at 200 degrees. We pulled my headlights apart by hand, so it shouldn't be too bad. Once you have the headlights modded, put back together. I highly recommend you getting more Butyl from the auto parts store. That way, you'll be assured of no condensation once you put the lights back together. We baked them once again (same time and temp), to insure a tight fit.
Best of luck-it's well worth it....
2011 National AcuraZine Meet-Kansas City-June 12, 2011-Details Here!
.
Best of luck-it's well worth it....
2011 National AcuraZine Meet-Kansas City-June 12, 2011-Details Here!
.
The following users liked this post:
TLCthc420 (11-14-2013)
05-03-2011 | 09:12 PM
#5
Moderator
Chapter Leader (South Florida Region)
Chapter Leader (South Florida Region)
iTrader: (6)
Joined: Sep 2008
Posts: 78,016
Likes: 20,033
2 things...I managed to pull apart after 9 minutes at 190 degrees...
condensation comes from humidity trapped inside the light...check some of the threads I've started/posted in for a complete explanation and DIY.
condensation comes from humidity trapped inside the light...check some of the threads I've started/posted in for a complete explanation and DIY.
05-03-2011 | 09:29 PM
#6

AZ Community Team
Joined: May 2007
Posts: 32,488
Likes: 7,771
From: N35�03'16.75", W 080�51'0.9"
I used Nissan Butyl Rubber Sealant from the Nissan dealer parts desk. Worked like a charm.
Put new dessicant pack in; if you don't have/can't get new, re-use the old ones.
Trending Topics
05-04-2011 | 02:27 AM
#8

I haven't baked a set of headlights in a long time. I've recently have been using my heat gun which I think works a lot better than using the oven. When seperating your headlights start on the inner part towards your DRL. Take a flat head screwdriver to seperate the lenses from the housing, when I'm seperating I always have the screwdriver cut through the Butyl so it doesn't get onto anything, especially the chrome of the turn signals (it doesn't come off very easily). When putting the lenses back together you can heat up your black housing part to soften up the butyl then smoosh it all together so it looks nice and smooth, then I'd recommend putting new butyl in, NAPA sells 3M Butyl tape, I usually use this.
IMO out of all the headlights, 3G to me seems to be the easiest to open. They all open the same way (with heat that is). Make sure its not touching anything/in too long and it shouldn't be a problem.
The following users liked this post:
ge97c (03-27-2014)
05-04-2011 | 02:30 AM
#9
if you go around the glue with a heat gun enough times it definitely gets hot enough. think about it, both the oven and the heatgun can get the glue to xxx degrees but just because its a heatgun, it will cool down faster? the heat guns i use go to over 1000 degrees F. yes i know it wont be 1000 by the time it reaches the glue but its still plenty hot.
05-04-2011 | 07:44 AM
#10
Heat gun may work when opening them, but not closing because it won't give the headlight an even seal since the stuff hardens back up within 30 seconds and no way your heating the whole headlight sealant with one gun. The gun also gives the high risk of melting the housing.
IMO out of all the headlights, 3G to me seems to be the easiest to open. They all open the same way (with heat that is). Make sure its not touching anything/in too long and it shouldn't be a problem.
IMO out of all the headlights, 3G to me seems to be the easiest to open. They all open the same way (with heat that is). Make sure its not touching anything/in too long and it shouldn't be a problem.
The following users liked this post:
DreGarciaTAT2 (08-23-2020)
05-04-2011 | 08:55 PM
#13
Thread Starter
Instructor
Joined: Jul 2010
Posts: 203
Likes: 7
From: Berlin, Maryland
Thanks for the answers I plan on using the oven since it is even and lower heat I know i would end up melting something with a heat gun.
What all did everyone take out before baking them i really havent got a chance to look at the back of the light but i noticed on the DIY on here he said he placed it in the oven with the HID components still installed. Any opinions
What all did everyone take out before baking them i really havent got a chance to look at the back of the light but i noticed on the DIY on here he said he placed it in the oven with the HID components still installed. Any opinions
 05-04-2011 | 09:18 PM
#16
Moderator
Chapter Leader (South Florida Region)
Chapter Leader (South Florida Region)
iTrader: (6)
Joined: Sep 2008
Posts: 78,016
Likes: 20,033
Any butyl rubber will work...there's one at napa. cheaper too.
I didn't take ANYTHING out...all bubls/ballast etc are fine at 190 degrees for 9 minutes.
Get yourself the ZKW-replicas while at it, you'll thank me later.
Also, press together until you hear the air bubbles pop in the rubber bead, that will mean it's sealed.
To avoid humidity caught IN the light, run a blowdryer routed thru a garden hose thru one light socket on the assembly and let the hot air out another socket. Run it for 10 minutes per side.
Tried and true, no condensation after..not on a cold day not after a wash. Nothing.
05-04-2011 | 10:19 PM
#17
Thread Starter
Instructor
Joined: Jul 2010
Posts: 203
Likes: 7
From: Berlin, Maryland
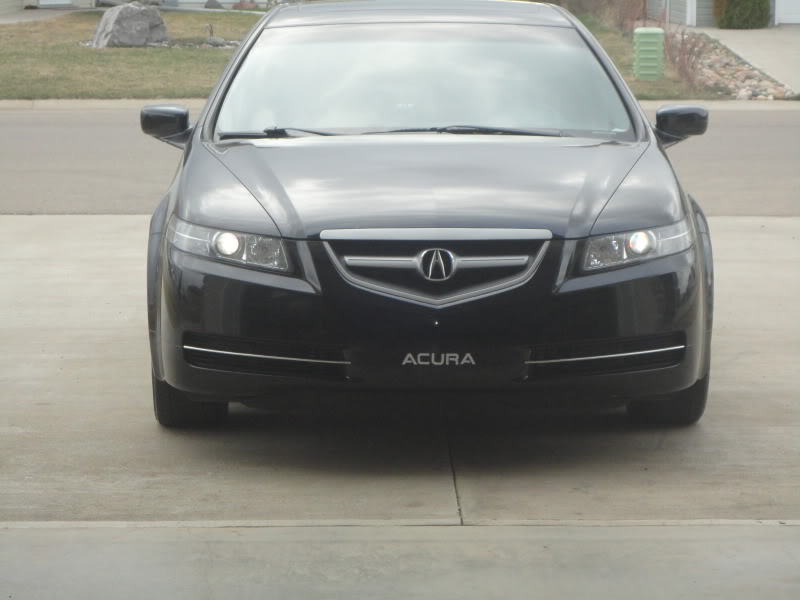
Ill probably end up getting ZKW Replicas i love the way they look. While im doing this ill attempt a very detailed DIY.
Also i have a KBP S I was wondering on what you all think, whether i should black them out or just take out all the stupid reflectors. I love the murdered look.
Also i have a KBP S I was wondering on what you all think, whether i should black them out or just take out all the stupid reflectors. I love the murdered look.

The following users liked this post:
rockstar143 (02-23-2013)
02-18-2013 | 11:29 AM
#22

Drifting
Joined: Jul 2008
Posts: 3,329
Likes: 171
From: Dallas
It's not that difficult. Bake for 20 minutes at 200 degrees. We pulled my headlights apart by hand, so it shouldn't be too bad. Once you have the headlights modded, put back together. I highly recommend you getting more Butyl from the auto parts store. That way, you'll be assured of no condensation once you put the lights back together. We baked them once again (same time and temp), to insure a tight fit.
Best of luck-it's well worth it....
Best of luck-it's well worth it....
Cant find Butyl on Orielly's webpage either.
Steve did you install ZDW lenses? I don't know where to buy them.
Also Steve, how did you get power to those auxillary lights? Is there room to run a wire somewhere without drilling? And did you put them on a switch? Or do they come on automatically?
Thanks
Chad
02-18-2013 | 11:45 AM
#23
Moderator
Chapter Leader (South Florida Region)
Chapter Leader (South Florida Region)
iTrader: (6)
Joined: Sep 2008
Posts: 78,016
Likes: 20,033
Holy hell...revival!

Napa is the only place locally (other than Nissan) that I've found it. Butyl Rubber sealant...look it up on amazon and there are also many options if you can afford to wait for ship.
J.
Napa is the only place locally (other than Nissan) that I've found it. Butyl Rubber sealant...look it up on amazon and there are also many options if you can afford to wait for ship.
J.
 02-18-2013 | 12:37 PM
#25
If you guys are close to Atlanta, I'm sure you can just stop in at TRS and pick up a roll.
http://www.theretrofitsource.com/product_info.php?products_id=792
I haven't personally used this stuff YET, but I hear it's the best on the market.
http://shop.lightwerkz.net/Koito-Butyl-Rubber-Sealer
Can't seem to find Nissan butyl anywhere. Hopefully they didn't discontinue it.
http://www.theretrofitsource.com/product_info.php?products_id=792
I haven't personally used this stuff YET, but I hear it's the best on the market.
http://shop.lightwerkz.net/Koito-Butyl-Rubber-Sealer
Can't seem to find Nissan butyl anywhere. Hopefully they didn't discontinue it.
02-18-2013 | 06:51 PM
#27
Honestly after all the hassles and buying supplies and stuff I almost feel its just easier and more efficient to let JNC or ACKTL05 do it. Last time I did it, parts supplies and a few extra tools coste around 89$. Not to mention the full days work OR risk of damaging/breaking something. Those guys do a damn good job refinishing the lenses and making sure there won't be leaks or anything.
BUT if you have the skills and tools, it's not rocket science.
BUT if you have the skills and tools, it's not rocket science.
02-18-2013 | 07:24 PM
#28
Drifting
Joined: Jul 2008
Posts: 3,329
Likes: 171
From: Dallas
Thanks for all the replies. Waiting on Skeeve now. Anyway, the reason I am thinking about doing it myself is because shiping for the headlights "to and from" another person is probably going to be about $30 each away. These headlights are big and require big boxes. Plus you gotta pay the guy to do the work.. But I don't need to buff the outside, I just need to work on 1 or 2 spots on the inside of my head lights. One spot looks discolored and it might be from the heat of the bulb. I'm only running 6v through each 9005 bulb but that still may be too much. So, I ordered a variable resistor to place inline with the power to choak down the current even more. It will be easy to install the variable resistor because the connectors are just like the kind I already have on the bulb harness. I just need to polish the inside. I have Meguiars Diamond cut #10 and it will polish and cut at the same time.
So really, I don't need to do much and I can do it in my own time. PLUS, I have my old 05 headlights I can experiment with if I want to. But if Steve says 200 degrees for 20 minutes, then I feel like I can trust him. ALSO, I have a heat gun sitting in my garage. So, I have the tools, and the tape is only $10 shipped from amazon, and the variable attenuator is $10 shipped (already purchased it), and now just thinking HEY, why not add some pretty lights like Steve did? But I may not do that because the light strips that I have seen at Pep Boys are bright in your face while you hold them, but the BULBS are not as big as the ones on the Audi's and other factory cars that I have seen. So I am afraid it may look like a cheap imitation. And PepBoys wanted $60.. I think that's too pricey for small bulbs, even though they were "bright-ish" But I will be looking for some larger bulbs online tonight. By the way, regarding those strip lights they sell at PepBoys, all but 1 style had the bulbs facing UP. Thats the wrong direction. They have to be facing forward after you mount the strip. So that is something to remember to check out if you by any.
I was also thinking about installing ZDW lenses if its not too hard to do. But I tell ya, These TLS projectors are a huge leap up compared to my 05 headlights.. Still usiing the same HID bulb. Cutoff was greatly increased and brightness was increased with these new headlights.
Last edited by Chad05TL; 02-18-2013 at 07:30 PM.
02-18-2013 | 09:14 PM
#29
Team Owner
iTrader: (2)
Joined: Jan 2008
Posts: 36,545
Likes: 6,470
From: Kansas City, MO (Overland Park, KS)
Chad,
I used the Permatex Glass sealer as well, or whatever my Advance Auto Part had-that stuff is fine.
We did not install ZDW lenses. I wanted the LED's on all the time, so we ran wire back to a green wire that goes to the windshield wipers-it's a hot wire.
We did not put a switch on because I wanted them on with the DRL's and the headlights. It was more of a simple install because of no switch.
I called Pepboys and they dont have Butyl rubber. They do have a Permatex Glass sealer. I wonder if that is good enough?
Cant find Butyl on Orielly's webpage either.
Steve did you install ZDW lenses? I don't know where to buy them.
Also Steve, how did you get power to those auxillary lights? Is there room to run a wire somewhere without drilling? And did you put them on a switch? Or do they come on automatically?
Thanks
Chad
02-19-2013 | 11:27 AM
#30
Drifting
Joined: Jul 2008
Posts: 3,329
Likes: 171
From: Dallas
thanks Steve. do you have any pictures of these LEDs installed during daylight hours? And what brand did you use, if u don't mind me asking.
I figured the permatex would be fine. The only difference I can think of, is if we want to get back inside the light later, will the permatex stuff relax by baking like the factory stuff does.. so then, we may not be able to do the oven thing and have it work.. on the other hand, the permatex may be easier to pull apart normally..so maybe then, baking would not be required. just guessing.
I figured the permatex would be fine. The only difference I can think of, is if we want to get back inside the light later, will the permatex stuff relax by baking like the factory stuff does.. so then, we may not be able to do the oven thing and have it work.. on the other hand, the permatex may be easier to pull apart normally..so maybe then, baking would not be required. just guessing.
Last edited by Chad05TL; 02-19-2013 at 11:34 AM.

 02-19-2013 | 07:09 PM
#35
Team Owner
iTrader: (2)
Joined: Jan 2008
Posts: 36,545
Likes: 6,470
From: Kansas City, MO (Overland Park, KS)
thanks Steve. do you have any pictures of these LEDs installed during daylight hours? And what brand did you use, if u don't mind me asking.
I figured the permatex would be fine. The only difference I can think of, is if we want to get back inside the light later, will the permatex stuff relax by baking like the factory stuff does.. so then, we may not be able to do the oven thing and have it work.. on the other hand, the permatex may be easier to pull apart normally..so maybe then, baking would not be required. just guessing.
I figured the permatex would be fine. The only difference I can think of, is if we want to get back inside the light later, will the permatex stuff relax by baking like the factory stuff does.. so then, we may not be able to do the oven thing and have it work.. on the other hand, the permatex may be easier to pull apart normally..so maybe then, baking would not be required. just guessing.
Chad,
There should be daylight pictures in My Garage, which you can get to from the car title of my signature. If you want more, I'll shoot some pictures for you.
I bought them from AutoLumination.com. They are the flexible side-emitting LED's in the 2 foot length. They had to be cut/trimmed down to length/size. You can cut them every 3 LED.
I'm sure the Permatex will work fine.
02-22-2013 | 07:28 PM
#36
Drifting
Joined: Jul 2008
Posts: 3,329
Likes: 171
From: Dallas

Last edited by Steven Bell; 02-22-2013 at 08:20 PM. Reason: Merged Posts
 many thanks
