
Notes from Koni + Eibach DIY install

Thread Starter
Burning Brakes
Joined: Apr 2011
Posts: 937
Likes: 247
From: Fairfax, VA
Notes from Koni + Eibach DIY install
I finally got around to doing this. It isn't a full DIY write up, just some notes that hopefully will help others doing it.
I used these threads are my primary guides, so huge credit to these guys, along with the Koni instructions in the box:
Gabe15 aka Terdbath?
https://acurazine.com/forums/2g-tsx-tires-wheels-suspension-300/diy-tein-s-tech-cu2-809439/
Stan
https://acurazine.com/forums/showpos...9&postcount=13
I got the Konis from Excelerate, who gave me extremely competitive pricing with a price match, although they ended up being backordered from Koni for 2 months. Eibachs were off Amazon when they had a 10-15% sale on all Eibach products.
As stressed by others numerous occasions, look over your tools and parts before starting. There's nothing more frustrating than diving in and having to run out and get something you're missing, or worse still, having to order it and postponing the job. On the flip side, be prepared to get creative or improvise, because things don't always go as planned.
After getting the car on stands and removing the wheels, I unbolted the lower fork from the hub first, then unbolted it from the shock assembly. I could then push the hub/lower arm down to free the fork piece, giving me more room to remove the shock. I covered the CV boot with a towel to make sure it didn't get damaged while removing the shock. After that, I loosened the three nuts to the top mount, removed two, but held on to the shock while removing the last one to make sure it wouldn't fall on the boot. It took some simultaneous pressing down on the hub and wiggling but it came out just fine. Obviously, having another pair of hands here would have been really helpful.
After compressing the spring, getting the top hat off was easy but with Konis you need some extra time to make the required modifications:
I want to stop here and say a huge thank you to Stan for documenting all this in the linked post above, it saved me lots of "self discovery" time. I didn't have a bit to drill out the dustboot hole, but used a Dremel with small grinding wheel instead.
When it comes to assembling any suspension components, double check and triple check that you have everything in place and in the correct order (Koni has good diagrams for this). I foolishly used the right strut with the left top hat and that didn't work, so I had to re-compress and remove the spring. And then after reassembling, I forgot the dustboot the second time. Argh. Note here that the front stock spring isolator that fits on the spring perch should be reused with your aftermarket strut and must be lined up with the contour of the spring perch. It is the black plastic piece that "molds" to the bottom of the spring. This ensures that the spring does not slip and there is no metal on metal contact between spring and perch. Eibachs do come with rubber isolators on the spring that you can slide down to the bottom, but in my experience, those wear out over time and you get the metal on metal rubbing, which may or may not cause some squeaks and rattles.
Suspension 101 - when you uncompress the spring, always make sure that the lower end of the spring is flush with the "groove" on the spring perch, there should be no gap. Also make sure the top of the spring is snug and fit properly in the upper mount and that none of the rubber edges of the spring seat within the top hat are smushed or folded in.
Re-installing is straightforward if you reverse the process - stick the shock assembly up into the holes, screw on a nut to keep it in place, add remaining nuts but don't tighten all the way. Then add the fork and tighten fork back to hub. Replace wheel, lower car, then tighten the nuts that hold the shock to the car. Tighten the nuts on the shock piston to correct torque specs. I think it was 22 ft lb or 30 Nm.
The rears were a pain to remove because of greater need than the front to push the hub down to free the shock assembly. I unbolted the nuts to the top hat first, but there's no lower fork to remove to clear space at the bottom. I did what Gabe15 did and used the emergency jack to push the lower arm down (see the second picture in his thread linked above), but not after frustrating myself for a while using a jack stand handle to try to push it down myself. Once you've pushed the lower arm far down enough with the emergency jack to get the shock free, just leave the jack in there because you need to do it again to reinstall. The rear shock disassembly and assembly process is almost the same as the front and pretty straightforward, except the stock spring isolator is connected to the dustboot, so you don't have to worry about that. Just make sure the contours line up so that the groove for the end of the spring on the perch is covered by the corresponding groove on the rubber isolator. Koni modifications as listed above apply as well.
The pain in the rear is getting the top hat nuts back in, while trying to hold the shock up. Impossible when you're alone. I had my wife climb into the trunk to do the first side, but then she went to bed, so on the second one, I stuck the top hat studs though the holes, then wedged in a ratchet and hammer handle under the shock to hold it in place while I jumped in and screwed the nuts on. After that, I slowly lowered the emergency jack, raising the lower arm, until the lower bolt holes from the shock lined up with the hub. Bolted that down and then removed the emergency jack. Lower car, tighten all the top hat nuts to the studs, and tighten the piston nuts to spec.
Took me 7.5 hours in total (split over two nights), which is a long time for me, but a lot of it was learning since this was the first time I've taken apart a TSX suspension, and time to do the necessary adjustments to assemble the Konis.
I only have one picture so far, but will find some time to get more in daylight and when the car is cleaned up.
Drop - Eibach is 1.0" front and rear, but I used the lower of two perches on the front Konis for an extra 0.5" because I had anticipated the rear would be lower due to the additional sheet metal of the wagon. Used the upper perch for the rears. It's much lower than I expected but I like it and it's level.

This was after I did the front only:

What a mess:

This design feature makes it so easy to unbolt the top hat:

Stock strut had lots of crud and grease on it, I wondered if it was blown, but it compressed and rebounded just fine, by hand at least:

Front Koni + Eibach vs front stock:

Hope this might help someone else tackling the job. Feel free to post questions or comments. Thanks.
I used these threads are my primary guides, so huge credit to these guys, along with the Koni instructions in the box:
Gabe15 aka Terdbath?
https://acurazine.com/forums/2g-tsx-tires-wheels-suspension-300/diy-tein-s-tech-cu2-809439/
Stan
https://acurazine.com/forums/showpos...9&postcount=13
I got the Konis from Excelerate, who gave me extremely competitive pricing with a price match, although they ended up being backordered from Koni for 2 months. Eibachs were off Amazon when they had a 10-15% sale on all Eibach products.
As stressed by others numerous occasions, look over your tools and parts before starting. There's nothing more frustrating than diving in and having to run out and get something you're missing, or worse still, having to order it and postponing the job. On the flip side, be prepared to get creative or improvise, because things don't always go as planned.
After getting the car on stands and removing the wheels, I unbolted the lower fork from the hub first, then unbolted it from the shock assembly. I could then push the hub/lower arm down to free the fork piece, giving me more room to remove the shock. I covered the CV boot with a towel to make sure it didn't get damaged while removing the shock. After that, I loosened the three nuts to the top mount, removed two, but held on to the shock while removing the last one to make sure it wouldn't fall on the boot. It took some simultaneous pressing down on the hub and wiggling but it came out just fine. Obviously, having another pair of hands here would have been really helpful.
After compressing the spring, getting the top hat off was easy but with Konis you need some extra time to make the required modifications:
- Drilling to enlarge the hole in the metal cup at the top of the dust boot to fit over the larger Koni piston
- Trimming the bumpstops
- Pushing the bumpstop down over the weld on the piston which is larger than stock
- Replacing the metal sleeve between the two bushings in the top hat. Since the sleeve is much larger than stock, I used a little white lithium grease to get the sleeve into the bushings easier.
I want to stop here and say a huge thank you to Stan for documenting all this in the linked post above, it saved me lots of "self discovery" time. I didn't have a bit to drill out the dustboot hole, but used a Dremel with small grinding wheel instead.
When it comes to assembling any suspension components, double check and triple check that you have everything in place and in the correct order (Koni has good diagrams for this). I foolishly used the right strut with the left top hat and that didn't work, so I had to re-compress and remove the spring. And then after reassembling, I forgot the dustboot the second time. Argh. Note here that the front stock spring isolator that fits on the spring perch should be reused with your aftermarket strut and must be lined up with the contour of the spring perch. It is the black plastic piece that "molds" to the bottom of the spring. This ensures that the spring does not slip and there is no metal on metal contact between spring and perch. Eibachs do come with rubber isolators on the spring that you can slide down to the bottom, but in my experience, those wear out over time and you get the metal on metal rubbing, which may or may not cause some squeaks and rattles.
Suspension 101 - when you uncompress the spring, always make sure that the lower end of the spring is flush with the "groove" on the spring perch, there should be no gap. Also make sure the top of the spring is snug and fit properly in the upper mount and that none of the rubber edges of the spring seat within the top hat are smushed or folded in.
Re-installing is straightforward if you reverse the process - stick the shock assembly up into the holes, screw on a nut to keep it in place, add remaining nuts but don't tighten all the way. Then add the fork and tighten fork back to hub. Replace wheel, lower car, then tighten the nuts that hold the shock to the car. Tighten the nuts on the shock piston to correct torque specs. I think it was 22 ft lb or 30 Nm.
The rears were a pain to remove because of greater need than the front to push the hub down to free the shock assembly. I unbolted the nuts to the top hat first, but there's no lower fork to remove to clear space at the bottom. I did what Gabe15 did and used the emergency jack to push the lower arm down (see the second picture in his thread linked above), but not after frustrating myself for a while using a jack stand handle to try to push it down myself. Once you've pushed the lower arm far down enough with the emergency jack to get the shock free, just leave the jack in there because you need to do it again to reinstall. The rear shock disassembly and assembly process is almost the same as the front and pretty straightforward, except the stock spring isolator is connected to the dustboot, so you don't have to worry about that. Just make sure the contours line up so that the groove for the end of the spring on the perch is covered by the corresponding groove on the rubber isolator. Koni modifications as listed above apply as well.
The pain in the rear is getting the top hat nuts back in, while trying to hold the shock up. Impossible when you're alone. I had my wife climb into the trunk to do the first side, but then she went to bed, so on the second one, I stuck the top hat studs though the holes, then wedged in a ratchet and hammer handle under the shock to hold it in place while I jumped in and screwed the nuts on. After that, I slowly lowered the emergency jack, raising the lower arm, until the lower bolt holes from the shock lined up with the hub. Bolted that down and then removed the emergency jack. Lower car, tighten all the top hat nuts to the studs, and tighten the piston nuts to spec.
Took me 7.5 hours in total (split over two nights), which is a long time for me, but a lot of it was learning since this was the first time I've taken apart a TSX suspension, and time to do the necessary adjustments to assemble the Konis.
I only have one picture so far, but will find some time to get more in daylight and when the car is cleaned up.
Drop - Eibach is 1.0" front and rear, but I used the lower of two perches on the front Konis for an extra 0.5" because I had anticipated the rear would be lower due to the additional sheet metal of the wagon. Used the upper perch for the rears. It's much lower than I expected but I like it and it's level.

This was after I did the front only:

What a mess:

This design feature makes it so easy to unbolt the top hat:

Stock strut had lots of crud and grease on it, I wondered if it was blown, but it compressed and rebounded just fine, by hand at least:

Front Koni + Eibach vs front stock:

Hope this might help someone else tackling the job. Feel free to post questions or comments. Thanks.
Thread Starter
Burning Brakes
Joined: Apr 2011
Posts: 937
Likes: 247
From: Fairfax, VA
Initial impressions of the lowered ride are that the set up feels comparable or even softer than stock with the Konis set at the middle of the dial. But I do seem to recall from one of the early reviews that the wagons came with higher spring rates or linear springs from the factory, not sure how credible the source is though. Anyway, it's a really smooth ride still, but you can feel much more feedback and stiffness over bumpy road surfaces. Handling is way flatter with less lean/roll and much less jumpy over bumps and expansion gaps, despite the softer feel.
No rattles or clunks but for one dull clunk when I back out of my driveway, same side same turn. Even on crappy DC roads, no clunking or rattling, part of which is testament to how solidly this chassis and subframe is built. Will check and retighten that top mount later today.
No rattles or clunks but for one dull clunk when I back out of my driveway, same side same turn. Even on crappy DC roads, no clunking or rattling, part of which is testament to how solidly this chassis and subframe is built. Will check and retighten that top mount later today.

Thread Starter
Burning Brakes
Joined: Apr 2011
Posts: 937
Likes: 247
From: Fairfax, VA
Thanks Octo, glad to help, I'm hoping anyone else attempting a suspension job will find it useful. Loving the new suspension but I've only been driving it in traffic so far. Can't wait to get out on some twisties, although I need to get an alignment soon. Pretty sure I used many of your old rides' pictures when deciding on the Eibachs too!
Thread Starter
Burning Brakes
Joined: Apr 2011
Posts: 937
Likes: 247
From: Fairfax, VA
One more thing to add about my dealing with Excelerate. Not only did they give me a good price, communication was good, and after the 2 month wait, Josh had the Konis overnighted to me once they reached his warehouse. Yes, overnighted.
Trending Topics
Thread Starter
Burning Brakes
Joined: Apr 2011
Posts: 937
Likes: 247
From: Fairfax, VA
Thanks, guys. It's one of those mods that has made me more excited about driving the car again. Koni makes awesome suspension parts and I think the extra effort getting these on was worth it vs fully assembled coils (nothing against them either of course). Hoping to get some time to wash it tonight, along with rechecking to make sure everything is fastened properly.
Last edited by Puppetmaster; Jun 19, 2013 at 03:14 PM.
Former Sponsor
iTrader: (1)
Joined: Mar 2004
Posts: 9,877
Likes: 624
From: www.ExceleratePerformance.com

Thank you for the feedback and your patience.

Hello World


Joined: Jul 2011
Posts: 4,757
Likes: 1,788
From: Dallas, TX
Excelerate is a great company.
Great writeup. I've heard many good things about koni yellow. Didn't take you too long to install, considering it took me about the same amount of time to install my coilovers. Maybe I'm just slow.
Great writeup. I've heard many good things about koni yellow. Didn't take you too long to install, considering it took me about the same amount of time to install my coilovers. Maybe I'm just slow.
Thread Starter
Burning Brakes
Joined: Apr 2011
Posts: 937
Likes: 247
From: Fairfax, VA
Thanks, I'm not a pro or anything, it's only because I have ama$$ed all the right tools for the job over the years, which really makes a difference. Also in tinkering with my old Maxima and helping others on Maxima.Org I've swapped more suspension setups more than I want to remember so I've sort of figured out a way of doing things quickly. At least, once I know what I'm doing.


Thread Starter
Burning Brakes
Joined: Apr 2011
Posts: 937
Likes: 247
From: Fairfax, VA


More pictures are here:
https://acurazine.com/forums/showthr...8#post14543918
Thread Starter
Burning Brakes
Joined: Apr 2011
Posts: 937
Likes: 247
From: Fairfax, VA
Quick update - After driving around for a couple weeks, I'm going to raise the front back to the upper perch (scraping the exhaust/cat entering and exiting my parking garage at work), and stiffen the settings; right now they are set right in the middle between full stiff and full soft and can be a little firmer. Took the rims off temporarily until I get things fine tuned.
Racer
Joined: Jun 2012
Posts: 287
Likes: 51
From: San Francisco, CA
^^ If your wife is worried about the ride not being comfortable enough for her and kid, she shouldn't be too worried. Comfort is very reasonable, I actually thought some aspects of the KONIs made for a comfier ride than the stock shocks. You can also run them with the stock springs for smallest possible drop and lowest rate spring setup -- works well too. Only downside vs. stock is the cost IMO.
Stan
Stan
Instructor
Joined: Jun 2011
Posts: 217
Likes: 18
From: Arizona
^^ If your wife is worried about the ride not being comfortable enough for her and kid, she shouldn't be too worried. Comfort is very reasonable, I actually thought some aspects of the KONIs made for a comfier ride than the stock shocks. You can also run them with the stock springs for smallest possible drop and lowest rate spring setup -- works well too. Only downside vs. stock is the cost IMO.
Stan
Stan
Racer
Joined: Jun 2012
Posts: 287
Likes: 51
From: San Francisco, CA
A lot will depend on tires, if you will use tires with thin stiff sidewall I bet even on stock suspension the car may feel rough sometimes. Ride quality was a big concern for me which is why I tried KONIs with stock springs first. I'm running stock size tires with ProKit and KONIs now and it's still very reasonable. Even on stock springs the handling and control improved a lot, you can always fall back to that as your last resort.
Stan
Stan
Racer
Joined: Jun 2012
Posts: 287
Likes: 51
From: San Francisco, CA
Not sure. I go for the shocks first. The ProKit rates are a good amount higher.. I didn't like the stock shocks that much in the first place, but then again I'm not a fan of Japanese suspension tuning anyway. A lot has to do with road quality where you live.
Stan
Stan
Thread Starter
Burning Brakes
Joined: Apr 2011
Posts: 937
Likes: 247
From: Fairfax, VA
The stock shocks might be okay, but if you're installing springs you're going to have everything disassembled so you might as well swap the shocks out too and get it done right the first time.
Instructor
Joined: Jun 2011
Posts: 217
Likes: 18
From: Arizona
You guys are right...I wont want to take eveything apart again once the stock shocks go bad. Thanks for all the help!
Thread Starter
Burning Brakes
Joined: Apr 2011
Posts: 937
Likes: 247
From: Fairfax, VA
My Photobucket sucks so I'm going to have to replace the pictures via Flickr.
Here's how the drop looks with the Koni + Eibach, using the lower spring perch in the front and upper perch in the rear. The front is significantly lower, even with the heavier rear end of the wagon. Stock 17s and my 18s.
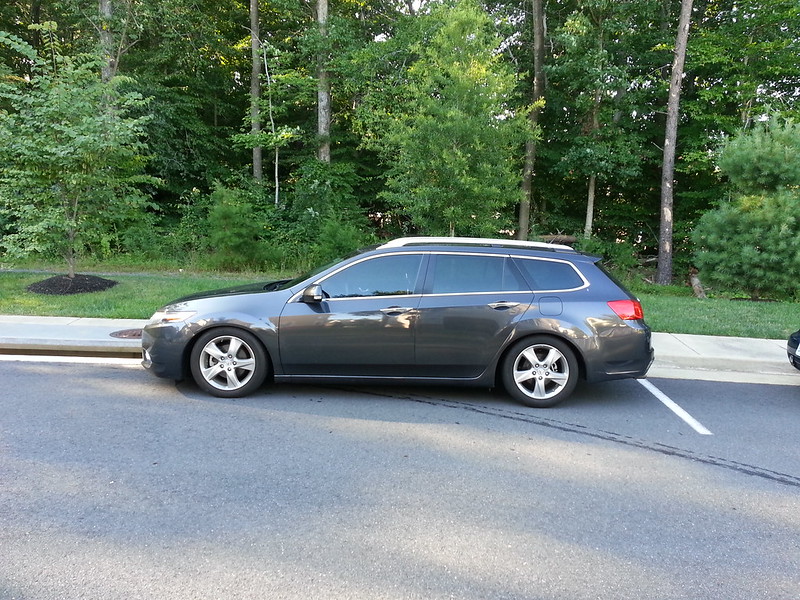
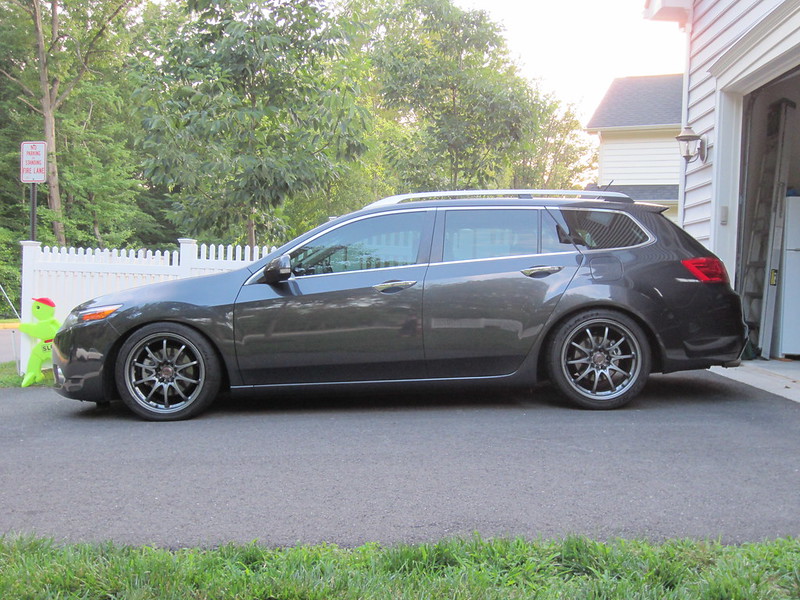
Here's how the drop looks with the Koni + Eibach, using the lower spring perch in the front and upper perch in the rear. The front is significantly lower, even with the heavier rear end of the wagon. Stock 17s and my 18s.

10th Gear
Joined: Mar 2013
Posts: 13
Likes: 0
From: Boston
Puppet, ride looks slick. Any update on that Flickr account? Every time I got to look at pics of yours there is nothing and the PB link is always broken. What did the suspension run you granted you saved big on the DIY?
thanks for the write up.
thanks for the write up.

Racer
Joined: Jun 2012
Posts: 287
Likes: 51
From: San Francisco, CA
Yes, I would trim them. Instructions that came with springs should have mentioned it. H&R front springs would be even shorter than Eibachs, and I'm not sure if they are stiffer (they must be?).
Stan
Stan
Thread Starter
Burning Brakes
Joined: Apr 2011
Posts: 937
Likes: 247
From: Fairfax, VA
Hoping to finally get an alignment and fenders rolled this week...
PS - totally off topic but I only realized this weekend that the OEM 17s are made by Enkei; saw the stamping when I was washing them.
Thread Starter
Burning Brakes
Joined: Apr 2011
Posts: 937
Likes: 247
From: Fairfax, VA
Got the alignment today, along with getting the rear fenders rolled, and the new tires mounted and balanced. The work was done by Mach V Motorsports in Sterling, VA, they also run fastwrx.com for those who know the site. Excellent crew over there.
Specs before:
Front driver camber -0.7 deg, toe -0.08"
Front passenger camber -0.8 deg, toe -0.02"
Rear driver camber -3.0 deg, toe +0.10"
Rear passenger camber -2.8 deg, toe +0.06"
Specs after (I don't have a camber kit, so just toe was done):
Front driver camber -0.7 deg, toe +0.01"
Front passenger camber -0.8 deg, toe +0.01"
Rear driver camber -3.1 deg, toe +0.03"
Rear passenger camber -3.0 deg, toe +0.03"
Again, my car was lowered with Eibach Pro-Kit springs, and I used the lower perch of the Koni struts up front, higher perch in the rear. I did ask for a slight toe-in set up.
At this point I'm considering getting a rear camber arm to reduce some of the negative camber since after the fender roll there's no more rubbing. Also contemplating the front ball joint, because I think the front could have more camber.
Racer
Joined: Mar 2011
Posts: 492
Likes: 104
Good write up Puppetmaster. Stan had a good write up as well. I am in the suspension market again myself. I noticed recently I blew my OEM driver side front shock. (clunky front suspension noise and hydraulic fluid all over the shock) Not surprised. I knew it would happen eventually just didnt think it would be so soon. 2.5 years and 20,000 miles. Im torn at the moment whether to go the Koni Yellow route with my Teins or go with coilovers. Going to research the pros and cons of each this weekend.
By the way, yes, I am the artist formally known as Gabe15.
By the way, yes, I am the artist formally known as Gabe15.
Thread Starter
Burning Brakes
Joined: Apr 2011
Posts: 937
Likes: 247
From: Fairfax, VA
Good write up Puppetmaster. Stan had a good write up as well. I am in the suspension market again myself. I noticed recently I blew my OEM driver side front shock. (clunky front suspension noise and hydraulic fluid all over the shock) Not surprised. I knew it would happen eventually just didnt think it would be so soon. 2.5 years and 20,000 miles. Im torn at the moment whether to go the Koni Yellow route with my Teins or go with coilovers. Going to research the pros and cons of each this weekend.
By the way, yes, I am the artist formally known as Gabe15.
By the way, yes, I am the artist formally known as Gabe15.
I'd say Konis, since you already have springs that you like, and they are still one of the best dampers available for this application. For any application really.
Thread Starter
Burning Brakes
Joined: Apr 2011
Posts: 937
Likes: 247
From: Fairfax, VA
They are wearing just fine from what I can tell, been around 2500 miles since the alignment. Once the rims are off I'll get some pics if you want. Negative camber isn't what causes bad wear, it's toe. Once you get an alignment and have the toe fixed, you should be fine, especially with such a mild drop.


Thread Starter
Burning Brakes
Joined: Apr 2011
Posts: 937
Likes: 247
From: Fairfax, VA
No, pretty sure mine all slid down fine. I might have brute-forced them over the weld, but definitely didn't have to drill. The metal cup was the only piece that had to be drilled/Dremel-ed.

