
Do it by yourself guide: Lighted Doorsills

Thread Starter
Op is too busy to care
Joined: Jul 2010
Posts: 5,257
Likes: 913
Specials thanks to 09tsxtech for the wiring diagrams i needed and to all the other acurazine heros who helped along the way
Anyway, lemme preface this by saying that i assume no responsibility for however you destroy your car, this has only been in my car for a few days and so far so good, anyone who is cautious about modding should wait a bit and see how this holds up before attempting this mod, its also a somewhat difficult mod, its not too bad, but it does cost you time and money. Also, unless you are really careful and/or know what you are doing with electricity, just disconnect your battery while you work
It is not a perfect mod, and some of you wont like certain things about it, but it is what it is and i hope those of you who are more talented than I can take this and make something better of it.
cons:
-Biggest con is that the rears arent lighted, i explained in my other thread why i decided not to do this and the difficulties involved, but the other night i had an idea and im gonna attempt to do the rears too in the coming weeks, so stay tuned for that
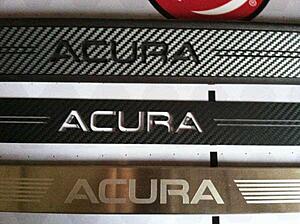
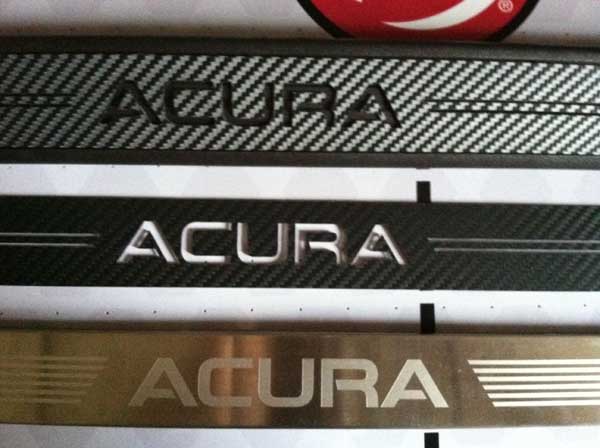
-they are not metal. unfortunately our stock sills cant be cut in a cost efficient manner to my knowledge (i tried) so another solution had to be found. I found a company that does laser cutting of acrylic so i designed a vector file of our door sills which i sent to them and they produced 1.5mm thick acrylic sills for me at a very reasonable price, i then covered them in 3m di-noc. The pics dont really do it justice, the di-noc looks much better in person. 3M also makes a brushed aluminum vinyl for anyone who wants to follow the same process and wants a metal look
- no fucking idea how they will hold up to water, the tape is already waterproof and i did my best to waterproof the only area where there could be an issue (where the connectors are crimped on), the tape you get is pretty solid, its called Aclar tape or something and it sticks like a mofo
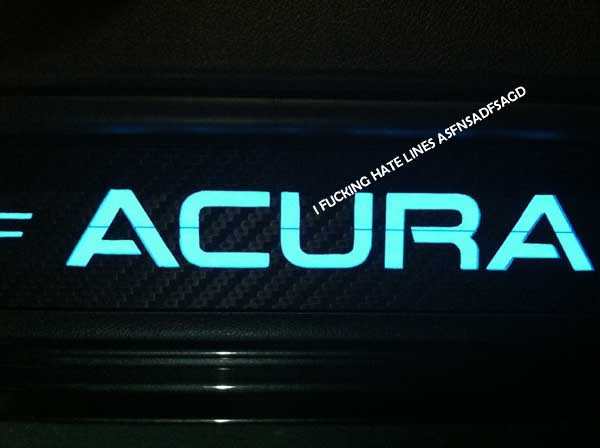
-They have a line going through them. Its barely noticeable and only if you get up close, but due to the design of the lighted panels a small black line appears in the glowing portion. This is unavoidable and a caveat of using this type of electroluminescent technology. I used Light Tape, they are a reputable company, another Azine member has dealt with them before, and their pieces are sealed for moisture. I have all the details/contact info for whoever wants it
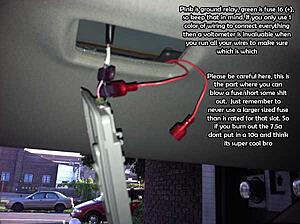
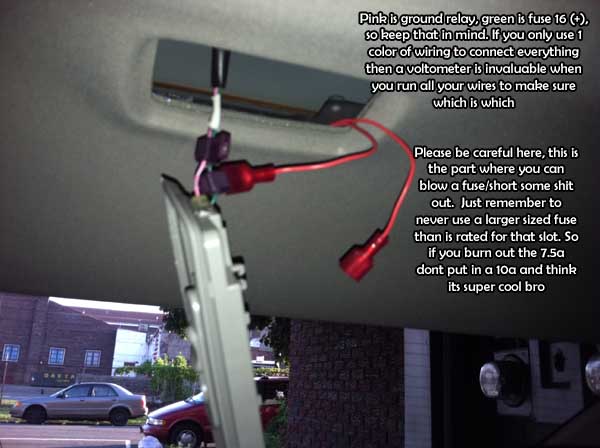
Also, i blew fuse 16 under the hood while i was working on this, i dont know if i unintentionally shorted at some point or what, but this is a 7.5 amp fuse which is located under the hood which controls the rear interior lights, rear courtesy lights, front courtesy lights, and garage door opener, you may want to pull it out before you proceed, you only have ONE ex
Supplies:
- 2 acrylic sills for pololu ~ $40
- 4 Ft. Light Tape + Inverter ~ $90
- 4 sq ft. CF vinyl ~ $30
- Wiring and shit below ~ $20
- Roll of 18 guage wiring (stranded will be easier to manage)
- Wire Stripper / crimper
- 6 18-22 guage wire t-taps
- 6 18-22 guage butt connectors
- Voltometer
- 12V Test unit (a drill battery with exposed leads, a battery block with 8 AA's, whatever, its really helpful)
All in all this isnt too bad, the one area where you can choose to go about this differently is you could buy two inverters from light tape as opposed to 1. I got 1 medium sized and wired it to the rear dome light for simplicitys sake, if you get two there is less wiring to do and you can tap the door courtesy grounds and find a constant 12v somewhere.
Anyway, once you get all your stuff in, ill give an exact parts list later, The first thing you are gonna wanna do when you get your sills is unwrap them from their packaging and then rewrap them in CF, so take the sills, cover them in cf, and then use a heatgun to make sure they are on tight, blowdry if you dont have a heatgun, then i flipped them over and as i mentioned earlier someone assisted me and helped me exacto knife the lettering out from behind, finish all that shit up and then you should be at this stage:
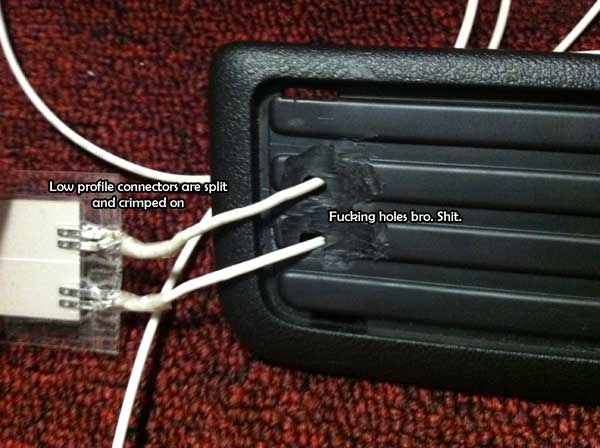
great you did it, next take your light tape stuff out, and start by splitting the white low profile connectors in half, seperate the two sides and then use pliers to crimp them on to the top and bottom section of the light tape, ill link a how to video from them soon, then you need to drill into your removed door sill holders in about the spot where they need to go through
keep in mind that the white connection wires are NOT polarity sensitive, however the red and black wires are
oh yeah and after you crimp the ends on make sure you wrap that shit in Aclar tape (ull get it when you buy the L-tape)
so basicallly line up the 2 foot long tape with the connectors on and mark where you need to drill and then drill the holes and pull the connectors through

next you wanna take whatever power tool ( i used a dremel from everything) and remove some of the sill holder and create kind of a groove around the holes. You can see it above, the purpose is to compensate for the thickness of the connectors. Anyway here you have to use your best judgement, but basically in the end the tape will be completely flat against the sill and the wires will be poking out the back

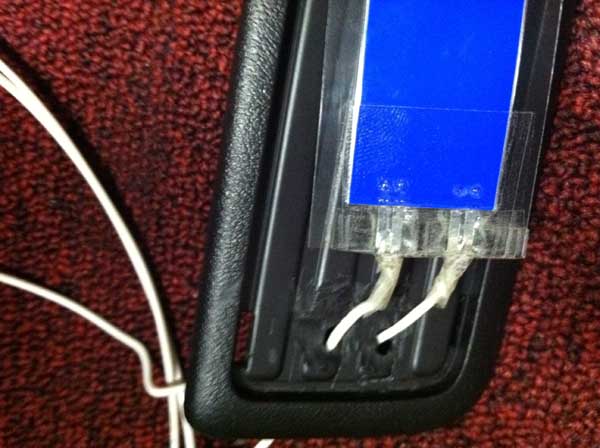
once you get it set and flat go ahead and throw some Aclar tape over the hole area for shits and giggles, next step is to get the l-tape stuck to the sill. I used some double sided cloth carpet tape. Why? Cause i fucking had some in my house thats why. Any thin, and lemme stress thin, double sided tape will do, also something sticky. See in this pic below the roll was the perfect size for the tape

then tape it down.
then take ur sills and tape em down over that. Bam, door sills created.
At this point i sprayed the white wires with plastidip so they would be dark near the sills
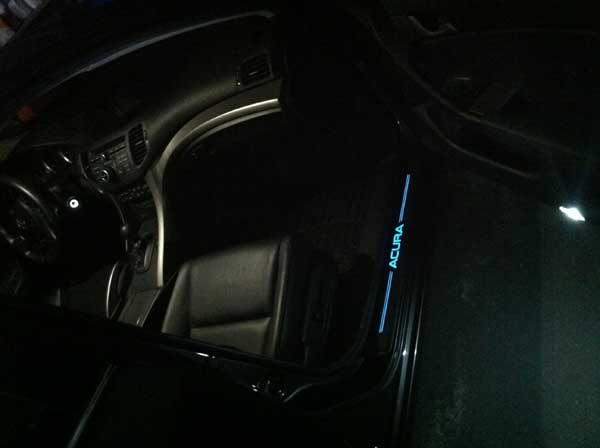
Next step is placing the sills down in the car ready for installation.
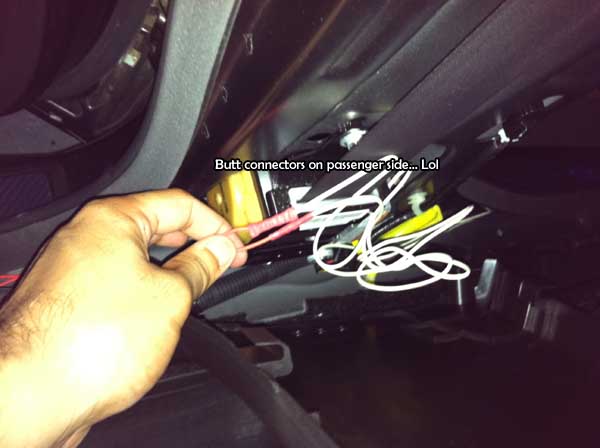
so then remove the passenger side wire harness cover and then the b-pillar interior cover, pull the wires from sill 1 towards this area and sneak the next pic
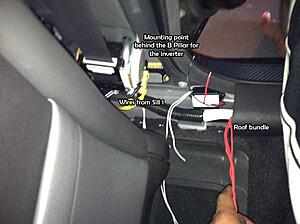
dont worry about the roof bundle right now. Its 4 wires, its the positive and negative from the rear dome light, and the 2 wires from sill 2 (drivers side). Once you have the sill 1 wires in this area start repeating the process on the drivers side
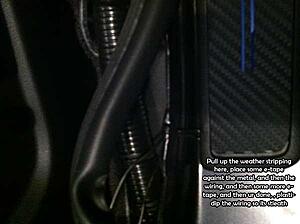
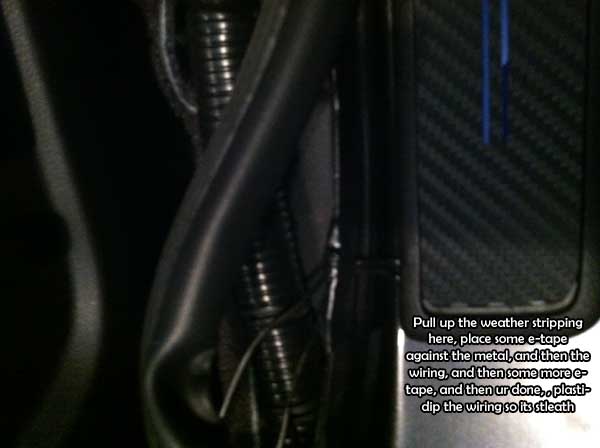
Ull need the drivers side wires to reach the passenger side unless you buy 2 inverters so crimp on some extra wiring with connectors (it says passenger in the pic, thats an error) and tuck the excess behind the drivers side b-pillar, then run the wiring up along the weatherstripping to the rear of the roof and then slightly pull down the roof headliner and tuck in the wires there and bring em back down on the other side, you will use the same path for the power wires from the rear dome so you will have 4 total wires coming down from the roof
bring down the power wires to the passenger side b-pillar as well. I recommend you prep the wires for tapping here but dont connect them until the last step
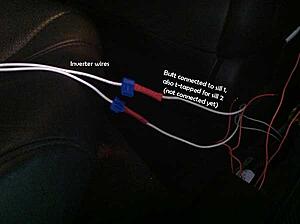
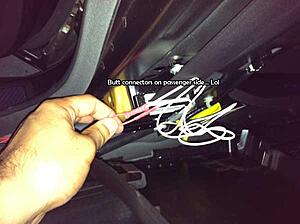
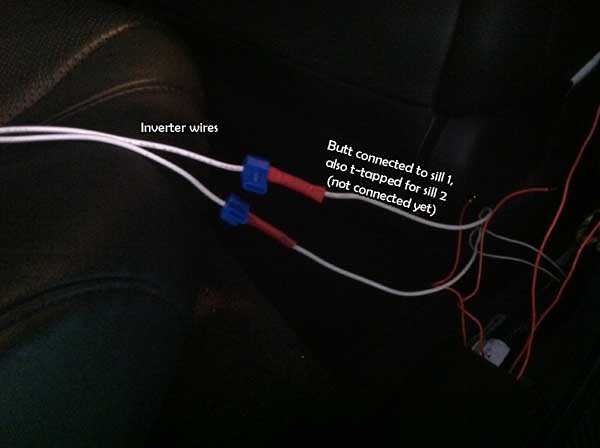
Then start the final connections, connect the passenger sills to the inverter via butt connectors and then tap them also for the driver sills, test with a 12v unit make sure all ur connections so far are solid
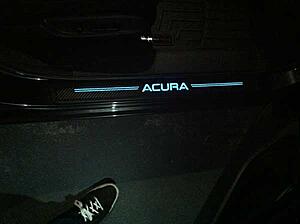
Finally connect your wiring for the power, test and make sure the sills come on with the rear dome light, and then well great success
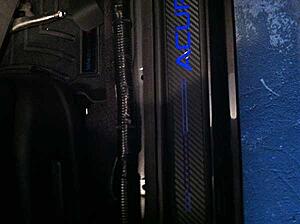
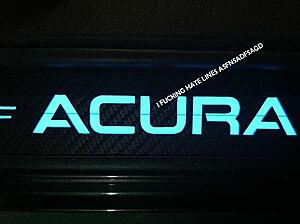
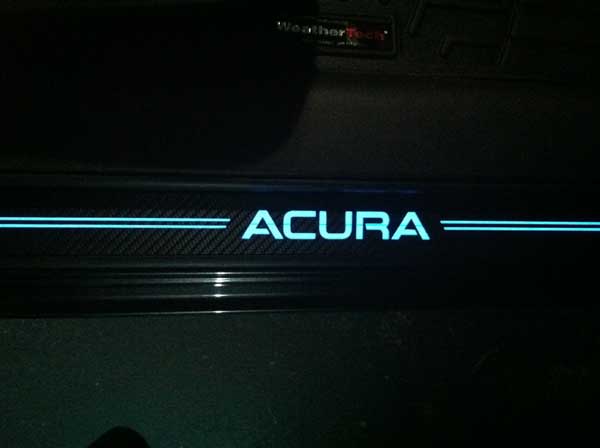
the pics dont do em justice, they look alot bluer in person


Anyway, lemme preface this by saying that i assume no responsibility for however you destroy your car, this has only been in my car for a few days and so far so good, anyone who is cautious about modding should wait a bit and see how this holds up before attempting this mod, its also a somewhat difficult mod, its not too bad, but it does cost you time and money. Also, unless you are really careful and/or know what you are doing with electricity, just disconnect your battery while you work
It is not a perfect mod, and some of you wont like certain things about it, but it is what it is and i hope those of you who are more talented than I can take this and make something better of it.
cons:
-Biggest con is that the rears arent lighted, i explained in my other thread why i decided not to do this and the difficulties involved, but the other night i had an idea and im gonna attempt to do the rears too in the coming weeks, so stay tuned for that
-they are not metal. unfortunately our stock sills cant be cut in a cost efficient manner to my knowledge (i tried) so another solution had to be found. I found a company that does laser cutting of acrylic so i designed a vector file of our door sills which i sent to them and they produced 1.5mm thick acrylic sills for me at a very reasonable price, i then covered them in 3m di-noc. The pics dont really do it justice, the di-noc looks much better in person. 3M also makes a brushed aluminum vinyl for anyone who wants to follow the same process and wants a metal look
- no fucking idea how they will hold up to water, the tape is already waterproof and i did my best to waterproof the only area where there could be an issue (where the connectors are crimped on), the tape you get is pretty solid, its called Aclar tape or something and it sticks like a mofo
-They have a line going through them. Its barely noticeable and only if you get up close, but due to the design of the lighted panels a small black line appears in the glowing portion. This is unavoidable and a caveat of using this type of electroluminescent technology. I used Light Tape, they are a reputable company, another Azine member has dealt with them before, and their pieces are sealed for moisture. I have all the details/contact info for whoever wants it
Also, i blew fuse 16 under the hood while i was working on this, i dont know if i unintentionally shorted at some point or what, but this is a 7.5 amp fuse which is located under the hood which controls the rear interior lights, rear courtesy lights, front courtesy lights, and garage door opener, you may want to pull it out before you proceed, you only have ONE ex
Supplies:
- 2 acrylic sills for pololu ~ $40
- 4 Ft. Light Tape + Inverter ~ $90
- 4 sq ft. CF vinyl ~ $30
- Wiring and shit below ~ $20
- Roll of 18 guage wiring (stranded will be easier to manage)
- Wire Stripper / crimper
- 6 18-22 guage wire t-taps
- 6 18-22 guage butt connectors
- Voltometer
- 12V Test unit (a drill battery with exposed leads, a battery block with 8 AA's, whatever, its really helpful)
All in all this isnt too bad, the one area where you can choose to go about this differently is you could buy two inverters from light tape as opposed to 1. I got 1 medium sized and wired it to the rear dome light for simplicitys sake, if you get two there is less wiring to do and you can tap the door courtesy grounds and find a constant 12v somewhere.
Anyway, once you get all your stuff in, ill give an exact parts list later, The first thing you are gonna wanna do when you get your sills is unwrap them from their packaging and then rewrap them in CF, so take the sills, cover them in cf, and then use a heatgun to make sure they are on tight, blowdry if you dont have a heatgun, then i flipped them over and as i mentioned earlier someone assisted me and helped me exacto knife the lettering out from behind, finish all that shit up and then you should be at this stage:
great you did it, next take your light tape stuff out, and start by splitting the white low profile connectors in half, seperate the two sides and then use pliers to crimp them on to the top and bottom section of the light tape, ill link a how to video from them soon, then you need to drill into your removed door sill holders in about the spot where they need to go through
keep in mind that the white connection wires are NOT polarity sensitive, however the red and black wires are
oh yeah and after you crimp the ends on make sure you wrap that shit in Aclar tape (ull get it when you buy the L-tape)
so basicallly line up the 2 foot long tape with the connectors on and mark where you need to drill and then drill the holes and pull the connectors through
next you wanna take whatever power tool ( i used a dremel from everything) and remove some of the sill holder and create kind of a groove around the holes. You can see it above, the purpose is to compensate for the thickness of the connectors. Anyway here you have to use your best judgement, but basically in the end the tape will be completely flat against the sill and the wires will be poking out the back
once you get it set and flat go ahead and throw some Aclar tape over the hole area for shits and giggles, next step is to get the l-tape stuck to the sill. I used some double sided cloth carpet tape. Why? Cause i fucking had some in my house thats why. Any thin, and lemme stress thin, double sided tape will do, also something sticky. See in this pic below the roll was the perfect size for the tape

then tape it down.
then take ur sills and tape em down over that. Bam, door sills created.
At this point i sprayed the white wires with plastidip so they would be dark near the sills

Next step is placing the sills down in the car ready for installation.
so then remove the passenger side wire harness cover and then the b-pillar interior cover, pull the wires from sill 1 towards this area and sneak the next pic

dont worry about the roof bundle right now. Its 4 wires, its the positive and negative from the rear dome light, and the 2 wires from sill 2 (drivers side). Once you have the sill 1 wires in this area start repeating the process on the drivers side
Ull need the drivers side wires to reach the passenger side unless you buy 2 inverters so crimp on some extra wiring with connectors (it says passenger in the pic, thats an error) and tuck the excess behind the drivers side b-pillar, then run the wiring up along the weatherstripping to the rear of the roof and then slightly pull down the roof headliner and tuck in the wires there and bring em back down on the other side, you will use the same path for the power wires from the rear dome so you will have 4 total wires coming down from the roof
bring down the power wires to the passenger side b-pillar as well. I recommend you prep the wires for tapping here but dont connect them until the last step
Then start the final connections, connect the passenger sills to the inverter via butt connectors and then tap them also for the driver sills, test with a 12v unit make sure all ur connections so far are solid
Finally connect your wiring for the power, test and make sure the sills come on with the rear dome light, and then well great success
the pics dont do em justice, they look alot bluer in person

Pro
Joined: Jan 2011
Posts: 686
Likes: 34
From: Australia
Whoa Killer, a great DIY write up! Even with your guide, my lack of knowledge in DIY's suck ass so I still can't do it. Maybe when I get the chance, I'll show this to my cousin and see if he can do it for me. Cheers man!


Trending Topics


Three Wheelin'
Joined: Sep 2008
Posts: 1,946
Likes: 83
From: Vancouver, BC
Yes they are. You can order them down under for the Accord also.
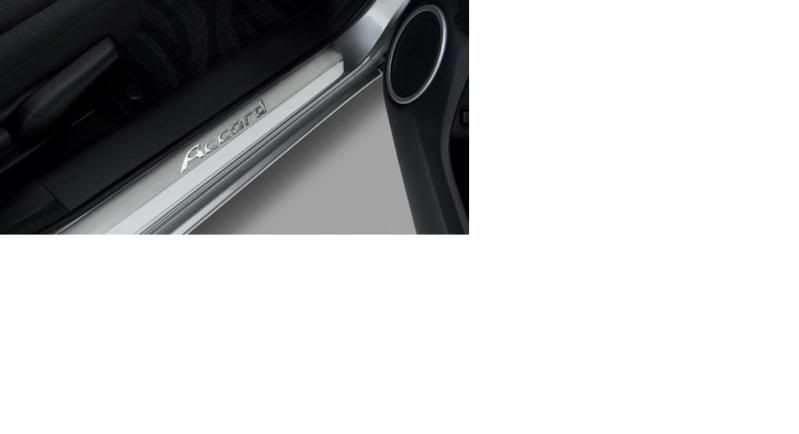
The Illuminated Doorstep Garnish available from Japan and Europe is a shiny stainless steel featuring blue illuminated logo. Part # 08E12-TL0-621 - Black interior

Part # 08E12-TL0-611- Gray interior
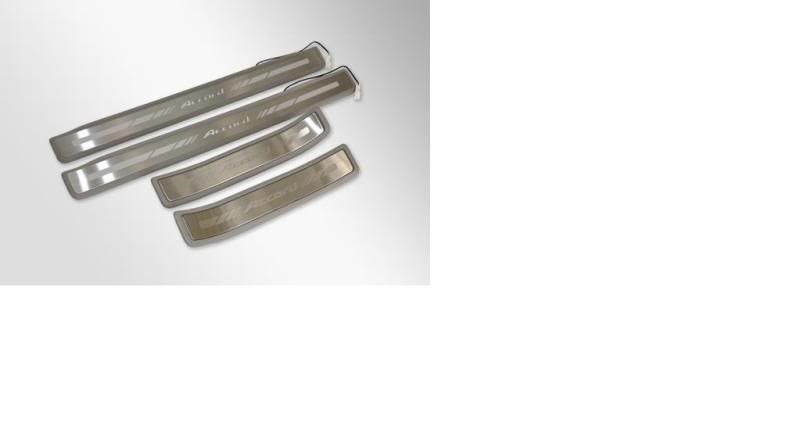
The Illuminated Doorstep Garnish available from Japan and Europe is a shiny stainless steel featuring blue illuminated logo. Part # 08E12-TL0-621 - Black interior
Part # 08E12-TL0-611- Gray interior


Developer & Car Fan
Joined: Feb 2011
Posts: 309
Likes: 28
From: Massachusetts
 .
.


takin care of Business in
iTrader: (5)
Joined: Jan 2008
Posts: 30,994
Likes: 4,733
From: Kansas City, MO


Thread
Thread Starter
Forum
Replies
Last Post
mada51589
3G TL Problems & Fixes
80
Jan 9, 2025 04:40 PM
prox
5G TLX Problems & Fixes
6
Sep 1, 2015 02:03 AM