Just a quick brake bleeding question
 05-20-2009, 07:43 PM
#1

Just a quick brake bleeding question
I like to be 100% sure before i do any work on my car so forgive me. I read through a few a threads and got the basic understanding of what to do. My question is
1. Clean the master cylinder lid and neck to make sure no dirt enters.
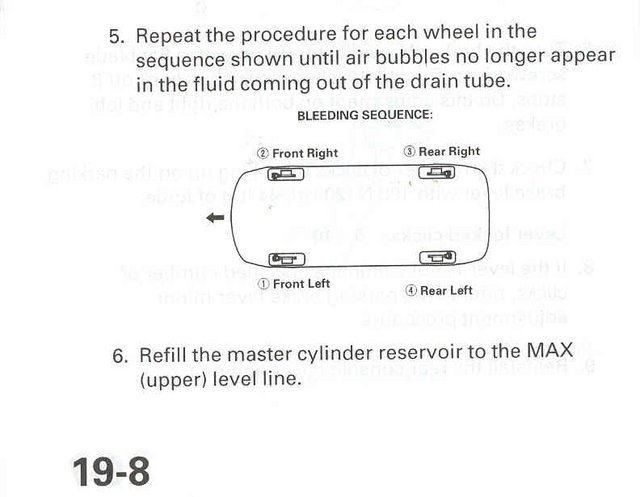
2. Suck out old fluid from master cylinder, add new fluid, replace cap
3. Have someone in car press and hold brake pedal, open bleeder "gonna use 1/4 inch clear tubing", for a sec then close valve, release brake pedal. This is my question, is the goal to open and close the bleeder valve till i see no air bubbles in the clear tubing, or to wait till i see new clean fluid, or both? Also is the person in the car supposed to only press in brake once or can they pump the brake a few times then hold it in while i open the bleeder valve?
4. Fill master cylinder after each bleed.
5. After complete get in car pump pedals to regain pressure
6. Make sure there are no leaks at any of the lines and master cylinder.
Is this the proper order in which to bleed?
Sorry for proably the 100th post on this matter i just wanna be certain im on the right track. I enjoy working on my own car but have never done anything brake related been seen it done many many times. After this i plan on replacing my rotors and pads, gotta stop being a wimp and man up and try.
1. Clean the master cylinder lid and neck to make sure no dirt enters.
2. Suck out old fluid from master cylinder, add new fluid, replace cap
3. Have someone in car press and hold brake pedal, open bleeder "gonna use 1/4 inch clear tubing", for a sec then close valve, release brake pedal. This is my question, is the goal to open and close the bleeder valve till i see no air bubbles in the clear tubing, or to wait till i see new clean fluid, or both? Also is the person in the car supposed to only press in brake once or can they pump the brake a few times then hold it in while i open the bleeder valve?
4. Fill master cylinder after each bleed.
5. After complete get in car pump pedals to regain pressure
6. Make sure there are no leaks at any of the lines and master cylinder.
Is this the proper order in which to bleed?
Sorry for proably the 100th post on this matter i just wanna be certain im on the right track. I enjoy working on my own car but have never done anything brake related been seen it done many many times. After this i plan on replacing my rotors and pads, gotta stop being a wimp and man up and try.
 05-20-2009, 08:22 PM
#2
You have the procedure down pretty good.
To answer your questions, the goal of a brake bleed is to get air out of the system. It's done if you feel the pedal is soft with a good bit of travel. This is when you'll bleed until no bubbles come out.
If you're due for a flush, then you repeat the bleed sequence until you see new fluid.
And yes, for our cars, thats the right order
How many miles on the car? And has it ever been flushed?
05-20-2009, 09:05 PM
#4

Hi tlzib :
I'm assuming you're never bled brakes before. I've never used the tubing as you can see the air in fluid as it comes out.
The goal for bleeding is the end up with about an inch of travel then hit solid brake pedal. If the pedal spongy or goes all the way to the floor, then you need to continue to bleed until you have a solid pedal feel.
To actually bleed the line, vigorously pump the pedal a few times and then stop while holding it down, get the other guy (it takes two) to open the bleed valve. The pedal will go to the floor as the fluid comes out. Close the value just before the pedal goes all the way to the floor. Repeat if you see just air coming out or white foam (air bubbles) in the fluid. Repeat this procedure for each wheel until the fluid is clear and you should feel a rock solid pedal.
You'll know what I'm taking after you've done this a few times. Don't forget to check or top up the fluid a few days after.
smartypants.
Last edited by smartypants; 05-20-2009 at 09:07 PM.
05-20-2009, 09:22 PM
#5
Senior Moderator
Seeing your really not bleeding it as much as your are trying to flush it i would do each wheel till you get new fluid
05-20-2009, 09:47 PM
#6
Trending Topics
05-21-2009, 11:07 AM
#8
05-21-2009, 12:32 PM
#10
You actually put the directions in a clear, concise, easy to follow sequence for those who have never done this before.
It took me several hours of poking around and reading and uncertainty before I had arrived at the basic procedure you outlined. Now you've organized it in a straightforward post that can be easily reviewed, commented upon and validated by those who know better.
I was going to suggest that the other thing I had heard was to not press the pedal completely to the floor and to use a block of wood.
Can anybody explain further why and/or how pressing it all the way to the floor can damage the master cylinder, and what the consequences of that would be? How close is it OK to get to fully compressed?
Once the bleeder is open the "man" inside the car should only apply steady pressure. From what I understand, the reason for that is to prevent pulling fluid back up the tube.
I've seen some instructions say to partially fill the waste bottle to make sure the other end of the tube connected to the nipple is submerged in brake fluid the whole time.
I presume this is to prevent air from being sucked back up the tube if any pumping of the brake pedal occurs while the bleeder is open. This shouldn't be an issue if the assistant is synced up with the person opening the valve and applies steady pressure the whole time the valve is open.
05-21-2009, 03:13 PM
#11
Drifting
Because the master cyl. piston (& it's seal) has a range of normal movement in the bore, limited by the max. pedal travel which is not normally all the way to the floor. If there's any debris (like rust particles, etc.) in the unused bore travel, it could damage the piston's seal when it moves over it. When you put something under the pedal it prevents the piston from moving in that possibly contaminated area. Hope that helps.
05-21-2009, 03:32 PM
#12
Because the master cyl. piston (& it's seal) has a range of normal movement in the bore, limited by the max. pedal travel which is not normally all the way to the floor. If there's any debris (like rust particles, etc.) in the unused bore travel, it could damage the piston's seal when it moves over it. When you put something under the pedal it prevents the piston from moving in that possibly contaminated area. Hope that helps.
I had (apparently falsely) assumed it was a problem of clearances, like something bottoming out with 0 or negative clearance. That makes sense.
So I guess I want to prevent the pedal from traveling further than it would in normal use.
05-21-2009, 06:58 PM
#13
Thanks for the comment Murky much appreciated, i to have rotors and pads bring ordered next week. I guess after reading all this im comfortable enough to do it on my own. Got everything i need and will tackle this job next week. Thanks again to all those that posted in this thread, your help is much appreciated.
05-22-2009, 06:39 AM
#14
Drifting
Much of this you'll probably find is easier to do than it may seem from reading about it. A hand vacuum pump (like a Mityvac, Sears sells one, etc.) makes the job easier and faster and eliminates relying on another person to follow your instructions pumping the pedal. Remember to watch the fluid level in the master cyl. If it gets too low you'll put air in the system & have to start over.
05-22-2009, 07:13 PM
#16
 05-23-2009, 12:02 PM
#20
So leave the cap off and take a change for debris and more air to enter the MS? I think i wouldn't want to take that chance, but if you do more power to ya.
05-25-2009, 10:29 PM
#25
Cap on or off makes no difference !!!! Just do not let the fluid level goes down lest then
MIN then air will get in the system .
At least you work under a tree or outside with a lot of debris are flying around then I
repeat cap ON/OFF make no Difference....
MIN then air will get in the system .
At least you work under a tree or outside with a lot of debris are flying around then I
repeat cap ON/OFF make no Difference....

Thread
Thread Starter
Forum
Replies
Last Post