
LED interior, part 2 : shift gate indicator light

Thread Starter
woooo!!
Joined: Jul 2004
Posts: 2,985
Likes: 20
From: California
continuation of this thread: https://acurazine.com/forums/car-parts-sale-361/sale-m5-spoiler-144257/
finally got time to do it this afternoon.
this is no simple bulb replacement... because the stock shift indicator has nasty green/red/yellow hues in the plastic that prevents even a blue LED underneath to shine through as something else (trust me on this i've tried it).
so, that means you have to make your own.
i wanna give thanks to z3ro and aaaron, got some tips from these guys that have done this before
i'll let the picture-ful DIY do the talk:
first off, obviously, remove the shift gate trims.
the black outside frame is taken off easily by sliding your fingers under the corners and then pulling it out.
the silver (or chrome if you have a cool 99 like me ) piece requires pulling on one edge away from its position horizontally, and then upwards. <-- read this phrase again if you don't really understand it at first. sorry it's tough to explain in words.

and this is what you'll see:

peeling off that thin plastic filter / indicator letters (it's like a sticker) would reveal the diffuser underneath:

and of course take that off to and you'll see the bulb (74-type). you can find the LED replacement here: http://autolumination.com/74.htm the $2.50 one with the single bulb works just fine.

spray paint! (i only used black)

and also need these:
you can find them at staples/wal-mart/office depot/etc.

now comes the not-for-impatient-people part.
you'll be matching where the stock indicator letters are (P, R, N, D, etc.) and applying those sticker letters onto the laminating pouches.
we are doing this because we'll be spray painting these pouches later and with the stickers on, they act like masking tape so that light can shine through later!


i also traced the shape of the original piece so it's easier to know where to cut later.

and to be less wasteful (and also playing safe), i did two on each pouch.
spray time!

i applied about 6 layers of paint... waited about 7-10 mins between each recoat. if you are bored and wish to make another pouch/sheet in case the first one ends up being bad, now would be a good time.

^ after painting
now, cut the piece out. you do not have to be exact around the edges.
i used a pin to help remove the sticker letters.

tape the finished piece onto the backside of the silver shift gate piece to secure the correct position, as follows:

lookin' good eh!

and behold... the finished product!
this was with a super-white LED (it's REALLY bright, might even be distracting for some at night)

and this is with a blue LED, matches my dash nicely

Questions/comments welcome!
finally got time to do it this afternoon.
this is no simple bulb replacement... because the stock shift indicator has nasty green/red/yellow hues in the plastic that prevents even a blue LED underneath to shine through as something else (trust me on this i've tried it).
so, that means you have to make your own.
i wanna give thanks to z3ro and aaaron, got some tips from these guys that have done this before
i'll let the picture-ful DIY do the talk:
first off, obviously, remove the shift gate trims.
the black outside frame is taken off easily by sliding your fingers under the corners and then pulling it out.
the silver (or chrome if you have a cool 99 like me
) piece requires pulling on one edge away from its position horizontally, and then upwards. <-- read this phrase again if you don't really understand it at first. sorry it's tough to explain in words.and this is what you'll see:
peeling off that thin plastic filter / indicator letters (it's like a sticker) would reveal the diffuser underneath:
and of course take that off to and you'll see the bulb (74-type). you can find the LED replacement here: http://autolumination.com/74.htm the $2.50 one with the single bulb works just fine.
spray paint! (i only used black)
and also need these:
you can find them at staples/wal-mart/office depot/etc.
now comes the not-for-impatient-people part.
you'll be matching where the stock indicator letters are (P, R, N, D, etc.) and applying those sticker letters onto the laminating pouches.
we are doing this because we'll be spray painting these pouches later and with the stickers on, they act like masking tape so that light can shine through later!
i also traced the shape of the original piece so it's easier to know where to cut later.
and to be less wasteful (and also playing safe), i did two on each pouch.
spray time!
i applied about 6 layers of paint... waited about 7-10 mins between each recoat. if you are bored and wish to make another pouch/sheet in case the first one ends up being bad, now would be a good time.
^ after painting
now, cut the piece out. you do not have to be exact around the edges.
i used a pin to help remove the sticker letters.
tape the finished piece onto the backside of the silver shift gate piece to secure the correct position, as follows:
lookin' good eh!
and behold... the finished product!
this was with a super-white LED (it's REALLY bright, might even be distracting for some at night)
and this is with a blue LED, matches my dash nicely
Questions/comments welcome!

Race Director
iTrader: (1)
Joined: Oct 2006
Posts: 11,395
Likes: 0
From: Charlotte(home) /Raleigh (school), NC
Ohhh I really like that it looks sweet. Just if you sell the car make sure you explain to the people what you did because if they read the manuel there gonna be like wtf?
New ride...Acura MDX 2013
Joined: Jun 2005
Posts: 478
Likes: 1
From: Toronto
nicely done , but I am concearned a little about the fact that it may be distracting, I'm going to look into possibly diffusing the light coming through the lettering when I do this one
, but I am concearned a little about the fact that it may be distracting, I'm going to look into possibly diffusing the light coming through the lettering when I do this one

Trending Topics

Must have been incredibly tedious. I would do the LED Dash and interior light conversion, but I don't have the patience. I really do like super white or blue LED look though.
Future JDM Whore
Joined: Aug 2004
Posts: 1,648
Likes: 0
From: In a hood near you
dam man u are the most patient person i have come across lol....thanks for the DIY because guess what.....my shift gate light went out last week so now i get to attempt this beautiful project
as stated above pics of the whole dash including this would look hot.....do you have anymore projects that you will be completing for the interior????
as stated above pics of the whole dash including this would look hot.....do you have anymore projects that you will be completing for the interior????


Banned
Joined: Feb 2006
Posts: 1,439
Likes: 0
From: Tampa, FL
Dude, if you ever need help getting the leds to work in the radio, let me know, I just finished (this morning) soldering my dash console and the entire radio in less than 12 hrs. ( I left the cluster untouched since I'll be swapping it out for Type-S gauges later down the road.)
( I left the cluster untouched since I'll be swapping it out for Type-S gauges later down the road.)
Senior Moderator


Joined: Aug 2002
Posts: 81,385
Likes: 3,068
From: Appleton WI
Originally Posted by joe80055
Dude, if you ever need help getting the leds to work in the radio, let me know, I just finished (this morning) soldering my dash console and the entire radio in less than 12 hrs. ( I left the cluster untouched since I'll be swapping it out for Type-S gauges later down the road.)
( I left the cluster untouched since I'll be swapping it out for Type-S gauges later down the road.)Banned
Joined: Feb 2006
Posts: 1,439
Likes: 0
From: Tampa, FL
Originally Posted by fsttyms1
Do them in the type-s cluster. I want to do that to mine really bad. I dont care for the greenish light at all with the silver gauges.

Once I get to the tl-s gauges, then i'll go all out. It's actually extremely easy to my surprise. If you ever need anymore leds, let me know, i have at least 200+ blue and white leds just laying on my table.
B A N N E D
Joined: Jul 2006
Posts: 2,141
Likes: 0
From: Huntington Beach, California
Originally Posted by Da_iLLeZt_TL973
i just finished mine.....those little letters are hard as hell to line up if you have big fingers lol i just painted mine so im waiting for it to dry right now
Thread Starter
woooo!!
Joined: Jul 2004
Posts: 2,985
Likes: 20
From: California
thanks for all the compliments guys!!
haha yeah! i had to realign some of the letters too when i was doing it. after applying everything i realized i could have use a tweezer of some sort to have more accuracy, doh!
the LED comes with a pretty broad angle of light diffusion already (it's intended for gauge/cluster use).
the red tape idea - brilliant! now i just need to find some
i shall post that up sometime soon...!
maybeeeee  i'll need to contact the mods about selling stuff on az first though
haha good timing bro~ i really want to get my AC temperature display to have a blue backlight too. but for those i guess soldering is a must. got to find another ballsy day 
im gonna leave the radio alone joe. will pick up a double DIN navi/dvd player in the futrue, plus my current HU is crap (doesnt play ANY cd-r's, even the ones burned at 2x!). i only use it with the tape adapter + mp3 player 
and... 12 hrs is a long time!
man i might just want to take up on that offer. would you happen to have some of the super white neo-wedge bulbs?
this:
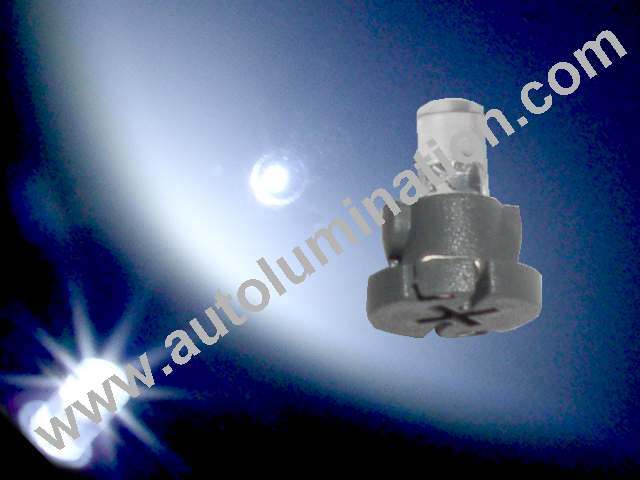
and perhaps the 74-type super whites too:
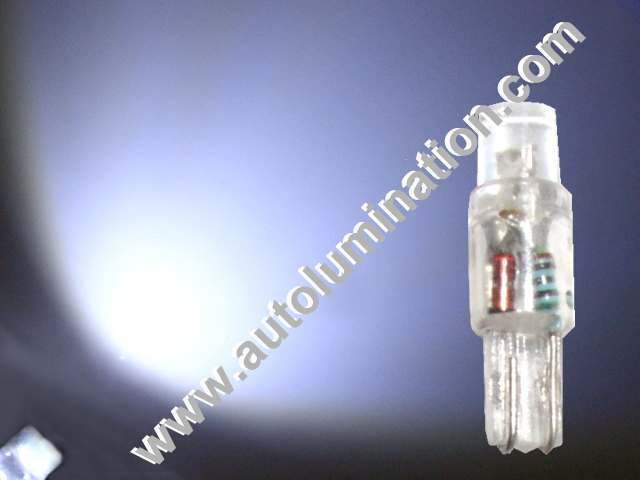
the LAST type of bulbs i would love to have are the miniature verison of the neo-wedge bulbs that go in the middle AC temperature display as well as all the buttons on the dash (sunroof, trip select/reset, TCS/cruise, window up/down)... with those i'll be really completing the package!
if you do you are my hero. at least allow me to pay for shipping
Originally Posted by Da_iLLeZt_TL973
i just finished mine.....those little letters are hard as hell to line up if you have big fingers lol i just painted mine so im waiting for it to dry right now
Originally Posted by stiletto
GREAT DIY THANK YOU. Have you tried shaving the LED so it gets a rough surface to difuse the light? What about placing (taped) a red piece of red lighting gel over (under) the R...
the red tape idea - brilliant! now i just need to find some
Originally Posted by FL3.2TL
Nice DIY!, give us a pic of the whole dash even tho I saw your last project, but this wasn't included. Your a genius!
Originally Posted by imagerockone
You should make more of those templates and sell them. I know that it's a simple DIY project, but I bet people would pay.
i'll need to contact the mods about selling stuff on az first though
Originally Posted by Da_iLLeZt_TL973
dam man u are the most patient person i have come across lol....thanks for the DIY because guess what.....my shift gate light went out last week so now i get to attempt this beautiful project
as stated above pics of the whole dash including this would look hot.....do you have anymore projects that you will be completing for the interior????
as stated above pics of the whole dash including this would look hot.....do you have anymore projects that you will be completing for the interior????
Originally Posted by joe80055
Dude, if you ever need help getting the leds to work in the radio, let me know, I just finished (this morning) soldering my dash console and the entire radio in less than 12 hrs. ( I left the cluster untouched since I'll be swapping it out for Type-S gauges later down the road.)
( I left the cluster untouched since I'll be swapping it out for Type-S gauges later down the road.)and... 12 hrs is a long time!
Originally Posted by joe80055
If you ever need anymore leds, let me know, i have at least 200+ blue and white leds just laying on my table.
this:
and perhaps the 74-type super whites too:
the LAST type of bulbs i would love to have are the miniature verison of the neo-wedge bulbs that go in the middle AC temperature display as well as all the buttons on the dash (sunroof, trip select/reset, TCS/cruise, window up/down)... with those i'll be really completing the package!
if you do you are my hero. at least allow me to pay for shipping

Banned
Joined: Sep 2006
Posts: 500
Likes: 0
From: Tampa, FL
It came out super nice! Im definitely gona use this DIY. BTW, do you know the part # for the '99 TL shift gate? i want to buy it and chrome it out! Maybe they wont just sell that piece but whatever it is let me know, it looks sexxxy.
Future JDM Whore
Joined: Aug 2004
Posts: 1,648
Likes: 0
From: In a hood near you
Originally Posted by vzuptnguyen
lol, u got right on top of it so quick.
Originally Posted by subtledreamer
haha yeah! i had to realign some of the letters too when i was doing it. after applying everything i realized i could have use a tweezer of some sort to have more accuracy, doh!
heres a tip: put the original piece under the clear pouch and just lay the letters directly over the original....sort of like you are tracing a drawing.....and use a razor to lay the letters down straight and everything should be perfect...
Jonathan thanks alot man without this DIY i wouldnt have had a clue as to wat i was doing lol
Future JDM Whore
Joined: Aug 2004
Posts: 1,648
Likes: 0
From: In a hood near you
Originally Posted by OntarioTL
I forgot to ask what font size did you have to buy for the lettering?
OntarioTL
OntarioTL
i got the 1/4 in. lettering size im pretty sure Jonathan has the same because the other ones wouldve been way too big

Mr. 2tone
Joined: Sep 2004
Posts: 1,921
Likes: 9
From: Pleasanton, CA
i wana add to the DIY...from mine...its also best if u have another piece of lamination on top as the cover...that way when it gets dirty...u dont have to make a new 1...just a new piece of lamination
Banned
Joined: Sep 2006
Posts: 500
Likes: 0
From: Tampa, FL
Originally Posted by z3Ro
i wana add to the DIY...from mine...its also best if u have another piece of lamination on top as the cover...that way when it gets dirty...u dont have to make a new 1...just a new piece of lamination
Mr. 2tone
Joined: Sep 2004
Posts: 1,921
Likes: 9
From: Pleasanton, CA
what do u mean which lamination? the same kind lol...ok ok...ill see if i can put it in an easier way...um....
"shift gate cover"
layer 1...clear lamination
layer 2...modified lamination <----shift indicator
"shift gate cover"
layer 1...clear lamination
layer 2...modified lamination <----shift indicator