
Gabru678 Car Thread
 09-06-2012, 11:42 PM
#1
Gabru678 Car Thread
* Just a side note: I think this is the right place to put all the stuff I going to do to my car in one thread If not please let me know via PM and I will move it. Pretty positive it goes here but hey... *
*
Hey guys so I ordered my brakes from the Brakemotive group buy going on. and decided while I had them off I would paint them.
And this is how they turned out:


Why not paint over the old rotors? Not gonna use them again!

Remember to put a tire under the car for Jack Failure safety!


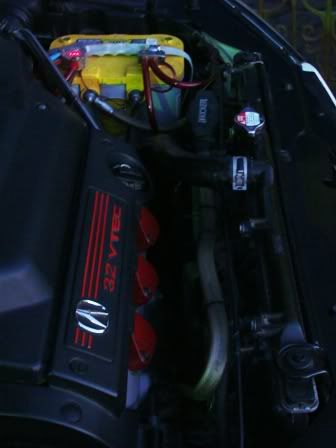
They turned out pretty good I thought. And I had used barely any of the silver paint. So I figured since I have my car up anyway and I liked the naked engine but not the Intake Manifold's metal not so clean, I'll do that too! So I took it off using the EGR guide method and sanded it down a bit. Used some brake cleaner fluid to remove the dirt and painted it really well. Like Really REALLY well. 5 coats, even finish, in places you will never see. ( I didnt think of that, I just wanted it to be a showroom piece on its own and forgot half of it is still going to be covered)


After that I did that stripe on the top of the engine manifold in red and STILL I Had this guy left over and did some small accents.


What do you guys think?
*Hey guys so I ordered my brakes from the Brakemotive group buy going on. and decided while I had them off I would paint them.
And this is how they turned out:
Why not paint over the old rotors? Not gonna use them again!
Remember to put a tire under the car for Jack Failure safety!
They turned out pretty good I thought. And I had used barely any of the silver paint. So I figured since I have my car up anyway and I liked the naked engine but not the Intake Manifold's metal not so clean, I'll do that too! So I took it off using the EGR guide method and sanded it down a bit. Used some brake cleaner fluid to remove the dirt and painted it really well. Like Really REALLY well. 5 coats, even finish, in places you will never see. ( I didnt think of that, I just wanted it to be a showroom piece on its own and forgot half of it is still going to be covered)
After that I did that stripe on the top of the engine manifold in red and STILL I Had this guy left over and did some small accents.
What do you guys think?

The following users liked this post:
QFcreeper (09-24-2014)
09-07-2012, 04:31 AM
#2

I think you need to take the calipers off and replace the piston rubber seals you painted!
those must remain clean as they move with the piston,,especially as pads wear and piston is farther extended- those boots must extend as well
the boots keep bad stuff away from a very thin o-ring seal for the caliper piston
those must remain clean as they move with the piston,,especially as pads wear and piston is farther extended- those boots must extend as well
the boots keep bad stuff away from a very thin o-ring seal for the caliper piston
09-07-2012, 04:36 AM
#3
use of tire as a safety device in case of jack failure is a good idea as noted
but
placing it under the front of the car as shown above- is not
Ive never seen anyone use a tire AND a real jackstand,,,
a floor/hydraulic jack and no stand- YES use something,, in case
under the frame rail where it will do some good = keeping car off you is the key
but
placing it under the front of the car as shown above- is not
Ive never seen anyone use a tire AND a real jackstand,,,
a floor/hydraulic jack and no stand- YES use something,, in case
under the frame rail where it will do some good = keeping car off you is the key
09-07-2012, 04:38 AM
#4
the end result is interesting,,not many do all the painting
show it off a ziner meets!
other note: the plenums of the intake manifold-- polish up really well too
show it off a ziner meets!
other note: the plenums of the intake manifold-- polish up really well too
09-07-2012, 04:47 AM
#5
:( Harminder Is Lost In
iTrader: (1)
Join Date: Jan 2006
Location: HaHa, You Cant Find Me
Age: 37
Posts: 1,090
Received 0 Likes
on
0 Posts
Just an opinion, use G2 Caliper paint. I use to use the spray cans and had to redo every year. I used G2 and been almost 2 years and still holding up real well. Id like to see a pic from farther away to see how the red and silver contrast looks. Other then that, ghaint aa bai lol
09-07-2012, 07:07 AM
#6
Everything looks great except the coilpacks. The red just looks kinda out of place. Not bad though. I'm going to paint that slot in the IM too, looks good.
Peace of mind when your head is directly under the frame or something like that. I'm always a little nervous whenever I'm under it like that. Can't say I trust my life on HF and Walmart jack stands.
Peace of mind when your head is directly under the frame or something like that. I'm always a little nervous whenever I'm under it like that. Can't say I trust my life on HF and Walmart jack stands.
09-07-2012, 12:01 PM
#7
Painted calipers=yaaaayyy. Painted pistons=errrr. Basically the goal would be to paint all visible parts but protect all working/moving parts. Looks good but not sure what's gonna happen as paint flakes off and possibly gets inside the rubber and into the piston. I'd clean that off w something or get some legend calipers to swap in. Brakes are something you shouldn't take chances w. Aside from all that I think it looks good. Painting coil packs is an original idea, I like it. Good work bro.
Trending Topics
09-07-2012, 12:25 PM
#8
Team Owner
iTrader: (4)
Holy rusty knuckle Batman.
09-08-2012, 08:15 PM
#9

Hey Gabru678, a nice personalized detailing touch never hurts anything....looks are all in the eye of the beholder. Looks good, except now that you've started this new look.....there's a few things that will tend to jump out and holler for help.
Make sure that you use only the highest quality paint and more important is the cleaning / prepping ! Otherwise, it'll not wear it new suit very long. The exhaust manifold cover could use attention, or maybe headers are on order, aye ? "JK", indeed a very good effort on your behalf, as I have a hard enough time keeping up with the exterior. Ha, hah....!
Make sure that you use only the highest quality paint and more important is the cleaning / prepping ! Otherwise, it'll not wear it new suit very long. The exhaust manifold cover could use attention, or maybe headers are on order, aye ? "JK", indeed a very good effort on your behalf, as I have a hard enough time keeping up with the exterior. Ha, hah....!
09-08-2012, 11:57 PM
#10
I've learned from doing alot of metal fabrication and customization on my TL the most important part of any metal job is the beginning. For instance, when painting a metal surface (such as your calipers and intake) is to clean the entire components with a high speed drill and a soft metal wire wheel. Then go back and spray off with any fast evaporating cleaner that leaves no residue: I use brake parts cleaner. Preparation is key and ultimately determines both the look quality and longevity of the work itself. As for metal polishing, take your time with the sanding process and don't skip any area that will be polished or machined. If I'm polishing a painted surface, I still begin with a soft wire wheel to aid in the paint removal (this generally removes all paint unless it's a powder coat) followed by a multi-stage sanding process from rough to fine grit sand paper. The number of stages depends on the type of metal or how porous the surface is. Typically the softer the metal, the less stages of sanding the metal requires and the more lustrous the shine becomes. Luckily for you, most of the pieces on the J-series motors are aluminum or aluminum alloy. This makes easy for the sanding and appearance quality! Have fun with it and try to space out the sanding stages or you will be burned out QUICK! Check out my 3.5 build thread and look at some of my work on my RL intake. Although they were taken before it was polished, the machining alone makes for one helluva look too!
09-09-2012, 12:11 AM
#11
Moderator
Next time dont Use Caliper Paint (At least from Duplicolor)  It will flake in less than 6 months... Use Engine Enamel in Glossy Flavor for Calipers and High Heat 1200�F for Rotors. (Been there, Done that). ALSO You must not Paint the Piston BOOT!!!
For the Plenum I have it fully polished... If anything I would Chrome it in the Future.
I Also have painted the Coil Packs but I did them Complete not partially now that I see yours they look neat..
Mine (MANY MANY WINTERS AGO):
KEEP UP THE GOOD WORK!
It will flake in less than 6 months... Use Engine Enamel in Glossy Flavor for Calipers and High Heat 1200�F for Rotors. (Been there, Done that). ALSO You must not Paint the Piston BOOT!!! For the Plenum I have it fully polished... If anything I would Chrome it in the Future.
I Also have painted the Coil Packs but I did them Complete not partially now that I see yours they look neat..
Mine (MANY MANY WINTERS AGO):
KEEP UP THE GOOD WORK!
Last edited by Skirmich; 09-09-2012 at 12:15 AM.
09-20-2012, 05:48 PM
#12
I think you need to take the calipers off and replace the piston rubber seals you painted!
those must remain clean as they move with the piston,,especially as pads wear and piston is farther extended- those boots must extend as well
the boots keep bad stuff away from a very thin o-ring seal for the caliper piston
those must remain clean as they move with the piston,,especially as pads wear and piston is farther extended- those boots must extend as well
the boots keep bad stuff away from a very thin o-ring seal for the caliper piston
Originally Posted by 01tl4tl
01tl4tl: use of tire as a safety device in case of jack failure is a good idea as noted
but
placing it under the front of the car as shown above- is not
but
placing it under the front of the car as shown above- is not
Also I know of a man that got hurt quite badly when working under his car, though he was not doing it safely or properly as I was. But now im very paranoid and scared under there. And I never rush when doing something with my only method of transportation :P
Originally Posted by MilwaukeeDave
Painted calipers=yaaaayyy. Painted pistons=errrr. Basically the goal would be to paint all visible parts but protect all working/moving parts. Looks good but not sure what's gonna happen as paint flakes off and possibly gets inside the rubber and into the piston. I'd clean that off w something or get some legend calipers to swap in. Brakes are something you shouldn't take chances w. Aside from all that I think it looks good. Painting coil packs is an original idea, I like it. Good work bro.
Originally Posted by 3.2TLc
Hey Gabru678, a nice personalized detailing touch never hurts anything....looks are all in the eye of the beholder. Looks good, except now that you've started this new look.....there's a few things that will tend to jump out and holler for help.
Make sure that you use only the highest quality paint and more important is the cleaning / prepping ! Otherwise, it'll not wear it new suit very long. The exhaust manifold cover could use attention, or maybe headers are on order, aye ? "JK", indeed a very good effort on your behalf, as I have a hard enough time keeping up with the exterior. Ha, hah....!
Make sure that you use only the highest quality paint and more important is the cleaning / prepping ! Otherwise, it'll not wear it new suit very long. The exhaust manifold cover could use attention, or maybe headers are on order, aye ? "JK", indeed a very good effort on your behalf, as I have a hard enough time keeping up with the exterior. Ha, hah....!
Originally Posted by harminder247
Just an opinion, use G2 Caliper paint. I use to use the spray cans and had to redo every year. I used G2 and been almost 2 years and still holding up real well. Id like to see a pic from farther away to see how the red and silver contrast looks. Other then that, ghaint aa bai lol
Originally Posted by Skirmich
I Also have painted the Coil Packs but I did them Complete not partially now that I see yours they look neat..
Mine (MANY MANY WINTERS AGO):
Mine (MANY MANY WINTERS AGO):
Thanks for all the good looks guys!
09-25-2012, 04:04 PM
#13
Also I should just say on here that I got a job at a Ford Dealership (Tom Holzer) as a mechanic/assistant guy. Really fun and learning A TON about cars.
Current issues I'm having here (https://acurazine.com/forums/2g-tl-1999-2003-98/bosch-oil-filter-fitment-problem-3312-a-869097/)
Current issues I'm having here (https://acurazine.com/forums/2g-tl-1999-2003-98/bosch-oil-filter-fitment-problem-3312-a-869097/)
 10-07-2012, 09:13 PM
#15
Ok guys so the next step i have is to do a tranny flush. Now I know that the D-11 is the trans fluid preferred and am going to go to a honda dealer to get it. I had a question after doing a search and reading it on the other threads about a 3x3 flush.
What is this?
and I probably am going to do this at the Ford dealership I got a job at and they use a machine to do it.
My concern is that someone said that it is very detrimental if another type of trans fluid gets in while doing this. The machines use the mercon fluid and I dont want to get any of that in there if it as bad as they say.
Is this true?
and should I use the 3x3 method instead?
10-07-2012, 10:49 PM
#16
Moderator
NONONONONONO No FLUSH Machine or What Else!!
Do a Normal 3x3! This is done in like 3 Weeks...
3x3 Means 3 Changes x 3q
First Week 1 Change of 3q of DW-1
2nd Week 1 Change of 3q of DW-1
3rd Week 1 Change of 3q of DW-1
= DONE 3x3
Dont use any Type of Flush with the Trans or It will be Damaged.. specially a Machine made for FORDs and dont make me talk about DEXRON III... USE HONDA DW-1 ONLY! or REDLINE STUFF.
The following users liked this post:
jra8858 (10-08-2012)
10-08-2012, 08:38 PM
#17
Oh ok, well I had just thought the machine would be nice and through and watching them do it is quite interesting. I only suggested the machine because I had checked the other attachments and they are not FORD specific and would fit both the in and out of my car during the flush.
And ok I do understand the 3x3 flush now. But how will I know I am fully getting all of the old fluid out while replacing with the new? Wouldn't a small amount always remain of the old if I was not to do it all at once?
And do you know why a full drain and fill would be bad?
And ok I do understand the 3x3 flush now. But how will I know I am fully getting all of the old fluid out while replacing with the new? Wouldn't a small amount always remain of the old if I was not to do it all at once?
And do you know why a full drain and fill would be bad?
12-02-2012, 08:54 PM
#18
Hey guys thinking of 'Carboning' my mirrors.
I took a look at them and they seem like they can be divided in 2 sections.
A top half (Square ish) and the bottom half. Seperate like audi mirrors
But instead of the brushed aluminium the carbon fiber.
What are your guys' opinions? should i do either half or the whole mirror?
I took a look at them and they seem like they can be divided in 2 sections.
A top half (Square ish) and the bottom half. Seperate like audi mirrors
But instead of the brushed aluminium the carbon fiber.
What are your guys' opinions? should i do either half or the whole mirror?

The following users liked this post:
Stephen00TL (12-02-2012)
12-03-2012, 02:17 AM
#22
Believe me I would if I could, I just dont really have that retrofit knowledge yet.
And on a students budget, buying this $15 roll of 1'x5' is as heavy modding as I can do as I already spent on something else I have yet to show
But maybe later, I would rather get a set of LED tails that I would mod first before I tackle the side mirrors.
Still though back to the point: what do you guys say?
12-19-2012, 11:19 PM
#23
Whilst waiting for the thoughts to come rushing in on the mirror warp idea.
I went ahead and used some of my wrap to test and get a feel for it on my Gauges.

Measure twice cut once, lol thanks construction job!


Got a Heat gun for $22 from Home Depot pretty good IMO and the 3M 1080 wrap really works amazingly well stretching and getting all the bubbles out from the heat.

As this was the first time I had ever done it I did cut off a bit much on the inside parts, But thats why I started on the part that no-one would really notice and see all that much.
Practice makes perfect... or at least better


I just finished trimming the edges and am really happy with it and it looks great!
Also have to take some pics in the day so you can see the rest of what I have going on
.I went ahead and used some of my wrap to test and get a feel for it on my Gauges.
Measure twice cut once, lol thanks construction job!
Got a Heat gun for $22 from Home Depot pretty good IMO and the 3M 1080 wrap really works amazingly well stretching and getting all the bubbles out from the heat.
As this was the first time I had ever done it I did cut off a bit much on the inside parts, But thats why I started on the part that no-one would really notice and see all that much.
Practice makes perfect... or at least better
I just finished trimming the edges and am really happy with it and it looks great!
Also have to take some pics in the day so you can see the rest of what I have going on

 05-06-2013, 06:00 PM
#25
Me and my friend took some pics of my car before I put all my summer mods on. Here they are, I am going to take the After pictures when he is back in town.


Wanted to take pictures here because my car is also 'Under Construction' lol


Was removing my mudflaps, all but this one.

I also put these on the hood.
Looks not to bad IMO


As you can see the lines are crooked a bit. You can only tell from this angle.
So for anybody else that wants to do this, when you are cutting do not go by feel alone. A good way is to use masking tape (because it wont leave a reside and is easy to apply/remove) to line out where you are going to go, and then perfect that and then cut along the tape, the ridge of the tape on the material will guide you in a solid line.


And This was the first time I had ever used the Carbon Fiber trim. So yea, It came out kinda awful. I had cut it to the shape before hand (but that didnt work which is why it wasn't all covered)

At least the bottom of it came out flawless :P

Gotta Rep the Azine!

And the shop that did my paint did an awful job and when it rains over time a little bit keeps building and collecting in it. I have poked a hole in the bottom so it doesnt go any further (hopefully)
They do say they have a lifetime coverage over defects in the paint. Do you think something like this would be covered?


My slotted rotors peeking out.


And the next post will hopefully come with all of the good looking things on
Wanted to take pictures here because my car is also 'Under Construction' lol
Was removing my mudflaps, all but this one.
I also put these on the hood.
Looks not to bad IMO
As you can see the lines are crooked a bit. You can only tell from this angle.
So for anybody else that wants to do this, when you are cutting do not go by feel alone. A good way is to use masking tape (because it wont leave a reside and is easy to apply/remove) to line out where you are going to go, and then perfect that and then cut along the tape, the ridge of the tape on the material will guide you in a solid line.
And This was the first time I had ever used the Carbon Fiber trim. So yea, It came out kinda awful. I had cut it to the shape before hand (but that didnt work which is why it wasn't all covered)
At least the bottom of it came out flawless :P
Gotta Rep the Azine!
And the shop that did my paint did an awful job and when it rains over time a little bit keeps building and collecting in it. I have poked a hole in the bottom so it doesnt go any further (hopefully)
They do say they have a lifetime coverage over defects in the paint. Do you think something like this would be covered?
My slotted rotors peeking out.
And the next post will hopefully come with all of the good looking things on
05-12-2013, 10:49 AM
#26
So now that my foglights finally both cracked and failed, lets do something to them!
So the day the remaining one failed I ordered it. It got here this weekend and started yesterday night.
I found that just sticking paper into the gap of the housing and bumper fit pretty well to protect from overspray. I only had to tape the one to the top. All the other ones just fit snugly in.


Yes Ladies and Gents the miracle that is Plastidip has found its way onto my car!
I watched too many videos of this stuff and really wanted to try it out.

Looks like a black hole!


Also dont mind the awful looking bumper, thats gonna be...taken care of

I think this can go somewhere!
So the day the remaining one failed I ordered it. It got here this weekend and started yesterday night.
I found that just sticking paper into the gap of the housing and bumper fit pretty well to protect from overspray. I only had to tape the one to the top. All the other ones just fit snugly in.
Yes Ladies and Gents the miracle that is Plastidip has found its way onto my car!
I watched too many videos of this stuff and really wanted to try it out.
Looks like a black hole!
Also dont mind the awful looking bumper, thats gonna be...taken care of
I think this can go somewhere!


 05-14-2013, 04:33 PM
#33
Ok yea I didnt really like it that much after.
(It was a spur of the moment thing after both bulbs were gone)
and I didnt want to remove them as then I would have a hole where you could see the internals, not 'clean' IMO
But thats the best part of plasti dip you can take it off when you are done.
But I didnt take it all off, I took it off only on the bezels so the surrounding silver trim shows.
low key but noticable
It looks amazaballs.
05-29-2013, 10:40 AM
#34
Hey guys so I got my car all ready for the summer!
Keep in mind that this is still a progress thread so im not done yet
But I have maxed out what I can do this year so I wont be in the AZine hall of fame yet lol
I dont plan on showing it all yet because I want to shoot the car somewhere this weekend so your going to have these teaser shots I took earlier today
You can probably tell I really like teh 'Carbon Fibers' and my car shows:

I also put some batman love on with a sample of the 'Brushed Gold' wrap from 3M

I even did my keys to match!


Even though they go through some wear being in my pocket all day it holds up well which gives me hope for the what is on my car.


Look at those wide (to me) tires!

Nice new shoes!


Until the weekend!
Keep in mind that this is still a progress thread so im not done yet
But I have maxed out what I can do this year so I wont be in the AZine hall of fame yet lol
I dont plan on showing it all yet because I want to shoot the car somewhere this weekend so your going to have these teaser shots I took earlier today
You can probably tell I really like teh 'Carbon Fibers' and my car shows:
I also put some batman love on with a sample of the 'Brushed Gold' wrap from 3M
I even did my keys to match!
Even though they go through some wear being in my pocket all day it holds up well which gives me hope for the what is on my car.
Look at those wide (to me) tires!
Nice new shoes!
Until the weekend!


 06-07-2013, 12:24 PM
#38
I took most of these at my school (WMU!!) with my old Point-and-Shoot, whereas the other ones before were form a Samsung GS3! amazing how my previously good P&S is completely outpaced by a camera on a cell phone!
But anyway here are the rest of them!


Gotta contain all that go power lol


Being from Detroit it's all about that light to light racing!

Thanks for all the help so far guys!
Never would have guessed in under a year I would be able to go from bone stock to something like this!
But there is still plenty more to go!
As for now though I wont be able to do much more until next spring (when I have the budget for it)
But anyway here are the rest of them!
Gotta contain all that go power lol
Being from Detroit it's all about that light to light racing!
Thanks for all the help so far guys!
Never would have guessed in under a year I would be able to go from bone stock to something like this!
But there is still plenty more to go!
As for now though I wont be able to do much more until next spring (when I have the budget for it
)
06-09-2013, 05:35 PM
#39
Also here is the other 'go' bits I put on:
Can you say +500HP?

Looks like something is missing. Hmm..


Look at that! Mid Muffler is gone and it sounds GOOD! With it all properly bent and decent welding job

I am constantly on the go pedal now and the start-up bark is nice.
I am also proud to say this is the only work I have ever gotten done by anyone other than myself on this car.
What do you think of my progress and what I should try and do (Other than a drop, I know that one :P)
Or even general input is nice to hear of, even if you dont like something I would like to hear about it, my thread is filled of myself only and would like to hear from others.
And now to update my signature...
Can you say +500HP?
Looks like something is missing. Hmm..
Look at that! Mid Muffler is gone and it sounds GOOD! With it all properly bent and decent welding job
I am constantly on the go pedal now and the start-up bark is nice.
I am also proud to say this is the only work I have ever gotten done by anyone other than myself on this car.
What do you think of my progress and what I should try and do (Other than a drop, I know that one :P)
Or even general input is nice to hear of, even if you dont like something I would like to hear about it, my thread is filled of myself only and would like to hear from others.
And now to update my signature...


