When you click on links to various merchants on this site and make a purchase, this can result in this site earning a commission. Affiliate programs and affiliations include, but are not limited to, the eBay Partner Network.
An unfortunate outcome...if I may make some suggestions: When you get it all back together; the manual states (once you've got the belt back on and properly tensioned: to rotate the crankshaft by hand 6 times.
Other Honda manuals also suggest that during this time, you should stop if there are any signs of binding whatsoever. to avoid confusion on binding; I'd take out the spark plugs so that you are not confusing compression with binding.
Thank you for documenting your process here; I am sure it will be quite helpful to others in the future...
Other Honda manuals also suggest that during this time, you should stop if there are any signs of binding whatsoever. to avoid confusion on binding; I'd take out the spark plugs so that you are not confusing compression with binding.
Jup. It is a problem. Compression vs binding, how to differentiate. If you remember you wondered how I didn't do damage to the engine. It is how I see it. When 11 tooths went off at my Acura engine was still in time only it stops working because sensors were plugged from dirt. And when I did rotate it with old belt on it stayed in timing. When I took the old belt off, I never rotated cam compared to crank more than 60 degrees. I hold 60 degrees like reference because 360, full circle, divided with 6, number of cylinders is 60. Yeah, if you rotate cam full circle and crank do not move valve is bent.
My unhinged, theory is if you drive and belt broke compression keep valves from pistons so is good chance that they are saved.
That photo of head with bent valve is helpful. It gives me an idea of what to look for when checking head at youpull.
An unfortunate outcome...if I may make some suggestions: When you get it all back together; the manual states (once you've got the belt back on and properly tensioned: to rotate the crankshaft by hand 6 times.
Other Honda manuals also suggest that during this time, you should stop if there are any signs of binding whatsoever. to avoid confusion on binding; I'd take out the spark plugs so that you are not confusing compression with binding.
Thank you for documenting your process here; I am sure it will be quite helpful to others in the future...
Yea I plan on keeping the plugs out into later in the rebuild for sure. I�ll take my time with my rotations, hopefully it�ll go smooth.
Just got the heads back yesterday actually. They look great. Since I had all the stem seals with the gasket kit I bought I got them to change all those as well, In the end I needed to replace 8 valves.. I�ll post some pics of the bent ones soon. Unfortunately they forgot one of my wire harness brackets so I�ll have to wait until Monday to get that back. Also a few odds and ends that I�m waiting for from the dealer.. parts sure take a while to come in these days.
^
Just curious, did the machine shop notate or mention that the cylinder head intake / exhaust valves are pre-adjusted, as part of their rebuild services, to OEM specifications?
^
Just curious, did the machine shop notate or mention that the cylinder head intake / exhaust valves are pre-adjusted, as part of their rebuild services, to OEM specifications?
Yes thankfully. I paid them to gage the valves correctly for me.
Yes thankfully. I paid them to gage the valves correctly for me.
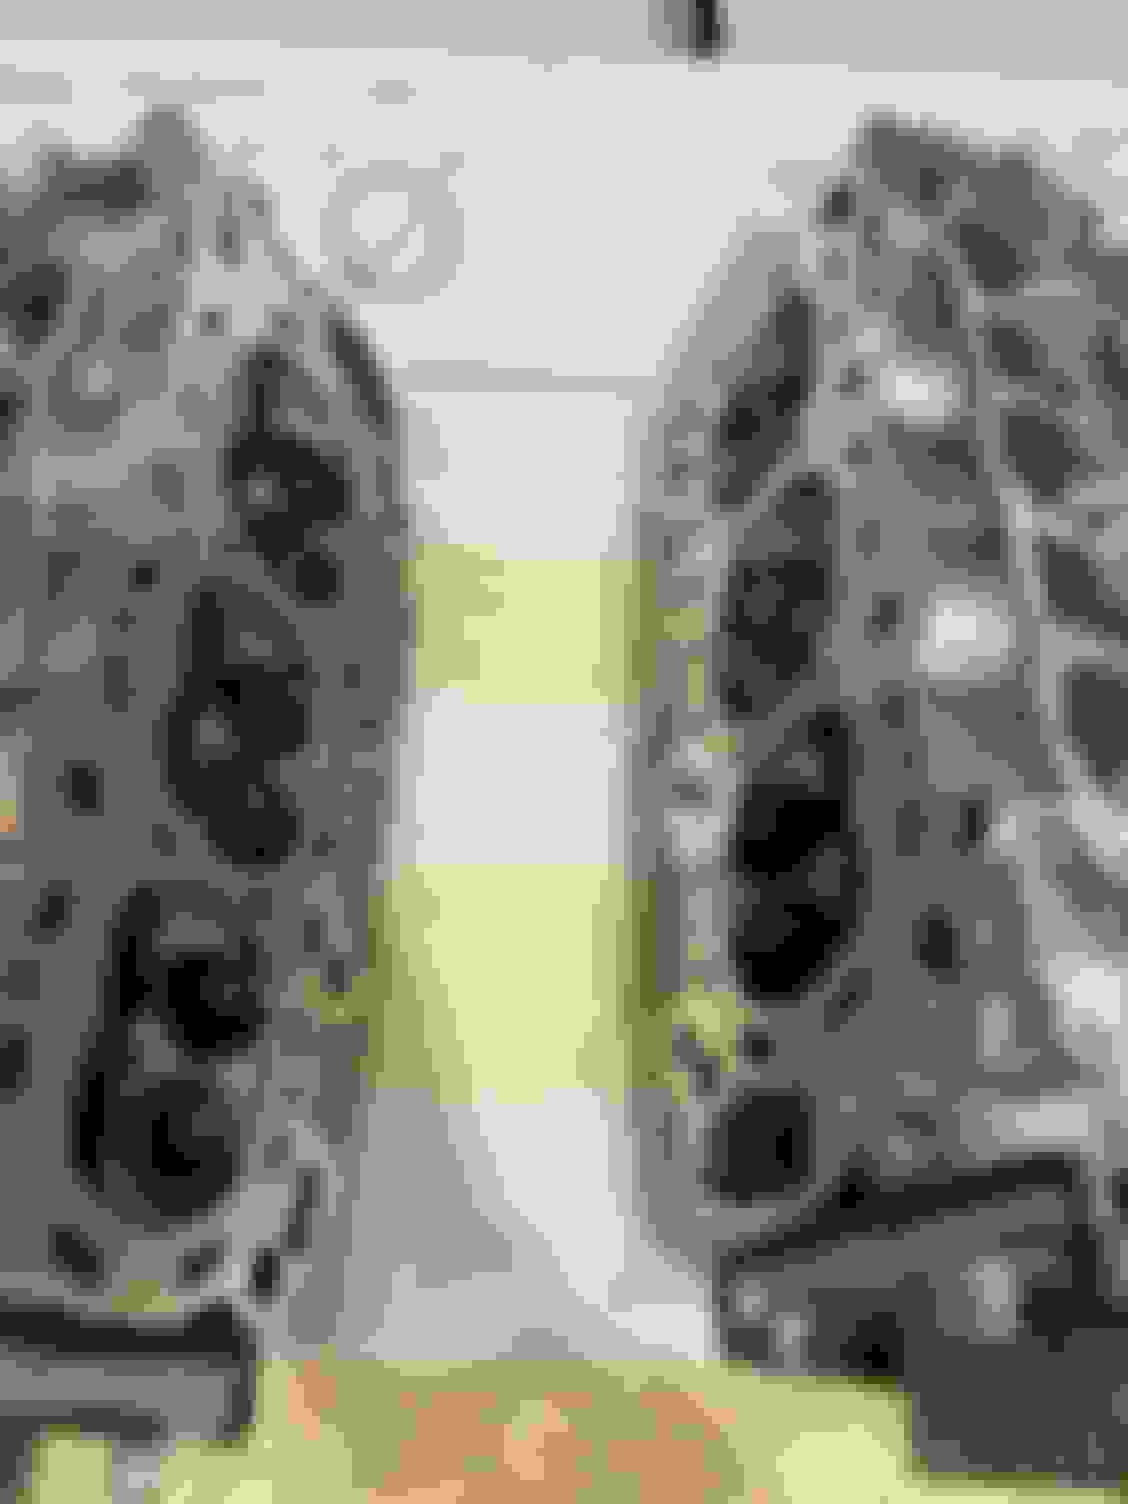
What�s the best (at home) remedy for cleaning the cylinder block heads without scratching them?
They�re in pretty good shape but there is a little bit of gasket residue that I would like to get off.
What�s the best (at home) remedy for cleaning the cylinder block heads without scratching them?
They�re in pretty good shape but there is a little bit of gasket residue that I would like to get off.
idk about best. But, I have used a brass brush to lightly clean a used head and block mating surface. Then finished with some 91% alcohol / brake clean.
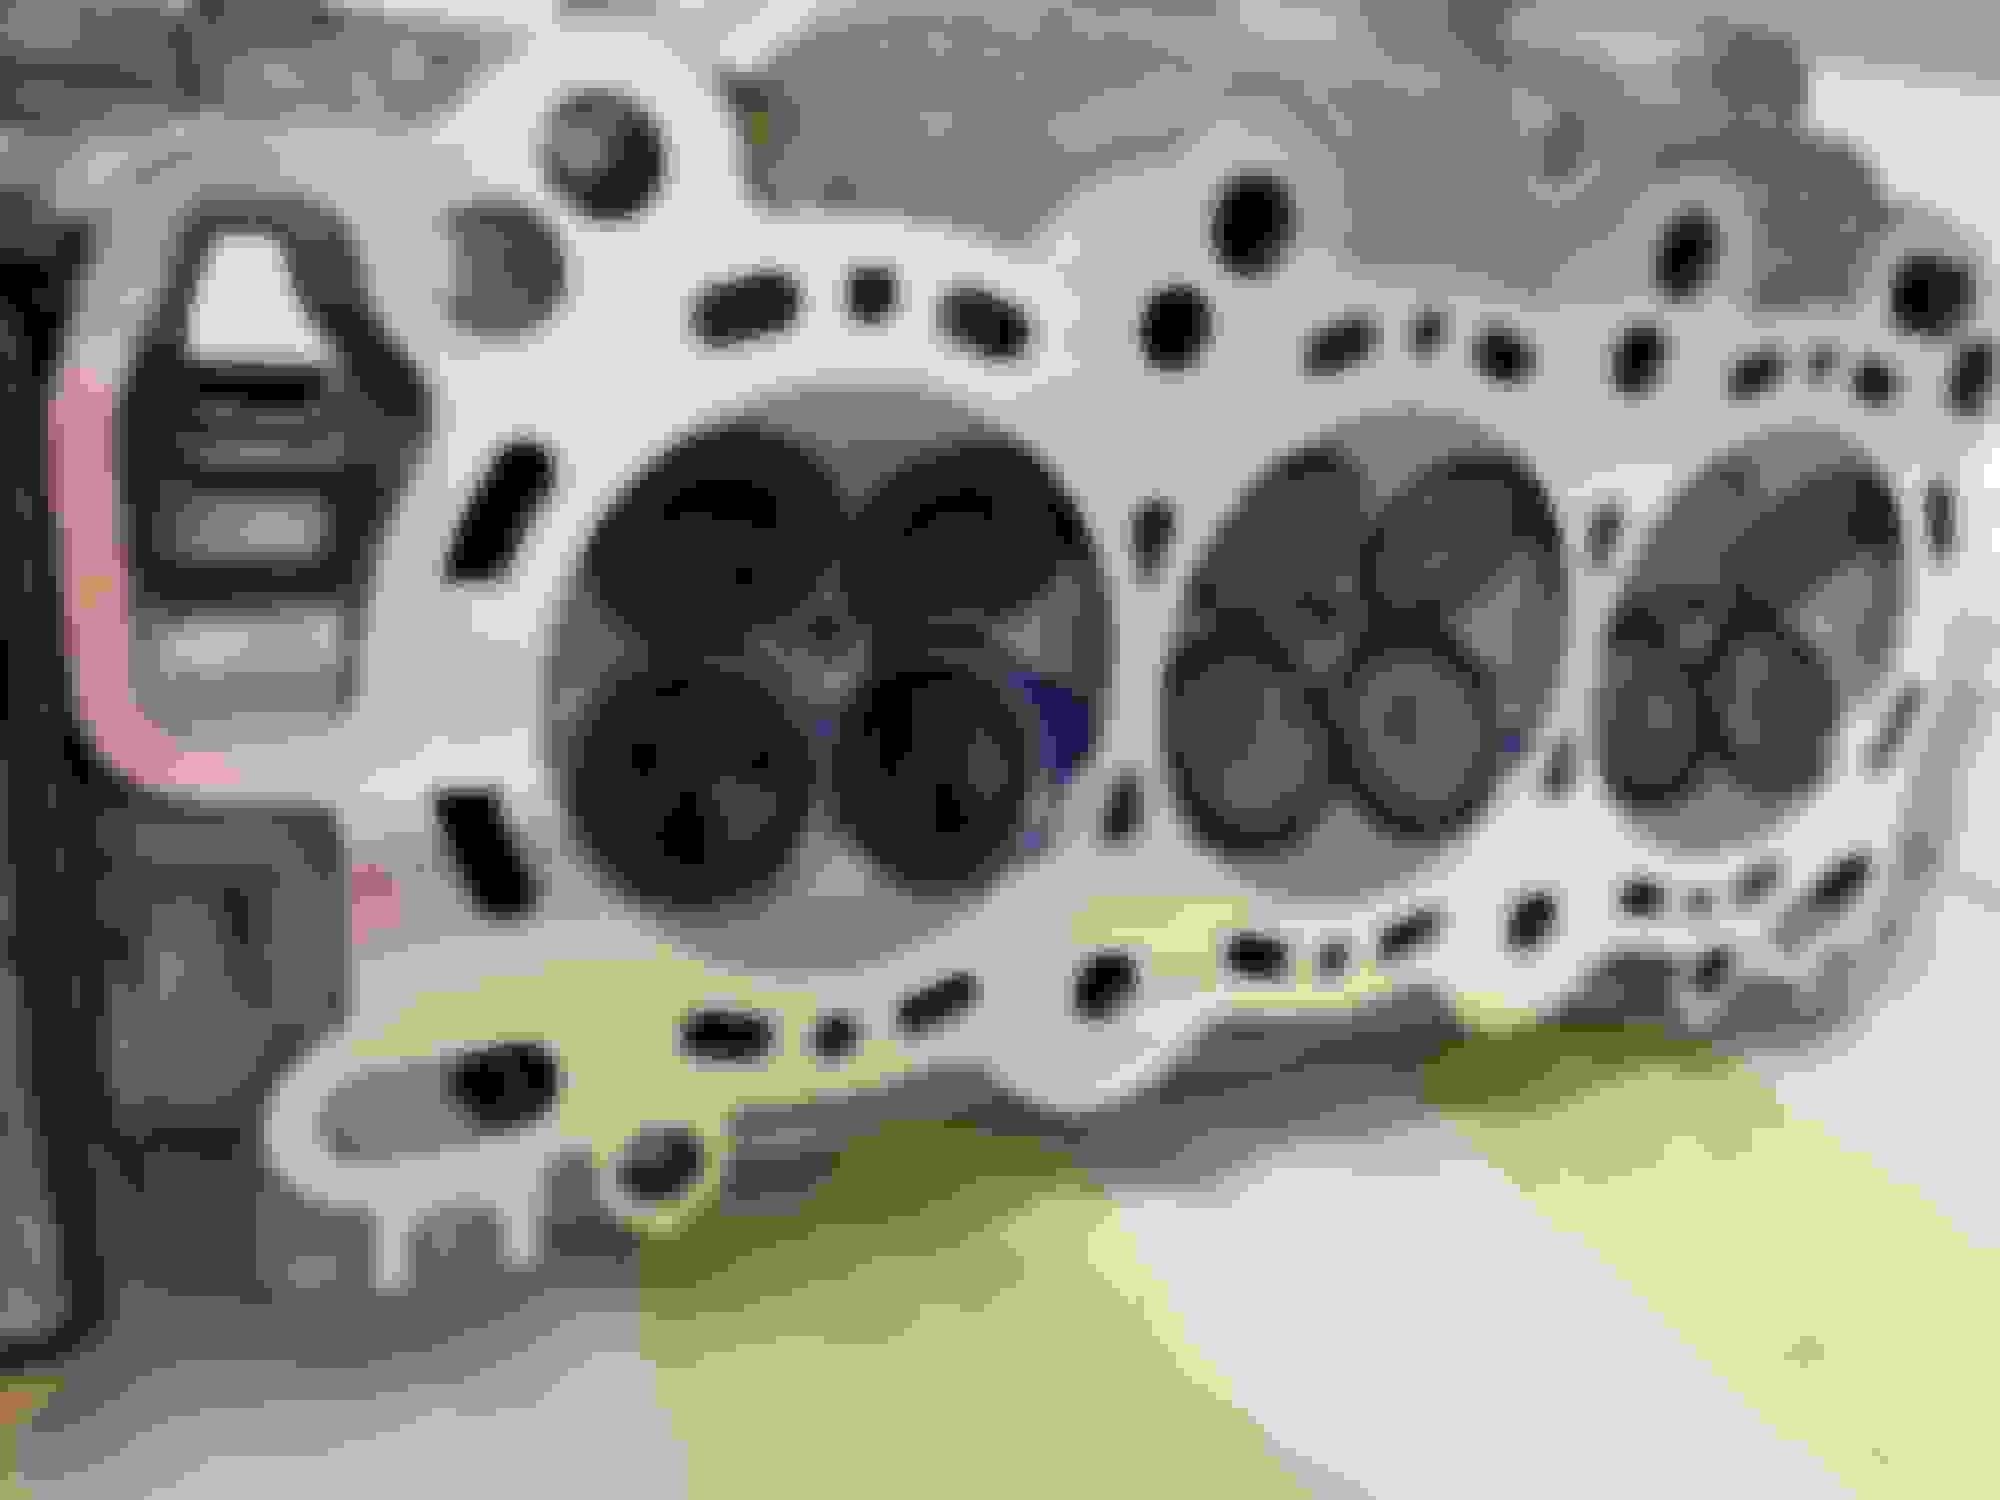
Finally got the motor mounts inspected. Turns out the front mount had 2 loose bolts here I was thinking they were shot.. anyways I got the heads cleaned off pretty much ready to put the head gasket on I just want to confirm that I have the correct orientation. There�s no writing that says up/down. But I�m assuming the writing would be facing up. It is also bevelled. If someone could confirm from the picture that this is correct it would be helpful. Thanks
Skipped through this thread, so I'm not sure if it's been mentioned. But when I do my timing belt jobs, to make things easier, I loosen the rocker arm shafts. This way, there's no tension on the camshafts, and the valve aren't able to be pushed down, causing you to accidently bend a valve when getting everything lined up. That rear cam gear loves to spring back when trying to line everything up.
Just be sure to check the rocker arm/valve clearances with a feeler gauge if you loosen the rocker arms. I would do it anyways for the piece of mind after installing the heads since you're right there anyways.
Hello, first off thanks to everyone for all the helpful information from the beginning until now there�s no way I would of been able to get this car back on the road without the tips and guidance of everyone so thank you very much.
So I got the car rolling drove it for about 2 hours no leaks anywhere everything seems to be great. Next day I get in the car heading out to work and the engine light comes on along with the VSA and ! On the dash. I put my OBD reader to it and I got error P0172(system to rich);P0304,P0305,P0306 (cylinder 4,5,6 misfire),P0300( random misfire) and finally P1399(wheel speed sensor-2-G sensor circuit intermittent). I put in new NGK iridium�s ,brand new standard motor part injectors I ordered from rockauto. I put in a new knock sensor, idle air control valve, temp sensor on the rad and thermostat.All OEM parts.The engine runs pretty smooth overall but it has a bit of a hick-up and my gas mileage is worse than ever.. I had to re-wire a ground wire that attached to the rear head near the power steering pump. I�m wondering if this is an electrical issue I�m having with that or is it possibly my injectors. The injectors weren�t exactly the same as the ones I took out But the box explained that they would look different but are correct� I�m stumped. Not sure where i should start looking first.
When I searched for "P1399 Acura", it comes back as a Honda specific code for "P1399 Acura Code - Random Cylinder Misfire Detected". The FSM also calls out random misfire. So other than the P0172, they are all misfire codes. What's interesting is that Bank 1 (near firewall) is running rich but Bank 2 (near radiator) has the misfires. Loss of mileage makes sense since you have a rich fuel issues. Does your code reader have live data? Check the fuel trims.
It's also possible that, since you had a valve job done, you might need to recheck valve clearances.
Recheck timing too. It is easy to see it through that small opening in plastic covers. I would advise you, if you have chance, to get help at some tricky jobs. For example, here you should hire a mechanic or friend, just to help you do timing properly. Pay mechanic just to adjust timing.
Just curious, were the injectors already present in the car faulty and replaced as a 'while you are there' item or were they just high mileage and you felt the need?
If you are up to it & if original injectors were OEM and not faulty, I'd put them back in to rule out whether the standard motor part injectors are problematic.
At last glance on RA, they appear to be pretty pricey at around $40+ each.
Then secondary to that, as Saudade mentioned, a valve clearance check may be in order.
The question is do you do the valve clearance check as part of the fuel injector reinstall experiment, reassemble, test the result for a few drive cycles or one at a time.
I�m not sure if the injectors were bad. I�ve never changed them and I�ve put over 100,000 miles on it , they may even be the original injectors who knows. But I�ll start with that.. I�ll put them back in see how it runs. If no change then I�ll look into the valves.
I assume that you don't see or smell gas (unless you remove the plugs). with those nice looking heads you should check the valve adjustment as mentioned by Saudade. As Zeta said I would start with the putting in the old fuel injectors and see if any of the codes change, What was different about the new fuel injectors? I used the SMP injectors a little while back and they looked exactly the same as the originals that were in there. Length, width, pintel were all the same.
I�m not sure if the injectors were bad. I�ve never changed them and I�ve put over 100,000 miles on it , they may even be the original injectors who knows. But I�ll start with that.. I�ll put them back in see how it runs. If no change then I�ll look into the valves.
When time permits, check them out.
J32A2 2G one's that I've pulled from the salvage yard & my old OEM's are marked KEIHIN on the side.
When time permits, check them out.
J32A2 2G one's that I've pulled from the salvage yard & my old OEM's are marked KEIHIN on the side.
I got all new O rings for the injectors with my gasket set I purchased, however It�s the bottoms of the injectors that are broken. Is it possible to replace just the bottom tips without buying new injectors?
Not sure if you can find the correct Pintle cap for these or if you can get them installed (don't remember if they are swaged in). Were there any differences other than the top where they are inserted into the fuel rail. The top should have the same dimensions but according to the paper you posted the filter will look different. The outside diameter should be the same. The injector holes (bottom, inside the pintle cap) should look the same. The bottom diameter must be the same to fit into the injector seat at the proper angle and distance.
Not sure if you can find the correct Pintle cap for these or if you can get them installed (don't remember if they are swaged in). Were there any differences other than the top where they are inserted into the fuel rail. The top should have the same dimensions but according to the paper you posted the filter will look different. The outside diameter should be the same. The injector holes (bottom, inside the pintle cap) should look the same.
I�ll take them out and show you a picture by end of the week. Even the way the wire harness clipped into the injectors didn�t feel as good as the ones that came out. It clipped in but they didn�t feel as tight fitted. I gave them a little tug once clipped it to make sure it wouldn�t pop out and unplug itself.. seemed to be ok but who knows.
Also you mentioned Cyl 4,5,6 had misfire codes but also had random misfire codes. Since 4,5,6 is the front bank of cylinders, closest to the front bumper, you should pay specific attention to the valve adjustments for those cylinders Of course, that is after checking the timing.
You replaced a lot of parts. Once this is solved it should run great.
I got all new O rings for the injectors with my gasket set I purchased, however It�s the bottoms of the injectors that are broken.
I know what you mean, that is the same area mine were damaged at upon removal. That plastic gets 'krispy' and tends to break easily, sometimes within the injector base and sometimes upon removal That's why I have a few salvage yard OEM's handy just in case.
Originally Posted by timbo53
Is it possible to replace just the bottom tips without buying new injectors?
Good question.
Looking at the Acura vendor websites, it does not appear to be a 'separate' part of the injector assembly that can be purchased individually.
Although I'm not sure, if you google your local area for fuel injector 'cleaning' or 'repair' service shops, since they specialize in this line of work, they may be able to source / obtain said component for replacement?
I have attempted taking apart a fuel injector for the heck of it, because like Zeta, I too have a bunch of salvage yard injectors. Let's just say, to get to the inside, I had to use a cutting wheel on a Dremel.
Those pintel caps are not necessary to make a motor run. It's just to help it spray into a cone like shape, helping it mix with the air better that's being sucked in instead of unleashing it like a hose. Like Zeta mentioned, over time, they get hard & brittle from constant heat cycling and having to deal with constant high temps. But it wouldn't be the cause of a misfire. Before my J35A3 swap escapades, I was running my injectors with half of the caps being broken, and completely missing. She red lined perfectly fine, until the inevitable happened. It just won't run as efficiently as it could is all.
I have tried removing the pintle caps on OEM injectors, but they do not come off without breaking. It seems like they're glued on or something. The issue is that while you can get it off with breaking, there's an indented portion that the cap sits inside of. So you'll need to get something small enough to pick it out to seat the new cap.
I eventually just opted for some eBay 'remanufactured' injectors off eBay for $110. Brand new blue plastic caps & filters, and they've been running great ever since. Plus, the caps are actually removable on these.
I had a FI that had a crack in the pintle cap and it caused inconsistent misfires. Mostly the caps are there to protect the nozzles. I agree that it is unlikely to find the correct caps and be able to install them. There are some that they are replaceable but I don't think it's feasible on ours. cracked pintle cap
I had a FI that had a crack in the pintle cap and it caused inconsistent misfires. Mostly the caps are there to protect the nozzles. I agree that it is unlikely to find the correct caps and be able to install them. There are some that they are replaceable but I don't think it's feasible on ours. cracked pintle cap
Interesting. I was thinking about what I said earlier, and I never like saying something with 100% certainty, because I'm still learning things.
What exactly would it be protecting the nozzle from though?
LOL I never asked that question or thought about it, great point! Once it is installed what would it protect from, and now that you bought it up if it was mainly for protection why did I get a inconsistent misfires on that cylinder? I think you convinced me what I was told was incorrect. In that case the only thing I a can see would be air mixture control. Thanks for making me think about it.
The recommendation to check timing and valve clearances are good places to start. I would also verify correct spark plug temp and quality (premium) fuel are being used.
Being that the heads were recently rebuilt, where they resurfaced? If so, how much was removed? Reason being resurfacing removes material and alters combustion chamber size and in turn compression ratio. To counteract this, a thicker head gasket can be utilized.
There was also mention of rich condition on a particular bank. While some vehicles have the capability to distinguish bank 1 and 2, the 2g does not. To clarify, the ecu detects air fuel ratio based one o2 sensor, installed upstream of the cat. Thus, while the ecu may detect a rich condition (fuel trims high), there is no way to isolate to a particular bank.
As for the rich condition code itself, when a misfire occurs fuel is not being burned completely. Therefore, if cyls 4,5,6 are misfiring it makes sense that there will be a very rich condition.
With respect to the aftermarket injectors, I ran the same new injectors for a few months on a new motor with no issues. They also carry a 36 month warranty if they are faulty.
Lastly, for reference the service manual provides the following recommendations:
I had the valves done by a local shop and I got them to pre gage the valve clearance for me, they told me they removed next to nothing on the resurface. Maybe he was off by a bit with the valves? I bough NGK iridium�s basically the most expensive plug I could get, always run 91 octane.
As for the timing I�m positive it�s correct. I
checked it over more than 10 times on install.
So if I get in there and start adjusting valves with no experience what�s my chances of doing it correctly?
Let�s say I put one to tight or lose. Could it potentially bend a valve again and I�d be back to square one?
I bough those injectors less than 30 days ago so I could still potentially put in a refund request if they accept used injectors.. however my old ones are in bad shape. I found a 2003 TL type s at my local auto wrecker. Thinking about going to see how those injectors look.
Doing a valve adjustment is easy, just tedious, especially on the rear heads. The main thing you have to learn is knowing how it should feel when sliding the feeler gauges in/out. A lot of people say that it should feel like sliding the gauge through the middle of a phone book. Typically what I do, is set it to the highest measurement first, so .009 for intake & .013 for exhaust, and then I try to see if a size one bigger will fit at all, so a .010 & .014. It should not fit, at least, not without forcing it. The smallest clearance should slide in with no problem.
As for messing it up? Well, as long as you don't overtighten the valves, you're good. Just make sure you don't get the valves mixed up. Top is intake, bottom is exhaust. Make sure it's done on a cold engine. Know which cylinder you're working on.
I got all new O rings for the injectors with my gasket set I purchased, however It�s the bottoms of the injectors that are broken. Is it possible to replace just the bottom tips without buying new injectors?
This site carries replacement parts including pintle caps. I see 2 specific to Honda/Acura/Keihin but not sure which is the correct one.
I had the valves done by a local shop and I got them to pre gage the valve clearance for me, they told me they removed next to nothing on the resurface. Maybe he was off by a bit with the valves?
This makes no sense. You're assuming they rotated the cams to set each cylinder to tdc one at a time? Which is required to properly adjust all 24 valves.
Even if the clearance was pre-set by the shop, it was done without the belt on. Meaning any slight variations in valve opening, from the installed belt position is not accounted for.
The guy was pretty confident he could do it without the belt on.. but ya I�ll double check them for sure.
Doing a valve adjustment is easy, just tedious, especially on the rear heads. The main thing you have to learn is knowing how it should feel when sliding the feeler gauges in/out. A lot of people say that it should feel like sliding the gauge through the middle of a phone book. Typically what I do, is set it to the highest measurement first, so .009 for intake & .013 for exhaust, and then I try to see if a size one bigger will fit at all, so a .010 & .014. It should not fit, at least, not without forcing it. The smallest clearance should slide in with no problem.
As for messing it up? Well, as long as you don't overtighten the valves, you're good. Just make sure you don't get the valves mixed up. Top is intake, bottom is exhaust. Make sure it's done on a cold engine. Know which cylinder you're working on.
I myself feel most comfortable taking out any subjectivity in a process as time consuming as valve clearance adjustment. I used go-no-go feeler gauges. The primary thickness will be within range of what is specified for valve clearance and the larger thickness will be too large, making it obvious that when you slide the gauge in, there may be some subjective amount of drag on the first part, but the secondary thickness will certainly not fit if clearance is adjusted to spec.
This makes no sense. You're assuming they rotated the cams to set each cylinder to tdc one at a time? Which is required to properly adjust all 24 valves.
Even if the clearance was pre-set by the shop, it was done without the belt on. Meaning any slight variations in valve opening, from the installed belt position is not accounted for.
You were right. Every single valve was either to tight or to loose. Guys did A good job on the heads but lesson learned don�t trust the machine shop to gage the valves for you. 😂

 12-05-2022, 11:00 AM