
Lighting "Upgrades"
 08-09-2008, 09:11 PM
#1
Burning Brakes
Thread Starter
I'm interested to replace the foglight bulbs in my '06 RL to use "selective yellow" like one might find on a LeMans race car...or your average Mercedes, Lexus etc...
So, who can tell me how to determine which bulb our foglights use? Has anyone swapped bulbs, and is this a simple, "drop the under-chin tray, pop the bulb out of the back and button it all up" type thing?
How about the high beams? Has anyone any experience on here with bulb changes to more closely approximate the color temp of the HID low beams?
 08-09-2008, 11:06 PM
#2
Safety Car

Bulb types are listed under Sylvania website
http://www.sylvania.com/ConsumerProd...RG-Results.htm
Fogs are H-11
High Beams are 9005.
Do a search on the high beams, this has been discussed many times before or just go to Walmart and buy the Sylvania Silverstars as a quick fix. Regardless of what you end up getting, because DRLs are run at like 60% power, they will always look yellow...but when on full power, the Silverstars are whiter looking
08-10-2008, 08:07 AM
#3
Burning Brakes
As noted, a quick search will turn up a lot of information on lighting. I put in Hoen fogs from HERE and Sylvania SilverStar Ultra high beams. They both match pretty well (but also as noted, not the DRLs since they will always look yellow).
If I remember correctly, it was a lot easier to change the fog bulbs by putting hte front of the car up on ramps and I had to loosten the battery to get to the high beam.
LL
If I remember correctly, it was a lot easier to change the fog bulbs by putting hte front of the car up on ramps and I had to loosten the battery to get to the high beam.
LL
08-10-2008, 09:26 AM
#5

I have switched out my high beams with HID's, and to do that with the DRL feature, I had to use a relay harness which used a 12V relay to power the HID when using HB.
Its actually very simple, and the principal works like this, the relay energized at 12V, and since DRL uses 2V, there isnt enough voltage for the relay to close when the DRL is on.
So, it works, and has been for 2 years.
Its actually very simple, and the principal works like this, the relay energized at 12V, and since DRL uses 2V, there isnt enough voltage for the relay to close when the DRL is on.
So, it works, and has been for 2 years.
08-10-2008, 12:47 PM
#7
Burning Brakes
Thread Starter
From the manual, it looks like the foglight bulb swap has us detaching, then pushing UP the undertray, but pretty easy. Considering the ride height, I think jack-stands will be involved! The link above, for Sylvania, didn't work, but the Silverstar bulbs are certainly easy to research.
Thanks for the bulb-info on the fogs and highs. The Hoen site didn't list them in the fitments section. It's good to see that Hoen has yellows, because Daniel Stern Lighting doesn't show them.
Thanks for the bulb-info on the fogs and highs. The Hoen site didn't list them in the fitments section. It's good to see that Hoen has yellows, because Daniel Stern Lighting doesn't show them.
Trending Topics
08-10-2008, 04:13 PM
#10
Burning Brakes
Thread Starter
I received an interesting reply to my inquiry about headlights:
Many work lamps, dive lamps, and other lamps originally designed around the relatively inefficient automotive 9005 (HB3) or 9006 (HB4) headlamp bulbs can be significantly upgraded by retrofitting the newer 9011 (HIR1) and 9012 (HIR2) headlamp bulbs made by Toshiba and available in North America from Candlepower . The 9011 and 9012 "HIR" (Halogen Infrared Reflective) bulbs are much more efficient by design, so they produce much more light, but they have the same wattage ratings as 9005 and 9006 (respectively), so there's no additional current draw or heat production. When making this bulb swap, use only a 9011 in place of a 9005, and only a 9012 in place of a 9006. One of the three plastic base tabs of an HIR bulb must be slightly trimmed with a small saw, a file, or a Dremel tool to fit in place of a non-HIR bulb. The diagram below shows how to do so.
Fit problems are quite rare, but occasionally you may encounter a lamp into which the HIR bulb will not quite fit, either because of a casting ridge on the inside of the round hole through which the bulb shank protrudes into the lamp, or because the bulb base tabs are slightly too thick to rotate into position in the lamp's bulb seat.
In the first case, the casting ridge can easily be removed by wrapping a strip of 100-grit sandpaper around your finger, abrasive side out, and going round and round the bulb shank hole with your abrasive-wrapped finger until the ridge has been smoothed away. Use a damp paper towel to wipe the inside of the shank hole to remove the sanding dust, and then the bulb will fit right in.
In the second case, usually bevelling the leading rear edge of each bulb base tab with a file, dremel tool or sandpaper will allow it to twist securely into the bulb seat. Some lamps have bulb seats that can be adjusted for bulb base tabs of various thickness, because the seat is held to the rear of the lamp with screws. Simply loosen the screws slightly until the thicker base tab is accommodated.
But in most cases, there'll be no such fit problems once you trim the top tab according to the image below.
Source Page
08-10-2008, 04:21 PM
#11
Burning Brakes
Thread Starter
And "Candlepower" carries a mega $$ Osram bulb...
Osram Night Breaker +90 Ultra High Output 55w H11 Bulb
Osram's newest NightBreaker Ultra High Output +90 H11 bulb puts up to 90% more precision-focused light on the road ahead, while maintaining stock 55w wattage. Crystal-clear bulb glass in the primary optical zone for maximum output, with blue-tinted peripheral glass for 10% whiter light without the reduced intensity common to other extra-white bulbs. Price is for one bulb.
That price? $32.00!
08-10-2008, 04:45 PM
#12
Safety Car
Originally Posted by slawek65
Chas, if You still have pics of my lights You can post them for me, Tx.
 08-10-2008, 08:25 PM
#16
Burning Brakes
Thread Starter
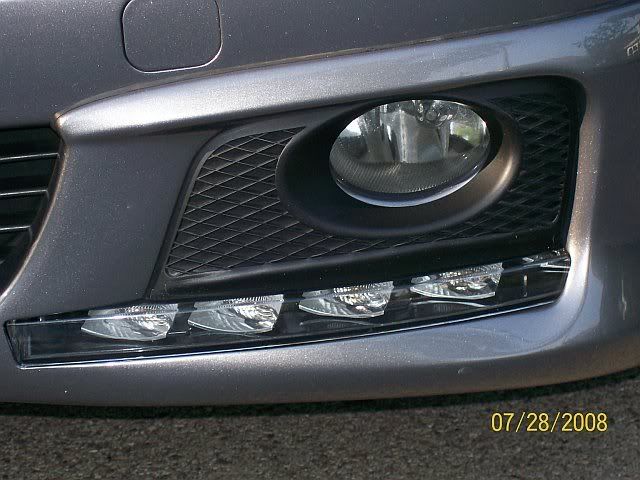
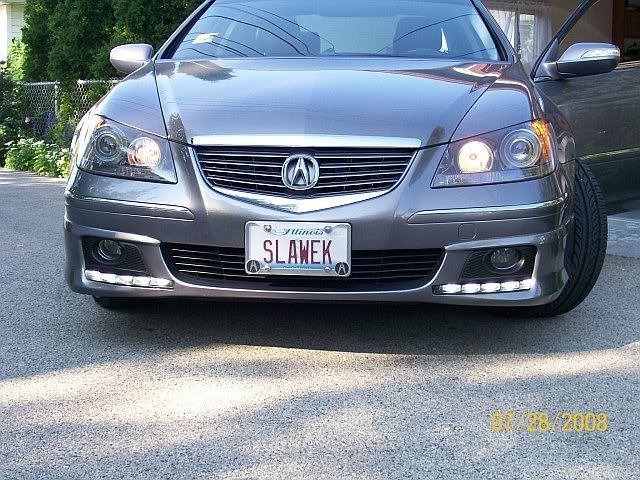
They really do look like they're built for the A-Spec nose on the RL! Very clean work by whomever did that. I bet that makes for an effective DRL, for sure.
08-10-2008, 08:53 PM
#17
Burning Brakes
Thread Starter
So, here's what I came up with:
For my high-beams, I went with the Toshiba HIR bulbs. They're describes as above and the comparison of light output and estimated life is as below:
stock: 9005, 12.8V, 65W, 1700 lumens, 320 hours
compare: 9005+50, 12.8V, 55W, 1830 lumens, 175 hours
new: HIR1, 12.8V, 65W, 2530 lumens, 320 hours

The pair cost me $50 and change for shipping, using the link I first posted above.
Now for the foglights, I could have gone with the uber bulbs that were also on the Candlepower site, but I don't just want brighter fogs, but smarter ones. I certainly don't want them color-matched to my headlights (either) when my headlights aren't beaming in a spectrum that's optimized for coastal fog or bad weather. Yellow is. So, I went with the chinese-made, Hoen Endurance Yellow H-11 lamps, direct from Hoen.

Guaranteed to convert my RL to a GT...
Since both are plug-ins, I'll post a few photos after they arrive and I swap them in. When complete, I should have a very effective combination of lights: selective yellow fogs, HID lows and nuclear meltdown high beams that are still 100% street legal with a DOT beam pattern.
For my high-beams, I went with the Toshiba HIR bulbs. They're describes as above and the comparison of light output and estimated life is as below:
stock: 9005, 12.8V, 65W, 1700 lumens, 320 hours
compare: 9005+50, 12.8V, 55W, 1830 lumens, 175 hours
new: HIR1, 12.8V, 65W, 2530 lumens, 320 hours
The pair cost me $50 and change for shipping, using the link I first posted above.
Now for the foglights, I could have gone with the uber bulbs that were also on the Candlepower site, but I don't just want brighter fogs, but smarter ones. I certainly don't want them color-matched to my headlights (either) when my headlights aren't beaming in a spectrum that's optimized for coastal fog or bad weather. Yellow is. So, I went with the chinese-made, Hoen Endurance Yellow H-11 lamps, direct from Hoen.
Guaranteed to convert my RL to a GT...
Since both are plug-ins, I'll post a few photos after they arrive and I swap them in. When complete, I should have a very effective combination of lights: selective yellow fogs, HID lows and nuclear meltdown high beams that are still 100% street legal with a DOT beam pattern.
08-10-2008, 09:06 PM
#18
Safety Car
Interesting choices! You are the first person I recall in a long time going for selective yellow fogs, which makes absolute good sense. Most everyone wants to go for high color temperature fogs which defeats the purpose of fogs.
08-11-2008, 07:18 AM
#19

Originally Posted by Chas2
Interesting choices! You are the first person I recall in a long time going for selective yellow fogs, which makes absolute good sense. Most everyone wants to go for high color temperature fogs which defeats the purpose of fogs.
08-11-2008, 08:06 AM
#20
Burning Brakes
Thread Starter
The foglights on the RL are foglights, though: the reflectors are shaped and aimed for a low, wide beam (as opposed to "driving lights"), so we're never going to get long distance punch out of them. In terms of glare to other drivers, that's a good thing, and if you stand out in front of your RL at night you'll see our fogs aren't bad for other drivers.
If you want to color match your fogs to either your high or low beam, those links I posted both contain bulbs that will do that.
If you want to color match your fogs to either your high or low beam, those links I posted both contain bulbs that will do that.
08-11-2008, 08:13 AM
#21
Experience installing HIR1 as high beams
Ballinger,
I'm very interested to hear how difficult it is to install the HIR1's as high beams. The earlier detailed post mentions possibly having to taper, file, sand, cut, etc. and gives me pause.
Let us know how it comes out because they sure sound interesting.
I'm very interested to hear how difficult it is to install the HIR1's as high beams. The earlier detailed post mentions possibly having to taper, file, sand, cut, etc. and gives me pause.
Let us know how it comes out because they sure sound interesting.
08-11-2008, 11:07 AM
#22
Safety Car
Originally Posted by db22
But, there are a lot of us to whom fog is not an issue. I would prefer what were called "driving lights" or " spot lights" to fog lights. These lights were to enhance your distance visabilty whereas the fogs were for wide and low close visability. Cibie were the choice for the driving lights but I guess the DOT ruled them illegal, which is strange when you consider the brightness and glare that you see on the roads today. The fog lights on the RL are too wide which is curious when you think that the RL has lights that "steer" with the wheels. I would rather enhance the distance than the width and leave the steering low beams to see further around the upcoming corner. One other observation is that the RL fog lights do actually do something. A lot of cars have the fog lights and you can hardly tell if they are on or off.
08-11-2008, 12:29 PM
#23
Burning Brakes
Thread Starter
I will photo-essay the installation, for sure. The "tab modification" looks very, very easy, from the page I linked above.
In the meantime, here are some neat, informative links regarding the Halogen Infrared Reflecting bulbs that can be retrofitted into all kinds of cars (and apparently OEM on BMW Z8, Datsun Maximas, Chevy Avalanche and a few others):

http://hirheadlights.com/stats.htm
http://hirheadlights.com/
An excellent source that includes this quote: "The Dodge dealer, for instance, charges $127 a piece for just one." He sells them for $50/set.
http://foohbar.com/light_bulb_saga.
This includes photos of the "surgery" on the top tab and a passing reference to the issues with "Sylvania Silverstar" type bulbs.
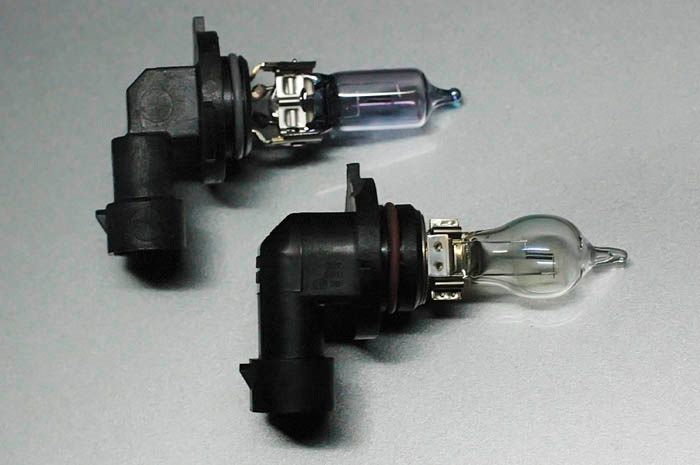
Blued 9005 on top, HIR buble below.
FANTASTIC thread on a Subaru site.
http://www.htl.co.jp/english/p_pro_03.html
They claim relative output similar to 135watts... whatever, but it's a Toshiba site (mfgr).
In the meantime, here are some neat, informative links regarding the Halogen Infrared Reflecting bulbs that can be retrofitted into all kinds of cars (and apparently OEM on BMW Z8, Datsun Maximas, Chevy Avalanche and a few others):
http://hirheadlights.com/stats.htm
http://hirheadlights.com/
An excellent source that includes this quote: "The Dodge dealer, for instance, charges $127 a piece for just one." He sells them for $50/set.
http://foohbar.com/light_bulb_saga.
This includes photos of the "surgery" on the top tab and a passing reference to the issues with "Sylvania Silverstar" type bulbs.
Blued 9005 on top, HIR buble below.
FANTASTIC thread on a Subaru site.
http://www.htl.co.jp/english/p_pro_03.html
They claim relative output similar to 135watts... whatever, but it's a Toshiba site (mfgr).
08-11-2008, 01:12 PM
#24
Safety Car
Looking forward to your test results. Sounds almost too good to be true, but the coating principle is sound. The infrared reflective coating is sort of the reverse of the dichroic coating on a dentist light. The dentist light has a highly reflective coating for desirable visible light, and yet it passes infrared and some undesirable components of visible light making the beam on your face feel "cool"
08-12-2008, 07:35 AM
#25
Originally Posted by Chas2
The dentist light has a highly reflective coating for desirable visible light, and yet it passes infrared and some undesirable components of visible light making the beam on your face feel "cool"
08-15-2008, 11:53 PM
#26
Burning Brakes
Thread Starter
Okay, I've swapped both sets of bulbs (high beam and fog) now, and it's a fast, easy job on the passenger side of the car. For the high-beam, you simply remove the aesthetic shroud, then reach right in and swap the bulbs. With the fog, you go under the air dam, pop the one plastic "plugget", thread out two screws and push the small undertray up. There's plenty of room to reach in, unplug, swap & replug the bulb. 5 minutes for each, soup to nuts.
On the driver's side, the high-beam is hidden behind the battery, so you've got to remove the battery tie downs, slide the battery toward the passenger side and then reach in to swap the bulb. 10 minutes, and you'll need a 10mm socket.
With the fog light on the driver's side, you pop the plugget, drop the two screws and then it gets fun. There's a coolant pipe right behind the foglight, so you can't push the panel up. After verifying it was flexible enough, I folded that panel back under itself and then had to fit an adult hand into a very tight spot to unplug, pop the bulb and replace it. I did this by sitting in front of the car, shining a light through the lens of the fog light to illuminate the tabs so I could line things up and it was not too bad... but it took me 15 minutes just to get the swap done.
The Hoen "endurance yellow" fogs are "golden yellow". This is not quite the corn color of a Cibie yellow, but close.
The Toshiba HIR bulbs were easy to modify with a Dremel, maybe 30 seconds, each, and then fit right in. They illuminate in the same color the oem high beams did, just a LOT brighter. A lot.
I photo'd it, but I see this site has "attachments" turned off for posts.
08-16-2008, 01:35 PM
#28
Safety Car
Originally Posted by Storm982
Can the S6 LED running lights fit in the original bumper too???
How long are they side to side?
How long are they side to side?
08-16-2008, 03:40 PM
#29
Burning Brakes
Thread Starter
I agree with Chuck: no space for those LEDs on the standard bumper/ valance. The "vents" under the foglight on the standard bumper is a narrow vent, but only to the interior of the bumper itself and the back of the foglight. Either way, it's a very small opening.
08-16-2008, 03:54 PM
#30
Racer
Join Date: Oct 2005
Age: 59
Posts: 288
Likes: 0
Received 0 Likes
on
0 Posts
Originally Posted by Storm982
Can the S6 LED running lights fit in the original bumper too???
How long are they side to side?
How long are they side to side?
08-16-2008, 04:38 PM
#31
Burning Brakes
Thread Starter
Okay, since HondaAcura World has the "Attachments" feature turned on (they use the same vBulletin software used here), I was able to upload and post some photos that may be helpful if you're considering an update to your high beams.
That thread is HERE
I hope that's helpful to those of you looking for input on the simplicity of this.
That thread is HERE
I hope that's helpful to those of you looking for input on the simplicity of this.
08-19-2008, 05:28 AM
#34
Senior Moderator
Your link is not easily accessible because the site admins do not allow linking to that site. You may consider uploading them to another image hoster ( www.imageshack.us is a good one) or you can send them to me so I can host them.
08-20-2008, 02:36 PM
#35
Burning Brakes
Thread Starter
Okay, thanks to the new Acurazine updates, the photos I would have posted above are now available with captions in my Hello Kitty Gallery.
Here's the high beams:

...and here are the fogs:

Here's the high beams:
...and here are the fogs:
09-24-2008, 01:40 AM
#36
I generally do not care too much on backyard low budget parts but came across these on Ebay
http://cgi.ebay.com/ebaymotors/XENON...mZ170264009318
Anyone running these HID fogs?
Curious.
http://cgi.ebay.com/ebaymotors/XENON...mZ170264009318
Anyone running these HID fogs?
Curious.
09-29-2008, 11:54 AM
#37
Instructor
Join Date: Apr 2008
Location: Maine
Age: 78
Posts: 211
Likes: 0
Received 0 Likes
on
0 Posts
Okay, I've swapped both sets of bulbs (high beam and fog) now, and it's a fast, easy job on the passenger side of the car. For the high-beam, you simply remove the aesthetic shroud, then reach right in and swap the bulbs. With the fog, you go under the air dam, pop the one plastic "plugget", thread out two screws and push the small undertray up. There's plenty of room to reach in, unplug, swap & replug the bulb. 5 minutes for each, soup to nuts.
On the driver's side, the high-beam is hidden behind the battery, so you've got to remove the battery tie downs, slide the battery toward the passenger side and then reach in to swap the bulb. 10 minutes, and you'll need a 10mm socket.
With the fog light on the driver's side, you pop the plugget, drop the two screws and then it gets fun. There's a coolant pipe right behind the foglight, so you can't push the panel up. After verifying it was flexible enough, I folded that panel back under itself and then had to fit an adult hand into a very tight spot to unplug, pop the bulb and replace it. I did this by sitting in front of the car, shining a light through the lens of the fog light to illuminate the tabs so I could line things up and it was not too bad... but it took me 15 minutes just to get the swap done.
The Hoen "endurance yellow" fogs are "golden yellow". This is not quite the corn color of a Cibie yellow, but close.
The Toshiba HIR bulbs were easy to modify with a Dremel, maybe 30 seconds, each, and then fit right in. They illuminate in the same color the oem high beams did, just a LOT brighter. A lot.
I photo'd it, but I see this site has "attachments" turned off for posts.
On the driver's side, the high-beam is hidden behind the battery, so you've got to remove the battery tie downs, slide the battery toward the passenger side and then reach in to swap the bulb. 10 minutes, and you'll need a 10mm socket.
With the fog light on the driver's side, you pop the plugget, drop the two screws and then it gets fun. There's a coolant pipe right behind the foglight, so you can't push the panel up. After verifying it was flexible enough, I folded that panel back under itself and then had to fit an adult hand into a very tight spot to unplug, pop the bulb and replace it. I did this by sitting in front of the car, shining a light through the lens of the fog light to illuminate the tabs so I could line things up and it was not too bad... but it took me 15 minutes just to get the swap done.
The Hoen "endurance yellow" fogs are "golden yellow". This is not quite the corn color of a Cibie yellow, but close.
The Toshiba HIR bulbs were easy to modify with a Dremel, maybe 30 seconds, each, and then fit right in. They illuminate in the same color the oem high beams did, just a LOT brighter. A lot.
I photo'd it, but I see this site has "attachments" turned off for posts.
Well, it was not quite that easy a swap for the High Beam lamps. The straightforward instructions are correct but the removable [sic] pins holding the shroud in place could not be removed. The forwardmost fixed pin allowed me to pry up the shroud in front to allow access. My hands are large and it made the job quite a bit more difficult. For some reason I had difficulty engaging the lamp tabs on the passenger side with the cable attached. I disconnecteed the cable, seated the lamp, and then re-connected. It also made it easier not to touch the lamp. The driver side swap was much easier, even with the battery move.
No doubt, the improvement in high beam lighting is great and worth the cost of the lamps (for me $56/pair incl. shipping) and the small effort.
09-29-2008, 01:49 PM
#38
Burning Brakes
Thread Starter
Good fun, trying to get your hand in a space it doesn't want to fit, eh? So you had to do the passenger side without removing the shroud that's "off" in this photo?

That must have been a bummer.
How would you describe the high beams' light, now that you've done it. My wife says "it's not dramatic, but that's a lot of light".
That must have been a bummer.
How would you describe the high beams' light, now that you've done it. My wife says "it's not dramatic, but that's a lot of light".
09-30-2008, 11:47 AM
#39
Instructor
Join Date: Apr 2008
Location: Maine
Age: 78
Posts: 211
Likes: 0
Received 0 Likes
on
0 Posts
Yes. I could pull up the forwardmost 12-15 in. of the shroud and reach in but it was difficult and with poor visability.
My MC (Honda ST1100) has those same plastic holders with the phillips threaded screw to expand the back. I keep a store of them on hand because they frequently break or fail when removing the fairing. Sometimes you can tug up on them to get the screw to engage and thread out, but not always. I replaced the one I broke during the lamp replacement.
As mentioned the light output is definitely higher and provides much better illumination on the twisty roads in Maine; I'm glad I did it and thanks for the tip in the first place.
10-30-2008, 07:08 AM
#40
Based on the recommendation above from Ballinger I bought a set of the HIR bulbs for the high beams in my wifes car. All I can say is, WOW are they ever bright. Fantastic illumination. They were not hard to modify just as reported above. I just used a flat file and it took a couple of minutes per bulb. Now I'm considering getting a set for my RL high beams to replace the Sylvania Silver Stars I've got currently. 

Thread
Thread Starter
Forum
Replies
Last Post
mada51589
3G TL Problems & Fixes
79
05-03-2022 08:54 PM
sockr1
Car Parts for Sale
22
10-01-2015 01:31 AM
wusty23jd
3G TL Audio, Bluetooth, Electronics & Navigation
4
09-24-2015 11:41 AM
prox
5G TLX Problems & Fixes
6
09-01-2015 02:03 AM