When you click on links to various merchants on this site and make a purchase, this can result in this site earning a commission. Affiliate programs and affiliations include, but are not limited to, the eBay Partner Network.
Front Strut assy & rear shock replacement DIY and torque specs?
I'm about to start this job, so if you have any suggestions or torque specs I'm all ears.
I got the front KYB spring/strut assemblies, and rear KYB shocks. I would have gone FCS with everything, since I've heard they ride softer, but I already had the KYB's from a few years ago.
I'm finding a few videos on YouTube, but they all seem a bit hack-ish.
As I said, any tips or torque specs could be great, I'm reading stuff that's all over the place, like to make sure to torque the suspension bolts when the car is on the ground to prevent bushing preload?
And some guys replace the dust covers, bearings, stoppers, and other guys don't. My car has 170K miles, so I'm looking to do whatever I need to in order to get it to go another 100K.
Also, there is some sort of rear adjustment that's either bad or maxed out that my alignment guy keeps talking about replacing. Does anyone know anything about that?
Front Damper/Spring Removal and Installation (2013-15): Removal
Vehicle - Lift
Front Wheel - Remove
Damper/Spring Items - Remove
Damper/Spring - Remove
1. Raise and support the vehicle.
1. Remove the front wheel.
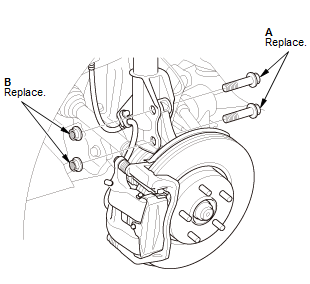
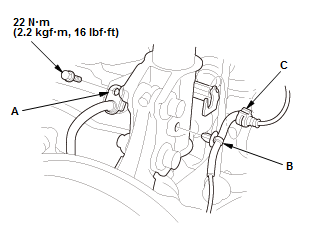
1. Remove the wheel speed sensor harness clip (A) and the wire guide (B).
NOTE: Do not disconnect the wheel speed sensor connector2. Remove the brake hose bracket (C).
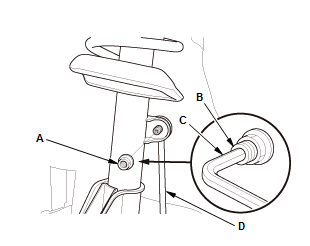
3. Remove the flange nut (A) while holding the joint pin (B) with a hex wrench (C)4. Disconnect the stabilizer link (D) from the damper.
1. Remove the damper pinch bolts (A) and the flange nuts (B).
NOTE: Do not allow the knuckle to rotate too far outward. This may allow the driveshaft inboard joint to come apart.
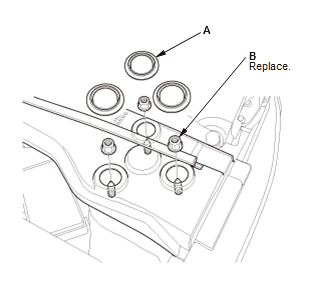
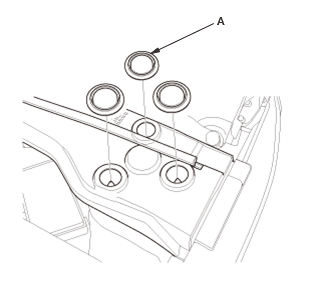
2. Remove the service caps (A)3. Remove the flange nuts (B).
NOTE: Do not let the damper/spring drop down under its own weight.
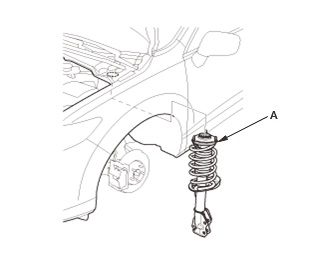
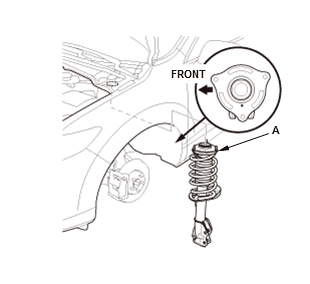
4. Remove the damper/spring (A).
NOTE: Be careful not to damage the body.
1. Install the damper/spring (A). Note the direction of the damper mounting base as shown.
NOTE: Be careful not to damage the body.
3. Install the brake hose bracket (A)4. Install the wheel speed sensor harness clip (B) and the wire guide (C).
5. Install the service caps (A).
1. Install front wheel.
1. Check wheel alignment.
Damper/Spring - Install
Fig 1: Damper Nut With Torque Specifications 2. Loosely install the new flange nuts (A).
Fig 2: Damper Pinch Bolts With Torque Specifications 3. Loosely install the new damper pinch bolts (A) and the new flange nuts (B)
4. Raise the front suspension with a floor jack to load the suspension with the vehicle's weight
5. Tighten the flange nuts on the upper side of the damper
6. Tighten the damper pinch bolts while holding the flange nuts on the lower side of the damper.
Damper/Spring Items - Install
Fig 3: Stabilizer Link With Torque Specifications 1. Connect the stabilizer link (A) to the damper
2. Tighten the flange nut (B) while holding the joint pin (C) with a hex wrench (D).
Front Wheel - Install
Wheel Alignment - Check
Rear Damper Removal, Installation, and Inspection (2013-18): Removal
NOTE:Refer to the Exploded View as needed during the following procedures.
Vehicle - Lift
Rear Wheel - Remove
Lower Arm B - Support
Damper - Remove
1. Raise & support the vehicle.
1. Remove the rear wheel.
1. Position a floor jack under lower arm B.
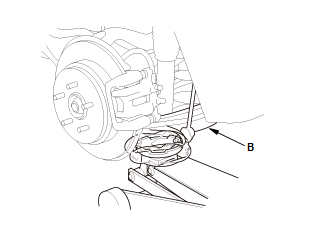
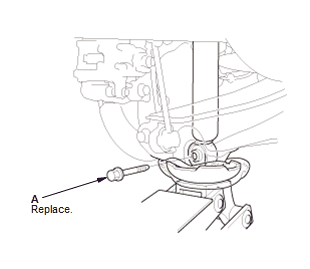
1. Raise the floor jack until the suspension begins to compress2. Remove the damper mounting bolt (A).
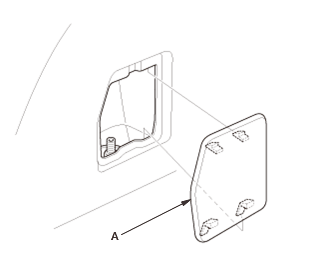
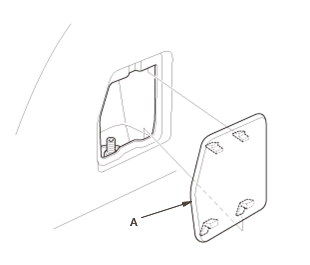
3. Remove the damper maintenance lid (A).
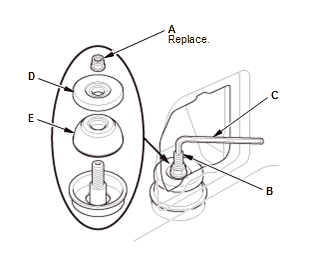
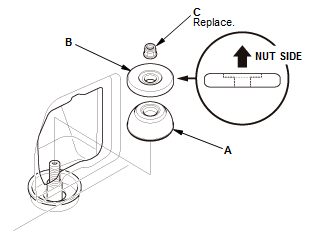
4. Remove the self-locking nut (A) while holding the damper shaft (B) with a hex wrench (C)5. Remove the damper mounting washer (D)
6. Remove the damper mounting rubber (E).
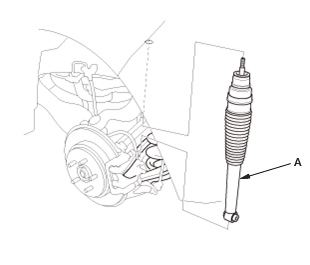
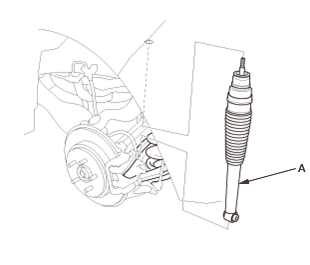
7. Remove the damper unit (A).
NOTE: Be careful not to damage the body.
Rear Damper Removal, Installation, and Inspection (2013-18): Installation
NOTE:
Damper - Install
Fig 1: Rear Damper Bolt With Torque Specifications 2. Position a floor jack under lower arm B to support the suspension
3. Slowly raise the floor jack until you align the bolt hole with the holes in lower arm B and the damper
4. Loosely install the new flange bolt (A)
5. Raise the rear suspension with the jack until the vehicle just lifts off of the safety stands, then tighten the damper mounting bolt to the specified torque.
Fig 2: Rear Damper Nut With Torque Specifications 9. Tighten the self-locking nut (A) to the specified torque while holding the damper shaft (B) with a hex wrench (C).
Rear Wheel - Install
Wheel Alignment - Check
1. Install the damper unit (A).
NOTE: Be careful not to damage the body.
6. Install the damper mounting rubber (A)7. Install the damper mounting washer (B)
8. Loosely install the new self-locking nut (C).
10.Install the damper maintenance lid (A).
1. Install rear wheel.
1. Check wheel alignment.


2. Loosely install the new flange nuts (A).
3. Loosely install the new damper pinch bolts (A) and the new flange nuts (B)
1. Connect the stabilizer link (A) to the damper
2. Position a floor jack under lower arm B to support the suspension
9. Tighten the self-locking nut (A) to the specified torque while holding the damper shaft (B) with a hex wrench (C).

