My '03 CLS6 progress thread
 03-29-2012, 08:44 PM
#561

Now when I install carbon fiber racing mirrors it will be ricerrific. Stock mirrors block my visibility way too much.
Last edited by brian6speed; 03-29-2012 at 08:49 PM.


The following users liked this post:
civicdrivr (03-31-2012)
03-31-2012, 10:55 AM
#565
Whats up with RDX owners?
iTrader: (9)

 04-07-2012, 05:03 PM
#566
My new tool chest and work table came in 2 days ago. Still need to put wheels on. This replaces my 30 year old 26" craftsman.


I ordered a new set of side mounts from thmotorsports. This pair was fine. I was test fitting the passenger seat. It didn't want to fit as well as driver since the seat and side mounts are different. My driver side mounts are the steel ones, the passenger are aluminum but probably don't really weigh much less cause they have a lot more metal used on them.
With the other 3 mounting points lined up, here is the front right mount point and you can see how much it is off. I was able to force it in tho.

Here is the seat mounted and this is with the slider in the farthest back position. It does not go as far back as I would like.

Here is my leg room in the seat with it as far back as it can go. I think I have atleast 6 inches till my feet would be at firewall so should be fine.

Here is the headroom. I think the seat is 4-5 inches from the moonroof assembly. With the moonroof assembly removed there would be atleast 2 more inches.

Oh and btw I think these brackets were fabbed with the steel side mounts backwards and that is why when I have the passenger the right way they go more forward than backward. I still have my driver side mounted backwards because it lets me move the seat further forward that way.
That is all for now.
I ordered a new set of side mounts from thmotorsports. This pair was fine. I was test fitting the passenger seat. It didn't want to fit as well as driver since the seat and side mounts are different. My driver side mounts are the steel ones, the passenger are aluminum but probably don't really weigh much less cause they have a lot more metal used on them.
With the other 3 mounting points lined up, here is the front right mount point and you can see how much it is off. I was able to force it in tho.
Here is the seat mounted and this is with the slider in the farthest back position. It does not go as far back as I would like.
Here is my leg room in the seat with it as far back as it can go. I think I have atleast 6 inches till my feet would be at firewall so should be fine.
Here is the headroom. I think the seat is 4-5 inches from the moonroof assembly. With the moonroof assembly removed there would be atleast 2 more inches.
Oh and btw I think these brackets were fabbed with the steel side mounts backwards and that is why when I have the passenger the right way they go more forward than backward. I still have my driver side mounted backwards because it lets me move the seat further forward that way.
That is all for now.
Last edited by brian6speed; 04-07-2012 at 05:13 PM.
04-11-2012, 09:31 AM
#567
Trying to decide what tire size and which tires to go with for my next set. Looking for a street/track tire. Here is what I am trying to decide between.
Size 255/35/18 from tirerack
1. Dunlop Star Spec $1012
2. Hankook R-S3 $1032
3. Toyo R1R $880
4. Michelin Super Sport $1068
Size 245/40/18
1. Dunlop Star Spec $872
2. Hankook R-S3 $788
3. Toyo R1R $720
4. Michelin Super Sport $1032
5. Nitto NT05 $752 from discounttire-tirerack dsnt sell nitto
First thing that pops out is how much more expensive the 255 tires are over the 245. The R-S3 price for 255 seems really high compared to the 245 price. The michelins are about same price regardless of size.
Queston is a 255 worth the extra price? Will it even perform better on a 8.5 wide rim?
I think I am leaning more towards the R-S3, NT05, or R1R's. I am thinking the R-S3 in 245 cause 255 is expensive, NT05 don't come in 255 so only 245 for those, and the R1R in 255 since the price isn't that much more.
I am currently on 235/45/18 hankook R-S2. Those only cost me $350 shipped. Been very happy with them.
Any comments welcome.
Last edited by brian6speed; 04-11-2012 at 09:41 AM.
04-11-2012, 11:24 AM
#568
Suzuka Master
iTrader: (1)
I like the look and was going to go with Toyo R1R's after having three sets of Proxes 4's; however, I found a killer deal on BFG KDW's and could not pass them up.
04-11-2012, 01:50 PM
#569
Whats up with RDX owners?
iTrader: (9)
You have 8" wide wheels, right? If so, Id go with the 245s. I, too, want to go with a wider tire, but I think with my fitment, 245 is the widest I could go.
The following users liked this post:
o0o0o0 (08-11-2013)
04-29-2012, 09:12 PM
#572
Some small updates.
Finally removed the plastic covers from behind the rear seat panels. I found out that there is padding taped onto the inside of the quarter panel behind the plastic. I was sick of them flapping in the wind with windows down. Removed the foam seatbelt protectors also.


Weight is pretty miniscule.
White Plastic Covers .29 lbs
Seat Belt Protectors .08 lbs
White Padding .68 lbs
Total 1.05 lbs
Here is a hint to project I am working on now.


Finally removed the plastic covers from behind the rear seat panels. I found out that there is padding taped onto the inside of the quarter panel behind the plastic. I was sick of them flapping in the wind with windows down. Removed the foam seatbelt protectors also.
Weight is pretty miniscule.
White Plastic Covers .29 lbs
Seat Belt Protectors .08 lbs
White Padding .68 lbs
Total 1.05 lbs
Here is a hint to project I am working on now.
Last edited by brian6speed; 04-29-2012 at 09:14 PM.
04-29-2012, 09:43 PM
#573
Whats up with RDX owners?
iTrader: (9)
Side view mirrors.
 04-30-2012, 02:53 PM
#575
Whats up with RDX owners?
iTrader: (9)
04-30-2012, 06:52 PM
#576
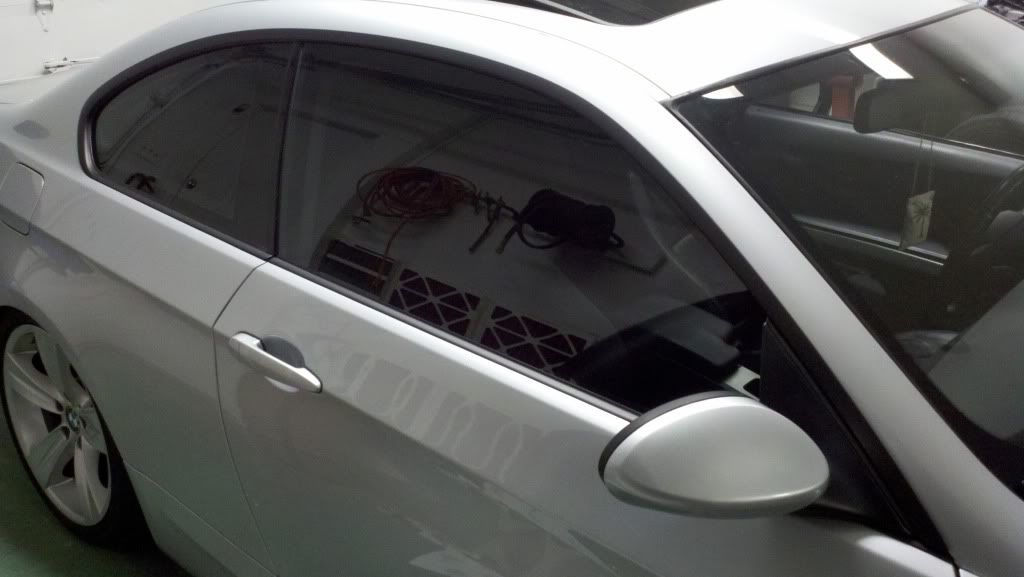
I have the driver side mirror pretty much done.
Here is the mirror removed.

Sheet of carbon fiber masking it gettting ready for the cutting wheel.
Masked up with first 2 paper templates made.

Here is the panel after some sanding. Final sanding still needed to make it fit perfectly.
I decided to reuse the oem rubber weatherstripping piece that goes behind the mirror panel. I fit the panel to fit perfectly in the groove. Took alot of fine sanding and refitting to make sure.
Here you can see I am using a exacto knife to remove the rubber sections that stick up to get it flat for the cf panel.


Next I marked off the mounting holes and drilled them out.
Finally, installed it. I had to order 6 m5 x 40mm button head cap screws to mount it. Local hardware store didn't have anything.


Here you can see the size difference between oem and apr mirror.

I still need to get weights will do that later need to leave.
Here is the mirror removed.
Sheet of carbon fiber masking it gettting ready for the cutting wheel.
Masked up with first 2 paper templates made.
Here is the panel after some sanding. Final sanding still needed to make it fit perfectly.
I decided to reuse the oem rubber weatherstripping piece that goes behind the mirror panel. I fit the panel to fit perfectly in the groove. Took alot of fine sanding and refitting to make sure.
Here you can see I am using a exacto knife to remove the rubber sections that stick up to get it flat for the cf panel.
Next I marked off the mounting holes and drilled them out.
Finally, installed it. I had to order 6 m5 x 40mm button head cap screws to mount it. Local hardware store didn't have anything.
Here you can see the size difference between oem and apr mirror.
I still need to get weights will do that later need to leave.
Last edited by brian6speed; 04-30-2012 at 06:55 PM.
04-30-2012, 07:48 PM
#577
Whats up with RDX owners?
iTrader: (9)
Well done 
05-01-2012, 12:52 PM
#580
It is nice for weight loss considering the weight is high up and so far out from the center of gravity. The drag is greatly reduced also.
I noticed the arm was a little loose and realized the tightening nut is on the back of where the arm attaches to the panel.
I removed the panel and drilled another hole to make it easier to get to the tightening nut.

 05-01-2012, 10:54 PM
#581
Looks good! Have you thought about wrapping the trim around your windows matte black vinyl? I think it would match the car well.
My friend just did his 07 335 coupe 6 speed not too long ago, it looks great on silver.
My bro just did his on my 02 cl-p and that looks good also on NBP.
My friend just did his 07 335 coupe 6 speed not too long ago, it looks great on silver.
My bro just did his on my 02 cl-p and that looks good also on NBP.
05-02-2012, 02:13 AM
#582
Looks good! Have you thought about wrapping the trim around your windows matte black vinyl? I think it would match the car well.
My friend just did his 07 335 coupe 6 speed not too long ago, it looks great on silver.
My bro just did his on my 02 cl-p and that looks good also on NBP.
My friend just did his 07 335 coupe 6 speed not too long ago, it looks great on silver.
My bro just did his on my 02 cl-p and that looks good also on NBP.
Are you saying your brother has a cl also?
05-02-2012, 02:18 PM
#583
Whats up with RDX owners?
iTrader: (9)
I tried the tape and failed miserably. Plasti-Dip was a lot easier, laid down nice and flat, and lasts. I did it over a year ago.
05-02-2012, 08:12 PM
#585
I have a few updates to post.
Replaced the front brake pads, fluid, front retainers and front shims. Went with EBC yellowstuff pads, prospeed rs683 fluid, retainers are ones from autozone when I bought legend calipers and shims are oem for cl, except for the shim that goes against the pistons I used the oem legend one. It seems my brake noise issue is gone.


Adjusted the parking brake from inside cockpit and also from the rear rotors.
Installed rear tie bar

Drilled a hole thru the floor/tunnel for my seatbelt harness eyebolt mounting point. Put a washer on the inside and step down washers on the outside. Still need to do the one for passenger side.


Replaced the front brake pads, fluid, front retainers and front shims. Went with EBC yellowstuff pads, prospeed rs683 fluid, retainers are ones from autozone when I bought legend calipers and shims are oem for cl, except for the shim that goes against the pistons I used the oem legend one. It seems my brake noise issue is gone.
Adjusted the parking brake from inside cockpit and also from the rear rotors.
Installed rear tie bar
Drilled a hole thru the floor/tunnel for my seatbelt harness eyebolt mounting point. Put a washer on the inside and step down washers on the outside. Still need to do the one for passenger side.
05-02-2012, 09:26 PM
#586
Whats up with RDX owners?
iTrader: (9)

I had to remove the mirrors too, but I dont think youll have that issue
 05-02-2012, 09:51 PM
#587
Suzuka Master
iTrader: (1)
Replaced the front brake pads, fluid, front retainers and front shims. Went with EBC yellowstuff pads, prospeed rs683 fluid, retainers are ones from autozone when I bought legend calipers and shims are oem for cl, except for the shim that goes against the pistons I used the oem legend one. It seems my brake noise issue is gone.
Keep us updated on how the remanufactured Legend calipers perform/handle for you when the heat is put to them on track days.
Good Luck!
05-03-2012, 12:33 AM
#588
Or you can install it with multiple straight pieces and stretch it around the bends which is harder/more time consuming and not as clean looking in my opinion. It still looks good if you don't mind this route and don't want to use as much vinyl.
Yes my brother sold his 03 tl-s and bought my old 02 cl-p since he basically got it for free. We put a 06 oddy trans in and it's been running great ever since.
Here's pictures of both cars wrapped.
 05-04-2012, 11:23 AM
#589
Side Mirror Weight
OEM driver mirror 3.33 lbs
APR mirror .68 lbs
-2.65 lbs
The oem passenger mirror might weigh more because of the tilt down feature. Will find out soon enough.
05-08-2012, 09:09 PM
#591
Thnx.
I ordered my next set of tires today. I was debating between the dunlop star spec and the hankook r-s3. I wanted them in 255/35/18. The R-S3 are not in stock and could take weeks or months to get so that made the decision easy. Ordered the star spec's in 255/35/18.
I ordered my next set of tires today. I was debating between the dunlop star spec and the hankook r-s3. I wanted them in 255/35/18. The R-S3 are not in stock and could take weeks or months to get so that made the decision easy. Ordered the star spec's in 255/35/18.
05-09-2012, 01:38 PM
#592
Finished cleaning up the 2 rust spots on the floor.
Here is a refresher of how it looked before.
Driver side, can see the rust coming thru the sealant.

Passenger side soaking in rust remover.


Removed this metal cap piece from passenger side because there was rust underneath.

Here is the passenger side after applying a little jb weld, sanding, then primed.

Here it is after applying the sealant.

Here is passenger side from under the car. This is after jb weld, primer, and sealant was applied.

Masked up and ready for undercoating.

Undercoating sprayed on.

Final product.

Now back to the driver side. Here it is after jb weld and sanding ready for primer.

2 pics of my excessive masking.


Inside primed.

Sealant applied.

Under car driver side. This is after jb weld, primer, and sealant.

Undercoating applied.

That is all.
Here is a refresher of how it looked before.
Driver side, can see the rust coming thru the sealant.
Passenger side soaking in rust remover.
Removed this metal cap piece from passenger side because there was rust underneath.
Here is the passenger side after applying a little jb weld, sanding, then primed.
Here it is after applying the sealant.
Here is passenger side from under the car. This is after jb weld, primer, and sealant was applied.
Masked up and ready for undercoating.
Undercoating sprayed on.
Final product.
Now back to the driver side. Here it is after jb weld and sanding ready for primer.
2 pics of my excessive masking.
Inside primed.
Sealant applied.
Under car driver side. This is after jb weld, primer, and sealant.
Undercoating applied.
That is all.
The following users liked this post:
civicdrivr (05-09-2012)
05-09-2012, 05:31 PM
#593
Looks like I waited too long to try and send in my rear coils to get rebuilt. I was told they are backed up and it would be a 2 month wait. Now I need to make a decision. Looks like I will be forced to buy new koni shocks for the rear. 

Only good news is the coils are still under warranty so the rebuild will be free.
Only good news is the coils are still under warranty so the rebuild will be free.
05-10-2012, 04:00 PM
#594
I removed the plastic horn cover. Didn't bother weighing it yet since it isn't much.

Tires arrived today. 255/35/18 dunlop z1ss.

Dropped off a few items to get powdercoated yesterday. Had them do a single layer satin black. They were ready to pick up today, talk about service. They are the ingalls stiffy mount brackets, fog cover vents, and 2 smaller brackets.

Tires arrived today. 255/35/18 dunlop z1ss.
Dropped off a few items to get powdercoated yesterday. Had them do a single layer satin black. They were ready to pick up today, talk about service.
They are the ingalls stiffy mount brackets, fog cover vents, and 2 smaller brackets.
05-14-2012, 03:58 PM
#596
Whats up with RDX owners?
iTrader: (9)
The cable reel is cruise, srs, radio, and horn. It also doesnt weigh a whole lot.
The following users liked this post:
brian6speed (05-14-2012)
05-14-2012, 04:13 PM
#597
Thnx. Only one of those I want to keep is the horn, so guess I will keep it. Debating whether it is worth tearing apart wiring harness to remove srs wiring. I would remove passenger airbag but don't want a big hole in my dash. Maybe I could make a plug.
05-14-2012, 04:59 PM
#598
Whats up with RDX owners?
iTrader: (9)
If I were you Id leave the wiring in place just in case you need to put the air bags back in.
05-20-2012, 07:38 AM
#599
Working on getting car ready for the national meet so should have some updates in the coming weeks.
The following users liked this post:
civicdrivr (05-20-2012)
05-20-2012, 08:17 PM
#600
Whats up with RDX owners?
iTrader: (9)
 I can't wait to see it in KC. A CF sunroof plug would be sick, and if you're really serious, you could replace the rear windows with lexan.