
D.I.Y. - Clearing Headlights!
 08-11-2008, 05:40 PM
#1
I've been looking forward to this mod for a long time. When I decided to look around and research this mod it was hard to find a solid write up. I found a little here a little there and was able to get a general idea of what I needed to do. So hopefully this D.I.Y. write-up will help anyone else who is looking forward to trying this mod.
MATERIALS
Flathead Screwdriver
Phillips Screwdriver
Medium Star Screwdriver
Silicone Sealant (I used an RTV waterproof/weatherproof silicon sealant)
10mm socket (long socket or an extension will help)
Clamps (when re-sealing housings)
Heat Gun (no oven heating here)
Razor or putty knife (scraping old adhesive from housing)
A buddy with a little free time (another set of hands makes this process much easier)
A well ventilated area (melting glue and fresh silicon can get to you)
STEP 1
BUMPER REMOVAL
Remove Bumper
It doesn't really matter which order you remove the bolts and snap clips as long as you remove them all or else you wonder why the bumper isn't coming off.
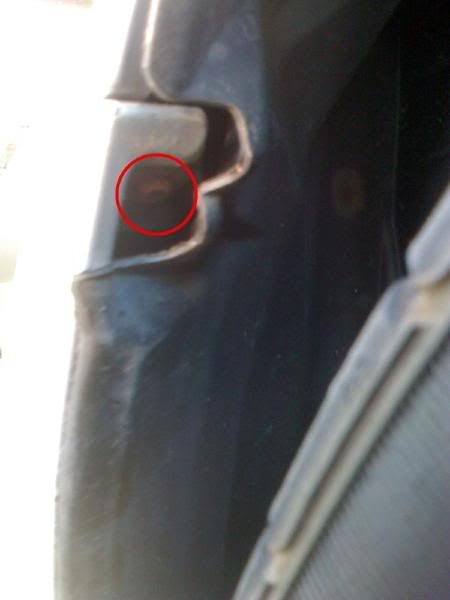
Bottom of Bumper
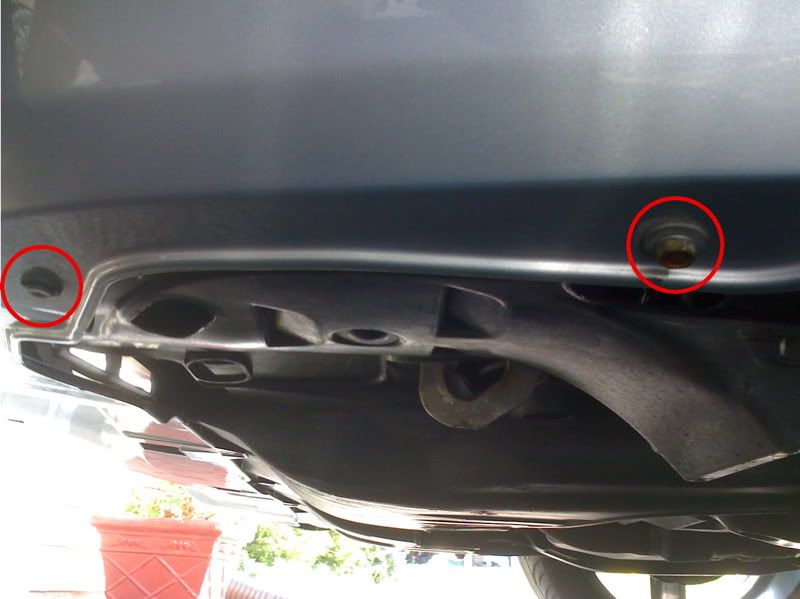
There are four(4) snap-clips and two(2) 10mm bolts on the bottom side of the bumper. To remove the snap-clips just use the flathead screwdriver to pop the flat part of the clip up and then the whole clip will pop out. I put all the clips/bolts for the bottom of the bumper in a zip-lock bag so i didn't mix them up with the other clips/bolts.
Here are the two(2) clips on the driver's side of the bumper:

Here is the 10mm bolt on the right (you can also see one of the two clips from the previous step on the left side. I just circled that to you give you a reference point for the 10mm bolt:
Top of Bumper
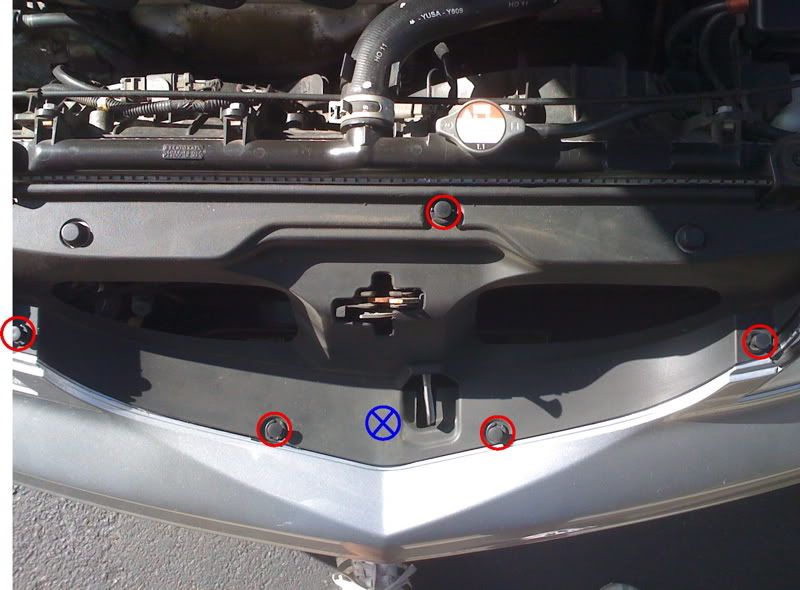
There are eight(8) snap-clips on the top of the bumper holding the radiator shroud to the bumper.
This is what you should see when you lift the hood. The black piece running along the top of the headlights across the bumper and covering the radiator is the shroud you are going to remove in this part:
Here are the five(5) clips in the middle of the shroud (the blue circle with an 'x' is where a few screws are that you'll remove in the next part of the bumper removal):
Here are the two(2) clips on the driver's side:

Here is the one(1) clip on the passenger side:
Once you have removed all the clips the shroud should come right off. Just set it aside where you won't trip over it.
Once the shroud is off, there are three screws right on top of the bumper in the middle (where the bumper comes to a point under the hood latch). These were a pain in the ass to remove because they had never been unscrewed. Make sure you don't strip them. I actually had to drill out the two smaller ones on the left and right because they were rusted in place. As long as you can salvage the bigger one in the middle that is all you really need.
Once again I put all the clips from the top of the bumper in a zip-lock so I didn't mix them up when putting it all back together.
Side of Bumper
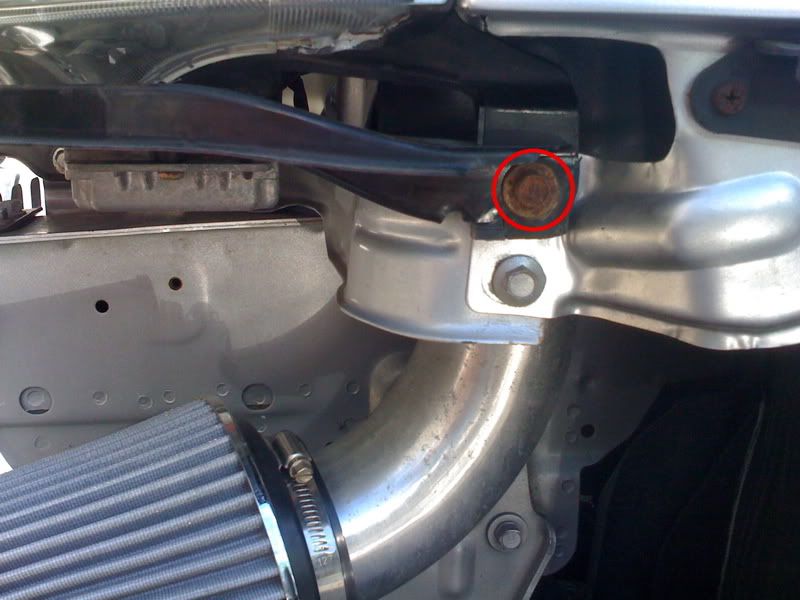
The final bolts you need to remove before you can take the bumper off are located on the sides of the bumper right in front of the two front tires. These are 10mm bolts like the two under the bumper.
Here is the driver's side bolt. They are right in front of the tire, if you have trouble reaching them with a socket, try turning the wheel to get better access to them:
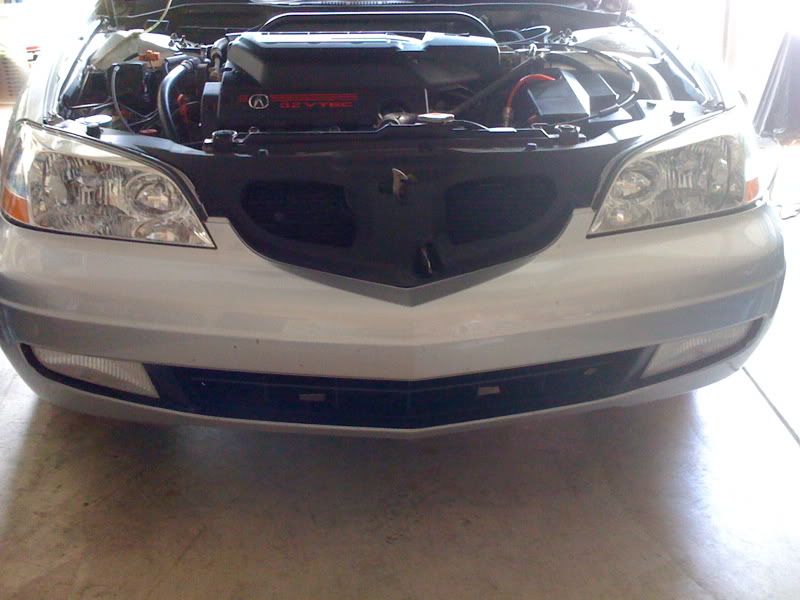
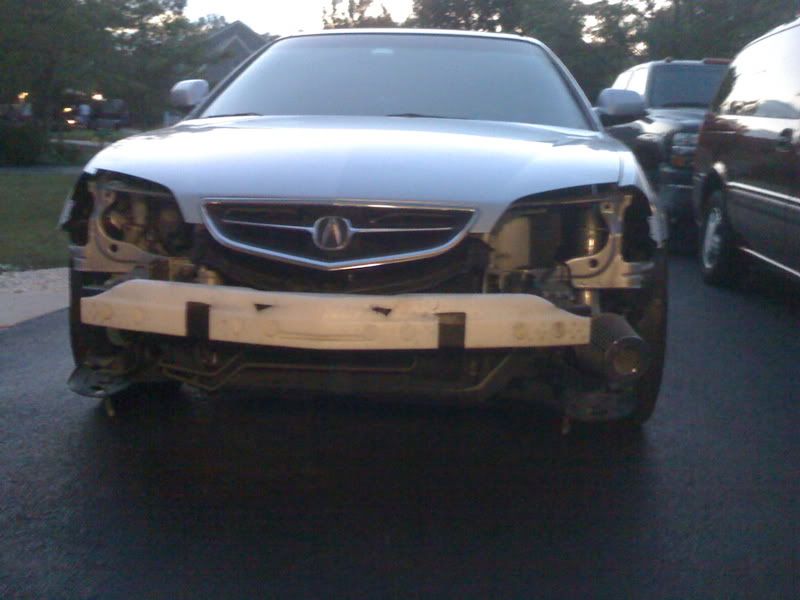
Now that you have all the bolts/clips removed you can slide the bumper off. It's a little tricky to do by yourself so if you were able to wrangle a buddy into helping you than this is a good time for him/her to step up and make himself/herself useful. Once the bumper is off, you should have something like this:
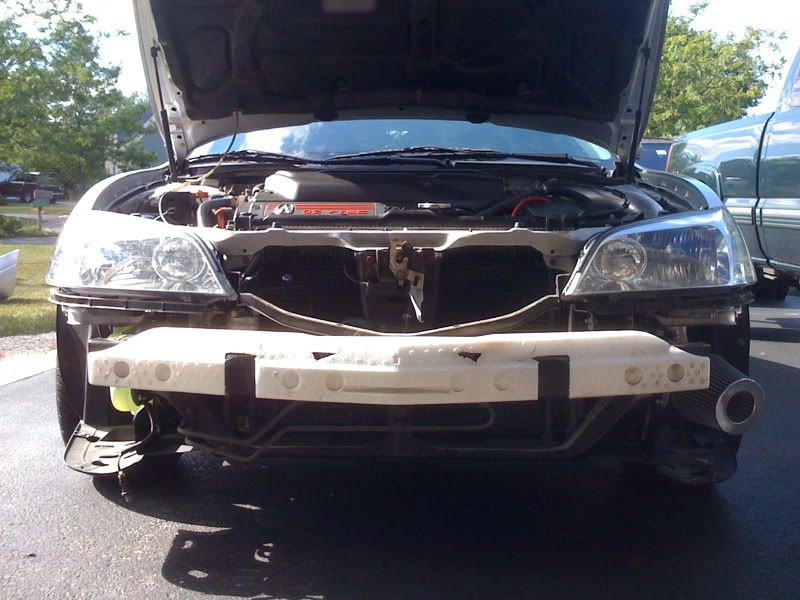
Alright, now the bumper is off! Believe it or not that was the simplest part. But its all business after this, set the bumper where it won't get in the way and where the weather won't get to it either. It's gonna be off for at least a day so inside is your best bet. I just took it down to the basement so it wasn't taking up room in the garage.
STEP 2
BUMPER/HEADLIGHT BRACKET REMOVAL
Remove Brackets
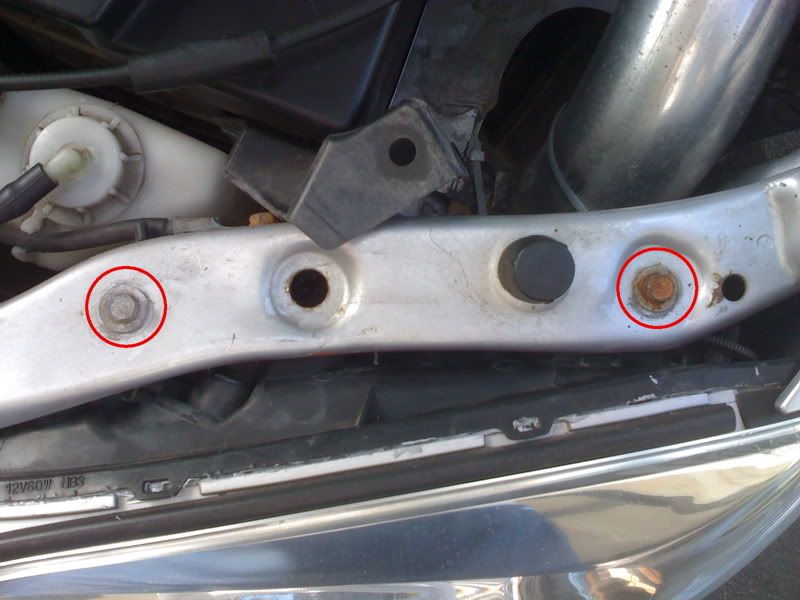
With the bumper now off you will see a metal bracket underneath each headlight. Each bracket is held in place with three(3) 10mm bolts. If you have a socket extension, it will help on these.
Here is the one(1) on the outside of the driver's side headlight:
Here are the two(2) underneath the headlight:
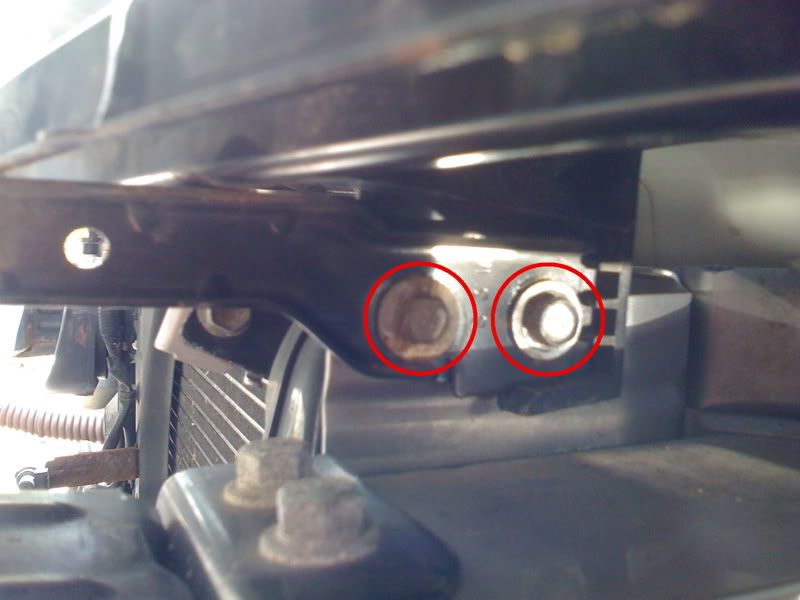
Got those out no problem right? The ones on the bottom are a bitch cause the threads are so long and take forever to unbolt with the limited space to ratchet back and forth... Well now its time to take out the headlights.
STEP 3
HEADLIGHT REMOVAL
Remove Headlights
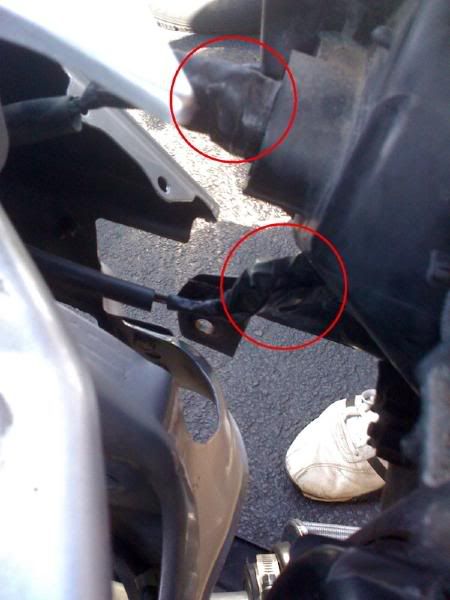
Now that the brackets are removed there are only two more bolts holding the headlights in place. The headlights are wedged in there pretty good, but make sure you support them with your other hand (or call back your buddy) while you unbolt them.
These are the two bolts located on the top of the driver's headlight:
Unplug/Remove Bulbs
Once you've got the bolts out, you just have to disconnect all the bulbs in the headlight housing. There are four total. The High Beam, Low Beam (HID), Turn Signal, and Parking Lamp. The High Beam is locked in place. All you have to do is look at the orientation of the thread and turn the bulb to unlock it. It takes some muscle so don't be afraid to give it a little oomph. The Low Beam (HID) is really simple. You can't remove the bulb itself, you have to unplug the power harness from where it connects to the back of the housing. Just push down on the clip and it slides right off.
Here is the back of the headlight housing from above. The High Beam is on the left (turn and it pops out), and the Low Beam (HID) is on the right (just unplug the power):
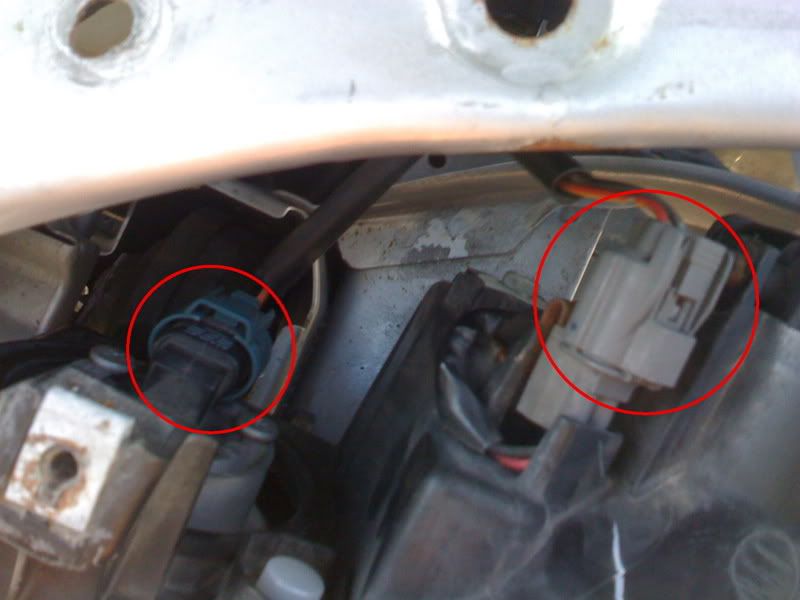
The last two bulbs are the same as the High Beam Bulb was, you just turn to unlock and they pull right out.
Here is the Turn Signal (on the top of the picture), and the Parking Lamp (the bottom of the picture):
Make sure that you tuck the bulbs back so they don't swing around or get in your way when you have to re-install everything. Be careful not pull too hard or bang them around, or else you're gonna be shopping for some new bulbs.
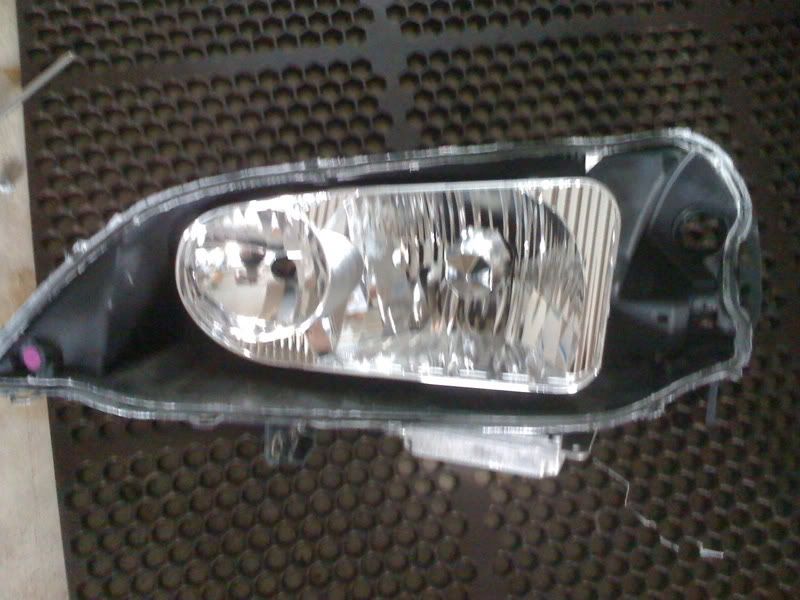
Alright so now you have all the bulbs removed and you can take the housing out of the frame! Set both the housings somewhere comfortable for you to work cause the next steps are going to be time consuming.
STEP 4
REMOVE HID BULBS
Remove HID Bulb
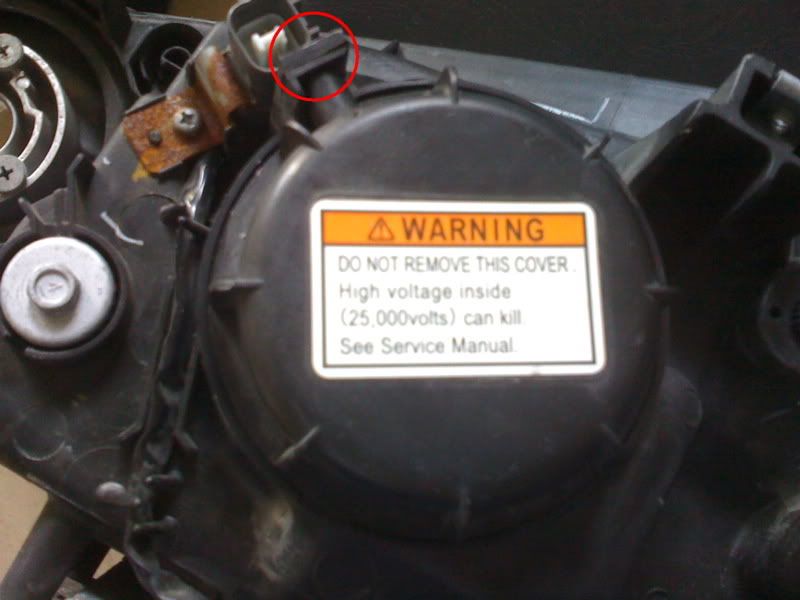
Now it sounds simple but the bulbs are locked in the housing to keep them away from moisture and dirt. Flip the headlight housing around so you can see the back of it. It should look like this:
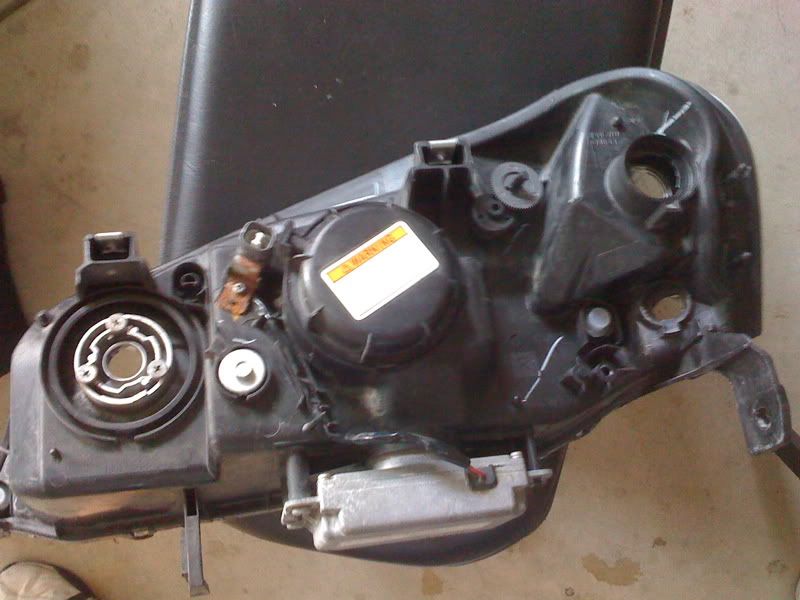
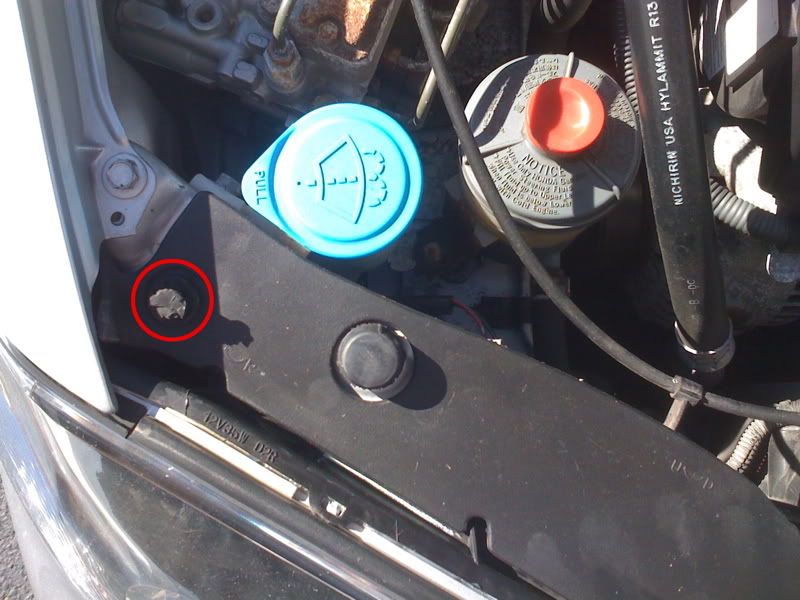
Now if you look closer you'll see a warning sticker and the dust/moisture shield where the HID Bulb is housed. At the top of the housing you'll see a small star screw. Once you unscrew this the back cover will rotate to unlock and then pop right off.
Here is a closer look at the back of the HID Bulb housing (the star screw is circled at the top):
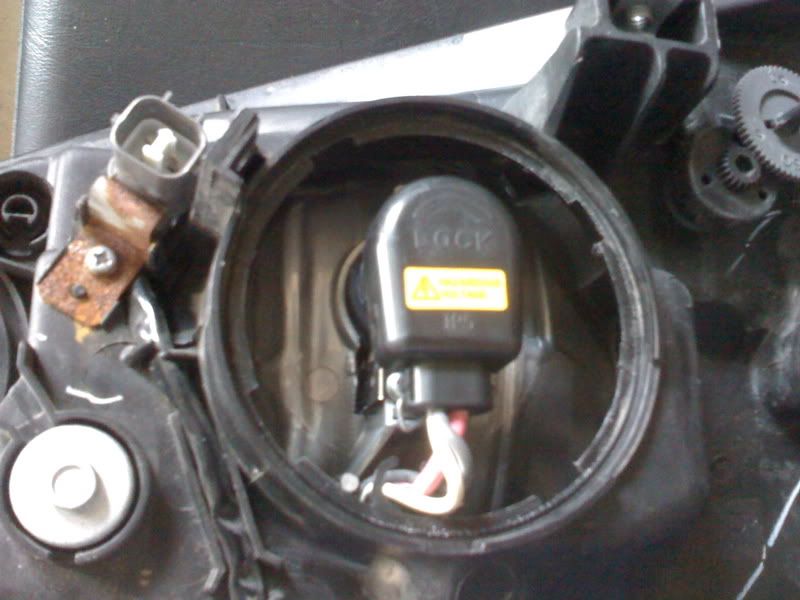
Once you have the cover off you can see the HID Bulb and the wiring, etc. There is a metal clip that holds the bulb in place. The metal clip latches right underneath where the wires connect to the bulbs harness. Push it down to release the bulbe and slowly pull the bulb out! Be careful! These are expensive bulbs so take your time taking them out! Once the bulb is out you have to turn the bulb in the harness to unlock it, then pull it out of the harness. MAKE SURE NOT TO TOUCH THE BULB! You can ruin it if you touch it with your hands.
Here is the back of the Bulb harness with the cover off:
Once you have the bulbs out make sure you set them aside somewhere where you will not damage them. That could be a costly mistake!
STEP 5
CLEARING HOUSING/REMOVING AMBER DIFFUSER
Open Headlight Housing
Now that you have Headlight Housing removed and the HID bulb is out you can begin the process of Clearing it (removing the amber diffuser from the corner). In this step you are going to need the Heat Gun, your buddies hands, and that flathead screwdriver again. Out of all the steps this is the most tedious. I can't stress enough how careful you need to be on this step. If you rush through, or you're not thorough in your work you may have problems with moisture getting into the housing. So please, take your time and remember that this is the most important step.
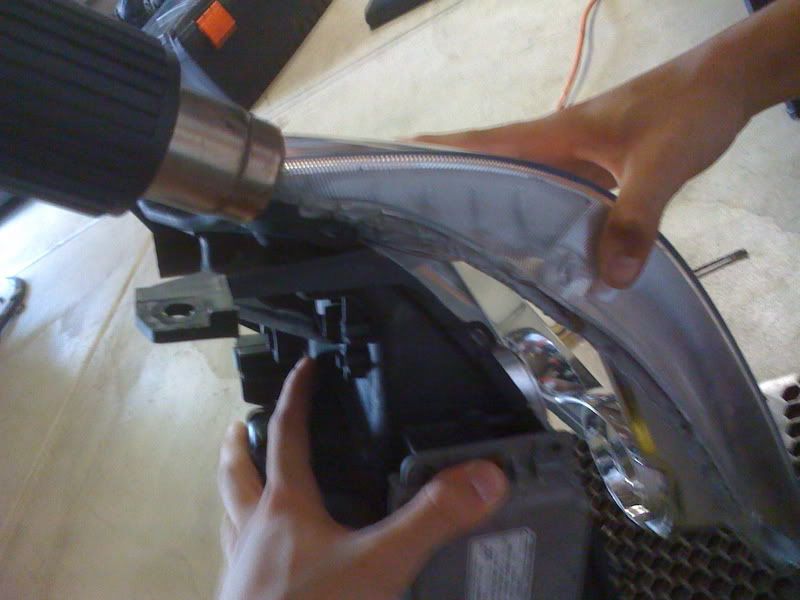
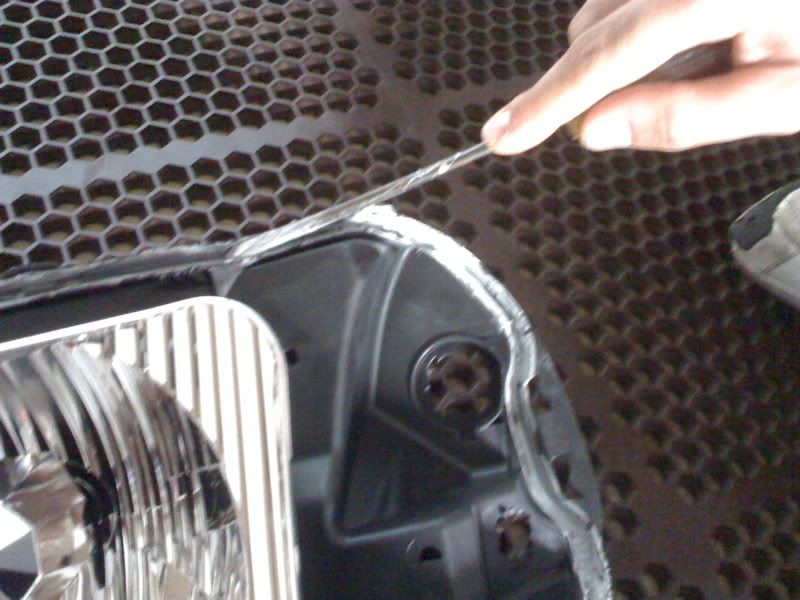
I found it easiest to start from the inside corner of the headlight first (the sharp corner on the opposite side of the amber diffuser). Find the seam where the grey sealant is visible between the black backing of the housing and the clear front. Heat it slowly with the Heat Gun making sure not to stay in one spot too long. It really doesn't take too long to heat the glue. To see if the glue is getting soft, just place the flathead screwdriver between the seam and turn it (don't pry or else you'll bend the plastic). If the glue is warm enough you will see the seam spread apart very easily. Continue to work your way down the seam slowly, heating the glue and twisting with the screwdriver to work the seam open. Once you or your buddy can get a good grip on the seam with your fingers, slowly pull it open while the other uses the heat gun to keep the glue warm. If you take your time and work your way around the housing, once your buddy starts pulling it apart the additional heat will make it very easy to pull apart. Just remember, TAKE YOUR TIME! You don't want to break anything.
Here is my buddy pulling it apart while I keep the glue warm with the Heat Gun:
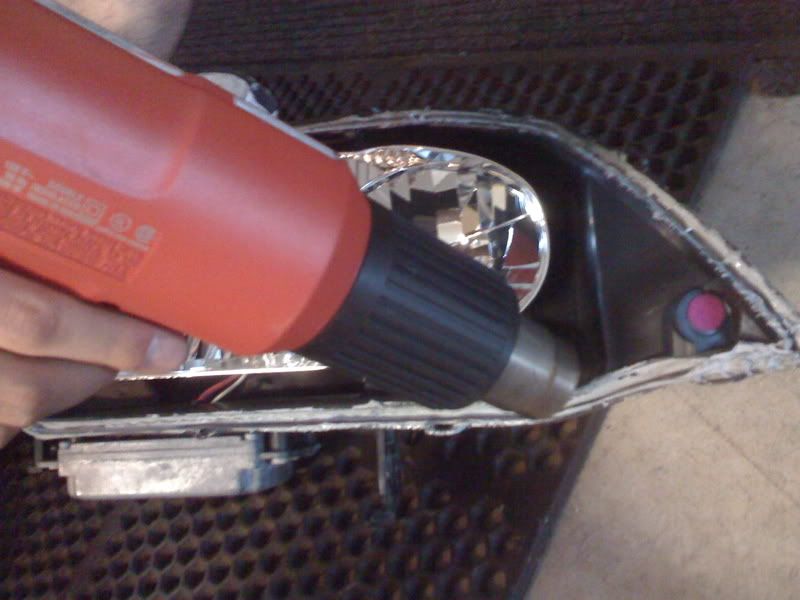
Cleaning/Removing Old Glue
Now, hopefully without too much trouble you've pulled the Black Backing and the Clear Front of the housing apart. In one hand you should have the back of the Housing which has a deep channel going all the way round the endge of it that is full of the grey glue. Then in the other you have the clear front of the Housing that also has the greay glue all around the edge. Now you have some clean up work to do before you can go any further. I almost made the mistake of not cleaning up the glue first. Trust me, do it while it's warm and get as much of it off as you can.
Keep the glue warm with the Heat Gun for easy removal:
Use the Flathead Screwdriver to scrape out the excess grey glue from the channel:
The Black Backing should look like this (this is the hardest part to get clean, but the most important. You need a clean channel so that you can put fresh silicon sealant in it for a tight bond):
Make sure you take your time on this part! All this extra grey glue needs to come off for a nice clean seal later:
The front of the housing shouldn't be as messy. The most important part about this half of the housing is to get the inside edge clean so that when you remove the chrome reflector, you won't get any glue on the chrome.
Removing Amber Diffuser
Once you have removed as much of the glue as you can, it's time to take out that Amber Diffuser! Make sure you're hands are clean or you put some new gloves on so that you don't get anything on the inside of the lens when removing the diffuser.
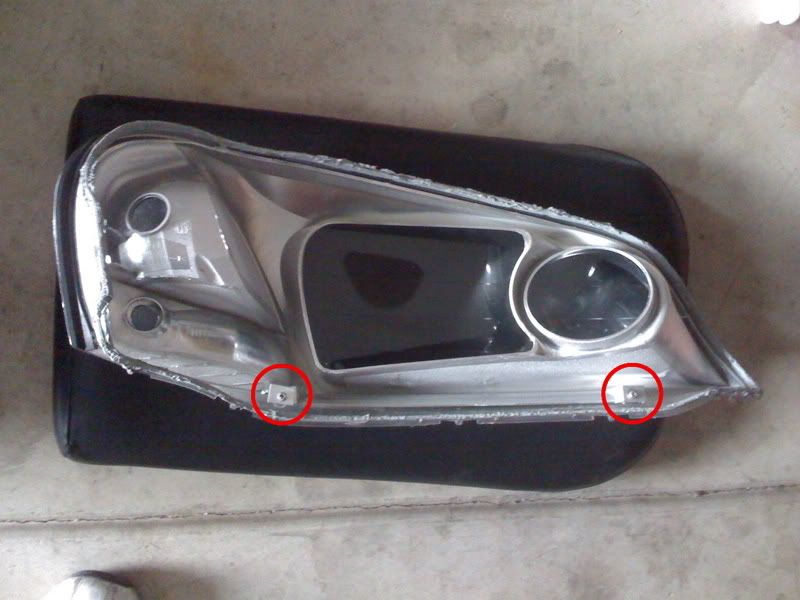
As you look at the inside of the Clear Housing you will see two screws at the bottom of the chrome reflector. Be careful when unscrewing these two screws. The chrome reflector is fragile so don't bend it or put too much pressure while unscrewing them.
Here are the two screws behind the chrome reflector:
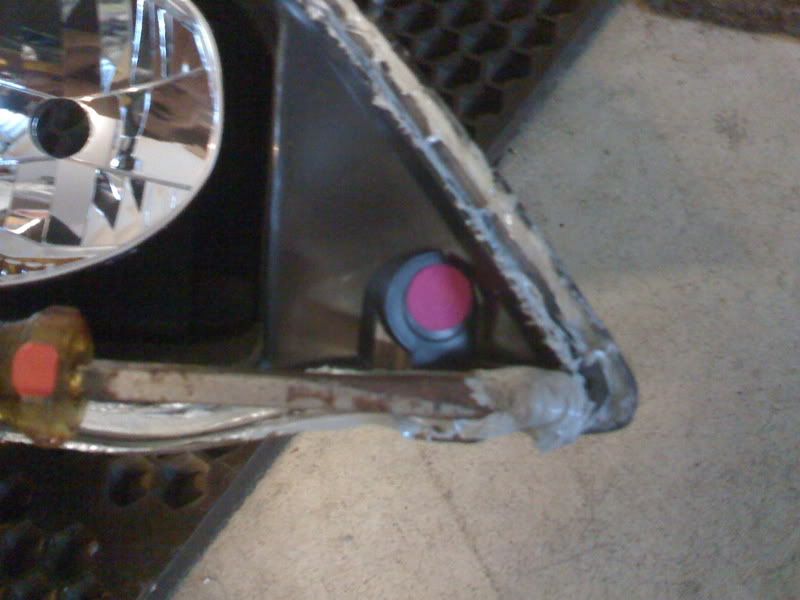
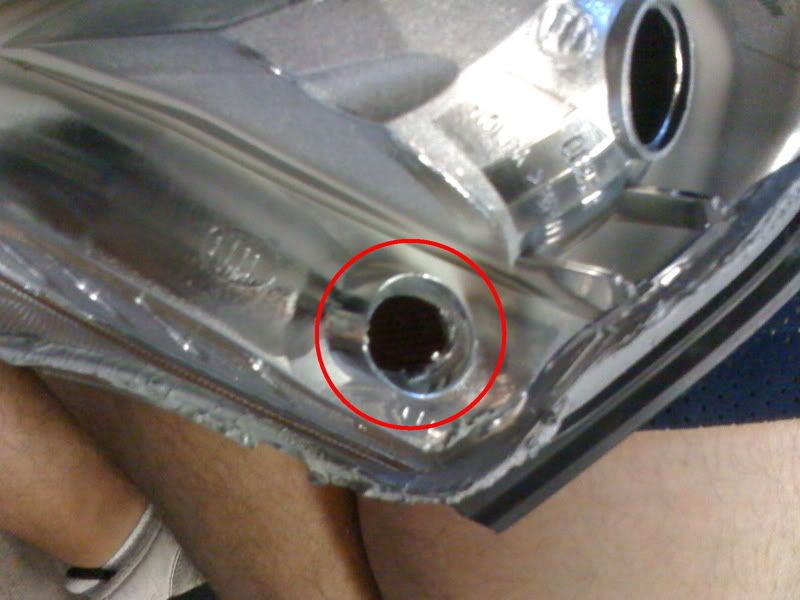
Once you have the chrome reflector and the clear housing separated, make sure not to touch the chrome or the inside of the clear housing. You want it to look clean, so hold it by the edges to keep any fingerprints off of them both. As you look at the back of the Chrome Reflector you should see the hole where the Parking Lamp goes through. Use your clean/gloved finger or a screwdriver and gently push through the hole against the Amber Diffuser.
Here is the hole for the Parking Lamp you want to go through:
STEP 6
RE-ASSEMBLY OF HOUSING
Finally! Now you have removed the Amber Diffuser and are almost done. The hardest part is over, but you still need to work carefully to ensure your work will last.
Resealing the Housing
Now it's time to put it all back together! First you have to put the Chrome Reflector and the Clear Front back together so you can screw them together. Start with the round side of the Chrome Reflector and put that side in first. Then push in the rest before screwing it back onto the Clear Front. You are screwing into plastic so don't force the screws in.
Using your Silicone Sealant put a nice thick bead in the channel of the Black Backing of the housing you cleaned so thoroughly in the last step. Re-Heat whatever grey glue is left on the Clear Housing (you want to get it warm and soft again so it will help bond the housing closed again). Then starting from the sharp inside corner of the housing, put the two halves of the housing back together. I started with the sharp corner because it fits right into place and makes it easy to guide the rest of it together. Make sure you snap all the clips along the seem back together to help hold it in place during drying. Once you have them back together, press them firmly to work the Silicone into the seems. Secure the Housing with clamps so that they can dry properly. ALLOW 24 HOURS TO DRY indoors away from humidity and weather.
Here is everything drying overnight:

I covered the car overnight cause I didn't want it sitting out like this:
STEP 7
PUTTING YOUR BABY BACK TOGETHER!
A lot of members have said that you should test the housing in a steamy bathroom to make sure its all sealed up. The only problem is you have to tape up all the holes and can't really be sure if you've taped it up all the way. It's a good idea so if you like you can do that before starting to put it all back together.
This next part should be pretty self explanatory. Just reverse the instructions to put the car back together. Make sure you remember to reconnect all the bulbs in the Headlight Housing, put all the snap-clips back in, and put all the bolts back in. I've done this a couple times and almost always forget about the bolts in the wheel well infront of the tires. Make sure someone is around to help you put the bumper back on as well. I did it by myself but trust me, its much easier with an extra set of hands.
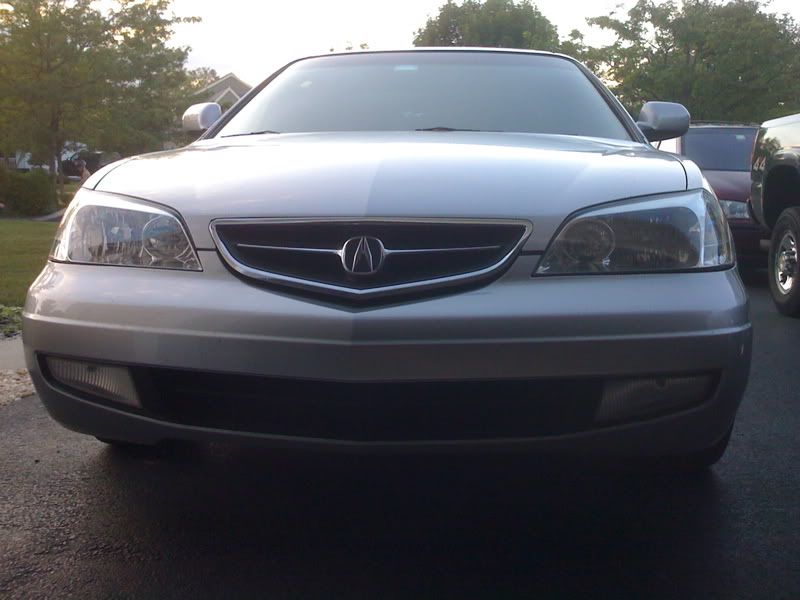
So I hope this helps anyone who is thinking about doing this mod. I debated for a long time if I was going to do it, and the results are amazing! I love the way it looks:
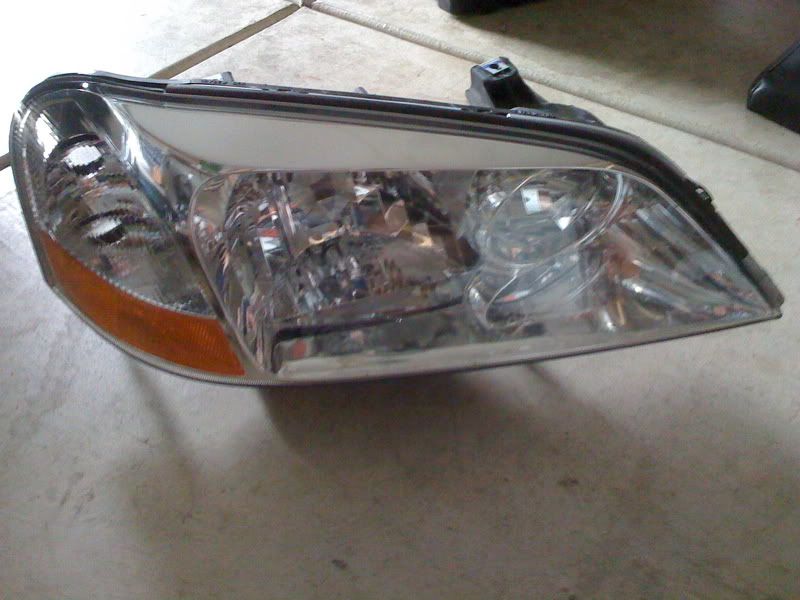
BEFORE
AFTER
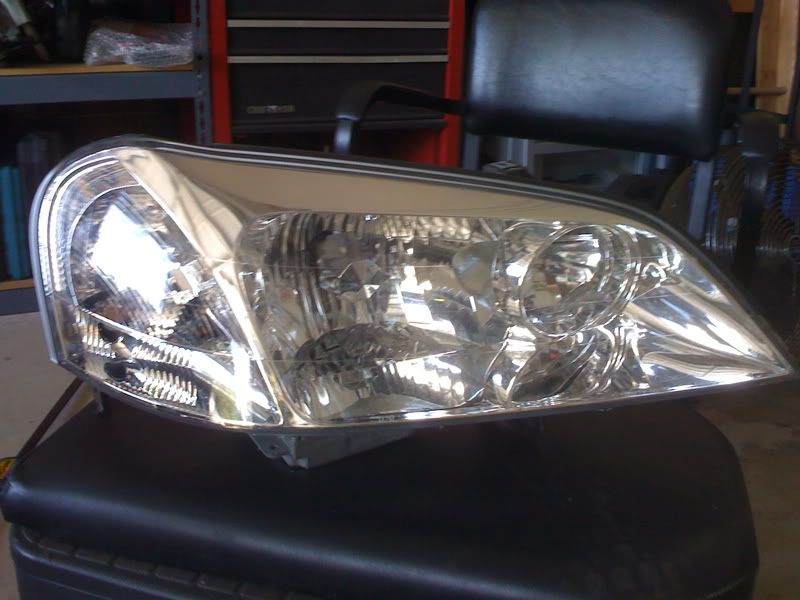
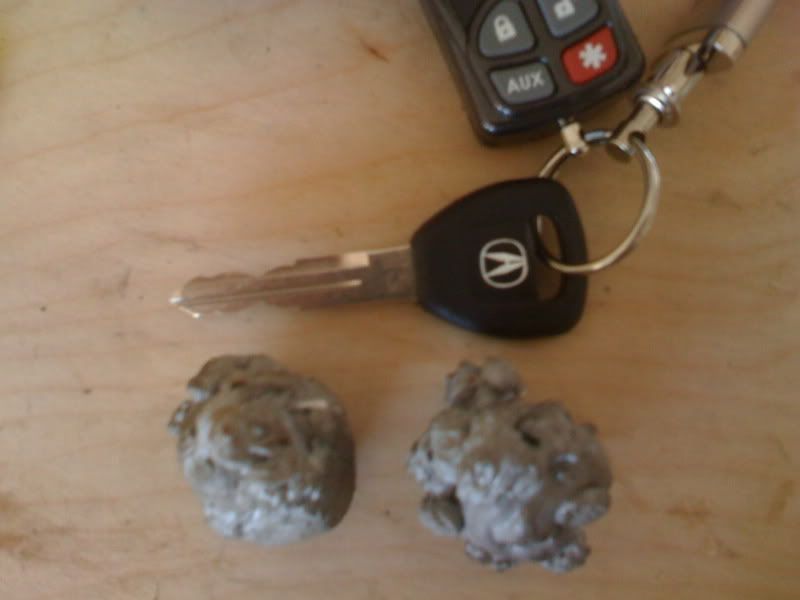
It just takes some time and patience to get the results you want:

All the glue that came out of the housings!
MATERIALS
Flathead Screwdriver
Phillips Screwdriver
Medium Star Screwdriver
Silicone Sealant (I used an RTV waterproof/weatherproof silicon sealant)
10mm socket (long socket or an extension will help)
Clamps (when re-sealing housings)
Heat Gun (no oven heating here)
Razor or putty knife (scraping old adhesive from housing)
A buddy with a little free time (another set of hands makes this process much easier)
A well ventilated area (melting glue and fresh silicon can get to you)
STEP 1
BUMPER REMOVAL
Remove Bumper
It doesn't really matter which order you remove the bolts and snap clips as long as you remove them all or else you wonder why the bumper isn't coming off.
Bottom of Bumper
There are four(4) snap-clips and two(2) 10mm bolts on the bottom side of the bumper. To remove the snap-clips just use the flathead screwdriver to pop the flat part of the clip up and then the whole clip will pop out. I put all the clips/bolts for the bottom of the bumper in a zip-lock bag so i didn't mix them up with the other clips/bolts.
Here are the two(2) clips on the driver's side of the bumper:
Here is the 10mm bolt on the right (you can also see one of the two clips from the previous step on the left side. I just circled that to you give you a reference point for the 10mm bolt:
Top of Bumper
There are eight(8) snap-clips on the top of the bumper holding the radiator shroud to the bumper.
This is what you should see when you lift the hood. The black piece running along the top of the headlights across the bumper and covering the radiator is the shroud you are going to remove in this part:
Here are the five(5) clips in the middle of the shroud (the blue circle with an 'x' is where a few screws are that you'll remove in the next part of the bumper removal):
Here are the two(2) clips on the driver's side:
Here is the one(1) clip on the passenger side:
Once you have removed all the clips the shroud should come right off. Just set it aside where you won't trip over it.
Once the shroud is off, there are three screws right on top of the bumper in the middle (where the bumper comes to a point under the hood latch). These were a pain in the ass to remove because they had never been unscrewed. Make sure you don't strip them. I actually had to drill out the two smaller ones on the left and right because they were rusted in place. As long as you can salvage the bigger one in the middle that is all you really need.
Once again I put all the clips from the top of the bumper in a zip-lock so I didn't mix them up when putting it all back together.
Side of Bumper
The final bolts you need to remove before you can take the bumper off are located on the sides of the bumper right in front of the two front tires. These are 10mm bolts like the two under the bumper.
Here is the driver's side bolt. They are right in front of the tire, if you have trouble reaching them with a socket, try turning the wheel to get better access to them:
Now that you have all the bolts/clips removed you can slide the bumper off. It's a little tricky to do by yourself so if you were able to wrangle a buddy into helping you than this is a good time for him/her to step up and make himself/herself useful. Once the bumper is off, you should have something like this:
Alright, now the bumper is off! Believe it or not that was the simplest part. But its all business after this, set the bumper where it won't get in the way and where the weather won't get to it either. It's gonna be off for at least a day so inside is your best bet. I just took it down to the basement so it wasn't taking up room in the garage.
STEP 2
BUMPER/HEADLIGHT BRACKET REMOVAL
Remove Brackets
With the bumper now off you will see a metal bracket underneath each headlight. Each bracket is held in place with three(3) 10mm bolts. If you have a socket extension, it will help on these.
Here is the one(1) on the outside of the driver's side headlight:
Here are the two(2) underneath the headlight:
Got those out no problem right? The ones on the bottom are a bitch cause the threads are so long and take forever to unbolt with the limited space to ratchet back and forth... Well now its time to take out the headlights.
STEP 3
HEADLIGHT REMOVAL
Remove Headlights
Now that the brackets are removed there are only two more bolts holding the headlights in place. The headlights are wedged in there pretty good, but make sure you support them with your other hand (or call back your buddy) while you unbolt them.
These are the two bolts located on the top of the driver's headlight:
Unplug/Remove Bulbs
Once you've got the bolts out, you just have to disconnect all the bulbs in the headlight housing. There are four total. The High Beam, Low Beam (HID), Turn Signal, and Parking Lamp. The High Beam is locked in place. All you have to do is look at the orientation of the thread and turn the bulb to unlock it. It takes some muscle so don't be afraid to give it a little oomph. The Low Beam (HID) is really simple. You can't remove the bulb itself, you have to unplug the power harness from where it connects to the back of the housing. Just push down on the clip and it slides right off.
Here is the back of the headlight housing from above. The High Beam is on the left (turn and it pops out), and the Low Beam (HID) is on the right (just unplug the power):
The last two bulbs are the same as the High Beam Bulb was, you just turn to unlock and they pull right out.
Here is the Turn Signal (on the top of the picture), and the Parking Lamp (the bottom of the picture):
Make sure that you tuck the bulbs back so they don't swing around or get in your way when you have to re-install everything. Be careful not pull too hard or bang them around, or else you're gonna be shopping for some new bulbs.
Alright so now you have all the bulbs removed and you can take the housing out of the frame! Set both the housings somewhere comfortable for you to work cause the next steps are going to be time consuming.
STEP 4
REMOVE HID BULBS
Remove HID Bulb
Now it sounds simple but the bulbs are locked in the housing to keep them away from moisture and dirt. Flip the headlight housing around so you can see the back of it. It should look like this:
Now if you look closer you'll see a warning sticker and the dust/moisture shield where the HID Bulb is housed. At the top of the housing you'll see a small star screw. Once you unscrew this the back cover will rotate to unlock and then pop right off.
Here is a closer look at the back of the HID Bulb housing (the star screw is circled at the top):
Once you have the cover off you can see the HID Bulb and the wiring, etc. There is a metal clip that holds the bulb in place. The metal clip latches right underneath where the wires connect to the bulbs harness. Push it down to release the bulbe and slowly pull the bulb out! Be careful! These are expensive bulbs so take your time taking them out! Once the bulb is out you have to turn the bulb in the harness to unlock it, then pull it out of the harness. MAKE SURE NOT TO TOUCH THE BULB! You can ruin it if you touch it with your hands.
Here is the back of the Bulb harness with the cover off:
Once you have the bulbs out make sure you set them aside somewhere where you will not damage them. That could be a costly mistake!
STEP 5
CLEARING HOUSING/REMOVING AMBER DIFFUSER
Open Headlight Housing
Now that you have Headlight Housing removed and the HID bulb is out you can begin the process of Clearing it (removing the amber diffuser from the corner). In this step you are going to need the Heat Gun, your buddies hands, and that flathead screwdriver again. Out of all the steps this is the most tedious. I can't stress enough how careful you need to be on this step. If you rush through, or you're not thorough in your work you may have problems with moisture getting into the housing. So please, take your time and remember that this is the most important step.
I found it easiest to start from the inside corner of the headlight first (the sharp corner on the opposite side of the amber diffuser). Find the seam where the grey sealant is visible between the black backing of the housing and the clear front. Heat it slowly with the Heat Gun making sure not to stay in one spot too long. It really doesn't take too long to heat the glue. To see if the glue is getting soft, just place the flathead screwdriver between the seam and turn it (don't pry or else you'll bend the plastic). If the glue is warm enough you will see the seam spread apart very easily. Continue to work your way down the seam slowly, heating the glue and twisting with the screwdriver to work the seam open. Once you or your buddy can get a good grip on the seam with your fingers, slowly pull it open while the other uses the heat gun to keep the glue warm. If you take your time and work your way around the housing, once your buddy starts pulling it apart the additional heat will make it very easy to pull apart. Just remember, TAKE YOUR TIME! You don't want to break anything.
Here is my buddy pulling it apart while I keep the glue warm with the Heat Gun:
Cleaning/Removing Old Glue
Now, hopefully without too much trouble you've pulled the Black Backing and the Clear Front of the housing apart. In one hand you should have the back of the Housing which has a deep channel going all the way round the endge of it that is full of the grey glue. Then in the other you have the clear front of the Housing that also has the greay glue all around the edge. Now you have some clean up work to do before you can go any further. I almost made the mistake of not cleaning up the glue first. Trust me, do it while it's warm and get as much of it off as you can.
Keep the glue warm with the Heat Gun for easy removal:
Use the Flathead Screwdriver to scrape out the excess grey glue from the channel:
The Black Backing should look like this (this is the hardest part to get clean, but the most important. You need a clean channel so that you can put fresh silicon sealant in it for a tight bond):
Make sure you take your time on this part! All this extra grey glue needs to come off for a nice clean seal later:
The front of the housing shouldn't be as messy. The most important part about this half of the housing is to get the inside edge clean so that when you remove the chrome reflector, you won't get any glue on the chrome.
Removing Amber Diffuser
Once you have removed as much of the glue as you can, it's time to take out that Amber Diffuser! Make sure you're hands are clean or you put some new gloves on so that you don't get anything on the inside of the lens when removing the diffuser.
As you look at the inside of the Clear Housing you will see two screws at the bottom of the chrome reflector. Be careful when unscrewing these two screws. The chrome reflector is fragile so don't bend it or put too much pressure while unscrewing them.
Here are the two screws behind the chrome reflector:
Once you have the chrome reflector and the clear housing separated, make sure not to touch the chrome or the inside of the clear housing. You want it to look clean, so hold it by the edges to keep any fingerprints off of them both. As you look at the back of the Chrome Reflector you should see the hole where the Parking Lamp goes through. Use your clean/gloved finger or a screwdriver and gently push through the hole against the Amber Diffuser.
Here is the hole for the Parking Lamp you want to go through:
STEP 6
RE-ASSEMBLY OF HOUSING
Finally! Now you have removed the Amber Diffuser and are almost done. The hardest part is over, but you still need to work carefully to ensure your work will last.
Resealing the Housing
Now it's time to put it all back together! First you have to put the Chrome Reflector and the Clear Front back together so you can screw them together. Start with the round side of the Chrome Reflector and put that side in first. Then push in the rest before screwing it back onto the Clear Front. You are screwing into plastic so don't force the screws in.
Using your Silicone Sealant put a nice thick bead in the channel of the Black Backing of the housing you cleaned so thoroughly in the last step. Re-Heat whatever grey glue is left on the Clear Housing (you want to get it warm and soft again so it will help bond the housing closed again). Then starting from the sharp inside corner of the housing, put the two halves of the housing back together. I started with the sharp corner because it fits right into place and makes it easy to guide the rest of it together. Make sure you snap all the clips along the seem back together to help hold it in place during drying. Once you have them back together, press them firmly to work the Silicone into the seems. Secure the Housing with clamps so that they can dry properly. ALLOW 24 HOURS TO DRY indoors away from humidity and weather.
Here is everything drying overnight:
I covered the car overnight cause I didn't want it sitting out like this:
STEP 7
PUTTING YOUR BABY BACK TOGETHER!
A lot of members have said that you should test the housing in a steamy bathroom to make sure its all sealed up. The only problem is you have to tape up all the holes and can't really be sure if you've taped it up all the way. It's a good idea so if you like you can do that before starting to put it all back together.
This next part should be pretty self explanatory. Just reverse the instructions to put the car back together. Make sure you remember to reconnect all the bulbs in the Headlight Housing, put all the snap-clips back in, and put all the bolts back in. I've done this a couple times and almost always forget about the bolts in the wheel well infront of the tires. Make sure someone is around to help you put the bumper back on as well. I did it by myself but trust me, its much easier with an extra set of hands.
So I hope this helps anyone who is thinking about doing this mod. I debated for a long time if I was going to do it, and the results are amazing! I love the way it looks:
BEFORE
AFTER
It just takes some time and patience to get the results you want:
All the glue that came out of the housings!

The following 3 users liked this post by dave586270:
Trending Topics
08-11-2008, 09:03 PM
#9

Great work man, you really have a lot of patience and skill. I did mine and skipped half your steps and took it a bit too fast. I don't have any cracked pieces or moisture in the housing but I'm sure down the road ill pull them open again to reseal. A+++ on the DIY, we need more AZine members like you!
08-11-2008, 09:45 PM
#10
Whats up with RDX owners?
iTrader: (9)

Very nice writeup.
08-12-2008, 10:59 AM
#11
Heat Gun -vs- Oven
Originally Posted by JJ92799
How much difference is there using the heat gun since everyone suggest using the oven?
That heat gun has more than paid for itself. I have used it for so many projects:
~De-Badging the car
~Bake-Painting the Callipers
~Clearing the Headlights
The following users liked this post:
ryan10 (01-14-2014)
08-12-2008, 11:01 AM
#12
Originally Posted by GreenMonster
Great write up  I'll leave it here for a couple of days, but then it'll get moved into the DIY/FAQ section since it's that good !!
I'll leave it here for a couple of days, but then it'll get moved into the DIY/FAQ section since it's that good !!
08-12-2008, 11:03 AM
#13
Originally Posted by fuzzy02CLS
Good job! This can also be used as a guide to replace the HID ballast. That's clearly visible in one of your pics.
The following users liked this post:
LoeyD (04-10-2014)
08-12-2008, 07:17 PM
#18
Bye Bye CL!!!
Join Date: Apr 2005
Location: Sin City
Posts: 613
Likes: 0
Received 0 Likes
on
0 Posts
nice write up brah. I was gonna do a writeup on this when i did my headlights but to little time to do so and bein a lil lazy when i do have the time... but kudos ... I used the oven to heat up and a blow dryer as well while I was seperating my headlights.
... I used the oven to heat up and a blow dryer as well while I was seperating my headlights.
08-13-2008, 12:01 PM
#19
Originally Posted by easymoney
great write up. I think I am going to try this soon..
08-13-2008, 12:03 PM
#20
Originally Posted by cltypeSLOW
nice write up. i did the same mod to my 01 headlights before i changed to 03 headlights.
08-13-2008, 04:08 PM
#21
Don't Mess With Texas
Originally Posted by dave586270
Nice. I'm curious though, why didn't you just paint your '01s instead of buyin new ones? I mean there isn't anything else different between the '01s and the '03s are there?
i have a set of 01 headlights cleared in good condition if anyone wants them and doesnt want to mess with baking them. they have been sitting for almost a year now. no leaks or anything. just shoot me a PM.
08-14-2008, 10:54 AM
#22
Originally Posted by cltypeSLOW
there are some subtle differences, and the type of sealant i used to reseal the lamps after clearing them does not allow them to be reopened without breaking them.
i have a set of 01 headlights cleared in good condition if anyone wants them and doesnt want to mess with baking them. they have been sitting for almost a year now. no leaks or anything. just shoot me a PM.
i have a set of 01 headlights cleared in good condition if anyone wants them and doesnt want to mess with baking them. they have been sitting for almost a year now. no leaks or anything. just shoot me a PM.
08-14-2008, 04:18 PM
#23
Don't Mess With Texas
Originally Posted by dave586270
That makes sense. I didn't think about that. That's how my sealant is. I wanted to make sure there wasn't any way that moisture was getting in. I used a good amount of it and made sure it was heavy duty stuff ( P.S. I like how you casual threw in at the end that you'd sell the old ones...slick).
cleared lights look great on silver cars. trust me i know.
09-26-2008, 11:20 PM
#25
Regional Coordinator (Texas)
iTrader: (38)
great DIY. also great to know i wont have to make one. I had all the pictures ready.
I did mine in the Oven.
225 F for 15min, each headlight.
also when prying them apart, I cut the glue as i go. This way i can reuse the same glue.
I did mine in the Oven.
225 F for 15min, each headlight.
also when prying them apart, I cut the glue as i go. This way i can reuse the same glue.
11-06-2008, 10:13 AM
#26
Making offspring in
Join Date: Oct 2008
Location: AUG
Age: 41
Posts: 90
Likes: 0
Received 0 Likes
on
0 Posts
I did this two days ago and put my bumper on last night, it was a pain but makes a big difference. sanding the headlights tonight to make it pop. good write up man.
11-07-2008, 06:18 PM
#27
Senior Moderator
nice work. I've done several of these and the oven is by far the best way to go.
I also reuse the factory sealant only and have never had a problem with a seal.
I also reuse the factory sealant only and have never had a problem with a seal.
11-12-2008, 02:08 AM
#32
I really don't know if the Parking Light (below the headlights) can be a different color. I guess it would depend on the state. I mean HID fogs can range from white - purple depending on the temp, and can be orange - yellow depending on the bulbs so I guess as long as you fall somewhere in there it shouldn't matter.
11-12-2008, 02:11 AM
#33
I really wanted to do it with the oven but I was pretty freaked about the idea of putting the headlight in the oven (big $$$ if i messed it up). If I could have worked on the project with someone who was experienced I would have trusted them. But it was my first time and I wanted to be able to control the heat. I also read a lot of horror stories about people not sealing them properly after they had cleared them so I didn't take any chance and used a high quality sealant. Just glad it turned out great!
11-12-2008, 02:15 AM
#34
UPDATE ON HEADLIGHTS :thumbsup:
For anyone looking at this thread I just wanted to give an update on the headlights since I cleared them.
I'm glad to anounce the headlights are still sealed with no moisture!
Its now Winter here in Illinois and I have had no problems through all the fog, heat, rain, snow and very low temps. We dropped to like 20 the other day and they're are goin strong!
So anyone thinking about this mod, can go forward with confidence using this instructions cause it works!
 06-13-2009, 04:20 AM
#40
Yes the side marker. The marker is just an amber diffuser inside the headlight. Once you have the housing apart it literally just pops out with the slightest touch of a screwdriver. Putting the headlight back together is a little more tricky than taking it apart. As long as you take your time and re-heat the glue (oven or heat gun) it goes right back together. I used extra sealant just to be safe. Any questions feel free to pm or post. Good luck!