
JDM Taillight intall w/ tutorial

boost owns
Joined: Aug 2006
Posts: 2,367
Likes: 3
From: CT
Quoting as requested...
Originally Posted by CCColtsicehockey
Ok I installed the JDM Taillights with the amber blinkers today. It was pretty easy took me just over an hour to install them.
The bumper is held on with 3 screws. 2 in the wheel well and one on the bottome of the bumper connecting it to the back of the wheel well. Last there are two clips in the middle between the exhaust tips.
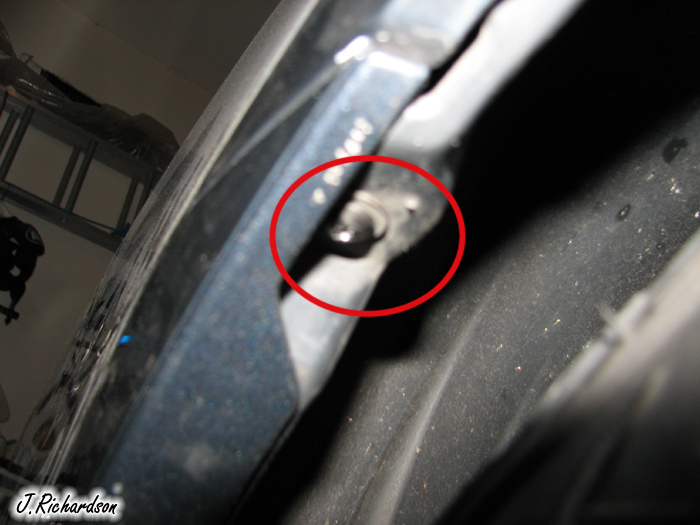
First screw that need to be removed at top of rear wheel well. One on each side of car.
Second screw that need to be reomved from the lower part of the wheel well. One on each side of car.
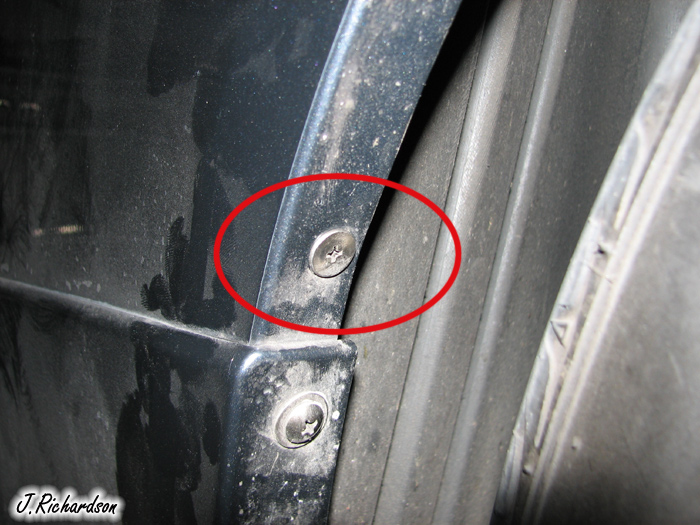
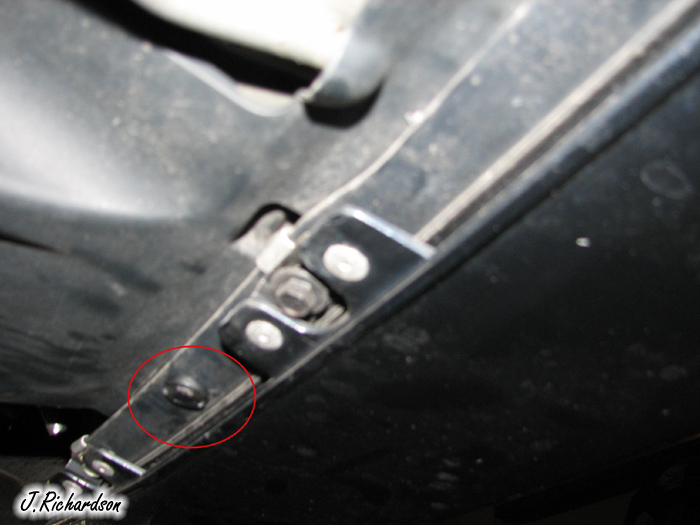
Third screw that needs to be removed on lower part of bumper about two inches in from edge of wheel well.
You need to pop of this screw to access the 10mm bolt that is behind it. One on each side.

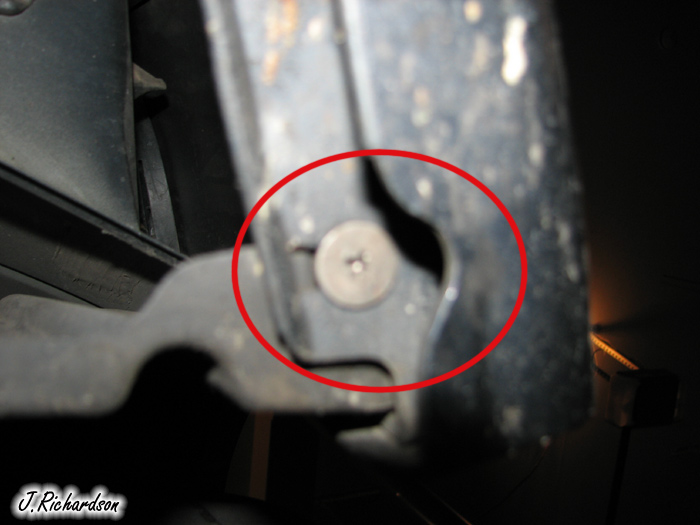
Then remove this bolt. One on each side
Then remove the two clips on the under side between the exhaust tips. There are two of them.
For those of you that have removed the front bumper the rear bumper snaps off the same way once you have all the screws, bolts, and clips off.
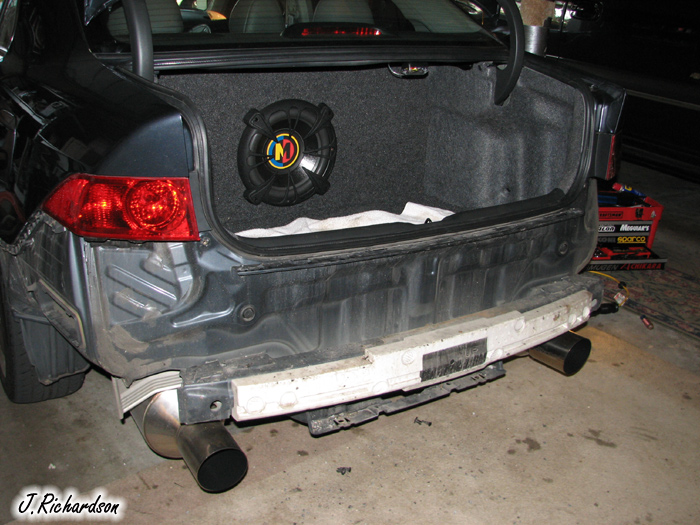
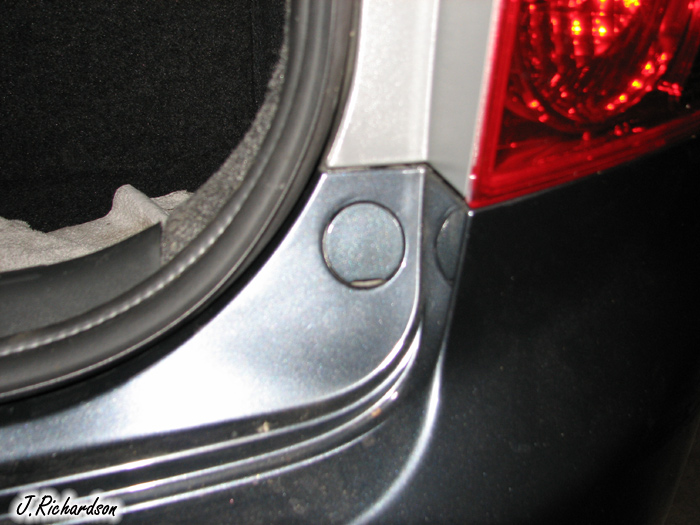
This is what you start with after the bumper is removed.
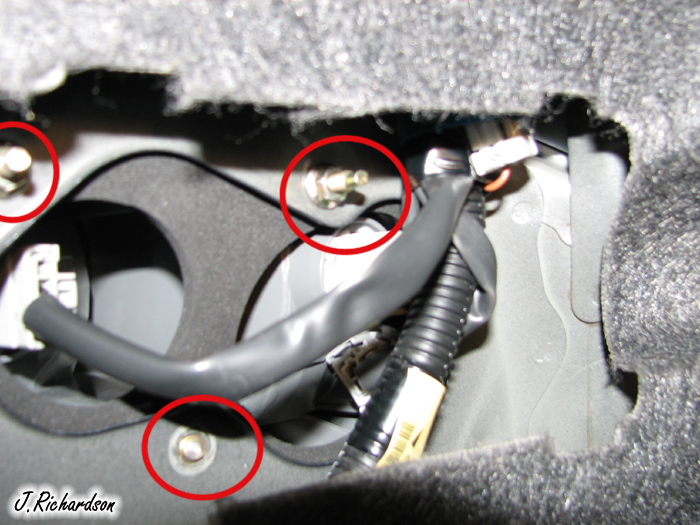
Once the bumper is off start on one side and remove the 3 8mm bolts holding the taillight on from the inside of the car and then disconnect the cables.
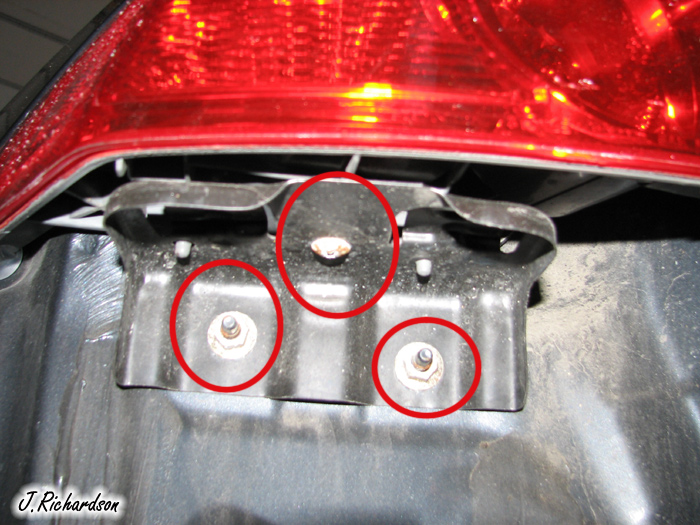
Then remove the two 10mm bolts shown here first. Then pull the taillight out and remove the screw that hold the plate to the light.
After this remove the bulbs from the original light and insert into the jdm light. Then reverse the process to install the new taillight.
Before: with factory tails
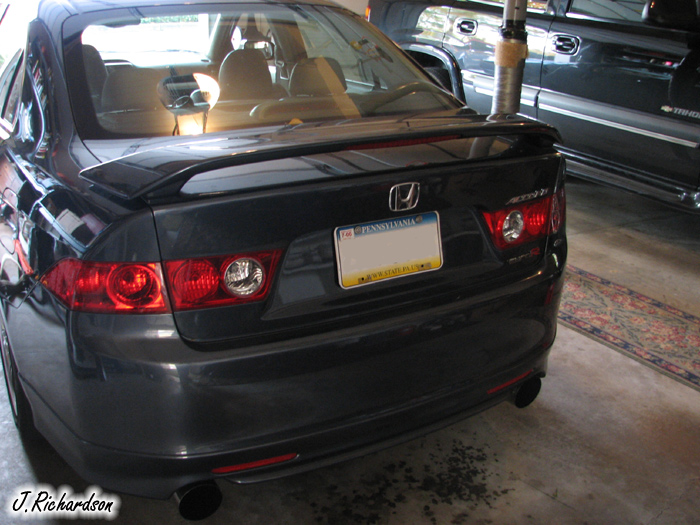
After with JDM Tails: You cant really tell that they are different at all when they are off.

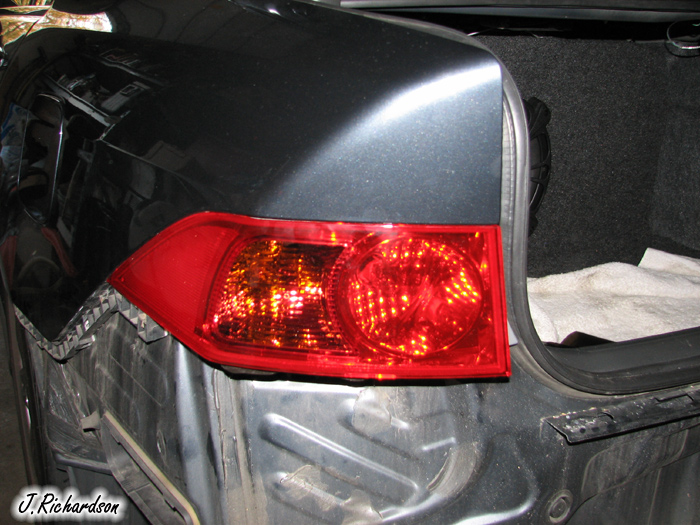
Close-Up of JDM Tail: not lit up
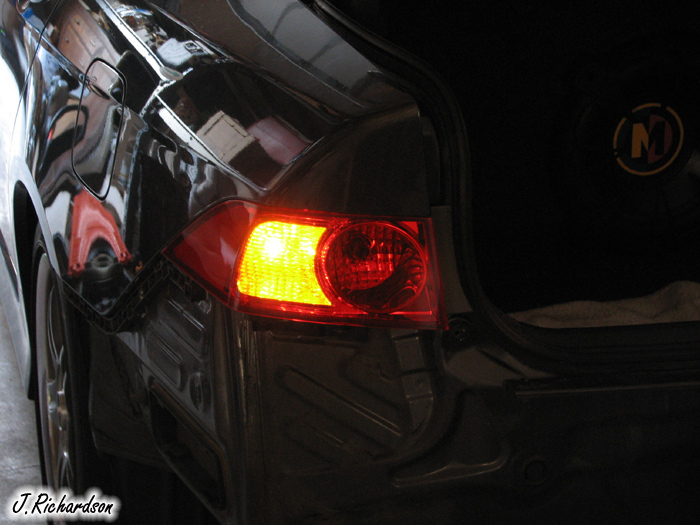
Close-Up of JDM Tail: blinker on
Well I hope this is helpful to anyone that attempts to do this.
The bumper is held on with 3 screws. 2 in the wheel well and one on the bottome of the bumper connecting it to the back of the wheel well. Last there are two clips in the middle between the exhaust tips.
First screw that need to be removed at top of rear wheel well. One on each side of car.
Second screw that need to be reomved from the lower part of the wheel well. One on each side of car.
Third screw that needs to be removed on lower part of bumper about two inches in from edge of wheel well.
You need to pop of this screw to access the 10mm bolt that is behind it. One on each side.
Then remove this bolt. One on each side
Then remove the two clips on the under side between the exhaust tips. There are two of them.
For those of you that have removed the front bumper the rear bumper snaps off the same way once you have all the screws, bolts, and clips off.
This is what you start with after the bumper is removed.
Once the bumper is off start on one side and remove the 3 8mm bolts holding the taillight on from the inside of the car and then disconnect the cables.
Then remove the two 10mm bolts shown here first. Then pull the taillight out and remove the screw that hold the plate to the light.
After this remove the bulbs from the original light and insert into the jdm light. Then reverse the process to install the new taillight.
Before: with factory tails
After with JDM Tails: You cant really tell that they are different at all when they are off.
Close-Up of JDM Tail: not lit up
Close-Up of JDM Tail: blinker on
Well I hope this is helpful to anyone that attempts to do this.
I installed mine last night, it took me almost 2 hours to this. I had to do all by myself  , I just couldn't wait till the weekend for a helping hand. Anyway, the tutorial was pretty easy to follow. I just memorized which bolts and clips to remove and it was fairly easy. I like how the amber now match the side markers on our cars.
I took pictures, but they look similar to CCC's. So they're not really worth seeing. It was already dark when I was finishing up, but this morning I noticed a small gap between the bumper and rear tailights on the passenger side (it kinda sticks out about 1-2 cmm). It's not very noticeable, but it's there. Comparing how perfectly the driver side bumper panel looks. In general, do any of you have this fitment problem? I think that tiny gap was there before I did the install, but now my mind is probably playing tricks on me. I don't know, I might just take off the bumper over the weekend and try to see if I can adjust it for a perfect fitment.
, I just couldn't wait till the weekend for a helping hand. Anyway, the tutorial was pretty easy to follow. I just memorized which bolts and clips to remove and it was fairly easy. I like how the amber now match the side markers on our cars. I took pictures, but they look similar to CCC's. So they're not really worth seeing. It was already dark when I was finishing up, but this morning I noticed a small gap between the bumper and rear tailights on the passenger side (it kinda sticks out about 1-2 cmm). It's not very noticeable, but it's there. Comparing how perfectly the driver side bumper panel looks. In general, do any of you have this fitment problem? I think that tiny gap was there before I did the install, but now my mind is probably playing tricks on me. I don't know, I might just take off the bumper over the weekend and try to see if I can adjust it for a perfect fitment.
Thread Starter
Moderator
Regional Coordinator (Southeast)
Regional Coordinator (Southeast)


Joined: Dec 2003
Posts: 44,123
Likes: 4,434
From: Mooresville, NC
Glad the tutorial helped.
I havent noticed any fitment issues with mine at all. Might want to double check that you have the bumper completely clipped in.
I havent noticed any fitment issues with mine at all. Might want to double check that you have the bumper completely clipped in.
Originally Posted by CCColtsicehockey
Glad the tutorial helped.
I havent noticed any fitment issues with mine at all. Might want to double check that you have the bumper completely clipped in.
I havent noticed any fitment issues with mine at all. Might want to double check that you have the bumper completely clipped in.
boost owns
Joined: Aug 2006
Posts: 2,367
Likes: 3
From: CT
Originally Posted by CCColtsicehockey
Glad the tutorial helped.
I havent noticed any fitment issues with mine at all. Might want to double check that you have the bumper completely clipped in.
I havent noticed any fitment issues with mine at all. Might want to double check that you have the bumper completely clipped in.
Good work on the install, jrock!

boost owns
Joined: Aug 2006
Posts: 2,367
Likes: 3
From: CT
C'mon! Nobody can give me a general idea of how the rear bumper comes off? I know I have to remove the screws + clips, but after that, does it just drop off? Pop out? Is it a pain to do alone, or am I better off having a buddy to help?
I already plan to lay down a big towel so that the bumper does not get scratched on the ground.
I already plan to lay down a big towel so that the bumper does not get scratched on the ground.
Thread Starter
Moderator
Regional Coordinator (Southeast)
Regional Coordinator (Southeast)
Joined: Dec 2003
Posts: 44,123
Likes: 4,434
From: Mooresville, NC
Originally Posted by Audioserf
C'mon! Nobody can give me a general idea of how the rear bumper comes off? I know I have to remove the screws + clips, but after that, does it just drop off? Pop out? Is it a pain to do alone, or am I better off having a buddy to help?
I already plan to lay down a big towel so that the bumper does not get scratched on the ground.
I already plan to lay down a big towel so that the bumper does not get scratched on the ground.
boost owns
Joined: Aug 2006
Posts: 2,367
Likes: 3
From: CT
Originally Posted by CCColtsicehockey
you just pull it off. have you taken the front bumper off. there are a couple of preasure clips right under the side of each light that old each side on so you have to pull a little but you wont break anything. other than that it just comes right off after you remove those screws and clips in my tutorial.
The lights fit perfectly, and I love the look of the amber in person. I can't wait for it to get dark tonight so I can go joyride just to signal, haha.
Now to sell my USDM tails, or maybe find a good LED retrofitter and get my G35 on...
boost owns
Joined: Aug 2006
Posts: 2,367
Likes: 3
From: CT
Originally Posted by ArcticBlue.
I can't seem to remove the plastic clips on the bottom of the bumper, anyone? tips?
Hope that helps!

Intermediate
Joined: Oct 2006
Posts: 31
Likes: 0
From: Arlington, VA
Does anyone know how to reinstall a tail light? It's the piece that wraps around the back of the car on the Driver Side? I busted my tail light and need to install a spare. I ordered the spare online and just need to install. Thakns for help!

Instructor
Joined: May 2007
Posts: 245
Likes: 3
Originally Posted by dlgold
Does anyone know how to reinstall a tail light? It's the piece that wraps around the back of the car on the Driver Side? I busted my tail light and need to install a spare. I ordered the spare online and just need to install. Thakns for help!
The overall parts are identical.
You had to pass over the installation instructions to post, that is just lazy.
Intermediate
Joined: Oct 2006
Posts: 31
Likes: 0
From: Arlington, VA
thanks dick. if you read page 1 of the thread you'd see that it just covers removing the bumper which is a pre-req for removing tail lights. The author does NOT go into removing the side panel tail light and re-installing it
Instructor
Joined: May 2007
Posts: 245
Likes: 3
Originally Posted by CCColtsicehockey
Once the bumper is off start on one side and remove the 3 8mm bolts holding the taillight on from the inside of the car and then disconnect the cables.
Then remove the two 10mm bolts shown here first. Then pull the taillight out and remove the screw that hold the plate to the light.
After this remove the bulbs from the original light and insert into the jdm light. Then reverse the process to install the new taillight.
Still have a question on how to do it? Now it is on page one and three. If you need more help, you should just take it to the dealer.
Thread Starter
Moderator
Regional Coordinator (Southeast)
Regional Coordinator (Southeast)
Joined: Dec 2003
Posts: 44,123
Likes: 4,434
From: Mooresville, NC
Originally Posted by Mskierki
Still have a question on how to do it? Now it is on page one and three. If you need more help, you should just take it to the dealer.

 really pretty comical that you apparently can't read and need your hand held so just take it to the dealer.
boost owns
Joined: Aug 2006
Posts: 2,367
Likes: 3
From: CT
It's especially funny how combative and angry he became when that was pointed out.
This tutorial is great, I used it to put in my JDM tails last spring. Very helpful and doesn't leave anything out. Thanks again CCC.
This tutorial is great, I used it to put in my JDM tails last spring. Very helpful and doesn't leave anything out. Thanks again CCC.

Still Lovin my 06
Joined: Nov 2005
Posts: 2,772
Likes: 1
From: West Orange, NJ
Originally Posted by dP-
Anyone have their OEM taillight (right outer) and willing to sell to me? My right one was broken this weekend... 
Still Lovin my 06
Joined: Nov 2005
Posts: 2,772
Likes: 1
From: West Orange, NJ
Originally Posted by dlgold
Does anyone know how to reinstall a tail light? It's the piece that wraps around the back of the car on the Driver Side? I busted my tail light and need to install a spare. I ordered the spare online and just need to install. Thakns for help!
Hey anybody want to do one on the EDM rear fog lamp? We have one or two in stock now....

http://www.heeltoeauto.com/Honda-Gen...M-pr-4988.html
http://www.heeltoeauto.com/Honda-Gen...M-pr-4988.html

Instructor
Joined: Feb 2005
Posts: 155
Likes: 5
From: Toronto, ON
Originally Posted by bradykp
do you plan on installing yourself? same problem for me, and the dealer wants $115 in labor.

Thread
Thread Starter
Forum
Replies
Last Post
rp_guy
Member Cars for Sale
9
Jul 16, 2017 07:33 AM
Iakonafuji
Car Parts for Sale
4
Sep 21, 2015 02:39 PM