
JDM Taillight intall w/ tutorial

Thread Starter
Moderator
Regional Coordinator (Southeast)
Regional Coordinator (Southeast)


Joined: Dec 2003
Posts: 44,126
Likes: 4,434
From: Mooresville, NC
JDM Taillight intall w/ tutorial
Ok I installed the JDM Taillights with the amber blinkers today. It was pretty easy took me just over an hour to install them.
The bumper is held on with 3 screws. 2 in the wheel well and one on the bottome of the bumper connecting it to the back of the wheel well. Last there are two clips in the middle between the exhaust tips.
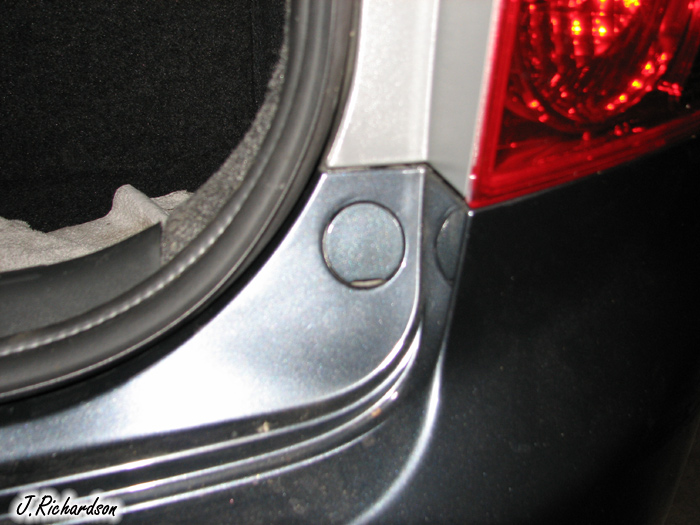
First screw that need to be removed at top of rear wheel well. One on each side of car.
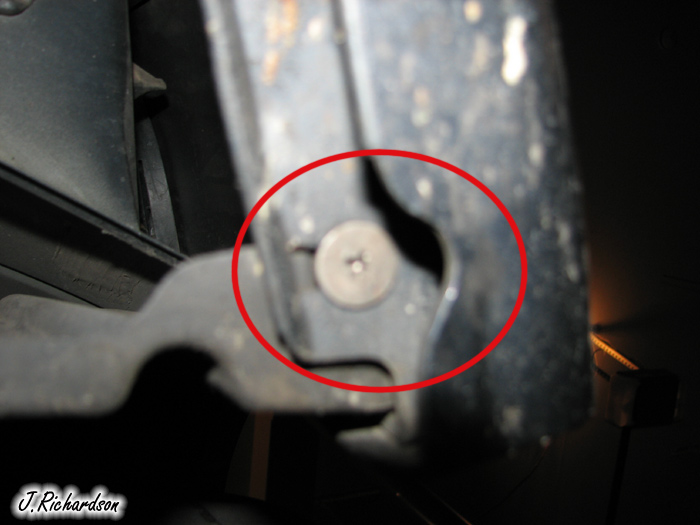
Second screw that need to be reomved from the lower part of the wheel well. One on each side of car.
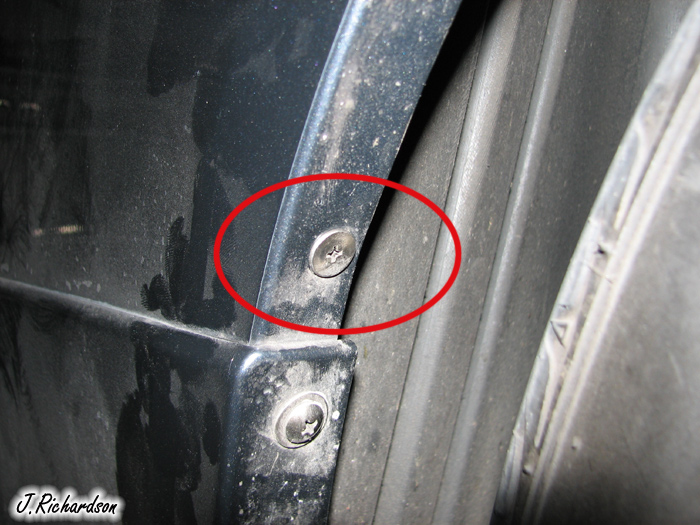
Third screw that needs to be removed on lower part of bumper about two inches in from edge of wheel well.
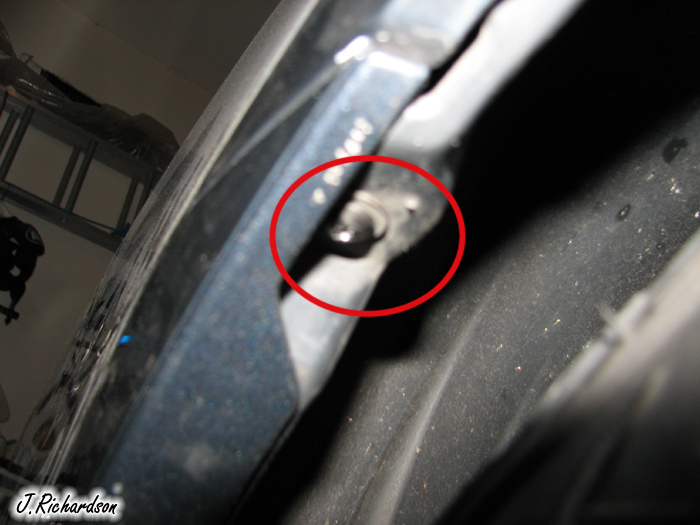
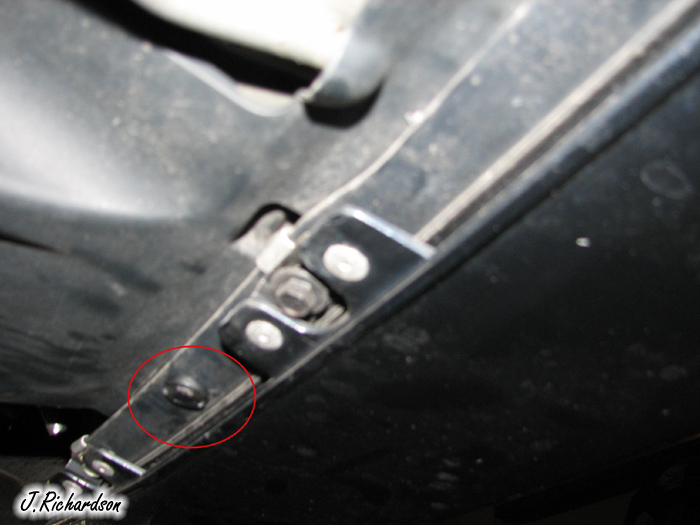
You need to pop of this screw to access the 10mm bolt that is behind it. One on each side.

Then remove this bolt. One on each side
Then remove the two clips on the under side between the exhaust tips. There are two of them.
For those of you that have removed the front bumper the rear bumper snaps off the same way once you have all the screws, bolts, and clips off.
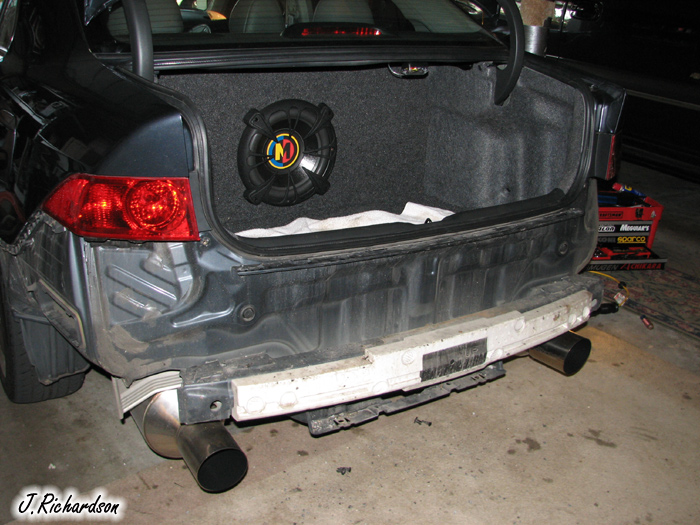
This is what you start with after the bumper is removed.
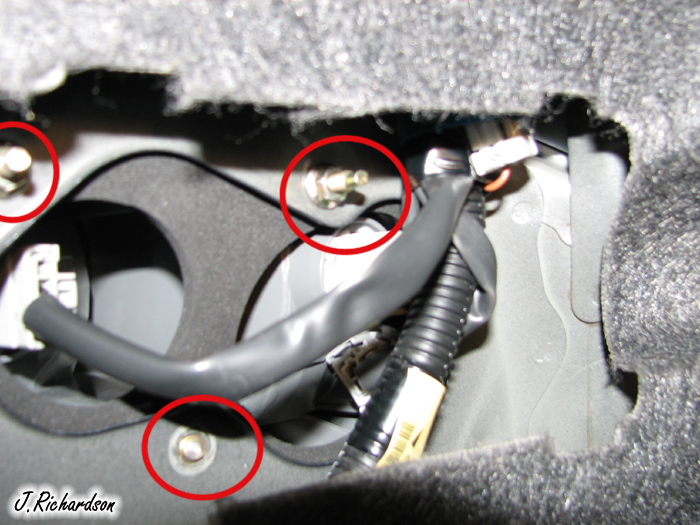
Once the bumper is off start on one side and remove the 3 8mm bolts holding the taillight on from the inside of the car and then disconnect the cables.
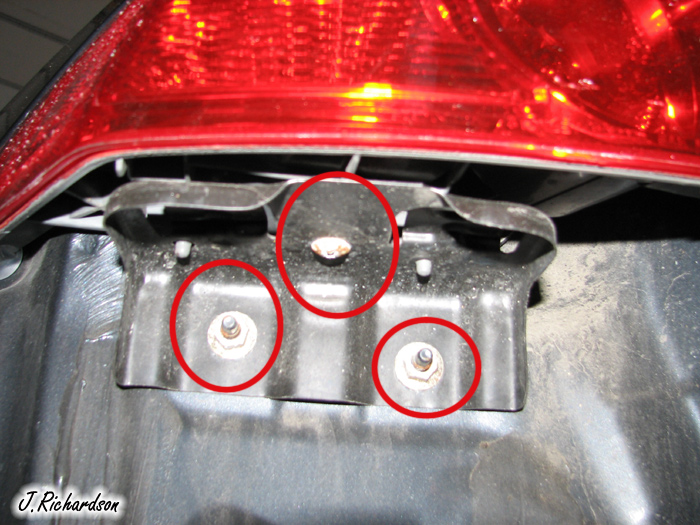
Then remove the two 10mm bolts shown here first. Then pull the taillight out and remove the screw that hold the plate to the light.
After this remove the bulbs from the original light and insert into the jdm light. Then reverse the process to install the new taillight.
Before: with factory tails
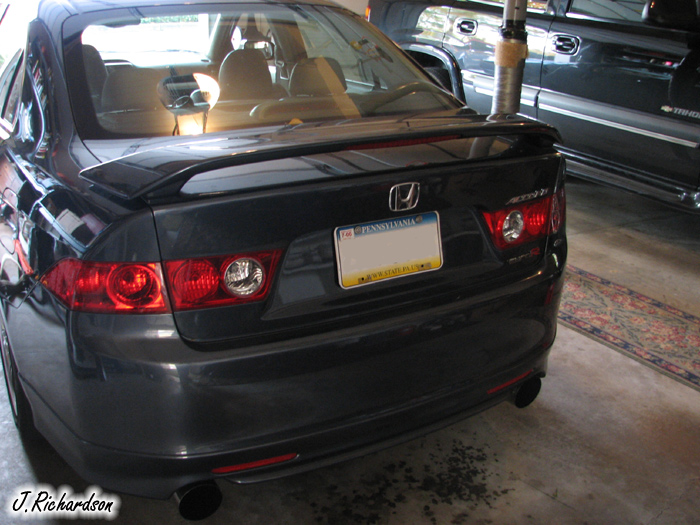
After with JDM Tails: You cant really tell that they are different at all when they are off.

Close-Up of JDM Tail: not lit up
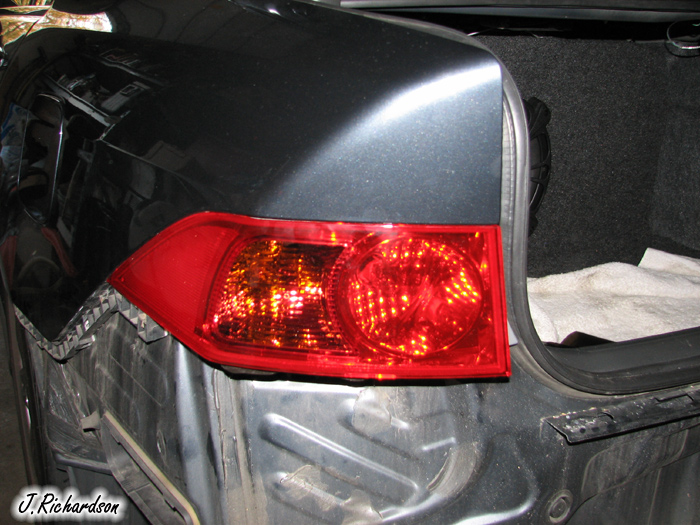
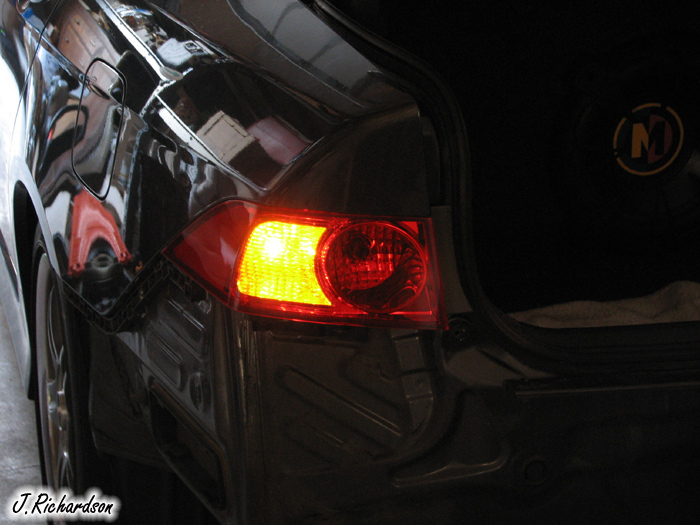
Close-Up of JDM Tail: blinker on
Well I hope this is helpful to anyone that attempts to do this.
The bumper is held on with 3 screws. 2 in the wheel well and one on the bottome of the bumper connecting it to the back of the wheel well. Last there are two clips in the middle between the exhaust tips.
First screw that need to be removed at top of rear wheel well. One on each side of car.
Second screw that need to be reomved from the lower part of the wheel well. One on each side of car.
Third screw that needs to be removed on lower part of bumper about two inches in from edge of wheel well.
You need to pop of this screw to access the 10mm bolt that is behind it. One on each side.
Then remove this bolt. One on each side
Then remove the two clips on the under side between the exhaust tips. There are two of them.
For those of you that have removed the front bumper the rear bumper snaps off the same way once you have all the screws, bolts, and clips off.
This is what you start with after the bumper is removed.
Once the bumper is off start on one side and remove the 3 8mm bolts holding the taillight on from the inside of the car and then disconnect the cables.
Then remove the two 10mm bolts shown here first. Then pull the taillight out and remove the screw that hold the plate to the light.
After this remove the bulbs from the original light and insert into the jdm light. Then reverse the process to install the new taillight.
Before: with factory tails
After with JDM Tails: You cant really tell that they are different at all when they are off.
Close-Up of JDM Tail: not lit up
Close-Up of JDM Tail: blinker on
Well I hope this is helpful to anyone that attempts to do this.
Thread Starter
Moderator
Regional Coordinator (Southeast)
Regional Coordinator (Southeast)
Joined: Dec 2003
Posts: 44,126
Likes: 4,434
From: Mooresville, NC
Originally Posted by lito
I want!  If you get a change can you take some night pics with the blinkers on.
If you get a change can you take some night pics with the blinkers on.Trending Topics


Thread Starter
Moderator
Regional Coordinator (Southeast)
Regional Coordinator (Southeast)
Joined: Dec 2003
Posts: 44,126
Likes: 4,434
From: Mooresville, NC
Originally Posted by NickR
I know you're going for the JDM look, but I think I like the USDM tails better.
Thread Starter
Moderator
Regional Coordinator (Southeast)
Regional Coordinator (Southeast)
Joined: Dec 2003
Posts: 44,126
Likes: 4,434
From: Mooresville, NC
Ok I installed the JDM Taillights with the amber blinkers today. It was pretty easy took me just over an hour to install them.
The bumper is held on with 3 screws. 2 in the wheel well and one on the bottome of the bumper connecting it to the back of the wheel well. Last there are two clips in the middle between the exhaust tips.
First screw that need to be removed at top of rear wheel well. One on each side of car.
Second screw that need to be reomved from the lower part of the wheel well. One on each side of car.
Third screw that needs to be removed on lower part of bumper about two inches in from edge of wheel well.
You need to pop of this screw to access the 10mm bolt that is behind it. One on each side.
Then remove this bolt. One on each side
Then remove the two clips on the under side between the exhaust tips. There are two of them.
For those of you that have removed the front bumper the rear bumper snaps off the same way once you have all the screws, bolts, and clips off.
This is what you start with after the bumper is removed.
Once the bumper is off start on one side and remove the 3 8mm bolts holding the taillight on from the inside of the car and then disconnect the cables.
Then remove the two 10mm bolts shown here first. Then pull the taillight out and remove the screw that hold the plate to the light.
After this remove the bulbs from the original light and insert into the jdm light. Then reverse the process to install the new taillight.
Before: with factory tails
After with JDM Tails: You cant really tell that they are different at all when they are off.
Close-Up of JDM Tail: not lit up
Close-Up of JDM Tail: blinker on
Well I hope this is helpful to anyone that attempts to do this.
Thread Starter
Moderator
Regional Coordinator (Southeast)
Regional Coordinator (Southeast)
Joined: Dec 2003
Posts: 44,126
Likes: 4,434
From: Mooresville, NC
Mods can you copy my post above and replace the original post. I rehosted all the images on my personal site so they wont go down anymore.
Thread Starter
Moderator
Regional Coordinator (Southeast)
Regional Coordinator (Southeast)
Joined: Dec 2003
Posts: 44,126
Likes: 4,434
From: Mooresville, NC
Originally Posted by WICKEDFX
Anyone ever tried using yellow led bulbs that are shaved? i'm sure you would get the same effect. anyone?

Instructor
Joined: Mar 2006
Posts: 169
Likes: 0
From: Toronto
Truthfully other than being JDM, these taillights are far more visible to other drivers.
I have a set as well as a friend and upon watching him signal at nite, its very clear and stands out unlike the oem red where it almost blends in with the rest of the taillight unit.
I have a set as well as a friend and upon watching him signal at nite, its very clear and stands out unlike the oem red where it almost blends in with the rest of the taillight unit.
boost owns
Joined: Aug 2006
Posts: 2,367
Likes: 3
From: CT
Originally Posted by Mugenpwp
Truthfully other than being JDM, these taillights are far more visible to other drivers.
I have a set as well as a friend and upon watching him signal at nite, its very clear and stands out unlike the oem red where it almost blends in with the rest of the taillight unit.
I have a set as well as a friend and upon watching him signal at nite, its very clear and stands out unlike the oem red where it almost blends in with the rest of the taillight unit.
This is definitely my next mod once I've got some money to play with.

Suzuka Master
Joined: Jul 2003
Posts: 7,594
Likes: 4
From: Cincinnati, OH
Originally Posted by Audioserf
I was just thinking that while driving in to work this morning. It's a dark, overcast day and it's probably going to snow later on. A 330i's amber signal caught my eye and I thought to myself, "I wonder what my car looks like signaling." Probably not as noticable as the amber.
This is definitely my next mod once I've got some money to play with.
This is definitely my next mod once I've got some money to play with.
boost owns
Joined: Aug 2006
Posts: 2,367
Likes: 3
From: CT
Originally Posted by moda_way
I've noticed that you can see our rear-view mirror signals from behind the car (e.g. cars in our blind spots). Kinda nice.
Any 06 owners want to chime in?

Burning Brakes
Joined: Jul 2005
Posts: 1,004
Likes: 1
From: Bayside, NY
Yeap, at night you can see it. I don't think its an 04/06 difference. I think it has to do more with the fact that at night the light just shines better. You won't notice it alot but if you're a bit to the right or on the sides (because the driver behind you is also sitting offset to the left the car), you can see the lights blink.
boost owns
Joined: Aug 2006
Posts: 2,367
Likes: 3
From: CT
Bumping because I got a great deal on some JDM tails from a fellow AZine member, have them sitting on my desk here at work, and plan to install them this weekend if weather permits. This tutorial will be invaluable. Thanks again for writing it, CCC. I can't wait to rock that amber look.


Thread Starter
Moderator
Regional Coordinator (Southeast)
Regional Coordinator (Southeast)
Joined: Dec 2003
Posts: 44,126
Likes: 4,434
From: Mooresville, NC
Originally Posted by Audioserf
Actually, the other difference is the JDMs have no side-marker bulb, just a reflector instead.
Help!
Can someone help me. I'm at work and for some reason I can't view the first page of this thread, due to some privacy settings here at work.
Can someone qoute CCC's first post so I can be able to view it. I'm about to do the install when I get home and I'd really like to see the tutorial.
Thanks in advance.
J
Can someone qoute CCC's first post so I can be able to view it. I'm about to do the install when I get home and I'd really like to see the tutorial.
Thanks in advance.
J
Originally Posted by llJrockll
Can someone help me. I'm at work and for some reason I can't view the first page of this thread, due to some privacy settings here at work.
Can someone qoute CCC's first post so I can be able to view it. I'm about to do the install when I get home and I'd really like to see the tutorial.
Thanks in advance.
J
Can someone qoute CCC's first post so I can be able to view it. I'm about to do the install when I get home and I'd really like to see the tutorial.
Thanks in advance.
J
