Drilling out side most grill for cold air?
 04-03-2008, 03:01 PM
#1
I Quit
Thread Starter
Drilling out side most grill for cold air?
Pardon if this has been posted before, if it has please direct me to that thread.
I know that somebody on here has drilled out the furthest driver side grill (small one next to fog light) for more cold air, so if you read this please chime in I am really looking for more of your answer than anything.
I was thinking of doing this same mod but I have a few questions, one being, is their a high chance of hydrolock with this mod using the CT ice box, I wouldn't think it'd be all that much higher than typical because rain would really have to travel a long way up the intake to get into the engine, but it does rain here quite often so what would the odds be?
Two, is there really any tangible gain by doing this, or is it more just for the heck of modding than anything?
I would most likely put some sort of screening material behind like that of a window screen to keep out large particulates and slow down the invasion of water, but I still have concerns. So everyone please chime in with your .02 and whether or not you would think it's actually worth it? Thanks!
 04-03-2008, 03:08 PM
#2
I've done this mod after installing the K&N Typhoon back when I was around 15K miles (I'm currently on 86,700miles). It took some time, since I was using "free-hand" to make the opening through the plastic slits of the fog light cover (I have no fogs). I used a Dremel to make the cuts, then glued on black window screen material. The screen blocks out the bugs and larger rocks. I've experienced no hydrolock. Where I live and in the rain, I do have flooded streets, but no problems.
04-03-2008, 03:15 PM
#4
^^I don't know, cause I did the mod right after I placed the CAI. I would think less air restriction from flowing to the filter would be beneficial as opposed to have a closed fog cover.
04-03-2008, 06:25 PM
#6

It's gotta help. Plus, the CT icebox's inlet faces out that way anyways. It's almost like ram air.
I just did it to my car with a dremel. Its simple to do and its free, so why not?
I just did it to my car with a dremel. Its simple to do and its free, so why not?
04-03-2008, 06:28 PM
#7
Team Owner
Originally Posted by CarbonGray Earl
It's gotta help. Plus, the CT icebox's inlet faces out that way anyways. It's almost like ram air.
I just did it to my car with a dremel. Its simple to do and its free, so why not?
I just did it to my car with a dremel. Its simple to do and its free, so why not?
Trending Topics
04-03-2008, 06:34 PM
#8
Rep'n Taxbrain.com
Join Date: Aug 2004
Location: N. Cali-forn-i-a
Age: 44
Posts: 7,075
Likes: 0
Received 3 Likes
on
3 Posts
I've done this, and if probably makes a minor difference. I could hear my intake sucking air after doing this mod though. One negative side effect is that I noticed that the air filter gets dirtier faster now. That should be expected though.
When I did the mod, I used a dremel to drill out the slits. Then I put a screen there from a screen repair kit. To attach the screen to the vent, I used a hot glue gun. It's held up nicely over the last year or so.
When I did the mod, I used a dremel to drill out the slits. Then I put a screen there from a screen repair kit. To attach the screen to the vent, I used a hot glue gun. It's held up nicely over the last year or so.
04-03-2008, 06:49 PM
#9
Originally Posted by Tsx536
One negative side effect is that I noticed that the air filter gets dirtier faster now. That should be expected though.
04-03-2008, 06:57 PM
#10
Originally Posted by jlukja
Earl, Could you detect any difference? Also, got a pic of what you did? I've been mulling over doing this too.
When I did this, I also did the TB bypass, so I'm not sure what's working here exactly.
No pics, but I basically followed what Jtso had done on one of his DIY threads for another part. Maybe his K&N install? I'll look around for ya.
04-03-2008, 07:32 PM
#11
Jan,
i was right, it was johnny's K&N install. https://acurazine.com/forums/showthread.php?t=6125
The first post, 6 pictures down is his vent. I pretty much followed that picture; just cut the slits out. I haven't installed the wire mesh yet, but will get around to doing so.
Post #6 has the dremel bit he used, same for me. I kept my dremel on max speed, and tried to cut the plastic slits as best as I can. Then I used a file to clean it up. It isn't perfect, but its barely noticeable down there. Gotta stoop down pretty low to notice any difference in appearance. Almost want to paint my air horn red to see it through the grill.
04-03-2008, 08:50 PM
#12
I Quit
Thread Starter
how about just drilling some 1/8" holes in a nice looking pattern every other slat. This would cut down on debris and possibly reduce water induction at the same time. Of course it wouldn't net the same benefit as completely removing the area. Any opinion on that?
04-03-2008, 09:50 PM
#13
Originally Posted by clee109
how about just drilling some 1/8" holes in a nice looking pattern every other slat. This would cut down on debris and possibly reduce water induction at the same time. Of course it wouldn't net the same benefit as completely removing the area. Any opinion on that?
For the effort, I'd just cut it all out.
04-03-2008, 10:08 PM
#14
heel/toe is my specialty
1. I cant see this mod making your car any more vaulnerable to hydrolock than with your regular cai setup.
2. I cant see this mod making much/if any difference on a CAI. No offence to you guys who have done it/are doing it. I cant justify hacking apart the bumper (as minor as it may be) on my "luxury" car for 0.2whp at 6900rpm (imo).
2. I cant see this mod making much/if any difference on a CAI. No offence to you guys who have done it/are doing it. I cant justify hacking apart the bumper (as minor as it may be) on my "luxury" car for 0.2whp at 6900rpm (imo).
04-03-2008, 11:40 PM
#15
Originally Posted by Red@8
I cant justify hacking apart the bumper (as minor as it may be) on my "luxury" car for 0.2whp at 6900rpm (imo).
Here's a closer shot.
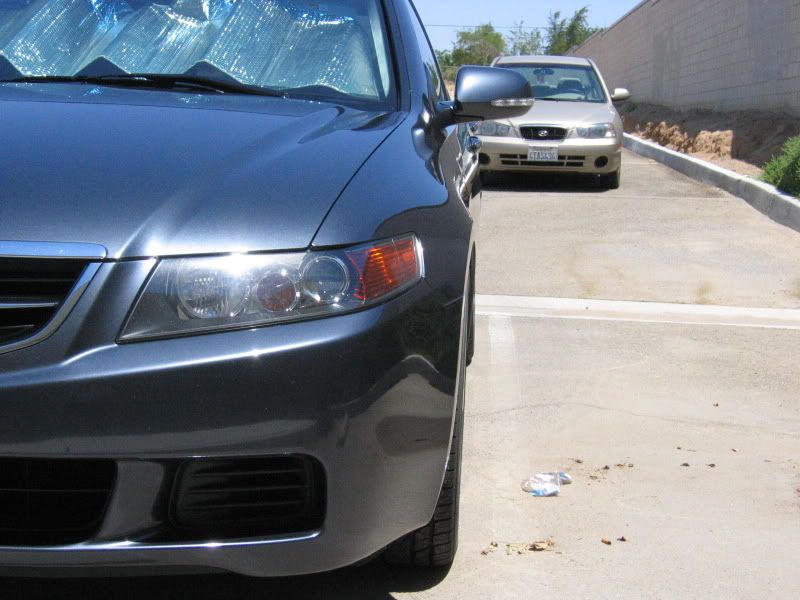
BTW, the replacement part is $12. Part # 71107-SEA-000 COVER, L. FR. BUMPER FOG
04-04-2008, 01:18 AM
#16
Originally Posted by Red@8
1. I cant see this mod making your car any more vaulnerable to hydrolock than with your regular cai setup.
2. I cant see this mod making much/if any difference on a CAI. No offence to you guys who have done it/are doing it. I cant justify hacking apart the bumper (as minor as it may be) on my "luxury" car for 0.2whp at 6900rpm (imo).
2. I cant see this mod making much/if any difference on a CAI. No offence to you guys who have done it/are doing it. I cant justify hacking apart the bumper (as minor as it may be) on my "luxury" car for 0.2whp at 6900rpm (imo).
04-04-2008, 06:40 AM
#17
boost owns
I'm considering just putting in some flat black diamond mesh grilles in both fog holes and the lower front airdam to make it look more even and sporty. I just need to find some good quality pieces because you have to be real careful - this mod walks the line between rice and 'factory sport' looking.
I'll think more about it when I convert back to CAI in the summertime. SRI for now, with all this insane rain we're getting!
I'll think more about it when I convert back to CAI in the summertime. SRI for now, with all this insane rain we're getting!
04-04-2008, 12:27 PM
#19
Team Owner
Thanks Earl. I remember seeing some detailed pics. I think I'll do what clee said first, just drill a series of holes and see how I like it. I can always go from holes to complete cutouts but not the other way around. And, yeah, the part is only $12 which cheap insurance against a hack like myself.
04-04-2008, 12:38 PM
#20
i too made slits in mine.. if you look at the back.. on the inner lining.. you'll see slits.. so my theory
the air is forced thru the slits.. thru my cai. and back out thru the slits =) lol
and as for hydrolocking.. k&n already came with a dry charger.. and i avoid large pools of water.
the air is forced thru the slits.. thru my cai. and back out thru the slits =) lol
and as for hydrolocking.. k&n already came with a dry charger.. and i avoid large pools of water.
04-04-2008, 12:48 PM
#22
Originally Posted by jlukja
Thanks Earl. I remember seeing some detailed pics. I think I'll do what clee said first, just drill a series of holes and see how I like it. I can always go from holes to complete cutouts but not the other way around. And, yeah, the part is only $12 which cheap insurance against a hack like myself.
If you'd like to feel the effect before you do anything, just take the cover off for one commute to and from work, if you can move at speed. Not too much dust or dirt out there out by you.
04-04-2008, 12:55 PM
#23
Team Owner
Originally Posted by CarbonGray Earl
If you'd like to feel the effect before you do anything, just take the cover off for one commute to and from work, if you can move at speed. Not too much dust or dirt out there out by you.
 Its so obvious I never thought of it.
  04-04-2008, 01:05 PM
#24
Originally Posted by jlukja
Its so obvious I never thought of it. I'm now wondering if I just discovered (or first person to put to post) the easiest HP DIY ever.
Sure, .02 HP, but whatever...
04-04-2008, 01:17 PM
#25
I Quit
Thread Starter
Hmm that's is a really good idea. I think I may wait for a little bit until this rain front pushes on and we get some dry weather to see what it does.
04-04-2008, 02:36 PM
#27
Originally Posted by Red@8
I stand corrected pacman - that is very stealthy!
04-04-2008, 09:42 PM
#29
A DiRTBAG decal on my
Join Date: Jul 2005
Location: Westside - SoCal
Posts: 886
Likes: 0
Received 0 Likes
on
0 Posts
I too, dremeled the grill piece and I also removed the fins inside the airbox. I have the CT Icebox + K&N.
Long drives especially going to Vegas is nice!!Especially with the HyTech
Long drives especially going to Vegas is nice!!Especially with the HyTech
04-04-2008, 10:22 PM
#30
Racer
You really have nothing to lose with this mod. It's easy; it's cheap; and yes, I do think the car breathes better.
I also used the Dremel method. This may be obvious, but you want to cut from the inside - out. I used the cone-shaped cutting head, and it worked really well.
I used hardware cloth (which is rigid 1/4" mesh) to keep the bugs out. I zip tied it to the body where the fog lights mount (as opposed to trying to attach it to the fog light cover directly).
Go for it!
04-09-2008, 06:43 PM
#31
Cruisin'

Join Date: Apr 2008
Location: Charlotte, NC
Age: 41
Posts: 16
Likes: 0
Received 0 Likes
on
0 Posts
Originally Posted by green_henry
You really have nothing to lose with this mod. It's easy; it's cheap; and yes, I do think the car breathes better.
I also used the Dremel method. This may be obvious, but you want to cut from the inside - out. I used the cone-shaped cutting head, and it worked really well.
I used hardware cloth (which is rigid 1/4" mesh) to keep the bugs out. I zip tied it to the body where the fog lights mount (as opposed to trying to attach it to the fog light cover directly).
Go for it!
I also used the Dremel method. This may be obvious, but you want to cut from the inside - out. I used the cone-shaped cutting head, and it worked really well.
I used hardware cloth (which is rigid 1/4" mesh) to keep the bugs out. I zip tied it to the body where the fog lights mount (as opposed to trying to attach it to the fog light cover directly).
Go for it!
04-09-2008, 07:02 PM
#32
Rep'n Taxbrain.com
Join Date: Aug 2004
Location: N. Cali-forn-i-a
Age: 44
Posts: 7,075
Likes: 0
Received 3 Likes
on
3 Posts
^^ I don't think there is enough room. You might be able to drill a couple of small holes but I doubt it would make enough of a difference to make it worth your while.
04-09-2008, 08:16 PM
#33
boost owns
I popped my fog cover out today to inspect it and this looks like it would be really easy. I am in the process of finding a friend with a Dremel tool I can borrow to make this happen.
04-13-2008, 10:39 AM
#34
B A N N E D
Join Date: Sep 2003
Location: Jerzey
Age: 44
Posts: 845
Likes: 0
Received 0 Likes
on
0 Posts
I drilled some holes in my cover last night. Came out alright, but a little rough around the edges. I was thinking about buying a few of these and inserting them into the holes to dress it up a little. I was going to order them in black of course.
What do you guys think?
http://www.metalgrommets.com/catalog...901f8297d4f198
What do you guys think?
http://www.metalgrommets.com/catalog...901f8297d4f198
04-13-2008, 06:33 PM
#35
iVTEC no koe
Join Date: Jul 2005
Location: Ontario
Age: 43
Posts: 1,057
Likes: 0
Received 0 Likes
on
0 Posts
Just to add to this thread for those with 04/05 TSX's. I vented my foglight cover with just an xacto knife, the plastic is relatively soft. So you don't necessarily need a Dremel.
04-13-2008, 08:00 PM
#36
boost owns
Originally Posted by HoRRo
Just to add to this thread for those with 04/05 TSX's. I vented my foglight cover with just an xacto knife, the plastic is relatively soft. So you don't necessarily need a Dremel.

Thread
Thread Starter
Forum
Replies
Last Post
rockyboy
2G RDX (2013-2018)
170
12-06-2022 02:29 PM