
Replacing A/C compressor clutch


Thread Starter
Intermediate
Joined: May 2023
Posts: 37
Likes: 4
Replacing A/C compressor clutch
I'm looking at a 2004 TSX that needs a new compressor clutch. The space between the pulley and the frame rail looks like it may or may not be possible to remove the pulley and clutch from the compressor without disconnecting the refrigerant lines and removing the compressor from the car. Does anyone know if this can be done without opening up the refrigerant system? Thanks!


^
Looks like getting at the snap ring may be difficult without it off the car?
Compressor Clutch Overhaul
Special Tools Required
A/C clutch holder, Robinair 10204 or Kent-Moore J37872, Honda Tool and Equipment KMT-J33939, commercially available
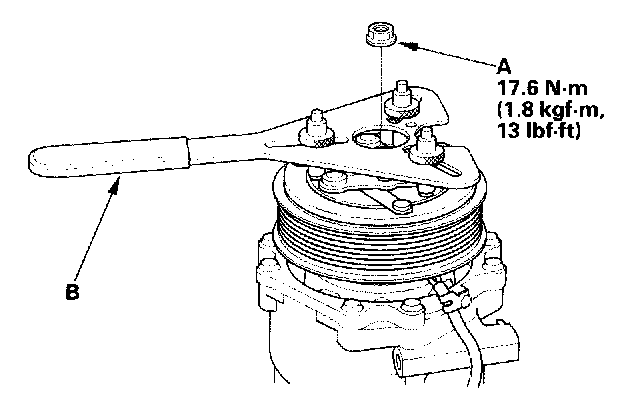
1.Remove the center nut (A) while holding the armature plate with the special tool (B).
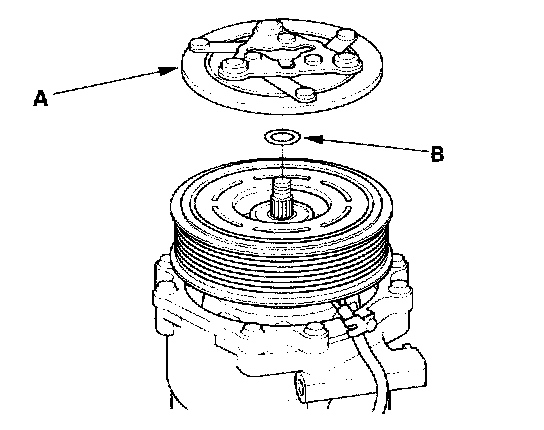
2.Remove the armature plate (A) and shim(s) (B), taking care not to lose the shim(s). If the clutch needs adjustment, increase or decrease the number and thickness of shims as necessary, then reinstall the armature plate, and recheck its clearance.
NOTE: The shims are available in four thickness: 0.1 mm, 0.2 mm, 0.4 mm and 0.5 mm.
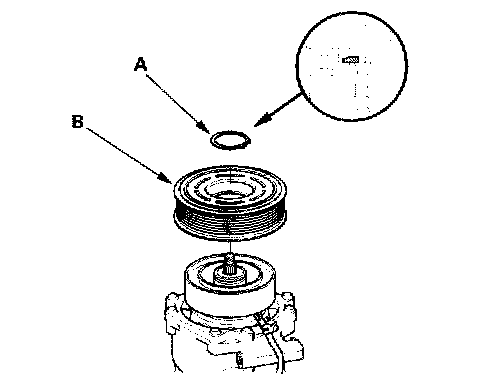
3.If you are replacing the field coil, remove the snap ring (A) with snap ring pliers, then remove the rotor pulley (B). Be careful not to damage the rotor pulley and compressor.
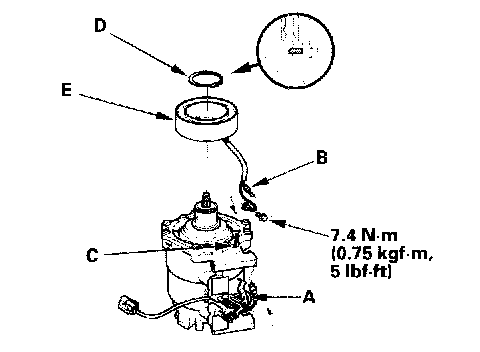
4.Remove the bolt and holder (A), then disconnect the field coil connector (B). Loosen the clamp screw (C) to free the field coil wire. Remove the snap ring (D) with snap ring pliers, then remove the field coil (E). Be careful not to damage the field coil and compressor.
5.Reassemble the clutch in the reverse order of disassembly, and note these items:
-Install the field coil with the wire side facing down, and align the boss on the field coil with the hole in the compressor.
-Clean the rotor pulley and compressor sliding surfaces with contact cleaner or other non-petroleum solvent.
-Install new snap rings, note the installation direction, and make sure they are fully seated in the groove.
-Make sure that the rotor pulley turns smoothly after it's reassembled.
-Route and clamp the wires properly or they can be damaged by the rotor pulley.
Looks like getting at the snap ring may be difficult without it off the car?
Compressor Clutch Overhaul
Special Tools Required
A/C clutch holder, Robinair 10204 or Kent-Moore J37872, Honda Tool and Equipment KMT-J33939, commercially available
1.Remove the center nut (A) while holding the armature plate with the special tool (B).
2.Remove the armature plate (A) and shim(s) (B), taking care not to lose the shim(s). If the clutch needs adjustment, increase or decrease the number and thickness of shims as necessary, then reinstall the armature plate, and recheck its clearance.
NOTE: The shims are available in four thickness: 0.1 mm, 0.2 mm, 0.4 mm and 0.5 mm.
3.If you are replacing the field coil, remove the snap ring (A) with snap ring pliers, then remove the rotor pulley (B). Be careful not to damage the rotor pulley and compressor.
4.Remove the bolt and holder (A), then disconnect the field coil connector (B). Loosen the clamp screw (C) to free the field coil wire. Remove the snap ring (D) with snap ring pliers, then remove the field coil (E). Be careful not to damage the field coil and compressor.
5.Reassemble the clutch in the reverse order of disassembly, and note these items:
-Install the field coil with the wire side facing down, and align the boss on the field coil with the hole in the compressor.
-Clean the rotor pulley and compressor sliding surfaces with contact cleaner or other non-petroleum solvent.
-Install new snap rings, note the installation direction, and make sure they are fully seated in the groove.
-Make sure that the rotor pulley turns smoothly after it's reassembled.
-Route and clamp the wires properly or they can be damaged by the rotor pulley.

Thread
Thread Starter
Forum
Replies
Last Post
Toddy
3G TL Problems & Fixes
6
Aug 28, 2012 02:16 PM