
Wiring and install of Aftermarket Speakers.

Thread Starter
Copy cat shinobi
Joined: Sep 2010
Posts: 408
Likes: 22
From: Konohagakure
Wiring and install of Aftermarket Speakers.
I think that this has taken long enough for a thread like this to develop. Meaning that I can't imagine that this thread did not exist before today.
Disclaimer-- You are ultimately responsible for missed work or damage to your vehicle. Blah blah blah,etc.
DO NOT cut any yellow wrapped looms, or tamper with the Yellow molex plugs.

The above is a picture of the one-time bass maker processor, the SRS airbag unit.
--Sidenote: this is sort of a trilogy to keep it simple. Hence the title of the thread this will dwell only on the install of speaker aspect with and without amps. I have a non tech equipped vehicle, but is the same for the most part, i checked with acura wiring diagrams.
--Also. For the most part I radically changed the audio equipment. It works for me, but for some a simple upgraded amp with a signal processor will do, the req-5 for example. I found the non tech OEM amp a "little" underpowered.
1. Removal of the doors.
All doors are fastened with lips, push pins, and screws. Rear doors have a black plastic garnish piece above the interior door panel held in by pushpins, that pops out. In the front, the doors have a a pillar tweeter speaker. You'll have to pop this out it is held by pushpins and disconnect the molex/harness plug
Pushpin-->
once the tweeter panels are separated the all doors have 3 screws to remove in the top and one in the middle under the armrest. Pop the door bottom of the door off with a clip tool; there is a space mid bottom of the door for this kind of tool.
Then unplug the molex that powers the courtesy light,windows, and locks may be 2 IIRC for driver side front. 1 everywhere else. If the push pins have been unseated from the door frame then lift up and towards you to get the lip off the door, if you have tinted the front windows do so with care to not scratch the film. Once the window lip is clear of the door the only thing holding the interior panel is the door handle mechanism. There is a flip-snap bracket that needs to be pinched and lifted to release the cables for the door handle and lock controls. Little bit puzzling but once you see it, it's simple. Opens like a tiny pizza box. After this 3x more you have taken all panels off the interior door.
2. Stock speakers.
At first glance they appear to look like a yellow carbon fiber, I assure you that they are not CF. These are attached by bolt w/philips head and a 2 bottom bracket prongs that holds it in place. You'll have to push down and pull towards then pull up to get the speakers to come out. They were a little "sticky" for me. Then you are left with this:

Once the speakers are out, pull the plastic plug that held the bolt on the top of the speaker out too. Depending on the speaker you chose to install, mounting depth will not be the same, you will have to make a speaker mount out of wood or polymer. I chose wood, I hate poly-resin; this is a inprogress example...

For this I took the stock speaker and traced a template and jig-sawed a 1/2inch bracket took wood glue and clamped it down over night. Obviously the center of this one needed to be cut out, and it was to acheive this.

(don't be a doof, unhook the handle and locks or it will tear the vapor barrier!)
I put mine together as seen here, I used some silicon/latex caulking around the speaker mount against the metal of the door, and that will seal the mount to the door. I used 1� inch self tapping screws to fasten with.
--I noticed afterwards that the tweeters run directly to the OEM amp, Where as I thought there was a crossover in the door. This is where it all pays off for you guys. IF you are running a crossover YOU NEED NOT install it in the door, as there is plenty of space in the mid lower center console. Just multimeter the red and white wires (both sides- tweeters use red and white)you hooked up to the Xover, just match polarity. If i had another go at it thats what I'd do.
3.Wires colors
Well this one is what held up most of the publishing of this thread. I found that the wires appear to be miss fed, positive wires on top and neg on the bottom, but instead all mixed up. I tested each speaker for push-pull polarity, and wrote it down. At the time I was just lazy and smarter than the wiring, but if the wiring is backwards, due to OEM defect, that would cause those speakers to produce cancelling sound waves.
You're gonna need to splice the connections for the new speakers to the wires listed below and match the polarity pleaz!!!
Both front tweeters = Red and white, wire to your liking if using crossover, because more than likely you are if splicing this wire or the thought of it is because you have component speakers.
At the OEM amp these are your colors go to directly to speakers, only one that you'll have to watch for is the rear driver side door. All doors have euro 6.5" basket compatability
________________________________________
FD (+) = Light blue
FD (-).... Lime green'ish teal
FP (+) = Brown
FP (-).... Grey
RD (+) = Yellow / @the door Red
RD (-).... Brown
RP (+) = Cobalt blue
RP (-).... Orange
--------------------------------------------------------
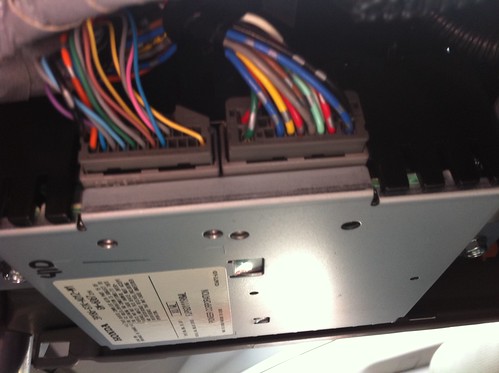
Above is a look from the Drivers floormat at the OEM amp, at the pix the Left molex 24-22awg is a signal input, the right molex is speaker out 18awg and power and ground.
BTW there are all kinds of tutorials for hooking up a signal processor on youtube. I'd parallel the wiring to the OEM amp for the signal processor IMO, also I'd just ground the signal processor to chassis nearby.
4. Wiring is done now to clean up.
Put the doors back together in the reverse order you took it apart. Depending on your accuracy and precision there are plastic shrouds that the stock speakers fit in, and those may need to be altered/removed(box-cuter works effortlessly) depending on if you can close the interior door panel back so that pushpins snap shut and the speaker aligns to the shroud.
Thats it.
My build consisted of new head-unit/CD receiver, 5 channel amp, re-wiring/wiring, and a sub. I will post more on the Amp and the head-unit install.
Disclaimer-- You are ultimately responsible for missed work or damage to your vehicle. Blah blah blah,etc.
DO NOT cut any yellow wrapped looms, or tamper with the Yellow molex plugs.
The above is a picture of the one-time bass maker processor, the SRS airbag unit.
--Sidenote: this is sort of a trilogy to keep it simple. Hence the title of the thread this will dwell only on the install of speaker aspect with and without amps. I have a non tech equipped vehicle, but is the same for the most part, i checked with acura wiring diagrams.
--Also. For the most part I radically changed the audio equipment. It works for me, but for some a simple upgraded amp with a signal processor will do, the req-5 for example. I found the non tech OEM amp a "little" underpowered.
1. Removal of the doors.
All doors are fastened with lips, push pins, and screws. Rear doors have a black plastic garnish piece above the interior door panel held in by pushpins, that pops out. In the front, the doors have a a pillar tweeter speaker. You'll have to pop this out it is held by pushpins and disconnect the molex/harness plug
Pushpin-->
once the tweeter panels are separated the all doors have 3 screws to remove in the top and one in the middle under the armrest. Pop the door bottom of the door off with a clip tool; there is a space mid bottom of the door for this kind of tool.
Then unplug the molex that powers the courtesy light,windows, and locks may be 2 IIRC for driver side front. 1 everywhere else. If the push pins have been unseated from the door frame then lift up and towards you to get the lip off the door, if you have tinted the front windows do so with care to not scratch the film. Once the window lip is clear of the door the only thing holding the interior panel is the door handle mechanism. There is a flip-snap bracket that needs to be pinched and lifted to release the cables for the door handle and lock controls. Little bit puzzling but once you see it, it's simple. Opens like a tiny pizza box. After this 3x more you have taken all panels off the interior door.
2. Stock speakers.
At first glance they appear to look like a yellow carbon fiber, I assure you that they are not CF. These are attached by bolt w/philips head and a 2 bottom bracket prongs that holds it in place. You'll have to push down and pull towards then pull up to get the speakers to come out. They were a little "sticky" for me. Then you are left with this:
Once the speakers are out, pull the plastic plug that held the bolt on the top of the speaker out too. Depending on the speaker you chose to install, mounting depth will not be the same, you will have to make a speaker mount out of wood or polymer. I chose wood, I hate poly-resin; this is a inprogress example...
For this I took the stock speaker and traced a template and jig-sawed a 1/2inch bracket took wood glue and clamped it down over night. Obviously the center of this one needed to be cut out, and it was to acheive this.
(don't be a doof, unhook the handle and locks or it will tear the vapor barrier!)
I put mine together as seen here, I used some silicon/latex caulking around the speaker mount against the metal of the door, and that will seal the mount to the door. I used 1� inch self tapping screws to fasten with.
--I noticed afterwards that the tweeters run directly to the OEM amp, Where as I thought there was a crossover in the door. This is where it all pays off for you guys. IF you are running a crossover YOU NEED NOT install it in the door, as there is plenty of space in the mid lower center console. Just multimeter the red and white wires (both sides- tweeters use red and white)you hooked up to the Xover, just match polarity. If i had another go at it thats what I'd do.
3.Wires colors
Well this one is what held up most of the publishing of this thread. I found that the wires appear to be miss fed, positive wires on top and neg on the bottom, but instead all mixed up. I tested each speaker for push-pull polarity, and wrote it down. At the time I was just lazy and smarter than the wiring, but if the wiring is backwards, due to OEM defect, that would cause those speakers to produce cancelling sound waves.
You're gonna need to splice the connections for the new speakers to the wires listed below and match the polarity pleaz!!!
Both front tweeters = Red and white, wire to your liking if using crossover, because more than likely you are if splicing this wire or the thought of it is because you have component speakers.
At the OEM amp these are your colors go to directly to speakers, only one that you'll have to watch for is the rear driver side door. All doors have euro 6.5" basket compatability
________________________________________
FD (+) = Light blue
FD (-).... Lime green'ish teal
FP (+) = Brown
FP (-).... Grey
RD (+) = Yellow / @the door Red
RD (-).... Brown
RP (+) = Cobalt blue
RP (-).... Orange
--------------------------------------------------------
Above is a look from the Drivers floormat at the OEM amp, at the pix the Left molex 24-22awg is a signal input, the right molex is speaker out 18awg and power and ground.
BTW there are all kinds of tutorials for hooking up a signal processor on youtube. I'd parallel the wiring to the OEM amp for the signal processor IMO, also I'd just ground the signal processor to chassis nearby.
4. Wiring is done now to clean up.
Put the doors back together in the reverse order you took it apart. Depending on your accuracy and precision there are plastic shrouds that the stock speakers fit in, and those may need to be altered/removed(box-cuter works effortlessly) depending on if you can close the interior door panel back so that pushpins snap shut and the speaker aligns to the shroud.
Thats it.
My build consisted of new head-unit/CD receiver, 5 channel amp, re-wiring/wiring, and a sub. I will post more on the Amp and the head-unit install.
Last edited by Kaze66218; Nov 17, 2011 at 06:55 PM.
Thread Starter
Copy cat shinobi
Joined: Sep 2010
Posts: 408
Likes: 22
From: Konohagakure
I just wanted to clarify the OEM speaker out wires are flanked by(in other words between) the red & green wires(left side)/ black & blue wires(right side) in picture
Sorry guys didn't go and mess with the stock sub it's been covered IIRC
Sorry guys didn't go and mess with the stock sub it's been covered IIRC

Instructor
Joined: Apr 2011
Posts: 201
Likes: 6
From: lost wages nv
nice.. now this is progress. since i havent been on this forum in a while, im not sure whats been added.. but i will be adding on top of your install pics here soon.. going to be doin some fiberglass work and adding some double d's
Thread Starter
Copy cat shinobi
Joined: Sep 2010
Posts: 408
Likes: 22
From: Konohagakure
@WLG, lol, My systems dun.. But I've been a lil under the weather lately(about 4-5 mths) so I've been away too. Need to get started on a poly-resin'd themed box too.
I plan to get the other threads started soon. BTW I typically (roughdraft) lay it down on paper first. Then type it up. Sorry for the wait.
Think I picked up a bad steering wheel remote. That NEEDS to be replaced and I'll post on that install separately. Too bad it's a pain in the ___ to get to now. All wires were loomed and taped as well. T_T
Thread Starter
Copy cat shinobi
Joined: Sep 2010
Posts: 408
Likes: 22
From: Konohagakure
Guess what I feel I NEED to post another thread with wiring an polarity for TECH owners too. BTW I have been gone for a wile with good new for my return.. I have correct wiring for PAC audio steering wheel controls for the RDX to post.

Trending Topics

Thread
Thread Starter
Forum
Replies
Last Post
AndrewS
Audio, Video, Electronics & Navigation
19
Mar 14, 2024 06:59 PM
cycdaniel
1G TSX Performance Parts & Modifications
8
Dec 17, 2019 10:58 AM
Soul_Deamon
Audio, Video, Electronics & Navigation
7
Nov 13, 2018 04:44 PM
trinikidcl
Car Parts for Sale
2
Sep 4, 2015 12:56 AM
acura, aftermarket, blue, caulk, connections, green, install, installing, integra, oem, rdx, speaker, speakers, wires, wiring, wiringacura