DIY- Clutch Replacement
 06-14-2006, 11:02 AM
#1
We ride RIMS!!!
Thread Starter
DIY- Clutch Replacement
Disclaimer: by using these guides, you are removing me from any liability that is related to any injury that might occur. I would suggest having a friend help you on these installs, if you are unsure about your abilities for any of these projects, get a professional to do it.
What i did: Exedy Stage 1 Clutch and ACT Lightweight Flywheel
Estimated Time: I've heard 4-6 hours... Took me 2 days w/ problems
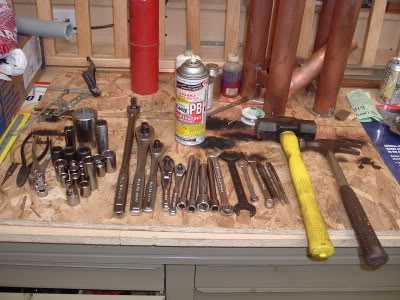
Tools: 10mm, 12mm, 14mm, 17mm, 36mm sockets. Some deepwells help. Those are the main ones used but you will use more. Make sure you have both 6 and 12 pt as well. 3/8 and 1/2 inch drive rachets come in handy. Hammers. Extensions. Breaker bar and pipes. Pry bar. Pliers. Open end wrenches.
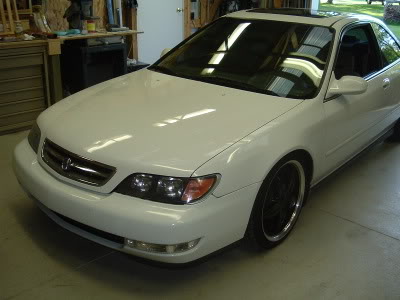
1. Start by pulling the car someplace that you can work on it.
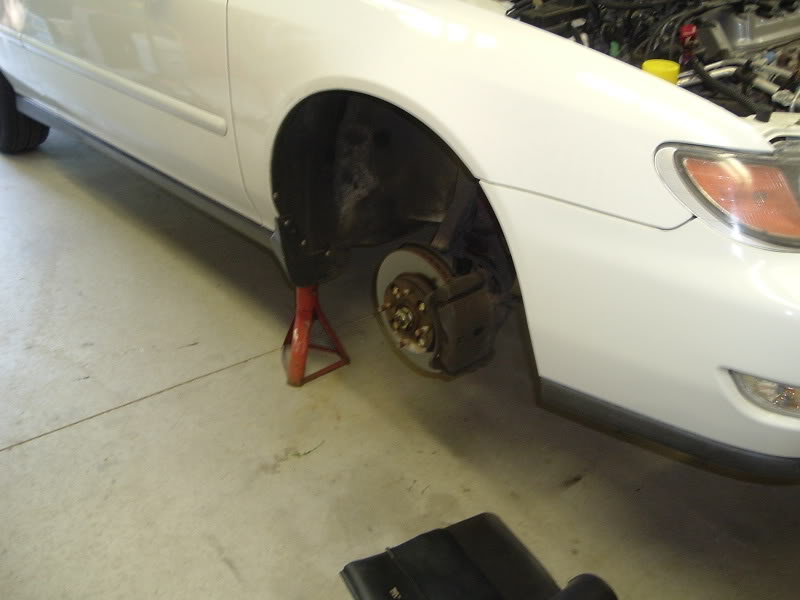
2. Put the car on jack-stands and take off both front tires.
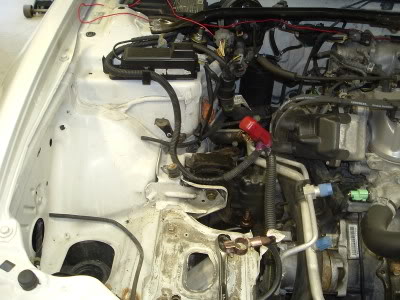
3. Open the hood. Disconnect the battery. Remove the battery from the car. You can take out the battery tray for more room. We opted to leave it in. Also take out the intake.
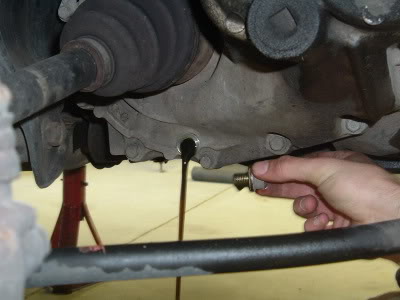
4. Drain the tranny fluid. Use a 3/8 inch drive rachet to do so.
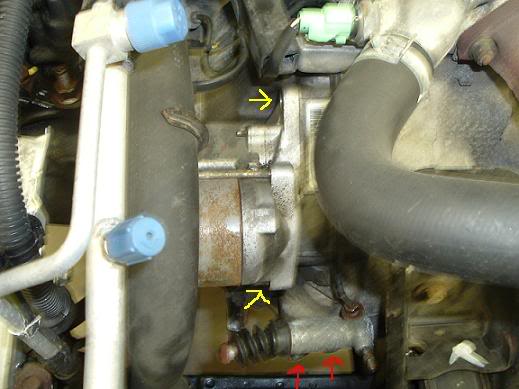
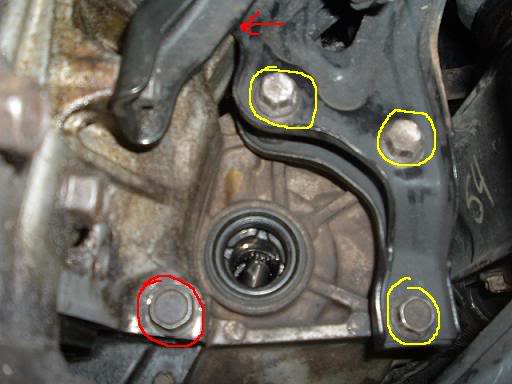
5. Disconnect the cables on the starter. (there are 2 of them) Then remove the two bolts holding the starter in. (Yellow bolts) Then remove the two bolts that hold the slave cylinder in place. (red bolts) Be careful not to bend any clutch lines!!!! Once slave is removed DO NOT operate the clutch pedal!!
6. Disconnect the back-up light switch.
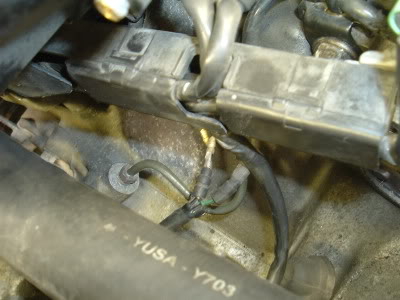
7. Remove the tranny ground and starter motor clamp cable. (sorry for the blurry pic)
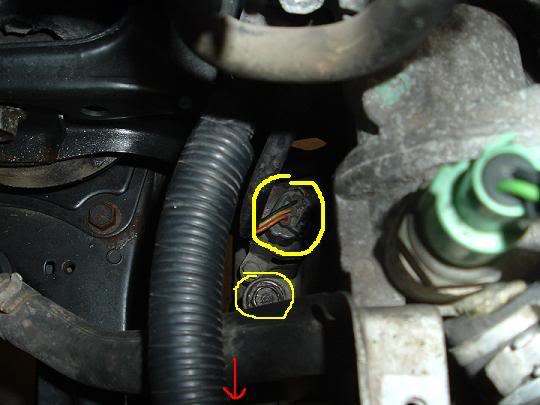
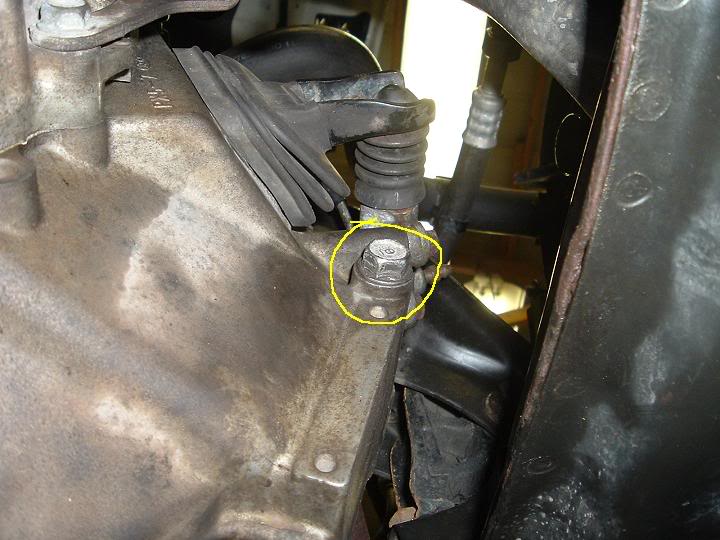
8. Disconnect the VSS (vehicle speed sensor). Then remove the wire harness clamp. (from this pic follow the black tube the direction of the red arrow until you see the clamp. Can't miss it. It's two bolts) Then after that remove the shifter cable bracket. (3 bolts. The one circled in yellow and 2 others that you can't see. Once the wire harness is out of the way its a clear shot to those) When moving the shift cable bracket DO NOT bend the lines!
9. Remove the shift cables from the tranny. (theres two of them) Remove the cotter pin, a metal washer, and then a plastic washer. Thats how it has to go back together. Then pull off the cable. (Cables in yellow)
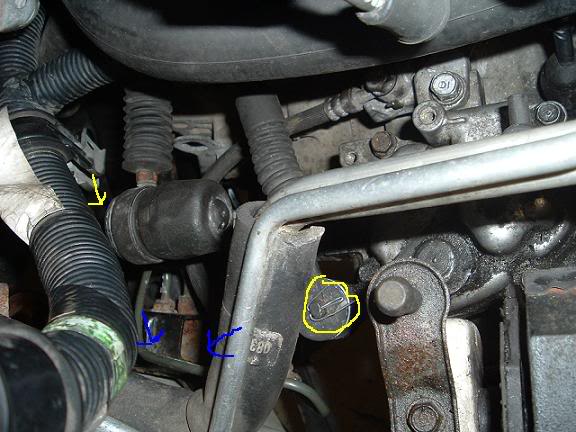
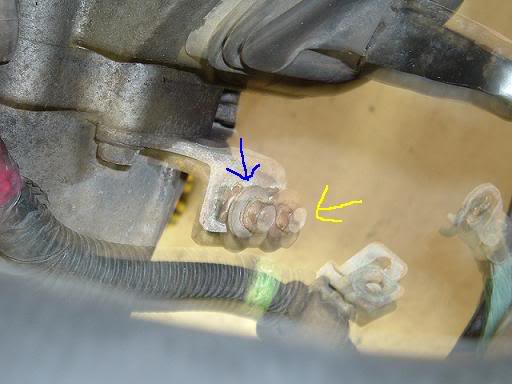
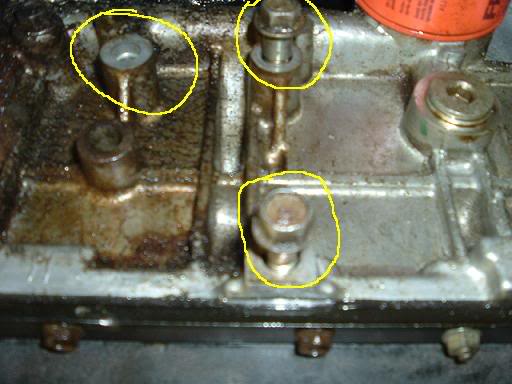
10. (Use the picture above) Remove the two bolts for the clutch damper bracket. It contains two hard lines on it. There are 2 bolts (Blue arrows) that need to be removed. DO NOT bend the hard lines!!
11. Now remove the hardline from the tranny. There should be 2 more bolts that you didnt remove before. Follow the line from the slave and you will find the two. Heres a pic of one. After you find this one keep following the line there is one more on the tranny. (yellow is the hard line)
12. Now remove the two upper tranny mounting bolts. The bolts are 17mm.(the blue circle above is one) The other one is to the left (rear of car). Use an extension to get at this one. (i couldn't get a pic to many things in the way)
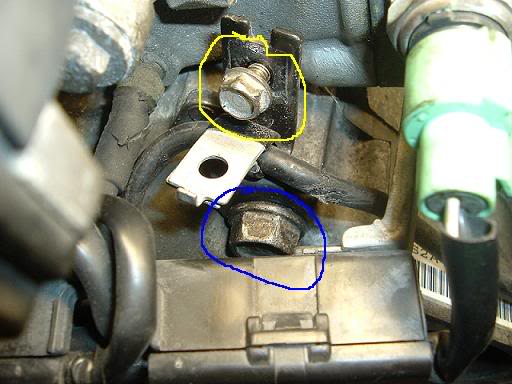
13. Now you need to remove the engine splash shield. There are 7 bolts that need to be removed. There are also 3 fastner clips that need to come out. Once all the bolts are out remove the piece and put it aside.
14. Remove the axle nuts on both sides of the car. It is a 36mm socket. If you don't have air tools you are going to need a breaker bar and pipe. Lots of torque are needed to loosen these things.
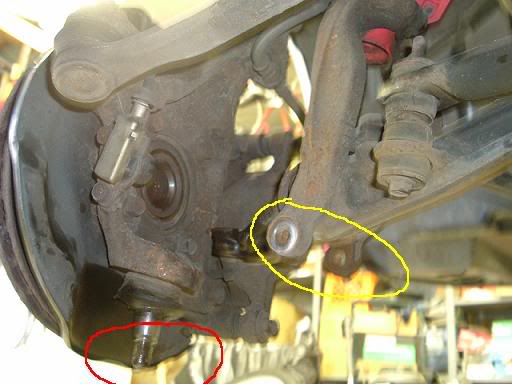
15. Remove the cotter pins and remove the castle nut for the lower ball joint on both sides. Once those are off seperate the ball joint from the lower control arm. Then remove the damper fork from the strut. (We didnt remove it all the way just the lower bolt and got the axle out fine with it still there)
16. Now remove the pass. side radius arm. There are 2 bolts on the lower control arm. Then follow it to the cross member and take that bolt out as well.

17. Remove both drive shafts. Once those are out you need to remove the intermediate shaft. (It might help to remove the driver side axle with the intermediate shaft if you are not replacing the axle. We found that it was a pain to get it out of the shaft) There are 3 bolts on the intermediate shaft that need to be removed. Once the bolts are removed the shaft should just pull out of the tranny.
18. Now remove the center beam. There are 3 bolts in the front and 2 in the rear.
19. Remove the clutch cover. It should be 3 bolts. Then it should just wiggle out.
20. Now you have to remove the intake manifold bracket. When under the car looking at the oil filter look to the pass side of the car. It is a black bracket with two bolts total holding it on. (sorry couldnt get a picture of this my camera broke)
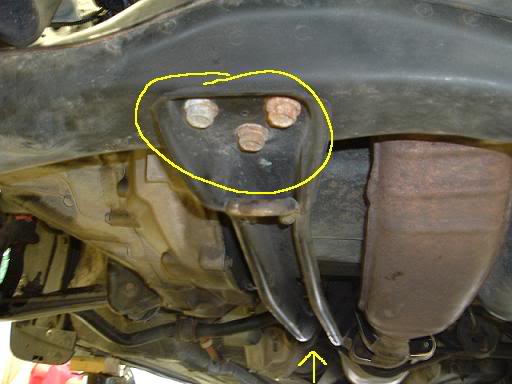
21. Remove the 3 rear mount bracket bolts. (yellow)
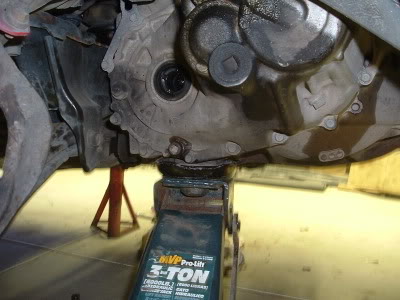
22. Place a floor jack under the tranny at this point.
23. Go under the hood and remove the top tranny mount. There are 3 bolts that go into the tranny (yellow) and the one main bolt that goes through the rubber mount. (blue) (There are also 2 bolts that hold the 2 pieces of the mount together. You could remove those to make it easier getting the mount out. We didnt and had no trouble getting it out)
24. Now remove the last 2 bolts that were by the rear mount. (red) There is also one bolt by the slave cylinder.
25. Once those are removed the tranny should be free and able to come away from the engine. Lots of wiggling and pulling and time are used here. Once the input shaft is clear of the pressure plate drop the tranny down slowly. BE SURE NOT TO BEND THE HARDLINES!!!
26. Once the tranny is away you can remove the pressure plate. It is 6 bolts. I believe it is a 10 or 12mm. YOU MUST USE A 12 PT SOCKET FOR THESE BOLTS. Once the bolts are removed pull on the plate and it should come free. Then the clutch disc should come out too.
27. If you are replacing the flywheel it is 8 bolts to get it out. These were 17mm i believe. YOU MUST USE A 12 PT SOCKET FOR THESE BOLTS. These are really tight so a air compressor helps. If not use a friend and have him hold the flywheel or find a way to get it to stop turning. IF your not getting a new flywheel you NEED to resurface the flywheel.
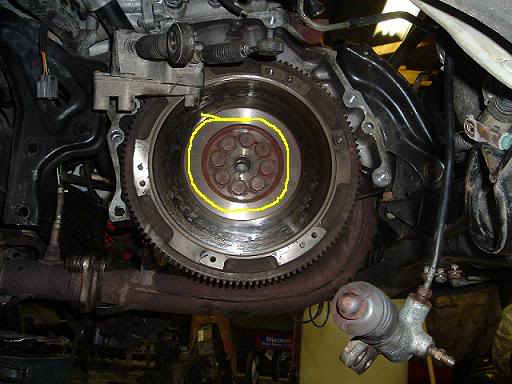
28. If you changed the flywheel torque the new one down to 75 ft lbs. Once that is done you can put the new clutch disc and pressure plate on. The pressure plate needs to be torqued to 19 ft lbs. NOTE: we found out that the alignment tool given to you in the kit doesnt work that well. Use it to get the pressure plate bolts semi-tight. Then pull the alignment tool and look into the hole. You should see equal flywheel on each side. If not your tranny wont go in. TRUST ME ON THIS ONE. We fought it for awhile. Use the alignment tool and your fist to get it closer to where is should be.
29. Once its all torqued go ahead and put the tranny back in. Go in reverse of these directions to get everything back in place. Once it is all together make sure to break in that new clutch of yours. Good luck and have fun with this one.
What i did: Exedy Stage 1 Clutch and ACT Lightweight Flywheel
Estimated Time: I've heard 4-6 hours... Took me 2 days w/ problems
Tools: 10mm, 12mm, 14mm, 17mm, 36mm sockets. Some deepwells help. Those are the main ones used but you will use more. Make sure you have both 6 and 12 pt as well. 3/8 and 1/2 inch drive rachets come in handy. Hammers. Extensions. Breaker bar and pipes. Pry bar. Pliers. Open end wrenches.
1. Start by pulling the car someplace that you can work on it.
2. Put the car on jack-stands and take off both front tires.
3. Open the hood. Disconnect the battery. Remove the battery from the car. You can take out the battery tray for more room. We opted to leave it in. Also take out the intake.
4. Drain the tranny fluid. Use a 3/8 inch drive rachet to do so.
5. Disconnect the cables on the starter. (there are 2 of them) Then remove the two bolts holding the starter in. (Yellow bolts) Then remove the two bolts that hold the slave cylinder in place. (red bolts) Be careful not to bend any clutch lines!!!! Once slave is removed DO NOT operate the clutch pedal!!
6. Disconnect the back-up light switch.
7. Remove the tranny ground and starter motor clamp cable. (sorry for the blurry pic)
8. Disconnect the VSS (vehicle speed sensor). Then remove the wire harness clamp. (from this pic follow the black tube the direction of the red arrow until you see the clamp. Can't miss it. It's two bolts) Then after that remove the shifter cable bracket. (3 bolts. The one circled in yellow and 2 others that you can't see. Once the wire harness is out of the way its a clear shot to those) When moving the shift cable bracket DO NOT bend the lines!
9. Remove the shift cables from the tranny. (theres two of them) Remove the cotter pin, a metal washer, and then a plastic washer. Thats how it has to go back together. Then pull off the cable. (Cables in yellow)
10. (Use the picture above) Remove the two bolts for the clutch damper bracket. It contains two hard lines on it. There are 2 bolts (Blue arrows) that need to be removed. DO NOT bend the hard lines!!
11. Now remove the hardline from the tranny. There should be 2 more bolts that you didnt remove before. Follow the line from the slave and you will find the two. Heres a pic of one. After you find this one keep following the line there is one more on the tranny. (yellow is the hard line)
12. Now remove the two upper tranny mounting bolts. The bolts are 17mm.(the blue circle above is one) The other one is to the left (rear of car). Use an extension to get at this one. (i couldn't get a pic to many things in the way)
13. Now you need to remove the engine splash shield. There are 7 bolts that need to be removed. There are also 3 fastner clips that need to come out. Once all the bolts are out remove the piece and put it aside.
14. Remove the axle nuts on both sides of the car. It is a 36mm socket. If you don't have air tools you are going to need a breaker bar and pipe. Lots of torque are needed to loosen these things.
15. Remove the cotter pins and remove the castle nut for the lower ball joint on both sides. Once those are off seperate the ball joint from the lower control arm. Then remove the damper fork from the strut. (We didnt remove it all the way just the lower bolt and got the axle out fine with it still there)
16. Now remove the pass. side radius arm. There are 2 bolts on the lower control arm. Then follow it to the cross member and take that bolt out as well.
17. Remove both drive shafts. Once those are out you need to remove the intermediate shaft. (It might help to remove the driver side axle with the intermediate shaft if you are not replacing the axle. We found that it was a pain to get it out of the shaft) There are 3 bolts on the intermediate shaft that need to be removed. Once the bolts are removed the shaft should just pull out of the tranny.
18. Now remove the center beam. There are 3 bolts in the front and 2 in the rear.
19. Remove the clutch cover. It should be 3 bolts. Then it should just wiggle out.
20. Now you have to remove the intake manifold bracket. When under the car looking at the oil filter look to the pass side of the car. It is a black bracket with two bolts total holding it on. (sorry couldnt get a picture of this my camera broke)
21. Remove the 3 rear mount bracket bolts. (yellow)
22. Place a floor jack under the tranny at this point.
23. Go under the hood and remove the top tranny mount. There are 3 bolts that go into the tranny (yellow) and the one main bolt that goes through the rubber mount. (blue) (There are also 2 bolts that hold the 2 pieces of the mount together. You could remove those to make it easier getting the mount out. We didnt and had no trouble getting it out)
24. Now remove the last 2 bolts that were by the rear mount. (red) There is also one bolt by the slave cylinder.
25. Once those are removed the tranny should be free and able to come away from the engine. Lots of wiggling and pulling and time are used here. Once the input shaft is clear of the pressure plate drop the tranny down slowly. BE SURE NOT TO BEND THE HARDLINES!!!
26. Once the tranny is away you can remove the pressure plate. It is 6 bolts. I believe it is a 10 or 12mm. YOU MUST USE A 12 PT SOCKET FOR THESE BOLTS. Once the bolts are removed pull on the plate and it should come free. Then the clutch disc should come out too.
27. If you are replacing the flywheel it is 8 bolts to get it out. These were 17mm i believe. YOU MUST USE A 12 PT SOCKET FOR THESE BOLTS. These are really tight so a air compressor helps. If not use a friend and have him hold the flywheel or find a way to get it to stop turning. IF your not getting a new flywheel you NEED to resurface the flywheel.
28. If you changed the flywheel torque the new one down to 75 ft lbs. Once that is done you can put the new clutch disc and pressure plate on. The pressure plate needs to be torqued to 19 ft lbs. NOTE: we found out that the alignment tool given to you in the kit doesnt work that well. Use it to get the pressure plate bolts semi-tight. Then pull the alignment tool and look into the hole. You should see equal flywheel on each side. If not your tranny wont go in. TRUST ME ON THIS ONE. We fought it for awhile. Use the alignment tool and your fist to get it closer to where is should be.
29. Once its all torqued go ahead and put the tranny back in. Go in reverse of these directions to get everything back in place. Once it is all together make sure to break in that new clutch of yours. Good luck and have fun with this one.

The following users liked this post:
TL Luver (03-14-2014)

 06-15-2006, 08:19 AM
#4
We ride RIMS!!!
Thread Starter
Thanks guys. Forgot to add this. REMEMBER TO PUT MANUAL TRANNY FLUID BACK IN!! Mine took 2 full quarts. I used the genuine honda stuff! The filler plug is just to left of the pass side axle. It is a 17mm socket!
06-15-2006, 10:46 PM
#6
We ride RIMS!!!
Thread Starter
Its really not that hard. But it is a way to get noticed. Cars are my passion i do all my own work.. (except im taking it in to get the ball joints done b4 they break) Thanks guys it was a hard time coming. Many issues to get through but its all done and it is different! BTW if there is anything else you guys want let me know. Im always down for doing things ive never done before aka the clutch!

Trending Topics
06-16-2006, 05:29 PM
#8
Pro
Join Date: Sep 2004
Location: Calgary, Canada
Age: 37
Posts: 643
Likes: 0
Received 0 Likes
on
0 Posts
Nice write-up! I don't know if I have the balls to change my clutch and flywheel myself even with detailed instructions like that. How much do most mechanics charge for this job?
06-18-2006, 03:42 PM
#9
We ride RIMS!!!
Thread Starter
Well here labor is $80 an hour.. So you have to figure they would have it for 2 days at least.. maybe? I dont think you would get out of a dealership w/o at least a $1000 spent. Not sure tho didnt ask around. I dont take my car to dealerships unless its something i cant do (like balljoints... tried no success.. $300 for both lower and alignment)
06-19-2006, 10:38 AM
#10
how handsome I am
Originally Posted by Wannarace62188
Its really not that hard. But it is a way to get noticed. Cars are my passion i do all my own work.. (except im taking it in to get the ball joints done b4 they break) Thanks guys it was a hard time coming. Many issues to get through but its all done and it is different! BTW if there is anything else you guys want let me know. Im always down for doing things ive never done before aka the clutch!
08-07-2007, 10:37 AM
#13
Racer
Join Date: Oct 2003
Location: Lakeland, FL
Age: 38
Posts: 383
Likes: 0
Received 0 Likes
on
0 Posts
Thanks for the writeup it helped out a lot when I changed mine. I also give you mad props for doing it in your garage. I did it on a lift and it was still a pain.
08-08-2007, 08:48 PM
#14
Advanced
Join Date: Aug 2007
Location: canada/montreal
Age: 50
Posts: 94
Likes: 0
Received 0 Likes
on
0 Posts
hi my car is acura 2.2 1997 i like to know is it same way to change the cluch disc?and like to know what if i only change the cluch disc not the pressure plate.
 08-12-2007, 01:13 PM
#16
Banned

Join Date: Jul 2007
Age: 42
Posts: 17
Likes: 0
Received 0 Likes
on
0 Posts
To adjust the pedal you get up under where the pedal is and there is one nut you loosen thats connecting a metal rod into the firewall. It's pretty easy to see/common sense. Then you can twist the little steel bar back or forth that goes into the firewall which adjust the pedal. Then you tighten up that little nut again. I tried this and it didn't help. I'm about to use this guide to rebuild my transmission.
I was qouted its a "estimated" $700 job from a friends shop and they would use Acura parts.
Or I could do it myself and buy a nice high performance clutch and flywheel and STILL save like $400.
I was qouted its a "estimated" $700 job from a friends shop and they would use Acura parts.
Or I could do it myself and buy a nice high performance clutch and flywheel and STILL save like $400.
08-13-2007, 09:46 AM
#18
Instructor

Join Date: Jun 2007
Location: Dayton, Ohio
Age: 37
Posts: 116
Likes: 0
Received 0 Likes
on
0 Posts
Originally Posted by acura2.2cl
some in selling brand new cluch pressureplate with kit for 90$ is it ok the person said its made in usa.
Nominated for post of the year.
 06-11-2008, 09:59 PM
#20
Drifting
first of all, nice write up. i was thinking about doing this to mine, but didn't have the information to do it. my clutch is starting to go out.
second, how do you like the feel of the clutch? how's the pedal feel in comparison to stock? i've thought about the performance clutch, but i don't want anything too grabby since it's a daily driver.
second, how do you like the feel of the clutch? how's the pedal feel in comparison to stock? i've thought about the performance clutch, but i don't want anything too grabby since it's a daily driver.
06-15-2008, 11:22 AM
#22
We ride RIMS!!!
Thread Starter
Originally Posted by mattastick
first of all, nice write up. i was thinking about doing this to mine, but didn't have the information to do it. my clutch is starting to go out.
second, how do you like the feel of the clutch? how's the pedal feel in comparison to stock? i've thought about the performance clutch, but i don't want anything too grabby since it's a daily driver.
second, how do you like the feel of the clutch? how's the pedal feel in comparison to stock? i've thought about the performance clutch, but i don't want anything too grabby since it's a daily driver.
The clutch is pretty much a stock feel. It grabs a little harder but it isnt anything crazy. For a daily driver it is perfect. If you are doing a flywheel too i wouldnt go under 10lbs for a daily driver.
 09-13-2008, 10:55 AM
#24
Jhatt from Ludhianna
Join Date: Jun 2006
Age: 53
Posts: 410
Likes: 0
Received 0 Likes
on
0 Posts
excellent write up.......just inspires a lot of us to tackle this on our own with the though that you will be there to answer/ help in case of any issues that might arise....
I am a sucker for DIY's good job all round....
and Thankx for the DIY
I am a sucker for DIY's good job all round....
and Thankx for the DIY
10-25-2008, 10:36 PM
#27
6spd FTW
Join Date: Oct 2007
Location: is everything.
Age: 36
Posts: 1,392
Likes: 0
Received 49 Likes
on
33 Posts
When we did my friend's mustang we used an air polisher with a lightly abrasive disk on it. So you could probably use light sand paper or emery cloth, not sure. The idea is just to get the glazing off as far as I know
 02-19-2011, 09:03 PM
#30
1st Gear
Join Date: Nov 2006
Location: Dayton, OH
Posts: 1
Likes: 0
Received 0 Likes
on
0 Posts
Once the tranny is out, is there anything else to replace while I'm down there?
- rear or right side seal?
- drive shafts?
'99 2.3 CL with 185,000 miles. I put on 20,000 miles a year min.
- rear or right side seal?
- drive shafts?
'99 2.3 CL with 185,000 miles. I put on 20,000 miles a year min.
02-20-2011, 02:02 PM
#31
I use my turn signals.
Join Date: Feb 2011
Location: Borelando, FLA
Posts: 65
Likes: 0
Received 0 Likes
on
0 Posts
480 - 600 in labor. Plus parts.
02-20-2011, 02:06 PM
#32
I use my turn signals.
Join Date: Feb 2011
Location: Borelando, FLA
Posts: 65
Likes: 0
Received 0 Likes
on
0 Posts
Rear main seal. Check the input and output shafts to see if they are tight, you can also get repair sleeves for those i believe.
11-21-2011, 06:38 PM
#33
1st Gear

Join Date: Oct 2011
Age: 36
Posts: 1
Likes: 0
Received 0 Likes
on
0 Posts
Okay on Step #23 you say: "There are also 2 bolts that hold the 2 pieces of the mount together. You could remove those to make it easier getting the mount out. We didnt and had no trouble getting it out." -- So my question is whether or not you take the bolts out, how did you not have trouble getting it? Cause my boyfriend is having one hell of a time getting it to move more than 2 inches.... any advice on how to get it out? Or do you have an idea on what were doing or did wrong? (FYI we took all the bolts out)
03-10-2015, 03:32 PM
#34
Intermediate

Join Date: Aug 2003
Location: new york
Posts: 39
Likes: 0
Received 0 Likes
on
0 Posts
Old post but I am in the process of changing my clutch and flywheel and I cant get the transmission out. The back side toward the firewall is stubborn and does not want to move. Any tips or tricks? I pull out all the bolts. should I have to beat it with a hammer for it to move?
I get the front to move and crack from the seal but not the back.
I get the front to move and crack from the seal but not the back.


Thread
Thread Starter
Forum
Replies
Last Post
cycdaniel
1G TSX Performance Parts & Modifications
8
12-17-2019 10:58 AM
mugen_kid
Member Cars for Sale
7
11-13-2015 10:38 PM