2.2 Intake Install
 07-06-2005, 05:54 PM
#1
Senior Moderator
Thread Starter
Join Date: Jul 2002
Location: Bay Area, CA
Age: 39
Posts: 12,005
Likes: 0
Received 9 Likes
on
8 Posts
2.2 Intake Install
Disclaimer: by using these guides, you are removing me from any liability that is related to any injury that might occur. I would suggest having a friend help you on these installs, if you are unsure about your abilities for any of these projects, get a professional to do it.
Credit goes to wes (llwesman@yahoo.com) for the original guide and pics
AEM V2 Intake install
Estimated Time: ~1 hour
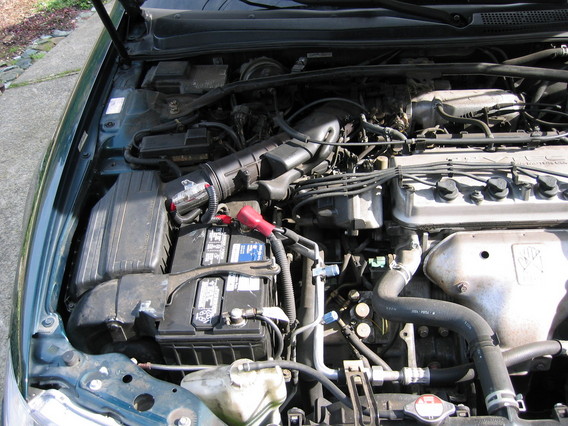
1. Here's your engine bay, if you've got a 2.2/2.3 CL. Start by lifting up your hood
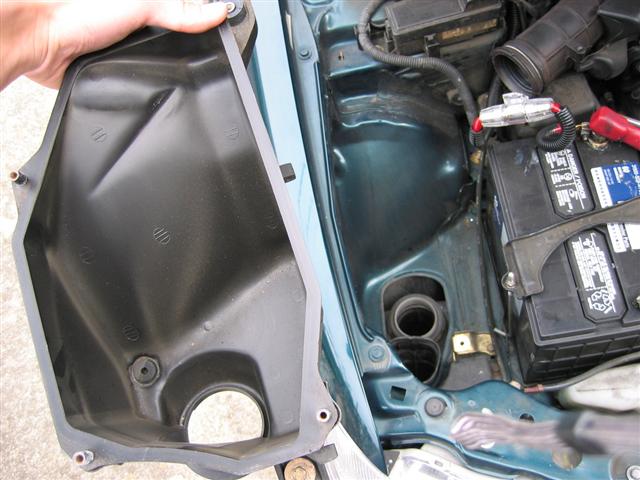
2. Next, remove this little piece of plastic, it should pull right out.

3. Disconnect these two pieces next.
4. Remove this cover with a screwdriver.
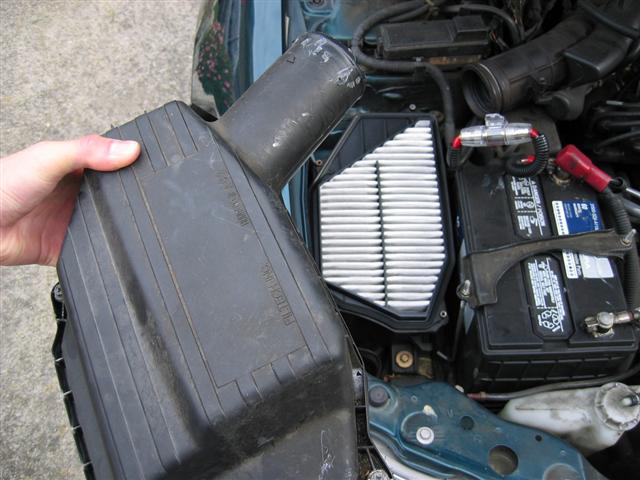
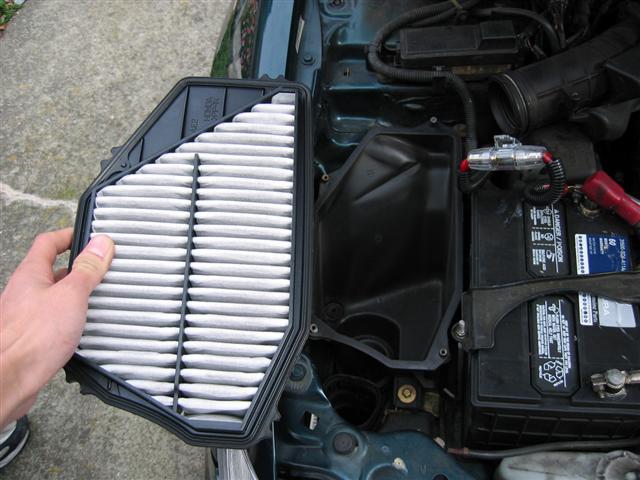
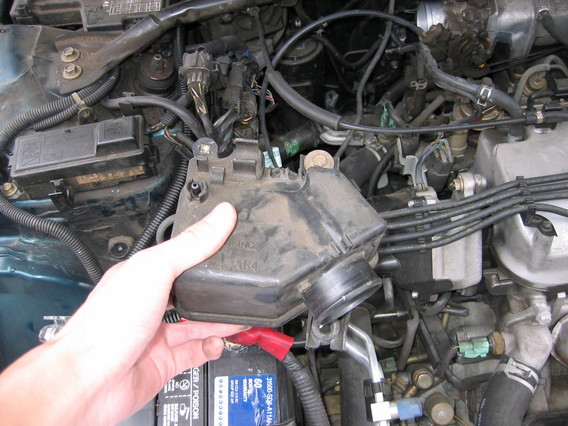
5. Remove the stock filter next, it should pull right out.
6. Next, pull this piece out.
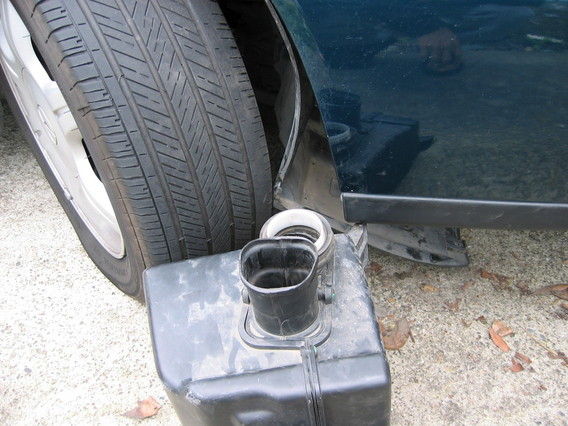
7. Then, carefully pull out the plastic plugs under the wheel well in order to access the stock air box. Be careful not to break the plugs. The wheel well should allow you to pull the air box out easily. It makes it easier if you turn the wheel away from the car as shown in the picture. If you are installing a Cold Air Intake (CAI), then leave the wheel well open, if you are installing a short ram or V2, go ahead and close it up with the plastic plugs.
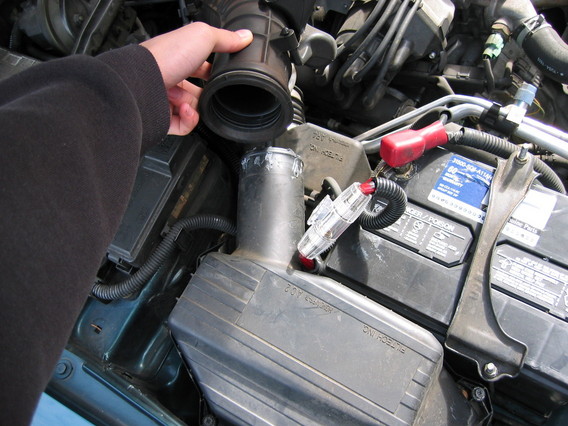
8. Next, remove this piece of plastic piping.
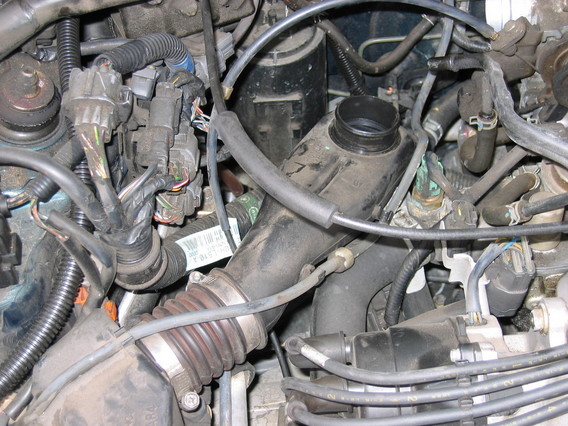
9. Then rip out this piece.
10. To finish, plug the rubber piping into the intake. It's the only thing that attaches to the intake and there's really only one place you can put it.
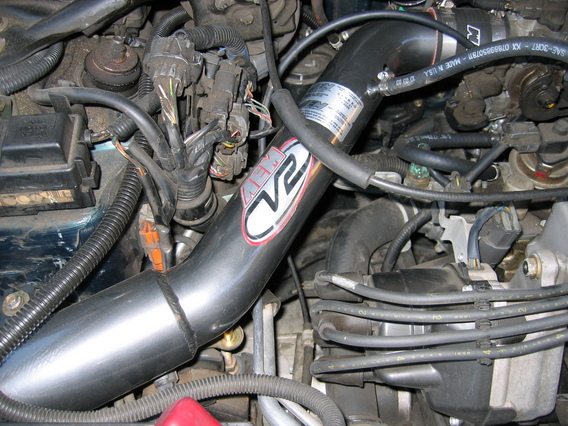
11. Next, clamp the intake to the engine bay as shown at the top of this picture. A screw/washer combination is usually included and attaches to the forked spot on the intake. In this picture the connection is partially covered by wiring.
12. Viola, there you go. Reset your ECU if you like by disconnecting the battery for about 10 min, or just leave it as is and your car will adjust in a couple weeks.
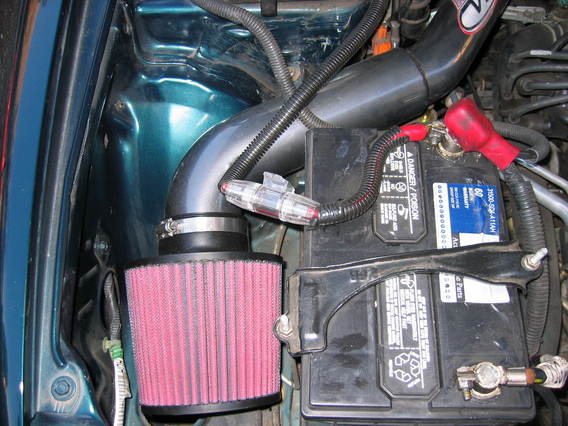
If you are installing a Cold Air Intake (CAI), install the piping as indicated, then attach the filter which sits inside the wheel well. The intake feeds directly into the hole where the old filter sat atop.
Credit goes to wes (llwesman@yahoo.com) for the original guide and pics
AEM V2 Intake install
Estimated Time: ~1 hour
1. Here's your engine bay, if you've got a 2.2/2.3 CL. Start by lifting up your hood
2. Next, remove this little piece of plastic, it should pull right out.
3. Disconnect these two pieces next.
4. Remove this cover with a screwdriver.
5. Remove the stock filter next, it should pull right out.
6. Next, pull this piece out.
7. Then, carefully pull out the plastic plugs under the wheel well in order to access the stock air box. Be careful not to break the plugs. The wheel well should allow you to pull the air box out easily. It makes it easier if you turn the wheel away from the car as shown in the picture. If you are installing a Cold Air Intake (CAI), then leave the wheel well open, if you are installing a short ram or V2, go ahead and close it up with the plastic plugs.
8. Next, remove this piece of plastic piping.
9. Then rip out this piece.
10. To finish, plug the rubber piping into the intake. It's the only thing that attaches to the intake and there's really only one place you can put it.
11. Next, clamp the intake to the engine bay as shown at the top of this picture. A screw/washer combination is usually included and attaches to the forked spot on the intake. In this picture the connection is partially covered by wiring.
12. Viola, there you go. Reset your ECU if you like by disconnecting the battery for about 10 min, or just leave it as is and your car will adjust in a couple weeks.
If you are installing a Cold Air Intake (CAI), install the piping as indicated, then attach the filter which sits inside the wheel well. The intake feeds directly into the hole where the old filter sat atop.
 07-14-2005, 07:07 PM
#3
Senior Moderator
Regional Coordinator
(Mid-Atlantic)
Regional Coordinator
(Mid-Atlantic)
iTrader: (6)
Originally Posted by LLWesMan
My left hand is pretty.
 damn sexy
  08-02-2005, 05:25 PM
#4
97 2.2CL?for how long??

Join Date: May 2004
Location: Los Angeles
Age: 41
Posts: 98
Likes: 0
Received 0 Likes
on
0 Posts
3 questions:
1)wtf is an ECU?
2)do you notice a difference in performance?
3)wtf can I get one????
I don't really understand steps 7 & 8, but if I ever get down to doing this, I might understand it then.
thanks for the post.
1)wtf is an ECU?
2)do you notice a difference in performance?
3)wtf can I get one????
I don't really understand steps 7 & 8, but if I ever get down to doing this, I might understand it then.
thanks for the post.
08-02-2005, 05:29 PM
#5
Senior Moderator
Thread Starter
Join Date: Jul 2002
Location: Bay Area, CA
Age: 39
Posts: 12,005
Likes: 0
Received 9 Likes
on
8 Posts
Originally Posted by lima
3 questions:
1)wtf is an ECU?
2)do you notice a difference in performance?
3)wtf can I get one????
I don't really understand steps 7 & 8, but if I ever get down to doing this, I might understand it then.
thanks for the post.
1)wtf is an ECU?
2)do you notice a difference in performance?
3)wtf can I get one????
I don't really understand steps 7 & 8, but if I ever get down to doing this, I might understand it then.
thanks for the post.
2) that isnt my car, but people have said that theyve noticed an increase in performance and in sound
3) theyre all over ebay
08-02-2005, 08:26 PM
#6
Senior Moderator
this DIY is awesome...used it today to install my V2. the only thing is that when u remove the resonator from the bottom, there is a bolt and a snap thingy thats keeping it in, and it takes a lil maneuvering to get the resonator out w/o lifting ur car up. Also, the clamping into the engine bay didnt line up exactly, so i screwed the bolt in slightly sideways and put rubber tubing around the screw since the 1 that came with the bolt didnt let me screw it in properly so now it sits pretty good. the tubing to connect the V2 and the tube i pulled out the stock intake also didnt match up, so i fabricated 1 with some rubber tubing, wrapped it in electrical tape and claped both sides to the hoses..works like a dream =). Great investment, even used
08-02-2005, 09:01 PM
#7
Ahhhhhhhh
Join Date: Oct 2003
Location: Bay Area, CA
Age: 37
Posts: 2,063
Likes: 0
Received 0 Likes
on
0 Posts
Originally Posted by DaInFaMMuS1
this DIY is awesome...used it today to install my V2. the only thing is that when u remove the resonator from the bottom, there is a bolt and a snap thingy thats keeping it in, and it takes a lil maneuvering to get the resonator out w/o lifting ur car up. Also, the clamping into the engine bay didnt line up exactly, so i screwed the bolt in slightly sideways and put rubber tubing around the screw since the 1 that came with the bolt didnt let me screw it in properly so now it sits pretty good. the tubing to connect the V2 and the tube i pulled out the stock intake also didnt match up, so i fabricated 1 with some rubber tubing, wrapped it in electrical tape and claped both sides to the hoses..works like a dream =). Great investment, even used
 .
.
Trending Topics
08-30-2005, 11:13 PM
#8
Advanced
Join Date: Aug 2005
Location: San Francisco
Age: 42
Posts: 86
Likes: 0
Received 0 Likes
on
0 Posts
I was trying to install the V2 intake. However, I ran into couple problems. The intake is slightly different, but essentially the same. First, I don't understand how to access the intake resonator from the wheelwell. Secondly, the piece that needs to be removed at step 9 is like a small can and I'm not sure if I could remove it or not. Then, there is this 1 cm hole on the side of the intake pipe. Manual says I should plug it in with the given rubber "nipple" but sweet jesus its hard to fit in!!!! Any ideas on this guys?? Thanks.
 09-01-2005, 02:06 PM
#10
Ahhhhhhhh
Join Date: Oct 2003
Location: Bay Area, CA
Age: 37
Posts: 2,063
Likes: 0
Received 0 Likes
on
0 Posts
Originally Posted by Slooo97CL
what piece is this, i dont remember taking that out.
and heres a pic of the v1 cai

 09-10-2005, 01:12 PM
#14
Racer
Join Date: Feb 2005
Location: New Jersey
Age: 37
Posts: 398
Likes: 0
Received 0 Likes
on
0 Posts
step 9:
that little canister has a rubber hose connected to it that connects to a little battery type thing (says 12V on it so im assuming it powers something) . am i supposed to just rip out the canister and leave the hose or rip out the canister with the hose?
that little canister has a rubber hose connected to it that connects to a little battery type thing (says 12V on it so im assuming it powers something) . am i supposed to just rip out the canister and leave the hose or rip out the canister with the hose?
09-10-2005, 01:31 PM
#15
Ahhhhhhhh
Join Date: Oct 2003
Location: Bay Area, CA
Age: 37
Posts: 2,063
Likes: 0
Received 0 Likes
on
0 Posts
Originally Posted by ninetysevencl
step 9:
that little canister has a rubber hose connected to it that connects to a little battery type thing (says 12V on it so im assuming it powers something) . am i supposed to just rip out the canister and leave the hose or rip out the canister with the hose?
that little canister has a rubber hose connected to it that connects to a little battery type thing (says 12V on it so im assuming it powers something) . am i supposed to just rip out the canister and leave the hose or rip out the canister with the hose?
02-14-2006, 09:47 AM
#17
Advanced
Join Date: Feb 2006
Age: 38
Posts: 83
Likes: 0
Received 0 Likes
on
0 Posts
I am thinking of getting a CAI (Thanks for the DIY) but I am unable to find any for the 97 2.2 cl.
I have done a fair amount of searching but have come up empty handed. Is the 97 accord F22b1 the exact same? To be totally redundant. If I purchase a 97' accord CAI, will have any modding to do, other than to plug the thing in?
I have done a fair amount of searching but have come up empty handed. Is the 97 accord F22b1 the exact same? To be totally redundant. If I purchase a 97' accord CAI, will have any modding to do, other than to plug the thing in?
02-14-2006, 11:18 AM
#18
Senior Moderator
Thread Starter
Join Date: Jul 2002
Location: Bay Area, CA
Age: 39
Posts: 12,005
Likes: 0
Received 9 Likes
on
8 Posts
Originally Posted by jimmyeatmud
I am thinking of getting a CAI (Thanks for the DIY) but I am unable to find any for the 97 2.2 cl.
I have done a fair amount of searching but have come up empty handed. Is the 97 accord F22b1 the exact same? To be totally redundant. If I purchase a 97' accord CAI, will have any modding to do, other than to plug the thing in?
I have done a fair amount of searching but have come up empty handed. Is the 97 accord F22b1 the exact same? To be totally redundant. If I purchase a 97' accord CAI, will have any modding to do, other than to plug the thing in?
02-14-2006, 11:37 AM
#19
Advanced
Join Date: Feb 2006
Age: 38
Posts: 83
Likes: 0
Received 0 Likes
on
0 Posts
Originally Posted by KLepTo
please search. this topic has been discussed millions of times. 94-97 accord 4cyl parts will fit our car.
02-15-2006, 10:29 AM
#20
Senior Moderator
Regional Coordinator
(Mid-Atlantic)
Regional Coordinator
(Mid-Atlantic)
iTrader: (6)
go to www.motors.ebay.com search for 97 accord 2.2 intake u'll get 10,000 replies
02-15-2006, 11:14 AM
#21
Advanced
Join Date: Feb 2006
Age: 38
Posts: 83
Likes: 0
Received 0 Likes
on
0 Posts
done and done. I found the cheapo intakes I was looking for. Quick question: Most of the auctions do not have the diameter's posted. Should I just order one and measure it and then order the bypass valve or can I assume that its 2.5"?
02-15-2006, 02:33 PM
#22
Senior Moderator
Regional Coordinator
(Mid-Atlantic)
Regional Coordinator
(Mid-Atlantic)
iTrader: (6)
Originally Posted by jimmyeatmud
done and done. I found the cheapo intakes I was looking for. Quick question: Most of the auctions do not have the diameter's posted. Should I just order one and measure it and then order the bypass valve or can I assume that its 2.5"?
05-01-2006, 11:25 PM
#23
1st Gen CL Noob
Join Date: Feb 2006
Location: Markham, ON
Posts: 428
Likes: 0
Received 0 Likes
on
0 Posts
Just got a Short Ram Intake installed (somewhat).
However I got to the point where the intake is secured to the Throttle Body.
I have the 2.3CL, and noticed there isn't actually a rubber hose that connects to the nipple on the intake. Instead of a simple rubber hose, its a metal one!
Obviously it won't connect to the metal nipple on the intake.
Since I installed this late tonight, I did a ghetto mod whereby I generously wrapped a good secure amount of electrical tape to connect both metal connections, then used the clip over top of the taped area temporarily until I can get to an auto shop to pick up a 1cm diameter rubber hose to permanently join the 2.
Went for a drive, but as most mention there isn't much difference, except under full throttle it emits a nice sound.
My question is, do I need to remove the lower part of the stock intake (the one in the fender well) or can I simply just leave that in place?
Any answers would be greatly appreciated.
05-02-2006, 01:40 AM
#24
Land of Pleasant Living
Join Date: Sep 2005
Posts: 2,619
Likes: 0
Received 0 Likes
on
0 Posts
might as well take it out?
in this guide, it says "if youre installing a cai, leave the wheel well open"
how can you just leave that open?
i dont get it.. when i did mine, everything was all connected, i just pryed the plastic open like in the pic.. you couldnt just leave that pryed open, so i duno what i was supposed to do..
any help?
 05-02-2006, 03:27 PM
#25
Ahhhhhhhh
Join Date: Oct 2003
Location: Bay Area, CA
Age: 37
Posts: 2,063
Likes: 0
Received 0 Likes
on
0 Posts
Originally Posted by shnee420
might as well take it out?
in this guide, it says "if youre installing a cai, leave the wheel well open"
how can you just leave that open?
i dont get it.. when i did mine, everything was all connected, i just pryed the plastic open like in the pic.. you couldnt just leave that pryed open, so i duno what i was supposed to do..
any help?
in this guide, it says "if youre installing a cai, leave the wheel well open"
how can you just leave that open?
i dont get it.. when i did mine, everything was all connected, i just pryed the plastic open like in the pic.. you couldnt just leave that pryed open, so i duno what i was supposed to do..
any help?
05-04-2006, 10:50 PM
#26
Instructor

Join Date: May 2005
Age: 39
Posts: 245
Likes: 0
Received 0 Likes
on
0 Posts
Originally Posted by Slooo97CL
what piece is this, i dont remember taking that out.
and heres a pic of the v1 cai
05-05-2006, 06:48 PM
#27
where is....
what filter is this? i was looking at it and it said something like fuel filter i think
and is taking out the stock airbox necessary for short ram? or can i just leave it there?
05-06-2006, 05:16 PM
#29
Racer
Join Date: Dec 2005
Location: bothell, WA
Age: 34
Posts: 459
Likes: 0
Received 0 Likes
on
0 Posts
Originally Posted by 1V4N
I have the 2.3CL, and noticed there isn't actually a rubber hose that connects to the nipple on the intake. Instead of a simple rubber hose, its a metal one!
Obviously it won't connect to the metal nipple on the intake.
Since I installed this late tonight, I did a ghetto mod whereby I generously wrapped a good secure amount of electrical tape to connect both metal connections, then used the clip over top of the taped area temporarily until I can get to an auto shop to pick up a 1cm diameter rubber hose to permanently join the 2.
I was a little confused at that exact same point. They don't really give you anything to connect the metal one to the intake. They say you're supposed to remove that whole setup (with the metal hose) but I wasn't up to that, so I just left it in there. But I just took the 3 pieces of hose they give you to replace the whole system, found the one that would fit there and cut off a little piece, then used two clamps to hold it on.
05-23-2006, 05:15 PM
#31
Matt
Join Date: Apr 2006
Location: St. Louis, MO
Age: 43
Posts: 2,663
Likes: 0
Received 0 Likes
on
0 Posts
Originally Posted by Slooo97CL
what piece is this, i dont remember taking that out.
and heres a pic of the v1 cai
06-15-2006, 06:02 PM
#32
where is....
Originally Posted by AznX TL
nvm i took that out, and i took out the stock airbox.....
what about the wires that attached to this...........
what about the wires that attached to this...........
06-15-2006, 08:40 PM
#33
chips and smokes, lets go
your problem must be from something else. i removed that piece as i'm sure everyone else has to who installed an intake. i only remember there being one small hose attached to that piece. i unplugged it and thats it. but as for what is causing you problem maybe someone else could help you..
11-24-2006, 08:58 AM
#34
Intermediate

Join Date: Apr 2005
Posts: 41
Likes: 0
Received 0 Likes
on
0 Posts
When you take out the 2 plastic plugs under the wheel well, do you just pop the inner circle out or do you take the entire plug out? I tried just popping the inner circle out but i ended up cracking it and now I'm afraid of destroying the entire plug if I keep trying. Please advise, thanks.
11-29-2006, 10:52 PM
#36
4x4- fat chicks cant jump
Join Date: Mar 2006
Location: NC
Age: 35
Posts: 1,192
Likes: 0
Received 0 Likes
on
0 Posts
pop the inner circle out, then you should be able to pull the whole clip out. its really easy to break them, so be careful. I had to super glue a few back together cause I was too lazy to go to the stealership and buy new ones 
02-24-2007, 06:53 AM
#40
Advanced
Join Date: Feb 2007
Location: BOston
Age: 38
Posts: 60
Likes: 0
Received 0 Likes
on
0 Posts
Originally Posted by KLepTo
i dont know, but AEM claims to be 50 state carb legal. it comes with the carb sticker
I better check it with the people that work at the inspection hopefully they say it will pass the next time.