FamilyGuy's 6MT Type S


 04-03-2015, 07:05 PM
#282
Three Wheelin'
Thread Starter

Yea, in your car you probably want some weight to hook up lol and like Rockstar said, you're already at a good weight.
04-03-2015, 09:15 PM
#283
Three Wheelin'
Thread Starter
Crazy busy lately no new pics, so figured I'd go back and post some that I missed before:
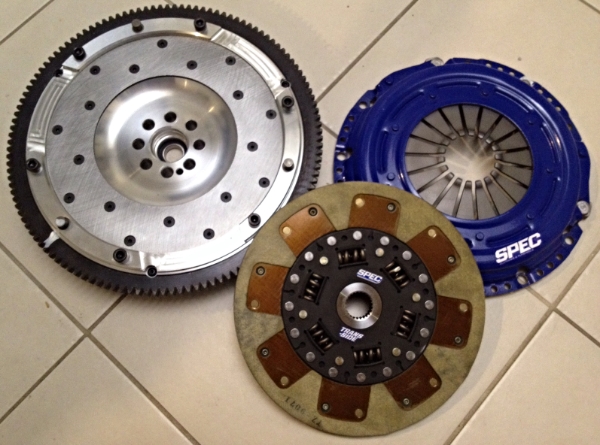
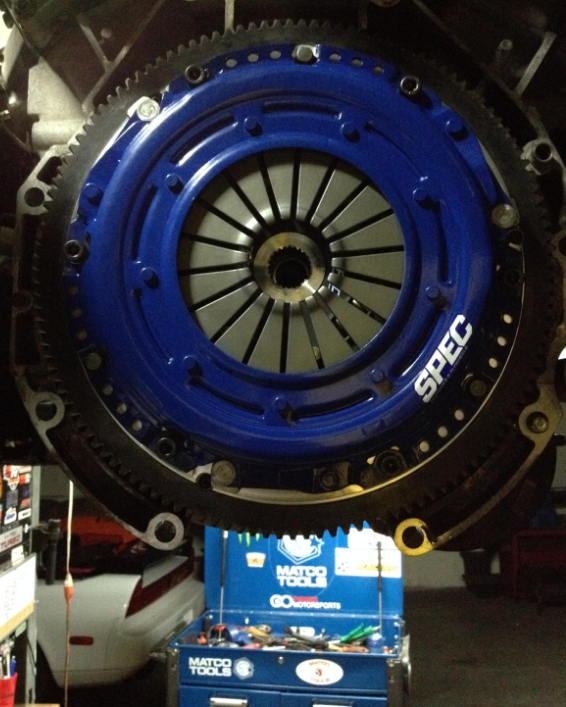
Spec stage 2 clutch and lightweight flywheel
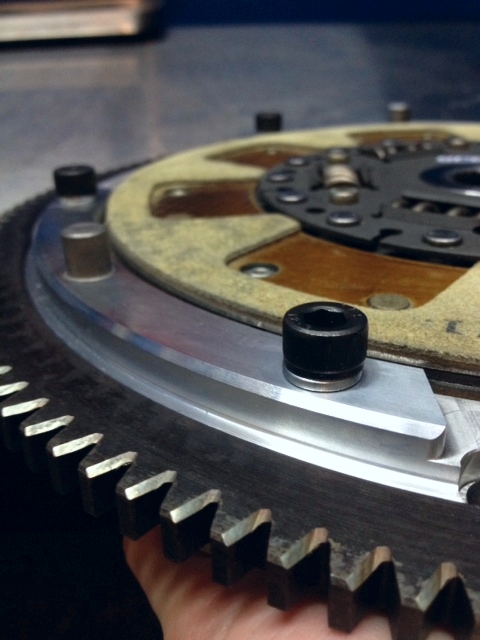
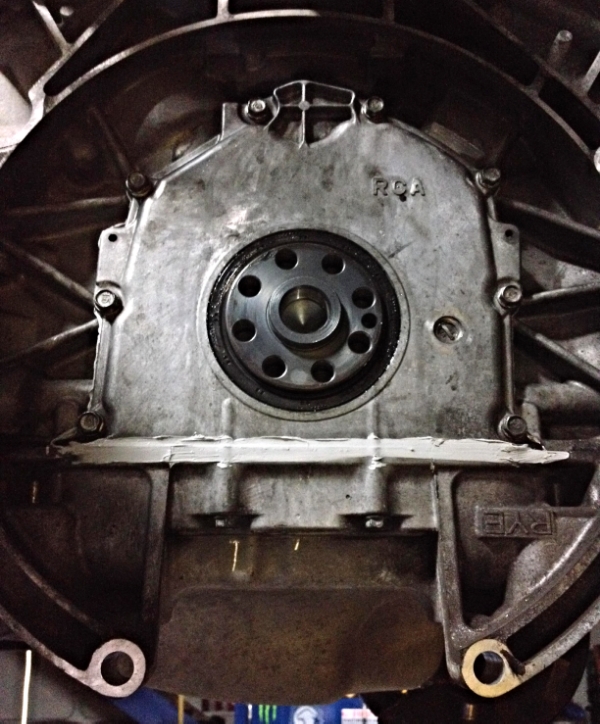
Installation - new rear main seal
Spec lightweight flywheel

Spec stage 2 clutch
I don't want to jinx myself, but the Progress RSB's bushing has been holding up fine after I adjusted the brackets hopefully it'll stay that way.
And of course some of the original goodies from my 1st round of mods:
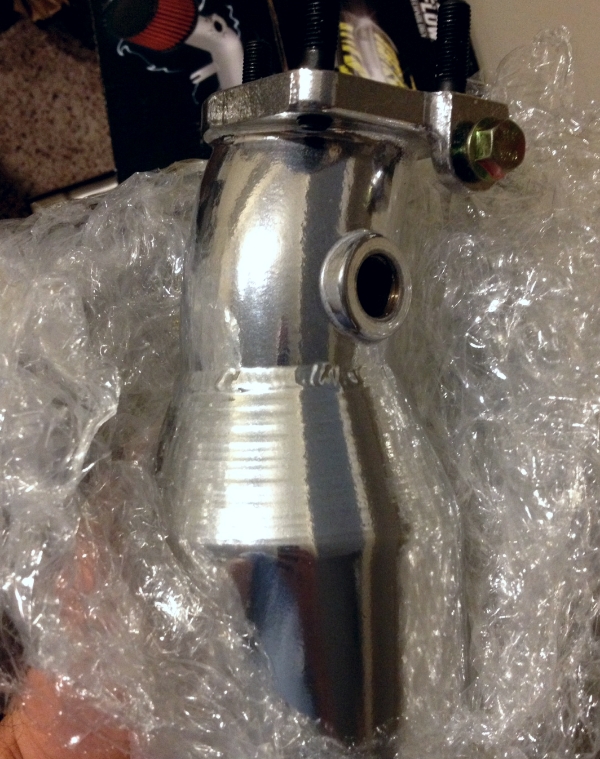
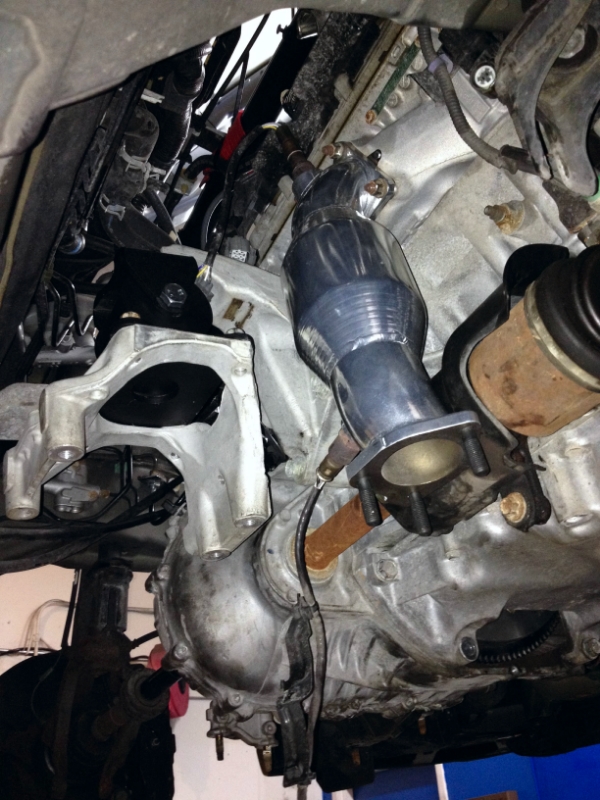
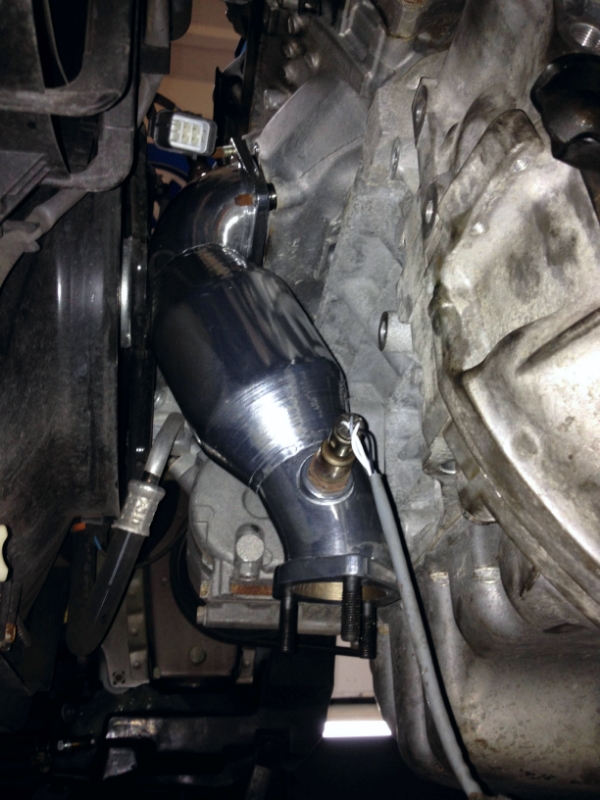
RV6 HFPCs w/ceramic coating
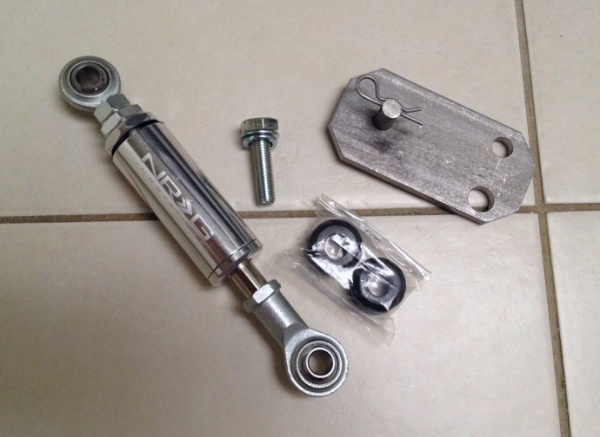
XLR8 (NRG) engine torque damper
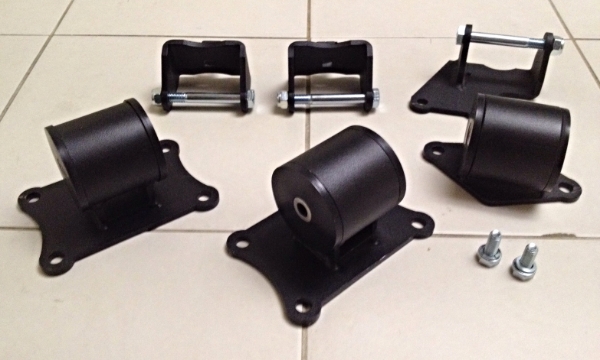
XLR8 motor mounts 75A durometer
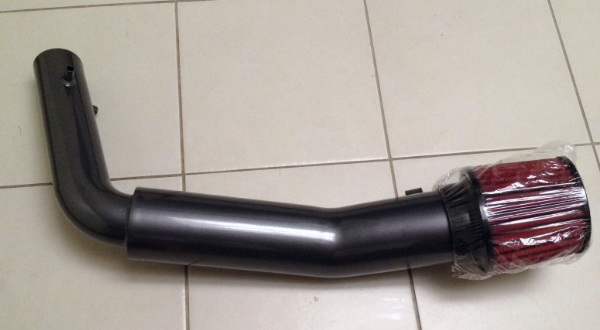
AEM V2 CAI
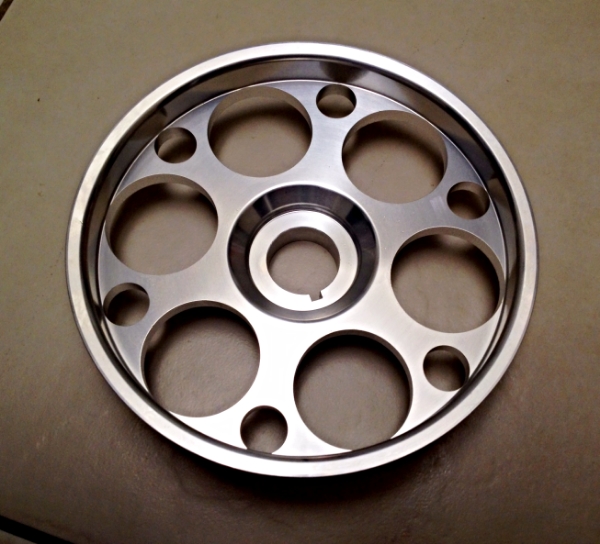
XLR8's UR lightweight pulley, OEM diameter
Couple pics of the RV6 HFPCs installation:
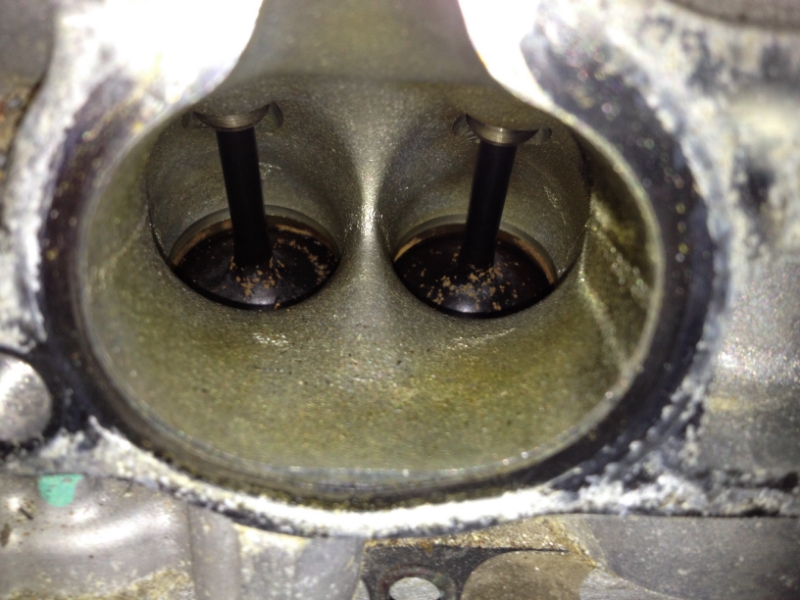
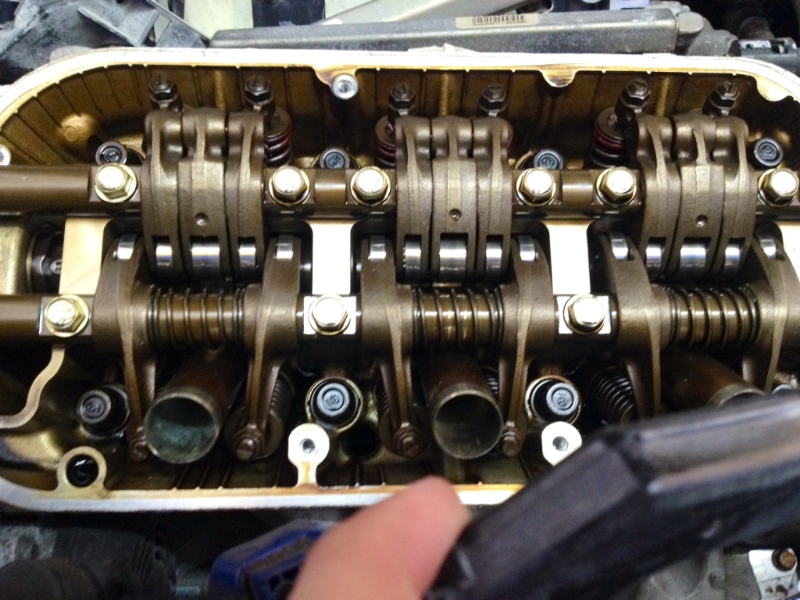
Couple pics of the valves and heads, looking pretty good after 80k miles:
Spec stage 2 clutch and lightweight flywheel
Installation - new rear main seal
Spec lightweight flywheel
Spec stage 2 clutch
I don't want to jinx myself, but the Progress RSB's bushing has been holding up fine after I adjusted the brackets
hopefully it'll stay that way.And of course some of the original goodies from my 1st round of mods:
RV6 HFPCs w/ceramic coating
XLR8 (NRG) engine torque damper
XLR8 motor mounts 75A durometer
AEM V2 CAI
XLR8's UR lightweight pulley, OEM diameter
Couple pics of the RV6 HFPCs installation:
Couple pics of the valves and heads, looking pretty good after 80k miles:
Last edited by FamilyGuy; 04-03-2015 at 09:27 PM.
The following users liked this post:
FamilyGuy (04-04-2015)
04-04-2015, 01:20 PM
#285
04-04-2015, 04:45 PM
#286
Three Wheelin'
Thread Starter
Thx!
I think I would've been ok because I'm on the stock wheels and I didn't add any spacers, but I went ahead and rolled the fronts already. Still need to do the rears, but no rubbing at all, bout ~1.5" lowered. I think you'll be ok too, but maybe be prepared just in case?
I think I would've been ok because I'm on the stock wheels and I didn't add any spacers, but I went ahead and rolled the fronts already. Still need to do the rears, but no rubbing at all, bout ~1.5" lowered. I think you'll be ok too, but maybe be prepared just in case?
Last edited by FamilyGuy; 04-04-2015 at 04:54 PM.
The following users liked this post:
Oh Sickest TL (04-04-2015)
04-05-2015, 06:33 PM
#287
Team Owner
iTrader: (2)
Join Date: Jan 2008
Location: Kansas City, MO (Overland Park, KS)
Posts: 36,545
Received 6,470 Likes
on
5,162 Posts
Wow dude, outstanding!
The following users liked this post:
FamilyGuy (04-06-2015)
The following users liked this post:
FamilyGuy (04-06-2015)
The following users liked this post:
FamilyGuy (04-06-2015)
04-06-2015, 08:55 PM
#290
Jeff
iTrader: (3)
Join Date: Jul 2014
Location: Port City, New Brunswick Canada
Posts: 5,728
Received 815 Likes
on
726 Posts
Thx! I used these: ACURA HONDA LED DRL HARNESS
 I think this may be my next little mod. it looks really modern! so thats all ya needed was that wiring harness for it to work ?
04-06-2015, 09:14 PM
I think this may be my next little mod. it looks really modern! so thats all ya needed was that wiring harness for it to work ?
04-06-2015, 09:14 PM
#291
Three Wheelin'
Thread Starter
Yea all you need is this harness: ACURA HONDA LED DRL HARNESS
You also need to go to a hardware store and buy some self-tapping screws, I think I used a 3/8" long #8 or #10, something like that, not too long not too short. You need 3 screws, one for the relays and one for each resistor. Also pick up some zip ties so you can tie up the wiring along the way. Why VLEDs didn't include less than $1 worth of screws and zip ties I don't know

Then just take your time and figure out where to tuck away all the wiring. You can do what I did and take off the bumper, or keep it all under the hood
Tip: wire everything up first and connect to battery to test to make sure everything works, before you do anything else. Once all is good, disconnect from battery and commence el festival (install everything permanently), then plug it to the battery and should work.
PS: you have a 2006 TL right? I'm not sure you have DRLs, I think the lights next to your headlights are actually fog lights. I'm not sure what bulb you need in this case sry
 Search!
Last edited by FamilyGuy; 04-06-2015 at 09:24 PM.
The following users liked this post:
Oh Sickest TL (04-06-2015)
04-06-2015, 09:24 PM
#292
Jeff
iTrader: (3)
Join Date: Jul 2014
Location: Port City, New Brunswick Canada
Posts: 5,728
Received 815 Likes
on
726 Posts
yes 2006.. but my TL is a Canadian TL so we have DRLS and not fogs in the headlights...I will pm guitar player he's from Canada and knows his shit.. id be getting a local shop to install it anyways I hate wires LOL
04-06-2015, 09:25 PM
#293
Three Wheelin'
Thread Starter
If you have DRLs and they're 9005 type bulbs, it's same as my type s. Confirm with the Canadian guys that everything will work before you buy.
 thanks bud!
04-06-2015, 09:39 PM
thanks bud!
04-06-2015, 09:39 PM
#295
Three Wheelin'
Thread Starter
Welcome neighbor 
Post a photo here after if you do it
Post a photo here after if you do it

 .. oh well
04-07-2015, 12:16 AM
.. oh well
04-07-2015, 12:16 AM
#298
Jeff
iTrader: (3)
Join Date: Jul 2014
Location: Port City, New Brunswick Canada
Posts: 5,728
Received 815 Likes
on
726 Posts
^^ this is the info Ive obtained
"Your Canadian 2006 TL does not have fog lights (9006).
It has DRL, as you know, which are 9005, essentially the exact same as all 07/08 TLs.
So when you read products for 07/08 TL DRL, that includes you too, even though you have an 06"
"Your Canadian 2006 TL does not have fog lights (9006).
It has DRL, as you know, which are 9005, essentially the exact same as all 07/08 TLs.
So when you read products for 07/08 TL DRL, that includes you too, even though you have an 06"
04-10-2015, 08:19 PM
#299
Three Wheelin'
Thread Starter
Alpinestarking - I got your PM and tried to reply back, but it says your inbox is full and you cannot receive any more msgs until you delete some. Let me know when this happens and I will send my reply.
Small update - after 2 weeks, suspension setting was nearly spot on, but the back was still a little too stiff over speed bumps and such, and front was just a hair soft on hard cornering - though I think it's actually the rubber compliance bushings or the stock front sway bar, but since I can't do anything about that at the moment, I upped the front to 21 and dropped the rear to 16. Feels really good now, I think this may be it!
Car feels a little more sporty but still absorbs bumps pretty good, does not crash. I def can't go any higher up front since I started at 22 and that was too stiff for daily driving. We'll see how the back feels after a couple of weeks. It does handle better right now. Wish we had polyurethane compliance bushings available.
04-11-2015, 10:39 AM
#300
Suzuka Master
I am glad you got the suspension sort out, its a pain in the ass trying to find a comfort spot.
04-11-2015, 11:30 AM
#301
Three Wheelin'
Thread Starter
Yea it takes time and patience. Luckily I rarely use my back seat at the moment, it's been in my dining room for like a month now lol
04-11-2015, 01:55 PM
#302
Team Owner
iTrader: (2)
Join Date: Jan 2008
Location: Kansas City, MO (Overland Park, KS)
Posts: 36,545
Received 6,470 Likes
on
5,162 Posts
^^^ Thank God for Springtime, right!
04-11-2015, 04:38 PM
#303
Three Wheelin'
Thread Starter
^^
Yes sir. Although here in south FL winter = spring we're a little spoiled
Yes sir. Although here in south FL winter = spring
we're a little spoiled
04-11-2015, 09:06 PM
#304
Team Owner
iTrader: (2)
Join Date: Jan 2008
Location: Kansas City, MO (Overland Park, KS)
Posts: 36,545
Received 6,470 Likes
on
5,162 Posts
Spoiled.....
....plus, Jeremy is there too.
....plus, Jeremy is there too.
04-12-2015, 11:20 AM
#305
Three Wheelin'
Thread Starter
Is that a good thing or a bad thing? 
j/k we love J
j/k we love J
04-13-2015, 11:31 PM
#306
Team Owner
iTrader: (2)
Join Date: Jan 2008
Location: Kansas City, MO (Overland Park, KS)
Posts: 36,545
Received 6,470 Likes
on
5,162 Posts
Yes, we do love J!
04-14-2015, 12:23 PM
#309
Three Wheelin'
Thread Starter
I'll check with my shop see if they still got the old ones. The ones I got now are new units 
04-14-2015, 01:42 PM
#311
Three Wheelin'
Thread Starter
Are they are new: Acura Parts @ AcuraOEMparts.com - Genuine Acura OEM Parts from Delray Acura
Note this is for my type s, not sure if base model is different.
Note this is for my type s, not sure if base model is different.
The following users liked this post:
mattpete (04-14-2015)
04-14-2015, 01:52 PM
#312
Jeff
iTrader: (3)
Join Date: Jul 2014
Location: Port City, New Brunswick Canada
Posts: 5,728
Received 815 Likes
on
726 Posts
^^ Nice, but why not just rip the old ones out sand blast em and coat em? thats what I was plannin on doing with mine, Ill get new gaskets but is there any reason why I should not use the old ones??
did you buy a whole new intake manifold too? lol
did you buy a whole new intake manifold too? lol
04-14-2015, 02:08 PM
#313
Three Wheelin'
Thread Starter
You can do that.
I bought new ones for two reasons: (1) minimize my down time and (2) my originals were in pretty bad shape and I just didn't want to deal with any corrosion or after the fact paint issues.
Our valve covers have baffles, so you can't sand blast them. You need to do a chemical dip to strip off any oem paint and grime and stuff. Since new ones were only like $90 each at the time I just did that. New ones came unpainted (note this may depend on P/N, some may come painted, idk). I also didn't know if a chem dip damages the hondabond on the baffles so...
Matt if I still have the old ones I'll just give'em to you. Just cover the shipping. I'll let you know in a day or two if the shop still got'em.
Last edited by FamilyGuy; 04-14-2015 at 02:16 PM.
04-14-2015, 03:35 PM
#315
You can do that.
I bought new ones for two reasons: (1) minimize my down time and (2) my originals were in pretty bad shape and I just didn't want to deal with any corrosion or after the fact paint issues.
Our valve covers have baffles, so you can't sand blast them. You need to do a chemical dip to strip off any oem paint and grime and stuff. Since new ones were only like $90 each at the time I just did that. New ones came unpainted (note this may depend on P/N, some may come painted, idk). I also didn't know if a chem dip damages the hondabond on the baffles so...
Matt if I still have the old ones I'll just give'em to you. Just cover the shipping. I'll let you know in a day or two if the shop still got'em.
I bought new ones for two reasons: (1) minimize my down time and (2) my originals were in pretty bad shape and I just didn't want to deal with any corrosion or after the fact paint issues.
Our valve covers have baffles, so you can't sand blast them. You need to do a chemical dip to strip off any oem paint and grime and stuff. Since new ones were only like $90 each at the time I just did that. New ones came unpainted (note this may depend on P/N, some may come painted, idk). I also didn't know if a chem dip damages the hondabond on the baffles so...
Matt if I still have the old ones I'll just give'em to you. Just cover the shipping. I'll let you know in a day or two if the shop still got'em.
I'm trying to minimize downtime as well - timing belt service coming up so I'm planning to overhaul the whole engine and bay. Fun stuff!!!
04-14-2015, 05:10 PM
#317
Three Wheelin'
Thread Starter
Yup you can powder coat the magnesium. No sand blasting here either because sand can get trapped in all the little crevices inside. Mine wasn't painted from factory so no need for chem dip. The powder coater will clean / prep the exterior surface for painting and block off all ports. I just cleaned the inside myself before and after the powder coating with a soft soap solution and water. Made sure it was dry before re-installing.
Hondabond can take the ~400-450F heat from powder coating (IIRC it's rated for ~600F), but I wasn't able to find out whether or not a chem dip was safe for it. Since I didn't have to dip, I was ok. I didn't want to separate the manifold and have to re-do the hondabond, and my powder coater said if it was painted from the factory, they could just kind of hand strip the exterior surface to avoid having to dip it, but luckily in my case, no need.
Since Honda covers the whole damn engine in the type s with plastic covers, they don't bother spending extra $$ in surface finishes for the metal manifolds and valve covers I think the base model TLs might come painted (silver) from the factory, not sure.
Hondabond can take the ~400-450F heat from powder coating (IIRC it's rated for ~600F), but I wasn't able to find out whether or not a chem dip was safe for it. Since I didn't have to dip, I was ok. I didn't want to separate the manifold and have to re-do the hondabond, and my powder coater said if it was painted from the factory, they could just kind of hand strip the exterior surface to avoid having to dip it, but luckily in my case, no need.
Since Honda covers the whole damn engine in the type s with plastic covers, they don't bother spending extra $$ in surface finishes for the metal manifolds and valve covers
I think the base model TLs might come painted (silver) from the factory, not sure.
Last edited by FamilyGuy; 04-14-2015 at 05:16 PM.
The following users liked this post:
Oh Sickest TL (04-15-2015)
04-15-2015, 10:29 PM
#318
Team Owner
iTrader: (2)
Join Date: Jan 2008
Location: Kansas City, MO (Overland Park, KS)
Posts: 36,545
Received 6,470 Likes
on
5,162 Posts
^^^^ That might look good.
04-15-2015, 10:39 PM
#319
Jeff
iTrader: (3)
Join Date: Jul 2014
Location: Port City, New Brunswick Canada
Posts: 5,728
Received 815 Likes
on
726 Posts
yea i got rid of them plastic covers, just rocking bare bones and the manifold is like a wrinkle silver type texture. and my manifold covers are just a flat shiny silver. But i found a sweet wrinkle red top plate and wanna get something going here under the hood. just seems like a lot of work and money.. we will see lol