When you click on links to various merchants on this site and make a purchase, this can result in this site earning a commission. Affiliate programs and affiliations include, but are not limited to, the eBay Partner Network.
I was never happy with the XM reception on my TL. It would loose signal too often when driving where trees or buildings were alongside the road. Compared to previous cars with XM this one had very poor reception. I always thought the antenna might be at fault and I was right. After the new antenna install I only loose recption when driving under bridges or under heavy tree canopy's etc.
1) Remove centerconsole side trim pieces: These pieces just snap in place. Open centerconsole lid door. Bend a coat hanger to form a J hook on one end. Starting at the rear most end, slide the coat hanger down alongside the E-brake handle and hook the trim and pull up. Keep pulling up as you work toward the dash. The passenger side is a little harder to get started as you'll see.
2) Remove center vent panel: Insert the same coat hanger hook into one side of the vent 2-3 inches and hook the rear of it (along the side) and pull to un-clip it. May or may not have to do the other side the same way. Disconnect the hazard warning connector.
3) Remove/loosen the shifter boot plate: Insert small screwdriver into the slot to pop out the rectangular plastic plug. Then insert the coat hanger hook into the hole and pull up on the boot plate. Don't need to remove the boot plate, just leave loose. Don't remove the shifter handle either.
4) Remove the plate that the seat heater switches are on: Reach down in the boot plate hole and pull the switch plate up to un-snap it. Disconnect 2 connectors for the seat heaters and 1 for the gear shift position indicator. Work the switch plate up and over the boot plate to remove.
5) Remove the entire center console top plate/storage compartment assembly: Remove 2 phillips screws located forward most on the assembly just below the HVAC controls, one on each side. Then start pulling up to un-snap the assembly. I had to put my gearshift in neutral (with E- brake on) to get the assembly to clear it.
6) Remove the radio/CD player audio unit: Remove 4 bolts, 2 on top and 2 on bottom. Disconnect several connectors on the backside of the unit. The connector on the far right (pass side) has a plastic slide lever to release the connector.
7) Remove the Bluetooth control box: This is the black plastic box with the bar code label on it. It is held in by 2 phillips screws, one on each side. Disconnect the connector from it.
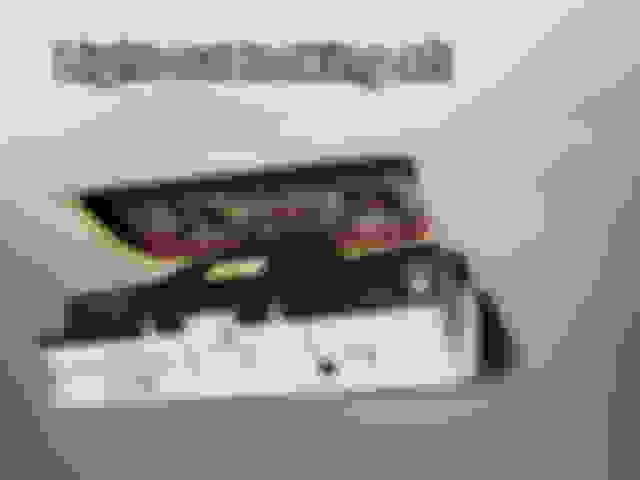
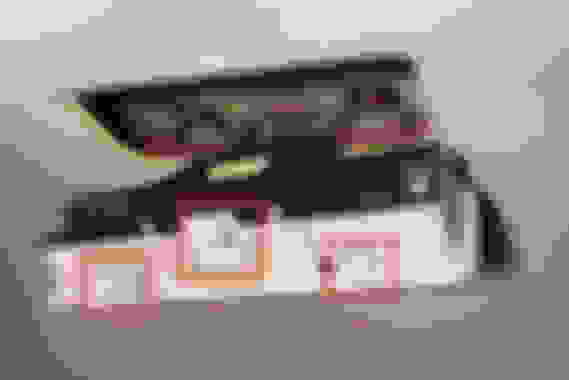
8) Finally!! Remove the XM receiver unit: This is the silver metal case box with the "PK" on the label. It has 3 bolts, 2 up on top and 1 to the right of the PK. The antenna connector is on the bottom as is another connector. Disconnect both. In this pic you see the new antenna plug connected. My hand is holding the original connector which was later ty-wrapped to secure it from rattling.
9) Modify the XM box and new antenna plug, so the plug fully seats into the XM box: I had to modify the antenna plug by removing the outer-most sleeve, leaving the toothed sleeve and center pin. I used a hack saw blade to cut almost all the way through the sleeve at its base then snapped it off with pliars. It broke off pretty clean. I also trimmed the plastic molded plug head to square it up to match the XM box. I didn't get a detailed pic of the modified plug itself, just a couple showing it plugged into the XM box, sorry.
Next, remove the many small screws from the XM box and remove its cover. Try not to touch the circuit board since it may be static sensitive and could be damaged, I'm not sure. I used tin snips, file and a knife to notch the XM box and its cover to accept the modified antenna plug which has a 90 degree plug. A straight plug would need much less modification (if you can buy one). When filing, use care not to get filings onto the circuit board. When filing, keep the file physically lower than the board. Blow everything out with canned air when done. Upon installation, I put a strip on duct tape on the XM box to ensure the plug stays fully seated (see last pic).
10) Routing and mounting the antenna:
Antenna reception will be best when mounted externally on a metal surface. During dis-assembly, with the center console out, I removed my back seat bottom and from there I fed the antenna plug forward under the carpet and along the top of the floor hump and into the console base cavity. Then along the hump past the shifter mechanism to the XM box location. Note that you can pull off the HVAC vents on the rear of the console. They just snap on/off. From the back seat area, I fed the antenna head into the trunk and behind the felt liner to the trunk lid hinge, up its plastic cover and out the top and across the trunk lid rubber seal. From there I tucked it under the trim strip along the side of the back window, across the top of the glass (it tucks down nicely) and stuck the magnetic antenna head just below the OEM antenna.
Notes:
-This was done on an '09 TL. Auto trans and no NAV.
-Be sure you have your radio code to enable your radio.
-I did not disconnect my battery but it is generally considered a good practice.
-My antenna has a 20 foot cord which was plenty.
Last edited by Steven Bell; 06-11-2013 at 03:25 PM.
I am all the more concerned why the TL's with Tech have a single disc changer and the non-nav models have 6 disc.. WTF? I didn't know that until I noticed your disc drive said it was 6 disc capable.
Thanks everyone for the reply's.
I'd love for someone to install this antenna and let me know how my instructions worked. It really wasn't too hard to do though I was a little scared for my car when I first tore into it.
Did you try replacing the factory antenna at all before attempting this? I am very interested in this since I just cancelled my sub because I can't even hear it clearly on a highway, and everything is working ok supposedly.
I replaced the antenna in my 3G with a Sirius/XM one. Yep, was quite a job getting to the antenna, then revising the roof piece to accept the antenna.. good stuff!
I am all the more concerned why the TL's with Tech have a single disc changer and the non-nav models have 6 disc.. WTF? I didn't know that until I noticed your disc drive said it was 6 disc capable.
Do the non-nav models have a hard drive? If not then that is probably why they have a 6 disk changer. No need to have 6 disks in at once if you can just download all of them to the hard drive.
Did you try replacing the factory antenna at all before attempting this?
I did not replace the factory antenna.
My thinking was, if it was at fault then a new OEM antenna likely would be weak also because too many TL owners have reception complaints. I knew the $20 add-on antenna's work good so I was hoping to get to the XM reciever and simply plug in the new antenna BUT I had to to do some modifying to connect it. I assembled the car enough to drive it with the antenna temporarily stuck onto the roof. Problem solved for $20. Good enough for me.
Per the Acura factory manual, to replace the antenna you need to pull down the rear headliner. Then disconnect the antenna connector, remove a nut and lift the antenna off the roof. Perhaps a person could install some other antenna from that connector. But again, you'd have to find one to mate to the factory connector.
As you can see (pic in the next post) I magnetically stuck the aftermarket antenna below the shark fin antenna. To remove the shark fin you'd have to drop the head liner and I didn't get into that.
Steps 9 and 10 talk about the aftermarket antenna install.
Will rain water seep along the wire into inside the car ?
No. The antenna wire runs down the side of the rear glass, in the gap between the glass edge and the body. Then into the trunk seal area where it jumps over the foam rubber seal and into the plastic channel that encases the trunk lid hinge.
From outside the car you see no part of this antenna except for between the glass and shark fin as shown in the pis above.
I had issues with crappy XM reception especially when East on highway. I always thought it was satellite being low in sky or something. Well, after reading about antenna or head replacement, I decided to check antenna. I pulled down rear seat light and found antenna wire. Not easy to reach, but I got to connector and unplugged and re-plugged. AMAZING how I had good reception for about 1 week, but then it went to hell again. I decided to get a new antenna from AcuraPartsWarehouse.com part number 39150-TK-AO1ZG which was Palladium color and I replaced it a couple of weeks ago (all through the ceiling light headliner hole).
Folks, IT IS ROCK SOLID RECEPTION now and here's the bet part....the sound quality is TOTALLY better. I've got such better sound I can't believe how long I've been listening to crappy XM.
Hope this helps others.
Greg H.
2009 TL-AWD
That's awesome! I've been needing to fix my horrible XM reception, but wasn't looking forward to having to deal with ripping apart the center console and running the line for an aftermarket antenna. An OEM plug'n'play replacement seems like much less work.
Did you actually replace the fin by only removing the rear interior map light and reaching through that hole, or did you have to pull down the rear half of the headliner to get to the bolt that holds on the fin?
Yes, the back seat lights come out by taking small screw driver in front and pop the lens out. Then 2 Phillips screws hold the light in and pull down from front. Unplug the light. Then you can reach back to unplug antenna and I think it was about 16mm open end wrench used to loosen the fin. VERY easy and well worth the time.
Sound is so much better I find myself now wanting to listen to music again instead of talk radio LOL!
Just a heads up, that magnetic antenna overtime scratches the paint up pretty good. No issue if you plan to leave it there but I had that thing on my old honda for a few years and little movements and grit that got under it caused the paint to get damaged where it was put.
Yes, the back seat lights come out by taking small screw driver in front and pop the lens out. Then 2 Phillips screws hold the light in and pull down from front. Unplug the light. Then you can reach back to unplug antenna and I think it was about 16mm open end wrench used to loosen the fin. VERY easy and well worth the time.
Sound is so much better I find myself now wanting to listen to music again instead of talk radio LOL!
Brilliant! Not to hijack OP's thread, but I just checked to make sure I'd be able to access everything easily before buying the replacement OEM fin, and it really is painlessly simple.
Pulled out the map light, reached into the headliner to pull it down a bit, and the bolt is a few inches back:
The service manual suggests unclipping the headliner, but you can easily access the connector through the maplight hole too:
I might as well order the $42.89 replacement fin now haha. Thanks!!!
Did you do this and how is the result if you did? My XM reception has been getting worse over the last year, very difficult to listen to, I keep the sub because I use the app on my phone. Would like to see more results from people who replaced their antenna with new stock antenna.
I would like to see more results from people who replaced
It worked out great! Night and day difference.
Everywhere I used to notice as a reception dead spot is completely gone, and the few times that I lose reception due driving under a bridge or something, the reception returns immediately.
Yes, the back seat lights come out by taking small screw driver in front and pop the lens out. Then 2 Phillips screws hold the light in and pull down from front. Unplug the light. Then you can reach back to unplug antenna and I think it was about 16mm open end wrench used to loosen the fin. VERY easy and well worth the time.
Sound is so much better I find myself now wanting to listen to music again instead of talk radio LOL!
Thanks for the useful post - I found the fin to be really loose but tightening did not help. When buying the fin, do they come in matching color for the car or is painting needed?
My XM is pretty much useless in the car but I use the app.
Thanks for the useful post - I found the fin to be really loose but tightening did not help. When buying the fin, do they come in matching color for the car or is painting needed?
My XM is pretty much useless in the car but I use the app.
You're looking at part #9, and you just choose whatever color you need. (Also change vehicle/year search if your color isn't in that list. I just searched based on my car)
The issue that I am having with my XM radio reception is...
1. Clear Day or Day with very little clouds.
2. Driving and XM is on.
3. Station will cut out for a second and then come back on. Just really annoying and I didn't remember it doing it often when I first got it. (TL 2009 model but I got it used in 2012)
4. The street is clear. I am not near any tall buildings or under a bridge.
5. If XM goes out, completely, I would need to restart the car and it works again. I guess it completely lost the signal and it was having a problem acquiring it again.
If replacing the fin is the best option, I am going to do it for sure. Your thoughts?
How easy is it to remove the 'map light' in the rear seats? I am seriously considering replacing the FIN without taking down the head liner.
Very easy - I removed it an tightened the nut holding the fin in place but made no difference in reception.I used a box/open end wrench.
Removing the nut will be simple also but getting the nut started when putting it back may be a bit challenging.
That's the only concern I have. I'm also looking at replacing mine because of poor reception.
Following this advice I also ordered and replaced my sharkfin antenna with a genuine replacement antenna. Problem of poor, cut out music stream now completely solved. The procedure is described above but I took some better pictures as I was going along. I have pretty big hands so I easily removed the brake light to get additional access and make sure I didn't loose the 17mm nut that holds the antenna on. I did this at night in the driveway in less than 30 minutes. 17mm box wrench, small screwdriver set, and putty knife to carefully remove the dome light frosted plastic cover is all you need. I also did a little clean and wax on the roof under the old antenna before mounting the new one.
That small antenna comes in a Honda box which was loaded into this huge UPS express box. Should have easily been a padded (or unpadded) envelope.
Last edited by ChunkyDA; 12-02-2017 at 10:23 AM.
Reason: spelling
I was experiencing extremely poor XM reception over the last couple of years. I finally decided to replace the XM antenna. It was a bit of a fiddly job and only took a 1/2 hour. What a difference! Solved the problem. My question is, why did the original antenna "go bad"?
I have actually have this part and I haven't had time to replace it yet. I was wondering how it connects to the roof (i.e rubber gaskets)? I plan to clean area and buff it a bit before installing it.
It is held in place by a nut; there is no gasket to be concerned with. The instructions provided in earlier posts to this thread were very helpful.
I did this as well and cleared the issue.
One issue I had was that the cable connector must of been tied down, way in the back under the liner
so I could not pull it forward, it was difficult to reach and connect the two cable ends.
So I tried to do this and it was really hard to install. Here are some additional instructions to remove the dome light correctly. You can then manually pull down the 3rd brake light shroud. After doing the steps to try to access the bolt for the antenna, I realized that you need to also remove the roof liner. NOTE: I had 'experts' do this part (dealer). In the end, the antenna replacement definitely improved XM reception. I am going to test this out later in some areas that I know that had some reception problems.
 06-07-2013, 09:05 AM