
WTF. Scratch on my 2 month old TL!! (Pic)
 01-19-2009, 10:21 PM
#41
Former Sponsor

Im not sure the yellow one is appropriate for that scratch. Its designed for using on larger panels which have a mass of swirls or scratches. Yours is rather isolated? If you want to just repair that spot, use an old sock and a finger with some compound!!....then polish a larger area encompassing that scratch to brighten up the entire area.
As for that machine, you could probably apply some liquids with it, depending on the accessories you have. Do you have a foam applicator which fits it?
As for that machine, you could probably apply some liquids with it, depending on the accessories you have. Do you have a foam applicator which fits it?
 01-20-2009, 09:45 AM
#42
Instructor
Thread Starter

Join Date: Nov 2008
Posts: 155
Likes: 0
Received 0 Likes
on
0 Posts
Im not sure the yellow one is appropriate for that scratch. Its designed for using on larger panels which have a mass of swirls or scratches. Yours is rather isolated? If you want to just repair that spot, use an old sock and a finger with some compound!!....then polish a larger area encompassing that scratch to brighten up the entire area.
As for that machine, you could probably apply some liquids with it, depending on the accessories you have. Do you have a foam applicator which fits it?
As for that machine, you could probably apply some liquids with it, depending on the accessories you have. Do you have a foam applicator which fits it?
And by saying 'that' spot, you mean the one I marked with blue circle?
I was thinking to polish all the scratches and apply compound if polishing does not fix that blue circled one.
Is there any specific reason that you are recommending to compound first then polishing?
01-20-2009, 09:50 AM
#43
Instructor
Thread Starter
Join Date: Nov 2008
Posts: 155
Likes: 0
Received 0 Likes
on
0 Posts
Thank you for clarifying it. I guess I wasted some good $30+ on it.
 01-20-2009, 12:34 PM
#45
Former Sponsor
I don't think I have any foam applicator.
And by saying 'that' spot, you mean the one I marked with blue circle?
I was thinking to polish all the scratches and apply compound if polishing does not fix that blue circled one.
Is there any specific reason that you are recommending to compound first then polishing?
And by saying 'that' spot, you mean the one I marked with blue circle?
I was thinking to polish all the scratches and apply compound if polishing does not fix that blue circled one.
Is there any specific reason that you are recommending to compound first then polishing?
Your approach is safe and sound with polishing first. It is the lesser evil of the two. Usually when you compound, you have to polish afterwards. So I think I was just trying to save you a step based on my experience.
But...........its a good learning step for you to determine what a polish can do for you. I stand corrected, polish first, guage results, then take the next necessary step which would be compounding the affected area.
01-20-2009, 01:20 PM
#46
Instructor
Thread Starter
Join Date: Nov 2008
Posts: 155
Likes: 0
Received 0 Likes
on
0 Posts
Yes, by the looks of the circled scratch, I dont think polish will remove it, hence the compound suggestion.
Your approach is safe and sound with polishing first. It is the lesser evil of the two. Usually when you compound, you have to polish afterwards. So I think I was just trying to save you a step based on my experience.
But...........its a good learning step for you to determine what a polish can do for you. I stand corrected, polish first, guage results, then take the next necessary step which would be compounding the affected area.
01-23-2009, 09:42 AM
#47
Instructor
Thread Starter
Join Date: Nov 2008
Posts: 155
Likes: 0
Received 0 Likes
on
0 Posts
OK, I got the compound and polish yesterday.
But how do I use this?
Just apply them on the scratch and wait until it dries then buff?
Or just apply and buff without waiting?
But how do I use this?
Just apply them on the scratch and wait until it dries then buff?
Or just apply and buff without waiting?
01-23-2009, 10:28 AM
#48
Former Sponsor
Apply to cloth or applicator and polish in the same direction as the scratch. Simply rub the polish into the scratch until the polishing product hazes (loses lubricity) or disappears. Wipe clean with a microfiber, inspect for further polishing. repeat if necessary. Can you polish too far? YES! By hand? YES! But it would take you quite some time. The key with scratch and swirl removal (No pun intended) is MINIMIZE its appearance. Get it to a point where you can live with it. There's no sense in reducing clear coat surrounding the scratch, which dependent on color, can actually lighten the appearance of the paint.
What your trying to accomplish is not necessarily "remove" the scratch, but your trying to undermine its light grabbing edges.
If you can reduce the vertical edge along the length of the scratch, the light has nowhere to refract from. It will really minimize the scratches effect.
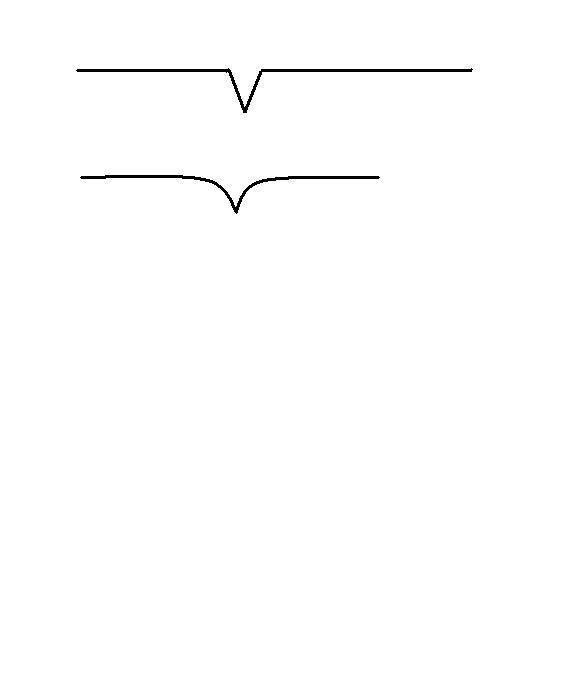
You can certainly remove the entire scratch, if its not too deep.
What your trying to accomplish is not necessarily "remove" the scratch, but your trying to undermine its light grabbing edges.
If you can reduce the vertical edge along the length of the scratch, the light has nowhere to refract from. It will really minimize the scratches effect.
You can certainly remove the entire scratch, if its not too deep.
01-23-2009, 12:26 PM
#49
Instructor
Thread Starter
Join Date: Nov 2008
Posts: 155
Likes: 0
Received 0 Likes
on
0 Posts
Apply to cloth or applicator and polish in the same direction as the scratch. Simply rub the polish into the scratch until the polishing product hazes (loses lubricity) or disappears. Wipe clean with a microfiber, inspect for further polishing. repeat if necessary. Can you polish too far? YES! By hand? YES! But it would take you quite some time. The key with scratch and swirl removal (No pun intended) is MINIMIZE its appearance. Get it to a point where you can live with it. There's no sense in reducing clear coat surrounding the scratch, which dependent on color, can actually lighten the appearance of the paint.
What your trying to accomplish is not necessarily "remove" the scratch, but your trying to undermine its light grabbing edges.
If you can reduce the vertical edge along the length of the scratch, the light has nowhere to refract from. It will really minimize the scratches effect.
You can certainly remove the entire scratch, if its not too deep.

Thread
Thread Starter
Forum
Replies
Last Post
asahrts
Member Cars for Sale
0
09-04-2015 05:55 PM