3M Headlight Restoration System review
 01-09-2009, 09:55 PM
#1
Former Sponsor
Thread Starter

3M Headlight Restoration System review
After always being confronted with hazy headlights, on my own and client vehicles, I decided to purchase an actual product designed for headlight restoration. What better company to look to then 3M. 3M has been in car care
for quite a long time. Matter of fact 3M SMR (for Dark) was one of the first choices I selected for detailing many years ago.
I viewed their YouTube video and decided it was easy enough for even me. The video describes the exact process and tools required (cordless drill basically) to the "t". I was very impressed with how uncomplicated they made the process appear.
I called the local Auto Zone to see if they carried any, the salesman said he had one left and would be happy to hold it for me. Off I went, 8:30 last night to retrieve my new toy.The 3M HRS retails for around $21.00 at Auto Zones.
Contains 1 backing plate, suited for cordless drill. 1 Soft interface pad for cushion (velcro backed). 6 sanding discs, 4 finishing discs, 1 Trizact disc, (which i think is some hi tech padded superfast water absorbing wetsanding disc, otherwise known as a HTPSFWAWD.
1oz headlight polish in a pouch, 1 very familiar looking Orange buffing pad. All you need is a household or cordless drill, masking tape (painters) and a spray bottle with water
Preliminary steps: Wash headlight with soapy water to remove bug splatter and debris. I opted for AquaWax as that was all I had close to me. Tape off surrounding areas, twice. I later learned 3 times is even better on the hard to get to angles. Especially where the nipples are on some headlights. Getting around those can be difficult.
Step One:
Install backing plate onto drill and secure. Fasten velcro sanding disc P500 (The more abrasive) I simply ran the drill across the surface and the disc immediately abraded away any plastic oxidation. I probably ran over the surface a total of 3 times, just as I would have if I was polishing with the UDM/PC. Same technique matter of fact. Once the headlight was real foggy or hazy, I figured I was done with this step. It took a little finesse around the nipples. I had to make sure when I elevated the disc to go around them, that #1 I wasnt
making alot of contact with the tape, as it would tear through rather quickly, and #2 I wasnt topping the nipple with the disc which would abrade it down, or worse, away!
Step 2:
Wipe away sanded plastic from headlight, install disc #2 P800.
Same process as step one, 3 passes at a minimum, depending on how much you sanded with step one. Step one quickly whisks away the oxidation, but if you spend more time with step one, you will need more time with step 2. Disc 2 is the finer of the discs, so if you left a lot of swirls with disc 1, several passes will be needed. I must have hit it just right, as I think disc 2 wasnt as long a time. When your at this stage, your continuing to remove plastic, but not oxidized plastic. Now your leveling the plastic. The finished product
again, looked real hazy (as per directions stated as well).
Step 3:
Wipe away plastic residue, remove disc 2 and install disc 3. The Trizact Disc. This is that HTPSFWAWD one I was referring to earlier. Give the pad a spritz or two of water, and start sanding again. This disc is a little more sensitive as I learned after running over a nipple. It took the sanding elements away and left me a perfect circle with no more sanding
abrasives in about a 1/8th area. (And I still hade one light to go!) I continued sanding, creating a little slurry mixture of plastic and abrasives. I could see at this point that the plastic was starting to come alive. I probably spent the majority of time, maybe 5 minutes in all, with this disc. Getting around those nipples was the strenuous part, as I didnt want to go
through the masking tape, however this disc was cushioned and had some to give, so I used every bit of it. Still being wary of "what could happen".
Step 4:
Wipe away slurry, afix foam polishing pad and added the included Headlight Lens Polish. Just a few small dabs on the orange waffle texture pad. Ran in over the surface a few times and added a few more dabs to help saturate it. Then just polished away! Not a big fear of ruining the tape at this point, but still played it cautious as one should. Again, nothing unusual about the technique or routine. I used the same rational as I would if I was approaching paint.
A few notes of interest. This work all came about several months ago when a friend approached me and asked what he could do to repair his foggy headlights. I said I would take care of it for him. This guys wife cooks incredible mexican
food, and well, we sort of barter from time to time! Well, he texts me today and tells me "this guys said he would take care of my paint, wonder what happened to him". This is another story in itself. He let a "friend" borrow his
truck to haul some tree branches away? Well, they got pine sap on the side panels, and tried to get it off with a friggin Scotchbrite pad! Well, I told him i would take care of that too! So, now I can kill two birds (make it cats) with one stone (We seem to be talking about cats as of late). So after I compounded the side of his truck, and polished them out (then sealed) I set out upon the headlights. I figured (and told him) that if I screwed something up, I didnt want it to be on my own truck!
So heres some pics, and if theres any questions, just ask.
Oh, I walked away with 25 fresh made Chicken Tamales and 6 huge Avocados!
Before:
After always being confronted with hazy headlights, on my own and client vehicles, I decided to purchase an actual product designed for headlight restoration. What better company to look to then 3M. 3M has been in car care
for quite a long time. Matter of fact 3M SMR (for Dark) was one of the first choices I selected for detailing many years ago.
I viewed their YouTube video and decided it was easy enough for even me. The video describes the exact process and tools required (cordless drill basically) to the "t". I was very impressed with how uncomplicated they made the process appear.
I called the local Auto Zone to see if they carried any, the salesman said he had one left and would be happy to hold it for me. Off I went, 8:30 last night to retrieve my new toy.The 3M HRS retails for around $21.00 at Auto Zones.
Contains 1 backing plate, suited for cordless drill. 1 Soft interface pad for cushion (velcro backed). 6 sanding discs, 4 finishing discs, 1 Trizact disc, (which i think is some hi tech padded superfast water absorbing wetsanding disc, otherwise known as a HTPSFWAWD.
1oz headlight polish in a pouch, 1 very familiar looking Orange buffing pad. All you need is a household or cordless drill, masking tape (painters) and a spray bottle with water
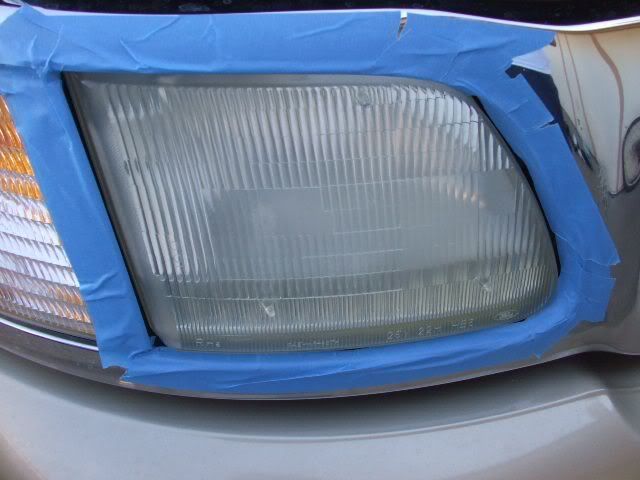
Preliminary steps: Wash headlight with soapy water to remove bug splatter and debris. I opted for AquaWax as that was all I had close to me. Tape off surrounding areas, twice. I later learned 3 times is even better on the hard to get to angles. Especially where the nipples are on some headlights. Getting around those can be difficult.
Step One:
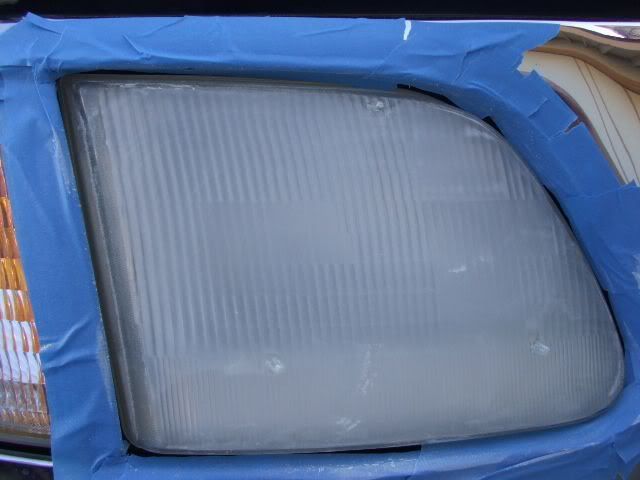
Install backing plate onto drill and secure. Fasten velcro sanding disc P500 (The more abrasive) I simply ran the drill across the surface and the disc immediately abraded away any plastic oxidation. I probably ran over the surface a total of 3 times, just as I would have if I was polishing with the UDM/PC. Same technique matter of fact. Once the headlight was real foggy or hazy, I figured I was done with this step. It took a little finesse around the nipples. I had to make sure when I elevated the disc to go around them, that #1 I wasnt
making alot of contact with the tape, as it would tear through rather quickly, and #2 I wasnt topping the nipple with the disc which would abrade it down, or worse, away!
Step 2:
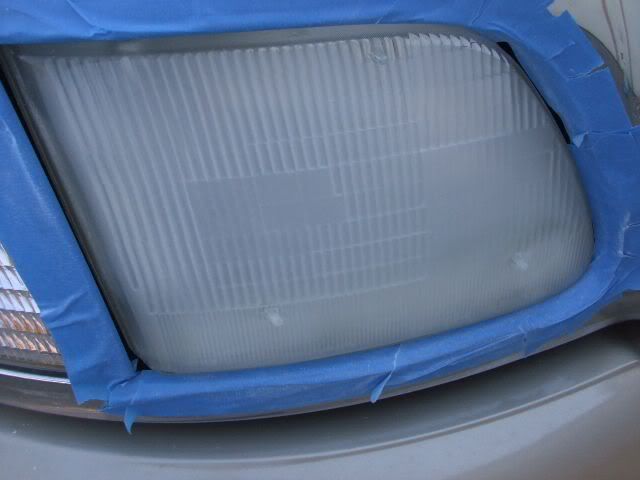
Wipe away sanded plastic from headlight, install disc #2 P800.
Same process as step one, 3 passes at a minimum, depending on how much you sanded with step one. Step one quickly whisks away the oxidation, but if you spend more time with step one, you will need more time with step 2. Disc 2 is the finer of the discs, so if you left a lot of swirls with disc 1, several passes will be needed. I must have hit it just right, as I think disc 2 wasnt as long a time. When your at this stage, your continuing to remove plastic, but not oxidized plastic. Now your leveling the plastic. The finished product
again, looked real hazy (as per directions stated as well).
Step 3:
Wipe away plastic residue, remove disc 2 and install disc 3. The Trizact Disc. This is that HTPSFWAWD one I was referring to earlier. Give the pad a spritz or two of water, and start sanding again. This disc is a little more sensitive as I learned after running over a nipple. It took the sanding elements away and left me a perfect circle with no more sanding
abrasives in about a 1/8th area. (And I still hade one light to go!) I continued sanding, creating a little slurry mixture of plastic and abrasives. I could see at this point that the plastic was starting to come alive. I probably spent the majority of time, maybe 5 minutes in all, with this disc. Getting around those nipples was the strenuous part, as I didnt want to go
through the masking tape, however this disc was cushioned and had some to give, so I used every bit of it. Still being wary of "what could happen".
Step 4:
Wipe away slurry, afix foam polishing pad and added the included Headlight Lens Polish. Just a few small dabs on the orange waffle texture pad. Ran in over the surface a few times and added a few more dabs to help saturate it. Then just polished away! Not a big fear of ruining the tape at this point, but still played it cautious as one should. Again, nothing unusual about the technique or routine. I used the same rational as I would if I was approaching paint.
A few notes of interest. This work all came about several months ago when a friend approached me and asked what he could do to repair his foggy headlights. I said I would take care of it for him. This guys wife cooks incredible mexican
food, and well, we sort of barter from time to time! Well, he texts me today and tells me "this guys said he would take care of my paint, wonder what happened to him". This is another story in itself. He let a "friend" borrow his
truck to haul some tree branches away? Well, they got pine sap on the side panels, and tried to get it off with a friggin Scotchbrite pad! Well, I told him i would take care of that too! So, now I can kill two birds (make it cats) with one stone (We seem to be talking about cats as of late). So after I compounded the side of his truck, and polished them out (then sealed) I set out upon the headlights. I figured (and told him) that if I screwed something up, I didnt want it to be on my own truck!
So heres some pics, and if theres any questions, just ask.
Oh, I walked away with 25 fresh made Chicken Tamales and 6 huge Avocadoes!
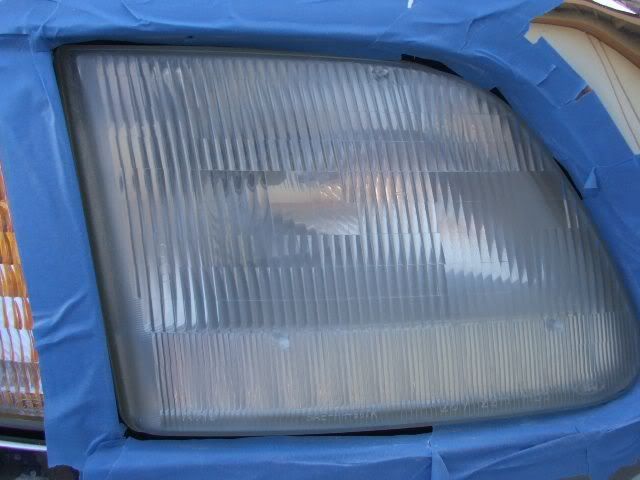
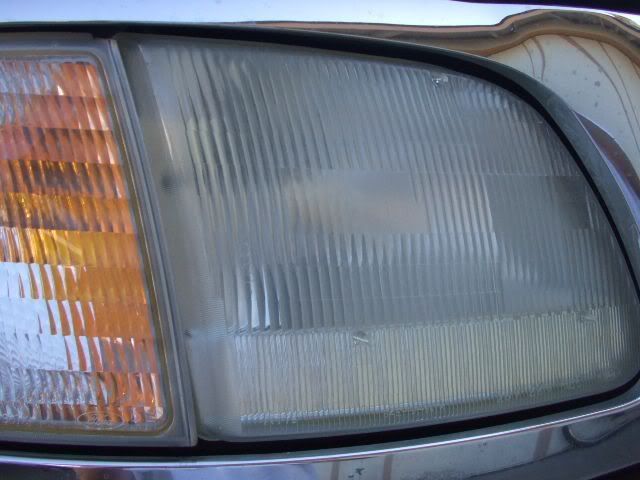
Before:
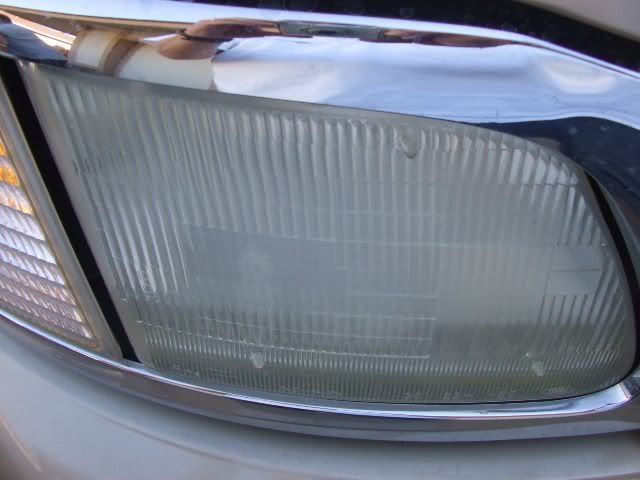
After tape:
Step 1:
Step 2:
Step 3:
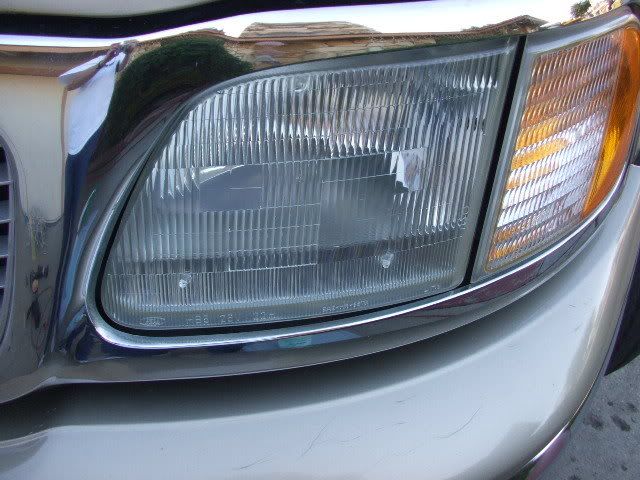
After Polishing:
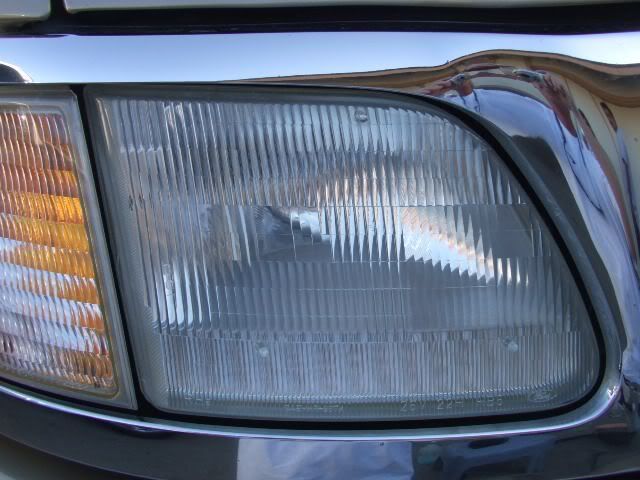
Before and After:
All in all, I was very pleased with the results my first time out. Does it have anything over a sheet of wetsanding paper and some optimum polish? I truly believe it does. And I think due to this particular kit, im going to up my services for Headlight Restoration. The kits $20.00 vs. $100.00+for the lens (domestic, foreign are over $200.00!) I figured in my area, i could probably set aside some detailing and save several hours all while making $100.00 in about an hr. restoring headlights. It will take some marketing from a different angle, but face it, Im not getting any younger, the arms are getting much older, and time is more precious.
This is a keeper in my book, and I hope to be able to resell from 3M as well, onsite.
for quite a long time. Matter of fact 3M SMR (for Dark) was one of the first choices I selected for detailing many years ago.
I viewed their YouTube video and decided it was easy enough for even me. The video describes the exact process and tools required (cordless drill basically) to the "t". I was very impressed with how uncomplicated they made the process appear.
I called the local Auto Zone to see if they carried any, the salesman said he had one left and would be happy to hold it for me. Off I went, 8:30 last night to retrieve my new toy.The 3M HRS retails for around $21.00 at Auto Zones.
Contains 1 backing plate, suited for cordless drill. 1 Soft interface pad for cushion (velcro backed). 6 sanding discs, 4 finishing discs, 1 Trizact disc, (which i think is some hi tech padded superfast water absorbing wetsanding disc, otherwise known as a HTPSFWAWD.
1oz headlight polish in a pouch, 1 very familiar looking Orange buffing pad. All you need is a household or cordless drill, masking tape (painters) and a spray bottle with water
Preliminary steps: Wash headlight with soapy water to remove bug splatter and debris. I opted for AquaWax as that was all I had close to me. Tape off surrounding areas, twice. I later learned 3 times is even better on the hard to get to angles. Especially where the nipples are on some headlights. Getting around those can be difficult.
Step One:
Install backing plate onto drill and secure. Fasten velcro sanding disc P500 (The more abrasive) I simply ran the drill across the surface and the disc immediately abraded away any plastic oxidation. I probably ran over the surface a total of 3 times, just as I would have if I was polishing with the UDM/PC. Same technique matter of fact. Once the headlight was real foggy or hazy, I figured I was done with this step. It took a little finesse around the nipples. I had to make sure when I elevated the disc to go around them, that #1 I wasnt
making alot of contact with the tape, as it would tear through rather quickly, and #2 I wasnt topping the nipple with the disc which would abrade it down, or worse, away!
Step 2:
Wipe away sanded plastic from headlight, install disc #2 P800.
Same process as step one, 3 passes at a minimum, depending on how much you sanded with step one. Step one quickly whisks away the oxidation, but if you spend more time with step one, you will need more time with step 2. Disc 2 is the finer of the discs, so if you left a lot of swirls with disc 1, several passes will be needed. I must have hit it just right, as I think disc 2 wasnt as long a time. When your at this stage, your continuing to remove plastic, but not oxidized plastic. Now your leveling the plastic. The finished product
again, looked real hazy (as per directions stated as well).
Step 3:
Wipe away plastic residue, remove disc 2 and install disc 3. The Trizact Disc. This is that HTPSFWAWD one I was referring to earlier. Give the pad a spritz or two of water, and start sanding again. This disc is a little more sensitive as I learned after running over a nipple. It took the sanding elements away and left me a perfect circle with no more sanding
abrasives in about a 1/8th area. (And I still hade one light to go!) I continued sanding, creating a little slurry mixture of plastic and abrasives. I could see at this point that the plastic was starting to come alive. I probably spent the majority of time, maybe 5 minutes in all, with this disc. Getting around those nipples was the strenuous part, as I didnt want to go
through the masking tape, however this disc was cushioned and had some to give, so I used every bit of it. Still being wary of "what could happen".
Step 4:
Wipe away slurry, afix foam polishing pad and added the included Headlight Lens Polish. Just a few small dabs on the orange waffle texture pad. Ran in over the surface a few times and added a few more dabs to help saturate it. Then just polished away! Not a big fear of ruining the tape at this point, but still played it cautious as one should. Again, nothing unusual about the technique or routine. I used the same rational as I would if I was approaching paint.
A few notes of interest. This work all came about several months ago when a friend approached me and asked what he could do to repair his foggy headlights. I said I would take care of it for him. This guys wife cooks incredible mexican
food, and well, we sort of barter from time to time! Well, he texts me today and tells me "this guys said he would take care of my paint, wonder what happened to him". This is another story in itself. He let a "friend" borrow his
truck to haul some tree branches away? Well, they got pine sap on the side panels, and tried to get it off with a friggin Scotchbrite pad! Well, I told him i would take care of that too! So, now I can kill two birds (make it cats) with one stone (We seem to be talking about cats as of late). So after I compounded the side of his truck, and polished them out (then sealed) I set out upon the headlights. I figured (and told him) that if I screwed something up, I didnt want it to be on my own truck!
So heres some pics, and if theres any questions, just ask.
Oh, I walked away with 25 fresh made Chicken Tamales and 6 huge Avocados!
Before:
After always being confronted with hazy headlights, on my own and client vehicles, I decided to purchase an actual product designed for headlight restoration. What better company to look to then 3M. 3M has been in car care
for quite a long time. Matter of fact 3M SMR (for Dark) was one of the first choices I selected for detailing many years ago.
I viewed their YouTube video and decided it was easy enough for even me. The video describes the exact process and tools required (cordless drill basically) to the "t". I was very impressed with how uncomplicated they made the process appear.
I called the local Auto Zone to see if they carried any, the salesman said he had one left and would be happy to hold it for me. Off I went, 8:30 last night to retrieve my new toy.The 3M HRS retails for around $21.00 at Auto Zones.
Contains 1 backing plate, suited for cordless drill. 1 Soft interface pad for cushion (velcro backed). 6 sanding discs, 4 finishing discs, 1 Trizact disc, (which i think is some hi tech padded superfast water absorbing wetsanding disc, otherwise known as a HTPSFWAWD.
1oz headlight polish in a pouch, 1 very familiar looking Orange buffing pad. All you need is a household or cordless drill, masking tape (painters) and a spray bottle with water
Preliminary steps: Wash headlight with soapy water to remove bug splatter and debris. I opted for AquaWax as that was all I had close to me. Tape off surrounding areas, twice. I later learned 3 times is even better on the hard to get to angles. Especially where the nipples are on some headlights. Getting around those can be difficult.
Step One:
Install backing plate onto drill and secure. Fasten velcro sanding disc P500 (The more abrasive) I simply ran the drill across the surface and the disc immediately abraded away any plastic oxidation. I probably ran over the surface a total of 3 times, just as I would have if I was polishing with the UDM/PC. Same technique matter of fact. Once the headlight was real foggy or hazy, I figured I was done with this step. It took a little finesse around the nipples. I had to make sure when I elevated the disc to go around them, that #1 I wasnt
making alot of contact with the tape, as it would tear through rather quickly, and #2 I wasnt topping the nipple with the disc which would abrade it down, or worse, away!
Step 2:
Wipe away sanded plastic from headlight, install disc #2 P800.
Same process as step one, 3 passes at a minimum, depending on how much you sanded with step one. Step one quickly whisks away the oxidation, but if you spend more time with step one, you will need more time with step 2. Disc 2 is the finer of the discs, so if you left a lot of swirls with disc 1, several passes will be needed. I must have hit it just right, as I think disc 2 wasnt as long a time. When your at this stage, your continuing to remove plastic, but not oxidized plastic. Now your leveling the plastic. The finished product
again, looked real hazy (as per directions stated as well).
Step 3:
Wipe away plastic residue, remove disc 2 and install disc 3. The Trizact Disc. This is that HTPSFWAWD one I was referring to earlier. Give the pad a spritz or two of water, and start sanding again. This disc is a little more sensitive as I learned after running over a nipple. It took the sanding elements away and left me a perfect circle with no more sanding
abrasives in about a 1/8th area. (And I still hade one light to go!) I continued sanding, creating a little slurry mixture of plastic and abrasives. I could see at this point that the plastic was starting to come alive. I probably spent the majority of time, maybe 5 minutes in all, with this disc. Getting around those nipples was the strenuous part, as I didnt want to go
through the masking tape, however this disc was cushioned and had some to give, so I used every bit of it. Still being wary of "what could happen".
Step 4:
Wipe away slurry, afix foam polishing pad and added the included Headlight Lens Polish. Just a few small dabs on the orange waffle texture pad. Ran in over the surface a few times and added a few more dabs to help saturate it. Then just polished away! Not a big fear of ruining the tape at this point, but still played it cautious as one should. Again, nothing unusual about the technique or routine. I used the same rational as I would if I was approaching paint.
A few notes of interest. This work all came about several months ago when a friend approached me and asked what he could do to repair his foggy headlights. I said I would take care of it for him. This guys wife cooks incredible mexican
food, and well, we sort of barter from time to time! Well, he texts me today and tells me "this guys said he would take care of my paint, wonder what happened to him". This is another story in itself. He let a "friend" borrow his
truck to haul some tree branches away? Well, they got pine sap on the side panels, and tried to get it off with a friggin Scotchbrite pad! Well, I told him i would take care of that too! So, now I can kill two birds (make it cats) with one stone (We seem to be talking about cats as of late). So after I compounded the side of his truck, and polished them out (then sealed) I set out upon the headlights. I figured (and told him) that if I screwed something up, I didnt want it to be on my own truck!
So heres some pics, and if theres any questions, just ask.
Oh, I walked away with 25 fresh made Chicken Tamales and 6 huge Avocadoes!
Before:
After tape:
Step 1:
Step 2:
Step 3:
After Polishing:
Before and After:
All in all, I was very pleased with the results my first time out. Does it have anything over a sheet of wetsanding paper and some optimum polish? I truly believe it does. And I think due to this particular kit, im going to up my services for Headlight Restoration. The kits $20.00 vs. $100.00+for the lens (domestic, foreign are over $200.00!) I figured in my area, i could probably set aside some detailing and save several hours all while making $100.00 in about an hr. restoring headlights. It will take some marketing from a different angle, but face it, Im not getting any younger, the arms are getting much older, and time is more precious.
This is a keeper in my book, and I hope to be able to resell from 3M as well, onsite.
 01-09-2009, 11:54 PM
#2
Nice DIY...looks like it took you a while to script that.
I have done mine a few times now...a reality of plastic lens life.
I love the comment on where you replaced "birds" with "cats"
How fitting with the "I hate cats" flavor of the month.
I have done mine a few times now...a reality of plastic lens life.
I love the comment on where you replaced "birds" with "cats"
How fitting with the "I hate cats" flavor of the month.
01-10-2009, 01:26 AM
#3
Racer
Join Date: Jan 2007
Location: Northern Virginia
Age: 51
Posts: 439
Likes: 0
Received 1 Like
on
1 Post
Nice write up Pat! looks like it did a nice job. I usually do the wet sanding or simple compounding followed by a finishing polish route. I was surprised to hear you say the 3M kit appeared to be better than wetsanding. Heck for $20 I might just have to pick one up myself and see. Thanks again for the nice write up.
01-10-2009, 07:52 AM
#5
Everyday Joe

Join Date: Jul 2004
Location: Hampton Roads, VA (Smithfield)
Age: 49
Posts: 888
Likes: 0
Received 0 Likes
on
0 Posts
I've never had nasty, foggy headlight lens, but I've just used something from Meguires that was maybe 10 bucks and have always gotten very good results to spruce up my headlights. In fact, a buddy of mine used it on his 01 Jeep GC's nasty headlights and got great results. Plus it saved him over a hundred bucks that the dealer was trying to charge him.
No doubt that some people will pay $100 for a headlight buffing, but there are easy to apply products that do 90% of the work for 10% of the price.
No doubt that some people will pay $100 for a headlight buffing, but there are easy to apply products that do 90% of the work for 10% of the price.
01-10-2009, 10:16 AM
#6
Former Sponsor
Thread Starter
No doubt that some people will pay $100 for a headlight buffing, but there are easy to apply products that do 90% of the work for 10% of the price.
Once adults reach there mid 40's, the begin to lose the ability to grab spectrums of light. Its the inability of the retina, to process the light. By the time they are in there 60's they require 40% more light, to see the same source of light. Think about that the next time your driving a dark, undivided road late at night. Would you be happy knowing they went the cheaper route as they head toward you at 45mph?
I think when you can justify the need for this, you can make the sale for the restoration with a top of the line product. And comon, its $20.00!
01-10-2009, 10:36 AM
#7
Sounds like a good sales pitch.
There are people that will do it and I have seen this service available at some of my local detailing shops.
So as I see it...why not.
Let's face it...people are lazy by design and it won't cost you really any overhead to supply the materials.
Does that kit come with the UV protection to prevent it from again hazing over?
Trending Topics
01-10-2009, 12:19 PM
#8
Former Sponsor
Thread Starter
No, thats an additional $50.00 for the 3M custom fit kit (headlights and driving/fog lights). Add that on and your covered for as long as you own the car against oxidation and damage. So for about $70.00, you could theoretically save a potential $330.00 if you drove say a.....TL ....
01-10-2009, 12:57 PM
#11
Former Sponsor
Thread Starter
D, I already posed that question to 3M, to which there response was, "the discs are not available online, but please check with local 3M distribution points"........they then provided a comprehensive list of suppliers in my area. As for the Rockblocker kits, all you have to do is ask! I can get them for you.
01-10-2009, 05:35 PM
#12
The Detailer
iTrader: (1)
Join Date: Jul 2008
Location: Hollister / San Jose, CA
Age: 41
Posts: 1,090
Likes: 0
Received 0 Likes
on
0 Posts
Interesting... I'll have to look into this and see if I can piece together this kit or similar.
So far I've been sanding with 1000, 2000, 3000 Unigrit and a backing pad; then following up with 4" pads by compounding/polishing. That actually works pretty well but if I can cut down on some time by using those sanding discs, I'd be perfectly set.
So far I've been sanding with 1000, 2000, 3000 Unigrit and a backing pad; then following up with 4" pads by compounding/polishing. That actually works pretty well but if I can cut down on some time by using those sanding discs, I'd be perfectly set.
 01-11-2009, 08:45 AM
#16
Everyday Joe
Join Date: Jul 2004
Location: Hampton Roads, VA (Smithfield)
Age: 49
Posts: 888
Likes: 0
Received 0 Likes
on
0 Posts
Same with Carnaubas! More like 95% of the work, for 75% less of your cash.
Once adults reach there mid 40's, the begin to lose the ability to grab spectrums of light. Its the inability of the retina, to process the light. By the time they are in there 60's they require 40% more light, to see the same source of light. Think about that the next time your driving a dark, undivided road late at night. Would you be happy knowing they went the cheaper route as they head toward you at 45mph?
I think when you can justify the need for this, you can make the sale for the restoration with a top of the line product. And comon, its $20.00!
 01-11-2009, 06:50 PM
#19
Everyday Joe
Join Date: Jul 2004
Location: Hampton Roads, VA (Smithfield)
Age: 49
Posts: 888
Likes: 0
Received 0 Likes
on
0 Posts


Thread
Thread Starter
Forum
Replies
Last Post
handsom-hustla
Car Parts for Sale
70
11-13-2015 05:04 PM
CheeseyPoofs McNut
5G TLX (2015-2020)
35
10-11-2015 11:25 AM
prox
5G TLX Problems & Fixes
6
09-01-2015 02:03 AM