
DIY Tein S Tech CU2

DIY Tein S Tech CU2
Cant stress enough to plan ahead, try to make sure you have all the tools and be patient.
I did the back first because it was after work and I figured I could do those faster than the fronts. No need to take the seat out. Just pop off the plastic covers after droping your back seats down. With a 3 inch extension and a ratchet you can get in there and remove the 2 nuts.
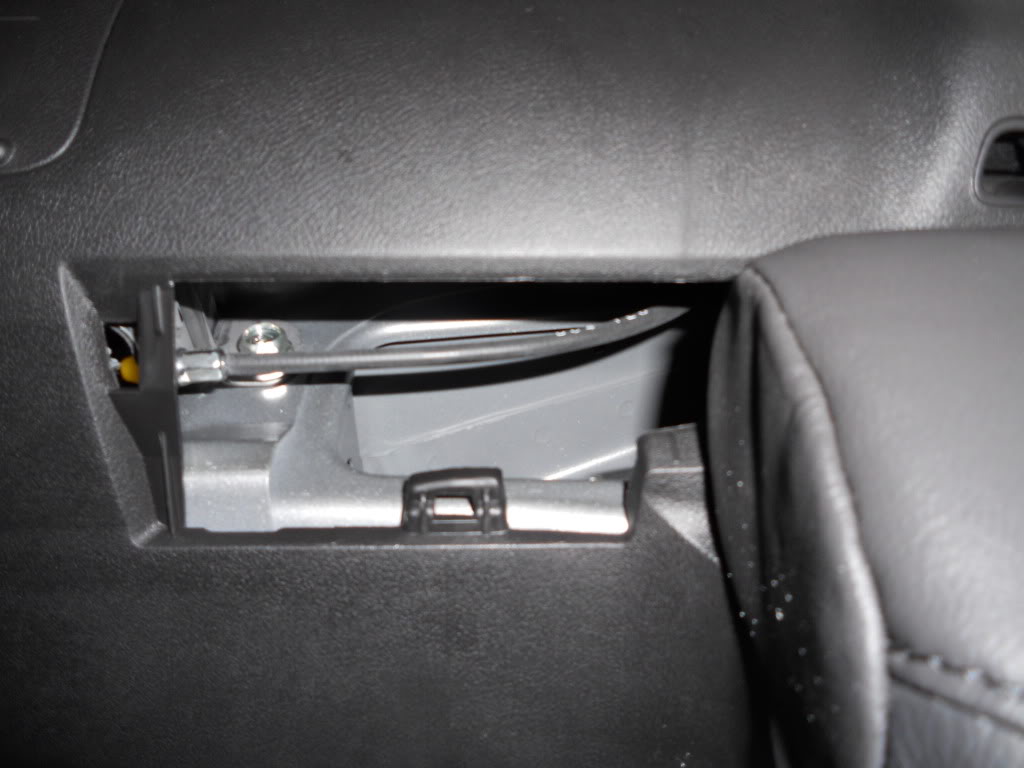
2 nuts on top. One on bottom. I hit all bolts under the car with WD40 or some kind of liquid wrench. Once all bolts are loose you either need a friend to step on the lugs to move the suspension down or do what I saw Tisivich do. Throw the jack inbetween the suspension piece and frame.
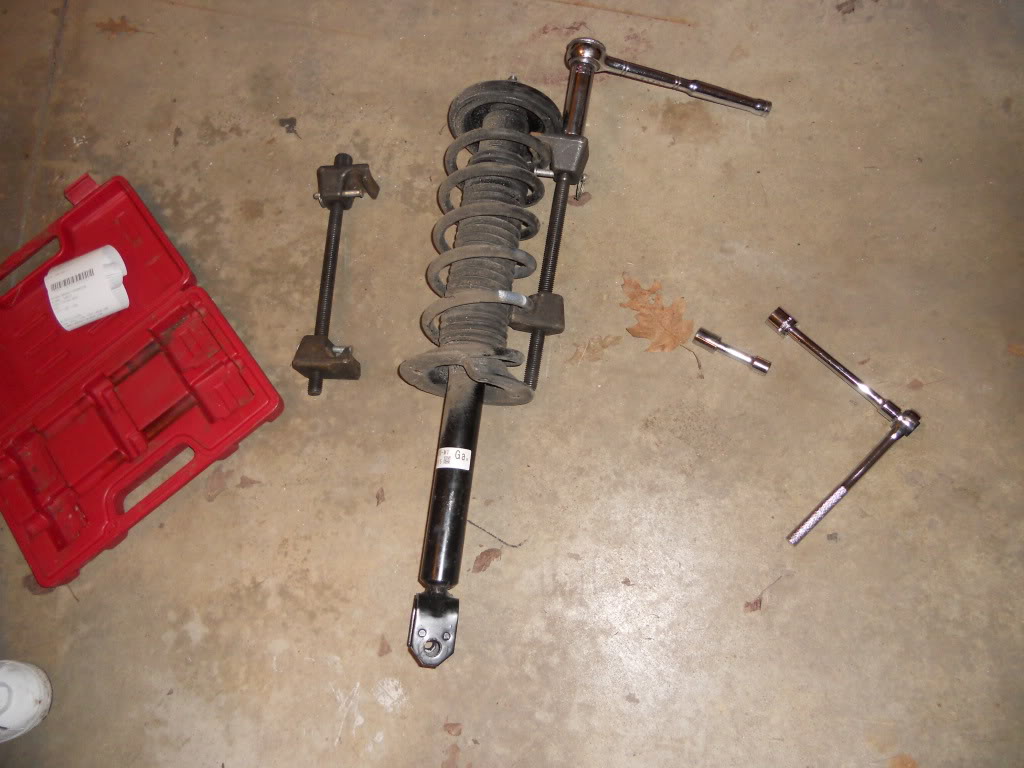
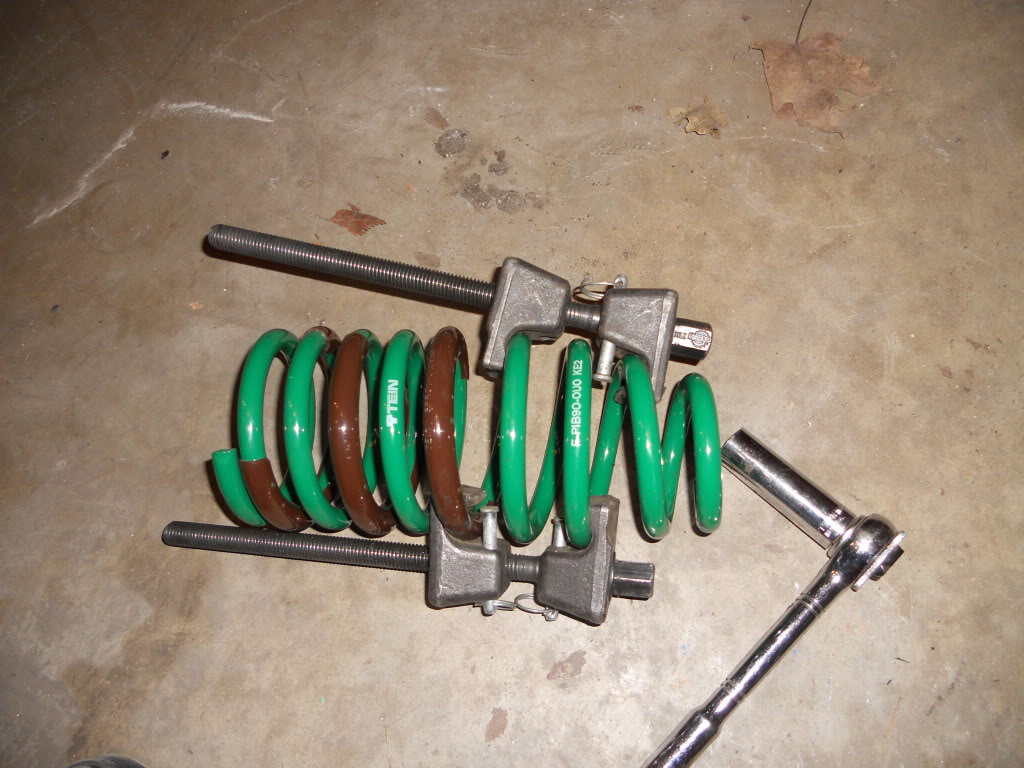
Once out get your spring compressor. I got one from autozone. Buy it for $50 then return it for 100% refund.
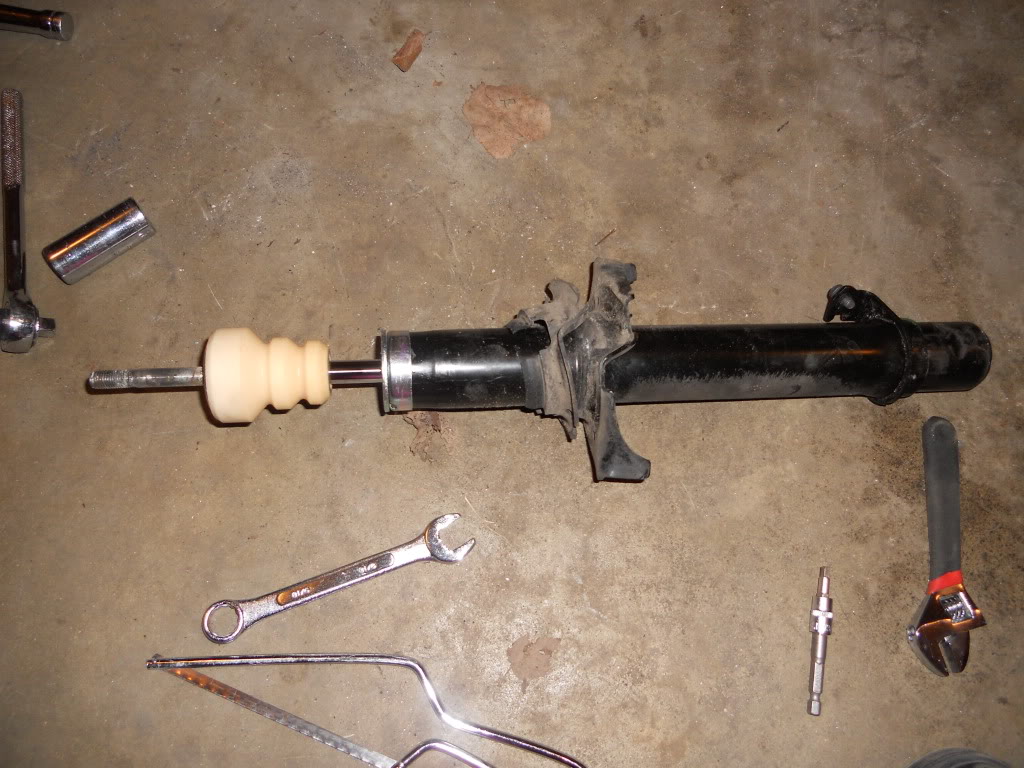
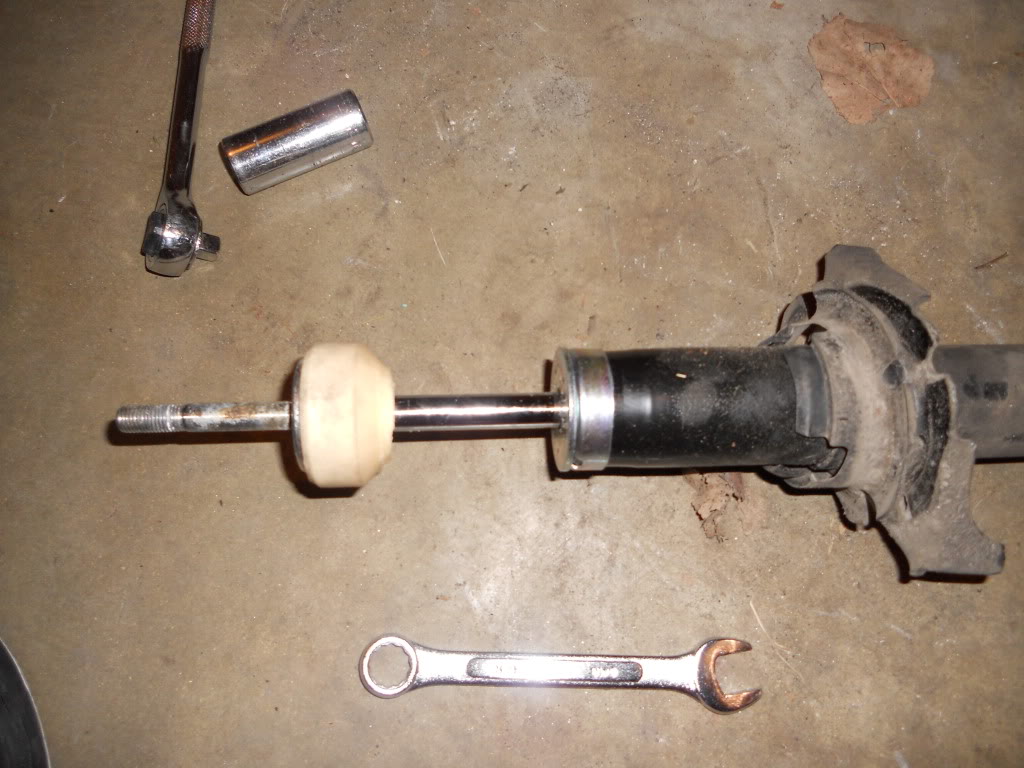
Here was a tricky part. Didnt know the bolt had an allen head inside it. Need to secure that while loosening the retaining nut.

Per Tein instructions dont forget to cut the bump stops.
Install every thing back. The backs are alot easier because you dont need the spring compressor to get the rear springs back on and there are less bolts to deal with.
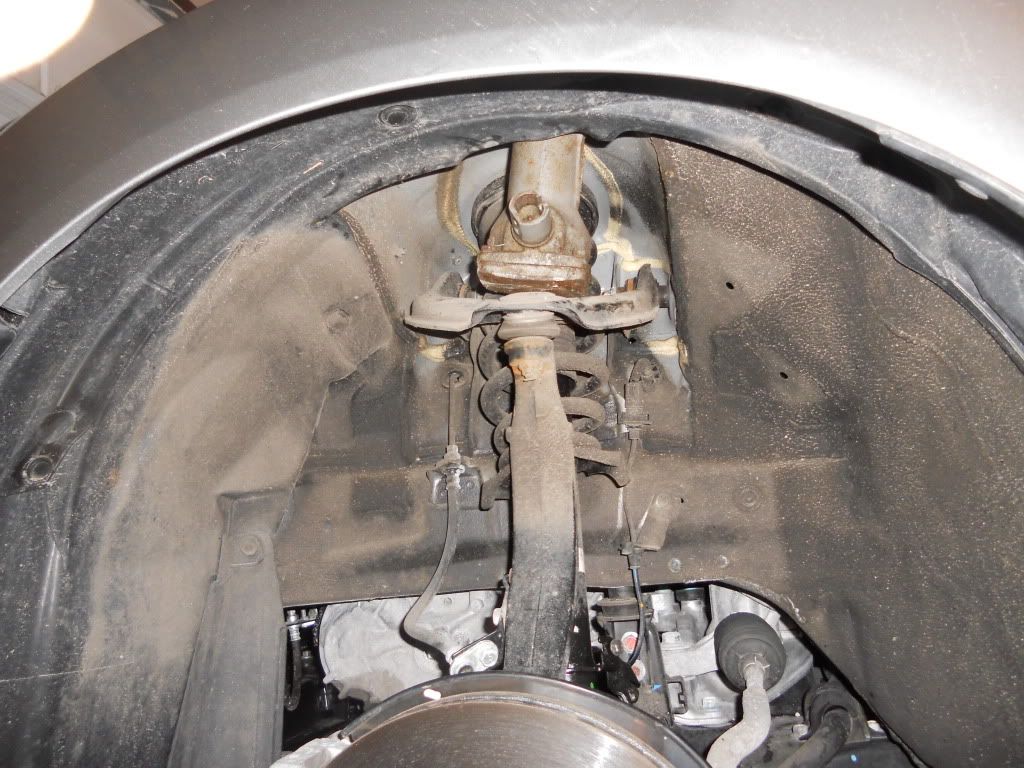
Now the fronts. I didnt have a guide so I just took off the wheel and looked at what needed removed. It really wasnt as bad as I thought it was going to be.
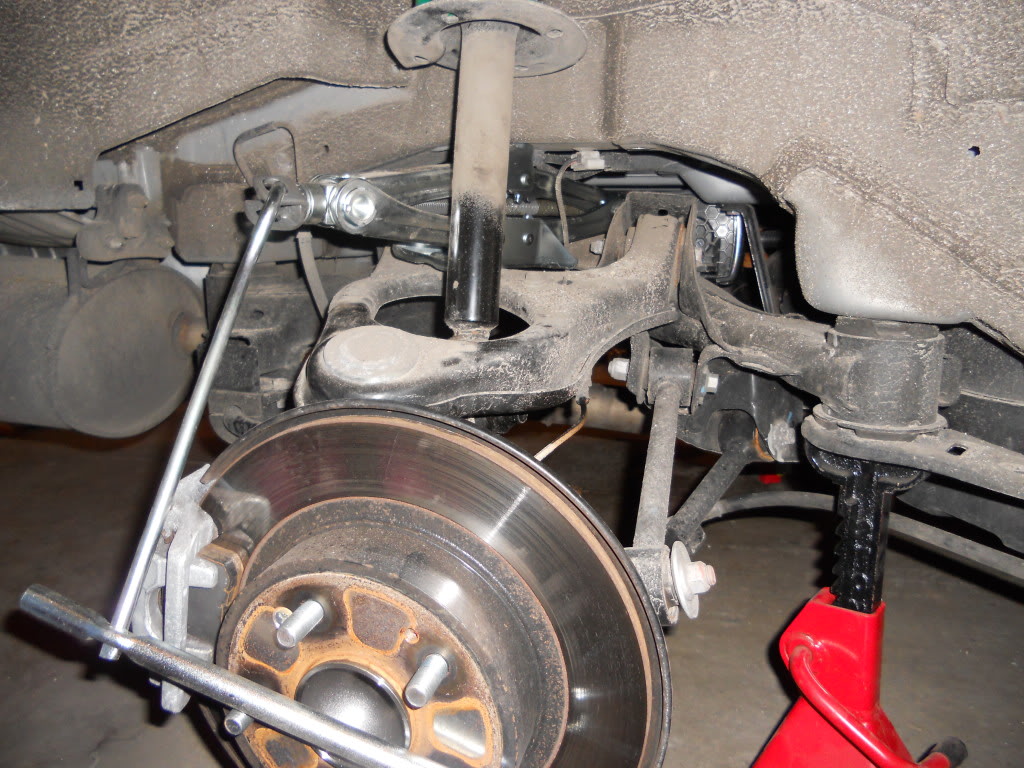
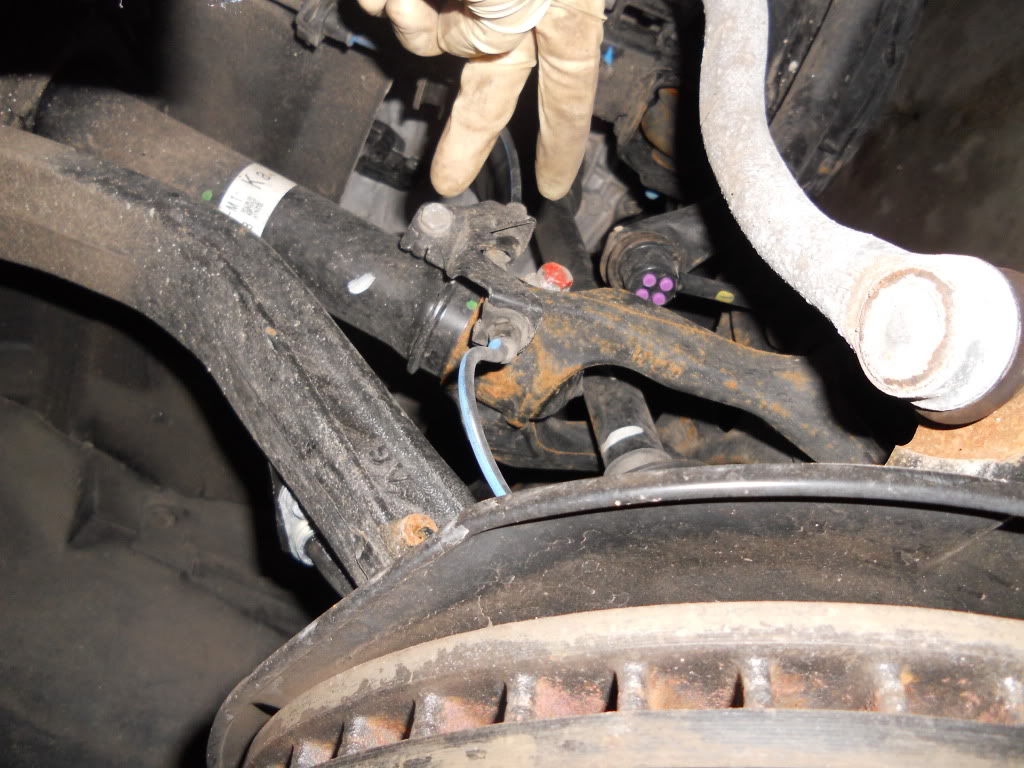
These were the nuts and bolts I removed from the bottom.
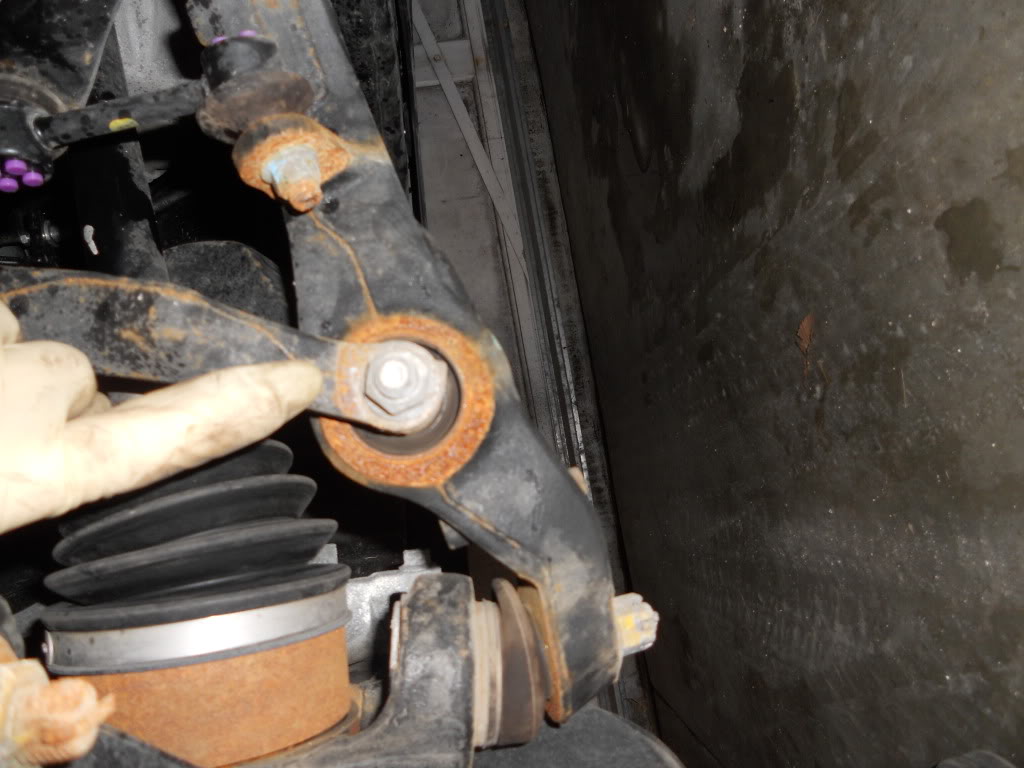
Take out the top six bolts and now you have some play but not quite enough to remove. This is where a friend would be able to help by turning the wheel or stepping on the lugs for you. I had a different type of jack that I lodged between the upper arm and inside fender.

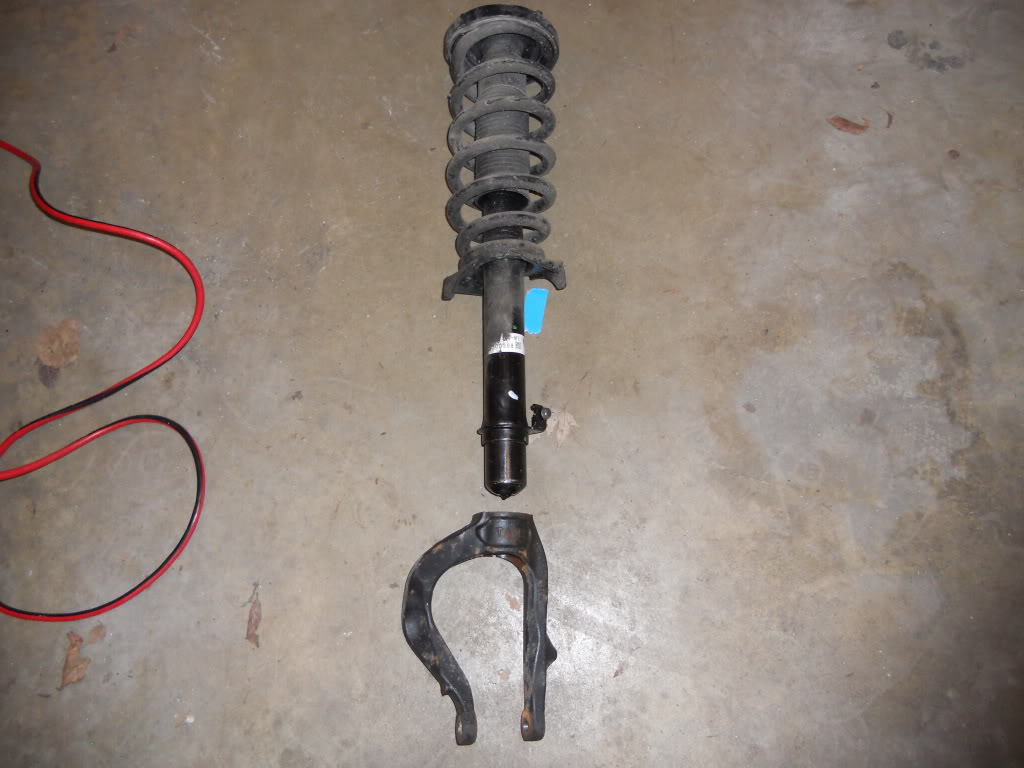
Here are the pieces you pulled out.
Same thing with the spring compressor and shock only this time you need to compress the new spring to get everything bolted back together before putting back in.
Install same way you removed.
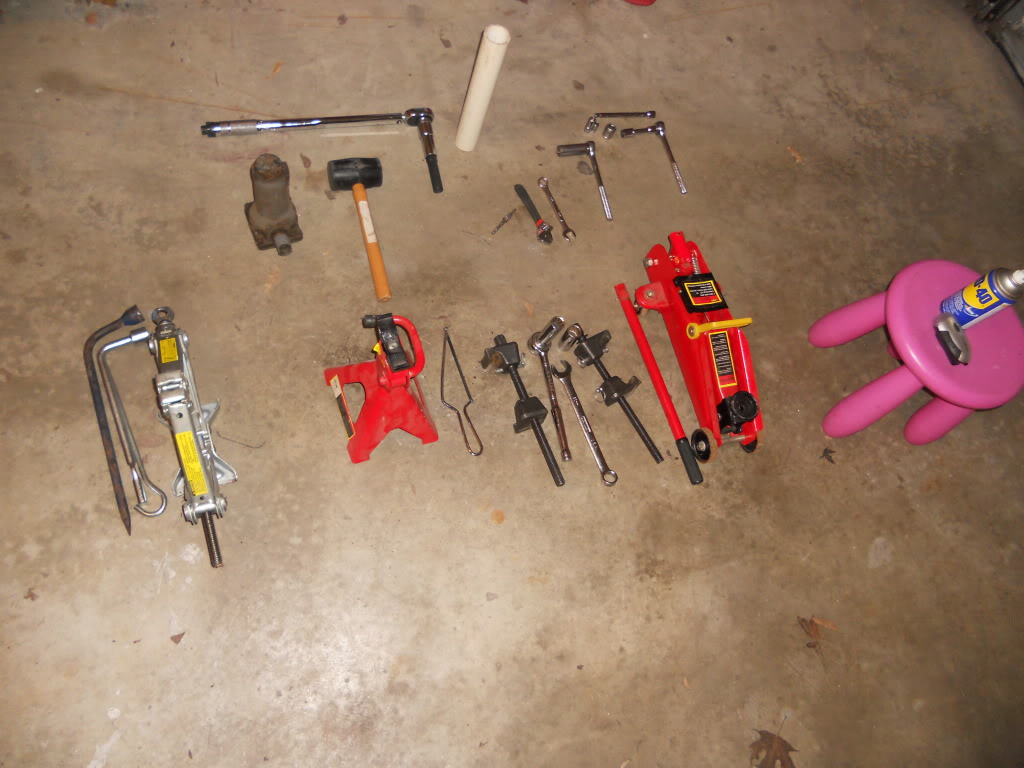
And thats it. No air tools and no help. Here is a pic of all the tools I ended up using.
Plan on doing the alignment in a couple weeks. So far car drives straight and I absolutely love the ride. Very normal when cruising around but firms up nicely during spirited driving. Questions, concerns, or comments welcome.
I did the back first because it was after work and I figured I could do those faster than the fronts. No need to take the seat out. Just pop off the plastic covers after droping your back seats down. With a 3 inch extension and a ratchet you can get in there and remove the 2 nuts.
2 nuts on top. One on bottom. I hit all bolts under the car with WD40 or some kind of liquid wrench. Once all bolts are loose you either need a friend to step on the lugs to move the suspension down or do what I saw Tisivich do. Throw the jack inbetween the suspension piece and frame.
Once out get your spring compressor. I got one from autozone. Buy it for $50 then return it for 100% refund.
Here was a tricky part. Didnt know the bolt had an allen head inside it. Need to secure that while loosening the retaining nut.
Per Tein instructions dont forget to cut the bump stops.
Install every thing back. The backs are alot easier because you dont need the spring compressor to get the rear springs back on and there are less bolts to deal with.
Now the fronts. I didnt have a guide so I just took off the wheel and looked at what needed removed. It really wasnt as bad as I thought it was going to be.
These were the nuts and bolts I removed from the bottom.
Take out the top six bolts and now you have some play but not quite enough to remove. This is where a friend would be able to help by turning the wheel or stepping on the lugs for you. I had a different type of jack that I lodged between the upper arm and inside fender.
Here are the pieces you pulled out.
Same thing with the spring compressor and shock only this time you need to compress the new spring to get everything bolted back together before putting back in.
Install same way you removed.
And thats it. No air tools and no help. Here is a pic of all the tools I ended up using.
Plan on doing the alignment in a couple weeks. So far car drives straight and I absolutely love the ride. Very normal when cruising around but firms up nicely during spirited driving. Questions, concerns, or comments welcome.


3 hours for both rears and 4 hours for both fronts. It definitely isnt as quick as a professional shop but hand cranking that spring compressor takes time and the learning curve on the fronts. Had no plan of action for those and kind of winged it.

Racer
Joined: Nov 2010
Posts: 433
Likes: 51
From: Acworth, Ga
Great write up. Not sure I need to do a write up on my Tien SS install. I agree some circles or arrows pointing would be a little more helpful to the noobs but I guess a noob shouldn't being doing a project like this on their own. Thanks for putting this together.
Trending Topics


SeeYou2Crew #2
Joined: Mar 2009
Posts: 8,574
Likes: 825
From: Socal 626

Advanced
Joined: Nov 2010
Posts: 82
Likes: 1
From: NY
I dont think you mentioned that it is easier to mark the top cap where the oem spring ends before you take the spring off so when you put it back together it will still align perfectly to the chassis.
Good job on the write up man!
Good job on the write up man!
SeeYou2Crew #2
Joined: Mar 2009
Posts: 8,574
Likes: 825
From: Socal 626
In this case the rubber mounts that sit in the top hat have notches and indentations so its really easy to line it back up correctly. But good point. You must have done this before.
Advanced
Joined: Nov 2010
Posts: 82
Likes: 1
From: NY


Pro
Joined: Jun 2010
Posts: 563
Likes: 35
What would be a fair price for a shop to charge to do this? I was quoted $300 and I thought I was getting ripped off. I see it took you 7 hours. If it only took a shop 3.5 hours I guess $300 is still high.
I would think $225 or less would be fair, no?
I would think $225 or less would be fair, no?
Burning Brakes
Joined: Apr 2011
Posts: 937
Likes: 247
From: Fairfax, VA
Great write up, Gabe. So for the "top hat" nut, you don't have to loosen it before jacking the car up, while there is still load on it? I guess that's why the you need the hex head, so you can take the assembly off, hold the piston from spinning with that in there while you unscrew the top. This is very helpful, thanks again.
I was referring to this nut, btw:

PS - I'm a fan of the pink stool too, I think your daughter and mine would get along...
I was referring to this nut, btw:
PS - I'm a fan of the pink stool too, I think your daughter and mine would get along...
Burning Brakes
Joined: Apr 2011
Posts: 937
Likes: 247
From: Fairfax, VA

Actually no. You dont want to take that top nut off until you have the whole assembly out with the spring compressors squishing the spring down. That nut holds the spring in a compressed state so if you remove it before you take the assembly out the spring could without warning smash you in the hands, arms, head, etc.
Burning Brakes
Joined: Apr 2011
Posts: 937
Likes: 247
From: Fairfax, VA
Actually no. You dont want to take that top nut off until you have the whole assembly out with the spring compressors squishing the spring down. That nut holds the spring in a compressed state so if you remove it before you take the assembly out the spring could without warning smash you in the hands, arms, head, etc.
Burning Brakes
Joined: Jun 2011
Posts: 1,083
Likes: 139
From: Lauderhill/Gainesville, FL
So I gave this a try, first wheel = succes (but it took like 4 hours lol) 2nd wheel however.... the allen stripped even with WD-40 on it. Any suggestions to get it still? I already tried knocking in a slightly bigger allen but that also stripped...

Three Wheelin'
Joined: Jan 2009
Posts: 1,831
Likes: 215
You are talking about the bolt on top of the mount, that holds the entire assembly together? If so, this happened to me. I ended up destroying the assembly, but I also learned that an impact wrench would make quick work of the bolt. Good luck.
Burning Brakes
Joined: Jun 2011
Posts: 1,083
Likes: 139
From: Lauderhill/Gainesville, FL
I called Midas and I told the guy I wanted the bolt cut (didn't know what else to ask for lol) and he told me he would torch it off o.O. Ima stop by today after classes and see how much he'll charge me for him to just use the impact gun. Thanks a lot.
Three Wheelin'
Joined: Mar 2002
Posts: 1,377
Likes: 362
From: MD
A tip for anyone who wants to tackle this job, there is NO need for the scissor jack as it can do some damage to you and your suspension. If the front wheels are off the ground at the same time, just unbolt the sway bar end links and you have all the room to removed the strut assembly from the vehicle without the need for the scissor jack. Also, when reinstalling the struct assembly, do NOT bolt the fork and main bolt in place until you have both structs in place and secured to the shock towers. Once again, giving you plenty of room to work with to get the fork and main bolts in place.
As for the rear, use an ax handle, sledge hammer handle, or a long sturdy piece of wood to push down on the upper control arm to get the strut assembly in and out. Just make sure both both wheels are in the air on jack stands or a sturdy floor jack. Hope that helps
As for the rear, use an ax handle, sledge hammer handle, or a long sturdy piece of wood to push down on the upper control arm to get the strut assembly in and out. Just make sure both both wheels are in the air on jack stands or a sturdy floor jack. Hope that helps
Burning Brakes
Joined: Jun 2011
Posts: 1,083
Likes: 139
From: Lauderhill/Gainesville, FL
A tip for anyone who wants to tackle this job, there is NO need for the scissor jack as it can do some damage to you and your suspension. If the front wheels are off the ground at the same time, just unbolt the sway bar end links and you have all the room to removed the strut assembly from the vehicle without the need for the scissor jack. Also, when reinstalling the struct assembly, do NOT bolt the fork and main bolt in place until you have both structs in place and secured to the shock towers. Once again, giving you plenty of room to work with to get the fork and main bolts in place.
As for the rear, use an ax handle, sledge hammer handle, or a long sturdy piece of wood to push down on the upper control arm to get the strut assembly in and out. Just make sure both both wheels are in the air on jack stands or a sturdy floor jack. Hope that helps
As for the rear, use an ax handle, sledge hammer handle, or a long sturdy piece of wood to push down on the upper control arm to get the strut assembly in and out. Just make sure both both wheels are in the air on jack stands or a sturdy floor jack. Hope that helps
Racer
Joined: Mar 2011
Posts: 492
Likes: 104
Dang that is a PITA. Sorry to hear about your troubles. I hope you dont have to buy a replacement shock absorber. If it is any consolation the rears will go alot faster and easier.
Three Wheelin'
Joined: Mar 2002
Posts: 1,377
Likes: 362
From: MD

Burning Brakes
Joined: Jun 2011
Posts: 1,083
Likes: 139
From: Lauderhill/Gainesville, FL
Thanks for the advice guys. I went to a car place called Tuffy up here in Gainesville and for a few bucks the guy took off the bolt with an impact wrench and even changed my springs for me. (Yay me!)


Advanced
Joined: Aug 2010
Posts: 70
Likes: 2
From: Kingston, NY
I just installed my fronts, and just so you know, the reason why you had a problem with the front install is because you were doing it backwards as shown here:

You want to push the LCA UP, not down to get the shock assembly out. You can do this all by yourself with some wiggling and also removing the sway bar endlink helps with some give and play. I was able to install both sides in under 1:30 by myself. Also, you can take off the tophat from the top with an airgun so you dont have to use the spring compressor to take off the stock springs.
You want to push the LCA UP, not down to get the shock assembly out. You can do this all by yourself with some wiggling and also removing the sway bar endlink helps with some give and play. I was able to install both sides in under 1:30 by myself. Also, you can take off the tophat from the top with an airgun so you dont have to use the spring compressor to take off the stock springs.
VTEC just kicked in, yo!
Joined: Jan 2014
Posts: 4,361
Likes: 1,113
From: Toronto, ON
I just installed my fronts, and just so you know, the reason why you had a problem with the front install is because you were doing it backwards as shown here:
You want to push the LCA UP, not down to get the shock assembly out. You can do this all by yourself with some wiggling and also removing the sway bar endlink helps with some give and play. I was able to install both sides in under 1:30 by myself. Also, you can take off the tophat from the top with an airgun so you dont have to use the spring compressor to take off the stock springs.
You want to push the LCA UP, not down to get the shock assembly out. You can do this all by yourself with some wiggling and also removing the sway bar endlink helps with some give and play. I was able to install both sides in under 1:30 by myself. Also, you can take off the tophat from the top with an airgun so you dont have to use the spring compressor to take off the stock springs.
Intermediate
Joined: Aug 2013
Posts: 36
Likes: 3
From: New Orleans
Thanks for the write up. It helped me some what installing h&r springs.
I thought the fronts were easier to do. For the rear I also disconnected the endlinks to sway.
If I were to do it again I probably could do it in 2-3hrs.
I thought the fronts were easier to do. For the rear I also disconnected the endlinks to sway.
If I were to do it again I probably could do it in 2-3hrs.

Thread
Thread Starter
Forum
Replies
Last Post
SUPRMN84
3G TL Audio, Bluetooth, Electronics & Navigation
5
Oct 7, 2015 09:46 PM
Eggs999bacon
2G TSX (2009-2014)
10
Sep 24, 2015 10:08 AM
4drviper
3G TL Tires, Wheels & Suspension
2
Sep 23, 2015 07:42 PM