Wide high beam mod.
 12-13-2014, 09:31 PM
#1

Wide high beam mod.
Sup guys. Im ImagioX1 from Hidplanet.com and want to show you a mod I did to the TL projectors. Reposted from HIDplanet.
We here at HIDplanet are all about getting maximum performance out of our headlights. The TL projectors are know to have one of the greatest high beams of all bixenon projectors. Today I made a quick tutorial on how to modify your already awesome TL projectors to have a much wider high beam than stock! Yeah MUCH wider. Nearly reaching the edges of the lowbeam. Its very easy and doesnt take much time at all. The edges of the modified highbeam are not as bright as the exposed portion but is still very good at lighting up the sides of the road close to you very well. Its good that the sides of the high beam are not as bright as the center too because that keeps the close range light from blinding you and sacrificing you long range distance vision.
First thing you want to do is disassemble your TL projectors and put the parts in a safe place. Keep the foreground limiter plate out as thats what we'll be working with first.
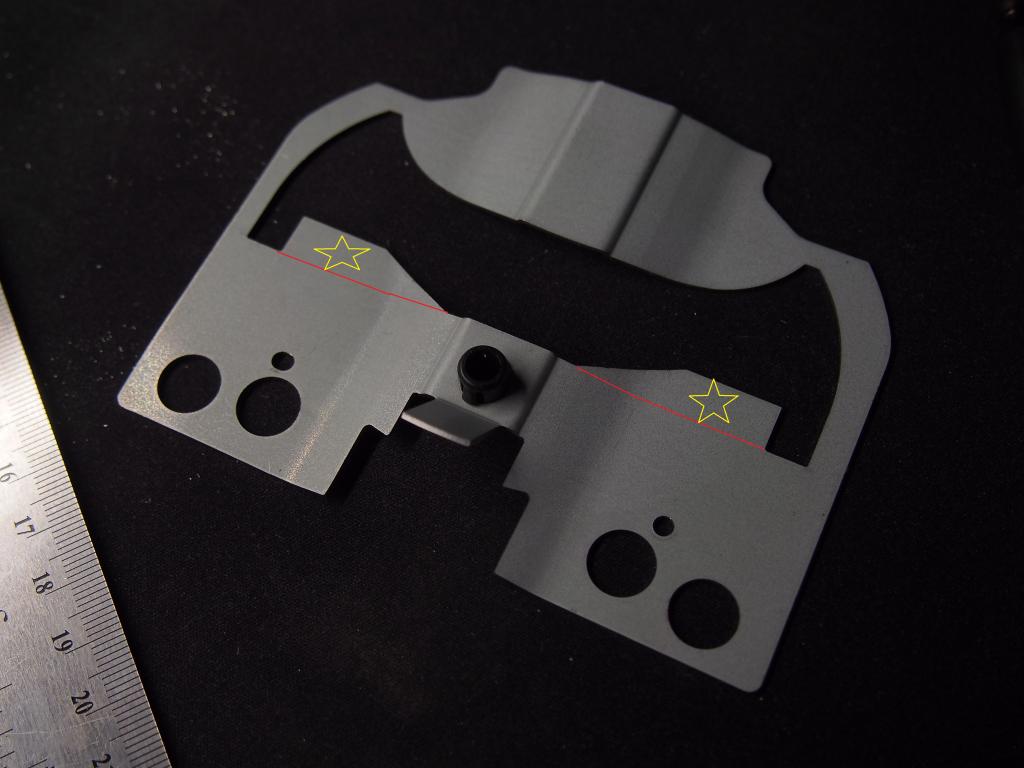
At the bottom of the limiter plate we will find two little "wings" on either side of the plate( marked with a yellow star in the image below). These are the high beam width limiters. We want to remove these little wings by cutting them off on the lines marked with red in the image below.
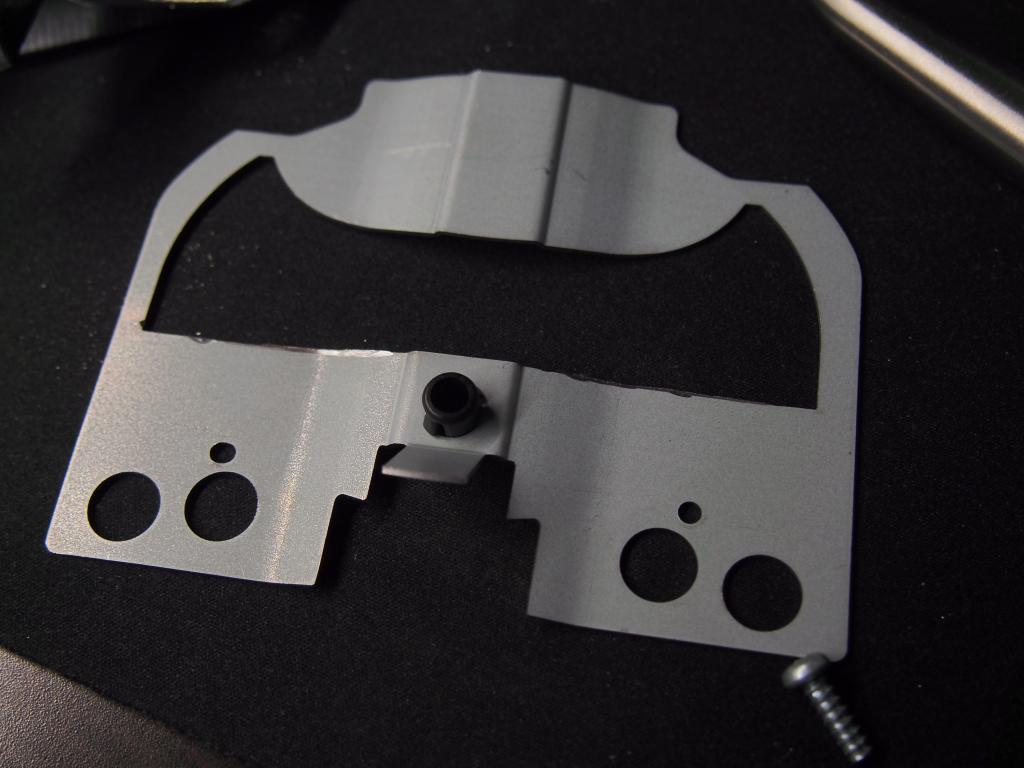
Once cut your limiter should look like this.
Installing the limiter back on the projector we see that there are now two large gaps for light to escape beneath the shield.
Light escaping
So what we want to do is block that light. I found it easiest to drill a hole in the OEM shield so that we can mount a custom shield unto the bottom of it to block that light.
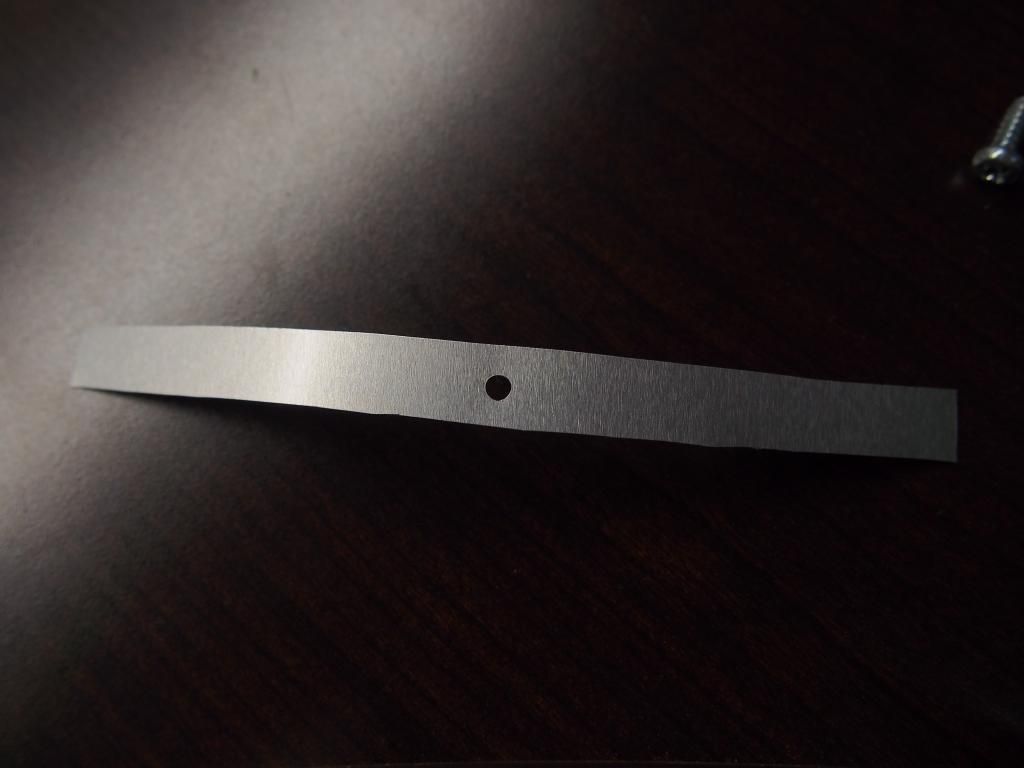
Cut a piece of aluminum flashing the same length as the OEM shield and bend it to fit the curve of the oem shield. Drill a whole in the center and mount it to the OEM shield as shown below.
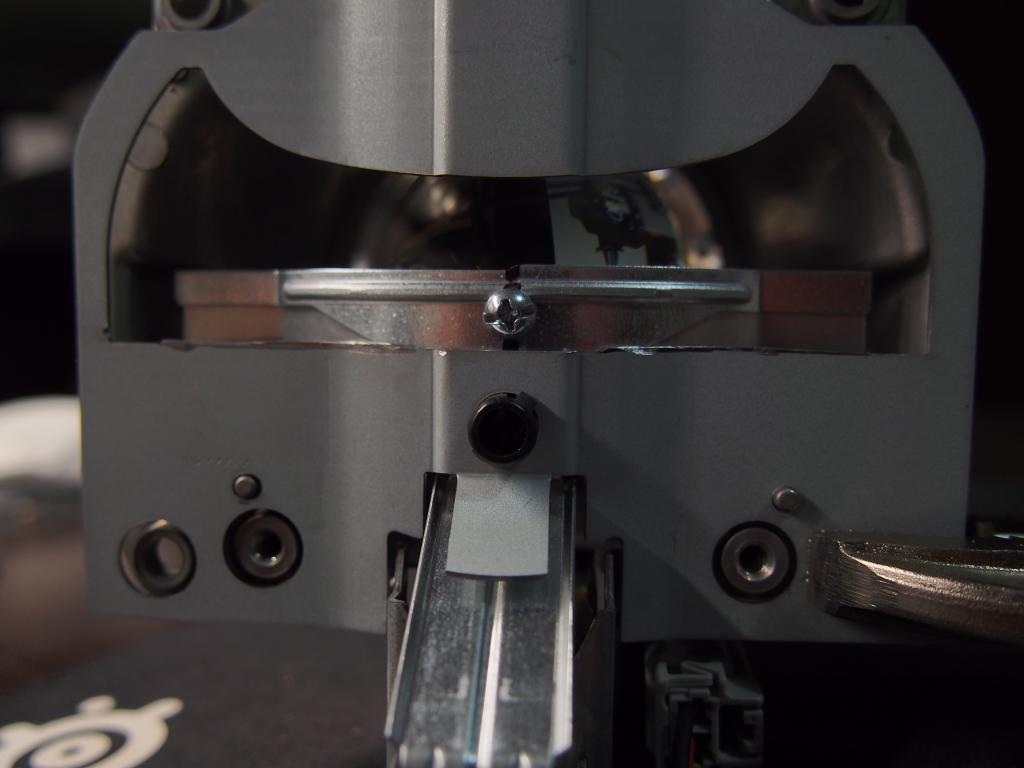
The finished product. As we can see the gaps are now closed. We want to test the solenoid movement and make sure that our custom shield does not impede movement in any kind of way and that the solenoid is able to pull the shield fully into the lower position.
IF everything is moving smoothly with no binding then you are ready to tune the projectors for maximum color and enjoy!
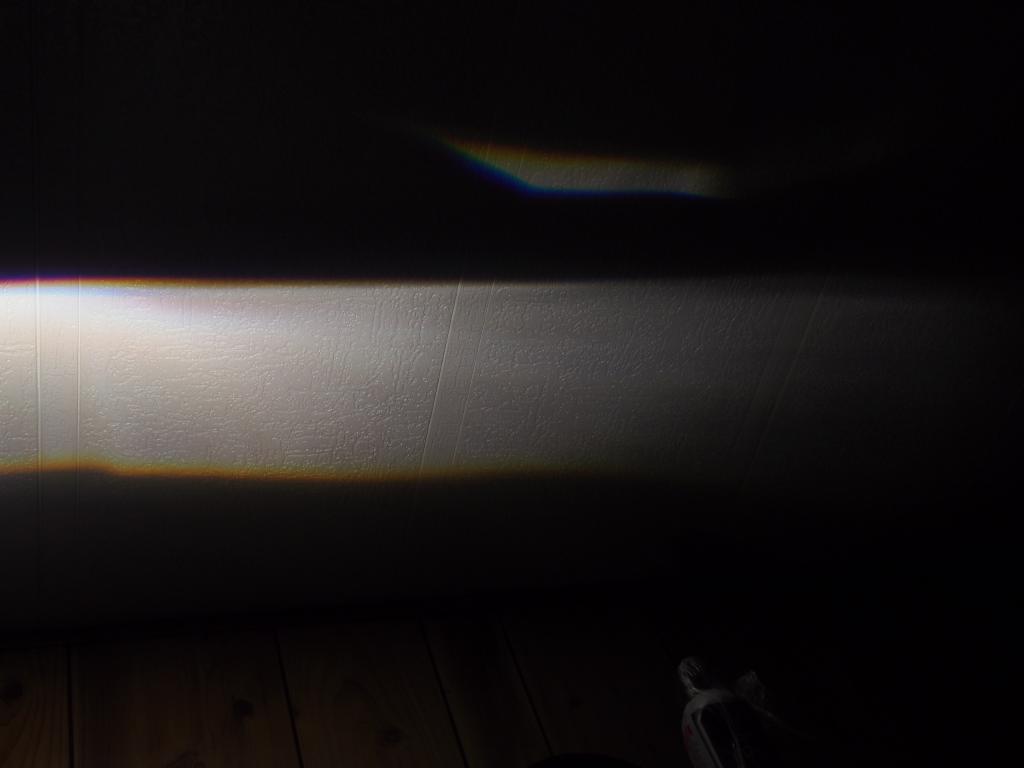
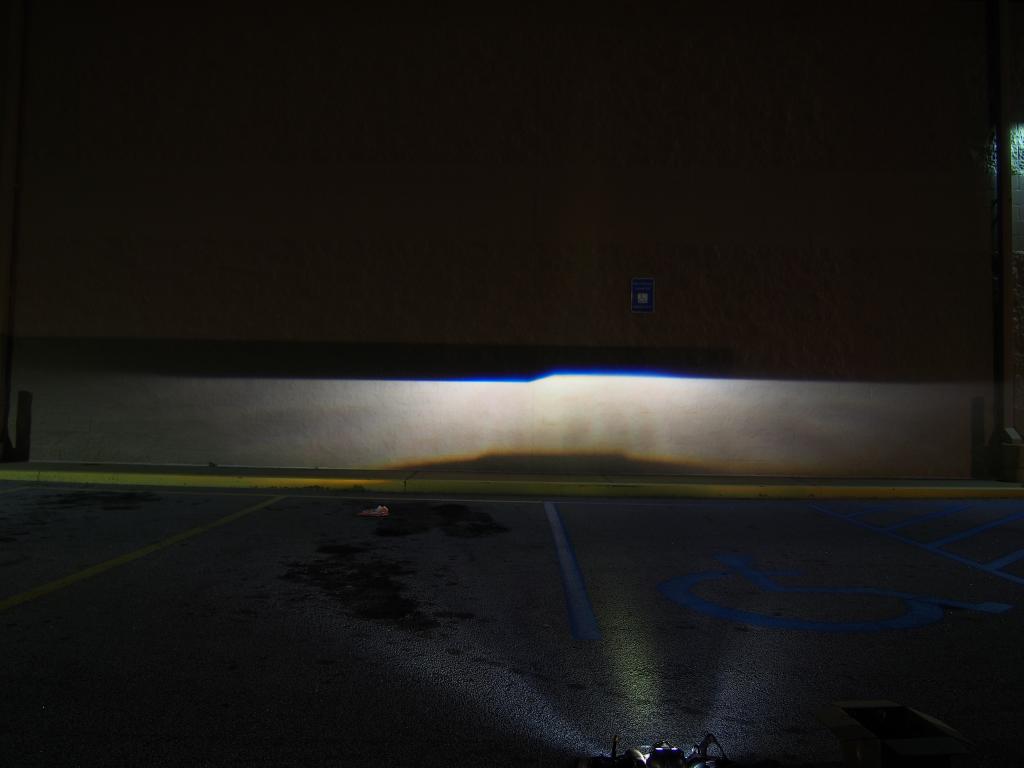
Highbeam
Stock 3rd Gen projectors high beam

Modded high beam
Clear lens and modified shield.
Another modded high beam view.
We here at HIDplanet are all about getting maximum performance out of our headlights. The TL projectors are know to have one of the greatest high beams of all bixenon projectors. Today I made a quick tutorial on how to modify your already awesome TL projectors to have a much wider high beam than stock! Yeah MUCH wider. Nearly reaching the edges of the lowbeam. Its very easy and doesnt take much time at all. The edges of the modified highbeam are not as bright as the exposed portion but is still very good at lighting up the sides of the road close to you very well. Its good that the sides of the high beam are not as bright as the center too because that keeps the close range light from blinding you and sacrificing you long range distance vision.
First thing you want to do is disassemble your TL projectors and put the parts in a safe place. Keep the foreground limiter plate out as thats what we'll be working with first.
At the bottom of the limiter plate we will find two little "wings" on either side of the plate( marked with a yellow star in the image below). These are the high beam width limiters. We want to remove these little wings by cutting them off on the lines marked with red in the image below.
Once cut your limiter should look like this.
Installing the limiter back on the projector we see that there are now two large gaps for light to escape beneath the shield.
Light escaping
So what we want to do is block that light. I found it easiest to drill a hole in the OEM shield so that we can mount a custom shield unto the bottom of it to block that light.
Cut a piece of aluminum flashing the same length as the OEM shield and bend it to fit the curve of the oem shield. Drill a whole in the center and mount it to the OEM shield as shown below.
The finished product. As we can see the gaps are now closed. We want to test the solenoid movement and make sure that our custom shield does not impede movement in any kind of way and that the solenoid is able to pull the shield fully into the lower position.
IF everything is moving smoothly with no binding then you are ready to tune the projectors for maximum color and enjoy!
Highbeam
Stock 3rd Gen projectors high beam

Modded high beam

Clear lens and modified shield.

Another modded high beam view.

Last edited by Steven Bell; 12-16-2014 at 09:21 PM.
 12-14-2014, 03:11 AM
#4
12-14-2014, 01:14 PM
#5
If the images in the first post would just work you would see that the mod doesn't affect the shield at all. I for one have always hated the fact that the TL projects bow downwards and so while I had them open I decided to make them bow upwards slightly. A lot of oem projectors bow upwards on the sides because it helps light up the shoulders of the road better so I think it's an improvement. Either way all it takes is a simple shield tweak and they will be back straight or bow downwards once again.
12-14-2014, 03:55 PM
#7
Very awesome of you to come to this forum and share your knowledge on how to make the TL high beams more wide.
With that being said I don't have the wits to do any headlight modifications and that's why I turn to our vendors.
Honestly I stopped reading everything after "First thing you want to do is disassemble your TL projectors" lol
With that being said I don't have the wits to do any headlight modifications and that's why I turn to our vendors.
Honestly I stopped reading everything after "First thing you want to do is disassemble your TL projectors" lol
Trending Topics
12-14-2014, 04:04 PM
#8
Moderator
iTrader: (7)
this might be worthwhile for someone who has their headlights open for something else alrdy but other than that i think there will be very few ppl who want to open their headlights just for this
one thing to keep in mind, that with mods like this, you have to sacrifice something. Light cant magically appear from the sides without giving up light elsewhere. If you look closely in the center, the center is less intense after the widening of the high beams. It's also not as high as before(just a bit). It's a tradeoff, and I guess its just up to preference. For those who drive in lots of curvy roads, the wider high beam may be worth it. But if not, a more focused and higher high beam(stock) may be better off.
one thing to keep in mind, that with mods like this, you have to sacrifice something. Light cant magically appear from the sides without giving up light elsewhere. If you look closely in the center, the center is less intense after the widening of the high beams. It's also not as high as before(just a bit). It's a tradeoff, and I guess its just up to preference. For those who drive in lots of curvy roads, the wider high beam may be worth it. But if not, a more focused and higher high beam(stock) may be better off.
Last edited by paperboy42190; 12-14-2014 at 04:07 PM.
12-14-2014, 07:47 PM
#9
I'll create another thread tomorrow with the proper pictures when I get a chance. For some reason I can't edit any of my post to add pictures that show how this works. It doesn't sacrifice any light though because of how it works. The pictures may make the center look dimmer but it's not. The factory foreground limiter limits a good portion of the light coming from the bulbs. It is light that is produced bit is just blocked. This mod just unblocks some of that hidden light. Anyway I'll show get the pictures up to show how it works.
12-15-2014, 10:15 AM
#10
Wide highbeam mod-With pics!
I posted another thread about this and never could get the pics working so I decided to give it another try.
The TL projectors are known to have one of the greatest high beams of all bixenon projectors. Today I made a quick tutorial on how to modify your already awesome TL projectors to have a much wider high beam than stock! Yeah MUCH wider. Nearly reaching the edges of the lowbeam. Its very easy and doesnt take much time at all. The edges of the modified highbeam are not as bright as the exposed portion but is still very good at lighting up the sides of the road close to you very well. Its good that the sides of the high beam are not as bright as the center too because that keeps the close range light from blinding you and sacrificing you long range distance vision.
First thing you want to do is disassemble your TL projectors and put the parts in a safe place. Keep the foreground limiter plate out as thats what we'll be working with first.
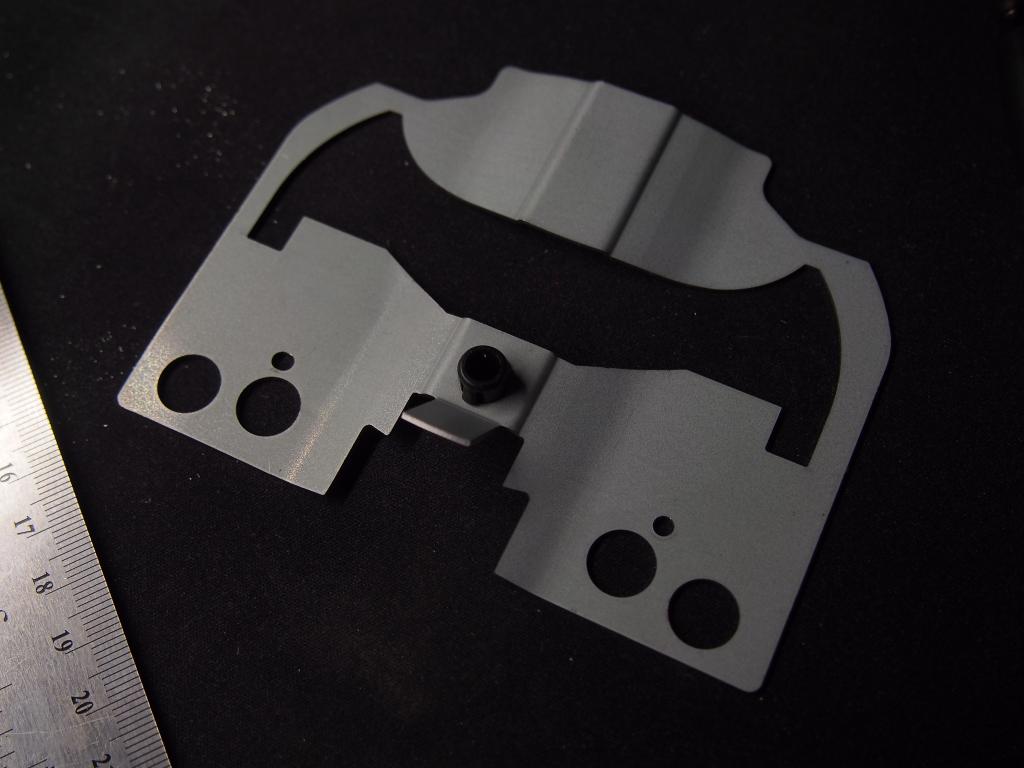
At the bottom of the limiter plate we will find two little "wings" on either side of the plate( marked with a yellow star in the image below). These are the high beam width limiters. We want to remove these little wings by cutting them off on the lines marked with red in the image below.
Once cut your limiter should look like this.
Installing the limiter back on the projector we see that there are now two large gaps for light to escape beneath the shield.
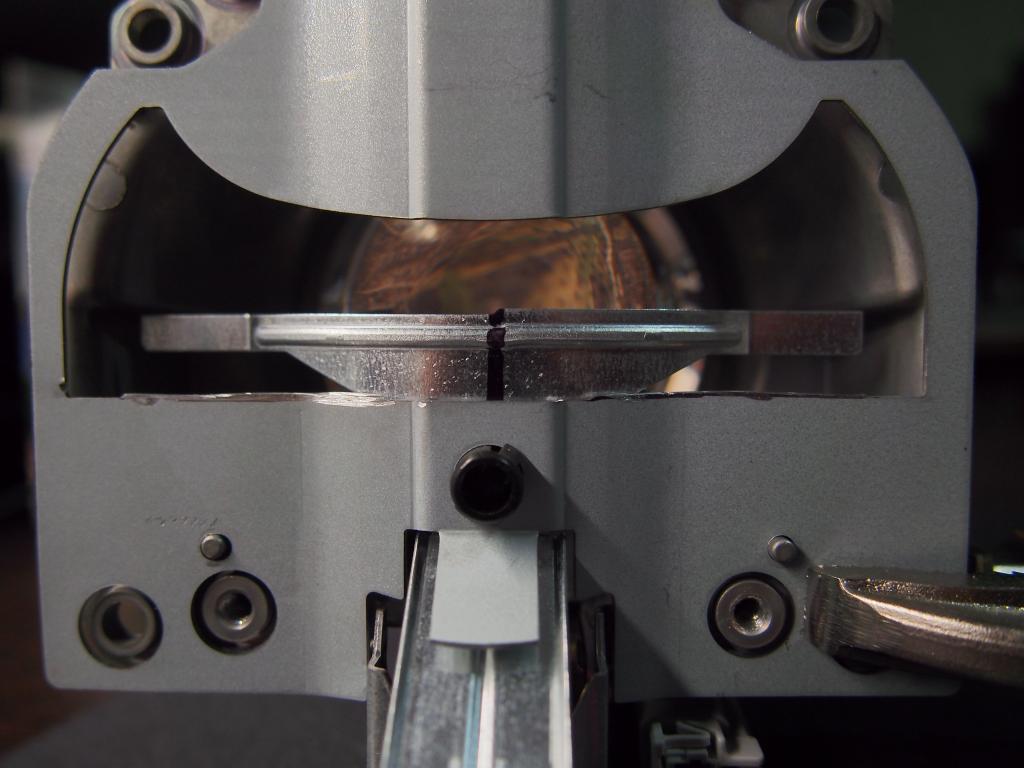
Light escaping
So what we want to do is block that light. I found it easiest to drill a hole in the OEM shield so that we can mount a custom shield unto the bottom of it to block that light.

Cut a piece of aluminum flashing the same length as the OEM shield and bend it to fit the curve of the oem shield. Drill a whole in the center and mount it to the OEM shield as shown below.
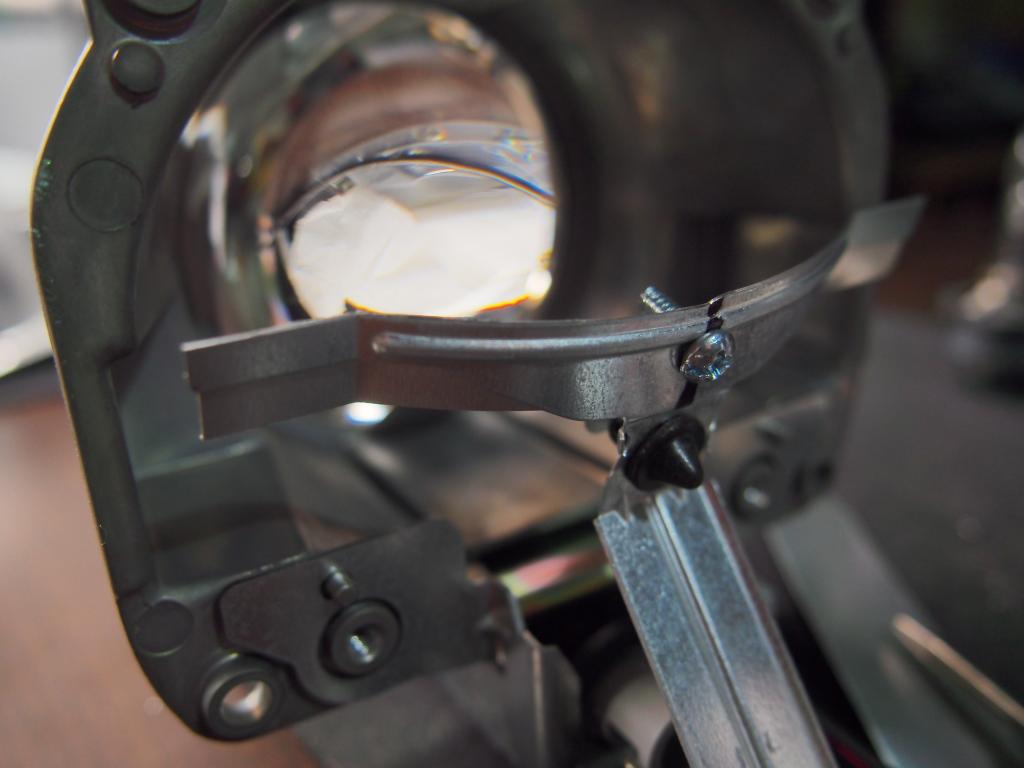
The finished product. As we can see the gaps are now closed. We want to test the solenoid movement and make sure that our custom shield does not impede movement in any kind of way and that the solenoid is able to pull the shield fully into the lower position.
IF everything is moving smoothly with no binding then you are ready to tune the projectors for maximum color and enjoy!
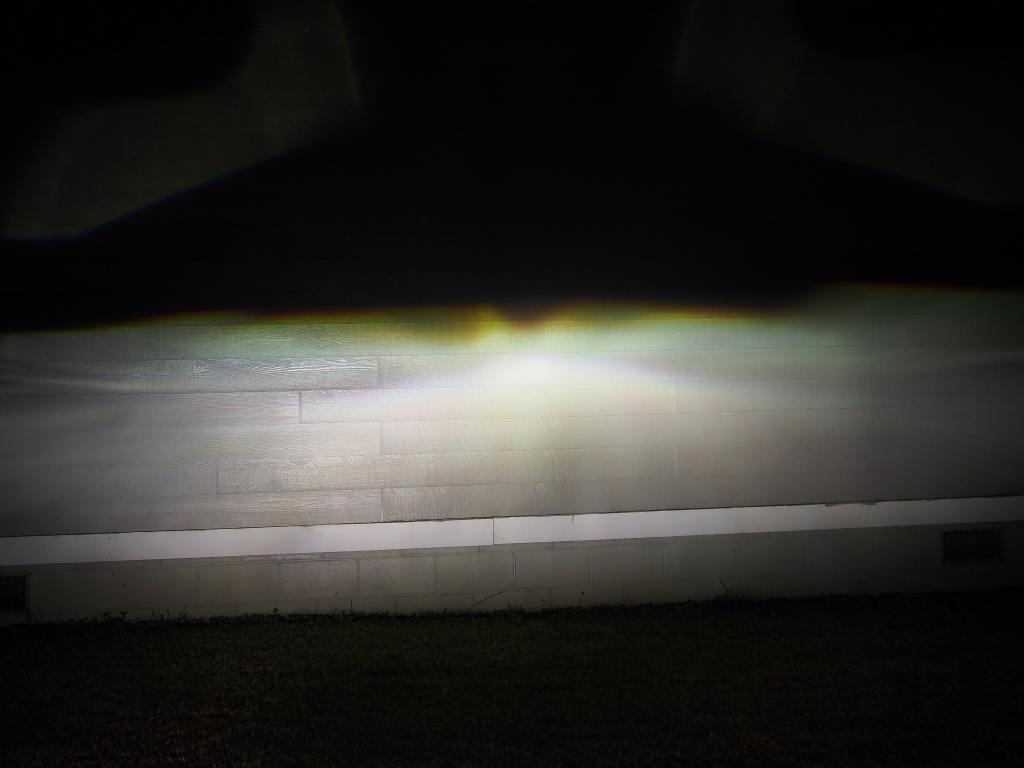
Highbeam
Before

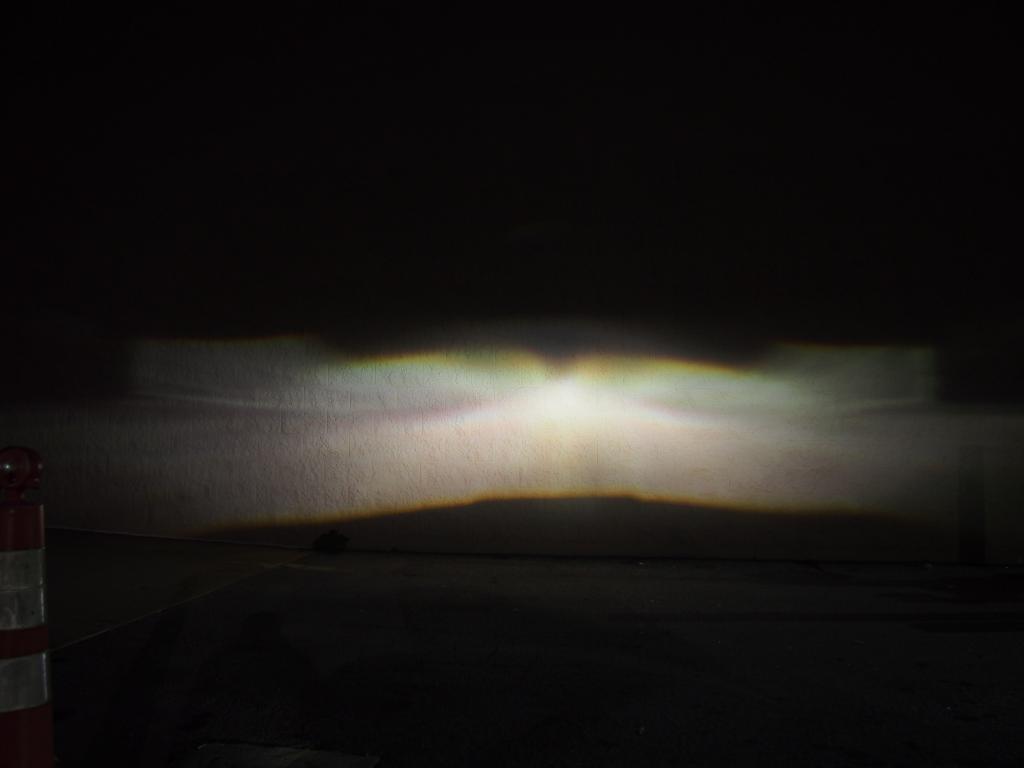
After


While I was at it I decided to fix the bowing downwards the TL projectors are also known for. With a little bending of the shield we can actually get them to curve upwards on the edge so that the shoulders of the road are illuminated much more effectively.
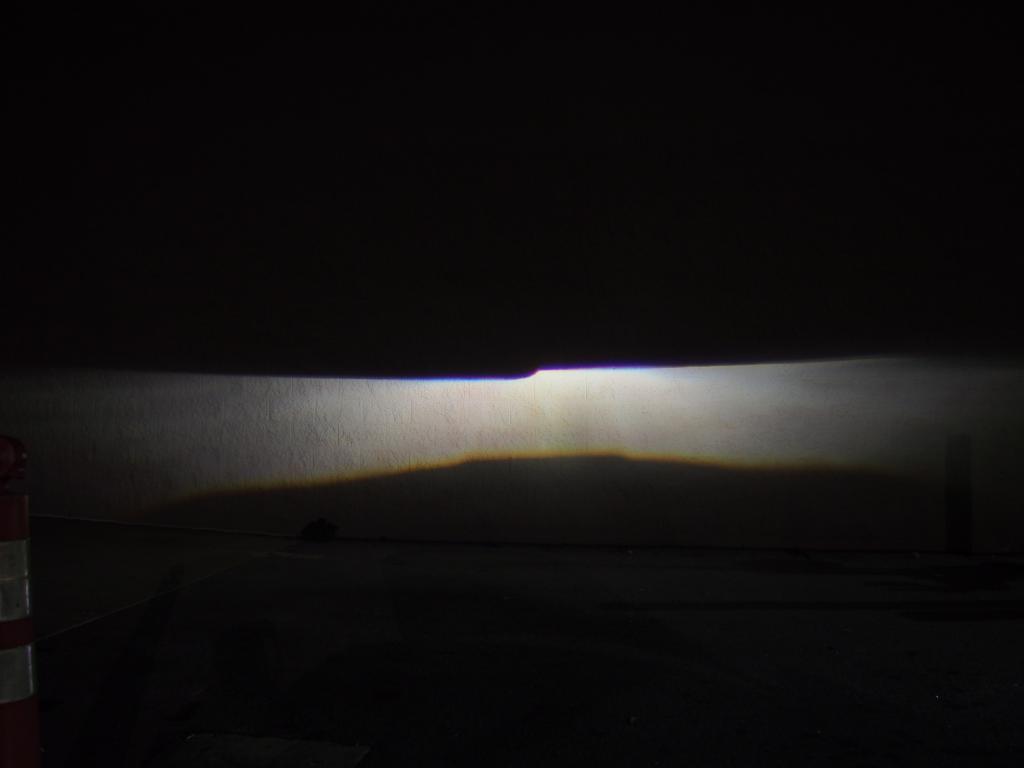
Before
After( Nevermind the different style step in the center)

The TL projectors are known to have one of the greatest high beams of all bixenon projectors. Today I made a quick tutorial on how to modify your already awesome TL projectors to have a much wider high beam than stock! Yeah MUCH wider. Nearly reaching the edges of the lowbeam. Its very easy and doesnt take much time at all. The edges of the modified highbeam are not as bright as the exposed portion but is still very good at lighting up the sides of the road close to you very well. Its good that the sides of the high beam are not as bright as the center too because that keeps the close range light from blinding you and sacrificing you long range distance vision.
First thing you want to do is disassemble your TL projectors and put the parts in a safe place. Keep the foreground limiter plate out as thats what we'll be working with first.

At the bottom of the limiter plate we will find two little "wings" on either side of the plate( marked with a yellow star in the image below). These are the high beam width limiters. We want to remove these little wings by cutting them off on the lines marked with red in the image below.

Once cut your limiter should look like this.

Installing the limiter back on the projector we see that there are now two large gaps for light to escape beneath the shield.

Light escaping

So what we want to do is block that light. I found it easiest to drill a hole in the OEM shield so that we can mount a custom shield unto the bottom of it to block that light.

Cut a piece of aluminum flashing the same length as the OEM shield and bend it to fit the curve of the oem shield. Drill a whole in the center and mount it to the OEM shield as shown below.


The finished product. As we can see the gaps are now closed. We want to test the solenoid movement and make sure that our custom shield does not impede movement in any kind of way and that the solenoid is able to pull the shield fully into the lower position.

IF everything is moving smoothly with no binding then you are ready to tune the projectors for maximum color and enjoy!
Highbeam
Before
After
While I was at it I decided to fix the bowing downwards the TL projectors are also known for. With a little bending of the shield we can actually get them to curve upwards on the edge so that the shoulders of the road are illuminated much more effectively.
Before

After( Nevermind the different style step in the center)
12-15-2014, 10:16 AM
#11
Created another thread here with working pics!
https://acurazine.com/forums/third-g.../#post15269698
If you want to read the discussion on this at HIDplanet here is the link.
TL wide high beam mod
TL wide high beam mod
https://acurazine.com/forums/third-g.../#post15269698
If you want to read the discussion on this at HIDplanet here is the link.
TL wide high beam mod
TL wide high beam mod
Last edited by Steven Bell; 12-16-2014 at 09:19 PM. Reason: Merged Posts
12-15-2014, 10:33 AM
#12
Registered Bunny
So essentially you're "simply" removing a part on the front limiter and putting it on the shield that moves? It's so simple, it's stupid it hasn't been done before. 
Why would you say they've limited the width of the projectors on the TL? Is the side glare really terrible/blinding?
Why would you say they've limited the width of the projectors on the TL? Is the side glare really terrible/blinding?
12-15-2014, 10:39 AM
#13
According to a lighting engineer at Hidplanet any amount of light close to your car will be detrimental to you long distance vision. Most high beams have a very narrow beam for this reason according to him. But with this mod the extra light that is exposed is not very bright in comparison to the hotspot. So even though it may affect you distance vision to some extent its not enough to be of significance and the light seems like it would help on twisty curvy roads.
12-15-2014, 10:46 AM
#15
Registered Bunny
According to a lighting engineer at Hidplanet any amount of light close to your car will be detrimental to you long distance vision. Most high beams have a very narrow beam for this reason according to him. But with this mod the extra light that is exposed is not very bright in comparison to the hotspot. So even though it may affect you distance vision to some extent its not enough to be of significance and the light seems like it would help on twisty curvy roads.
 12-15-2014, 06:57 PM
#17
If you look at the pictures carefully you will see that I drilled a hole through the cutoff shield and mounted the custom plate onto with a small nut and bolt. I doubt any kind of glue would be able to sustain the extreme temperatures on the cutoff shield.
12-16-2014, 09:19 PM
#19
Team Owner
iTrader: (2)
Join Date: Jan 2008
Location: Kansas City, MO (Overland Park, KS)
Posts: 36,545
Received 6,470 Likes
on
5,162 Posts
I've added your pictures to the first post, as requested.
Last edited by Steven Bell; 12-16-2014 at 09:21 PM.
The following users liked this post:
ImagioX1 (12-17-2014)
12-18-2014, 12:23 PM
#20
That bowing would drive me absolutely nuts. It seems like a great idea, but I just don't see it worth the hassle of opening up the headlights. I've never had any issues with my original high beams on country roads. I thought JVX did a comparison of light loss when messing with the shield limiters or it might also be hacknslash .
12-18-2014, 11:04 PM
#21
There are a few OEM projectors( rx350 bixenon) that bow upwards on the sides from the factory. Those who have driven with them said that the bowing lights up the side of the roads very good. It not like youll be looking at wall shots everyday LOL!
12-20-2014, 12:47 AM
#22
Race Director
iTrader: (8)
I trust a guy who frequents HID Planet.
The stuff you guys do over there blows my mind.
The stuff you guys do over there blows my mind.
12-21-2014, 12:37 PM
#23
Team Owner
iTrader: (2)
Join Date: Jan 2008
Location: Kansas City, MO (Overland Park, KS)
Posts: 36,545
Received 6,470 Likes
on
5,162 Posts
^^^ Agreed
12-27-2014, 11:29 PM
#24
Thanks for posting! Would an alternative to preventing stray light be to remove less of the high beam shield? How much would you say could be removed before stray light starts to come out?
I'm interested in increasing foreground illumination because I can see the lower cutoff when I'm driving, and it bugs me. How much of the foreground shield area should be removed (like 2mm or something), and should the material removal follow the existing curve exactly?
I'm interested in increasing foreground illumination because I can see the lower cutoff when I'm driving, and it bugs me. How much of the foreground shield area should be removed (like 2mm or something), and should the material removal follow the existing curve exactly?
Last edited by robocam; 12-27-2014 at 11:34 PM.
01-02-2015, 03:45 PM
#25
You wont be able to remove much at all before stray light starts to come through.
Also the more foreground light you allow the more you will decrease your distance vision. But if the lower cutoff is bothering you it will require trial and error to figure out how much you will have to remove before the cutoff is close enough to the front of your car so that you cant see it. I dont have a TL so I cant tell you how much to remove.
Also the more foreground light you allow the more you will decrease your distance vision. But if the lower cutoff is bothering you it will require trial and error to figure out how much you will have to remove before the cutoff is close enough to the front of your car so that you cant see it. I dont have a TL so I cant tell you how much to remove.

Thread
Thread Starter
Forum
Replies
Last Post
MrHeeltoe
1G TSX Tires, Wheels, & Suspension
20
02-23-2023 01:54 PM
MrHeeltoe
2G TSX Tires, Wheels & Suspension
3
09-29-2015 10:43 PM
MrHeeltoe
3G TL Tires, Wheels & Suspension
0
09-28-2015 05:43 PM