
G-103: DIY-HIDs in Reverse Lights

G-103: DIY-HIDs in Reverse Lights
This DIY is a supplement to those who have done the Tailgater switch or for those who want really BRIGHT backup lights! Here is a link to the Tailgater switch thread: https://acurazine.com/forums/3g-tl-audio-bluetooth-electronics-navigation-94/e-127-diy-reverse-lights-switch-tailgater-switch-757118/
I would try to do both the Tailgater switch and the rear reverse HIDs at the same time since alot of parts you remove are the same.
WARNING:
Some people say that since you are in reverse for merely a few seconds it will kill the ballast of the HIDs. Some people also say that the HIDs get sooo hot that they will melt your rear backup lenses.
THIS HAS NEVER HAPPENED TO ME OR ANYONE ELSE WHO HAS DONE THIS MOD TO A 3G TL THAT I KNOW OF.
If you post any of the above in this thread I will !! ARGH!! (it just bothers me that people say things who have never actually experienced it)
I gathered a bunch of info from a bunch of people regarding this mod. So, all these other people deserve credit first!
Thanks to the following for being so helpful: rodneyc77, thait, Trew, Elegant TYPE S and dwb933
On to the DIY!
What does this mod do?
This DIY will show you how to install HIDs in your reverse lights. I prefer this over LEDs because HIDs are brighter and I have had problems with LEDs in the trunk before. I think closing and opening the trunk lid are what cause the problems with LEDs dying.
Why would you do this?
For those of us with dark tint it is a must! You will be able to see at least double what you saw before. With this and a backup camera you will never have to worry about backing up into anything!
Here are the parts you need:
- H3 Reverse HIDs with slim ballasts 5000k (You can get any k you want, but I prefer 5000k)
- HID Relay Harness
- 0 - 4 gauge wire (about 15 feet should be enough) You need this because you do not want to melt your factory wires. HIDs draw more power then the factory wires are able to handle.
- 10 gauge wire (Preferably in Red)
- Distributor block
- Velcro (Preferably industrial strength)
- JB Weld (Preferably one that sets fast)
- Electrical Tape
- Zip Ties
- Optional - Battery Terminals with extra slots
- Optional - Diodes
- Optional - Timer
Total cost is around 100.00 (160.00 with the optional stuff)
================================================== =
1. First remove all the necessary panels:
Remove the Rear seats:

Remove the Trunk Liner (Only need to remove the driver side):

Remove the Trunk Lid liner (https://acurazine.com/forums/showthread.php?t=763693):

Remove the driver side kick panels:

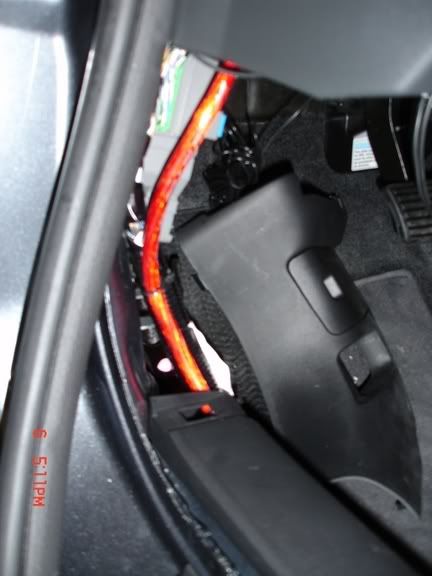
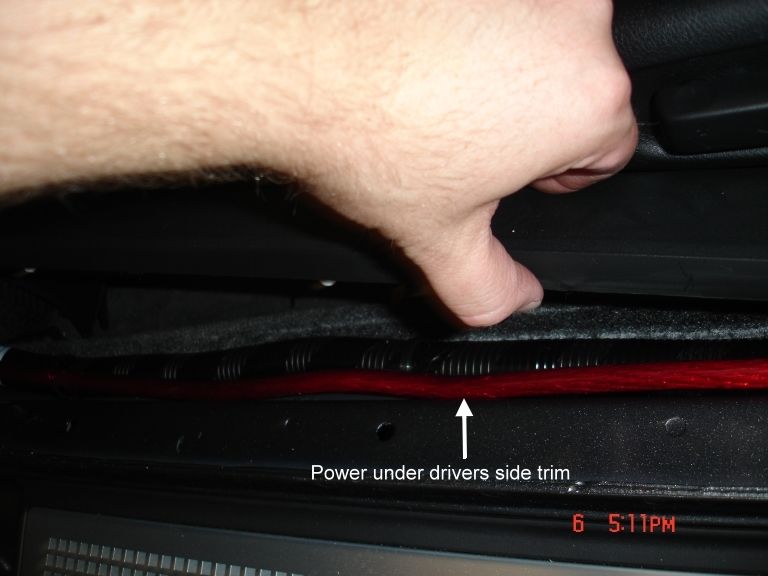
Remove Door sills on Driver Side:
[IMG] [/IMG]
Remove all Engine Bay Covers except the cover on the actual motor.. (Sorry dont have any instructions on this, but it should be self explanatory)
Remove battery terminals. (MAKE SURE YOU HAVE YOUR RADIO AND NAVI CODE!!)
Remove Reverse lights and sockets. Keep in a safe place since you will no longer need these.

================================================== =
2. Now I ran my 4 gauge wire from the battery to the trunk. I used this thread to help me run this wire. Thanks DEATHTOTOASTERS!! (https://acurazine.com/forums/3g-tl-audio-bluetooth-electronics-navigation-94/diy-aftermarket-amp-install-speaker-install-audiocontrol-matrix-install-w-pics-580314/)
Here is the writeup from that thread (For those to lazy to click on the link lol):
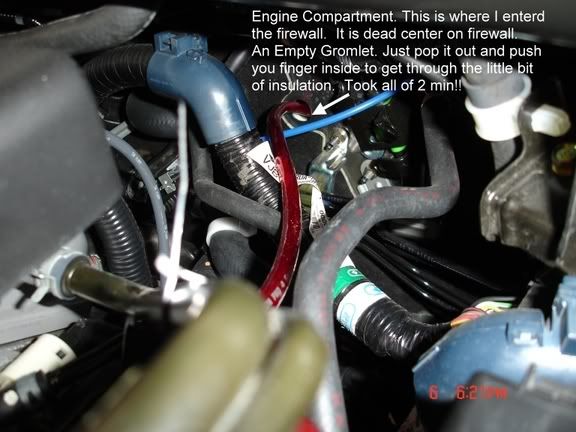
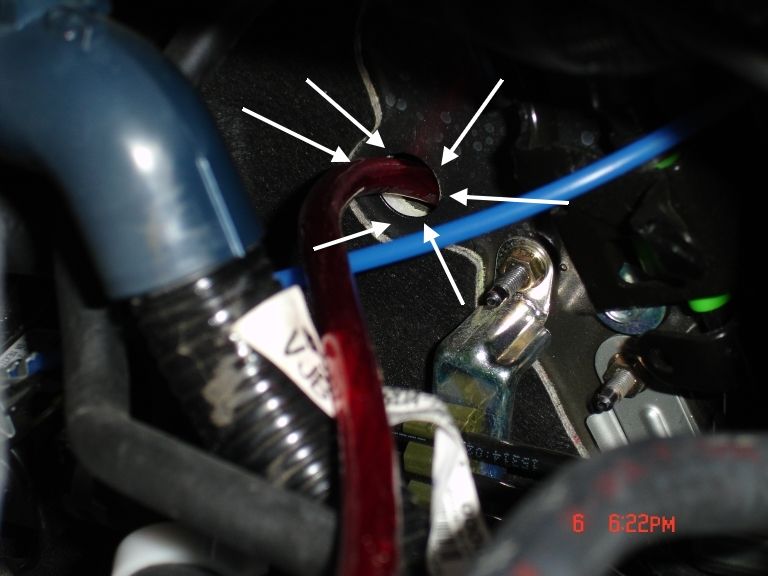
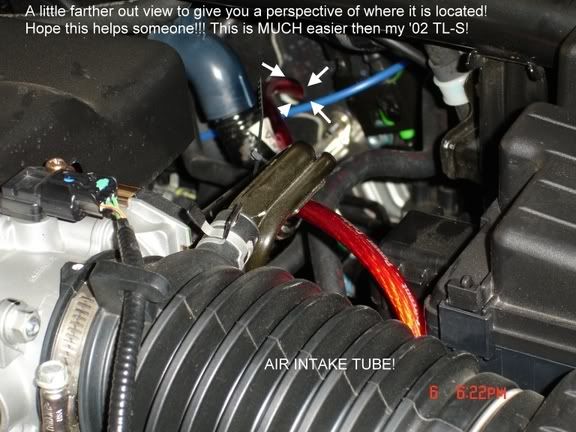
In the middle of the Engine Compartment about 8-9� down from the top you will see am empty grommet. Just pluck it out. Then push your finger in the grommet and you will feel the insulation. Once you rip a little hole in the insulation, just feed the wire through.
Below are a couple of pics showing the location of the grommet.
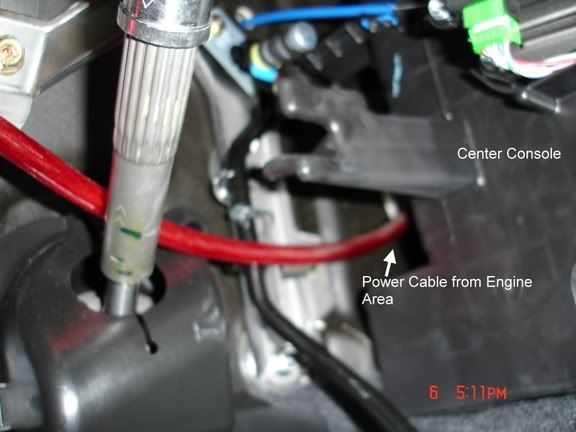
Once you thread the wire through, you go into the driver�s floor area and look up to the center middle console. My wire was just hanging out of the side there. Depending on how you thread it, you may have to fish around behind the middle console to grab it.
Once you find the wire, just pull it around to the drivers kick panel area, running it over other wires to keep it out of the way of the foot well.
Run the power wire down the kick panel and use ties to make it run with the flow of the current wire setup.
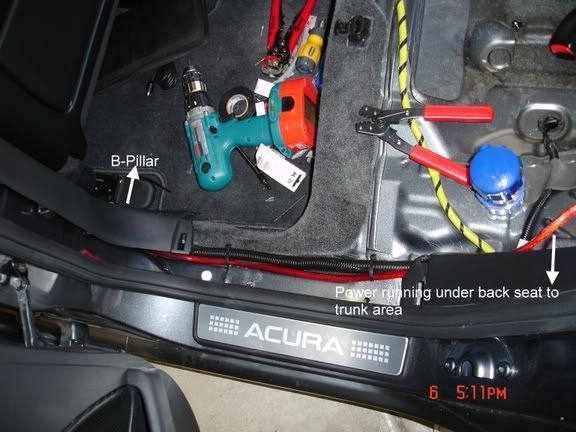
Next run the wire through the trim panels, the b-pillar and rear trim until you reach the rear cabin area.

================================================== =
3. Now that you have the Power wire in the trunk, connect it to the Distributor block that you purchased. I purchased a Tsunami Distributor block that goes from 4 gauge to two 8 gauge terminals. (NOTICE IN MY PICS, my 4 gauge wire is BLUE. In the previous pics they are RED because I used DEATHTOTOASTERS pics)
I ran my wire through the driver side hole into the trunk:

Below you can see my distributor block. I taped it to the trunk floor using double sided velcro.

================================================== =
4. Now Mount your HID Ballasts using the Velcro.


================================================== =
5. Install the HID bulbs into the reverse sockets. This is where you will need the JB Weld. Because they do not make any HIDs that fit perfectly in the socket you will need to dab a little bit of JB weld on 4 corners of the HID Bulb BASE and then hold the bulb until it sets. This is why you want JB Weld that sets quick. Took me a few tries, but after holding the bulb in there for 3-4 minutes it held. I tried taking the bulb out, just to test it if I ever needed to replace it and the bulb came out with a twist and a little pull.
Not the best pic, but you get the idea.

================================================== =
6. Now connect the ballast to the bulbs and run the wires so they will be out of the way. You will notice that since you did not use the original bulb sockets that the plug will just be hanging there. Do not zip tie them out of the way yet.
The white/brown plug is the one I am talking about:

================================================== =
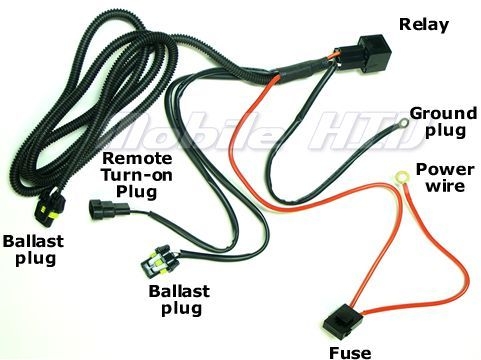
7. Now install the relay harness. Run the wires so that they will not be hanging all over the place. I just followed the stock wires and ran my wires with them. Attach the relay harness to the 2 plugs of the Ballasts. This should be self explanatory since there should be matching plugs for this.
Now there should be 3 wires. A black wire, a red wire with a fuse and another wire that may be red or black (depends where you get the kit. I got everything from a vendor on here HIDxtra)
Below is a pic of the HID relay harness. I stole this pic from another forum.
- First splice the Remote wire to Green wire of the white/brown plug. (If your remote wire has a plug on the end of it, just cut it off) You can splice into the wire by cutting it and soldering it or by using wire taps. I personally cut the wires and solder then wrap with electrical tape. See green wire you need to splice into below:
- Next attach the black ground wire to a bolt. I used one of the bolts that hold on the rear plate garnish. See the bolt in the top right in the pic above.
- Now run the red wire with the fuse down the driver side . I shoved the relay in the trunk lid and pulled the red wire with the fuse through one of the holes, to make it easier to change the fuse if I ever had to.

This wire needs to connect to other side of your distributor block. It will not be long enough. Cut off the ring connector at the end of the wire and attach your 10 gauge wire and extend it to the distributor block you bought running it through the trunk hinge and follow the factory wiring.
You can see I used a black wire in this pic.
================================================== =
8. Now attach the 4 Gauge wire you have dangling in your engine bay to your battery terminals. There are soo many solutions for this, but I opted to change my terminals all together and get some really nice Audio Essential terminals that tell me how much voltage my battery has (55.00 at a local audio shop).
You can see my blue wire attached to my new terminal. If you intend on swapping out terminals make sure you get a new terminal with AT LEAST 3 slots. 2 slots need to be 4 gauge and the last slot 8 gauge. The factory wiring actually splits up into 2 separate wires. See my terminal below. You can see the 2 factory wires in the back of it. I say this because I purchased a Rockford Fosgate terminal and it did not have enough slots ARGH!:


================================================== =
9. Test your reverse Lights! If you installed the tailgater switch try it. If not, just put your car in reverse and see if they turn on!
================================================== =
This is where my install ended for this mod!
The following are optional!
- Install a diode. A diode stops the flow of current from going the wrong way down a wire. If you wanted to install a diode you would install it on the driver side green wire. And you would need to make sure that you have the flow of the diode aiming the correct way. The correct way would be 12v -> Reverse light. Most of the people who have done this mod did not install a diode with no ill affects.
- Install a timer. I did not do this since my car is a manual. In automatic cars everytime you go through the gears, the HIDs will momentarily turn on. This could kill your HIDs. So installing a timer is the solution!
================================================== =
- Now clean up all your wiring with zip ties and put back all your oem pieces!
Here are some final installed pics before putting the trunk liners back on:


AND THE FINAL RESULT!!
- Pics of the reverse lights on:


Elegant Type S's videos (My inspiration to do this):
http://www.youtube.com/watch?v=Qvjx4dxfOzU
http://www.youtube.com/watch?v=VK345...eature=related
Here is my video of my Reverse light switch. My reverse light switch portion start 4 minutes into the video!
http://www.youtube.com/watch?v=V_mTIIpVqjg
Enjoy and Good Luck!
I would try to do both the Tailgater switch and the rear reverse HIDs at the same time since alot of parts you remove are the same.
WARNING:
Some people say that since you are in reverse for merely a few seconds it will kill the ballast of the HIDs. Some people also say that the HIDs get sooo hot that they will melt your rear backup lenses.
THIS HAS NEVER HAPPENED TO ME OR ANYONE ELSE WHO HAS DONE THIS MOD TO A 3G TL THAT I KNOW OF.
If you post any of the above in this thread I will
!! ARGH!! (it just bothers me that people say things who have never actually experienced it)I gathered a bunch of info from a bunch of people regarding this mod. So, all these other people deserve credit first!
Thanks to the following for being so helpful: rodneyc77, thait, Trew, Elegant TYPE S and dwb933
On to the DIY!
What does this mod do?
This DIY will show you how to install HIDs in your reverse lights. I prefer this over LEDs because HIDs are brighter and I have had problems with LEDs in the trunk before. I think closing and opening the trunk lid are what cause the problems with LEDs dying.
Why would you do this?
For those of us with dark tint it is a must! You will be able to see at least double what you saw before. With this and a backup camera you will never have to worry about backing up into anything!
Here are the parts you need:
- H3 Reverse HIDs with slim ballasts 5000k (You can get any k you want, but I prefer 5000k)
- HID Relay Harness
- 0 - 4 gauge wire (about 15 feet should be enough) You need this because you do not want to melt your factory wires. HIDs draw more power then the factory wires are able to handle.
- 10 gauge wire (Preferably in Red)
- Distributor block
- Velcro (Preferably industrial strength)
- JB Weld (Preferably one that sets fast)
- Electrical Tape
- Zip Ties
- Optional - Battery Terminals with extra slots
- Optional - Diodes
- Optional - Timer
Total cost is around 100.00 (160.00 with the optional stuff)
================================================== =
1. First remove all the necessary panels:
Remove the Rear seats:
Remove the Trunk Liner (Only need to remove the driver side):
Remove the Trunk Lid liner (https://acurazine.com/forums/showthread.php?t=763693):
Remove the driver side kick panels:
Remove Door sills on Driver Side:
[IMG]
[/IMG]Remove all Engine Bay Covers except the cover on the actual motor.. (Sorry dont have any instructions on this, but it should be self explanatory)
Remove battery terminals. (MAKE SURE YOU HAVE YOUR RADIO AND NAVI CODE!!)
Remove Reverse lights and sockets. Keep in a safe place since you will no longer need these.
================================================== =
2. Now I ran my 4 gauge wire from the battery to the trunk. I used this thread to help me run this wire. Thanks DEATHTOTOASTERS!! (https://acurazine.com/forums/3g-tl-audio-bluetooth-electronics-navigation-94/diy-aftermarket-amp-install-speaker-install-audiocontrol-matrix-install-w-pics-580314/)
Here is the writeup from that thread (For those to lazy to click on the link lol):
In the middle of the Engine Compartment about 8-9� down from the top you will see am empty grommet. Just pluck it out. Then push your finger in the grommet and you will feel the insulation. Once you rip a little hole in the insulation, just feed the wire through.
Below are a couple of pics showing the location of the grommet.
Once you thread the wire through, you go into the driver�s floor area and look up to the center middle console. My wire was just hanging out of the side there. Depending on how you thread it, you may have to fish around behind the middle console to grab it.
Once you find the wire, just pull it around to the drivers kick panel area, running it over other wires to keep it out of the way of the foot well.
Run the power wire down the kick panel and use ties to make it run with the flow of the current wire setup.
Next run the wire through the trim panels, the b-pillar and rear trim until you reach the rear cabin area.
================================================== =
3. Now that you have the Power wire in the trunk, connect it to the Distributor block that you purchased. I purchased a Tsunami Distributor block that goes from 4 gauge to two 8 gauge terminals. (NOTICE IN MY PICS, my 4 gauge wire is BLUE. In the previous pics they are RED because I used DEATHTOTOASTERS pics)
I ran my wire through the driver side hole into the trunk:
Below you can see my distributor block. I taped it to the trunk floor using double sided velcro.
================================================== =
4. Now Mount your HID Ballasts using the Velcro.
================================================== =
5. Install the HID bulbs into the reverse sockets. This is where you will need the JB Weld. Because they do not make any HIDs that fit perfectly in the socket you will need to dab a little bit of JB weld on 4 corners of the HID Bulb BASE and then hold the bulb until it sets. This is why you want JB Weld that sets quick. Took me a few tries, but after holding the bulb in there for 3-4 minutes it held. I tried taking the bulb out, just to test it if I ever needed to replace it and the bulb came out with a twist and a little pull.
Not the best pic, but you get the idea.
================================================== =
6. Now connect the ballast to the bulbs and run the wires so they will be out of the way. You will notice that since you did not use the original bulb sockets that the plug will just be hanging there. Do not zip tie them out of the way yet.
The white/brown plug is the one I am talking about:
================================================== =
7. Now install the relay harness. Run the wires so that they will not be hanging all over the place. I just followed the stock wires and ran my wires with them. Attach the relay harness to the 2 plugs of the Ballasts. This should be self explanatory since there should be matching plugs for this.
Now there should be 3 wires. A black wire, a red wire with a fuse and another wire that may be red or black (depends where you get the kit. I got everything from a vendor on here HIDxtra)
Below is a pic of the HID relay harness. I stole this pic from another forum.
- First splice the Remote wire to Green wire of the white/brown plug. (If your remote wire has a plug on the end of it, just cut it off) You can splice into the wire by cutting it and soldering it or by using wire taps. I personally cut the wires and solder then wrap with electrical tape. See green wire you need to splice into below:
- Next attach the black ground wire to a bolt. I used one of the bolts that hold on the rear plate garnish. See the bolt in the top right in the pic above.
- Now run the red wire with the fuse down the driver side . I shoved the relay in the trunk lid and pulled the red wire with the fuse through one of the holes, to make it easier to change the fuse if I ever had to.
This wire needs to connect to other side of your distributor block. It will not be long enough. Cut off the ring connector at the end of the wire and attach your 10 gauge wire and extend it to the distributor block you bought running it through the trunk hinge and follow the factory wiring.
You can see I used a black wire in this pic.
================================================== =
8. Now attach the 4 Gauge wire you have dangling in your engine bay to your battery terminals. There are soo many solutions for this, but I opted to change my terminals all together and get some really nice Audio Essential terminals that tell me how much voltage my battery has (55.00 at a local audio shop).
You can see my blue wire attached to my new terminal. If you intend on swapping out terminals make sure you get a new terminal with AT LEAST 3 slots. 2 slots need to be 4 gauge and the last slot 8 gauge. The factory wiring actually splits up into 2 separate wires. See my terminal below. You can see the 2 factory wires in the back of it. I say this because I purchased a Rockford Fosgate terminal and it did not have enough slots ARGH!:
================================================== =
9. Test your reverse Lights! If you installed the tailgater switch try it. If not, just put your car in reverse and see if they turn on!
================================================== =
This is where my install ended for this mod!
The following are optional!
- Install a diode. A diode stops the flow of current from going the wrong way down a wire. If you wanted to install a diode you would install it on the driver side green wire. And you would need to make sure that you have the flow of the diode aiming the correct way. The correct way would be 12v -> Reverse light. Most of the people who have done this mod did not install a diode with no ill affects.
- Install a timer. I did not do this since my car is a manual. In automatic cars everytime you go through the gears, the HIDs will momentarily turn on. This could kill your HIDs. So installing a timer is the solution!
================================================== =
- Now clean up all your wiring with zip ties and put back all your oem pieces!
Here are some final installed pics before putting the trunk liners back on:
AND THE FINAL RESULT!!
- Pics of the reverse lights on:
Elegant Type S's videos (My inspiration to do this):
http://www.youtube.com/watch?v=Qvjx4dxfOzU
http://www.youtube.com/watch?v=VK345...eature=related
Here is my video of my Reverse light switch. My reverse light switch portion start 4 minutes into the video!
http://www.youtube.com/watch?v=V_mTIIpVqjg
Enjoy and Good Luck!

Dam, I read this again and its very good I dont think your missing a thing, im so gonna attempt this, one question where I put the diode do I solder it between the green wire after I attach the remote wire to it? Thanks again.
Not to hyjack your thread, but if you wanted to you could run an amp or anything from the distribution block as long as it had enough outputs and you ran a large enough cable from the battery (0 gauge) correct?
Awesome writeup. I thought I had all of my parts together, but I will need battery terminals and a distribution block.
Thanks again for the info (and the credit at the beginning!)---I may be hitting you up with more questions in the future!
Thanks again for the info (and the credit at the beginning!)---I may be hitting you up with more questions in the future!

Yup let me know!!
Trending Topics
Racer
Joined: Apr 2006
Posts: 404
Likes: 1
That was a great write-up!! Now I feel confident about doing this one on my own! Only question I have is why did you run such a large power cable? Are you planning on adding an amp? I assume people who aren't adding an amp could get by with a #10 or 8 wire.


Thanks for answering the question man!


You only need about 2-3 feet, But just to be safe get about 5-6 feet. THat should be more than enough .
I read that I'm going to be needing a timer since I have an Auto. Is it possible to get a recommendation on which timer I should purchase? Any links would be great
Sorry for all the questions! Thank you in advance 
The timer is the DE528T SPDT Timer Relay
GOOGLE is your friend on this one.


This DIY is a supplement to those who have done the Tailgater switch or for those who want really BRIGHT backup lights! Here is a link to the Tailgater switch thread: https://acurazine.com/forums/showthread.php?t=757118
haha yah man! Are you the guys brother who bought the Privats from me? If so, Just wanted to let you know I got my Type S exhaust on and got rid of the mid muffler and resonator and swapped the resonator for the Dynomax one! Sounds soooo sweeet!

Racer
Joined: Jan 2010
Posts: 286
Likes: 2
From: Biloxi,MS
If you read the VERY FIRST line of the DIY you wouldve found a link to the tailgater switch DIY lol
This DIY is a supplement to those who have done the Tailgater switch or for those who want really BRIGHT backup lights! Here is a link to the Tailgater switch thread: https://acurazine.com/forums/showthread.php?t=757118
This DIY is a supplement to those who have done the Tailgater switch or for those who want really BRIGHT backup lights! Here is a link to the Tailgater switch thread: https://acurazine.com/forums/showthread.php?t=757118
i just wanted to see how this all works. when it comes to wiring stuff, i'm completely lost.
