2004-05 Acura Tl Illuminated Door Sills Group Buy


 04-24-2005, 06:08 PM
#243
04-24-2005, 06:17 PM
#244
better yet, use this, you can download all the PDFs from this single zip.
www.acurakid.com/sills.zip
www.acurakid.com/sills.zip
 04-24-2005, 06:49 PM
#247
Whoever does the install, take pics and do a write up. I will host it for you. I agree with you neogeek, more pics would be more helpful. In this case; however, since there are not any, somebody else can provide them!
04-24-2005, 07:01 PM
#249
Guys we did the best we could, I had to do my best to keep costs down, I am sure he could have gone into much more detail but It was an expensive process I paid by the hour. Let me know if you have any other questions and if anybody wants to do a write up and go into more detail I will be happy to provide a discount on future products.
04-24-2005, 07:14 PM
#251
NFL
Here is whats going on
94-03 Mustang Sills Done I can show you pics now
05 Mustang Sills Done
99-03 TL Done "Getting final product installed on my other car and getting directions done
04+ TL Done
CL In Prcoess waiting on Test Plates
TSX In Process waiting on Test Plates
G35 Just started with Factory Sills "Coupe and Sedan"
Caddy Esclade Testing
Navigator Testing.
Honda Accord IN process waiting on Test Sills.
04+ TL Race Style Amg Pedals Test Pedals are in and getting installed.
Beach Towel Size High End Micro Fiber, Waitng for product to come in.
Thats what we have on tap at this point.
Dave
04-24-2005, 07:31 PM
#252
Make MyTL Great Again
It looks like I'm a little late here...but here is 1 file with all PDFs combined
http://www.sbadesign.com/acurazine/t..._ins_04-05.pdf
http://www.sbadesign.com/acurazine/t..._ins_04-05.pdf
04-25-2005, 12:46 AM
#254
Instructor
Join Date: Feb 2005
Location: LA
Age: 38
Posts: 161
Likes: 0
Received 0 Likes
on
0 Posts
Originally Posted by Supercomputers
Just wanted to thank all who helped on this project. I know we had a bumpy road and both you and me learned something about this process. Hope the install goes well on all of your cars. You all know I am putting together Race style TL Pedals that look like Mercees AMG pedals. The Samples are in and will be test fit this week and we will start a group buy and you guys will love these to. All who purchased the Door Sills will get a special price on the pedals that no one else will get. 1 because you will be a repeat customer and 2 your were very patient on this whole door sill process. If you have any questions let me know and stay tuned for the pics of the pedals installed.
 , haven't gotten my door sills yet, but I'm in CA, should take a bit longer I'm guessing. Can't freakin' wait for the pedals!!!
04-25-2005, 08:48 AM
, haven't gotten my door sills yet, but I'm in CA, should take a bit longer I'm guessing. Can't freakin' wait for the pedals!!!
04-25-2005, 08:48 AM
#255
Previous Owner
Anyone in the Philly area that has this? I'd appreciate an assist on this one. heh.
For me, these are pretty complicated instructions. example: splice into the wire, do not disconnect at all. I wonder what happens if you disconnect it, lose seat memory?
For me, these are pretty complicated instructions. example: splice into the wire, do not disconnect at all. I wonder what happens if you disconnect it, lose seat memory?
04-25-2005, 09:08 AM
#256
Just in case you had any questions about putting the new sills over your old ones.
Also Just so you know. When installing the sills you need to make sure you fully clean your stock sills If there are not perfectly clean you will not get a good adhesion.
1. Temperture should be over 70 if not hit the sill plates and your stock sill with a hair dryer.
2. Take Stock Sills off the car to install properly
3. Use Clothes pins all around the sill to hold the new sill down on top of the old one and leave it over night so the 3m gets a good grip.
4. Install Sills back onto the car and follow the install directions for the electric.
5. If you feel your not getting the fit you want with the 3m "Most likley due to tempeture or rushing" You can use any type of plastic Epoxy to get a better hold.
If you have any other question send me a PM or E-mail.
04-25-2005, 02:28 PM
#258
Originally Posted by J RIDE 81
WRITE UP WRITE UP!!!!!!! Come on someone!
Send me yours and I will install them in my car


Those directions are actually rather complicated. I am wondering if these can be wired to the fusebox using the "add-a-circuit" units? That would make it much easier to do - well, at least I would think.
04-25-2005, 02:39 PM
#259
Make MyTL Great Again
Originally Posted by vikrampatel
Those directions are actually rather complicated. I am wondering if these can be wired to the fusebox using the "add-a-circuit" units? That would make it much easier to do - well, at least I would think.
1) power all the time (kill your battery)
2) power on ignition (makes the lighted door sill useless since you will never see them lit unless you drive with your doors open
 )
)3) connect it to constant power and use some switch to control when they are on (best option)
The directions are for #3. However the constant power sources you are told to use are "connector 28 on the fuse box, blue wire with a yellow stripe" and "connector c731 locate the yellow wire with the green stripe". I would see no problem with using "add-a-circuit" to get your constant power instead of tapping the other two places. Both would serve the same purpose of constant power.
The negative/ground/black wire is connected to the switch on the door, so when the door is opened, the circuit is complete and the sills will light up. When the door is closed (or you press down on the switch), the sills are unlit.
Instead of using the door switches, you can always hook it up to some sort of toggle switch, but again this seems a pointless to me as #2.
04-25-2005, 02:46 PM
#260
Adam - when the doors open, they the switch thats in there must be connected to one of the fuses in the fuse box. Wouldn't using that be sufficient and NOT needing a seperate switch? The switch in the door which turns on the overhead lights should be doing the same thing. Not sure if what I just said makes sense or not...
04-25-2005, 02:58 PM
#261
Make MyTL Great Again
Originally Posted by vikrampatel
Adam - when the doors open, they the switch thats in there must be connected to one of the fuses in the fuse box. Wouldn't using that be sufficient and NOT needing a seperate switch? The switch in the door which turns on the overhead lights should be doing the same thing. Not sure if what I just said makes sense or not...
and don't know what is there. But my guess is that there is 1 wire coming into the switch, and one going out (same wire really). +/power and -/ground cannot be carried on the same wire...there is no magic going on here. So you can't take the two wires from the sills and connect them to the 1 wire used by the switch...well you could, but it will would be a total waste of your time.  There may be another wire inside the pillar with constant power that you could use (instead of using add a circuit of the two recommended wires).
The each switch is probably connected to a 'master control unit', which is probably what is diagramed on page 2 (of my PDF). If you knew where that was, you could just wire everything to that.
No matter what, you will need a +/power wire and a -/ground wire.
04-25-2005, 03:12 PM
#262
Originally Posted by AdamNJ
The door switch is the picture shown in the directions "119. Left B-pillar ". I haven't received my sill yet, so I haven't taken apart my car yet and don't know what is there. But my guess is that there is 1 wire coming into the switch, and one going out (same wire really). +/power and -/ground cannot be carried on the same wire...there is no magic going on here. So you can't take the two wires from the sills and connect them to the 1 wire used by the switch...well you could, but it will would be a total waste of your time. There may be another wire inside the pillar with constant power that you could use (instead of using add a circuit of the two recommended wires).
The each switch is probably connected to a 'master control unit', which is probably what is diagramed on page 2 (of my PDF). If you knew where that was, you could just wire everything to that.
No matter what, you will need a +/power wire and a -/ground wire.
and don't know what is there. But my guess is that there is 1 wire coming into the switch, and one going out (same wire really). +/power and -/ground cannot be carried on the same wire...there is no magic going on here. So you can't take the two wires from the sills and connect them to the 1 wire used by the switch...well you could, but it will would be a total waste of your time. There may be another wire inside the pillar with constant power that you could use (instead of using add a circuit of the two recommended wires).The each switch is probably connected to a 'master control unit', which is probably what is diagramed on page 2 (of my PDF). If you knew where that was, you could just wire everything to that.
No matter what, you will need a +/power wire and a -/ground wire.
Yes, but what I am saying is that all four of the door switches MUST connect to a fuse under the dash somewhere, correct? So, when ALL the doors are close, the power to that fuse is cut off. When the door is open, power to the fuse is turned on. So, you could connect all four door sills to that fuse, and when a door opens, power will be turned on to the door sills. You can also have the ground next to the fuse box right into the frame of the car, that is where the ground for my laser jammer and V1 are located.
According to my service manual, the fuse for all the interior lights is #6 under the dash.
Give me a few minutes and I will go to my car, put my V1 in that fuse and see if the V1 gets power when the door is open, and does NOT get power when the door is close. If this is the case, then everybody can use that fuse for the door sills.
04-25-2005, 03:18 PM
#264
Make MyTL Great Again
Originally Posted by vikrampatel
Yes, but what I am saying is that all four of the door switches MUST connect to a fuse under the dash somewhere, correct? So, when ALL the doors are close, the power to that fuse is cut off. When the door is open, power to the fuse is turned on.
04-25-2005, 03:22 PM
#266
Team Nighthawk Director

Join Date: May 2004
Location: Buffalo Grove, ILL
Age: 40
Posts: 1,594
Likes: 0
Received 0 Likes
on
0 Posts
^--- Still would love to see more pictures and a step by step write up. I don't trust anyone at an Audio shop to do this and with the right directions i can do this myself!
 04-25-2005, 04:19 PM
#269
Guys I needed to get a direct article writen for the project, Sorry it is a bit technical but last thing I want is someone to do it wrong based on my directions and I am liable for the mistake. When the directions were created this was the exact setup we used on the test set in my car. They have been working perfect for the last 2 months now. If you guys want I will try to arange a live question answer session with the Acura tech who did the directions for me. Or like a said if a member who purchased the sills wants to do a more in detail write up I will be happy to give them a discount on all my ongoing projects.
04-25-2005, 04:41 PM
#270
Make MyTL Great Again
I am sure that more installation details/pics will come in time. The directions provided do seem good to me even though they are a little technical...but this isn't a 'plug and play' item, there is no empty plug on your car waiting for its friend. Some items that are not talked about in the directions are that you will want to route the wires somewhere (I'm sure you can figure out how/where), and how to tap the door sill wires to the into the door switch/constant power wires ... I would recommend that you that you use 3M Scotchlok Connectors or a similar product.
As I believe Dave said somewhere, if you don't feel comfortable with electrical/doing it yourself, have someone else do it.
As I believe Dave said somewhere, if you don't feel comfortable with electrical/doing it yourself, have someone else do it.
04-25-2005, 05:09 PM
#271
Previous Owner
Originally Posted by AdamNJ
I am sure that more installation details/pics will come in time. The directions provided do seem good to me even though they are a little technical...but this isn't a 'plug and play' item, there is no empty plug on your car waiting for its friend. Some items that are not talked about in the directions are that you will want to route the wires somewhere (I'm sure you can figure out how/where), and how to tap the door sill wires to the into the door switch/constant power wires ... I would recommend that you that you use 3M Scotchlok Connectors or a similar product.
As I believe Dave said somewhere, if you don't feel comfortable with electrical/doing it yourself, have someone else do it.
As I believe Dave said somewhere, if you don't feel comfortable with electrical/doing it yourself, have someone else do it.
04-25-2005, 06:52 PM
#272
Make MyTL Great Again
Originally Posted by Thorin78
ok so the link you provided is used to "splice" a wire with? I know very little about this electrical stuff. I don't even know if I would let the guys at a tint shop do anything to the car until there is a better PDF.
04-25-2005, 08:48 PM
#273
Weapon X
Join Date: Oct 2004
Location: San Diego, CA
Age: 52
Posts: 182
Likes: 0
Received 0 Likes
on
0 Posts
I got mine today and trying to install them. Maybe Im doing something wrong but there is no yellow wire with a green stripe underneath the glove box in the '05. there is a yellow one and there is a green one. So which one?? ARRGGGGGG!!!!!
04-25-2005, 09:05 PM
#274
Make MyTL Great Again
Originally Posted by GRich4u
I got mine today and trying to install them. Maybe Im doing something wrong but there is no yellow wire with a green stripe underneath the glove box in the '05. there is a yellow one and there is a green one. So which one?? ARRGGGGGG!!!!!
04-25-2005, 10:17 PM
#276
Weapon X
Join Date: Oct 2004
Location: San Diego, CA
Age: 52
Posts: 182
Likes: 0
Received 0 Likes
on
0 Posts
Well it took more than 10 minutes. What I have noticed is there is 2 white connecters on the '05 and not 1. Sorry if the pics arent clear. They were taken with my Sony Ericsson 710A phone and everytime I use a flash its to bright.
Now can someone shead some light on which wire should be used?
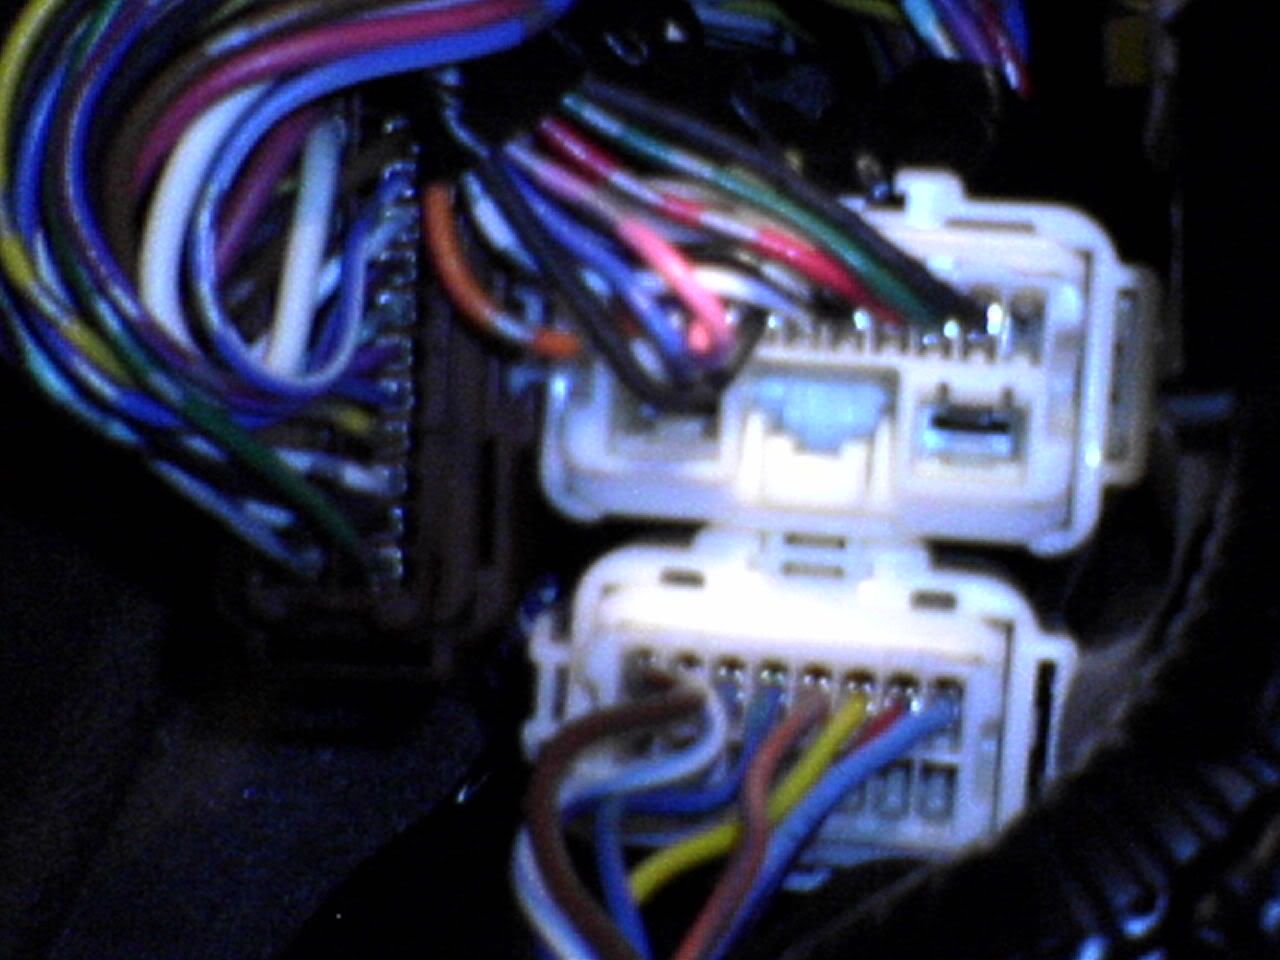
Now can someone shead some light on which wire should be used?
Last edited by GRich4u; 04-25-2005 at 10:20 PM.
04-25-2005, 10:51 PM
#277

Am I the only one who thinks that it is cheap looking to have wires showing in the door jam when all is said and done? Please tell me that I'm doing it wrong; I'm not about to pinch a wire in the door sill to hide it from view. Wires do not belong there... maybe I'm overlooking something obvious.
04-25-2005, 10:58 PM
#278
ok guys post up your pics as to where your wires are routed from the door sill itself into the car. Meaning, when you reinstalled the sills to the car with the new plates and fames put together, where are your wires routed immediately following the sills?
04-26-2005, 12:07 AM
#280
Grich4U
Sent your pic to my Tech, We did the directions based on the 04, Was told me there was no difference in set up between 04 and 05+ I will make sure wires did not change color and will try and get back to you as soon as I can. Also there are a few tech savy members here on the board maybe on of them have an answer Will try and get you a response asap.
Sent your pic to my Tech, We did the directions based on the 04, Was told me there was no difference in set up between 04 and 05+ I will make sure wires did not change color and will try and get back to you as soon as I can. Also there are a few tech savy members here on the board maybe on of them have an answer Will try and get you a response asap.