
F-165: DIY LED Interior Conversion Part 8: New LEDs--NO MORE SOLDERING! Navi Console

F-165: DIY LED Interior Conversion Part 8: New LEDs--NO MORE SOLDERING! Navi Console
UPDATE 11/21/09
Stop the presses!
I have found another option for those considering this mod, but don't feel comfortable tackling soldering, resistors, plastic mini bulb holders, etc. (You know who you are)
Here is the easy man's DIY option for LED console light replacement:
Ladies and gentlemen---I present the T3 SMT LED NEO WEDGE BASE BULBS


These bulbs are new and available from V-LEDs:
http://www.v-leds.com/Interior-LED/G...-p7688467.html
(Above link is to the blue LED bulbs, but they come in various colors.)
Also available from Autolumination.com:
http://autolumination.com/74.htm (scroll down about halfway to the �Neo - Wedge LED Instrument Panel Bulbs Type A, B & C�. You want the Type A bulb)
Note that there is a significant price difference between the two sites.
They are a direct fit replacement to the stock 8mm Honda/Acura bulbs. Well, they are a bit tight, but you can get them in there. You can use these bulbs for every location covered in the F-165 series of DIY articles EXCEPT the drivers door security LED, the master window control unit, the Homelink console buttons, the seat position switch (partially) and the mirror switch. All of these locations require straight LEDs in 3mm (5mm for door security LED, SMT for master window unit). The T3s have resistors built into the bulbs.
Here is a comparison of the T3 and my 3mm Frankenstein LED bulbs:

My Frankenstein units are from oznium.com. The Oznium 3mm LEDs are a slightly different color temperature which are a bit closer to the color of the OEM gauges. I have not ordered any of the Autolumination bulbs, so I cannot advise on the color of those units. I used the v-leds T3 bulbs on my center console NAVI and HVAC controls. Here are some pics:
BEFORE

Units out of the dash--NAVI on right

Back of NAVI display--We will be replacing a total of 12 bulbs on the back of this unit. You can see 4 bulbs along the bottom and each side of the unit. These bulbs are all the same specification even though the plastic is different colors. Note that the top positions on either side need to have white LED bulbs for proper display of the blue and red HVAC indicators.

It is much easier to gain access to the bulbs if you remove the metal cover and two plastic side covers from the back of the NAVI unit.

AFTER

Note the slight color difference between the NAVI console lights and the MID controls under the gauge cluster. Also note that this pic was taken when I had blue bulbs in the top most positions. Blue light does not shine through a red filter, requiring a pair of white bulbs for these two slots.

SEAT HEATER---We will be replacing the single bulb (shown in gray in this unit) on both switches.

This gives us blue switch illumination and keeps the OEM amber indicators.

The radio promises to be a much more difficult proposition. I went ahead and did a "recon" dis-assembly to see what I was dealing with. Here is what I got down to:

You can see there are 10 bulbs, each with a teeny-tiny resistor that need to be replaced. I have the resistors on order and will be tackling this (final) portion of the dash to complete my project. I will cover this portion in another post.
Stop the presses!
I have found another option for those considering this mod, but don't feel comfortable tackling soldering, resistors, plastic mini bulb holders, etc. (You know who you are)
Here is the easy man's DIY option for LED console light replacement:
Ladies and gentlemen---I present the T3 SMT LED NEO WEDGE BASE BULBS
These bulbs are new and available from V-LEDs:
http://www.v-leds.com/Interior-LED/G...-p7688467.html
(Above link is to the blue LED bulbs, but they come in various colors.)
Also available from Autolumination.com:
http://autolumination.com/74.htm (scroll down about halfway to the �Neo - Wedge LED Instrument Panel Bulbs Type A, B & C�. You want the Type A bulb)
Note that there is a significant price difference between the two sites.
They are a direct fit replacement to the stock 8mm Honda/Acura bulbs. Well, they are a bit tight, but you can get them in there. You can use these bulbs for every location covered in the F-165 series of DIY articles EXCEPT the drivers door security LED, the master window control unit, the Homelink console buttons, the seat position switch (partially) and the mirror switch. All of these locations require straight LEDs in 3mm (5mm for door security LED, SMT for master window unit). The T3s have resistors built into the bulbs.
Here is a comparison of the T3 and my 3mm Frankenstein LED bulbs:
My Frankenstein units are from oznium.com. The Oznium 3mm LEDs are a slightly different color temperature which are a bit closer to the color of the OEM gauges. I have not ordered any of the Autolumination bulbs, so I cannot advise on the color of those units. I used the v-leds T3 bulbs on my center console NAVI and HVAC controls. Here are some pics:
BEFORE
Units out of the dash--NAVI on right
Back of NAVI display--We will be replacing a total of 12 bulbs on the back of this unit. You can see 4 bulbs along the bottom and each side of the unit. These bulbs are all the same specification even though the plastic is different colors. Note that the top positions on either side need to have white LED bulbs for proper display of the blue and red HVAC indicators.
It is much easier to gain access to the bulbs if you remove the metal cover and two plastic side covers from the back of the NAVI unit.
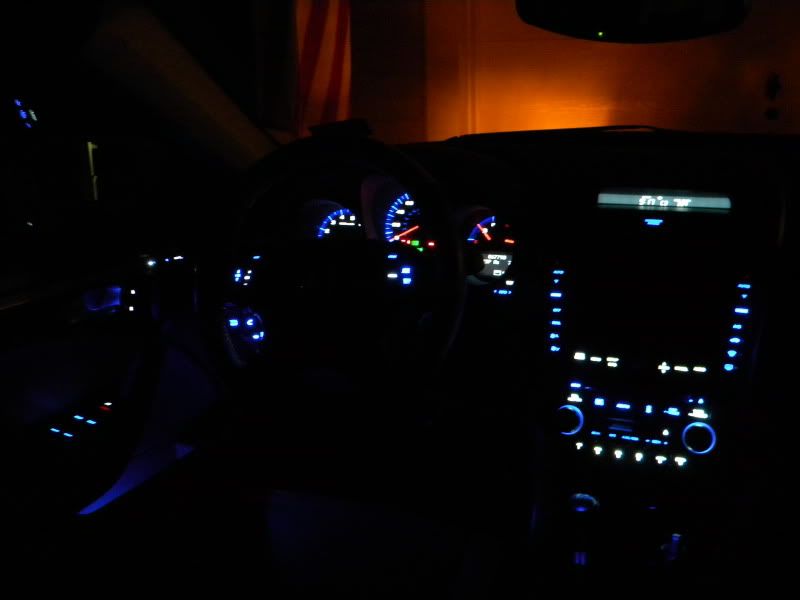
AFTER
Note the slight color difference between the NAVI console lights and the MID controls under the gauge cluster. Also note that this pic was taken when I had blue bulbs in the top most positions. Blue light does not shine through a red filter, requiring a pair of white bulbs for these two slots.
SEAT HEATER---We will be replacing the single bulb (shown in gray in this unit) on both switches.
This gives us blue switch illumination and keeps the OEM amber indicators.
The radio promises to be a much more difficult proposition. I went ahead and did a "recon" dis-assembly to see what I was dealing with. Here is what I got down to:
You can see there are 10 bulbs, each with a teeny-tiny resistor that need to be replaced. I have the resistors on order and will be tackling this (final) portion of the dash to complete my project. I will cover this portion in another post.


Trending Topics

Nice work, Dave!
Are the lights on the radio a repeat of the same madness that was seen in the headliner assembly?
Oh, and what happened to the red directional arrow for the climate control?
Are the lights on the radio a repeat of the same madness that was seen in the headliner assembly?
Oh, and what happened to the red directional arrow for the climate control?
Everyone else---thanks for the comments and support. This has been a long term project which has tested my endurance. I am happy that I have gotten as far as I have, but I have to tell you--the radio is going to be the worst part, I believe.
You may want to purchase just a few to see how they perform for you first.
My advice is to hold off on purchasing any in quantity until I can post some more pics and figure the best course of action with the white LEDs.
Cruisin'
Joined: Nov 2009
Posts: 17
Likes: 0
During my LED conversion I ran into the same tinted Auto buttons on the climate control cluster. I thought they had been painted just like the backs of the shift console lights. So I grabbed an assortment of my wife's blue nail polish and proceeded to take the buttons apart. Lo and behold I found a little plastic surprise from Acura which was easily removed.


Nice job Esper.ice. I'll have to remove that tint piece the next time I go into the console.
The Neo-Wedge bulbs from V-LEDs (and other vendors) are plug & play. Some of the bulb locations may not be as suitable for them as others. This series of DIYs in the Garage will tell you which ones need aiming---mostly the steering wheel lights, maybe a few others. Read them all to see what is involved in a complete interior conversion. I am just about finished with mine---I'm waiting on a board from DeathMetal to complete my radio. Will post pics of the complete interior when I am finished. Others have completed their interiors---DeathMetal, Madsiick and a few others.
This mod requires a lot of effort, planning and patience but it is well worth it. Every time I drive my GF's Accord, I can hardly see any of her buttons with the pale green glow and I appreciate my car that much more. The T3 bulbs make this mod that much more possible for everyone, since it eliminates soldering for the majority of locations. The Homelink/HFL console is one location that will need soldering, but the DIY has great info on how to do it. I had never soldered anything in my life before doing this---it really is not difficult at all.

^^Should be.
However, the steering wheel modules are weird in that they are not straight paths for the light. The incandescent bulbs shine a full 180 degrees, so it doesn't matter. I used 3mm LED bulbs but did not point them properly, so I have hotspots. DeathMetal did his differently, bending the LED prongs so the bulbs shine a direct path (see his DIY for pics and info) and the result is spectacular.
However, the steering wheel modules are weird in that they are not straight paths for the light. The incandescent bulbs shine a full 180 degrees, so it doesn't matter. I used 3mm LED bulbs but did not point them properly, so I have hotspots. DeathMetal did his differently, bending the LED prongs so the bulbs shine a direct path (see his DIY for pics and info) and the result is spectacular.
6 x Seat Heaters
1 x Trunk Release
1 x VSA Off
1 x Moonroof Control
1 x Interior Lighting Panel
1 x Airbag Warning
1 x Hazard
3 (or 2?) x Seat Memory
12 (?) x Nav/Radio Upper console
6 (?) x Steering Wheel (04 � 06)
�the balance lighting is comprised of solder-connect bulbs.
Cruisin'
Joined: Sep 2010
Posts: 24
Likes: 0
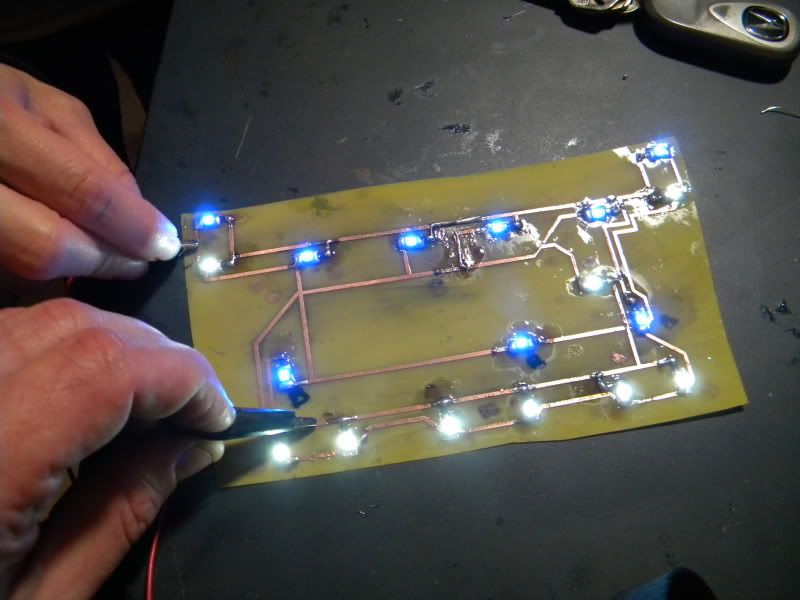
any progress on the radio lights dwb993 because i went ahead and changed out the lights but it wasnt easy because of the clear plastic frame has openings only big enough for a 5mm led flat on the board. this is what i got.


but i had to redo the resistor because the openings are enough for one light. so i had to spread the resistors to the white areas of the board because that is where there is room so the clear plastic can lay flat on the board. but i still have hot spots on the radio. sorry i dont have a pic yet of the radio installed but i will get one up asap.
but i had to redo the resistor because the openings are enough for one light. so i had to spread the resistors to the white areas of the board because that is where there is room so the clear plastic can lay flat on the board. but i still have hot spots on the radio. sorry i dont have a pic yet of the radio installed but i will get one up asap.


www.colradodetail.com
Joined: Jul 2009
Posts: 370
Likes: 12
From: Aurora CO

Intermediate
Joined: Sep 2010
Posts: 49
Likes: 0
From: Richmond VA
deathmetal would you be willing to mock these up and sell them. Maybe do like a core exchange plus your cost for this. I really want to do the radio but i dont have time to figure it out or if i mess it up fix it lol. I ordered my neo wedge lights and would like to do this at the same time.

ok to make things clear the T3 SMT LED NEO WEDGE BASE BULBS
is used to change all the lights correct? so you would still need to add an resistor? this mod is interesting and would like to go through with it but I dont want the resistors to get too hot that it melts the inside which I had an bad experience happen to one of my project. so just soldier it on(w/ or witout resistors) and eveyrthing should be good right. thanks for the help in advance
is used to change all the lights correct? so you would still need to add an resistor? this mod is interesting and would like to go through with it but I dont want the resistors to get too hot that it melts the inside which I had an bad experience happen to one of my project. so just soldier it on(w/ or witout resistors) and eveyrthing should be good right. thanks for the help in advance
snake212 used another method to replace the lights on his radio---as you can see, DeathMetal has a different solution with his LED board. I have one of his boards ready to be installed---just did not get to it while the weather was warm. His board (and replacing the bulbs that have burned out for whatever reason) will complete my LED replacement.
darn i see i wanted to see which was the best way so i dont mess up and do something wrong and melt my inside. maybe the one you used didnt last due to wrong resistors maybe? as for the board that death metal made, how is that suppose to install on the original circuit board. i see the picture but it kindve confused me how it was suppose to be installed a little more detail or pictures would be great. im the picture type of guy heh
-any suggestions what type of resistors is best to be used, i might just try out some led.
-any suggestions what type of resistors is best to be used, i might just try out some led.
I used 680ohm Oznium.com resistors for my "Frankenstein" bulbs, then moved to PLCC LEDs with 1 1000ohm chip resistor (like the one's on DeathMetal's board) from DigiKey.
I think the first ones failed due to my design.
As far as DM's board, it lays over the original board and you have to tap the power lines from the harness in the rear of the radio to illuminate it. Again, I have not installed mine yet---I have to re-do one of the LEDS which is not lighting up on my test bench. Once I get it installed, I will update this thread.
