DIY: Front Bumper Removal
 05-23-2012, 06:53 PM
#41
I use two small flathead screwdrivers, its pretty annoying
If I had this tool id definitely use it all the time
If I had this tool id definitely use it all the time

 05-23-2012, 08:49 PM
#43
Getting them off is really simple, just use a decently sized flathead screwdriver and twist it back and forth a little bit and the clip should pop down. If not put it in on the other side and do the same. Once its popped out, grab the pin with your fingers and it should just pull out with a bit of force. Or if you want you can use the flathead and the same method to pry out the base, but be careful if you do though since you might scratch the paint. Installing them back is even easier. The clips you remove will have pieces of metal holding the pin in so just pull the pin out as far as it'll go, pop it back in the hole holding the base and push the pin back in.
I'll give it a try some time later.
I might need the "bitch clip" popper though

Thanks MiYoung, HeelToe and all
05-23-2012, 11:07 PM
#44
Safety Car
Thread Starter

Great instructions, Dave.
So there are only 2 screws, the rest are just plastic clips?
My question, was it easy to remove the clip w/o breaking it AND was it easy to install it back?
Reason is: most of the time I removed the plastic clips, they either bent or broken and worst, I could never snap them back in.
If it does turn out all easy to put back, I might replace the foglight cover-lens myself, there is no reason for me to spend $400+ at the dealer to fix this.
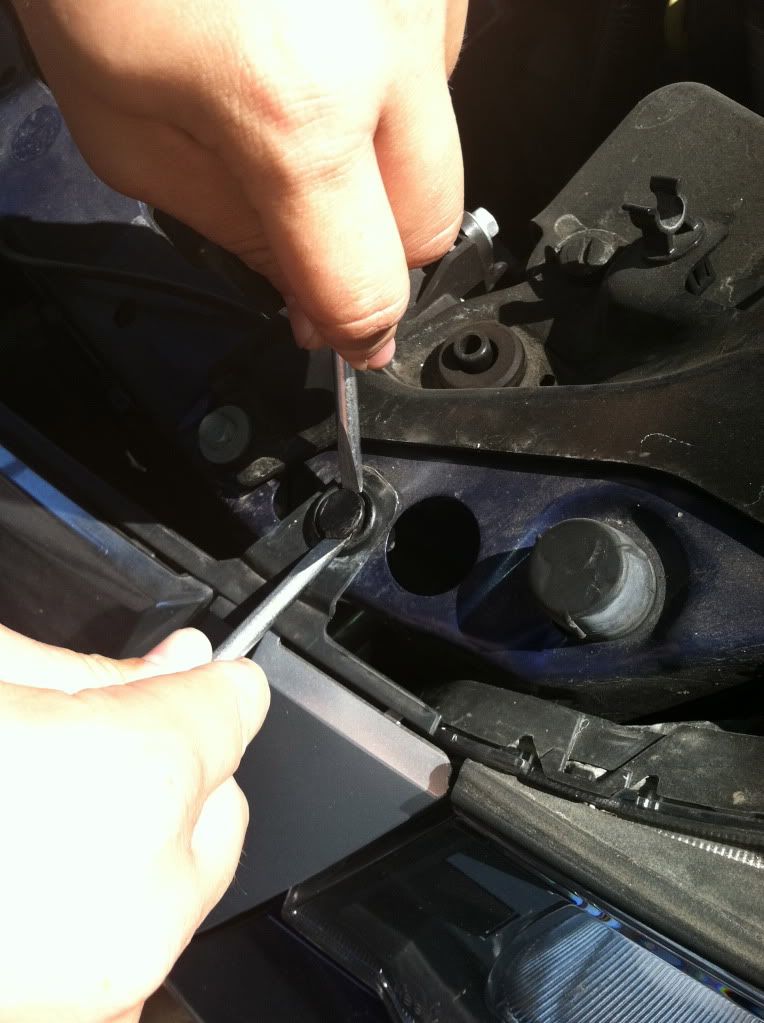
this is a pic showing my preferred method of taking them out. once you put the edge in between the base of the clip, and the other part, you can turn the flatheads 90 degrees, and that should provide enough to pull on them and pull them out. you could use pliers after you get them slightly out. or you can try using that tool. im fine without it. some of the clips are actually 2 parts, i prefer to separate them, put in the base, then stick the other part in to lock it in place
 05-24-2012, 09:23 AM
#45
Everyday I'm rofling
How did you take that picture when both of your hands are in the shot??????? WITCHCRAFT
The following users liked this post:
MC MiYoung3269 (05-24-2012)
05-24-2012, 02:06 PM
#46
Instructor

Great instructions, Dave.
So there are only 2 screws, the rest are just plastic clips?
My question, was it easy to remove the clip w/o breaking it AND was it easy to install it back?
Reason is: most of the time I removed the plastic clips, they either bent or broken and worst, I could never snap them back in.
If it does turn out all easy to put back, I might replace the foglight cover-lens myself, there is no reason for me to spend $400+ at the dealer to fix this.
So there are only 2 screws, the rest are just plastic clips?
My question, was it easy to remove the clip w/o breaking it AND was it easy to install it back?
Reason is: most of the time I removed the plastic clips, they either bent or broken and worst, I could never snap them back in.
If it does turn out all easy to put back, I might replace the foglight cover-lens myself, there is no reason for me to spend $400+ at the dealer to fix this.
waiiit waiit waitt, you can replace just the lense now?? no longer have to replace the whole assembly??
 05-26-2012, 08:20 AM
#47
yup, just 2 screws and the rest are clips. i find it easy to take it out and put it back in, i guess i've just done it enough times. kait freaked out at how fast i was doing it because it took her and her fiance(i think thats what he is lol) like 30 min to take out 1 clip.
this is a pic showing my preferred method of taking them out. once you put the edge in between the base of the clip, and the other part, you can turn the flatheads 90 degrees, and that should provide enough to pull on them and pull them out. you could use pliers after you get them slightly out. or you can try using that tool. im fine without it. some of the clips are actually 2 parts, i prefer to separate them, put in the base, then stick the other part in to lock it in place
this is a pic showing my preferred method of taking them out. once you put the edge in between the base of the clip, and the other part, you can turn the flatheads 90 degrees, and that should provide enough to pull on them and pull them out. you could use pliers after you get them slightly out. or you can try using that tool. im fine without it. some of the clips are actually 2 parts, i prefer to separate them, put in the base, then stick the other part in to lock it in place
I'll definitely give it a try
05-26-2012, 08:23 AM
#48
 , I just want to replace the lens, but yes, the whole foglight housing must be replaced
 The cost for the housing is roughly around $80, I believe.
Still wondering it's worth to switch to HID or not.
05-26-2012, 08:47 AM
#49
mugen cu2
even though i already knew how to remove my bumper but im glad that i took my time to read and pay attention to the pics cause i just found that i used to remove unnecessary clips  haha
haha
haha
05-26-2012, 02:15 PM
#50
Safety Car
Thread Starter
Great instructions, Dave.
So there are only 2 screws, the rest are just plastic clips?
My question, was it easy to remove the clip w/o breaking it AND was it easy to install it back?
Reason is: most of the time I removed the plastic clips, they either bent or broken and worst, I could never snap them back in.
If it does turn out all easy to put back, I might replace the foglight cover-lens myself, there is no reason for me to spend $400+ at the dealer to fix this.
So there are only 2 screws, the rest are just plastic clips?
My question, was it easy to remove the clip w/o breaking it AND was it easy to install it back?
Reason is: most of the time I removed the plastic clips, they either bent or broken and worst, I could never snap them back in.
If it does turn out all easy to put back, I might replace the foglight cover-lens myself, there is no reason for me to spend $400+ at the dealer to fix this.
06-06-2012, 02:12 PM
#52
Safety Car
Thread Starter
no, screw should be the last step. to put it back on, i like to line it up, then put the two grill clips at the top in place, then snap the headlights in, then the side 3 clips. screw is just to secure it
06-09-2012, 10:32 PM
#54
Burning Brakes
Can I add the fact that it is definitely a good idea to put the clips back on your bumper! Or at least put all of the clips that attach to the splash guard/wheel well liner. It can and will fuck it up. I know from experience. Because the plastic is loose without the clips it will eventually start to rub on your tires, especially if you are lowered. If you hit any type of rock or just do a lot of highway driving you will burn straight through the plastic exposing your intake ( if you did resonator removal) and wiring to your fog lights. A new liner and clips are close to $130. Be warned
06-10-2012, 02:13 AM
#55
Safety Car
Thread Starter
Yup this happened to me today on the highway. I recommend you don't let your friends help put the clips back on because they won't do it right. Remember to not only get the clip on to the bumper but make sure it also attaches to the fender liner. This little mistake it costing me mucho money that I rather spend on mods.
06-11-2012, 04:43 PM
#58
ROTAREDOM
I think I for mine for 90 plus about 15 in clips plus tax put me just under 130 otd
06-11-2012, 11:58 PM
#59
Burning Brakes
Yeah my friend over at acura told me it'll cost me 90. He'll just give me clips so I guess I'll save 15 there lol. Getting this done ASAP tomorrow.
06-12-2012, 12:58 PM
#60
Burning Brakes
Just got it done. He got me a discount so i got the fender piece for 72.71 instead of 96.95. I thought he would just give me clips but he didn't but there's 2 clips missing. He told me he'll try to get it off another car and give it to me later tonight lol
06-12-2012, 01:36 PM
#61
ROTAREDOM
lol damn, you're lucky... I didnt get any discount.
02-22-2017, 02:11 PM
#62
Racer

Yep, reviving and old thread cause I'm planning on pulling apart the wife's ride to replace the lower portion of the beak as it's been compromised.
Question, what MM are the push pins? 8mm, 10mm? I want to pick up a few as they're 8 years old and I'm sure they're a touch on the brittle side.
Thanks.
Question, what MM are the push pins? 8mm, 10mm? I want to pick up a few as they're 8 years old and I'm sure they're a touch on the brittle side.
Thanks.
02-22-2017, 02:23 PM
#63
ROTAREDOM
Yep, reviving and old thread cause I'm planning on pulling apart the wife's ride to replace the lower portion of the beak as it's been compromised.
Question, what MM are the push pins? 8mm, 10mm? I want to pick up a few as they're 8 years old and I'm sure they're a touch on the brittle side.
Thanks.
Question, what MM are the push pins? 8mm, 10mm? I want to pick up a few as they're 8 years old and I'm sure they're a touch on the brittle side.
Thanks.
02-22-2017, 02:24 PM
#64
Burning Brakes
The following 2 users liked this post by julius071:
MCDavis (02-22-2017),
t3hhcaptain (02-24-2017)
 09-07-2017, 09:27 AM
#67
Moderator
Join Date: Aug 2014
Location: Dirty H-Town, Amerikkka
Posts: 28,432
Received 7,772 Likes
on
5,045 Posts
See if this works for the time being. I'll try to update the original post this evening with a new host so this DIY can stay relevant.
OK, so you want to remove your front bumper do you? Finally manned up, and are willing to try it, but don't wanna just wing it? well, Here ya go. if you have any questions, post them up or PM me.
Some helpful links for after you remove the bumper
How to remove the intake resonator https://acurazine.com/forums/showthr...=DIY+resonator
How to install HID foglights
https://acurazine.com/forums/showthr...Y+HID+foglight
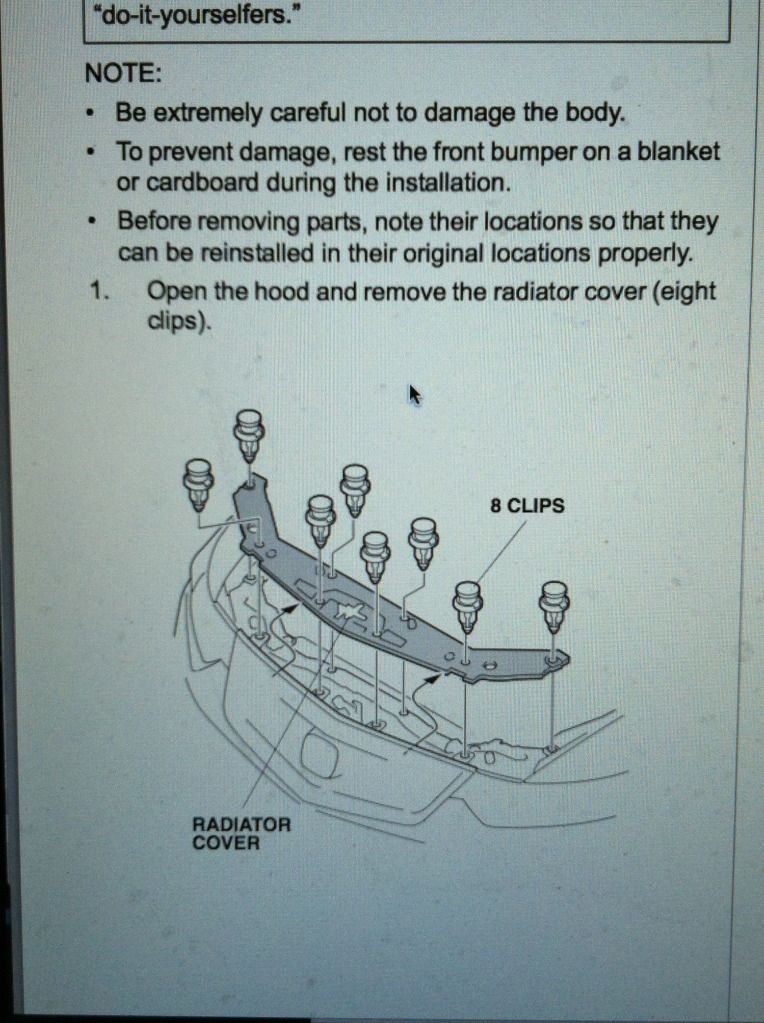
ok so to start off, pop your hood. remove the radiator cover, 8 clips as shown here
before and after

i prefer to put 2 of the clips back into the grill where it attaches to the frame, this pic also shows my method for removing the clips, two flatheads, then just use them as levers at the same time.

Then remove the phillips screw which is in each wheel well


ok now the annoying part, you gotta get underneath the car, and i didn't take pics of this, but heres the PDF part.
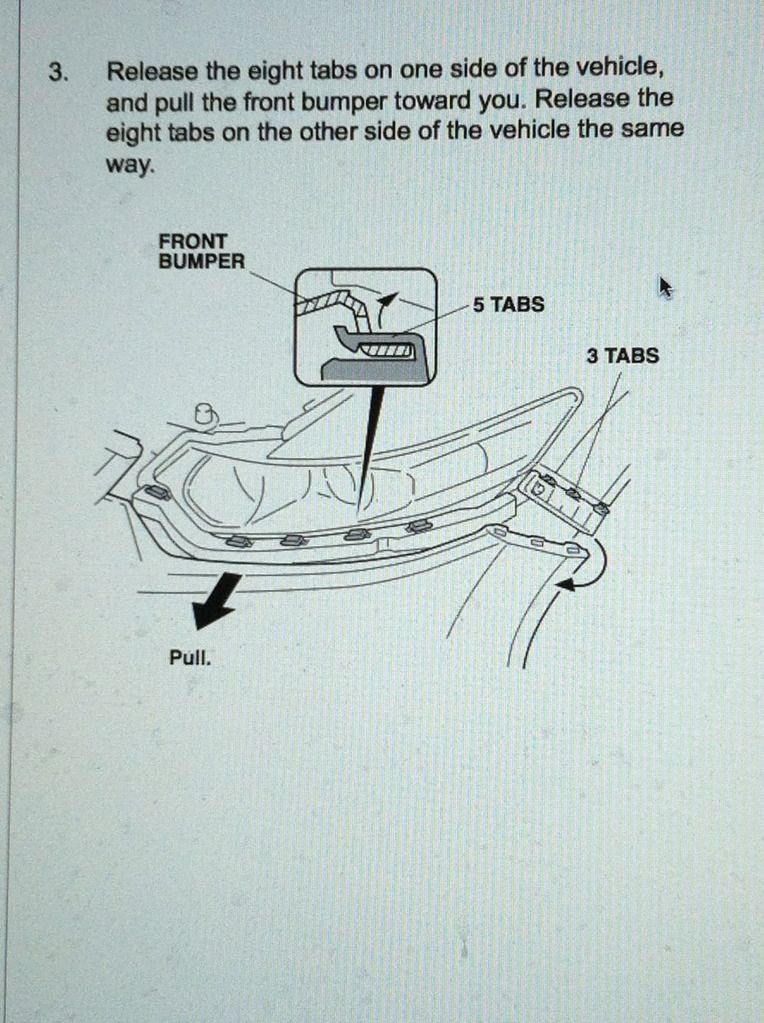
in the center, you will see a little black flap maybe a CM or 2 thick, and behind that, there are 6 clips. remove these. then on either side there are 3 more clips following the line of the bumper(remember the point is to separate the plastic bumper from the plastic black pieces of the car). the last clip of the 3 on each end is longer than the others. make note of where it goes, and keep it separate.
then remove the two clips you reattached to the top of the grill if you did that.
at this point, you have fully removed all the supports of the bumper except the built in clips for the headlight. this is the scariest and trickest part, but apply some force, and it should pop off. reach your hand through the wheel well area and push from behind the bumper. i dont know any real technique to make this easier. the bumper is hard to break and made of very tough plastic.
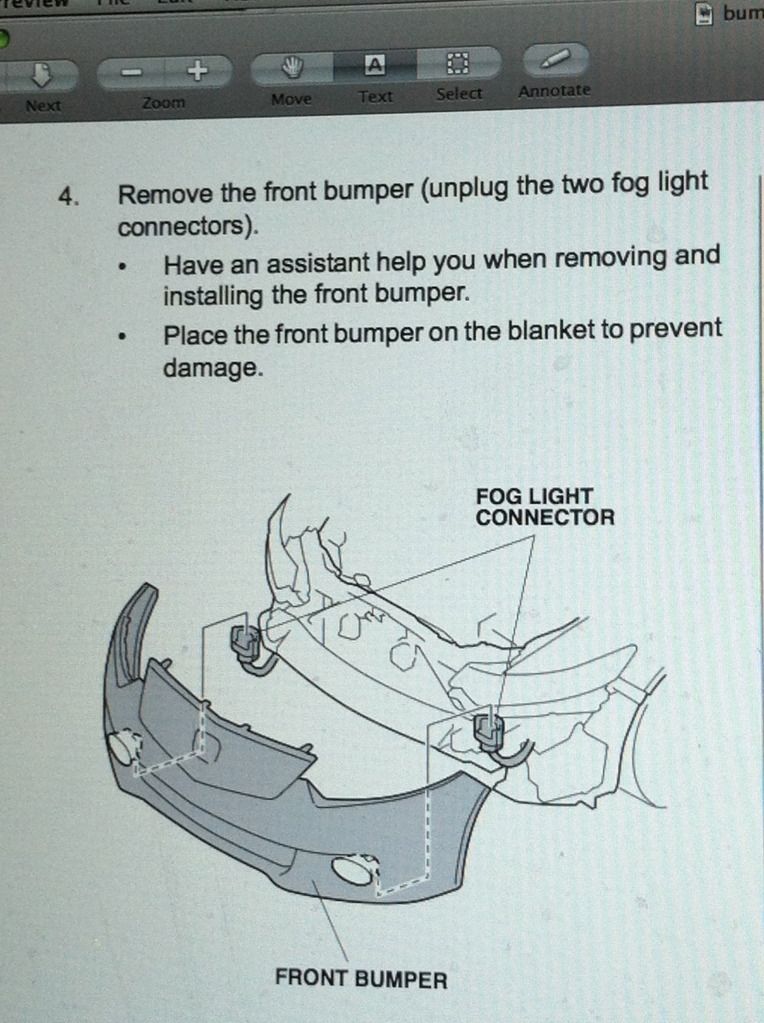
don't pull away from the car yet, the foglights are still attached. remove the foglight connectors(there is a tab on the side opposite the bulb near the bottom, just push it in, and pull the connector down and away from the bulb) or you can remove the entire bulb by twisting it counter clockwise, then place the bumper on cardboard or a beach towel.
DISCLAIMER: By attempting this guide or any DIY work, you understand the risks involved and relinquish all legal standing to sue or otherwise hold Myself, Acurazine, and its subsidiaries, or any other party or persons unless explicitly stated, responsible for any wrongdoing.
Some helpful links for after you remove the bumper
How to remove the intake resonator https://acurazine.com/forums/showthr...=DIY+resonator
How to install HID foglights
https://acurazine.com/forums/showthr...Y+HID+foglight
ok so to start off, pop your hood. remove the radiator cover, 8 clips as shown here
before and after
i prefer to put 2 of the clips back into the grill where it attaches to the frame, this pic also shows my method for removing the clips, two flatheads, then just use them as levers at the same time.
Then remove the phillips screw which is in each wheel well
ok now the annoying part, you gotta get underneath the car, and i didn't take pics of this, but heres the PDF part.
in the center, you will see a little black flap maybe a CM or 2 thick, and behind that, there are 6 clips. remove these. then on either side there are 3 more clips following the line of the bumper(remember the point is to separate the plastic bumper from the plastic black pieces of the car). the last clip of the 3 on each end is longer than the others. make note of where it goes, and keep it separate.
then remove the two clips you reattached to the top of the grill if you did that.
at this point, you have fully removed all the supports of the bumper except the built in clips for the headlight. this is the scariest and trickest part, but apply some force, and it should pop off. reach your hand through the wheel well area and push from behind the bumper. i dont know any real technique to make this easier. the bumper is hard to break and made of very tough plastic.
don't pull away from the car yet, the foglights are still attached. remove the foglight connectors(there is a tab on the side opposite the bulb near the bottom, just push it in, and pull the connector down and away from the bulb) or you can remove the entire bulb by twisting it counter clockwise, then place the bumper on cardboard or a beach towel.
DISCLAIMER: By attempting this guide or any DIY work, you understand the risks involved and relinquish all legal standing to sue or otherwise hold Myself, Acurazine, and its subsidiaries, or any other party or persons unless explicitly stated, responsible for any wrongdoing.
09-14-2017, 08:44 AM
#68
Racer
Just recently had to swap the beak trim due to it cracking, peeling, and bubbling. The factory piece was a black plastic the appeared to be vinyl wrapped. The replacement piece I found is silver all the way through. The process was not difficult, just tedious. Took my time and everything went back together just as it came off. Broke nearly every clip, so it was good that I had purchased 40+ replacements prior to this job. Happy with the results.

Thread
Thread Starter
Forum
Replies
Last Post
Oakes
Wash & Wax
10
10-12-2015 11:17 AM
Marmbo
4G TL Problems & Fixes
6
09-21-2015 09:39 AM
robowarrio
Car Parts for Sale
2
09-01-2015 09:25 PM