
DIY Brake pads & Rotor Replacement


Thread Starter
Burning Brakes
Joined: Jul 2004
Posts: 837
Likes: 5
From: Sacto
DIY Brake pads & Rotor Replacement
Fed Ex delivered some goodies today. Thanks Marcus!
My car: 04 TSX 6MT
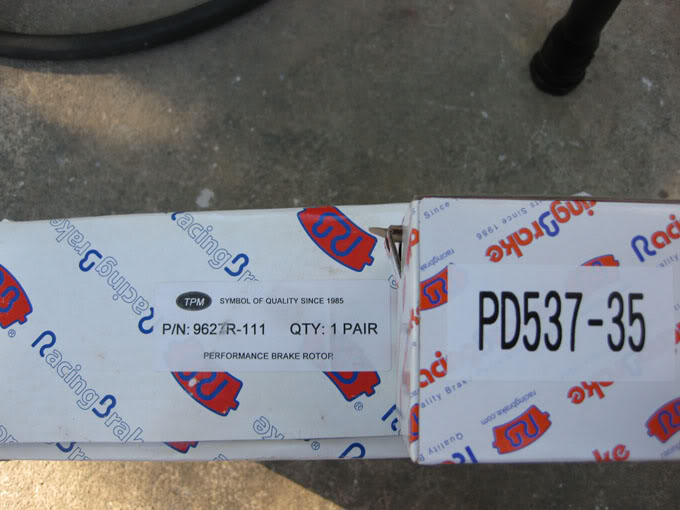
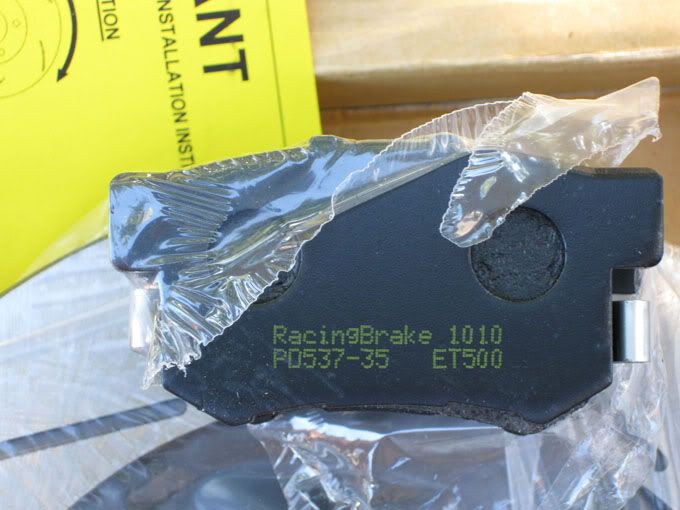
This is the rear set: RacingBrake RB ET500 pad and RacingBrake 1 piece slotted HP rotor 9627R-111.
DIY Brake pads & Rotor Replacement
Materials:
-Can of brake cleaner (or a few of them)
-Bottle of brake & caliper grease
-Rags
-Very fine grit sand paper (not needed but very useful)
Tools:
-12mm Wrench/Socket+ratchet
-14mm wrench/socket+ratchet
-19mm socket+ratchet or any tool to remove wheel lug nut
-C-clamp or a caliper piston presser tool (whatever it�s called)
-A big thick ended flat head screw driver or anything big and flat (If doing rear brakes)
-Impact screw driver (If replacing rotor, if do not have one or don�t want to buy one: read this
-Torque wrench: 0-100 lbs rated or higher
-Jack (Preferably 3 Ton rated or higher jack)
-2 or 4 jack stand (2 Ton rated or higher preferably)
-Air tool and compressor helps a bunch!
Let's Start
-Set your parking brake on.
-If you do not know how to jack your car up and secure it on a jack stand (front only, rear only, or both) stop here and have a professional do the brake job for you. Otherwise continue.
-If you do not have access to air tools and compressor, jack the car up but still have the tire touching the ground. Otherwise, jack it up and gun away!
-If you only have 2 jack stands, pick either the front or the rear to do first.
-Now use the 19mm socket and ratchet you have or even use the one that came with the car located originally in the trunk to loosen the wheel lug nut of the front or rear, which ever you started first. Once they are loose, fully jack the car up and secure them on jack stands.
-Remove wheels and place them where you find it convenient. I like to put the wheel under the car next to the jack stands as if they are jack stands as wheel (habit I picked up from my dad =)
-This part is optional: I like to remove the brake fluid reservoir cap and wrap a rag around the neck of the reservoir.

-Remove these two bolts, should be 12mm. Then pull the caliper away from the rotor. Spray brake cleaner on the caliper piston and use a rag and wipe it down. Also clean the two 12mm bolt as well. See pic above
-Set the caliper to where it is sitting on something or something is supporting it so that it�s not hanging using the brake line as support.
-Remove the brake pads and set it down somewhere near.
Front Brakes:
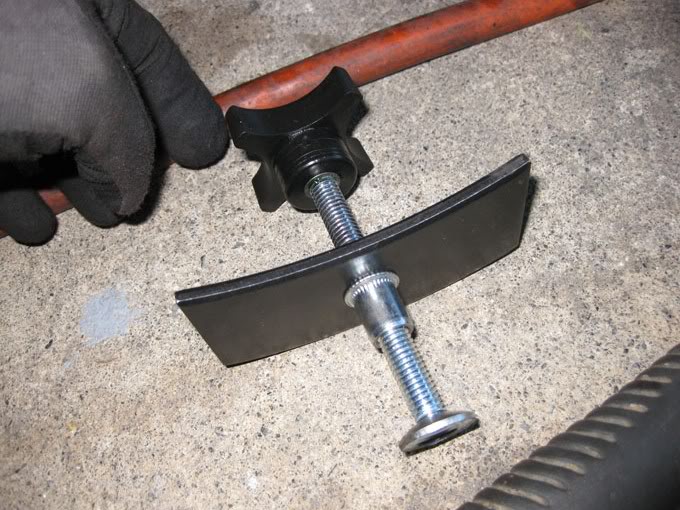
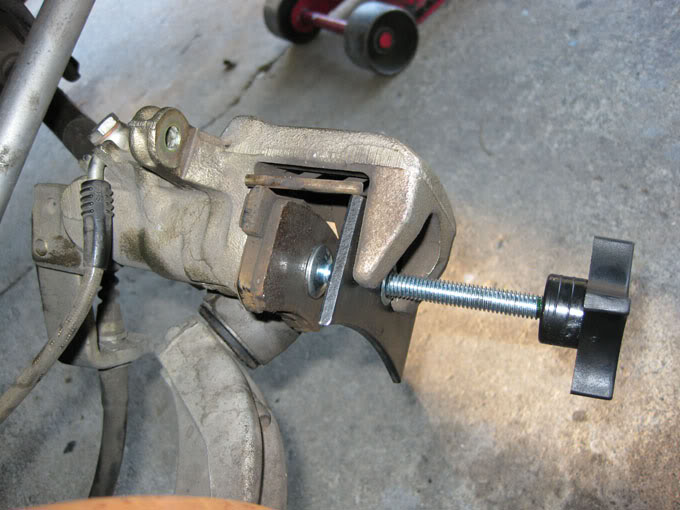
-Take the old brake pad, the one without the bracket attached to it, and place it against the caliper piston. Use a C-clamp or the caliper presser tool and slowly twist the knob. Once the caliper piston is pushed in, set the caliper aside making sure that it�s not hanging using the brake line. See pic below
Note: You might notice there�s fluid leaking under the car at the engine bay location. That is your brake fluid. (hence why I wrap a rag around the reservoir)
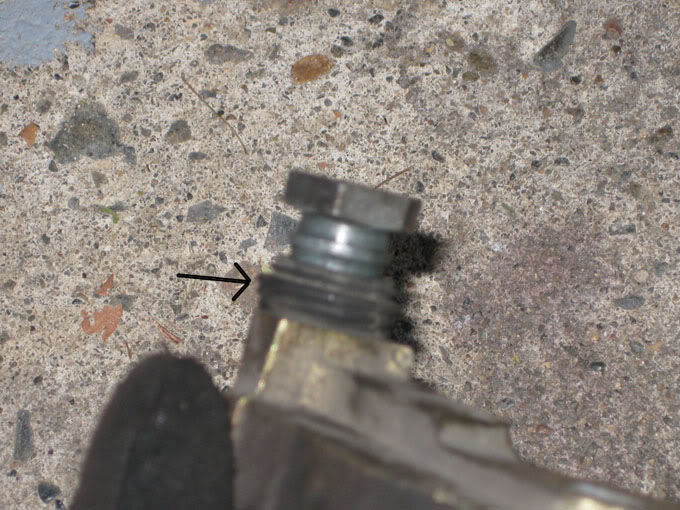
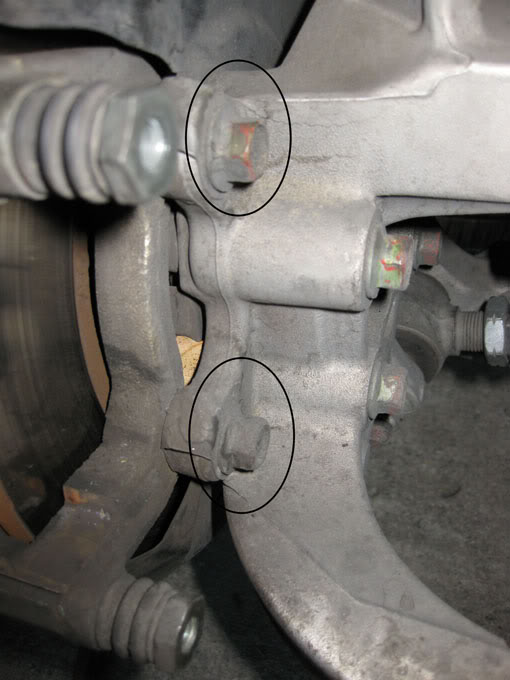
-Locate the caliper pins, see pic below.

-Push the pin in a few time to free it up. If frozen (stuck) repair it if you know how, otherwise take it to a professional to fix it.
-Slide/push the rubber boot down so you can pull the pin out (one pin only). Use the brake & caliper grease and lub the pin. Once lubbed, push it back in and slide the boot over till it fits. Repeat on the other pin. See pic below
-Now remove the pad clip and clean it with brake cleaner and rag. There�s two clip. (Very fine grit sand paper works well here). See pic below.
Once cleaned reinstall it.
-If replacing rotor, please read ROTOR down below. Otherwise read PADS below.
Rear Brakes:
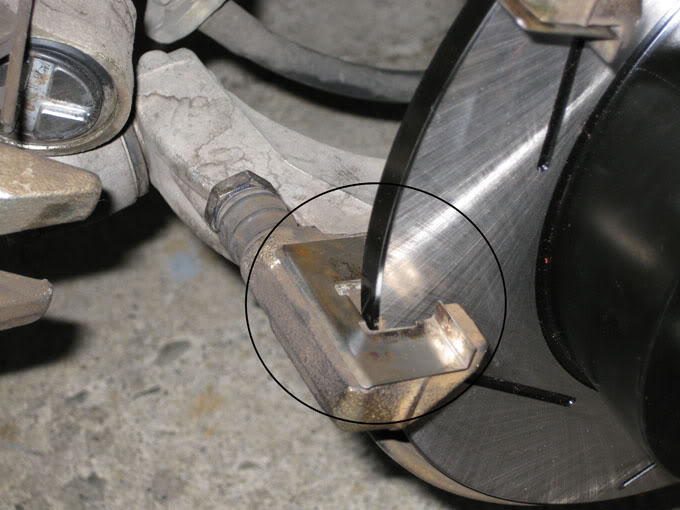
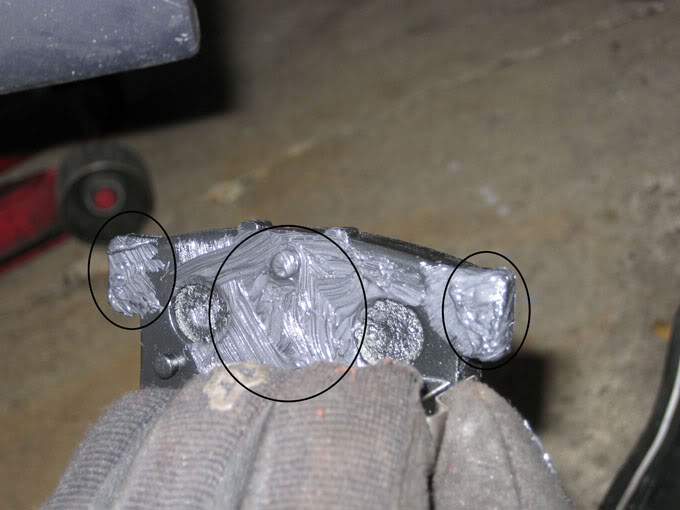
-Take the big thick flat head screw driver or the likes, put it in the slot and twist it clockwise. Just like you�re screwing something in. Once the piston is pressed in, be sure that the �+� is like the picture. Support the caliper somewhere. See pic below.
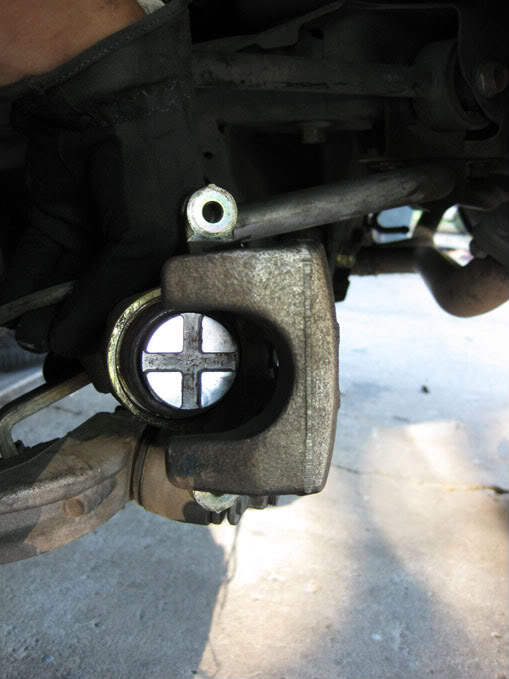
Note: You might notice there�s fluid leaking under the car at the engine bay location. That is your brake fluid. (hence why I wrap a rag around the reservoir)
-Locate the caliper pins, see pic below.
-Push the pin in a few time to free it up. If frozen (stuck) repair it if you know how, otherwise take it to a professional to fix it.
-Slide/push the rubber boot down so you can pull the pin out (one pin only). Use the brake & caliper grease and lub the pin. Once lubbed, push it back in and slide the boot over till it fits. Repeat on the other pin. See pic below
-Now remove the pad clip and clean it with brake cleaner and rag. There�s two clip. (Very fine grit sand paper works well here). See pic below.
Once cleaned reinstall it.
-If replacing rotor, please read ROTOR down below. Otherwise read PADS below.
Rotors:
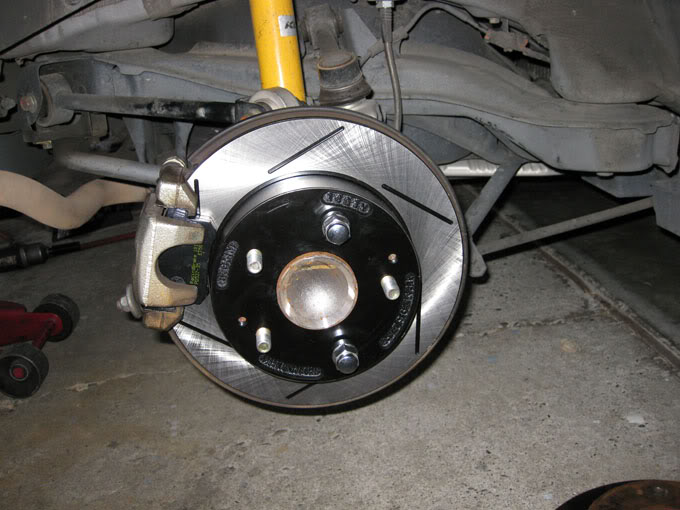
-Look behind the rotor and locate the two caliper bracket bolt. Use the 14mm socket/ratchet and remove it. Use a rag and brake cleaner and clean the two bolts. See pic below.
-Use the impact screw driver and remove the two screw. See pic below.
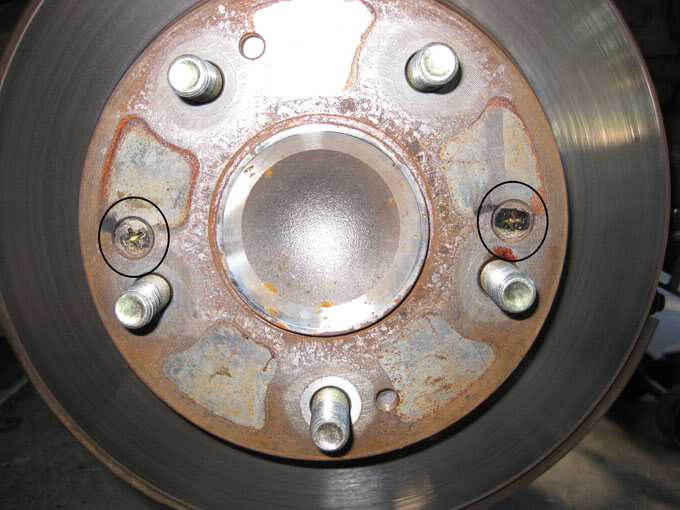
Otherwise, use Heeltoe�s personal method. I tossed the two screw away because I don�t want to deal with it later on if I have to remove the rotors again.
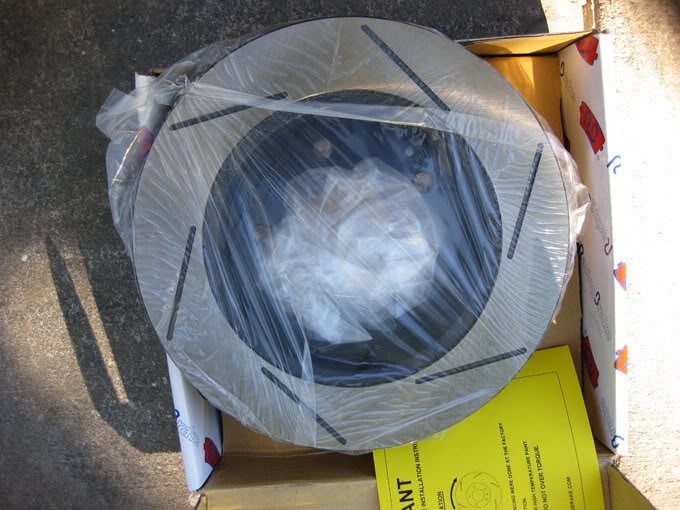
-Clean the new rotor with a rag and brake cleaner, as new rotor will have an oily film all over. See pic below.

-Install the new rotor and try to avoid touching the surface of the rotor where the pad will clamp on. If you did touch it, clean it with brake cleaner and rag.
-Reinstall the caliper bracket.
Pads:
-The pad with the bracket attached goes on the inside (towards the car) and the one without goes on the outside ( away from the car). The one with the bracket are side specific so match up which side it�s on with the old pad that you set aside. See pic below.
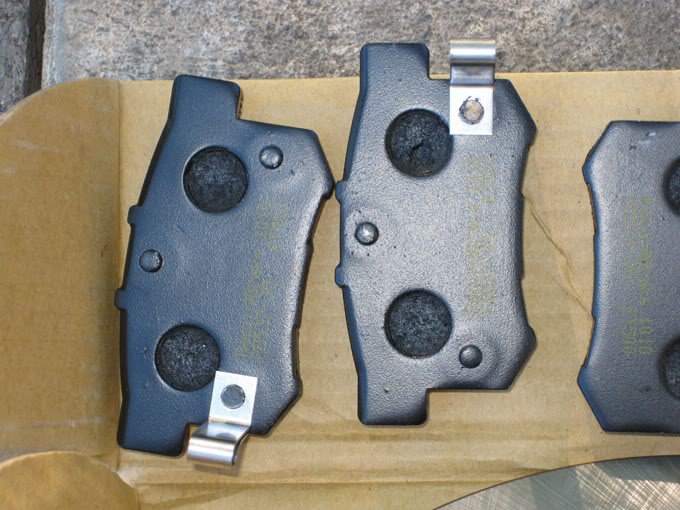
-Use the brake grease and apply it on the ends. Apply the grease on the backing plate of the pad with the bracket attached while avoiding to touch the pad�s friction surface. If you did touch it, clean it with brake cleaner and rag. See pic below.
-Install the new pad.
-Re-install the caliper.
Do a final clean on the rotor surface.
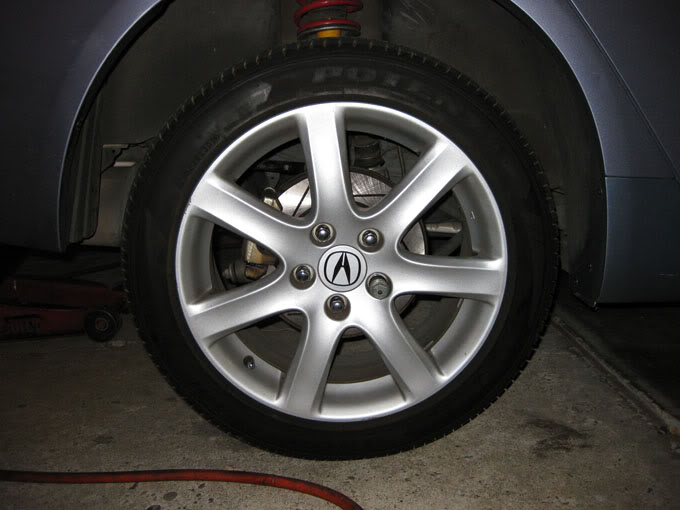
Reassemble your wheel.
Grats! You just installed your brakes and rotors!
-If you removed your brake fluid reservoir cap, screw it back on.
-Set your parking brake.
-Once car is removed from jack stand and is on the ground. Pump your brake pedal till it's hard to do so.
- Start the car and you're done.
My car: 04 TSX 6MT
This is the rear set: RacingBrake RB ET500 pad and RacingBrake 1 piece slotted HP rotor 9627R-111.
DIY Brake pads & Rotor Replacement
Materials:
-Can of brake cleaner (or a few of them)
-Bottle of brake & caliper grease
-Rags
-Very fine grit sand paper (not needed but very useful)
Tools:
-12mm Wrench/Socket+ratchet
-14mm wrench/socket+ratchet
-19mm socket+ratchet or any tool to remove wheel lug nut
-C-clamp or a caliper piston presser tool (whatever it�s called)
-A big thick ended flat head screw driver or anything big and flat (If doing rear brakes)
-Impact screw driver (If replacing rotor, if do not have one or don�t want to buy one: read this
-Torque wrench: 0-100 lbs rated or higher
-Jack (Preferably 3 Ton rated or higher jack)
-2 or 4 jack stand (2 Ton rated or higher preferably)
-Air tool and compressor helps a bunch!
Let's Start
-Set your parking brake on.
-If you do not know how to jack your car up and secure it on a jack stand (front only, rear only, or both) stop here and have a professional do the brake job for you. Otherwise continue.
-If you do not have access to air tools and compressor, jack the car up but still have the tire touching the ground. Otherwise, jack it up and gun away!
-If you only have 2 jack stands, pick either the front or the rear to do first.
-Now use the 19mm socket and ratchet you have or even use the one that came with the car located originally in the trunk to loosen the wheel lug nut of the front or rear, which ever you started first. Once they are loose, fully jack the car up and secure them on jack stands.
-Remove wheels and place them where you find it convenient. I like to put the wheel under the car next to the jack stands as if they are jack stands as wheel (habit I picked up from my dad =)
-This part is optional: I like to remove the brake fluid reservoir cap and wrap a rag around the neck of the reservoir.
-Remove these two bolts, should be 12mm. Then pull the caliper away from the rotor. Spray brake cleaner on the caliper piston and use a rag and wipe it down. Also clean the two 12mm bolt as well. See pic above
-Set the caliper to where it is sitting on something or something is supporting it so that it�s not hanging using the brake line as support.
-Remove the brake pads and set it down somewhere near.
Front Brakes:
-Take the old brake pad, the one without the bracket attached to it, and place it against the caliper piston. Use a C-clamp or the caliper presser tool and slowly twist the knob. Once the caliper piston is pushed in, set the caliper aside making sure that it�s not hanging using the brake line. See pic below
Note: You might notice there�s fluid leaking under the car at the engine bay location. That is your brake fluid. (hence why I wrap a rag around the reservoir)
-Locate the caliper pins, see pic below.
-Push the pin in a few time to free it up. If frozen (stuck) repair it if you know how, otherwise take it to a professional to fix it.
-Slide/push the rubber boot down so you can pull the pin out (one pin only). Use the brake & caliper grease and lub the pin. Once lubbed, push it back in and slide the boot over till it fits. Repeat on the other pin. See pic below
-Now remove the pad clip and clean it with brake cleaner and rag. There�s two clip. (Very fine grit sand paper works well here). See pic below.
Once cleaned reinstall it.
-If replacing rotor, please read ROTOR down below. Otherwise read PADS below.
Rear Brakes:
-Take the big thick flat head screw driver or the likes, put it in the slot and twist it clockwise. Just like you�re screwing something in. Once the piston is pressed in, be sure that the �+� is like the picture. Support the caliper somewhere. See pic below.
Note: You might notice there�s fluid leaking under the car at the engine bay location. That is your brake fluid. (hence why I wrap a rag around the reservoir)
-Locate the caliper pins, see pic below.
-Push the pin in a few time to free it up. If frozen (stuck) repair it if you know how, otherwise take it to a professional to fix it.
-Slide/push the rubber boot down so you can pull the pin out (one pin only). Use the brake & caliper grease and lub the pin. Once lubbed, push it back in and slide the boot over till it fits. Repeat on the other pin. See pic below
-Now remove the pad clip and clean it with brake cleaner and rag. There�s two clip. (Very fine grit sand paper works well here). See pic below.
Once cleaned reinstall it.
-If replacing rotor, please read ROTOR down below. Otherwise read PADS below.
Rotors:
-Look behind the rotor and locate the two caliper bracket bolt. Use the 14mm socket/ratchet and remove it. Use a rag and brake cleaner and clean the two bolts. See pic below.
-Use the impact screw driver and remove the two screw. See pic below.
Otherwise, use Heeltoe�s personal method. I tossed the two screw away because I don�t want to deal with it later on if I have to remove the rotors again.
-Clean the new rotor with a rag and brake cleaner, as new rotor will have an oily film all over. See pic below.
-Install the new rotor and try to avoid touching the surface of the rotor where the pad will clamp on. If you did touch it, clean it with brake cleaner and rag.
-Reinstall the caliper bracket.
Pads:
-The pad with the bracket attached goes on the inside (towards the car) and the one without goes on the outside ( away from the car). The one with the bracket are side specific so match up which side it�s on with the old pad that you set aside. See pic below.
-Use the brake grease and apply it on the ends. Apply the grease on the backing plate of the pad with the bracket attached while avoiding to touch the pad�s friction surface. If you did touch it, clean it with brake cleaner and rag. See pic below.
-Install the new pad.
-Re-install the caliper.
Do a final clean on the rotor surface.
Reassemble your wheel.
Grats! You just installed your brakes and rotors!
-If you removed your brake fluid reservoir cap, screw it back on.
-Set your parking brake.
-Once car is removed from jack stand and is on the ground. Pump your brake pedal till it's hard to do so.
- Start the car and you're done.
Last edited by xaznperswaesonx; Sep 5, 2010 at 01:10 AM.


Three Wheelin'
Joined: Jun 2006
Posts: 1,727
Likes: 0
From: Philadelphia Burbs
Thanks! I just paid $140 for install for all 4 rotors and pads because I did not have the time to do it however, I think I will try to do it myself next time around. I will be saving this and the other older one from way back when.
Thread Starter
Burning Brakes
Joined: Jul 2004
Posts: 837
Likes: 5
From: Sacto
btw .. all the pictures were taken from the rear brakes . but concept wise from what is written is true.
The two bolt that holds the caliper is 14 mm for the front, 12 for the rear. I just went and check the front brake for how much life they had left. I also check my caliper pins in the front .. thank god i did. It barely moved. I took it out and lubbed it. Now it moves very well.
The two bolt that holds the caliper is 14 mm for the front, 12 for the rear. I just went and check the front brake for how much life they had left. I also check my caliper pins in the front .. thank god i did. It barely moved. I took it out and lubbed it. Now it moves very well.
Trending Topics

3rd Gear
Joined: Nov 2007
Posts: 3
Likes: 0
Hi, I was just messing with my 2005 TSX rear brakes and the caliper bolts are 14 mm.
Does anyone know if the caliper bolts are "righty tighty, lefty loosey"? I couldn't get them to budge using "lefty loosey" and seem to remember something about my 2001 MDX brakes being "righty loosey"; i.e. ass backwards to loosen!
Does anyone know if the caliper bolts are "righty tighty, lefty loosey"? I couldn't get them to budge using "lefty loosey" and seem to remember something about my 2001 MDX brakes being "righty loosey"; i.e. ass backwards to loosen!
Thread Starter
Burning Brakes
Joined: Jul 2004
Posts: 837
Likes: 5
From: Sacto
rear caliper bracket bolt is 14mm and caliper bolt is 12mm. Front caliper bolt is 14mm and i didnt check/record the caliper bracket bolt.
I never learned that righty tighty stuff. I just went by Clockwise=tighten and counter clock wise=lossen when looking at the bolt's head. If you're looking at the hub/rotor, then we're looking at the bolt at its end, not the head .. use the wrench/ratchet and move it in a clockwise direction which is counter clockwise if you look at the bolt from the head.
If it moves and notice the caliper pins move as well, use another wrench to hold the caliper in place while you move the caliper bolt. It'll come off.
it's always righty tighty and lefty loosey. it's just really tight, so you will have to use a cheater bar to get it lose. did it a month ago and it was very tough without a cheater bar or a breaker bar.
El Cunado
Joined: Apr 2010
Posts: 283
Likes: 4
From: Baltimore, MD, USA
krhohio, try using a little penetrating-oil (but not a lot and be careful to not get any on the pads/rotor). It's definitely 'lefty-loosey'; I just replaced all four sets of pads two days ago. My front caliper bolts were pretty tight and I used a little oil on them.


Summer is Coming
Joined: Jun 2005
Posts: 2,857
Likes: 647
From: Houston
The bolts that attach the caliper bracket are torqued to 79 ft-lbs, same as the lug nuts. Yes they are tight.
The bolts that hold the calipers are 27 ft-lbs. Make sure to apply a wrench to the caliper pins for torque relief when loosening and tightening.
The bolts that hold the calipers are 27 ft-lbs. Make sure to apply a wrench to the caliper pins for torque relief when loosening and tightening.

Thread Starter
Burning Brakes
Joined: Jul 2004
Posts: 837
Likes: 5
From: Sacto
Current setup all brakes related:
Racingbrake stainless steel brake lines with run of the mill DOT 3 brake fluid.
Front: Racing brake UP rotor with E500 pads
Rear: Racing brake slotted rotor with E500 pads.
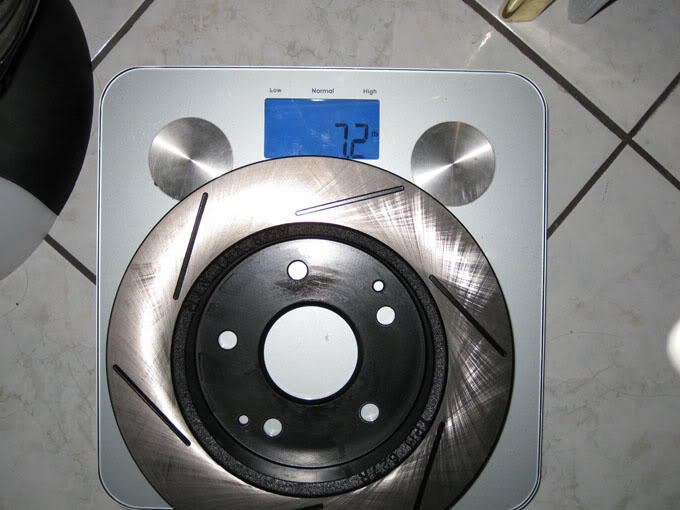
weight over oem .. not sure. How i like them?
Front: LOVE IT
Makes my car stop on a dime! Definately has tons of bite. Stomp it hard and you'll really feel the stopping power.
Rear: like it.
Didn't notice much difference in stopping but god damn .. longevity vs oem is way better. OEM rear pads last about 30k-40K miles. I'm currently about 20K with the RB E500 and it's still thicck. Can definately see it doing another 40K.
Our car shoulda came with these.
Racingbrake stainless steel brake lines with run of the mill DOT 3 brake fluid.
Front: Racing brake UP rotor with E500 pads
Rear: Racing brake slotted rotor with E500 pads.
weight over oem .. not sure. How i like them?
Front: LOVE IT
Makes my car stop on a dime! Definately has tons of bite. Stomp it hard and you'll really feel the stopping power.
Rear: like it.
Didn't notice much difference in stopping but god damn .. longevity vs oem is way better. OEM rear pads last about 30k-40K miles. I'm currently about 20K with the RB E500 and it's still thicck. Can definately see it doing another 40K.
Our car shoulda came with these.
10th Gear
Joined: Mar 2010
Posts: 12
Likes: 0
From: ATL
Great Write-Up
Great write-up. Last time I did this I wanted to take pictures but I had the most difficult time taking off the two screws that hold the front rotors in place. I broke one of those bits on my impact drill that I bought at an auto parts store. I was afraid of stripping the screws, so I ended up taking my car to a local shop and just machined the rotors instead of replacing them.
Bummer, because I had gotten a great deal on my rotors. Replacing the pads however was super easy. I just rented the caliper receding kit at AutoZone for the rear brakes (I read that you shouldn't just push the rear calipers like you do the fronts, since they are different due to the parking brake.).
Last time I did this I wanted to take pictures but I had the most difficult time taking off the two screws that hold the front rotors in place. I broke one of those bits on my impact drill that I bought at an auto parts store. I was afraid of stripping the screws, so I ended up taking my car to a local shop and just machined the rotors instead of replacing them. Bummer, because I had gotten a great deal on my rotors. Replacing the pads however was super easy. I just rented the caliper receding kit at AutoZone for the rear brakes (I read that you shouldn't just push the rear calipers like you do the fronts, since they are different due to the parking brake.).

Advanced
Joined: Feb 2010
Posts: 70
Likes: 3
From: Calgary, Alberta, Canada
Great write-up. Last time I did this I wanted to take pictures but I had the most difficult time taking off the two screws that hold the front rotors in place. I broke one of those bits on my impact drill that I bought at an auto parts store. I was afraid of stripping the screws, so I ended up taking my car to a local shop and just machined the rotors instead of replacing them.
Bummer, because I had gotten a great deal on my rotors. Replacing the pads however was super easy. I just rented the caliper receding kit at AutoZone for the rear brakes (I read that you shouldn't just push the rear calipers like you do the fronts, since they are different due to the parking brake.).
Last time I did this I wanted to take pictures but I had the most difficult time taking off the two screws that hold the front rotors in place. I broke one of those bits on my impact drill that I bought at an auto parts store. I was afraid of stripping the screws, so I ended up taking my car to a local shop and just machined the rotors instead of replacing them. Bummer, because I had gotten a great deal on my rotors. Replacing the pads however was super easy. I just rented the caliper receding kit at AutoZone for the rear brakes (I read that you shouldn't just push the rear calipers like you do the fronts, since they are different due to the parking brake.).
This is the best way I've found to get them out. Works every time, then throw those screws away & don't replace them ever.
http://www.heeltoeauto.com/pitboard/?p=143
Plus Heeltoeauto is a great vendor!
Old Guy
Joined: Apr 2007
Posts: 2,873
Likes: 161
Great write-up. Last time I did this I wanted to take pictures but I had the most difficult time taking off the two screws that hold the front rotors in place. I broke one of those bits on my impact drill that I bought at an auto parts store. I was afraid of stripping the screws, so I ended up taking my car to a local shop and just machined the rotors instead of replacing them.
Bummer, because I had gotten a great deal on my rotors. Replacing the pads however was super easy. I just rented the caliper receding kit at AutoZone for the rear brakes (I read that you shouldn't just push the rear calipers like you do the fronts, since they are different due to the parking brake.).
Last time I did this I wanted to take pictures but I had the most difficult time taking off the two screws that hold the front rotors in place. I broke one of those bits on my impact drill that I bought at an auto parts store. I was afraid of stripping the screws, so I ended up taking my car to a local shop and just machined the rotors instead of replacing them. Bummer, because I had gotten a great deal on my rotors. Replacing the pads however was super easy. I just rented the caliper receding kit at AutoZone for the rear brakes (I read that you shouldn't just push the rear calipers like you do the fronts, since they are different due to the parking brake.).
Advanced
Joined: Feb 2012
Posts: 72
Likes: 10
Yep, I also drilled out one of those screws on my front brakes and did not replace them. Also, could xaznperswaesonx elaborate a little on the caliper pin removal and replacement? I know it has been a while but this part seems a little murky in the description. The caliper pins have a nut which holds the pin to the caliper. Should that be removed and lubed and re-torqued? Do they just pull out of the assembly? Nice writeup with good pictures although none were of the rear brakes and same pics used for both front and rear.

1st Gear
Joined: Sep 2011
Posts: 1
Likes: 0
Good write-up and comments guys. Three things to make it clearer/easier.
Caliper bolts: Front 12mm, head size 17mm.
Rear 10mm, head size 14mm.
When working on caliper, can sit it on inverted 20litre (5 gallon?) plastic bucket. Works really well. No strain on fluid hose.
When pushing piston back to acommodate new thicker pads, fit plastic hose to and release bleed screw. Gets rid of some of the nasty old fluid and prevents reservoir overflow.
I nearly bowled a girl on pushbike this week. She just turned in front of me. Managed to stop in time, but I know plenty of vehicles on the road wouldn't have been able to stop in time. A very sobering reminder to make sure your brakes and tyres are as good as they can be. Pheww!
Thread Starter
Burning Brakes
Joined: Jul 2004
Posts: 837
Likes: 5
From: Sacto
Yep, I also drilled out one of those screws on my front brakes and did not replace them. Also, could xaznperswaesonx elaborate a little on the caliper pin removal and replacement? I know it has been a while but this part seems a little murky in the description. The caliper pins have a nut which holds the pin to the caliper. Should that be removed and lubed and re-torqued? Do they just pull out of the assembly? Nice writeup with good pictures although none were of the rear brakes and same pics used for both front and rear.
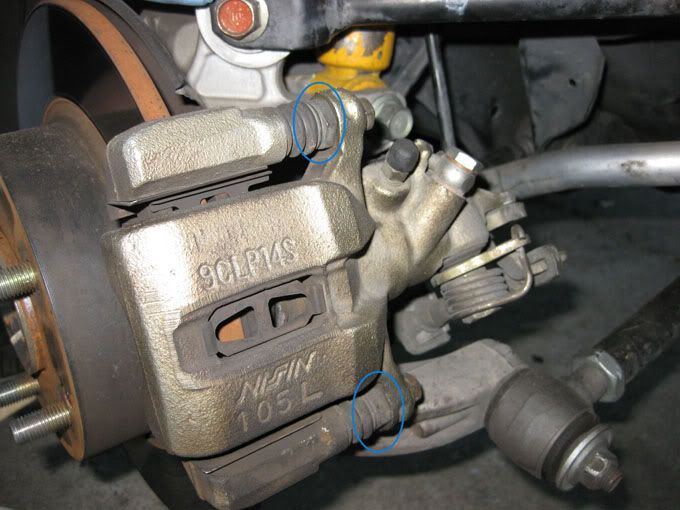
the circled item is the caliper pin. to the right of it is the caliper bolt. Remove the caliper bolt, so you can swing or remove both to pull out the caliper.

then slide the rubber boot away from the pin (towards the caliper) and just pull the pin out. but do one at a time. as they are hole specific. one pin is round stem while the other isn't. it's been so long i forget which goes to where. clean the pin and re-lube with brake grease.
Last edited by xaznperswaesonx; Aug 10, 2012 at 02:02 AM.


Advanced
Joined: Sep 2004
Posts: 61
Likes: 3
From: Chicago
Excellent DIY. Have a question on the grease though...Are the grease used for the pads/shims the same grease for the caliper pins? Can anyone recommend any good quality grease? Doing my brake job this weekend and found out the pads that I've ordered didn't come with any grease. I thought they normally did. I've read somewhere that the grease for the pads/shims should not be used for the caliper pins due to the rubber for the pin.

Racer
Joined: Mar 2005
Posts: 453
Likes: 3
From: Toronto
Ranting here, while taking a coffee break. My son's old enough to watch, help, and learn, so we've been replacing struts and brakes on the family fleet, rather than letting the dealer do them. Other than deglazing the Acura's rotors, I've left it's brakes alone, although the dealer told me a year ago that the rear pads were in need of replacement; I've been waiting for the squeal indicators to make an anouncement, while looking at pad thickness when swapping the snow tires on & off.
600 miles ago the dealer said the rear pad thickness was a "fail", with 2mm remaining. So, when I take the first caliper off, I see lots of pad material; I measured 6mm, vs the replacemnt Hawk HPS at 9mm. Well, I've been looking forward to a brake upgrade, so I continue, and think about cranking in the piston, when I stop and remove the brake fluid reservoir cap, and...there's no fluid, at least not above the screen!
I added some new fluid, cranked in the caliper piston, and go back to check on the reservoir, which is "fuller" but with swirls of two colours of fluid. I know that I asked for the fluid to be flushed less than two years ago, during a B servie, but I'm a bit pissed off, knowing that the brakes were "serviced" three weeks ago. I need to pick up another bottle of brake fluid, or two, before we do a complete flush.
There's a great lesson here, and I like to think that my son appreciates that you need to know enough about what's going on, to make sure that things are done right, whatever it is, regardless of who's actually doing the work. Excellent DIY, btw.
Thread Starter
Burning Brakes
Joined: Jul 2004
Posts: 837
Likes: 5
From: Sacto
Excellent DIY. Have a question on the grease though...Are the grease used for the pads/shims the same grease for the caliper pins? Can anyone recommend any good quality grease? Doing my brake job this weekend and found out the pads that I've ordered didn't come with any grease. I thought they normally did. I've read somewhere that the grease for the pads/shims should not be used for the caliper pins due to the rubber for the pin.
But .. grease on the back of the pads shims are different than the one going on the caliper pins.
Grease used on the back of the shims are those design to reduce noise. The grease that is used on caliper pins are just regular brake grease.
Racer
Joined: Mar 2005
Posts: 453
Likes: 3
From: Toronto
Coming around a known blind corner onto a short straight at an unusually slow 40 mph this morning, a very large deer deer bounded out of the the adjacent woods about 100 ft in front of me. After an initial "WOW!!!!", I nailed the brakes, even before the animals rear hooves hit the ground.
Six months ago I installed Hawk HPS metallic pads and some Brembo blanks, with the help of this thread. What an improvement, and today the strong initial bite was much appreciated. Many thanks to the author.
ABS kicked in, and either the dear heard the briefly locking tires scraping some gravel across the asphalt or the deer saw my approaching car, and where it had been slowing the deer instead literally high-tailed it out of there. As the nose of my car passed the deer's tail, we were both still on the road together. It was close. Thank you, thank you, thank you.


5th Gear
Joined: Jan 2012
Posts: 5
Likes: 0
ok, this maybe stupid on your standard, but ..
I replaced brake pads on my 06 TSX. I didn't realize that the inside Brake Pad Pin can be up or down based on how you put it.
can you guys tell me whether on 06 Acura the Brake Pad pin on inside brake Pad stays on upper side or lower side? Is it same for both front and rear?
thanks
I replaced brake pads on my 06 TSX. I didn't realize that the inside Brake Pad Pin can be up or down based on how you put it.
can you guys tell me whether on 06 Acura the Brake Pad pin on inside brake Pad stays on upper side or lower side? Is it same for both front and rear?
thanks

Thread
Thread Starter
Forum
Replies
Last Post
mada51589
3G TL Problems & Fixes
80
Jan 9, 2025 04:40 PM