Innovative SIDE Mount Install Advice
 10-06-2008, 10:36 PM
#1
Intermediate
Thread Starter

Join Date: Apr 2005
Age: 46
Posts: 40
Likes: 0
Received 0 Likes
on
0 Posts
Innovative SIDE Mount Install Advice
For the past weeks I started feeling some massive wheel-hoop; during hard acceleration or just by the quickl release of the gas pedal... So, I figured that some engine mount was broken.. I ordered the innovative mount setup 60a many of us are bragging about (75 and on, are for hardcore and will take the luxury away by adding more rattles and vibrations than we already have)..
Me and my mechanic started at 10am and finished exactly at 1:20pm .. We started with the b*tchy one, the scary REAR MOUNT.. Yes, it took almost 2hrs. after using many extensions and adapters.... NO NEED to remove the sway-bar or radiator, pass.fans or disconnecting battery or any other items. like other post I've read (we only un-snapped the power steering plastic bucket, BUT DID NOT disconnected any Hoses)...
During Install I came up with a problem that you will need TWO Shorter BOLTS for the SIDE MOUNT.. I'm ordering two of these, I'll tell you if did the work next week...
Part#
95701-10045-08 Bolt, Flange (10x45) ..
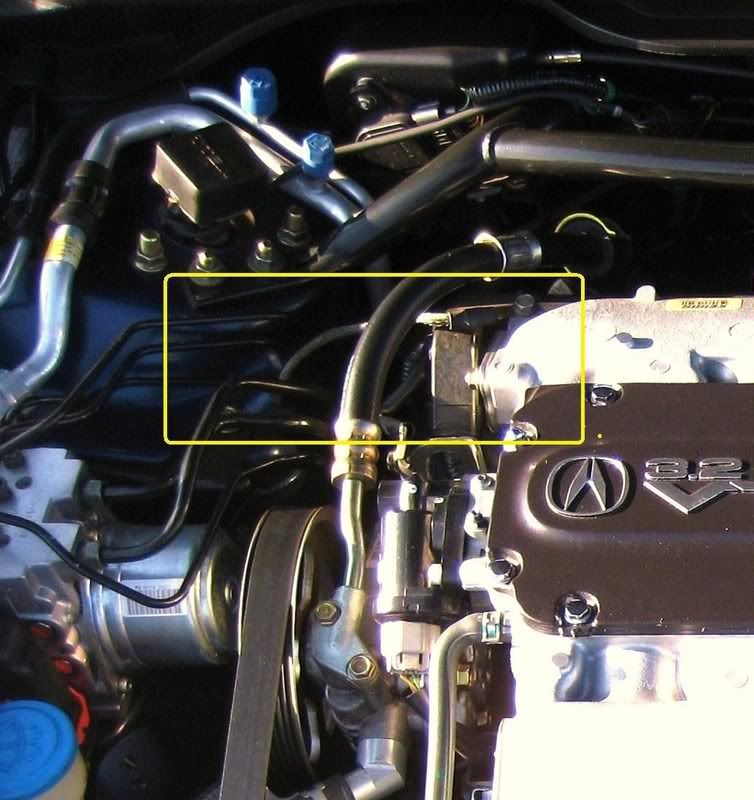
The original bolts (10x60).. are too long and you will damage the thread of the case if used.. In the meantime I used two big nuts I found as spacers while I receive the (10x45).. You may also need a small hand drill to re-install the ground wire on the mount, since the innovative mount does not have a hole. Here's a Pic Hope You can see:
http://pictures.sprintpcs.com/share....tate=RETRIEVED
I LOVE the Mounts, Kind of more cabin rattle while in "D" on a red light "ONLY" .. That's it... While doing the install TWO of my mounts were defectives "REAR and SIDE" OEM SHITTY MOUNTS . The front was almost intact, but I replaced it anyways.
Besides that, I realized that my upper tranny mount was gone too..
THESE Acura MOUNTS REALLY S*CK.. I will also order the Lower Tranny mounts just in case (Front and rear).. Giiiiiiiiizzzzzzzzzzzzzzzz...
My Bill so far:
300 innovative mounts
65 in all tranny mounts/Bolts acuraoemparts.com
150 Friendship Labor...
= Hope nothing else for the next months or so...
Take Care
Me and my mechanic started at 10am and finished exactly at 1:20pm .. We started with the b*tchy one, the scary REAR MOUNT.. Yes, it took almost 2hrs. after using many extensions and adapters.... NO NEED to remove the sway-bar or radiator, pass.fans or disconnecting battery or any other items. like other post I've read (we only un-snapped the power steering plastic bucket, BUT DID NOT disconnected any Hoses)...
During Install I came up with a problem that you will need TWO Shorter BOLTS for the SIDE MOUNT.. I'm ordering two of these, I'll tell you if did the work next week...
Part#
95701-10045-08 Bolt, Flange (10x45) ..
The original bolts (10x60).. are too long and you will damage the thread of the case if used.. In the meantime I used two big nuts I found as spacers while I receive the (10x45).. You may also need a small hand drill to re-install the ground wire on the mount, since the innovative mount does not have a hole. Here's a Pic Hope You can see:
http://pictures.sprintpcs.com/share....tate=RETRIEVED
I LOVE the Mounts, Kind of more cabin rattle while in "D" on a red light "ONLY" .. That's it... While doing the install TWO of my mounts were defectives "REAR and SIDE" OEM SHITTY MOUNTS . The front was almost intact, but I replaced it anyways.
Besides that, I realized that my upper tranny mount was gone too..
THESE Acura MOUNTS REALLY S*CK.. I will also order the Lower Tranny mounts just in case (Front and rear).. Giiiiiiiiizzzzzzzzzzzzzzzz...
My Bill so far:
300 innovative mounts
65 in all tranny mounts/Bolts acuraoemparts.com
150 Friendship Labor...
=
Hope nothing else for the next months or so... Take Care
Last edited by nibalm3; 10-06-2008 at 10:40 PM. Reason: adding pic
 10-07-2008, 03:08 PM
#5
^ wheel-hop... when you floor the car, and you feel/hear the front wheels thudding, and jumping... thats REALLY bad for your car, and can do alot of damage.. wheel hop is minimized tremendously, smoother shifts, less engine movement...
only downfall, is the vibrations.... you can feel/hear those inside the cabin...its all good to some, i surely didnt mind
only downfall, is the vibrations.... you can feel/hear those inside the cabin...its all good to some, i surely didnt mind
 10-07-2008, 10:13 PM
#8
Intermediate
Thread Starter
Join Date: Apr 2005
Age: 46
Posts: 40
Likes: 0
Received 0 Likes
on
0 Posts
here's a link . hope you can see.. Part#30 attach to part#5...
http://estore.honda.com/asp/showrepairblockimage.asp?popup=1&strImageId=SEP4B4 701B.png&&popup=1
Part#5 OEM, has slight larger height (where the screws goes of course) than the innovative mount... That was my issue..
Tuo capisci ?
10-07-2008, 10:17 PM
#9
Intermediate
Thread Starter
Join Date: Apr 2005
Age: 46
Posts: 40
Likes: 0
Received 0 Likes
on
0 Posts
since you have not done the install yet,. can you pliz measure the side mount vs the oem.. and confirm please, cuz I took it side by side and innovative mount was about 0.75" smaller if I remember..
10-08-2008, 04:00 PM
#10
^ I don't have my car its in the shop (again). You want me to measure the side mount height against the oem mount height - is that right?
I do remember my mechanic saying that the my OEM side mount isnt perfectly aligned with my other mounts, that the innovative mounts actually push the engine up slightly, but other ppl who installed said this wasn't the case....anyways....
I do remember my mechanic saying that the my OEM side mount isnt perfectly aligned with my other mounts, that the innovative mounts actually push the engine up slightly, but other ppl who installed said this wasn't the case....anyways....
10-09-2008, 04:52 AM
#11
That's wierd... I agree with you that appears to be an issue, but I dropped the side mount on 15 minutes and never noticed this. I don't think anyone has noticed this yet...
If you snug those bolts down, the milled aluminum bracket mount would be loose, and that would not be good.
If you snug those bolts down, the milled aluminum bracket mount would be loose, and that would not be good.
10-09-2008, 10:52 PM
#12
Safety Car
I spent the last hour invesigating this issue.

 IT IS AN ISSUE !!!
In my case, I found that the bolt was barely, barely short enough. The bolt seemed to be bottoming-out at the same moment that the proper tightening torque was reached.
However, the bolt is not bottoming-out the way you think. The blind hole that the bolt threads into is actually 1/4 inch longer than needed. The bolt is bottoming-out at the shank. I placed teflon tape on the threads and torqued the bolt. When I removed the bolt, here is what I found.


to fix it, I used a thick washer for one bolt.

For the other bolt, it has a grounding cable on it to provide clearance. So, I don't think that my bracket was loose because of this grounding cable. Plus, while tighten this bolt during the install, I know it was not bottoming-out because I watched the bolt crushing the ground cable as I tightened the bolt.

IT IS AN ISSUE !!! In my case, I found that the bolt was barely, barely short enough. The bolt seemed to be bottoming-out at the same moment that the proper tightening torque was reached.
However, the bolt is not bottoming-out the way you think. The blind hole that the bolt threads into is actually 1/4 inch longer than needed. The bolt is bottoming-out at the shank. I placed teflon tape on the threads and torqued the bolt. When I removed the bolt, here is what I found.
to fix it, I used a thick washer for one bolt.
For the other bolt, it has a grounding cable on it to provide clearance. So, I don't think that my bracket was loose because of this grounding cable. Plus, while tighten this bolt during the install, I know it was not bottoming-out because I watched the bolt crushing the ground cable as I tightened the bolt.
10-20-2008, 08:57 AM
#23
Burning Brakes
iTrader: (2)
Join Date: Mar 2003
Location: SOMEWHERE IN NJ
Age: 49
Posts: 1,108
Likes: 0
Received 18 Likes
on
7 Posts
A word of advice to all you mount installers. At the meet this weekend I noticed a bunch of guys with the side mount installed and the small ground tab floating around in no where securely mounted land. I would have to say that this is a serious design flaw if Innovative does not provide you with a relocation strategy. Maybe they do and no one did it I dunno. When I blow my mounts out and install these I would drill a small hole in the top of the side mount. Tap it with a 6x1.0 tap and make it nicey nice.
10-20-2008, 12:00 PM
#24
94 DC4 RS LSV/Turbo
iTrader: (1)
Join Date: Jul 2007
Location: New York City | Stuck in Traffic
Age: 38
Posts: 11,734
Likes: 0
Received 11 Likes
on
11 Posts
^ I wish I had a glance at who had it in nowhere's ville, I tucked the ground wire under one of the bolts metal to metal

as for that bottoming out issue, it is news to me I've done the install 3 times and torqued everything down nothing was left loose, guess when I get under wanderer's engine bay I know what to check
as for that bottoming out issue, it is news to me I've done the install 3 times and torqued everything down nothing was left loose, guess when I get under wanderer's engine bay I know what to check
10-20-2008, 12:06 PM
#26
Burning Brakes
iTrader: (2)
Join Date: Mar 2003
Location: SOMEWHERE IN NJ
Age: 49
Posts: 1,108
Likes: 0
Received 18 Likes
on
7 Posts
In the event I was maimed in a freak accident and lost my hands, and had you install my mounts, you know damn well that wouldnt fly with me. Heres another one  oh wait....stand still anddddddd hyughhh
oh wait....stand still anddddddd hyughhh
10-20-2008, 12:49 PM
#30
Burning Brakes
iTrader: (2)
Join Date: Mar 2003
Location: SOMEWHERE IN NJ
Age: 49
Posts: 1,108
Likes: 0
Received 18 Likes
on
7 Posts
lol. When the Economy is in the toilet and no one fixing their old cars, buying new cars, or even spending money on gas to show up.... Bored techs who have computers in on their tool boxes go on Azine lol.
 10-20-2008, 10:17 PM
#34
Safety Car
Regarding the ground cable.
I used this as an oppurtunity to upgrade the ground. I bought an Everstart brand cable (16" length) from Walmart. The eyelet was the perfect ID for the bolt shank.
I used this as an oppurtunity to upgrade the ground. I bought an Everstart brand cable (16" length) from Walmart. The eyelet was the perfect ID for the bolt shank.
10-21-2008, 02:02 PM
#36
4th Gear

Join Date: Jan 2006
Location: SO. CALIFORNIA
Age: 56
Posts: 4
Likes: 0
Received 0 Likes
on
0 Posts
I did the same thing as Incacurate for my grounding wire and then I tucked in the previous ground that attached to the inside fender wall. For the washer issue I used a 1/2 pressures washer from Home Depot. The washer was only $0.16  ...I have a V6 Accord automatic so I'm still getting more vibrations than I would like.
...I have a V6 Accord automatic so I'm still getting more vibrations than I would like.
10-23-2008, 09:44 PM
#37
Safety Car
Here is the info for the ground cable that I used from Walmart.
They are found in the Walmart auto department where oil and oil filters are sold.
Look for the green colored package called Everstart "Lawn & Garden".
You want the 19" length and 6 gauge.
The UPC barcode number should be (the last group of numbers) = 11196
They are found in the Walmart auto department where oil and oil filters are sold.
Look for the green colored package called Everstart "Lawn & Garden".
You want the 19" length and 6 gauge.
The UPC barcode number should be (the last group of numbers) = 11196