Keezer Build

 10-02-2017, 08:57 AM
#82
Moderator
Regional Coordinator (Southeast)
Regional Coordinator (Southeast)
Thread Starter
Join Date: Dec 2003
Location: Mooresville, NC
Age: 37
Posts: 43,490
Received 3,672 Likes
on
2,501 Posts
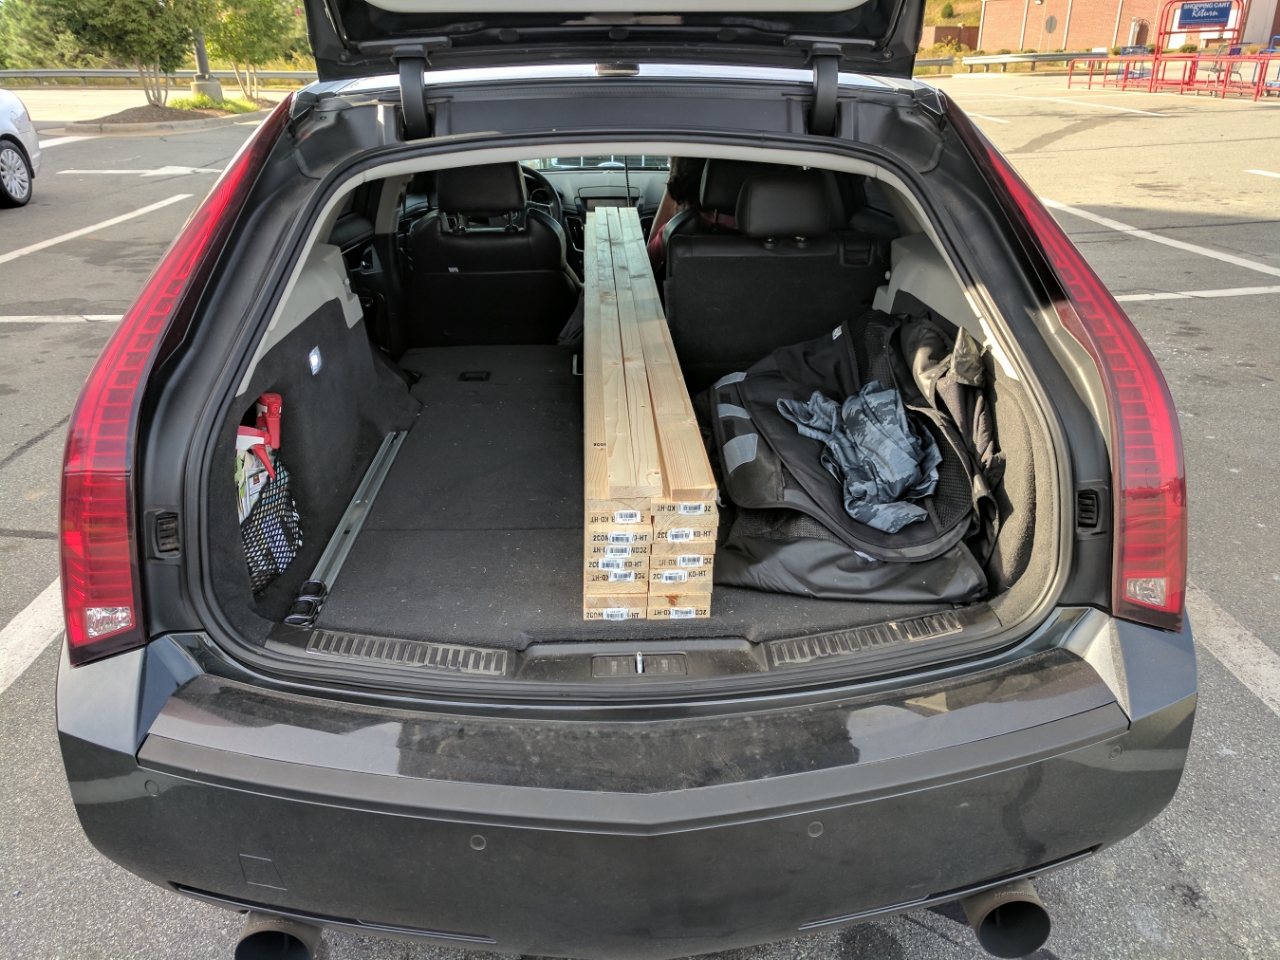
So time for the next phase of this project. Sunday afternoon I headed to lowes to try and pick through their selection of 1x4x8 whitewood boards. Found 18 that were satisfactory. I think I might end up needing a few more but this will get me started.
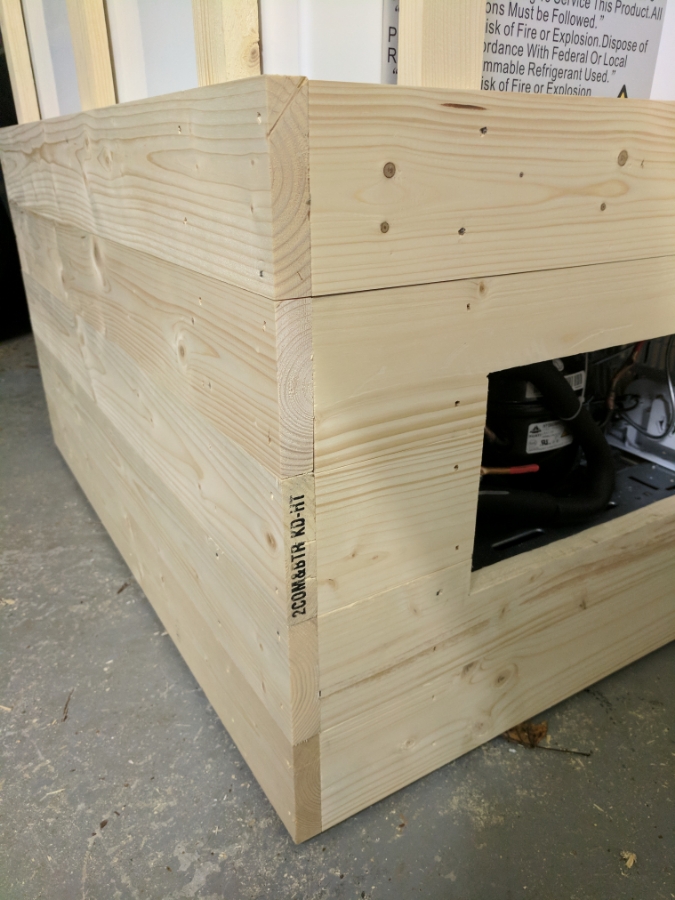
Had a few little projects left to finish before the outside cladding. Did a second round of caulk on the inside to make sure all seals were perfect with no air leak. Then trimmed out the opening for the air vent for the compressor on the side.
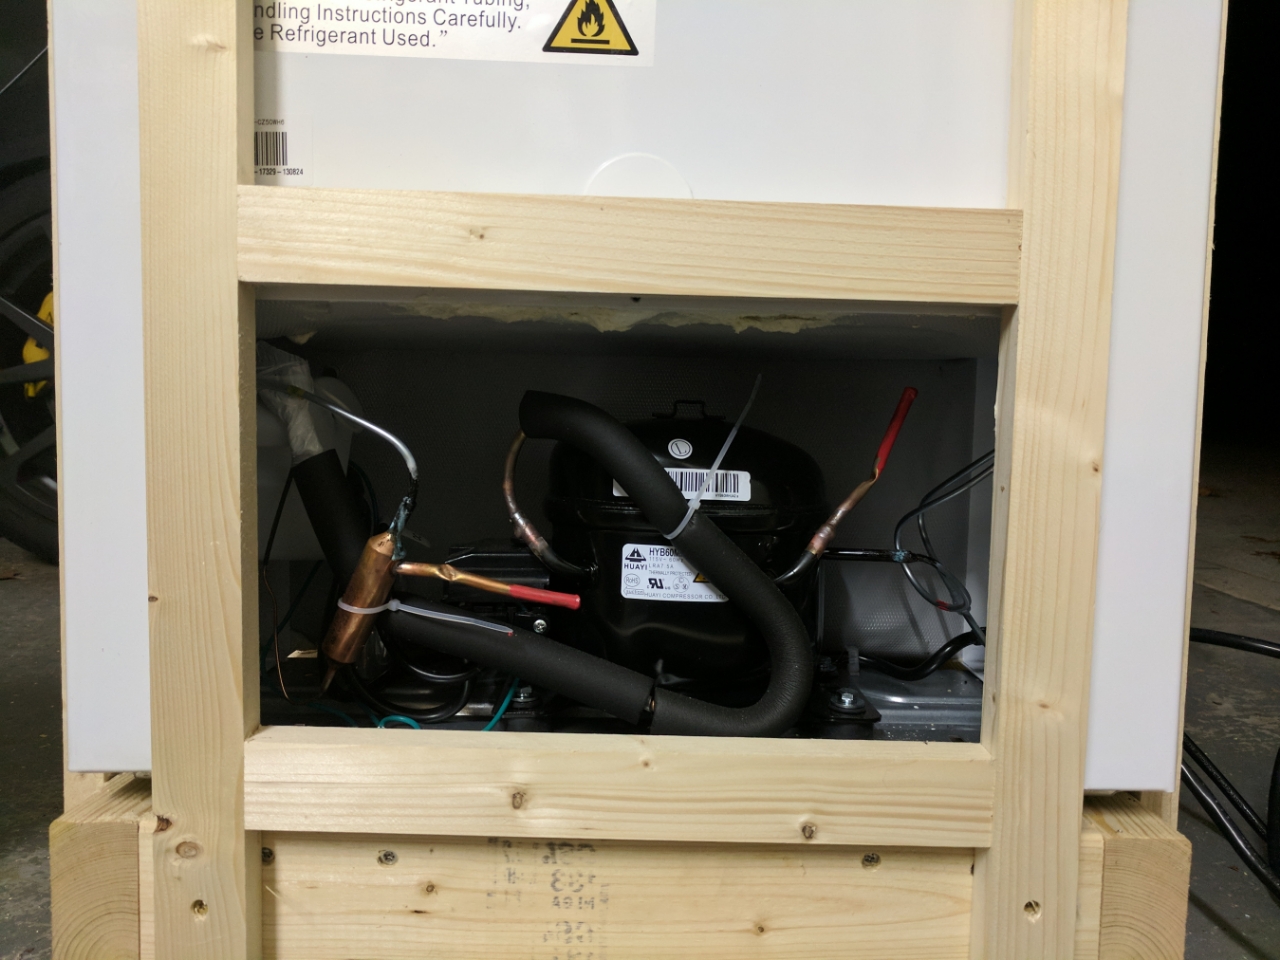
I am terrible at drilling accuate holes it seems. I measured a million times and even so these damn things ended up off by 1/8in. So I enlarged them a little one up a 1/16in and the other down and I should be good to go. I can caulk around them to make sure they don't move plus the lock nut will hold them in place.

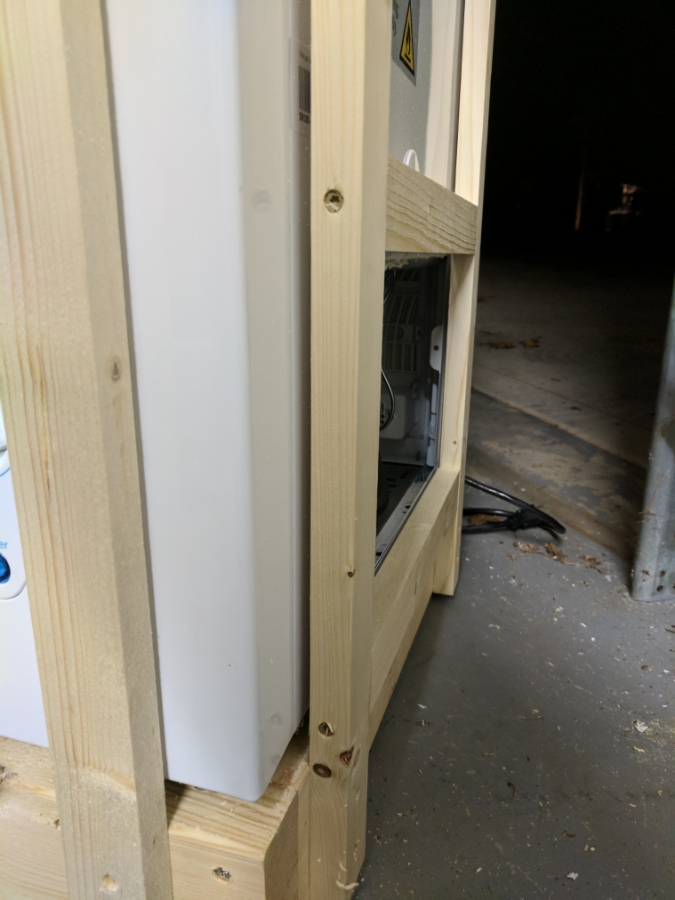
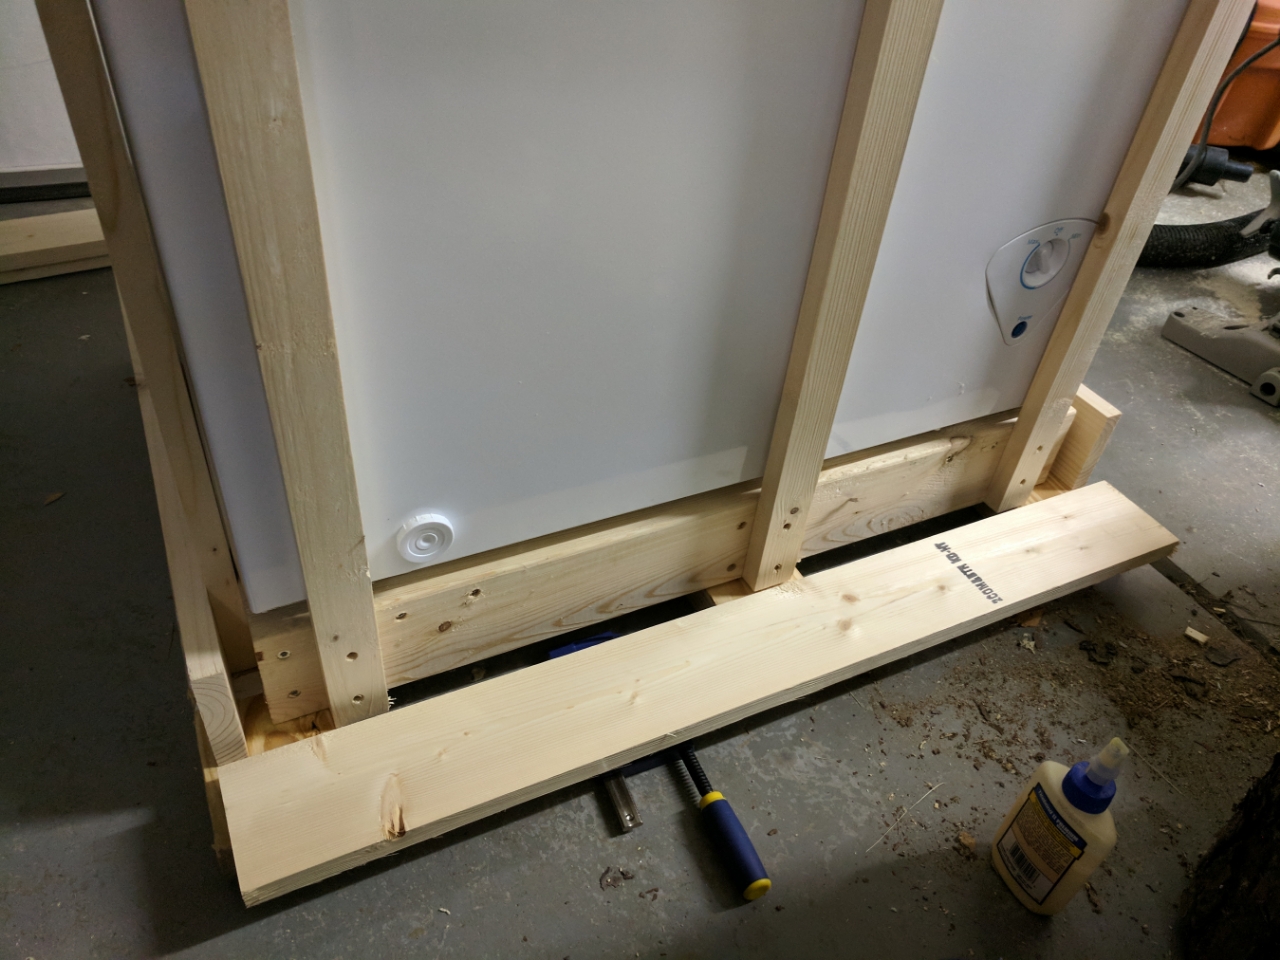
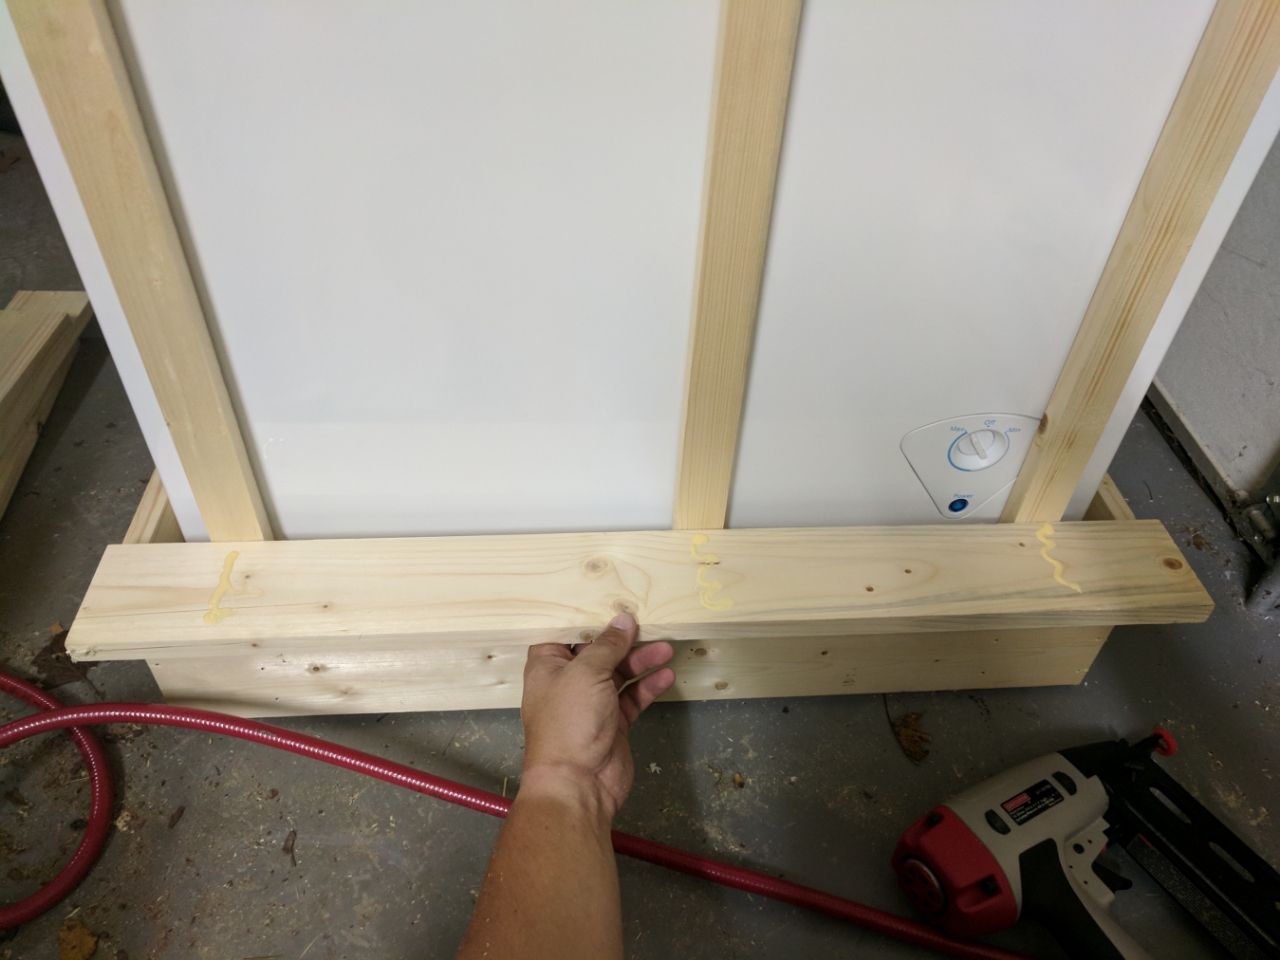
On to the cladding. I used two pieces of 2x4 to raise the keezer off the floor and off the wheels and to give me a surface to use to line up the first layer of cladding. The cladding is both glued on and attached with 1 1/4in 16gauge finish nails. Two nails in each board at each spot is crossed a vertical support as well as at the corners.

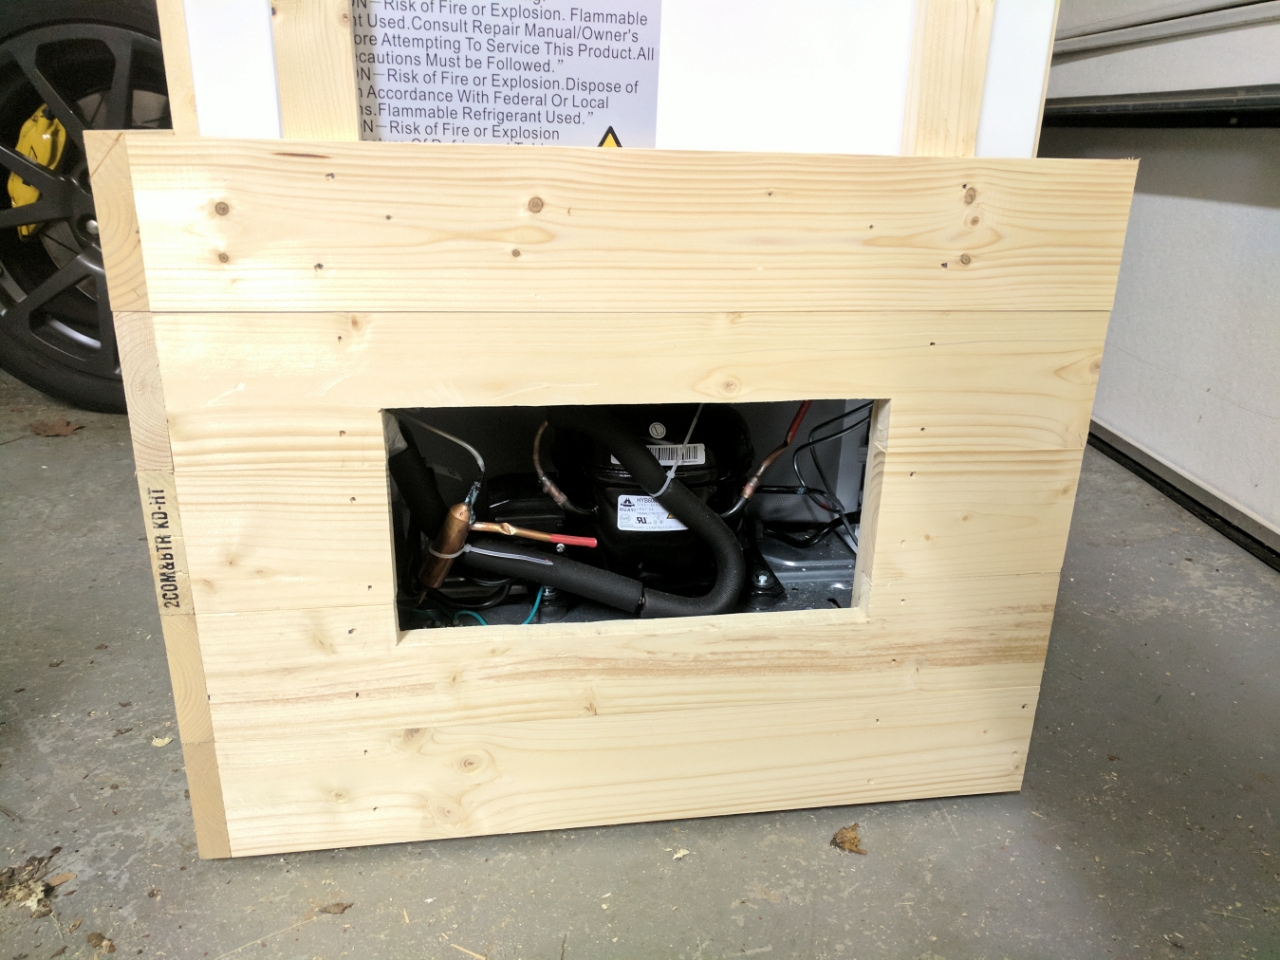
Didn't take any pictures of the process but had to cut out the opening on each of the top and bottom of the compressor opening and then two shorter boards in the middle. Still trying to decide what type of vent I am going to install here to finish it off then. Will make another post with a couple of the options I have come up with after this.
This is where I got to before calling it a night and heading to bed.
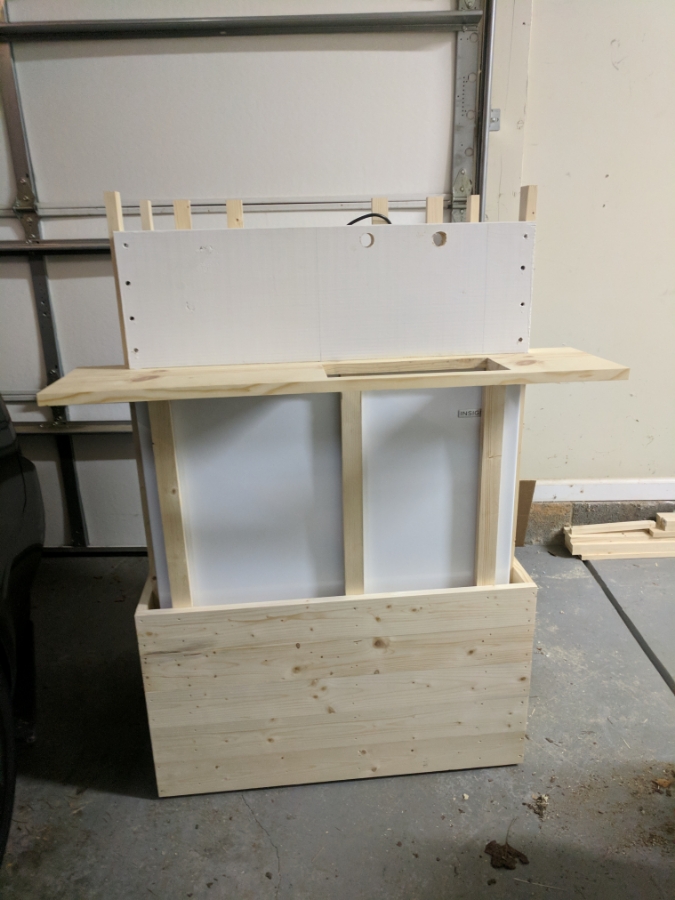
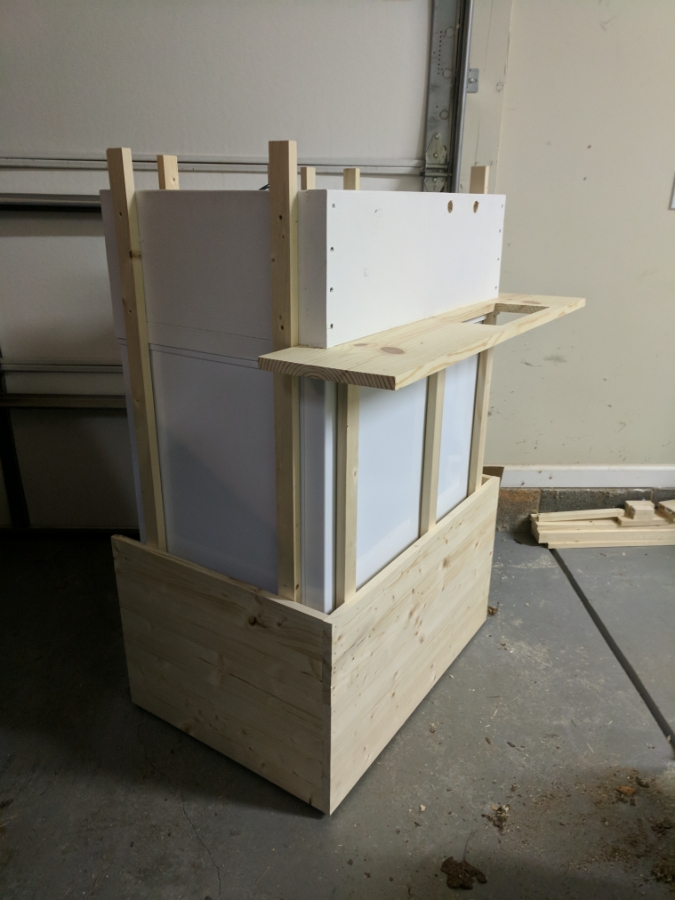
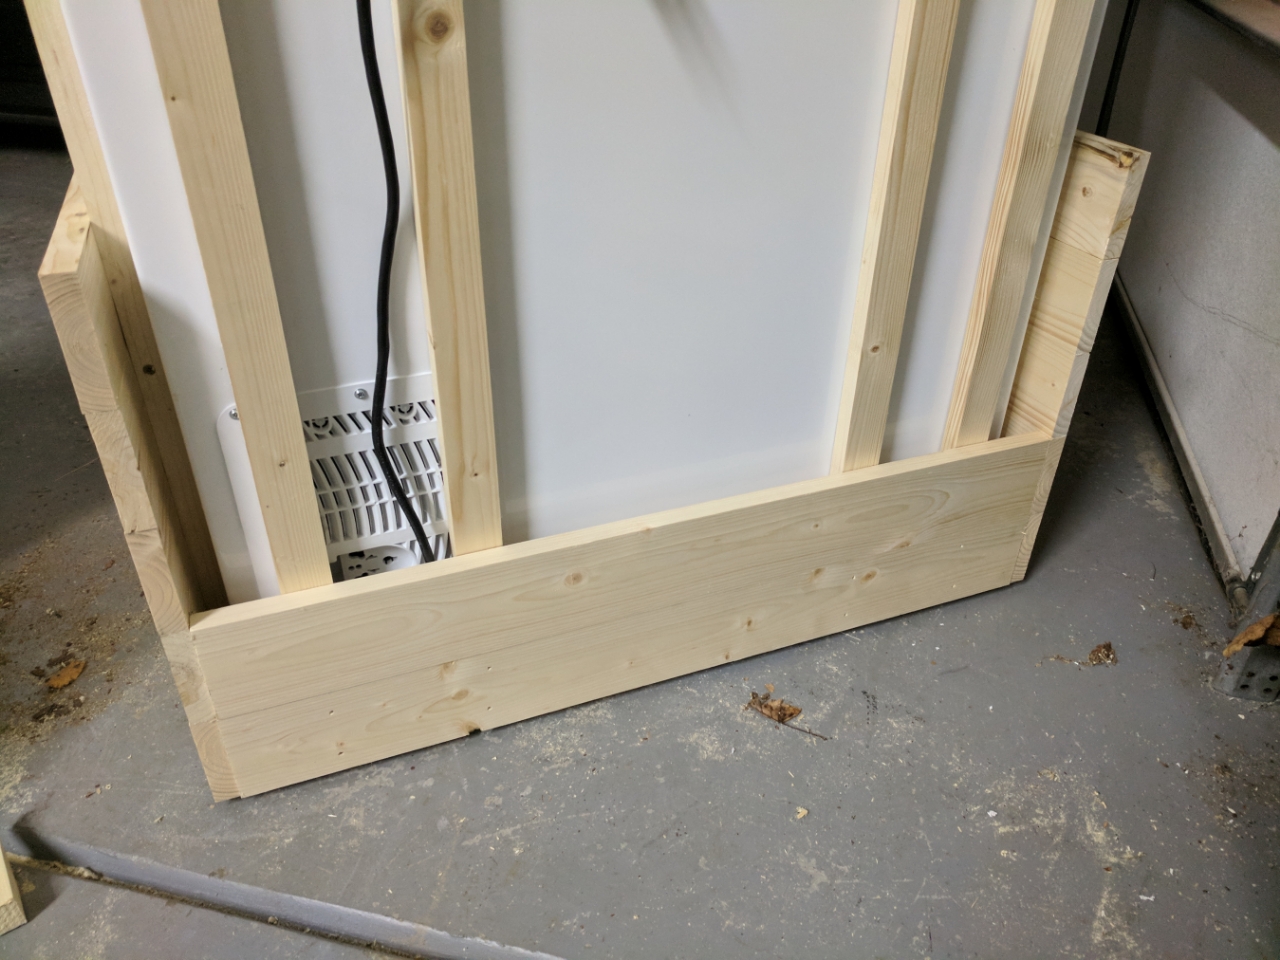
So I got 5 rows done on the front and sides. I only did 2 on the back side though as I am still waiting for a cable to show up that will go in the back. I am also considering leaving an opening around the other air opening on the back side as it allows for a cross flow of air through the compressor space. I have also thought about not covering the entire back now as I am reading that chest freezers work by releasing heat out all sides of the unit. Most people suggest a 1-2in gap between the woode and the freezer and mine is only 3/4in. Because of this I definitely plan to put this in the house now to help make it not have to work as hard. Hopefully I won't have any issues after all of this work.
Had a few little projects left to finish before the outside cladding. Did a second round of caulk on the inside to make sure all seals were perfect with no air leak. Then trimmed out the opening for the air vent for the compressor on the side.
I am terrible at drilling accuate holes it seems. I measured a million times and even so these damn things ended up off by 1/8in. So I enlarged them a little one up a 1/16in and the other down and I should be good to go. I can caulk around them to make sure they don't move plus the lock nut will hold them in place.
On to the cladding. I used two pieces of 2x4 to raise the keezer off the floor and off the wheels and to give me a surface to use to line up the first layer of cladding. The cladding is both glued on and attached with 1 1/4in 16gauge finish nails. Two nails in each board at each spot is crossed a vertical support as well as at the corners.
Didn't take any pictures of the process but had to cut out the opening on each of the top and bottom of the compressor opening and then two shorter boards in the middle. Still trying to decide what type of vent I am going to install here to finish it off then. Will make another post with a couple of the options I have come up with after this.
This is where I got to before calling it a night and heading to bed.
So I got 5 rows done on the front and sides. I only did 2 on the back side though as I am still waiting for a cable to show up that will go in the back. I am also considering leaving an opening around the other air opening on the back side as it allows for a cross flow of air through the compressor space. I have also thought about not covering the entire back now as I am reading that chest freezers work by releasing heat out all sides of the unit. Most people suggest a 1-2in gap between the woode and the freezer and mine is only 3/4in. Because of this I definitely plan to put this in the house now to help make it not have to work as hard. Hopefully I won't have any issues after all of this work.
10-02-2017, 09:19 AM
#83
Moderator
Regional Coordinator (Southeast)
Regional Coordinator (Southeast)
Thread Starter
Join Date: Dec 2003
Location: Mooresville, NC
Age: 37
Posts: 43,490
Received 3,672 Likes
on
2,501 Posts
Here are some of the options I am looking at. Trying not to spend a fortune on it but still keeping the color scheme somewhat the same.
With these I would just take the back duct piece off and use the front metal part.

With this I would need to paint it sort of an antique silver or raw steel like color to try and match smiliar to my shelf brackets that are coming.

This is the best one I have found so far but I am not sure I want to spent this much on a grate for the side.

I figured I should be able to find regular wall return vents in stainless steel with a basic design but it has proved rather difficult.
With these I would just take the back duct piece off and use the front metal part.
With this I would need to paint it sort of an antique silver or raw steel like color to try and match smiliar to my shelf brackets that are coming.
This is the best one I have found so far but I am not sure I want to spent this much on a grate for the side.
I figured I should be able to find regular wall return vents in stainless steel with a basic design but it has proved rather difficult.
10-02-2017, 09:45 AM
#85
Moderator
Regional Coordinator (Southeast)
Regional Coordinator (Southeast)
Thread Starter
Join Date: Dec 2003
Location: Mooresville, NC
Age: 37
Posts: 43,490
Received 3,672 Likes
on
2,501 Posts
 I thought I had taken two towels with me this time but I ended up only having one which got used to cover the leather armrest. I should have used the dog seat cover but oh well. It really isn't that bad. I should just order that Weather tech cover though. I just worry it will make access to the compartment below the floor that I store stuff in more difficult.
10-02-2017, 10:56 AM
I thought I had taken two towels with me this time but I ended up only having one which got used to cover the leather armrest. I should have used the dog seat cover but oh well. It really isn't that bad. I should just order that Weather tech cover though. I just worry it will make access to the compartment below the floor that I store stuff in more difficult.
10-02-2017, 10:56 AM
#86
Moderator
Nice work, looking good.
Guessing it's going to be a mighty heavy beast when it's done.
Guessing it's going to be a mighty heavy beast when it's done.
The following users liked this post:
CCColtsicehockey (10-03-2017)
10-02-2017, 10:59 AM
#87
1, it makes accessing the compartment a pain in the ass.
2, it has a raised lip which you're afraid to misshape by laying anything on it anyway...
that said, I love it...it's already caught milk and the nasty water that comes out of the pressure cleaner res.
2, it has a raised lip which you're afraid to misshape by laying anything on it anyway...
that said, I love it...it's already caught milk and the nasty water that comes out of the pressure cleaner res.
The following users liked this post:
CCColtsicehockey (10-03-2017)
10-03-2017, 09:40 AM
#88
Moderator
Regional Coordinator (Southeast)
Regional Coordinator (Southeast)
Thread Starter
Join Date: Dec 2003
Location: Mooresville, NC
Age: 37
Posts: 43,490
Received 3,672 Likes
on
2,501 Posts
 I don't like the sound of that. That has been my issue with getting a tray for the rear. I fold the seats down a good bit and access that storage area. I keep wheel tools, a jack, sockets, tire repair kit, window cleaner, rags, and a bunch of other stuff under there out of the way.
10-03-2017, 10:34 AM
I don't like the sound of that. That has been my issue with getting a tray for the rear. I fold the seats down a good bit and access that storage area. I keep wheel tools, a jack, sockets, tire repair kit, window cleaner, rags, and a bunch of other stuff under there out of the way.
10-03-2017, 10:34 AM
#90
Moderator
Regional Coordinator (Southeast)
Regional Coordinator (Southeast)
Thread Starter
Join Date: Dec 2003
Location: Mooresville, NC
Age: 37
Posts: 43,490
Received 3,672 Likes
on
2,501 Posts
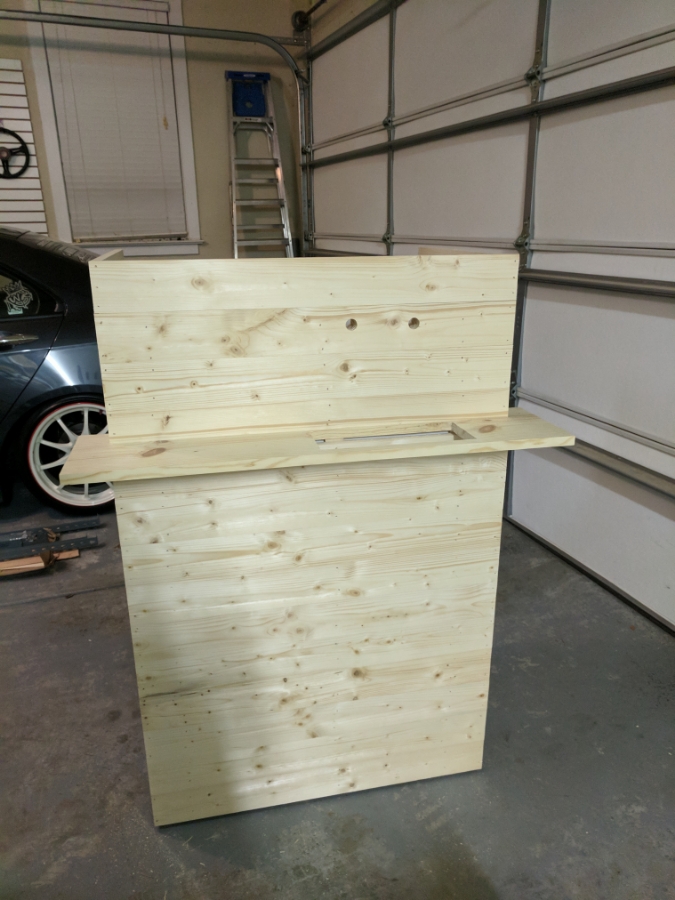
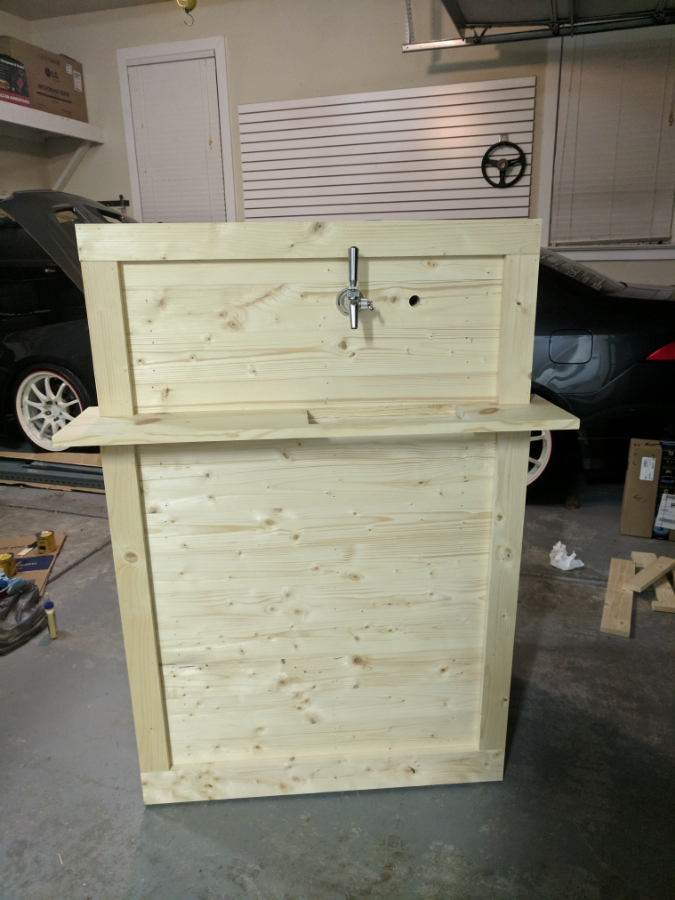
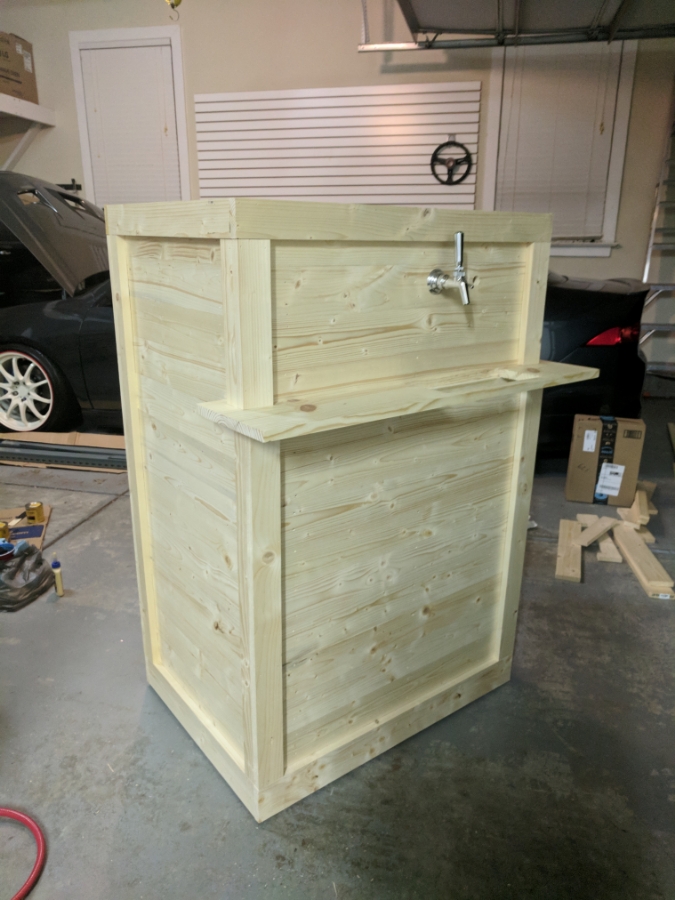
So last night I kept going on covering the outside of the front and sides. Still can't decide what I want to do regarding the heat of the unit. With it supposed to vent heat on all sides I guess just leaving the back open doesn't really help that much. It will look great being all wrapped up but I also don't want it to die in a year with putting all this work into it.
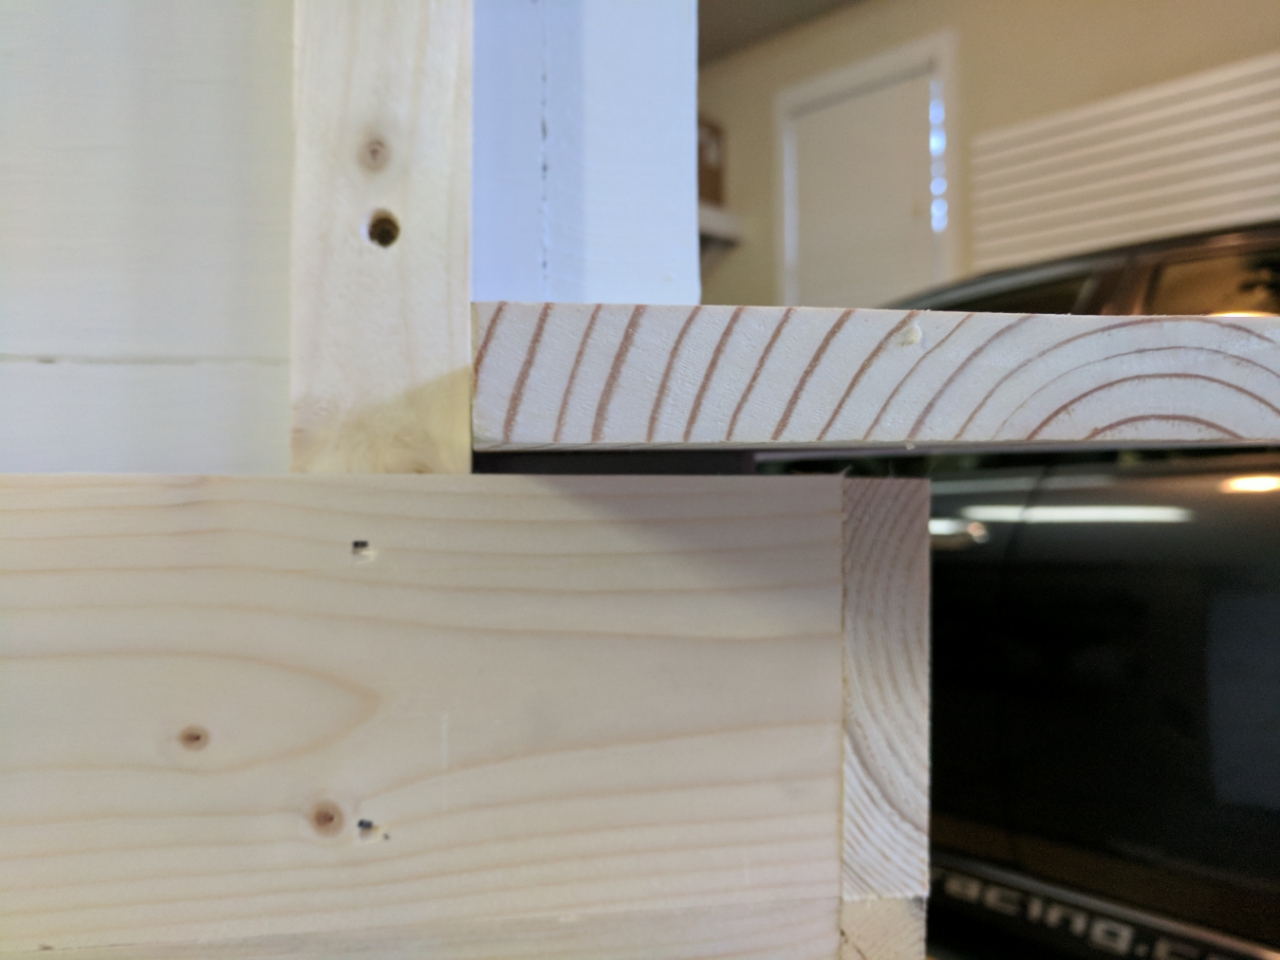
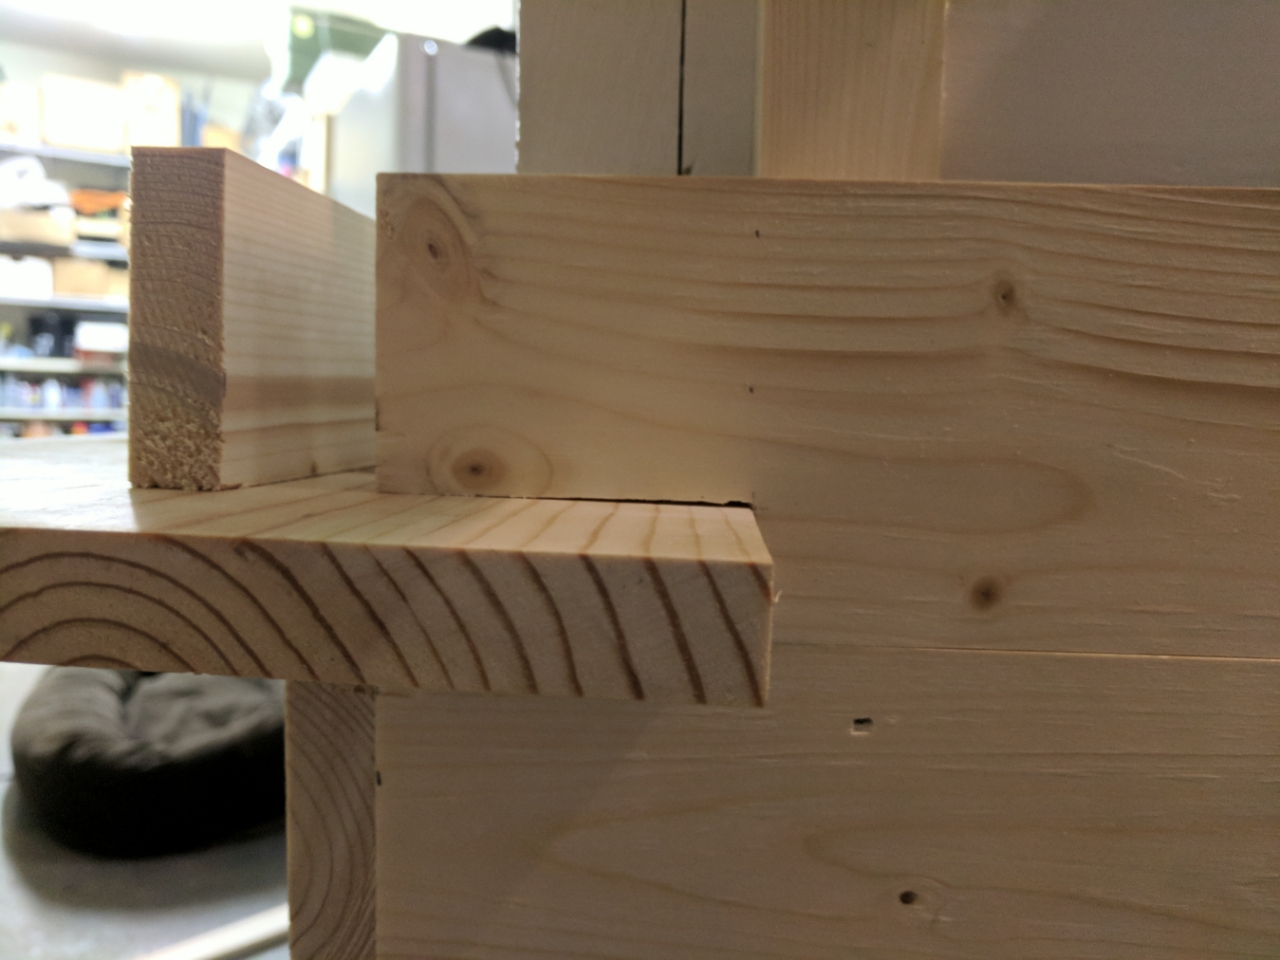
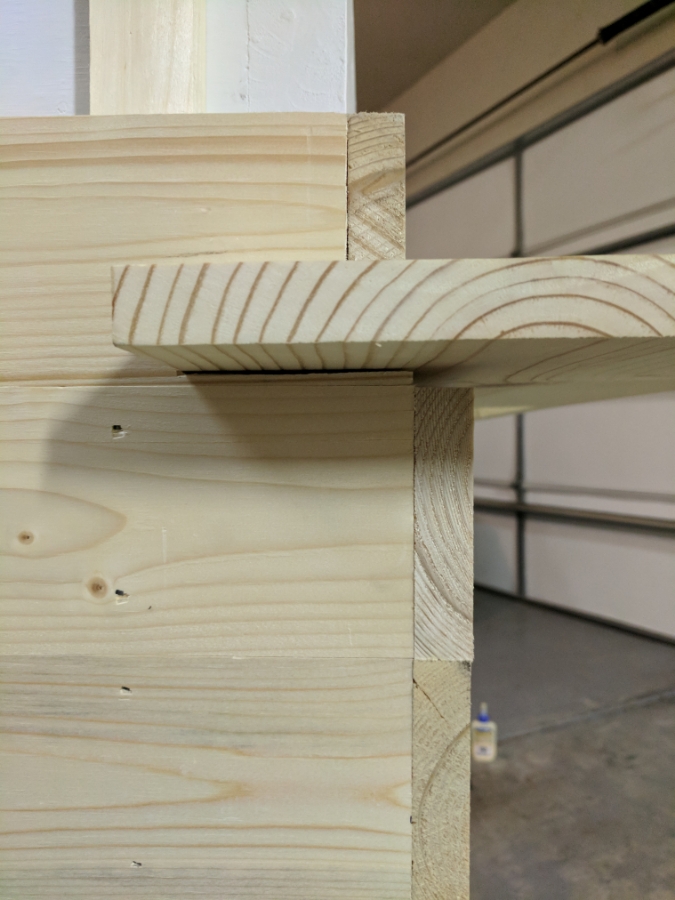
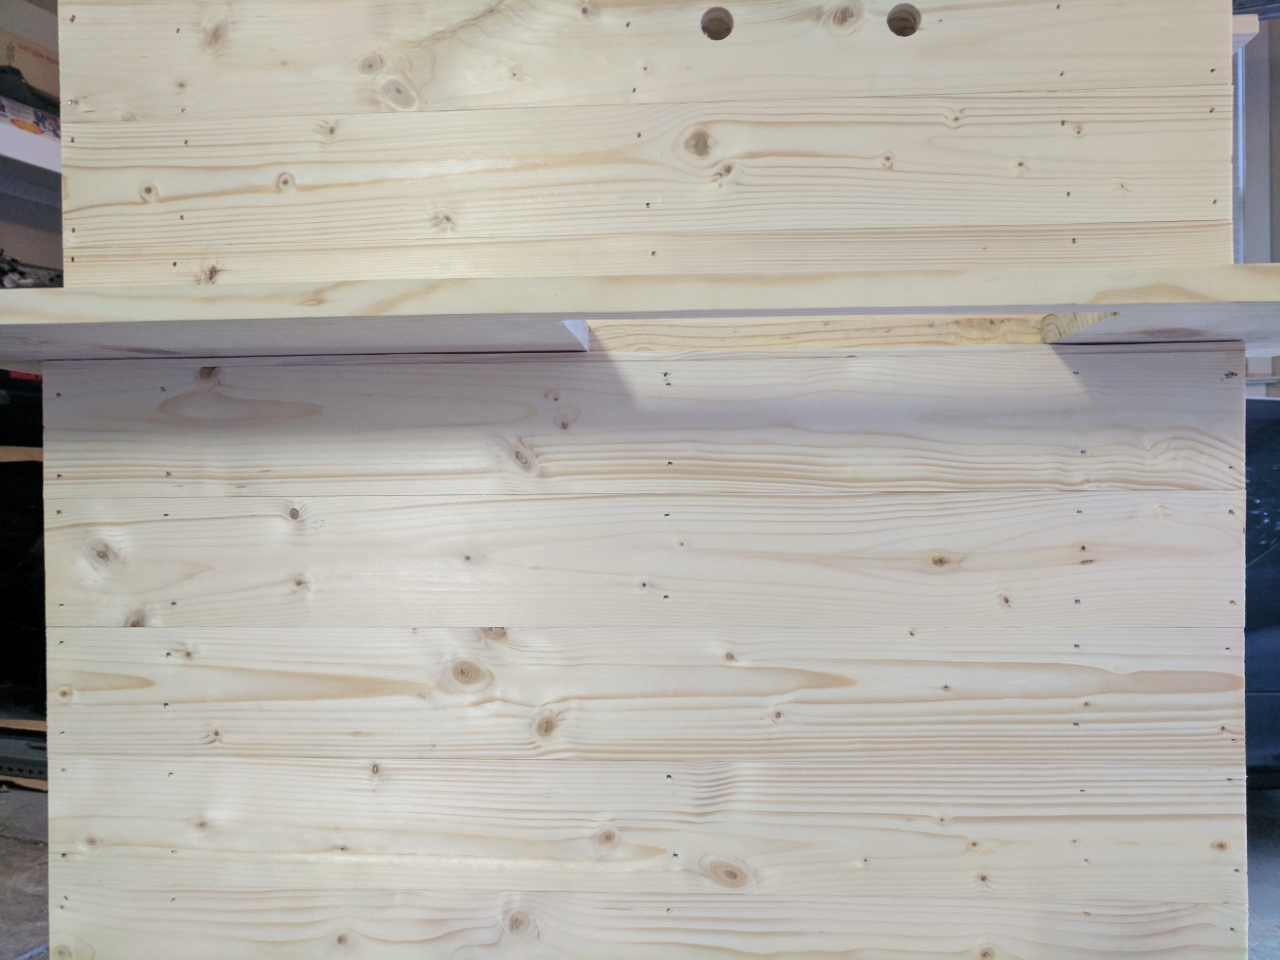
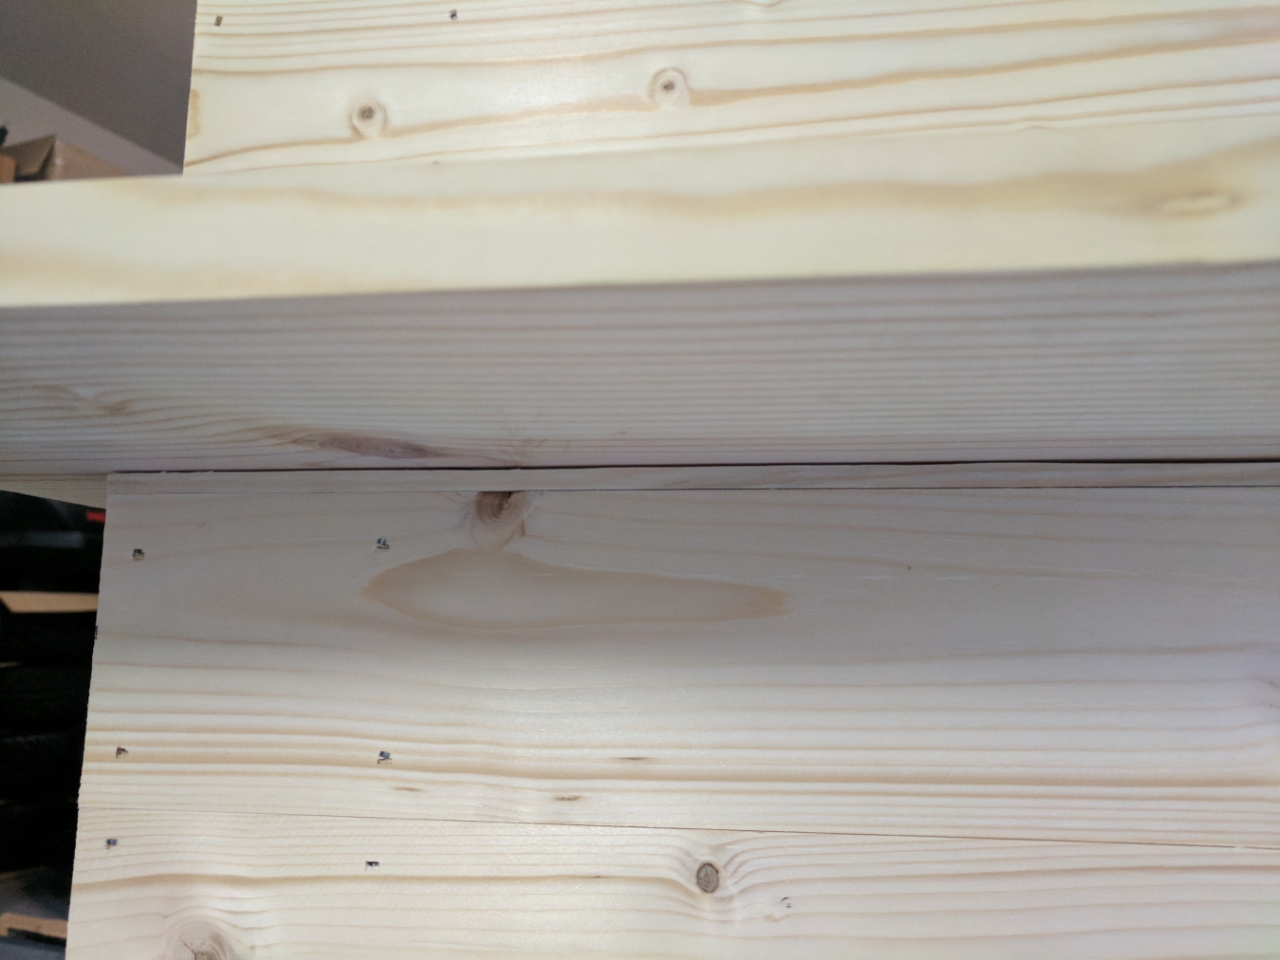
Getting up to the shelf was the easy part.
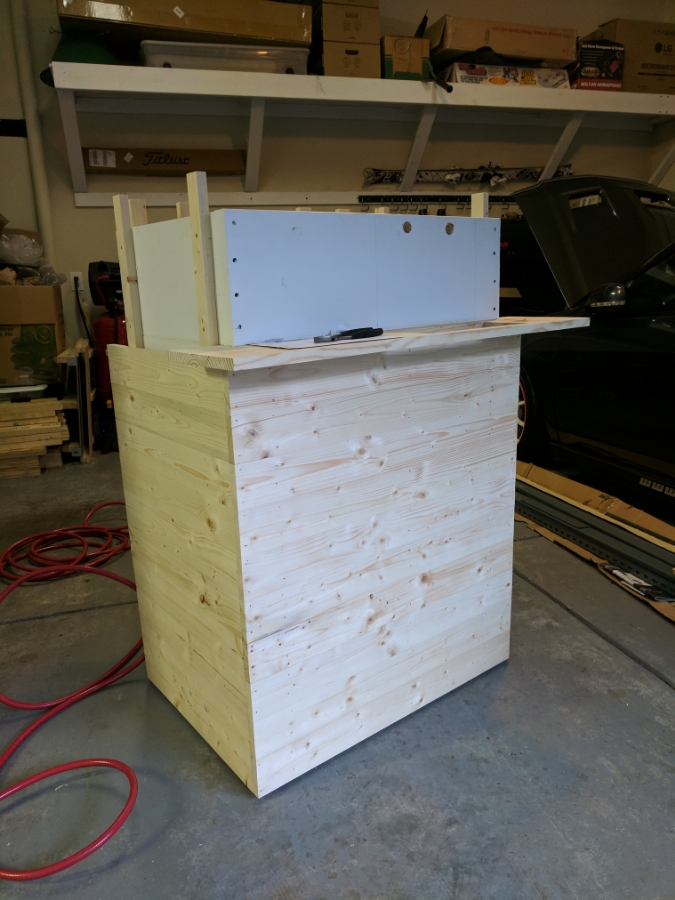
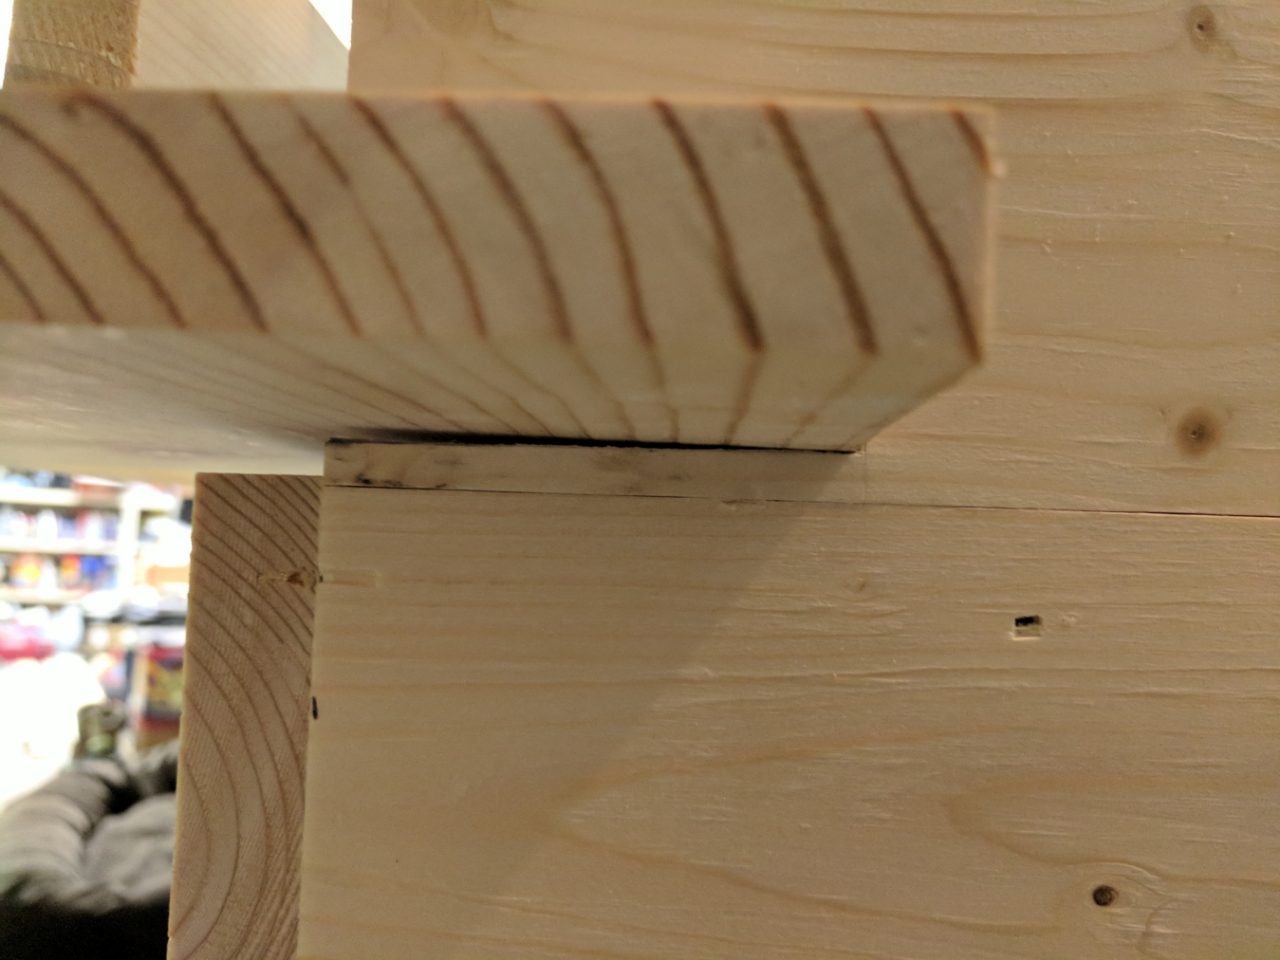
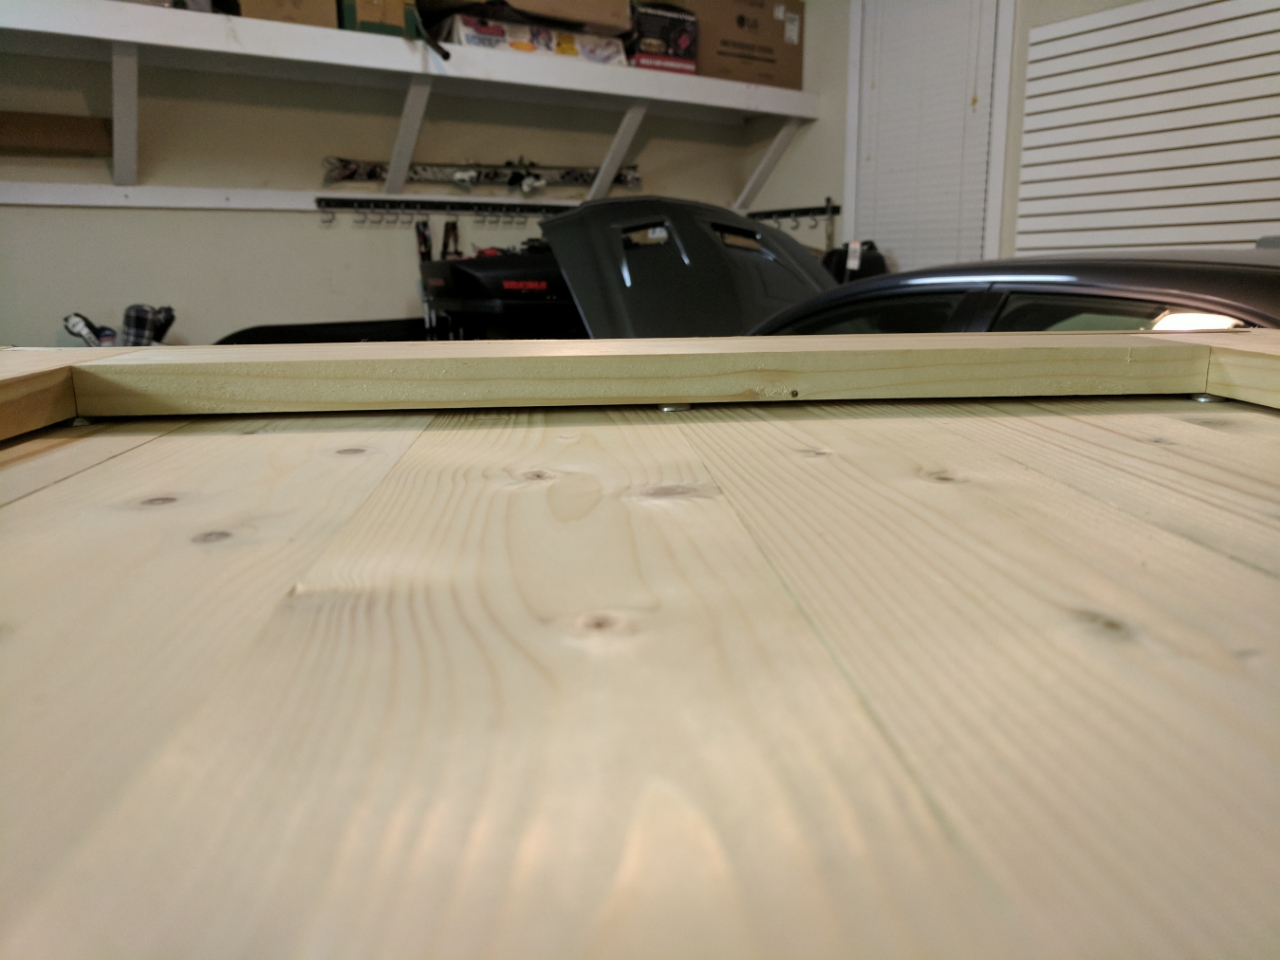
Triming the piece to go around the shelf was the hard part. Still haven't figure out what to do on the front regarding the small gap. It is only 3/16in high so hoping I can find some trim that is 3/16x3/4in to fill it. It would be so unseen I don't even care if it is the same time of wood really.
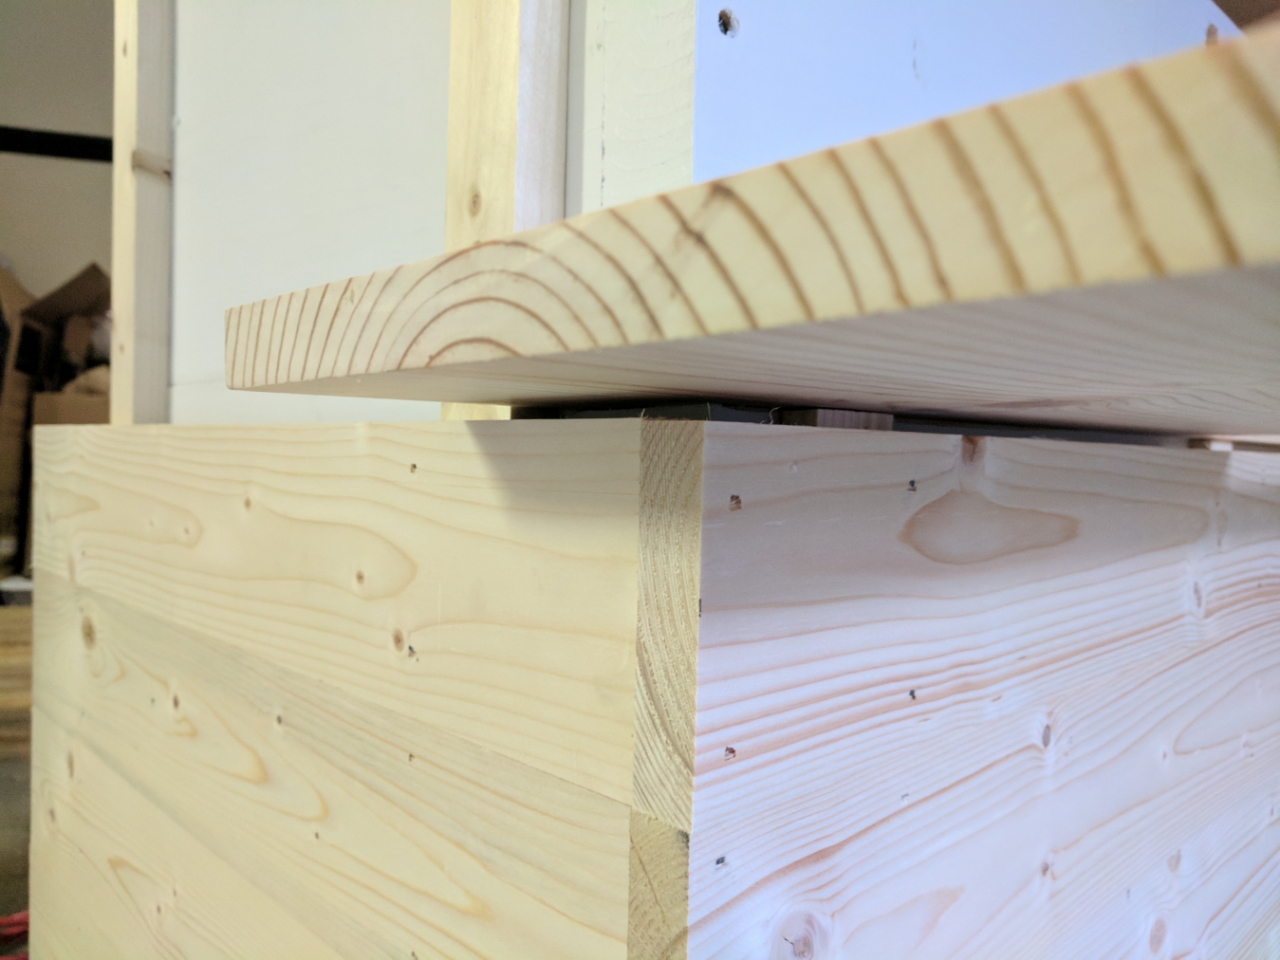
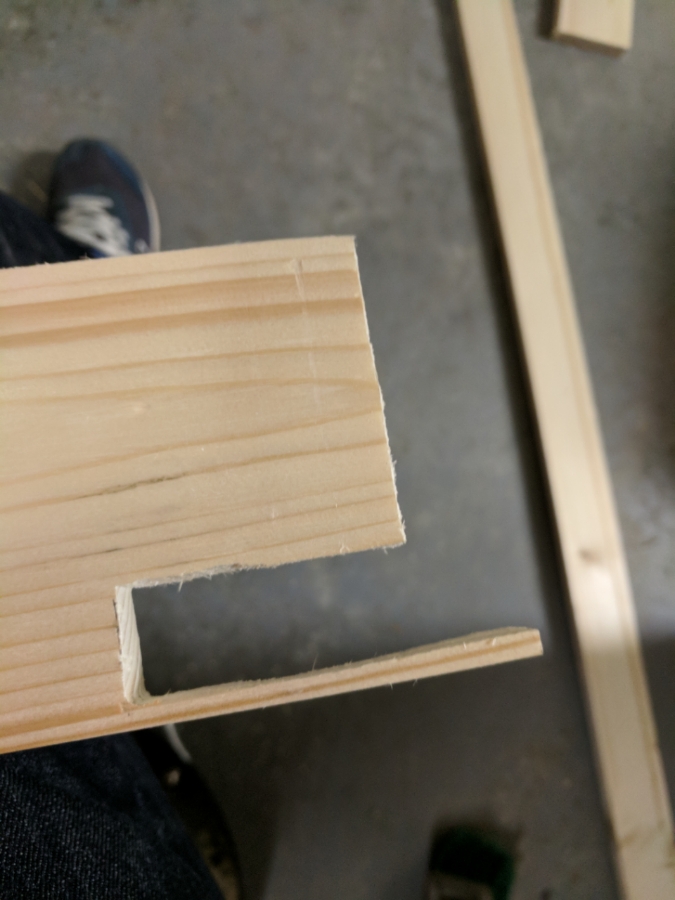
Cutting these pieces were not hard but also not easy. I ended up scraping my first attempt but got it right after that.
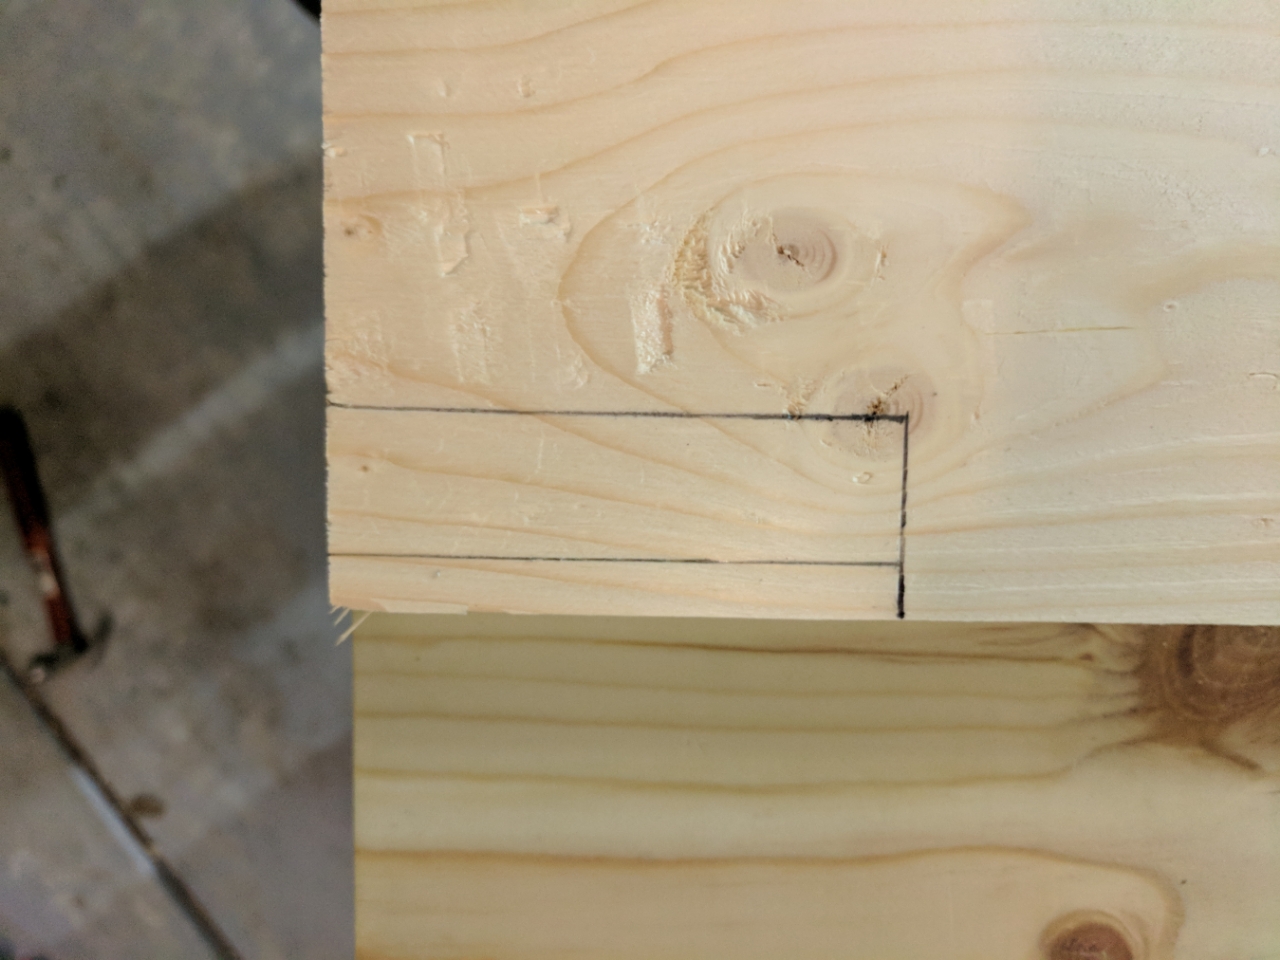
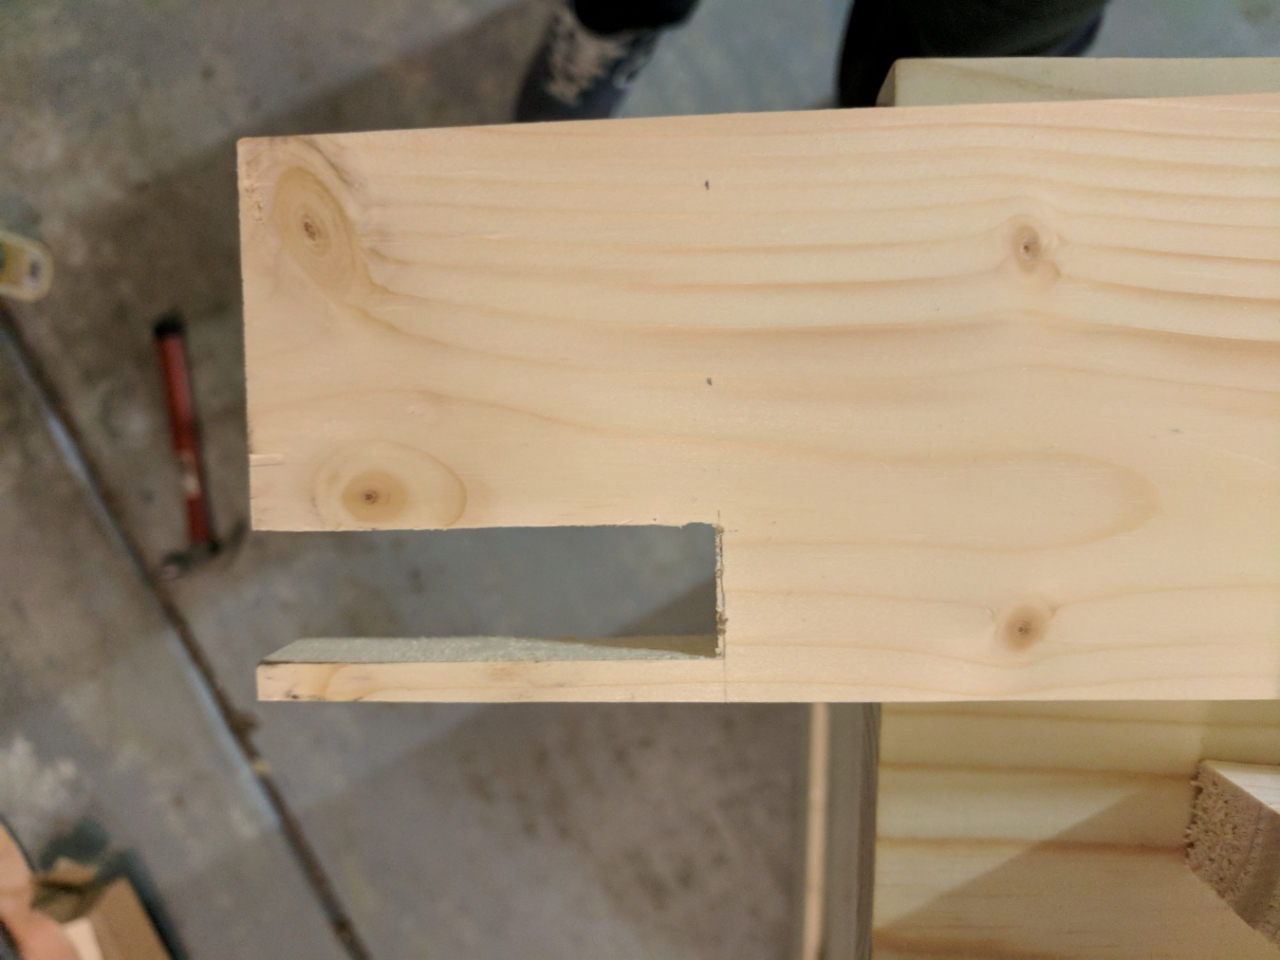
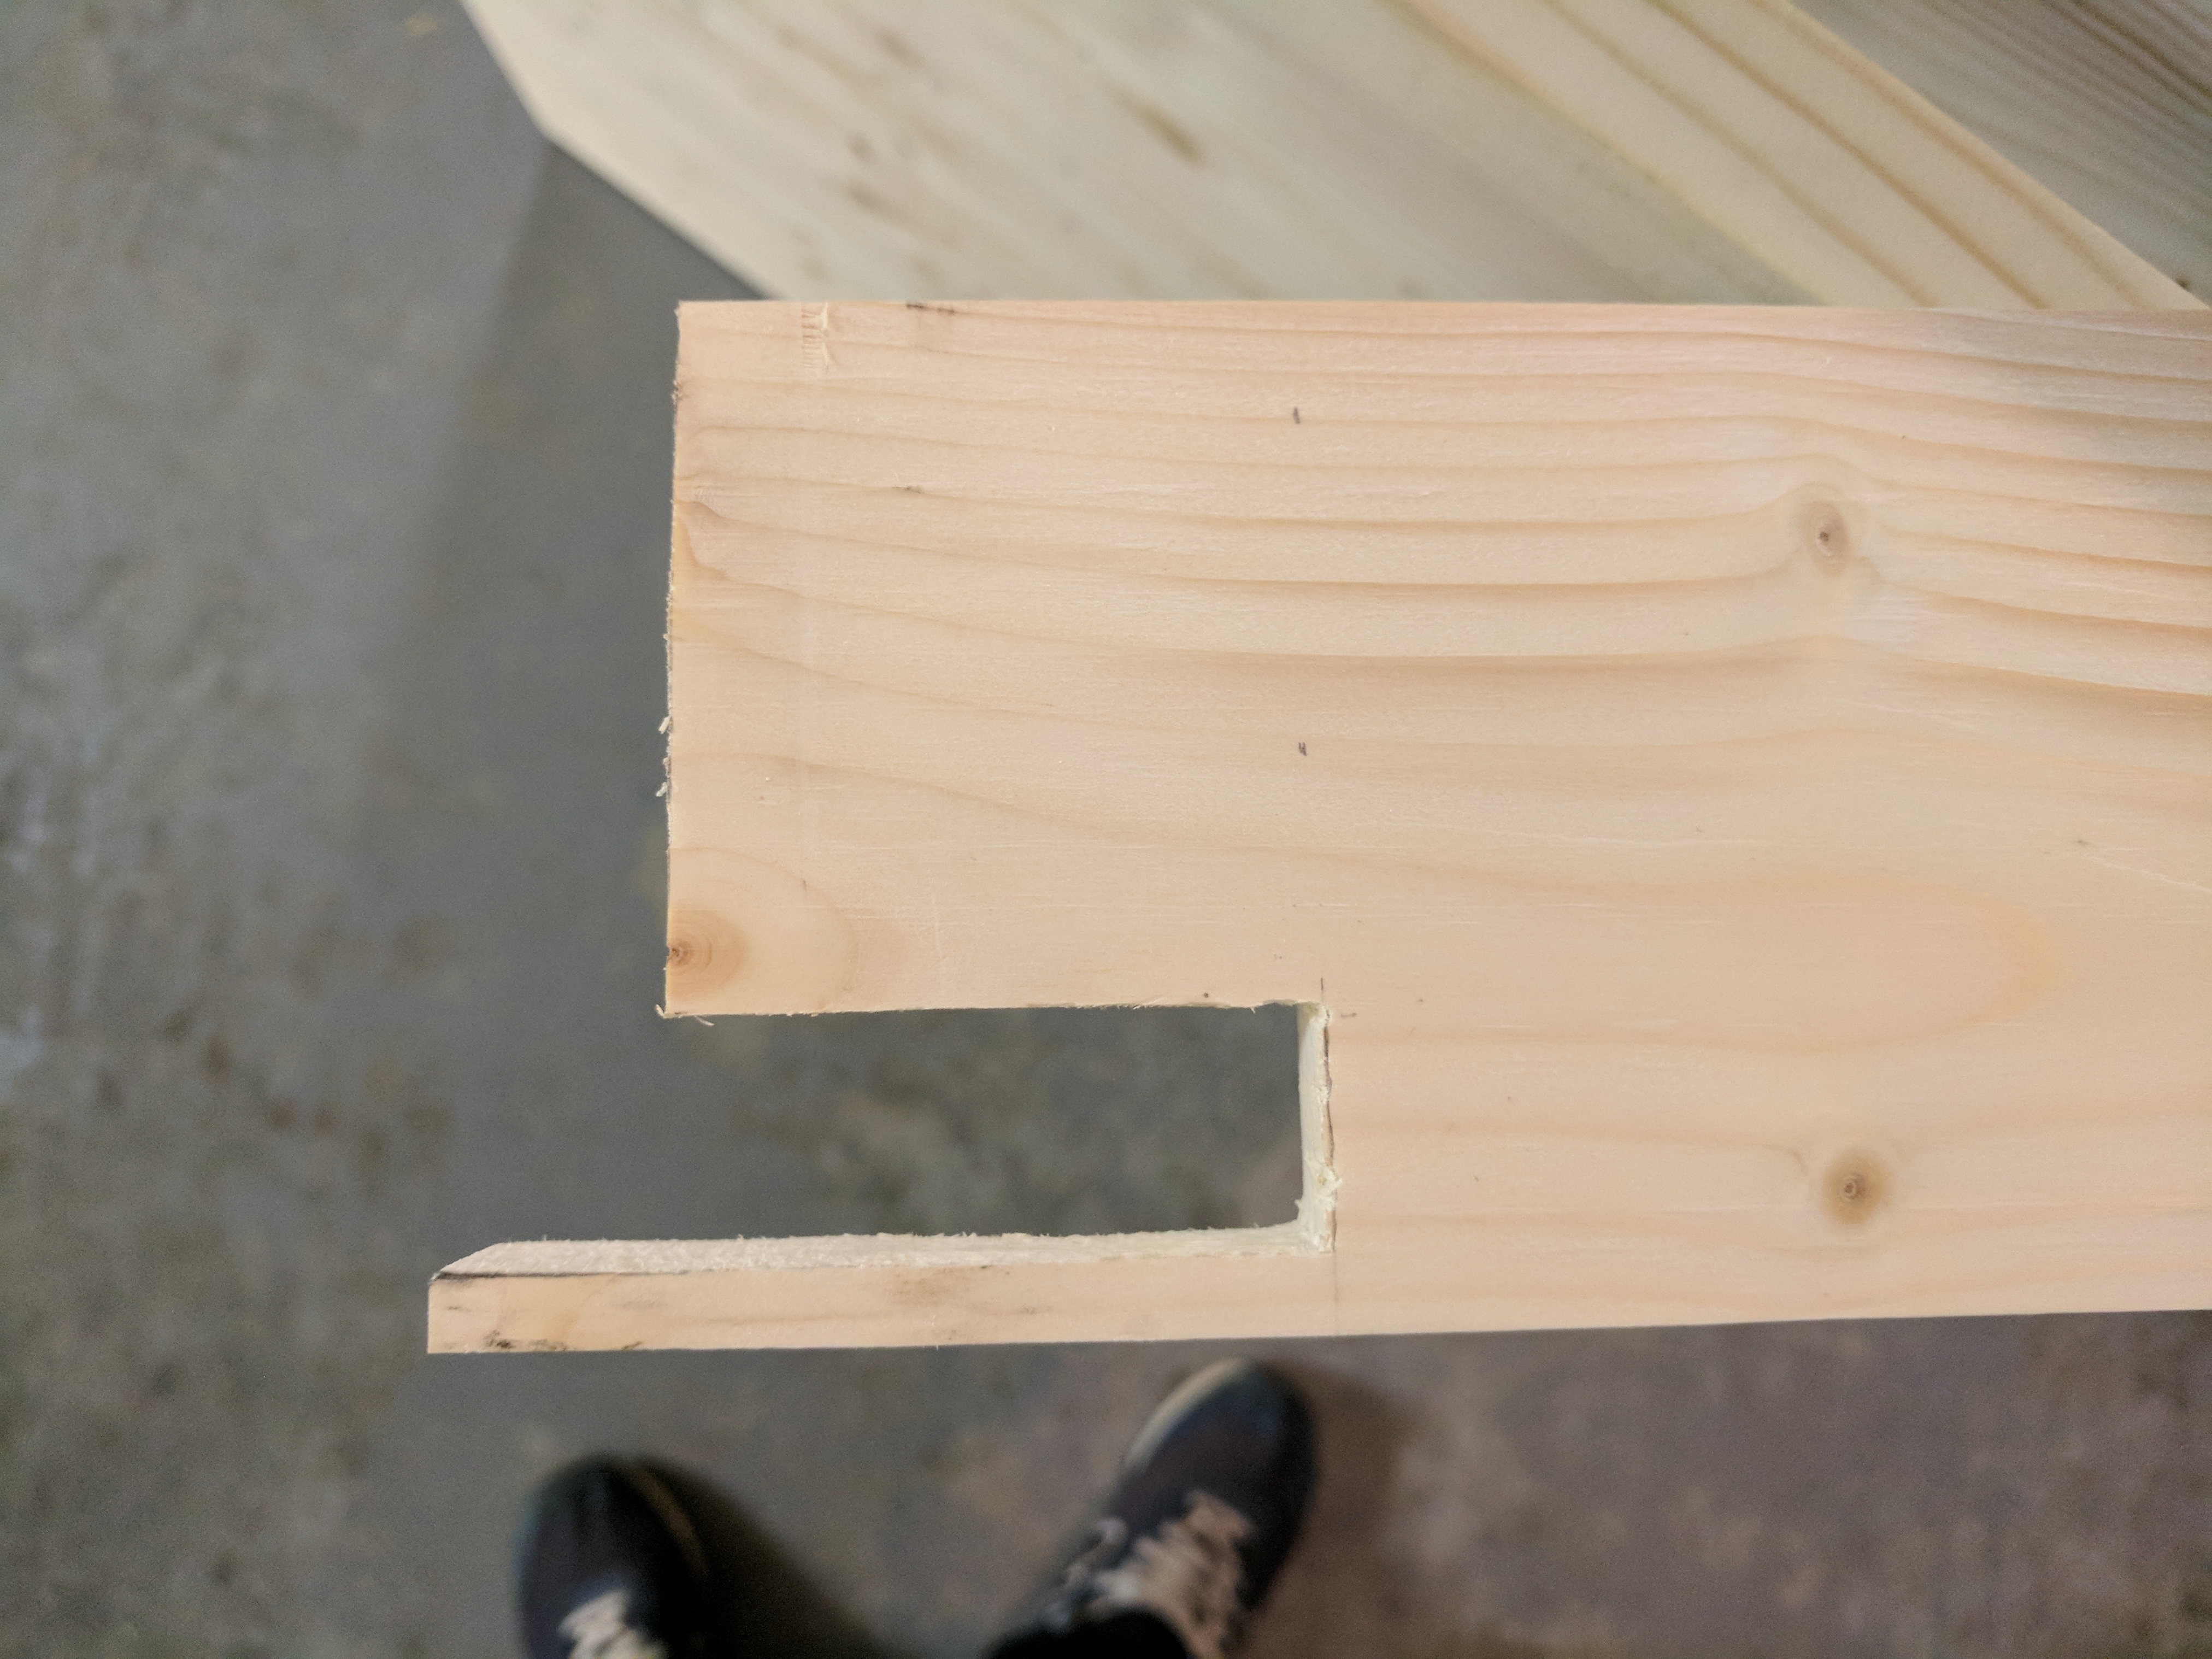
It doesn't fit 100% but close enough for some wood putty.
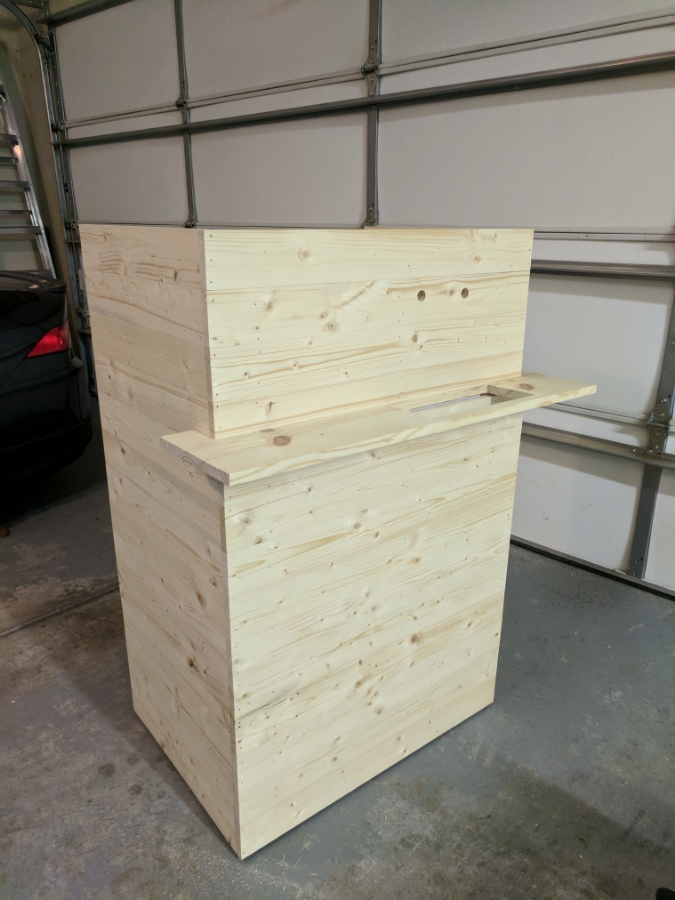
On to the next side
The top front board is only able to be nailed to the two side boards. Because of this I also used glue along the entire edge of the board below it as well as 3 nails instead of 2 on the corners.
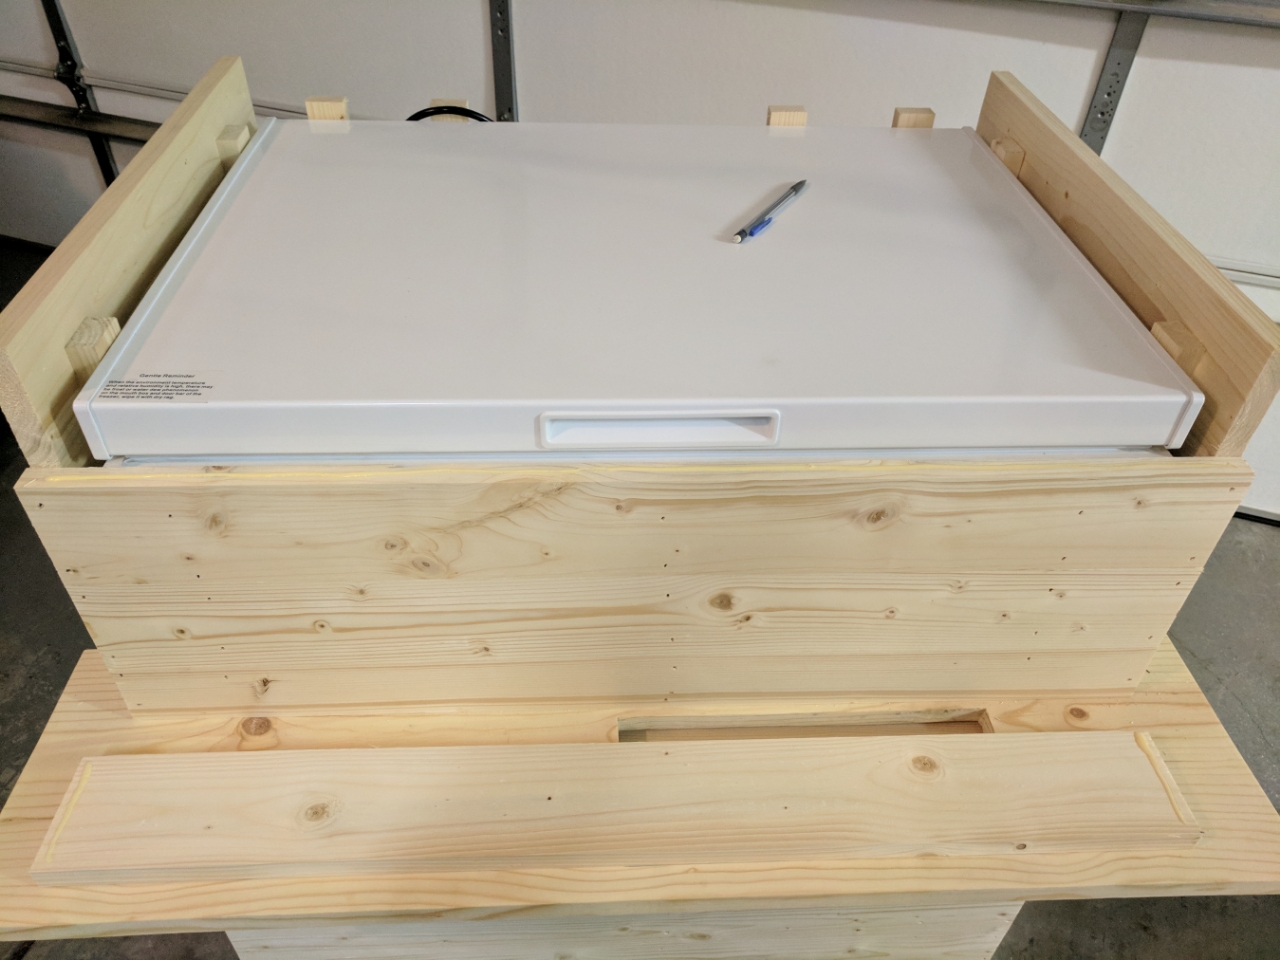
Holes drilled through the cladding and the outside is finished except fot the lid.
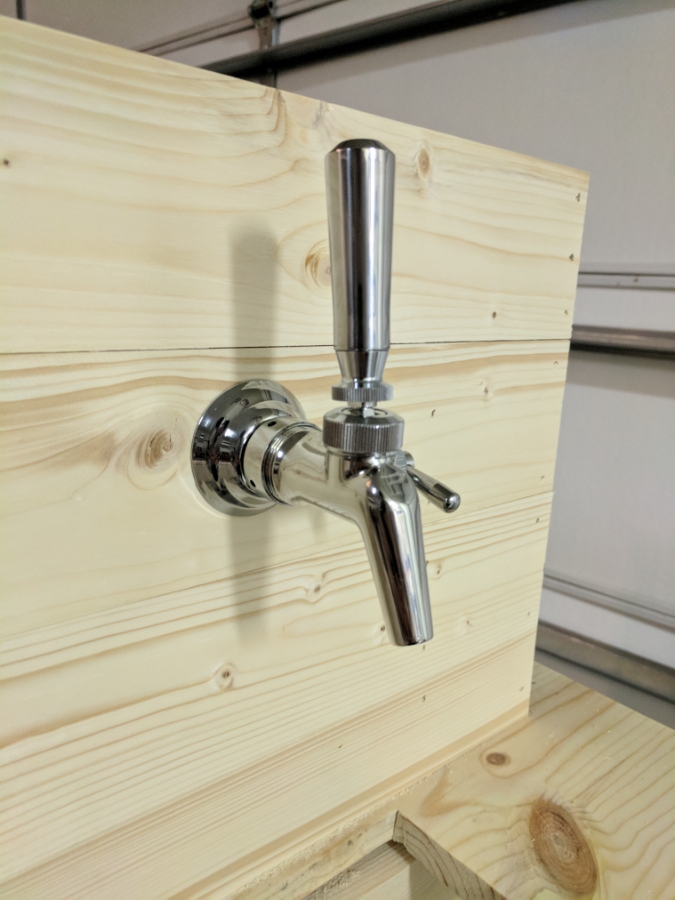
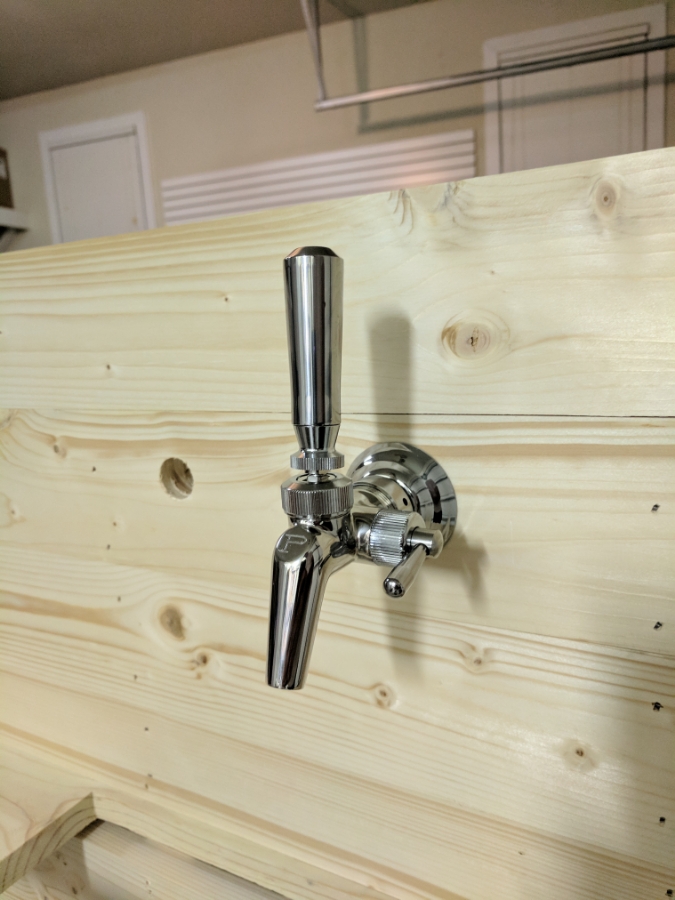
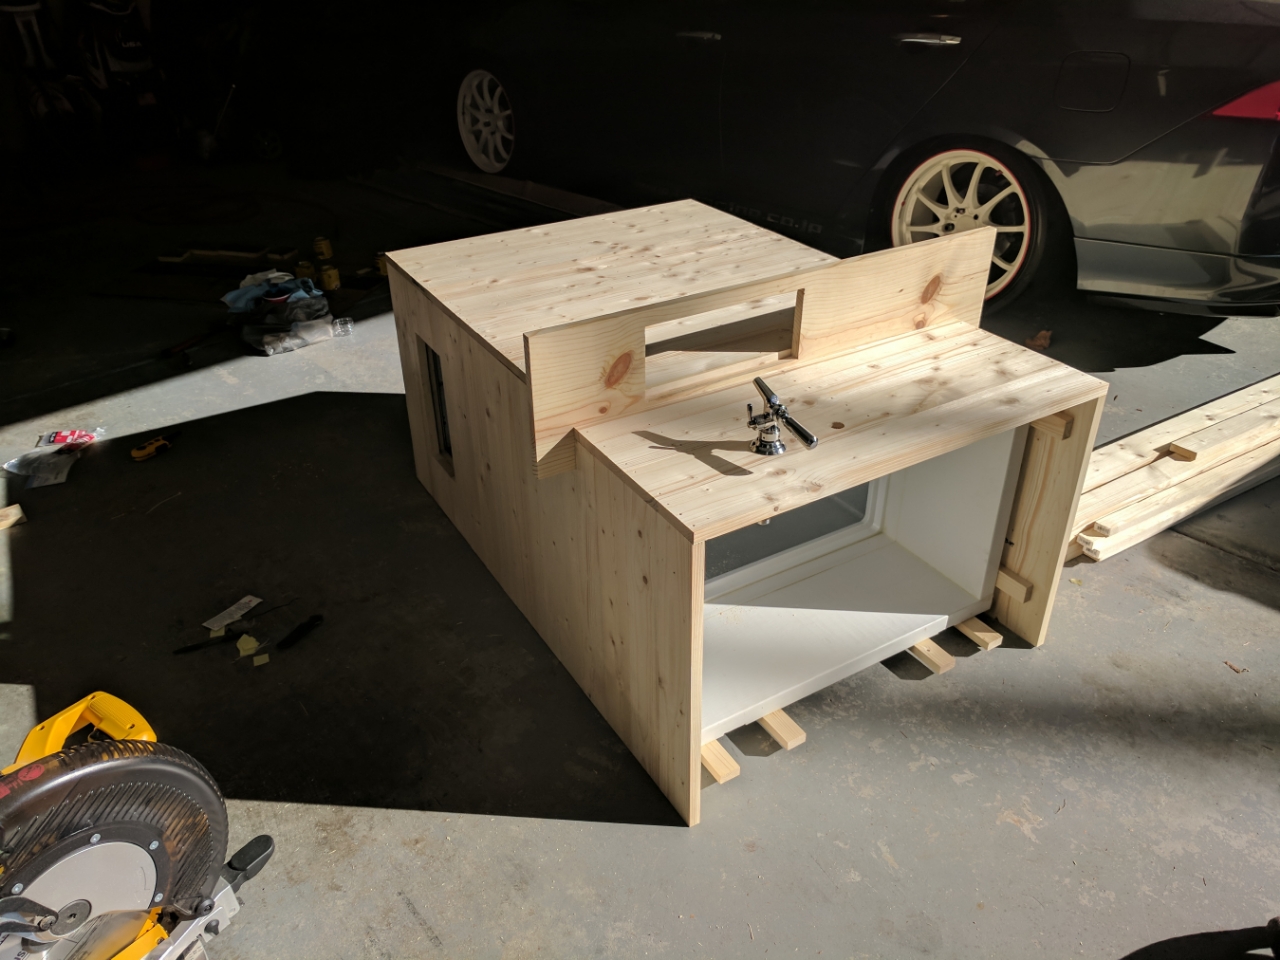
Faucet test fit. I wish the collars were brushed not polished but I guess they do match the faucets.
I have a few decisions I need to figure out now.
1. What size trim do I want to do? Do I want the veritcal trim to be the same size as the base trim or do I want the base trim board to be a 1x4 like the clading and then use a 1x3 cornered with a 1x2 to get a fairly close square match. Won't be perfect though without a table saw which I don't have.
2. How I am going to design the lid. Do I want to make it look just like the bottom with regards to have trim be part of the lid or do I want a lip over the sides.
3. Have to figure out the stain color. I originally wanted to do a weathered grey color but I am not sure how well it will go with the decor in the kitchen dinning area which it will be going for now.
Here is the color of the kitcen cabinets where it will be going.
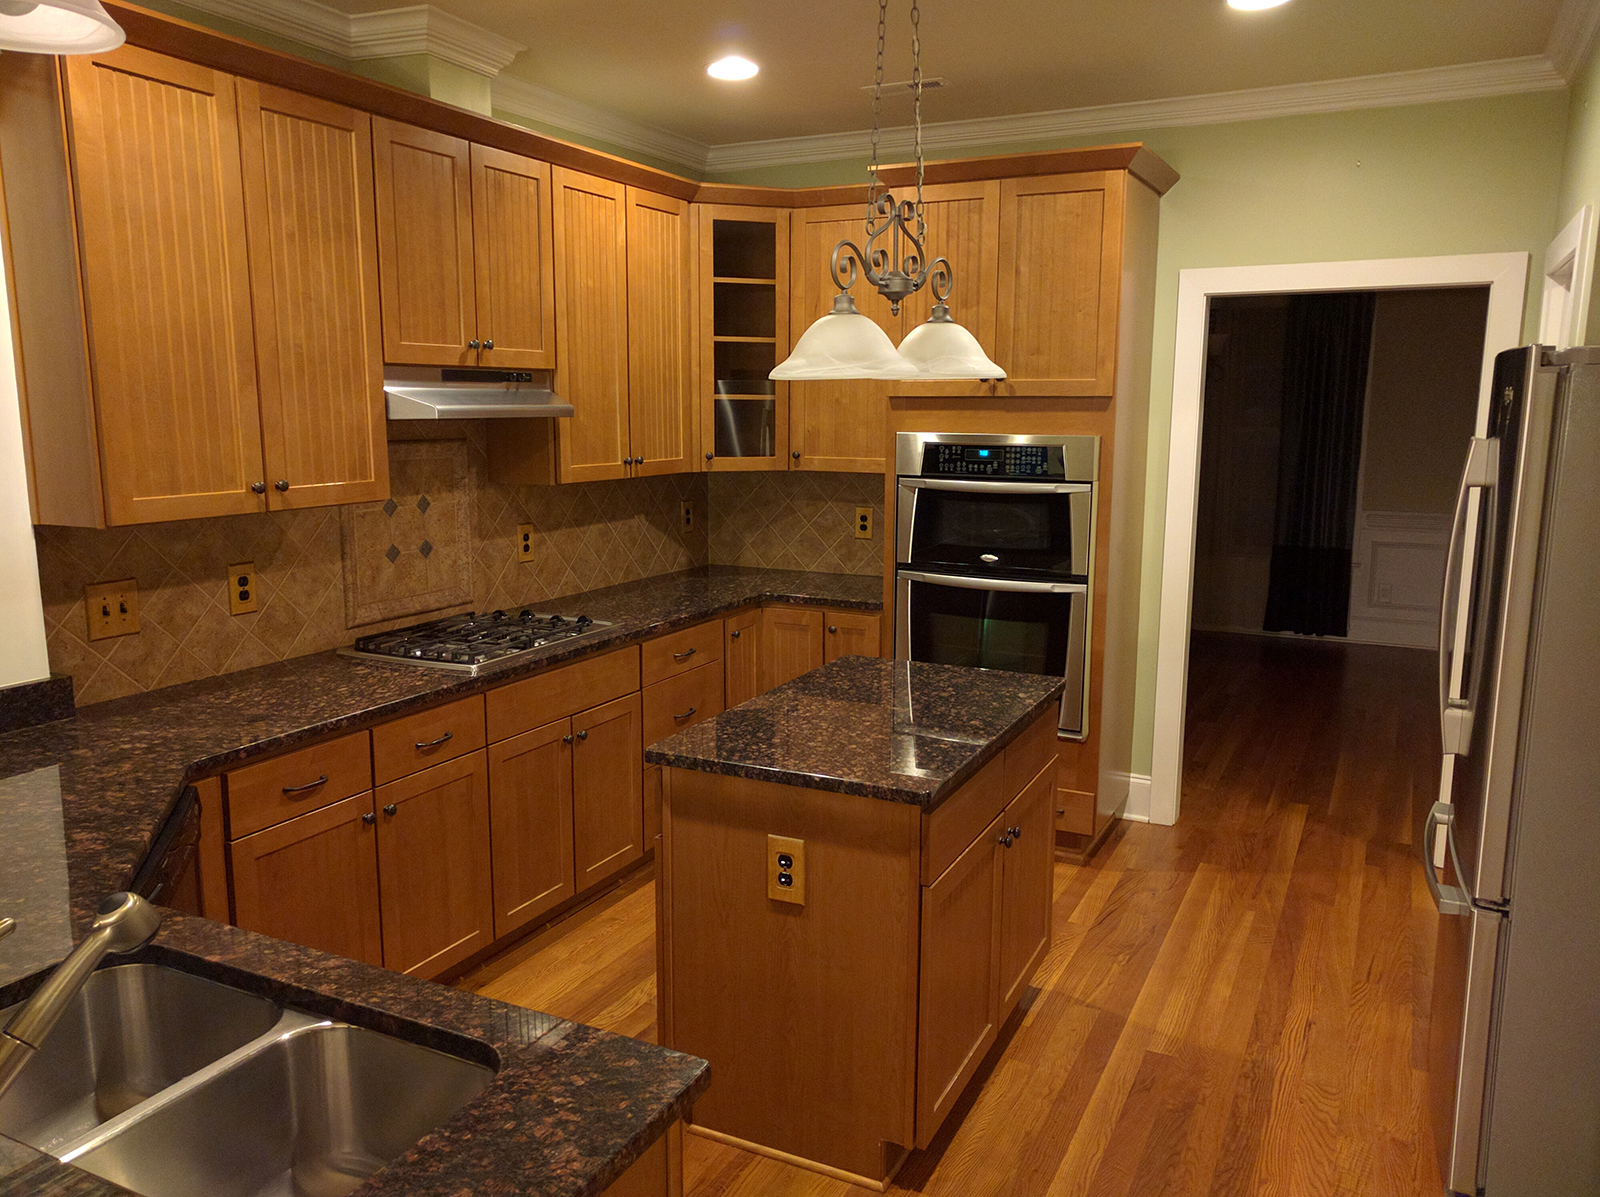
The kegerator itself will be going to the right of the hallway opening in this picture.

This is out kitchen table which is stained dark brown.

The color I originally wanted is similar to the middle on this picture. I am thinking now maybe the far left color would be better with my kitchen. Still don't know. Definitely need some opinions.

Here is the classic gray on Pine with two coats. The boards look very similar to what I have used so I would imagine it would come out close to this. Again not sure if it works in my kitchen though. I don't want the piece to look out of place.

Getting up to the shelf was the easy part.
Triming the piece to go around the shelf was the hard part. Still haven't figure out what to do on the front regarding the small gap. It is only 3/16in high so hoping I can find some trim that is 3/16x3/4in to fill it. It would be so unseen I don't even care if it is the same time of wood really.
Cutting these pieces were not hard but also not easy. I ended up scraping my first attempt but got it right after that.
It doesn't fit 100% but close enough for some wood putty.
On to the next side
The top front board is only able to be nailed to the two side boards. Because of this I also used glue along the entire edge of the board below it as well as 3 nails instead of 2 on the corners.
Holes drilled through the cladding and the outside is finished except fot the lid.
Faucet test fit. I wish the collars were brushed not polished but I guess they do match the faucets.
I have a few decisions I need to figure out now.
1. What size trim do I want to do? Do I want the veritcal trim to be the same size as the base trim or do I want the base trim board to be a 1x4 like the clading and then use a 1x3 cornered with a 1x2 to get a fairly close square match. Won't be perfect though without a table saw which I don't have.
2. How I am going to design the lid. Do I want to make it look just like the bottom with regards to have trim be part of the lid or do I want a lip over the sides.
3. Have to figure out the stain color. I originally wanted to do a weathered grey color but I am not sure how well it will go with the decor in the kitchen dinning area which it will be going for now.
Here is the color of the kitcen cabinets where it will be going.
The kegerator itself will be going to the right of the hallway opening in this picture.
This is out kitchen table which is stained dark brown.
The color I originally wanted is similar to the middle on this picture. I am thinking now maybe the far left color would be better with my kitchen. Still don't know. Definitely need some opinions.
Here is the classic gray on Pine with two coats. The boards look very similar to what I have used so I would imagine it would come out close to this. Again not sure if it works in my kitchen though. I don't want the piece to look out of place.
10-03-2017, 11:01 AM
#91
Classic gray all day...
steel wool the polished to make that brushed look you want.
and I can't help but feel like the shelf edge needs some sort of routing treatment to dress it up a little bit? or maybe decorative molding...something to make it pop a bit from the rest of the casing? maybe stain it a different color?
Just ideas.
The following users liked this post:
CCColtsicehockey (10-03-2017)
10-03-2017, 12:31 PM
#92
3.5 psi
iTrader: (1)
Looking good! +1 gray. I was going to suggest that before. As for venting, if your top overhangs a bit, you could notch a little from the side panelling on both sides. The heat will run up the side of the unit between the framing and vent out the top.
The following users liked this post:
CCColtsicehockey (10-03-2017)
10-03-2017, 12:51 PM
#93
Ex-OEM King

My opinions:
1.) for the gap underneath the shelf, I'd get some cove moulding and nail it on there to cover up the gap. I'll give a nice finished look and you won't have to be dead nuts on with the thickness. You can get pine to match everything else.
2.) For the lid, I'd make something that slips over the top. Gives a look of a table on top and you can also use it as such if you want.
3.) I'd avoid the weathered gray based on the pics you posted. Your house has a lot of warm colors (cabinets, paint, floor, table, etc) in it and the gray would definitely stand out. The one you said would be good (one on the left) is probably the one I'd pick. If you want it to stand out then go gray. If not...then I wouldn't.
+1 on steel wool to create the brushed look.
The following users liked this post:
CCColtsicehockey (10-03-2017)
10-03-2017, 02:01 PM
#94
Moderator
Regional Coordinator (Southeast)
Regional Coordinator (Southeast)
Thread Starter
Join Date: Dec 2003
Location: Mooresville, NC
Age: 37
Posts: 43,490
Received 3,672 Likes
on
2,501 Posts
Classic gray all day...
steel wool the polished to make that brushed look you want.
and I can't help but feel like the shelf edge needs some sort of routing treatment to dress it up a little bit? or maybe decorative molding...something to make it pop a bit from the rest of the casing? maybe stain it a different color?
Just ideas.
steel wool the polished to make that brushed look you want.
and I can't help but feel like the shelf edge needs some sort of routing treatment to dress it up a little bit? or maybe decorative molding...something to make it pop a bit from the rest of the casing? maybe stain it a different color?
Just ideas.
I was thinking the edge of the shelf might need something as well even if I just use some of the 1x2 I have left over to make it appear larger and finished looking.
My opinions:
1.) for the gap underneath the shelf, I'd get some cove moulding and nail it on there to cover up the gap. I'll give a nice finished look and you won't have to be dead nuts on with the thickness. You can get pine to match everything else.
2.) For the lid, I'd make something that slips over the top. Gives a look of a table on top and you can also use it as such if you want.
3.) I'd avoid the weathered gray based on the pics you posted. Your house has a lot of warm colors (cabinets, paint, floor, table, etc) in it and the gray would definitely stand out. The one you said would be good (one on the left) is probably the one I'd pick. If you want it to stand out then go gray. If not...then I wouldn't.
+1 on steel wool to create the brushed look.
1.) for the gap underneath the shelf, I'd get some cove moulding and nail it on there to cover up the gap. I'll give a nice finished look and you won't have to be dead nuts on with the thickness. You can get pine to match everything else.
2.) For the lid, I'd make something that slips over the top. Gives a look of a table on top and you can also use it as such if you want.
3.) I'd avoid the weathered gray based on the pics you posted. Your house has a lot of warm colors (cabinets, paint, floor, table, etc) in it and the gray would definitely stand out. The one you said would be good (one on the left) is probably the one I'd pick. If you want it to stand out then go gray. If not...then I wouldn't.
+1 on steel wool to create the brushed look.
2) Over the top or something that sits recessed in the top that with a lip that sits on top of the top boards was my other idea. I figure horizontal long boards will probably look the best but not sure.
3) Yeah that is what I was thinking as far as blending in vs standing out. It is a bummer cause I love the grey color. I picked up 5 colors of stain today and am going to make some sample boards this evening for actual tests on the wood I am using.
10-03-2017, 03:16 PM
#95
Moderator
Regional Coordinator (Southeast)
Regional Coordinator (Southeast)
Thread Starter
Join Date: Dec 2003
Location: Mooresville, NC
Age: 37
Posts: 43,490
Received 3,672 Likes
on
2,501 Posts
I know I am trying to justify the gray now just cause I think it looks cool but I definitely want things to match. I have gray furniture and barnwood furniture in the living room off the kitchen.

10-04-2017, 09:18 AM
#96
Moderator
Regional Coordinator (Southeast)
Regional Coordinator (Southeast)
Thread Starter
Join Date: Dec 2003
Location: Mooresville, NC
Age: 37
Posts: 43,490
Received 3,672 Likes
on
2,501 Posts
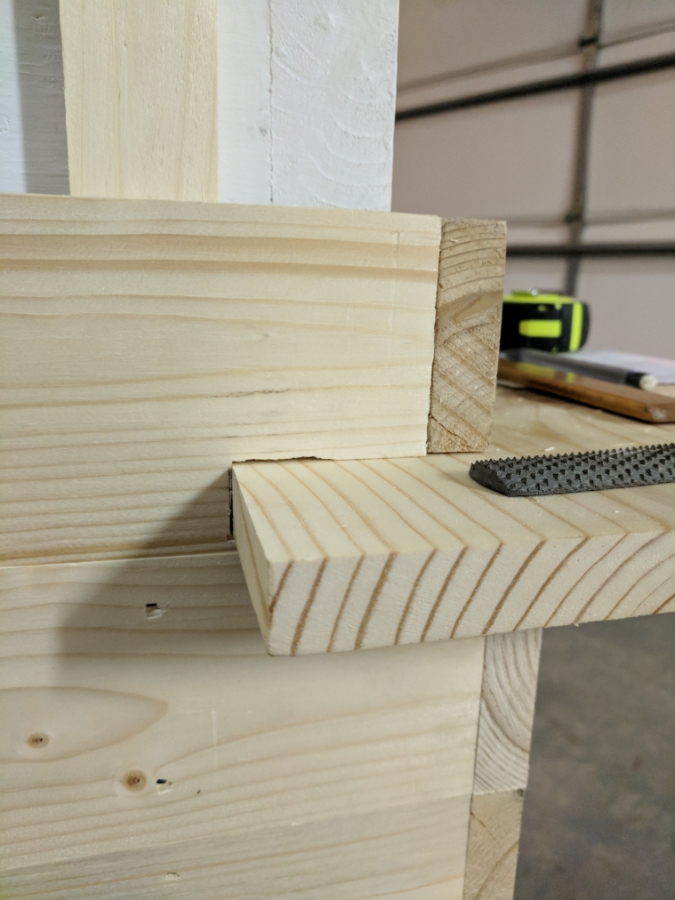
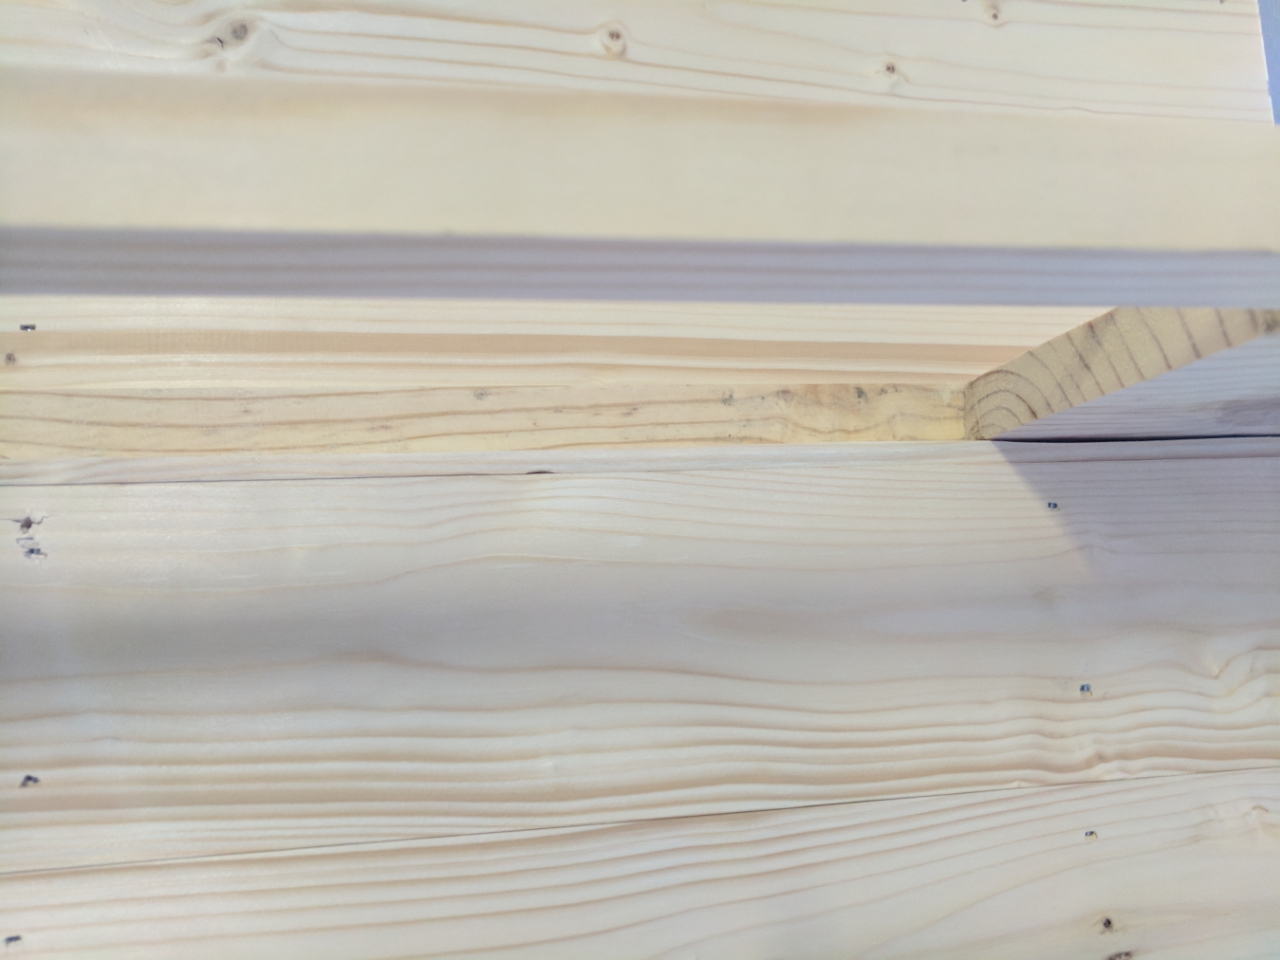
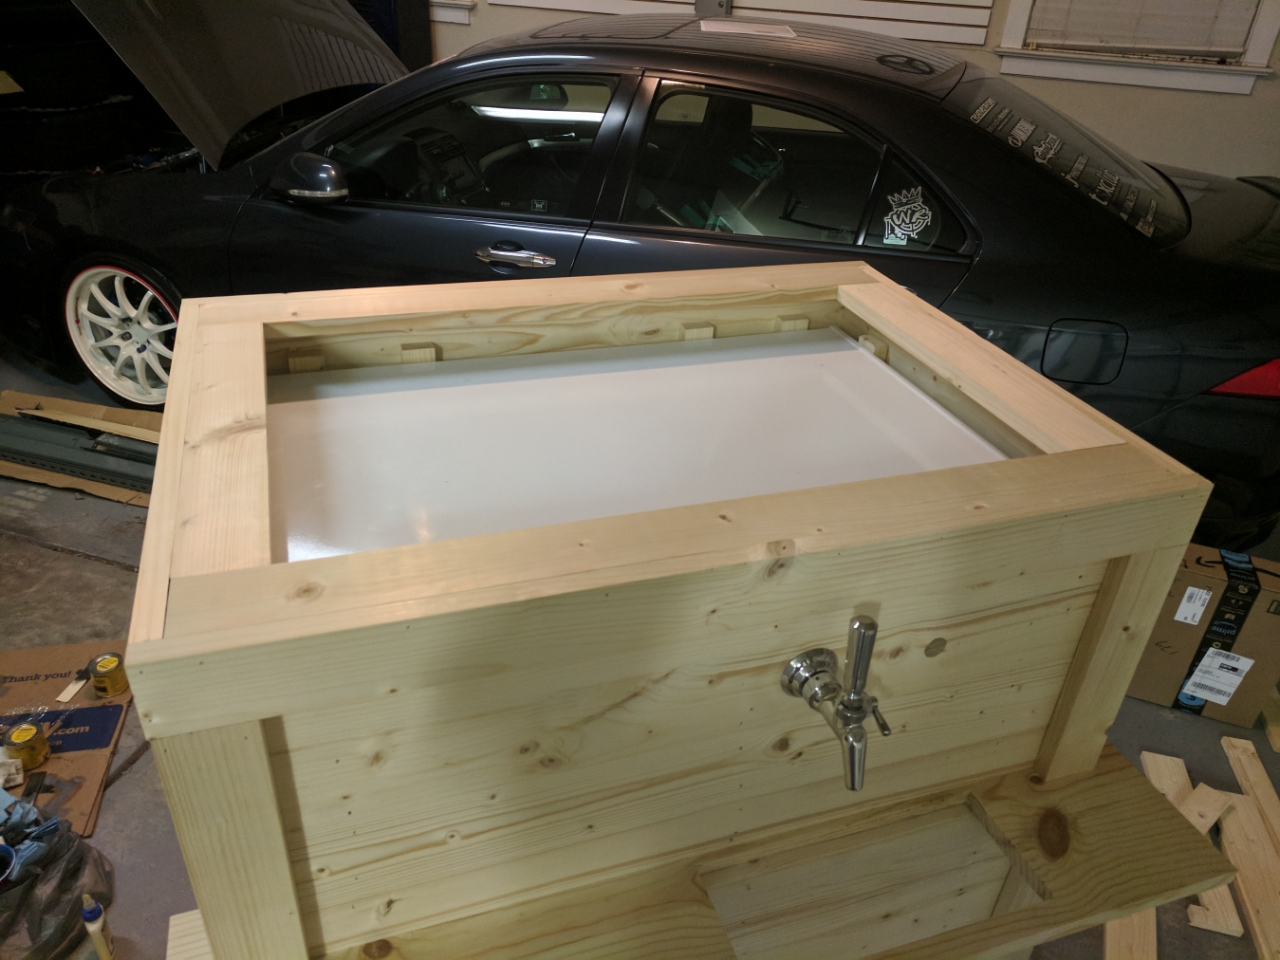
I finally got a piece of wood underneath the shelf. My desire for perfection got the best of me. I just my jigsaw to cut a slim piece off one of the 1x4. Then using a rasp and a orbital sander slimmed it down to the size I needed. Glued it in place and filled the little gaps there were with wood putty.

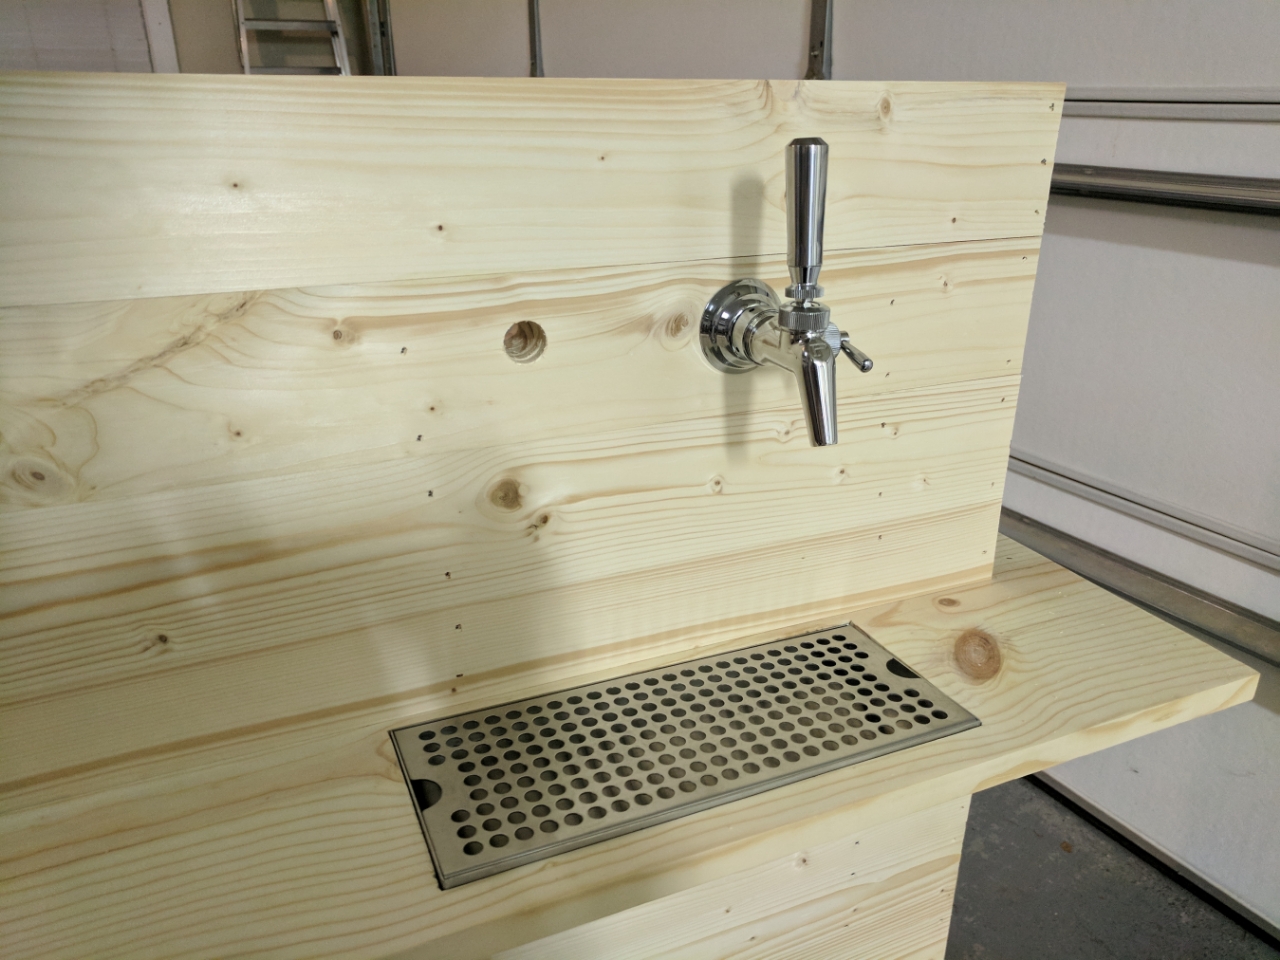
Also my metal brackets to hold the drip tray showed up. Part of my persistance to get a piece of wood in that gap is the back edge of the drip tray sits on that. Then these stainless steel plates which I can't even flex at all unless I really try will hold the front. Still not sure if I will use 4 or 6 screws in each one.
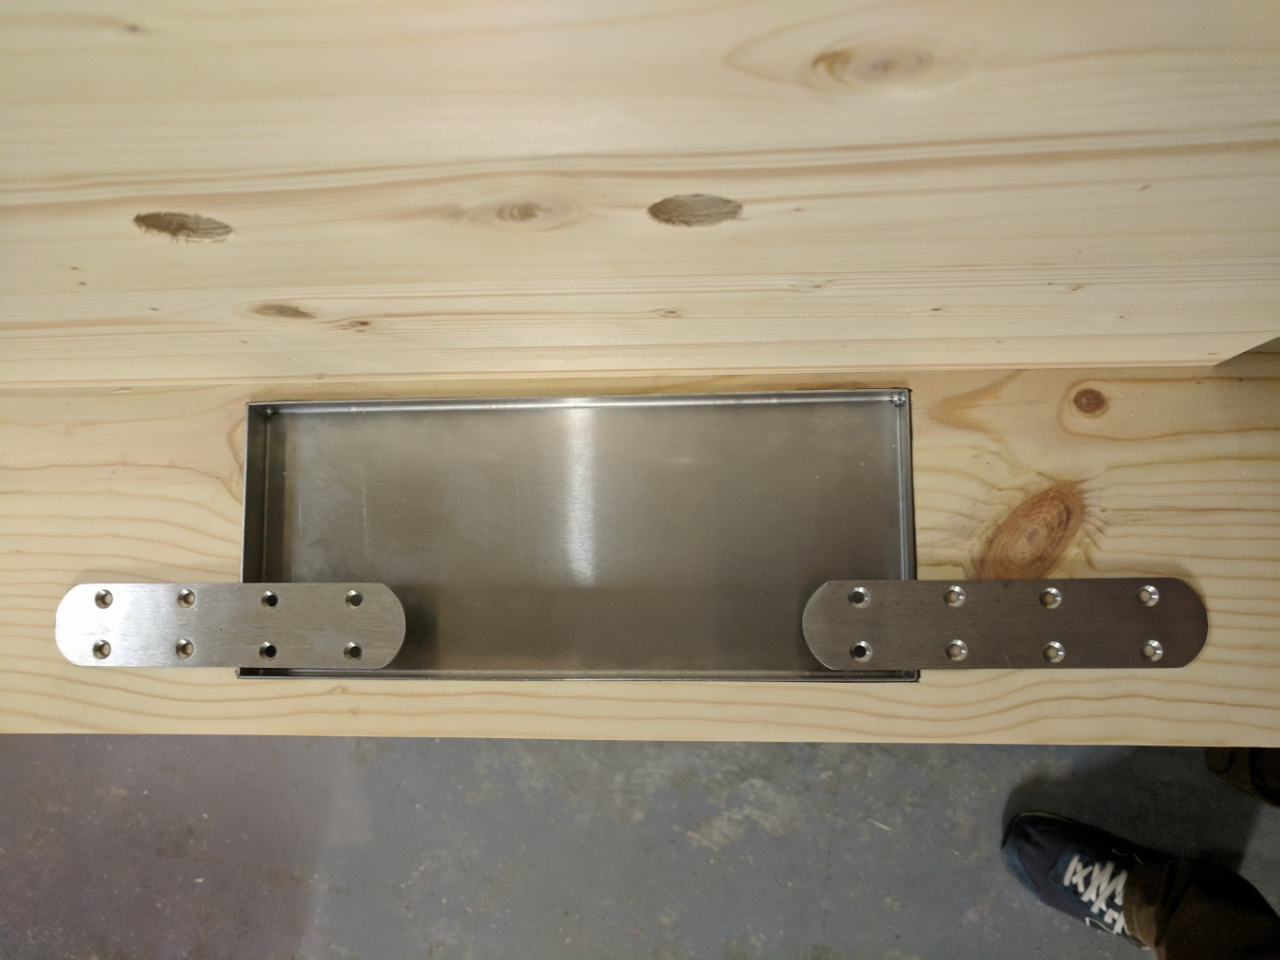
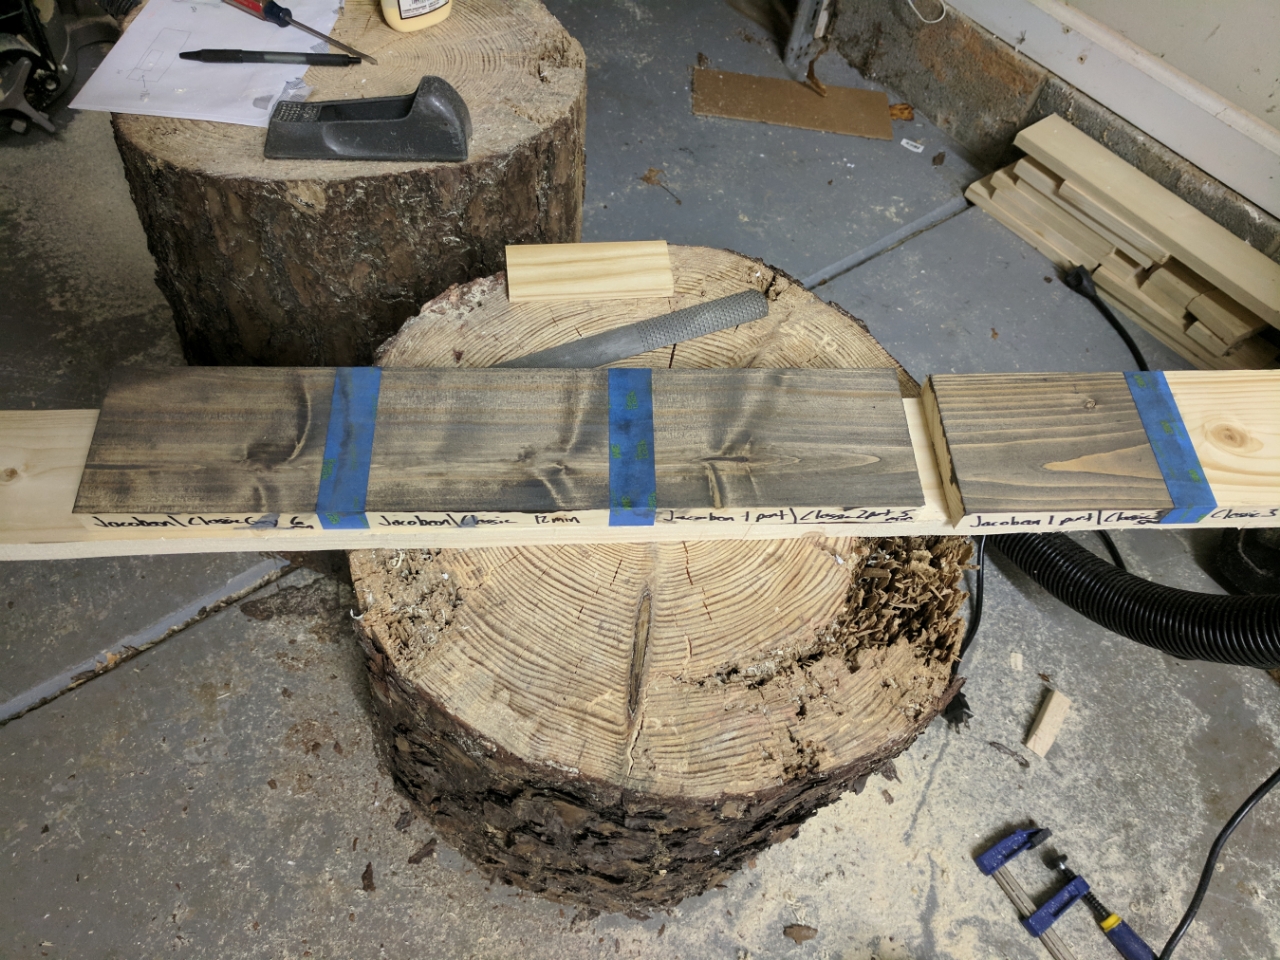
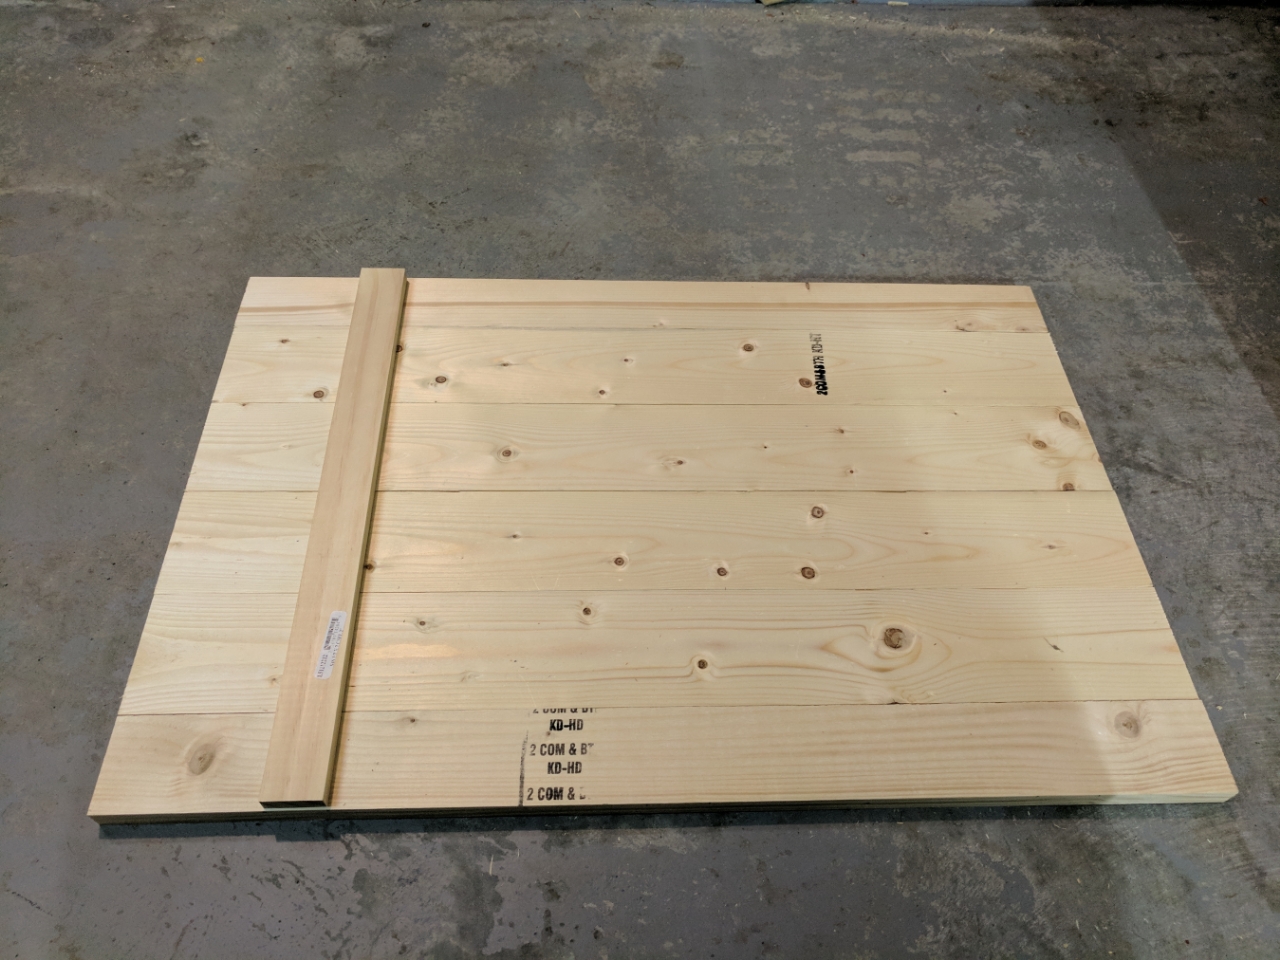
After that did some testing of stains. All this testing was 2 coats and any combos were putting down one color first and then the second color over top. I did not mix any colors before application yet. Going to try and do some of that tonight.
This picture is from last night right after I finished doing them. The first ones were only allowed to set for a minute or two before the excess was wiped off for each coat.
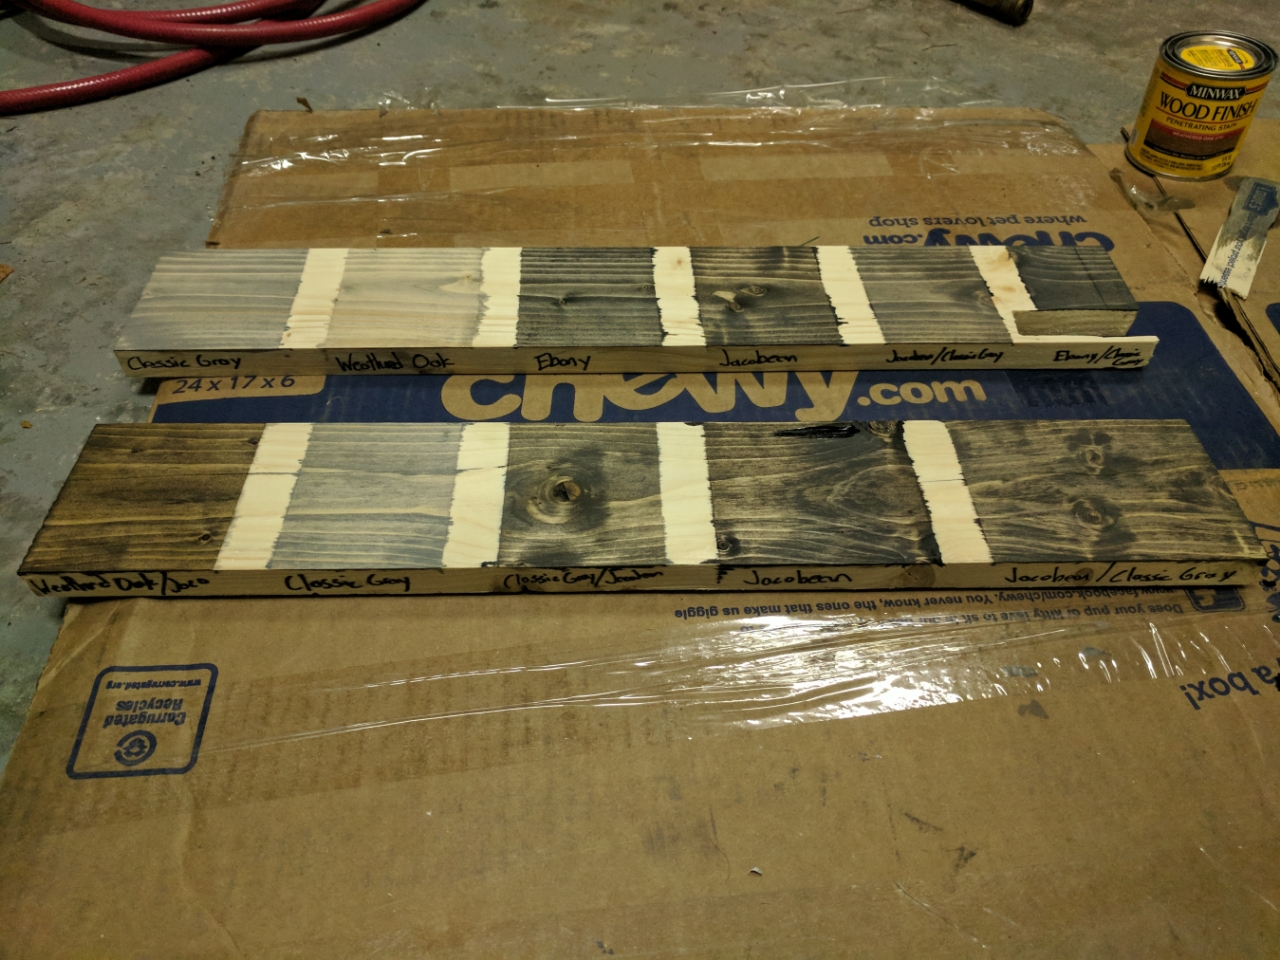
This set was 5-6min per stain coat. The order in which the stain names are written on the board is the order they were applied.
After doing these tests I am not as big of a fan of the gray stain by itself as it seems too cold on this type of wood. I am going to test 3 parts grey and 1 part jacobean this evening as that is a sample that I found online and I want to see it in person. Right now my favorite is jacobean first with a coat of classic gray over it. Also going to try classic/grey with ebony but I think the wood floors it is on is where some of the warmth is coming from.
Also my metal brackets to hold the drip tray showed up. Part of my persistance to get a piece of wood in that gap is the back edge of the drip tray sits on that. Then these stainless steel plates which I can't even flex at all unless I really try will hold the front. Still not sure if I will use 4 or 6 screws in each one.
After that did some testing of stains. All this testing was 2 coats and any combos were putting down one color first and then the second color over top. I did not mix any colors before application yet. Going to try and do some of that tonight.
This picture is from last night right after I finished doing them. The first ones were only allowed to set for a minute or two before the excess was wiped off for each coat.
This set was 5-6min per stain coat. The order in which the stain names are written on the board is the order they were applied.
After doing these tests I am not as big of a fan of the gray stain by itself as it seems too cold on this type of wood. I am going to test 3 parts grey and 1 part jacobean this evening as that is a sample that I found online and I want to see it in person. Right now my favorite is jacobean first with a coat of classic gray over it. Also going to try classic/grey with ebony but I think the wood floors it is on is where some of the warmth is coming from.
10-04-2017, 10:43 AM
#97
Ex-OEM King
1) I like the idea of molding but do you think it would look bad if I had to stop and restart it around those shelf brackets I ordered?
2) Over the top or something that sits recessed in the top that with a lip that sits on top of the top boards was my other idea. I figure horizontal long boards will probably look the best but not sure.
3) Yeah that is what I was thinking as far as blending in vs standing out. It is a bummer cause I love the grey color. I picked up 5 colors of stain today and am going to make some sample boards this evening for actual tests on the wood I am using.
2.) Over the top will definitely be better than recessed in terms of when it's time to remove it. Horizontal boards would be the way to go or get a piece of 3/4" ply and frame it with a 1x2 or 1x3 around the outside for one continuous piece.
3.) Kind of a personal choice, either would look great. Another thing I've been meaning to try is weatherizer vs gray stain. If you weatherize it and then stain, you get a good combo of that older look and a not gray stain. Basically amounts to putting some steel wool into a mason jar of vinegar, let it sit for a few days, strain it out, and brush on. Something to look into, instructions are all over the interwebs.
The pics you posted of the stain options look weird on my screen. Might be something with the white balance of the picture.
Also, have you thought about putting a scale underneath your keg with an external readout to see how much is left in there?
Other huge thing. The reason you're getting a kind of splotchy look with the stain is because, I'm guessing at least, you're not using a conditioner before staining. Pine is incredibly soft and has a very wide variety of porosity throughout the same piece. As such, the stain take up in different parts of the wood is different and gives that splotchy look. The conditioner will drastically even that out and make it look a lot better...unless you want that look and in that case, carry on.
Last edited by SamDoe1; 10-04-2017 at 10:49 AM.
 10-05-2017, 07:10 AM
#100
Moderator
Regional Coordinator (Southeast)
Regional Coordinator (Southeast)
Thread Starter
Join Date: Dec 2003
Location: Mooresville, NC
Age: 37
Posts: 43,490
Received 3,672 Likes
on
2,501 Posts
I have no idea how to make beer. I will be strictly buying kegs from distributers for this. I have too many hobbies as it is and not enough time to go adding home brewing to the list.1.) Looks like you already got it figured out but I don't think it'll matter. No one is really going to look underneath there anyway. You could chisel out clearances in the moulding to fit around the brackets if you really want to go crazy with it.
2.) Over the top will definitely be better than recessed in terms of when it's time to remove it. Horizontal boards would be the way to go or get a piece of 3/4" ply and frame it with a 1x2 or 1x3 around the outside for one continuous piece.
3.) Kind of a personal choice, either would look great. Another thing I've been meaning to try is weatherizer vs gray stain. If you weatherize it and then stain, you get a good combo of that older look and a not gray stain. Basically amounts to putting some steel wool into a mason jar of vinegar, let it sit for a few days, strain it out, and brush on. Something to look into, instructions are all over the interwebs.
The pics you posted of the stain options look weird on my screen. Might be something with the white balance of the picture.
Also, have you thought about putting a scale underneath your keg with an external readout to see how much is left in there?
Other huge thing. The reason you're getting a kind of splotchy look with the stain is because, I'm guessing at least, you're not using a conditioner before staining. Pine is incredibly soft and has a very wide variety of porosity throughout the same piece. As such, the stain take up in different parts of the wood is different and gives that splotchy look. The conditioner will drastically even that out and make it look a lot better...unless you want that look and in that case, carry on.
Option 1: Was going I am thinking would try and look as similar from the bottom of the build to the top. So I would use the same size trim as I do on the bottom to go around the top and and use horizontal boards up top. I think they need to be recessed though so I can still trim them out with a small piece of wood.
Option 2: Would be very similar but it would sit on thop of the top trim around the opening and then the trim to go around the horizontal boards would be larger and give a lip over the side of that trim.
Going to try and draw these up with a top view and side view of each so see if I can show what I am talking about.
3) I was looking at the weatherizer idea and it looked interesting but I see 50/50 results on the web with some people ending up always with a brown result instead of a grey when using white wood instead of other types.
I have not thought about putting a scale under them. That would be an interesting idea. I am not sure I would have room though under the top keg but the bottom one definitely would.
Last night I tried 4 different combos of te Jacobean with Classic Gray. Sadly I feel it was almost a waste of time cause they all came out identical basically. Not sure how this is but oh well. Back to the drawing board I guess.
So from the first night of tests without conditioner my favorite and my girl friends favorite was the far right with the jacobean on first and then classic grey over it at 5min. This gave a bit more brown vs grey look but there was still some grey in the color. It has a great look of depth in person as well and when I took the sample inside the house it didn't seem as if it would be out of place. My only desire was to try and darken it a little bit.
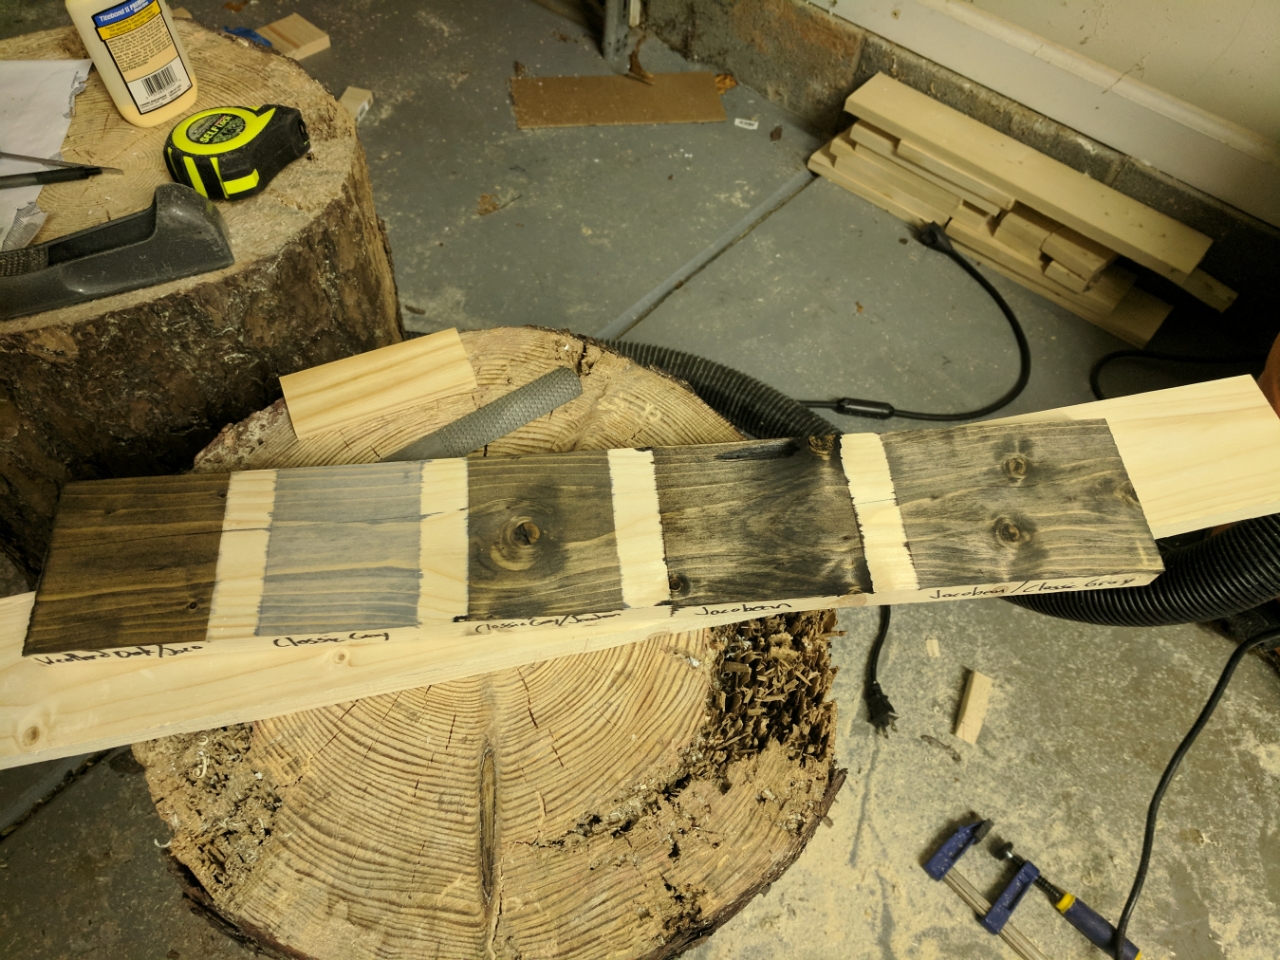
Conditioned everything first for 15min. Then applied the first coat. Here are the process I did incase you can't read my writing.
They are in order from left to right. Bottom row first then top row (Jacobean base 6min \ Classic Gray top 6min --- Jacobean base 12min \ Classic Gray top 12min --- Jacobean 1 part \ Classic Gray 2 part mixture 6min per coat --- Jacobean 1 part \ Classic Gray 2 part mixture 12min per coat)
After the excess was wiped off at the right times for coat 1
After coat 2 and drying overnight. The picture seems to show more color variance than they actually have in person. I can almost not even tell the difference between myself. The one on the far left does stand out as almost having some yellow to it.
What I am actually trying to accomplish now is the jacobean with grey from my first test but a bit darker color overall. My next test might instead be two parts jacobean and 1 part grey. Or maybe two coats of jacobean first follow by one light coat of classic grey.
10-05-2017, 08:20 AM
#102
3.5 psi
iTrader: (1)
when I was staining my cedar I was getting really blotchy parts that looked like they absorbed no stain. It was knotty cedar v-match (tongue and groove) and I ruined a few pieces at first and it wasn't cheap. It seemed to make a big difference around the knots which weren't absorbing the stain without the conditioner. I'm sure you'll find the right stain combo.
The following users liked this post:
CCColtsicehockey (10-05-2017)
10-05-2017, 09:31 AM
#103
Moderator
Regional Coordinator (Southeast)
Regional Coordinator (Southeast)
Thread Starter
Join Date: Dec 2003
Location: Mooresville, NC
Age: 37
Posts: 43,490
Received 3,672 Likes
on
2,501 Posts
10-05-2017, 10:17 AM
#104
Ex-OEM King
So regarding the conditioner you both suggested. I had bought conditioner but wasn't using it on my test pieces. Well as it turns out that makes a big difference in some good and not so good ways it seems. It really makes the wood absorb a lot lot less stain. Maybe I put the conditioner on for to long so I will try varying that. I put it on for about 15min which I read in one tutorial online. When doing this there was almost no excess to wipe off. When I put my stain on it didn't seem to go as deep into the wood as it did on the raw wood. I definitely don't want it to be splotchy but I do feel that I lost almost a feeling of depth some of the stains had before.
How much of this are you applying and how are you putting it on there? I've never had any excess to wipe off and use a rag to apply just as I'd apply stain. Let it soak for ~30mins to an hour and go to town.
When you are saying you don't get depth, are you meaning by appearance or color saturation? You can always do multiple coats to darken the stain up if you want. For depth, use a clear coating like poly or lacquer or to add some depth to the finish.
The following users liked this post:
CCColtsicehockey (10-05-2017)
10-05-2017, 10:40 AM
#105
Senior Moderator
 10-05-2017, 12:55 PM
#106
Moderator
Regional Coordinator (Southeast)
Regional Coordinator (Southeast)
Thread Starter
Join Date: Dec 2003
Location: Mooresville, NC
Age: 37
Posts: 43,490
Received 3,672 Likes
on
2,501 Posts
That's the whole point of the conditioner. There are some parts of pine that absorb a lot and some that don't absorb much. Because it's rather difficult to make the parts that don't absorb much to absorb more...the conditioner just fills the pores so all of them are evenly non-absorbing.
How much of this are you applying and how are you putting it on there? I've never had any excess to wipe off and use a rag to apply just as I'd apply stain. Let it soak for ~30mins to an hour and go to town.
When you are saying you don't get depth, are you meaning by appearance or color saturation? You can always do multiple coats to darken the stain up if you want. For depth, use a clear coating like poly or lacquer or to add some depth to the finish.
When I am putting stain down I am applying it pretty heavy and wet. Is that a bad idea?
As far as depth goes that it is weird and maybe has to do with part of the board cause the color just appears almost in visual layers with a depth look like a pearl car paint job. I know it is strange but it is cool looking. Have not been able to replicate it though so I don't expect to be able to ever.
With multiple coats I am wondering of maybe doing jacobean, jacobea, classic gray and then to compare do jacobean, classic gray, then jacobean and see if they come out different. Looking for a brown with a touch of gray.
10-05-2017, 02:15 PM
#107
Ex-OEM King
Ok makes sense. I didn't put an whole lot on. It seemed to soak it up pretty fast. I just am using blue rolls of disposable shop rags right now to put it on right now. Maybe I will try putting it on lighter then and only letting it on for 2-3min and wiping it down.
When I am putting stain down I am applying it pretty heavy and wet. Is that a bad idea?
As far as depth goes that it is weird and maybe has to do with part of the board cause the color just appears almost in visual layers with a depth look like a pearl car paint job. I know it is strange but it is cool looking. Have not been able to replicate it though so I don't expect to be able to ever.
With multiple coats I am wondering of maybe doing jacobean, jacobea, classic gray and then to compare do jacobean, classic gray, then jacobean and see if they come out different. Looking for a brown with a touch of gray.
When I do conditioner I don't wipe it down after at all. I just use a shop rag (same as you) and wipe it on there in real thin layers to the point that it all gets absorbed and there is zero excess. I wait for it to try to the touch, tack cloth whatever crap is on there, and then stain. That gap between conditioner and stain is 30min to an hour. Don't go more than 2 hours but you do need to wait for it to dry first. Read what it says on the can in case your stuff is different than mine.
For stain application, I also go really thin on the stain. I basically have stain rag in one hand and wipe rag in another. Wipe on in thin layers, wait for ~15-30 seconds and wipe it off. A little goes a long way, there's no reason to go wet and heavy especially with pine.
For color though, have you tried mixing it pre-stain? Layering stain isn't the same as mixing it similar to how paint works. If you mix it wet and then apply, you'll get a different result than going over the top of what is already there.
Edit: Based on the very last pic you posted, I don't think you're waiting long enough between conditioning and stain. It's still splotchy and you can see the difference in stain take up in different parts of the board. This is because some of the pores are not being filled. What you want is something like this:
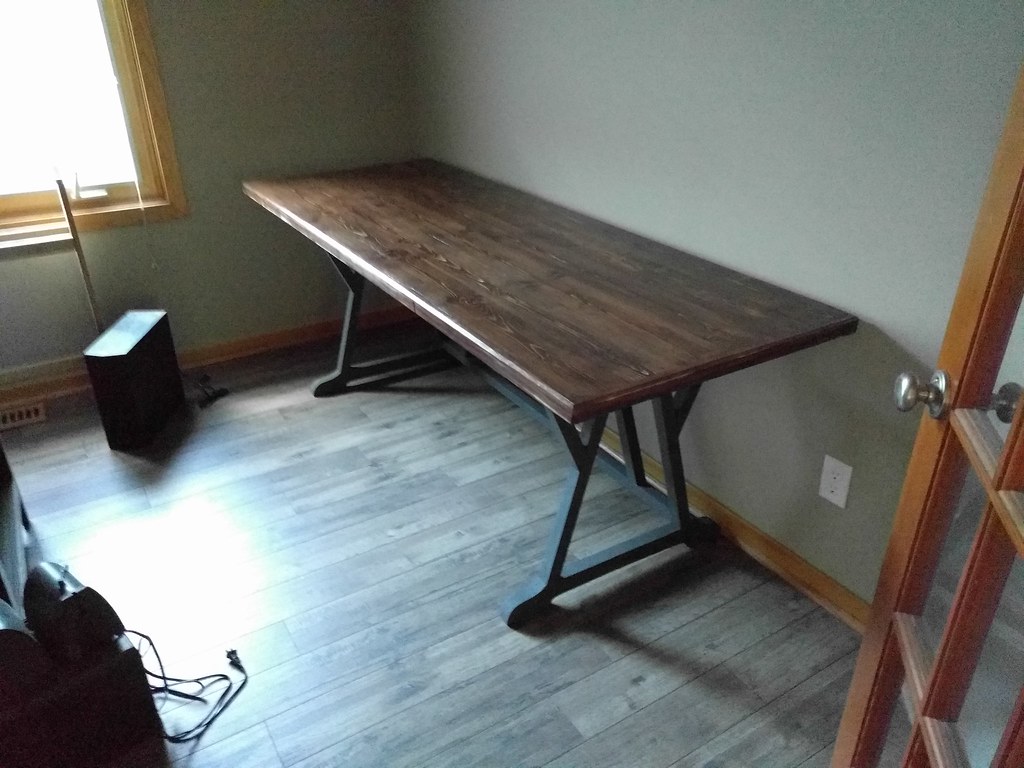
I wanted a bit of a rustic look so I spot sanded some areas to add a little of that "worn" look to it hence the certain lighter areas but for the most part the stain is very consistent all over. The top is made out of 2x6 pine boards, jointed, planed, and sanded to 320 grit before conditioning and stain and poly on top. I fucked up the poly though so I will be redoing the top hopefully soon before it gets cold out.
Last edited by SamDoe1; 10-05-2017 at 02:20 PM.
The following users liked this post:
CCColtsicehockey (10-05-2017)
10-05-2017, 03:18 PM
#108
Moderator
Regional Coordinator (Southeast)
Regional Coordinator (Southeast)
Thread Starter
Join Date: Dec 2003
Location: Mooresville, NC
Age: 37
Posts: 43,490
Received 3,672 Likes
on
2,501 Posts
Ah ok I get what you're saying with depth. That sort of thing is really really hard to get with pine or any soft wood. It's super easy to get with maple and other such close grain hard woods though (especially walnut) due to the fact that the wood itself has different colors and layers as a result of not being an evergreen tree. If you want to sorta get it with pine, it comes down a lot to how the board is finished though and not in terms of stain or clear. You have to sand the piss out of it down to 400 grit or higher and then seal it in with a clear over the top. If you stain it, you won't really get the appearance...or it'll be really hard to get at least.
When I do conditioner I don't wipe it down after at all. I just use a shop rag (same as you) and wipe it on there in real thin layers to the point that it all gets absorbed and there is zero excess. I wait for it to try to the touch, tack cloth whatever crap is on there, and then stain. That gap between conditioner and stain is 30min to an hour. Don't go more than 2 hours but you do need to wait for it to dry first. Read what it says on the can in case your stuff is different than mine.
For stain application, I also go really thin on the stain. I basically have stain rag in one hand and wipe rag in another. Wipe on in thin layers, wait for ~15-30 seconds and wipe it off. A little goes a long way, there's no reason to go wet and heavy especially with pine.
For color though, have you tried mixing it pre-stain? Layering stain isn't the same as mixing it similar to how paint works. If you mix it wet and then apply, you'll get a different result than going over the top of what is already there.
Edit: Based on the very last pic you posted, I don't think you're waiting long enough between conditioning and stain. It's still splotchy and you can see the difference in stain take up in different parts of the board. This is because some of the pores are not being filled. What you want is something like this:
I wanted a bit of a rustic look so I spot sanded some areas to add a little of that "worn" look to it hence the certain lighter areas but for the most part the stain is very consistent all over. The top is made out of 2x6 pine boards, jointed, planed, and sanded to 320 grit before conditioning and stain and poly on top. I fucked up the poly though so I will be redoing the top hopefully soon before it gets cold out.
I will start trying lighter with more coats. That might be why it is splotchy even with conditioner as I put it on pretty heavy. You can see in one pick it is almos thick like paint.
In the last two tests two of them I mixed before rather than layering. Not sure I really liked how the color itself came out. Going to try mixing again though tonight but this time with with more brown than gray instead since I am looking for brown with some gray instead of the other way around.
You table looks good. If my staining turns out even close to that good I will be happy.
10-05-2017, 04:57 PM
#109
Ex-OEM King
Other thing you might want to try is to almost rub the stain into the wood as you apply instead of just lightly wiping. I find that it gives a nice burnished look to the finish when you do that.
10-05-2017, 07:31 PM
#110
Moderator
Regional Coordinator (Southeast)
Regional Coordinator (Southeast)
Thread Starter
Join Date: Dec 2003
Location: Mooresville, NC
Age: 37
Posts: 43,490
Received 3,672 Likes
on
2,501 Posts
I will do and there test like that cause that will add to the look I want I believe.
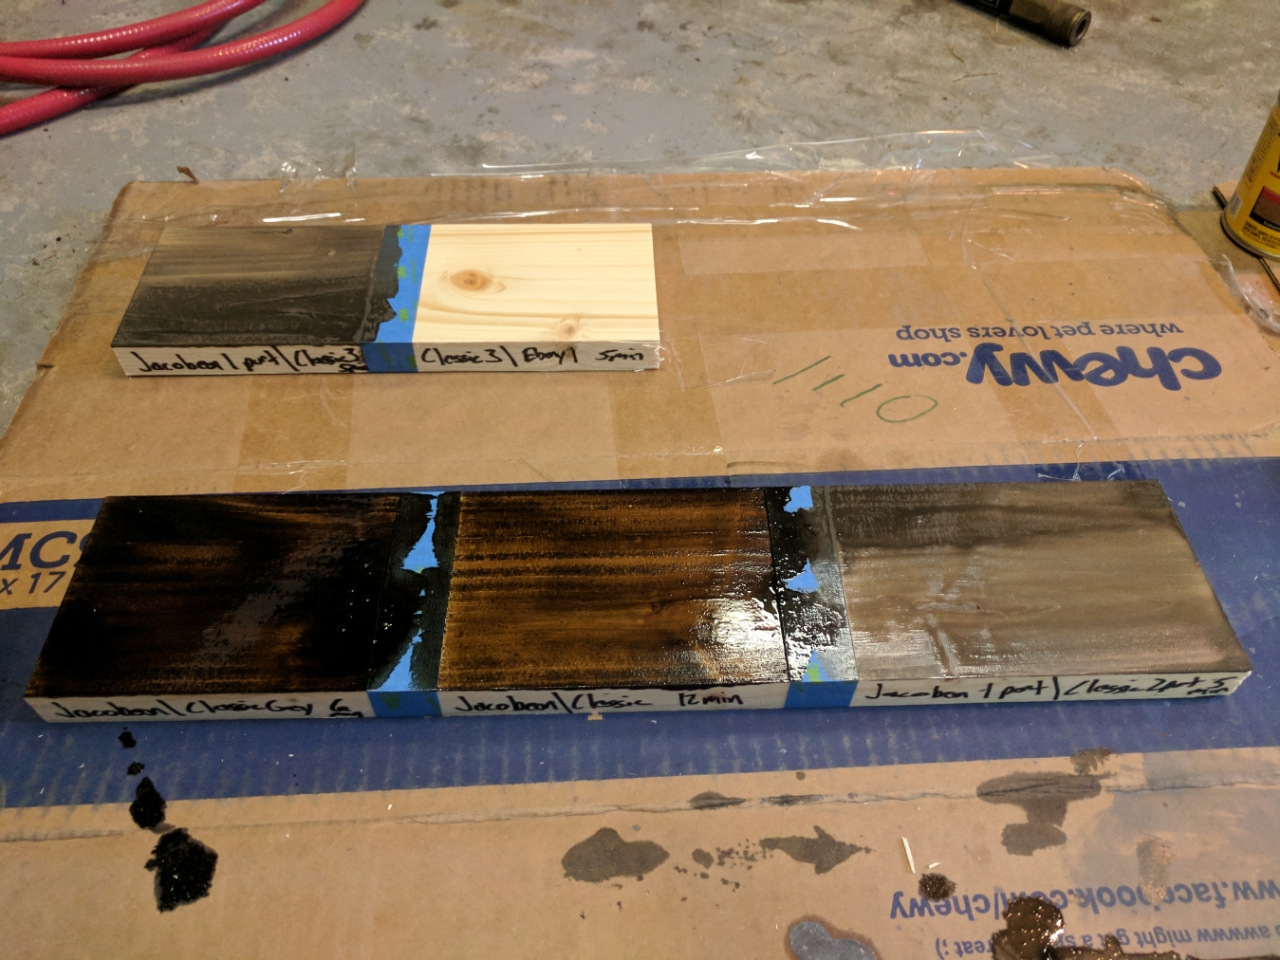
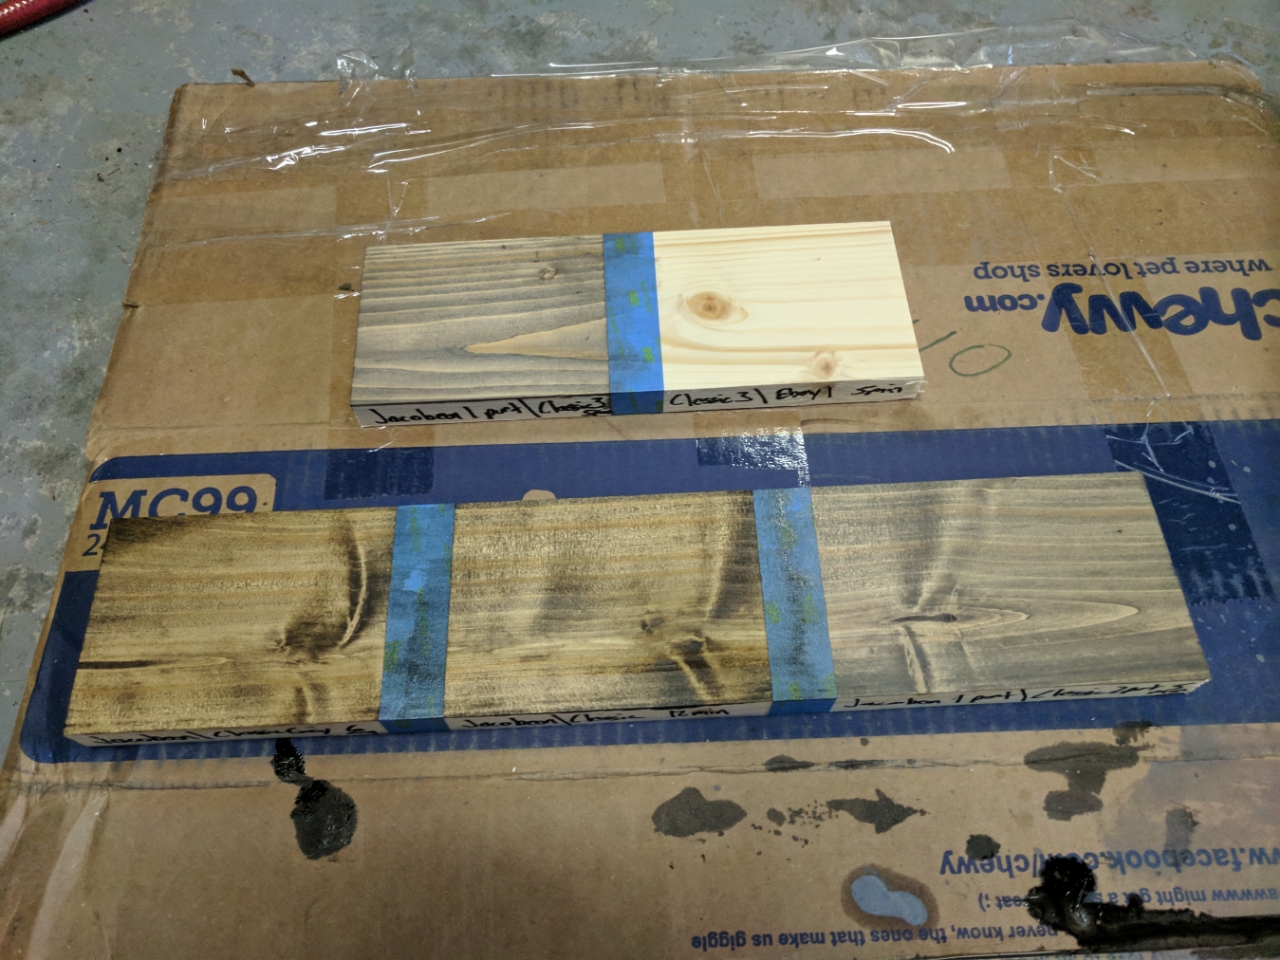
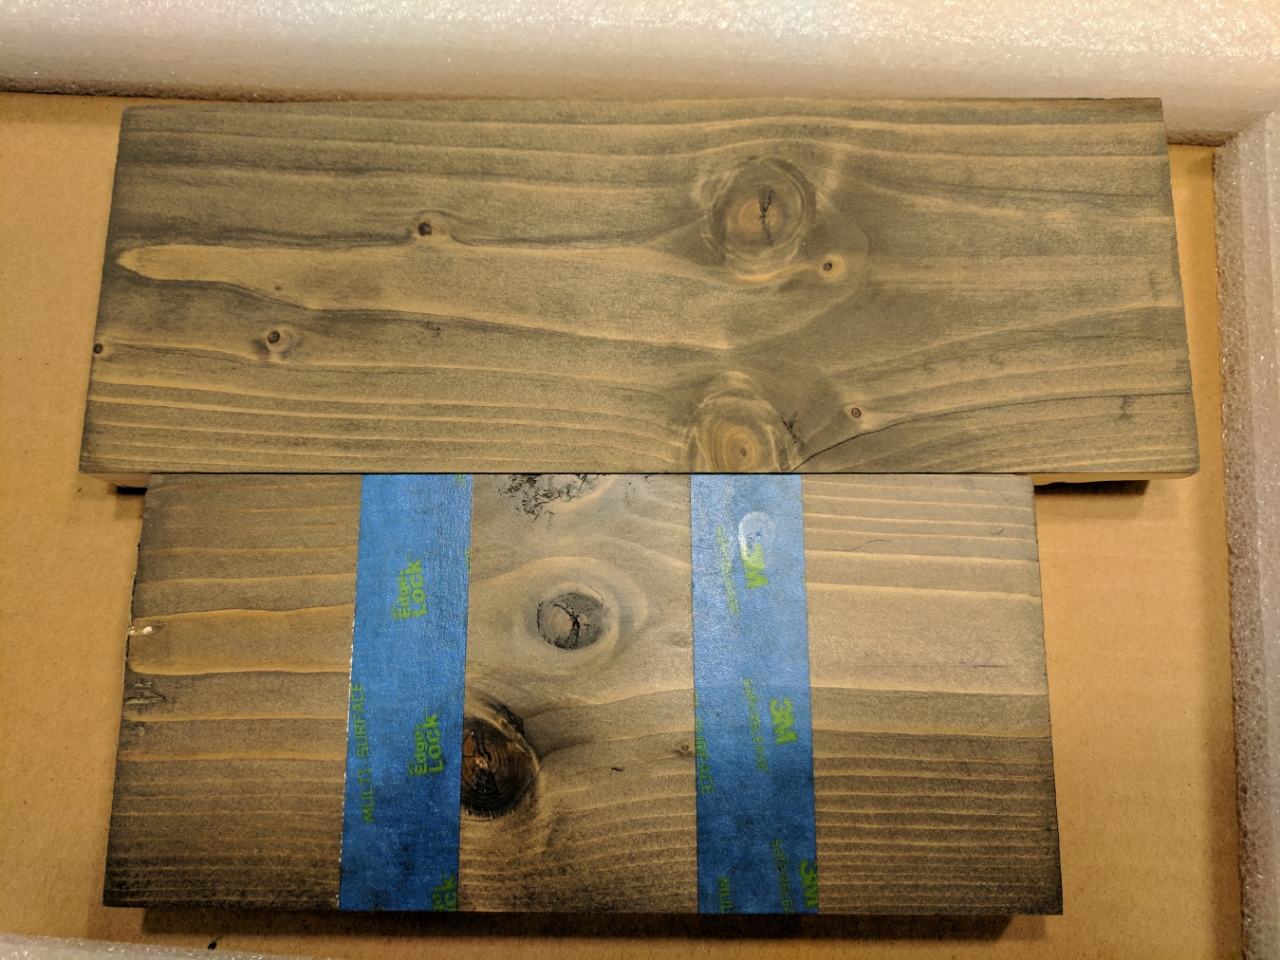
I think I have finally found my color tonight though. It is a stain mix of 2 parts classic gray and 1 part jacobean. I did this test last night but wasn't happy with the results. Used Sam's suggestion of applying and wiping off within a minute. Then I did 3 more coats the same way right after that. I also for the first time sanded the board before lightly using the conditioner. The larger board in the picture was raw and not treated. The smaller board was conditioned and I was able to replicate it again. Tomorrow I will put three boards together and try to do it again. The color is more brown than grey but has a very weathered look.
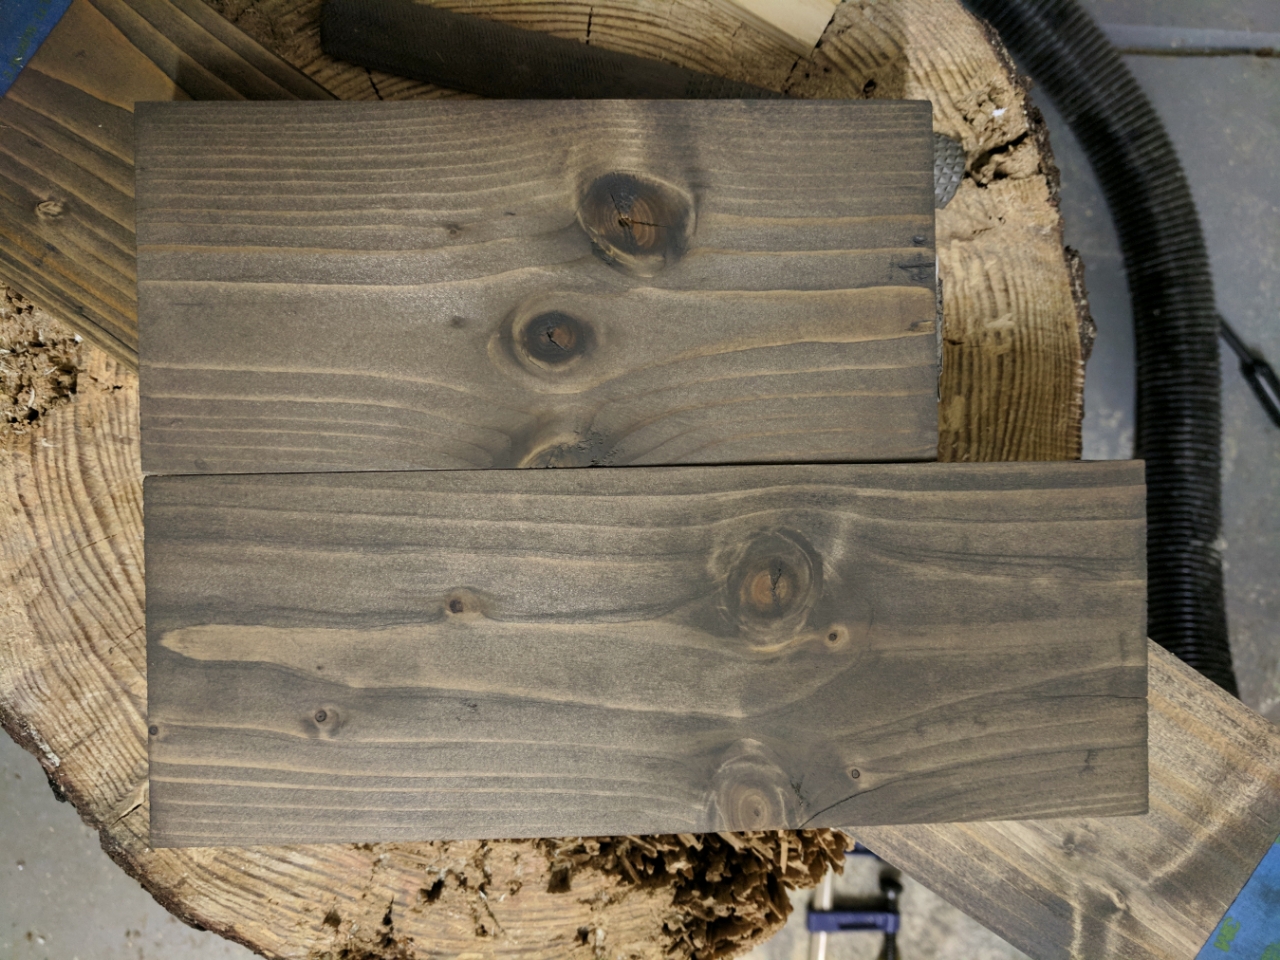
I think I have finally found my color tonight though. It is a stain mix of 2 parts classic gray and 1 part jacobean. I did this test last night but wasn't happy with the results. Used Sam's suggestion of applying and wiping off within a minute. Then I did 3 more coats the same way right after that. I also for the first time sanded the board before lightly using the conditioner. The larger board in the picture was raw and not treated. The smaller board was conditioned and I was able to replicate it again. Tomorrow I will put three boards together and try to do it again. The color is more brown than grey but has a very weathered look.
 10-06-2017, 06:46 AM
#112
I will do and there test like that cause that will add to the look I want I believe.
I think I have finally found my color tonight though. It is a stain mix of 2 parts classic gray and 1 part jacobean. I did this test last night but wasn't happy with the results. Used Sam's suggestion of applying and wiping off within a minute. Then I did 3 more coats the same way right after that. I also for the first time sanded the board before lightly using the conditioner. The larger board in the picture was raw and not treated. The smaller board was conditioned and I was able to replicate it again. Tomorrow I will put three boards together and try to do it again. The color is more brown than grey but has a very weathered look.
I think I have finally found my color tonight though. It is a stain mix of 2 parts classic gray and 1 part jacobean. I did this test last night but wasn't happy with the results. Used Sam's suggestion of applying and wiping off within a minute. Then I did 3 more coats the same way right after that. I also for the first time sanded the board before lightly using the conditioner. The larger board in the picture was raw and not treated. The smaller board was conditioned and I was able to replicate it again. Tomorrow I will put three boards together and try to do it again. The color is more brown than grey but has a very weathered look.
10-06-2017, 09:17 AM
#113
Moderator
Regional Coordinator (Southeast)
Regional Coordinator (Southeast)
Thread Starter
Join Date: Dec 2003
Location: Mooresville, NC
Age: 37
Posts: 43,490
Received 3,672 Likes
on
2,501 Posts
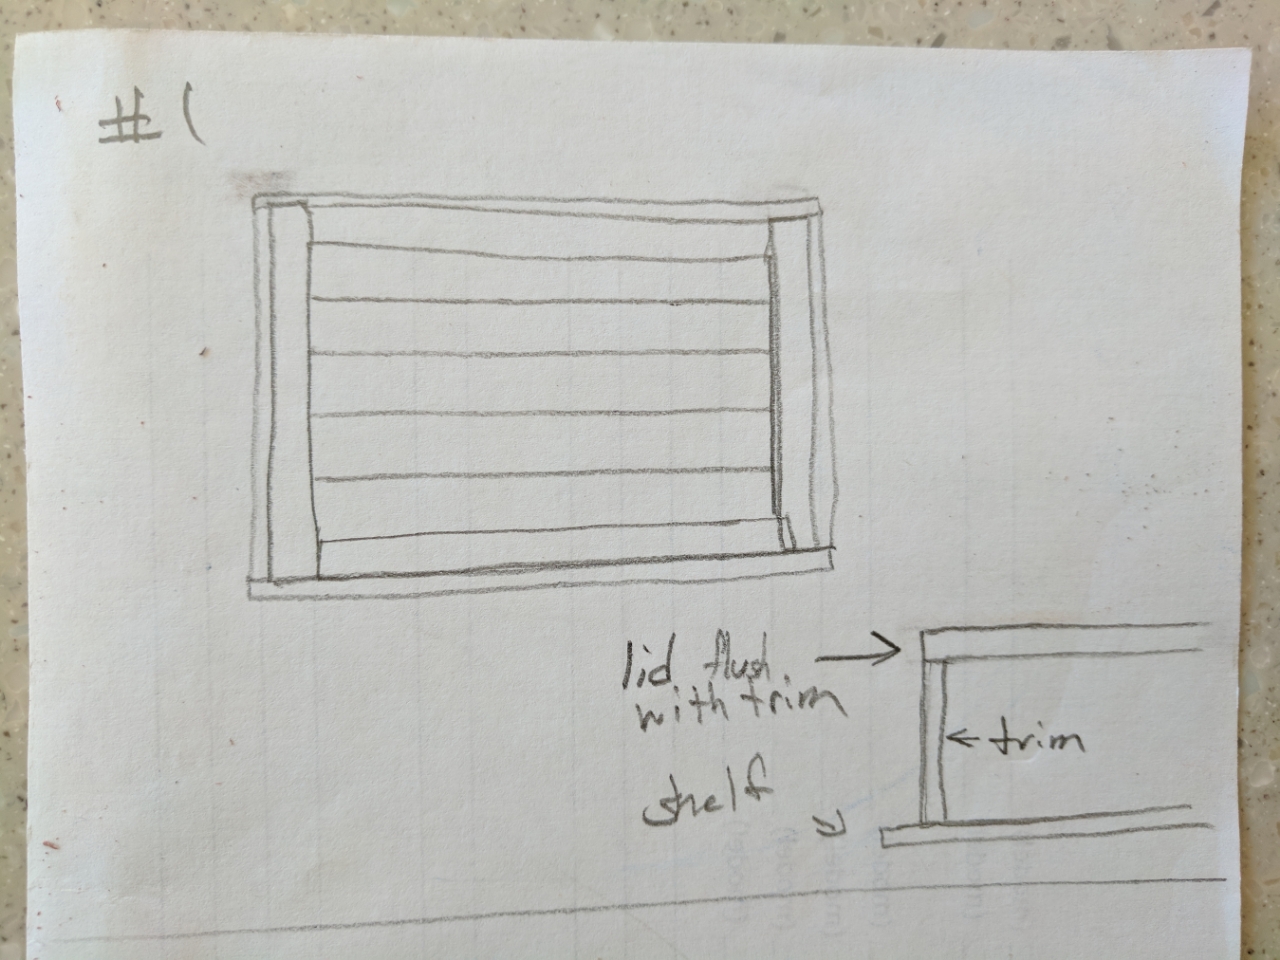
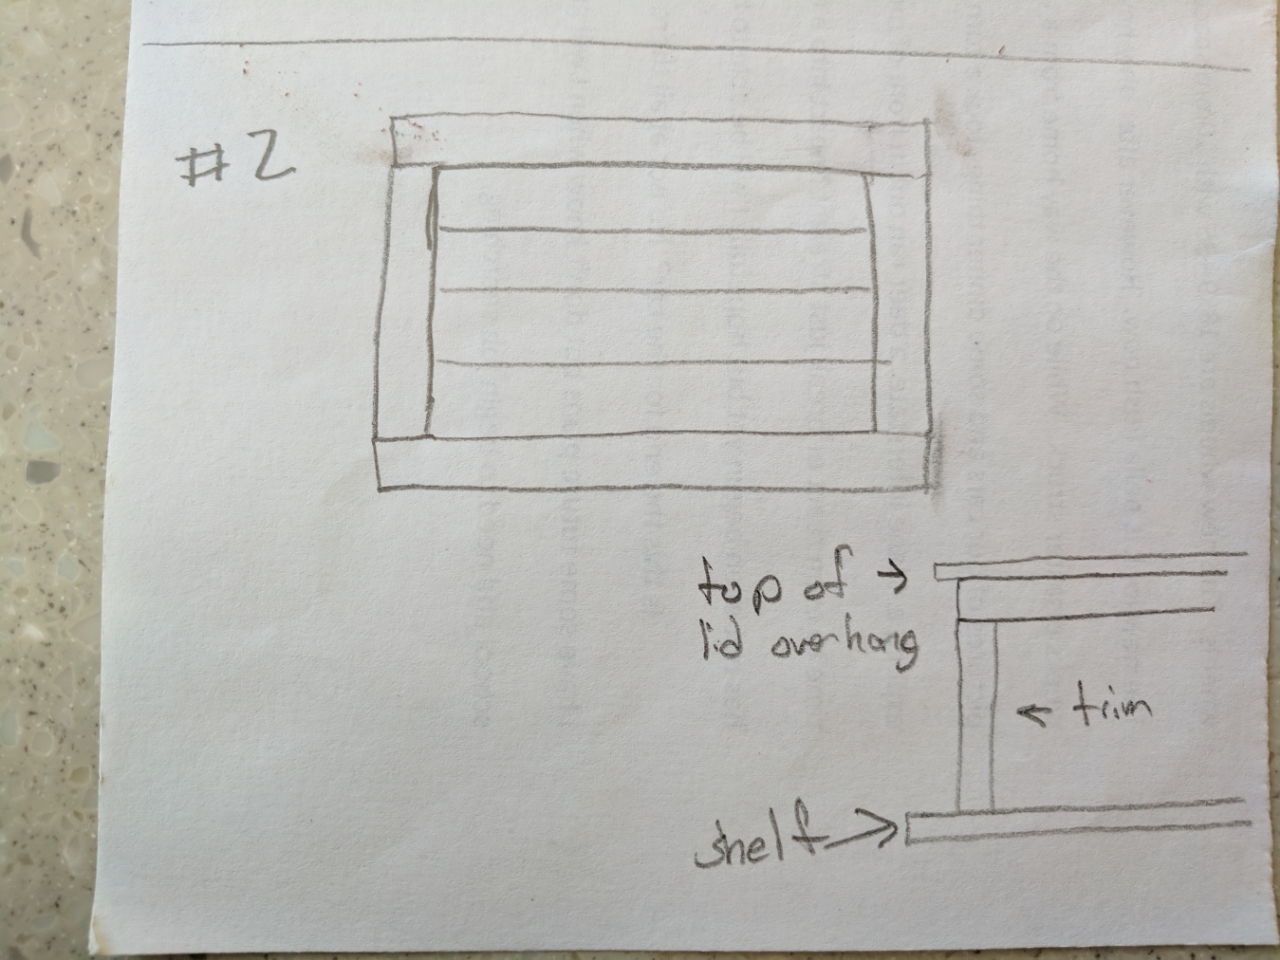
Also here are two fairly quick sketches of what I am thinking for the lid. I know they are not that great.
10-06-2017, 09:24 AM
#114
Ex-OEM King
I like option two but that's just my style.
10-09-2017, 08:08 AM
#115
Moderator
Regional Coordinator (Southeast)
Regional Coordinator (Southeast)
Thread Starter
Join Date: Dec 2003
Location: Mooresville, NC
Age: 37
Posts: 43,490
Received 3,672 Likes
on
2,501 Posts
So I mocked up both ideas this weekend and it was good I did before building one. I had to go with option 1 cause option 2 got too side and would have interfered with the tap handles. The only way I could have done option 2 was to have no overhang on the front and only have it on the sides and back.
I also finally decided I didn't want the back only partially covered so I filled it in completely except for the wiring. Further down I will get into what I did for the heat solution.
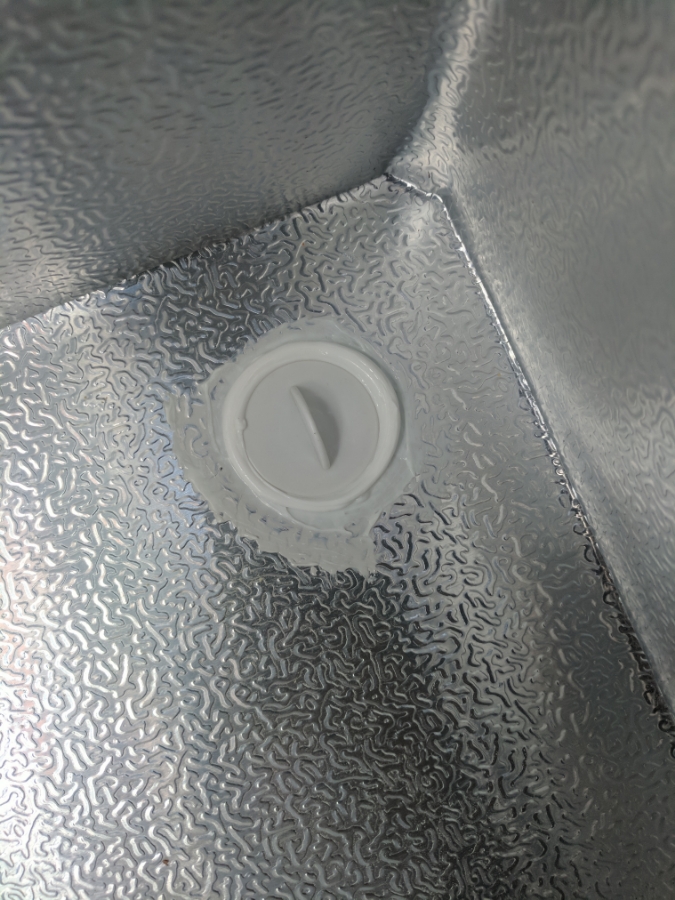
First thing though is I started with sealing the drain inside the freezer. I wanted no chance of anything leaking. I would rather have water from possible condensation pool up inside and have to mop or wetvac it out than have it leak on my hardwoods.
Crawling into this thing was not easy. I am not a small guy.
Sealed up the plastic meets the freezer panels.
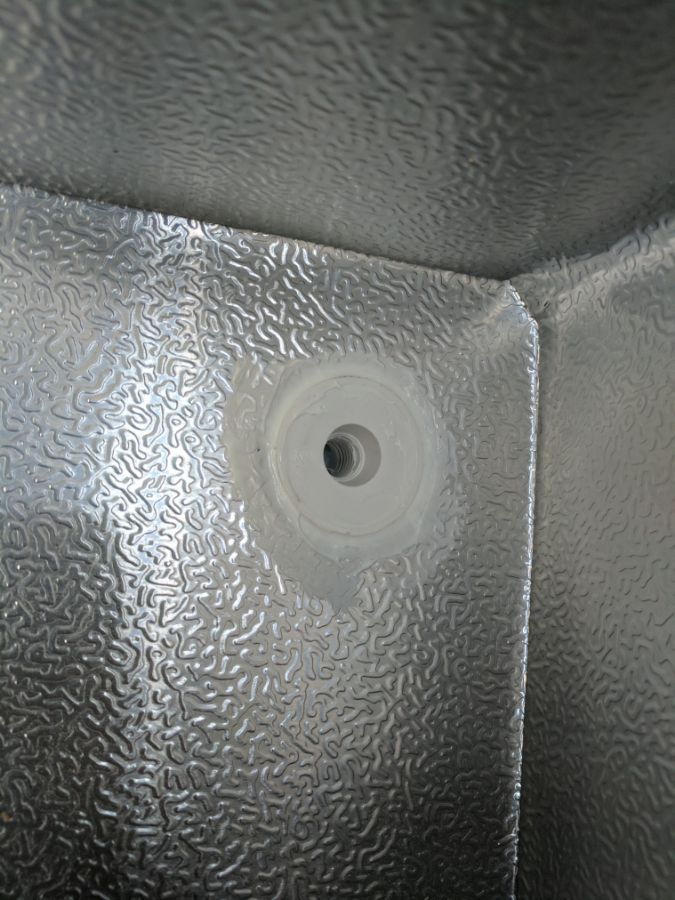
The drain hole itself.
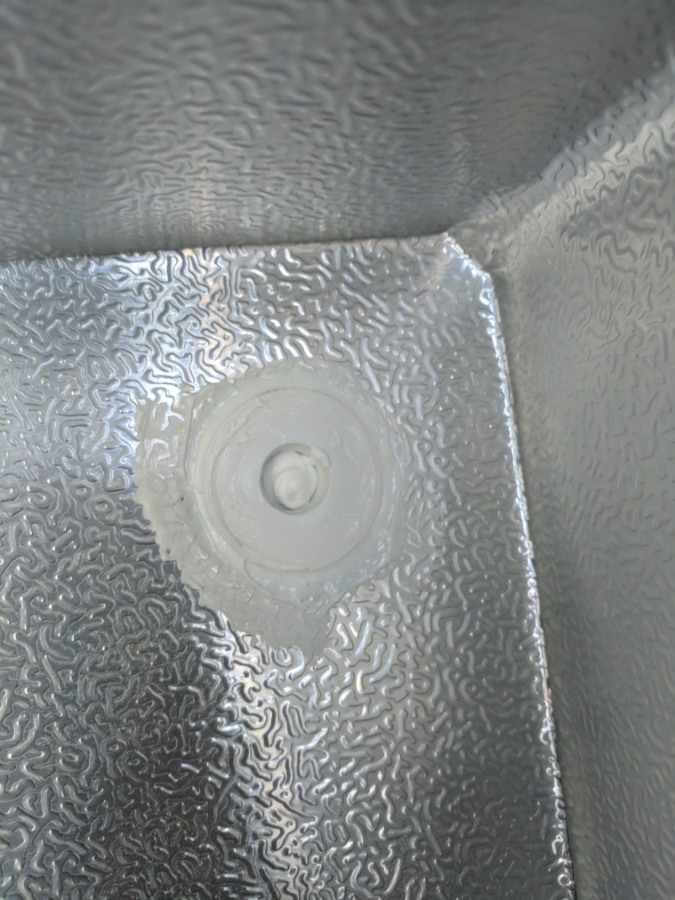
The plug threads.
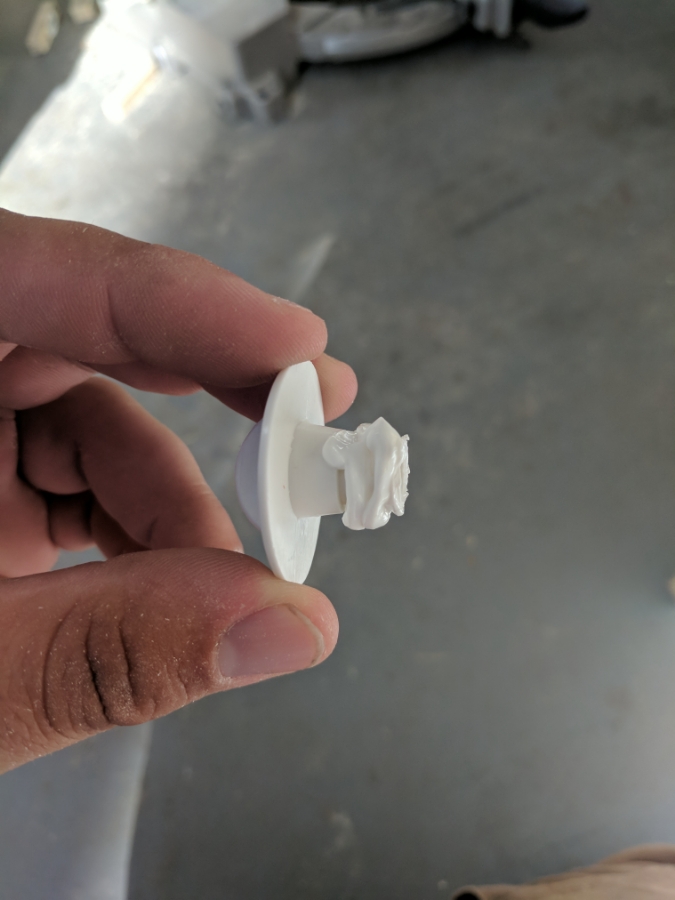
No way this thing leaks out of this at least
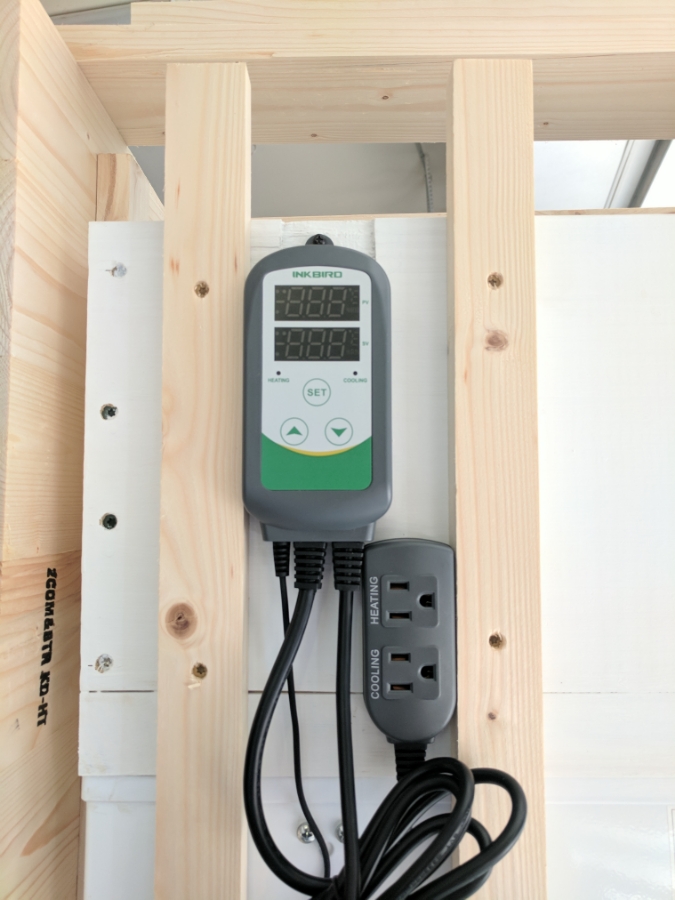
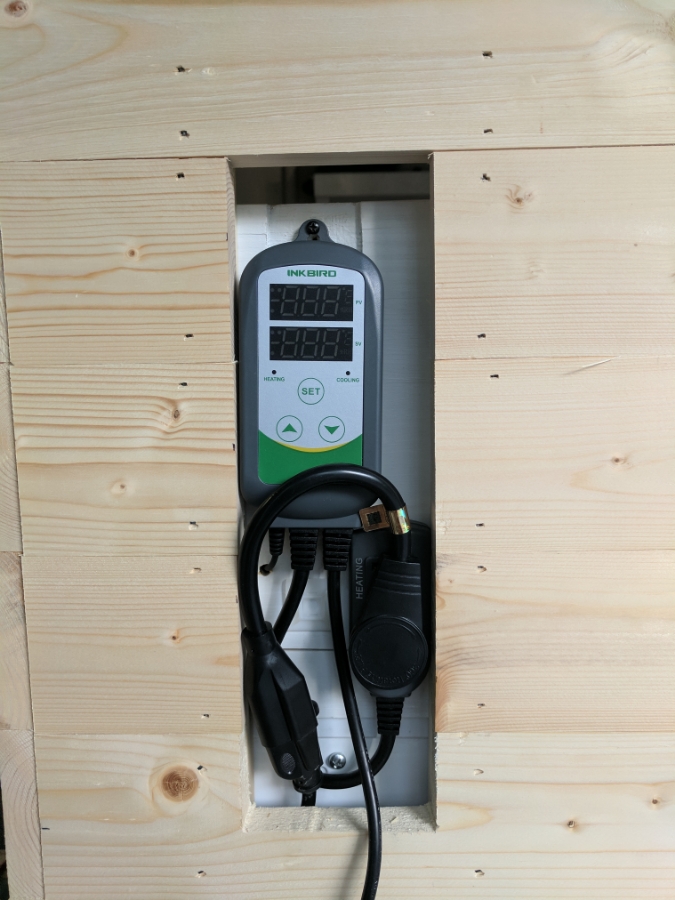
I then started working on mounting of the temp controller and the wire routing for the freezer. I want it all run so that if something went wrong with the temp controller I could replace it without having to tear anything apart. I also wanted it fairly hidden.
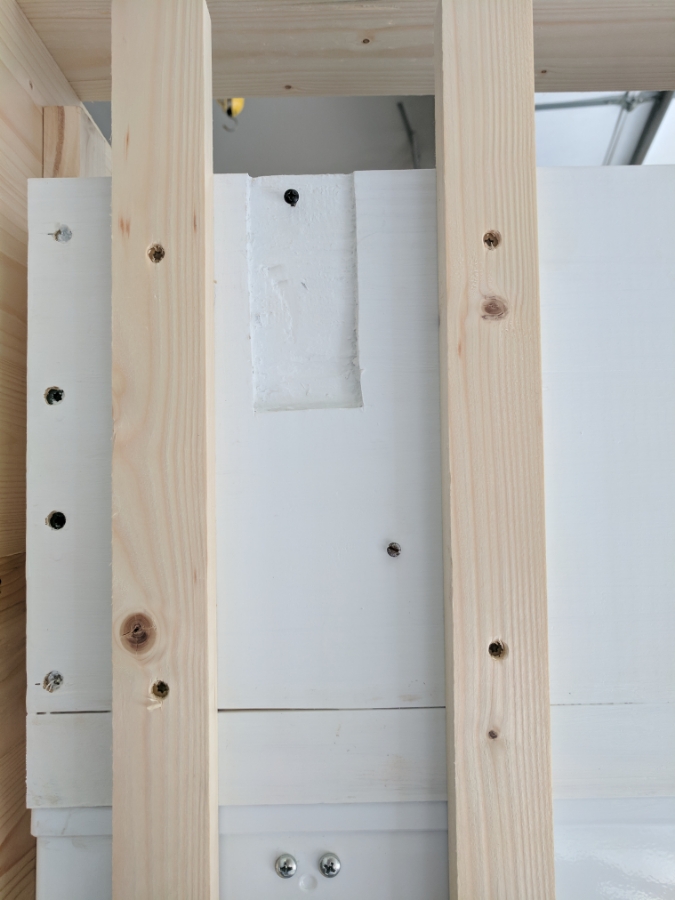
Wire secured with 3m tape ziptie mounts
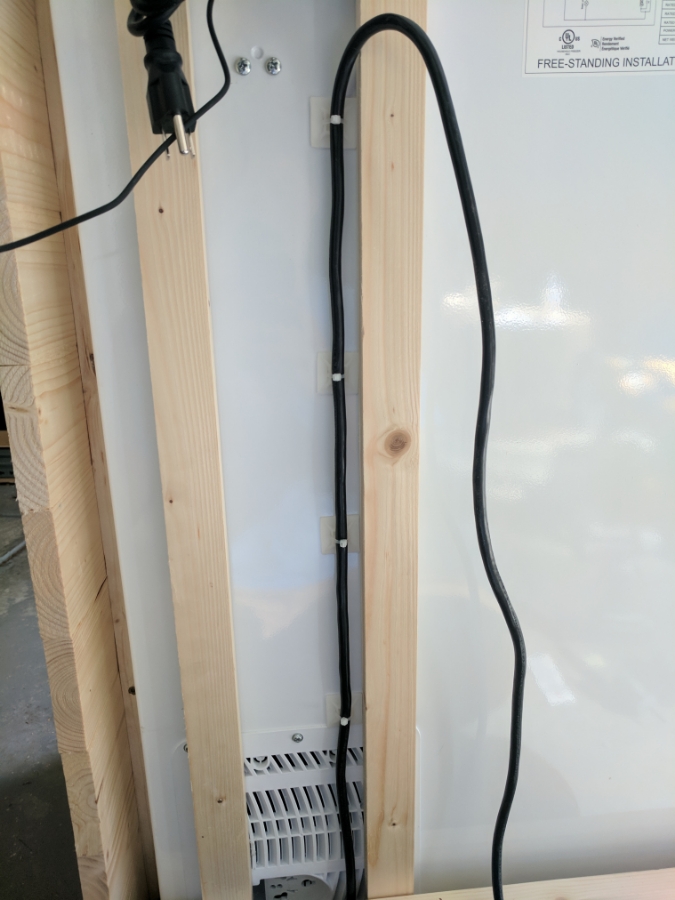
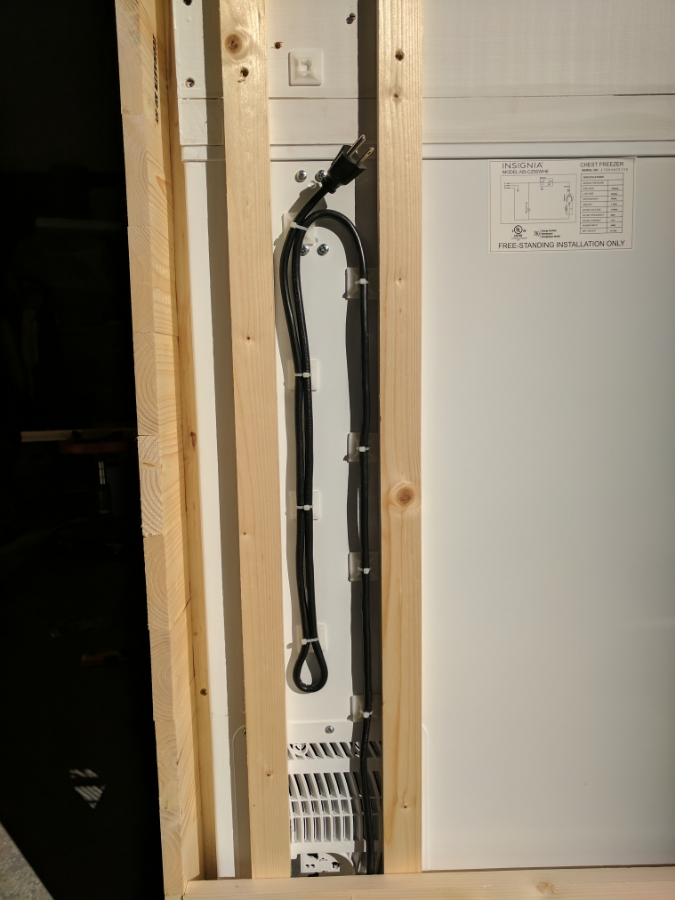
Everything fits nice and tight. I want to build a door for it but will have to figure out how to hollow out some pieces of 1x4 to do it as I don't want it to be any thicker than the trip so everything is flush on the back. The plug into the flat rotating adapter sticks out a little and the coil of wire going over the temp controller does as well. Nothing else sticks out though.
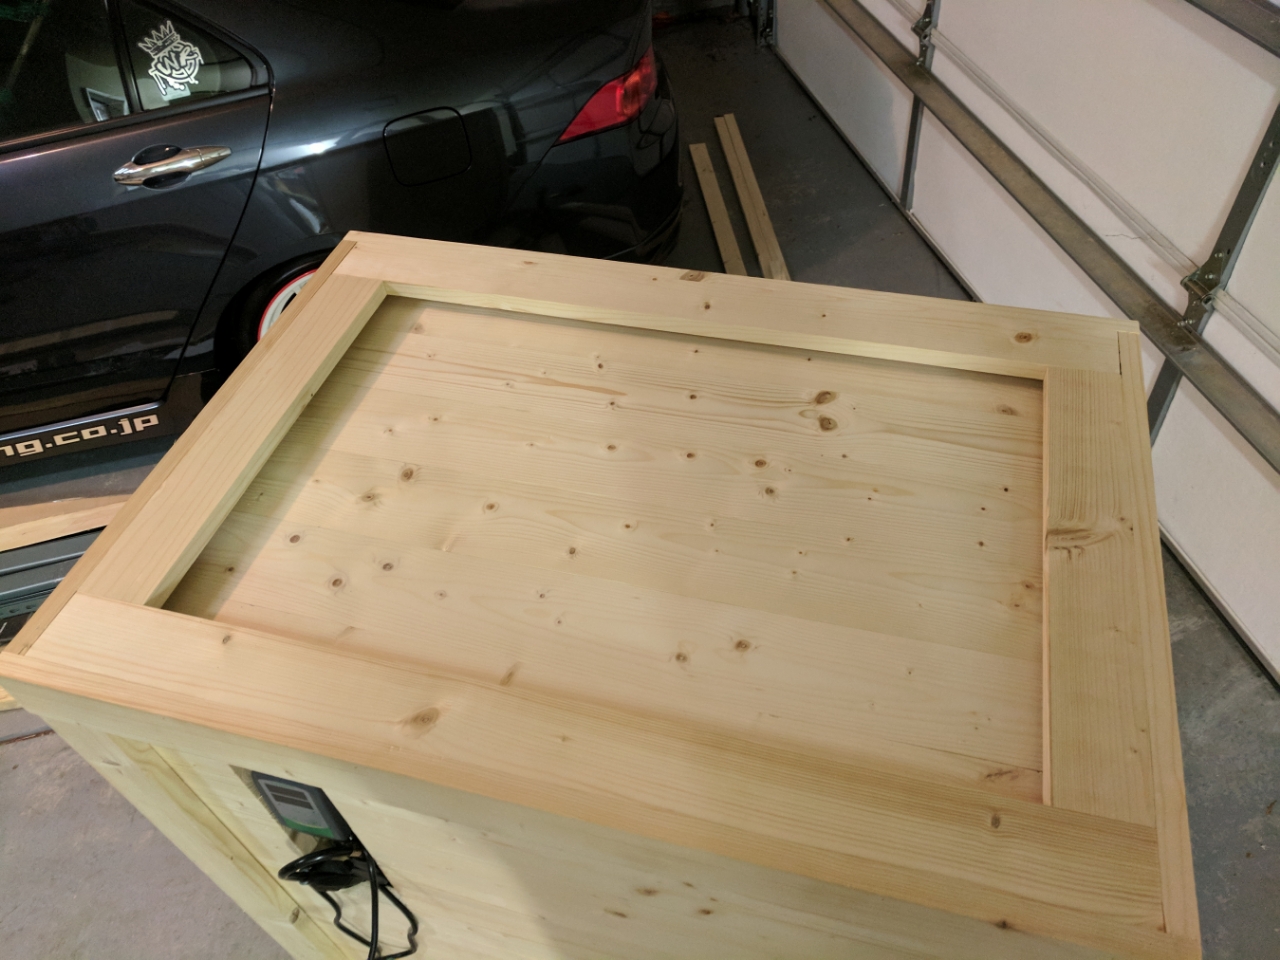
I then started working on the lid and the trim. The base trim is 1x4 and the corner trim is 1x3 on the front and back with 1x2 butted up against on the sides. This is close to square as I could get without a table saw to cut my own pieces.
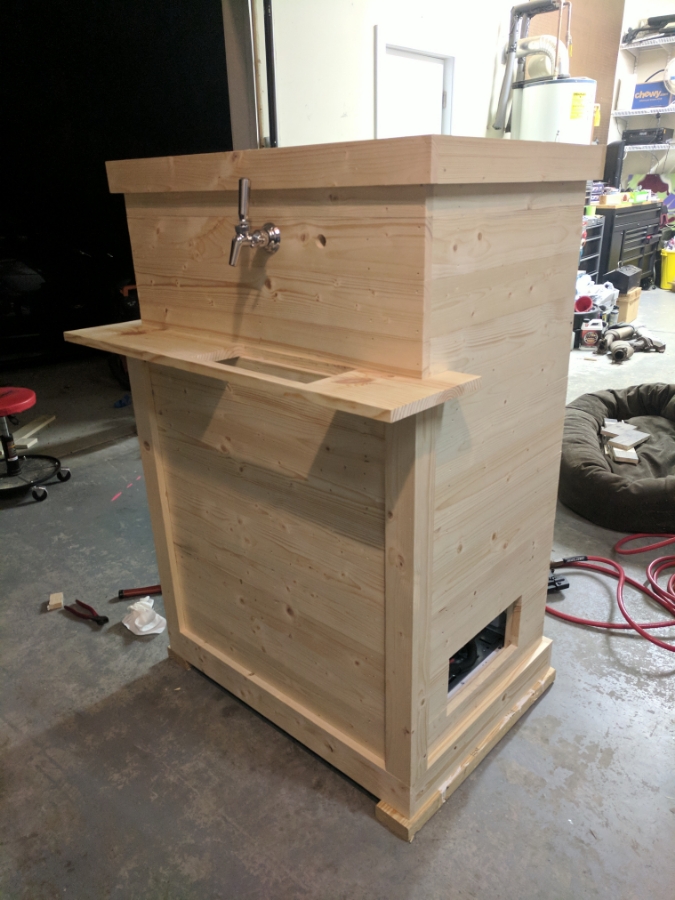
Now that the trim is on I think I need to trim out the shelf too. The shelf looks too small just being a plain board. J was right. I think I will use some 1x2 to make it look a little thicker but stay with the basic design of the entire thing.
I had to build the lid early on so I knew how high to make the trim pieces. Wasn't sure how I was going to do my center though but didn't need that right away.
I went with gnuts idea of creating a vent and modified it a little into my lid solution.
Last night I finally built the lid insert. It is made of 4 1x4 and 2 1x3. This was perfect as I didn't have to trim any board widths and everything lined up perfect. I overbuild all of this so it is held together with glue and 3 nails per board with 1/2in thick braces on the back side.
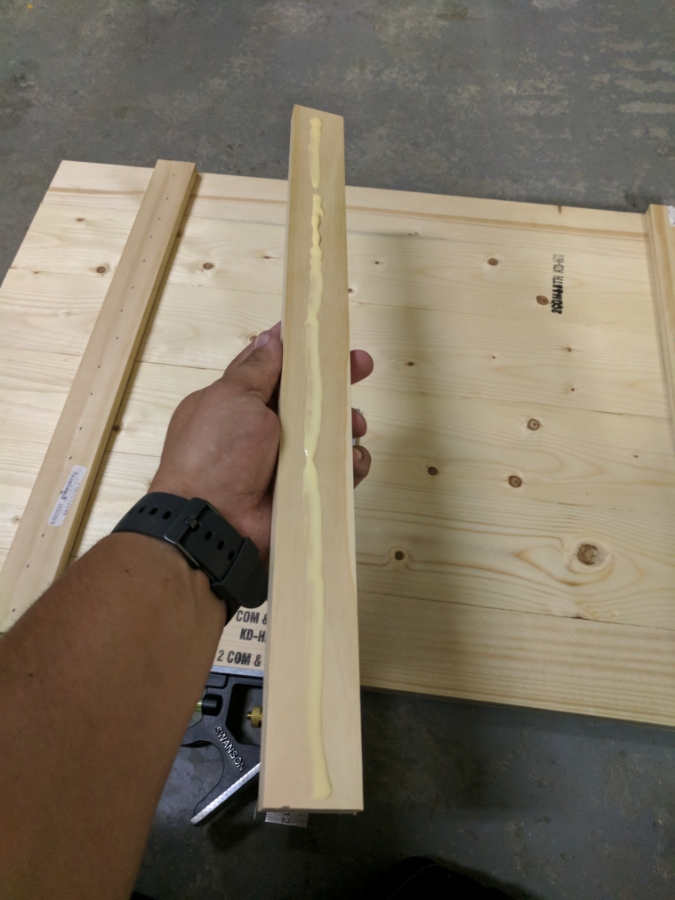

Test fit
I need to decide how I am giong to suspend the insert from the frame. Option 1 - 1.5x1.5in 3/8in thick wood pieces evenly space out. Option 2 - Stainless metal thick washers. They are 1/2in wide x 1/4in thick. I would be able to polish or make them brushed finish. I don't have these right now so I improvised with some raised washers that I have but they are only 1/8in thick but it gives a bit of a visual. So far I am leaning towards using the wood spacers. For one it gives a large vent channel.
Option 1 - Wood

Oprtion 2 - Stainless Spacers (not the actual ones I would use)
Made a larger test piece last night and mixed a large batch of my stain. Not sure what went wrong from the small batch but it has almost no gray color in it this time. So I am going to have to try and tweek the color a bit still before I stain the actual kegorator. Pretty much have decided I will not be making the deadline at this point.
The color on the left is what I want and in person it has more gray to it. The large test board is pretty much all brown. I don't hate the color but I really like the color on the other board. Also it seems to be that some of the boards I have even though they came from the same pile at lowes appear to be something different. I guess it is what I guess for using generic whiteboard since it comes from a variety of tree types.
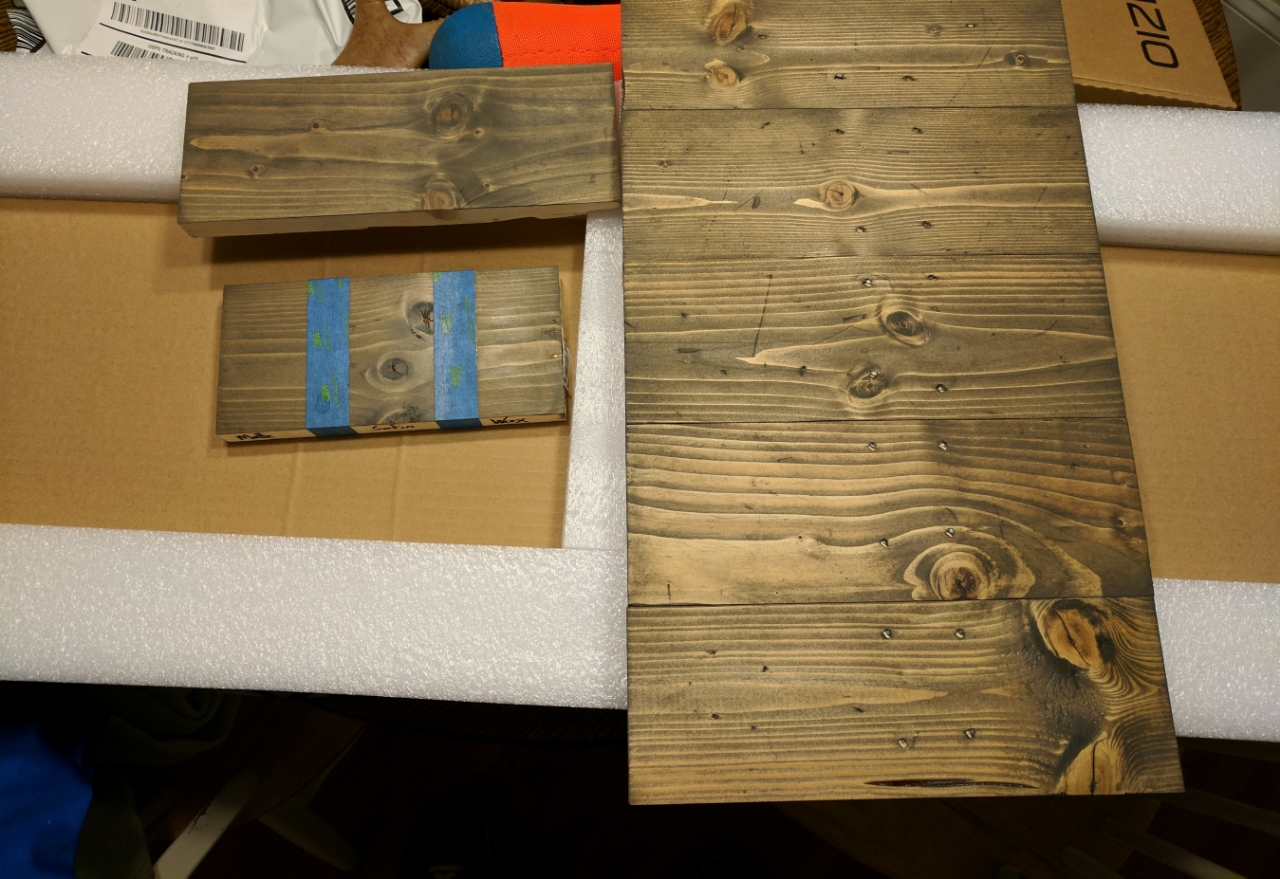
Also tested 3 different finishes. Water based matte clear, poly satin, and a wax finish.
I actually really like the wax finish but I am not sure it is the best used with something that could end up with beer drips or splatter on it.

I also finally decided I didn't want the back only partially covered so I filled it in completely except for the wiring. Further down I will get into what I did for the heat solution.
First thing though is I started with sealing the drain inside the freezer. I wanted no chance of anything leaking. I would rather have water from possible condensation pool up inside and have to mop or wetvac it out than have it leak on my hardwoods.
Crawling into this thing was not easy. I am not a small guy.
Sealed up the plastic meets the freezer panels.
The drain hole itself.
The plug threads.
No way this thing leaks out of this at least
I then started working on mounting of the temp controller and the wire routing for the freezer. I want it all run so that if something went wrong with the temp controller I could replace it without having to tear anything apart. I also wanted it fairly hidden.
Wire secured with 3m tape ziptie mounts
Everything fits nice and tight. I want to build a door for it but will have to figure out how to hollow out some pieces of 1x4 to do it as I don't want it to be any thicker than the trip so everything is flush on the back. The plug into the flat rotating adapter sticks out a little and the coil of wire going over the temp controller does as well. Nothing else sticks out though.
I then started working on the lid and the trim. The base trim is 1x4 and the corner trim is 1x3 on the front and back with 1x2 butted up against on the sides. This is close to square as I could get without a table saw to cut my own pieces.
Now that the trim is on I think I need to trim out the shelf too. The shelf looks too small just being a plain board. J was right. I think I will use some 1x2 to make it look a little thicker but stay with the basic design of the entire thing.
I had to build the lid early on so I knew how high to make the trim pieces. Wasn't sure how I was going to do my center though but didn't need that right away.
Last night I finally built the lid insert. It is made of 4 1x4 and 2 1x3. This was perfect as I didn't have to trim any board widths and everything lined up perfect. I overbuild all of this so it is held together with glue and 3 nails per board with 1/2in thick braces on the back side.
Test fit
I need to decide how I am giong to suspend the insert from the frame. Option 1 - 1.5x1.5in 3/8in thick wood pieces evenly space out. Option 2 - Stainless metal thick washers. They are 1/2in wide x 1/4in thick. I would be able to polish or make them brushed finish. I don't have these right now so I improvised with some raised washers that I have but they are only 1/8in thick but it gives a bit of a visual. So far I am leaning towards using the wood spacers. For one it gives a large vent channel.
Option 1 - Wood
Oprtion 2 - Stainless Spacers (not the actual ones I would use)
Made a larger test piece last night and mixed a large batch of my stain. Not sure what went wrong from the small batch but it has almost no gray color in it this time. So I am going to have to try and tweek the color a bit still before I stain the actual kegorator. Pretty much have decided I will not be making the deadline at this point.
The color on the left is what I want and in person it has more gray to it. The large test board is pretty much all brown. I don't hate the color but I really like the color on the other board. Also it seems to be that some of the boards I have even though they came from the same pile at lowes appear to be something different. I guess it is what I guess for using generic whiteboard since it comes from a variety of tree types.
Also tested 3 different finishes. Water based matte clear, poly satin, and a wax finish.
I actually really like the wax finish but I am not sure it is the best used with something that could end up with beer drips or splatter on it.
Last edited by CCColtsicehockey; 10-09-2017 at 08:15 AM.
10-09-2017, 08:55 AM
#116
Moderator

Coming along nicely.
I'd go with option 1, cleaner look, IMO.
The following users liked this post:
CCColtsicehockey (10-09-2017)
10-09-2017, 11:32 AM
#117
Ex-OEM King
The following users liked this post:
CCColtsicehockey (10-09-2017)
10-09-2017, 12:13 PM
#118
Moderator
Regional Coordinator (Southeast)
Regional Coordinator (Southeast)
Thread Starter
Join Date: Dec 2003
Location: Mooresville, NC
Age: 37
Posts: 43,490
Received 3,672 Likes
on
2,501 Posts
Anyone have any suggestions for staining in corners? Never done something like that and I feel like it could be an issue with the trim already installed.
10-09-2017, 12:59 PM
#119
Ex-OEM King
Like an inside corner? Foam brush is the best way I've found. That or soak your rag and drip it into the corner.