When you click on links to various merchants on this site and make a purchase, this can result in this site earning a commission. Affiliate programs and affiliations include, but are not limited to, the eBay Partner Network.
@Tacobello - I work for a tech company doing mechanical design and some fabrication, no auto repair or auto body work. Welding and composites experience from a couple of classes and bicycle frame and furniture projects - which is why my Phase I is only about bodywork
I don't mind the fixer upper, I got into this partly to teach myself more about car maintenance. Figured there's no better way to learn!
Alternator is putting out less than 10V so I guess that's my problem... more to follow when that arrives... now to start work for the day for serious
Heh cool. I'm gonna aim for something a little cleaner / OEM-like though... planning to chop a fresh line through the rear trunkline / c-pillar area and weld up new sheetmetal, and modify the lude lights for a wider tailgate opening.
Intense afternoon. Waiting all day for the alternator to show up, finally comes in at 2pm... and the smog shop closes at 4pm. Jumped in my car to drive 25min to work, where the lude was stranded yesterday. Already had the PS pump and old alternator out yesterday after work, so got the new one in fairly quick. But the darned O2 sensor codes kept coming back, and the live data readout stayed at 1.275V. Maybe a Bosch thing like ThoiBoi said?? Too rushed to take a bunch of pics so this just shows the new alternator in place.
Gave up hope of getting to the smog shop in time, so just drove home in the lude... and it appears all the codes are gone now!
Fingers crossed that they don't come back. Will be driving a bit more this weekend to monitor, hopefully smog and finally register on Monday.
Still don't have my speed readout working with the new VSS but hopefully it doesn't affect my smoggability.
I've been debating whether to admit this publicly and finally decided to do it, so as to be a lesson to others.
Fuse #14 under the dash is responsible for the alternator, O2 heater circuits, EGR and VSS... basically all the codes that I had. In my haste to get parts ordered I failed to check the weakest link.
Ah well anyway... she lives!! And is finally back in closed-loop operation with no codes:
That said, almost all the components I replaced were either immediately necessary (Cat and O2 sensors) or a matter of time (battery was 5 years old and had less than half the rated CCA's). Could have done without the alternator and VSS - a $115 mistake.
So it's smog tomorrow and hopefully registration right after. Wish me luck with my intake and muffler.
Thanks Tacobello, unfortunately it wasn't enough... intake won't cut it and I didn't realize my headers weren't stock either.
Smog guy was kind enough to do a visual check FOC. Surprised the loud-ass muffler wasn't an issue.
Sanity check: how much should I pay for stock headers from a junkyard? A local one quoted me $60. And the gasket I have on right now *should* be reusable, correct?
$60 does seem a little much for used. Does the H22 have the cat integrated in to the manifold? Or is it separate? Apples to Oranges, but our D17 Civic had the cat as part of the manifold, made for a pricey replacement when the mani developed a crack & a leak.
Also, think it's time for a thread title change, now that the car has been acquired.
60 seems a bit pricey. I dunno. Can you haggle with them? As for the gasket, it's probably toast after 1000s of blazing hot/cold cycles.
Yeah I balked at that quote too. Gonna try other options first, at least I know this Honda-specific yard has it. Will spring for it if the search comes up empty by the end of week, I just wanna settle this before my two week vacation. Good point on the gasket, I'll probably take the header off soon and check.
Originally Posted by 00TL-P3.2
$60 does seem a little much for used. Does the H22 have the cat integrated in to the manifold? Or is it separate? Apples to Oranges, but our D17 Civic had the cat as part of the manifold, made for a pricey replacement when the mani developed a crack & a leak.
The header, down pipe, cat, mid pipe and muffler are all separate bolt-together pieces on the H22A4. At least I have that going for me...
Originally Posted by 00TL-P3.2
Also, think it's time for a thread title change, now that the car has been acquired.
It's about time! Looks like only moderators can do this? If so I'd like to change it to "Project Prelute", thanks in advance!
Hi moderators! Could you please change the thread title to "Project Prelute"? Or tell me how to, if it's something I can do on my own. Thanks!
------------------------------
My wife's implied opinion of the lude... 'please don't do curbside drop-off at our son's school'
So the conversation would go
"Ok. Son, I'm gonna park the car... when I open the door you spring out and hobble to the school gate as fast as you can on your crutches so no one sees us!!"
(true story. he broke his toe when an unsecured cylindrical metal barrier toppled onto his foot last week)
Found a stock intake hose with clamps etc on eBay... shipping from Texas tomorrow.
Well at least one thing went right today...
Working on the car at night again, but thankfully no going under. Here's the short ram intake it came with:
I had the stock airbox so I just needed a new filter and the stock intake hose. Found one on eBay, shipping from TX was steep but at least it came with all the clamps and fittings I needed. Had to relocate the aftermarket HID ballast, but it fit like a charm. Stock just plain works. Don't worry, the green cloth was removed and battery "secured" afterward. Engine bay will need a lot of cleaning up, but not right now.
This is the part that didn't go quite right today. This is after I removed the aftermarket header at work, then compared it to the stock header I bought... uh-oh.
So it turns out my downpipe is also aftermarket and matched to the header. But by this time I'd already cut off the one seized stud stuck in the header, because I was planning to do this, to get the bolt pattern to match up:
And then I test fitted... only to discover the stock header is much shorter and unable to reach the downpipe flange. So I had to put the aftermarket header back on before I could drive home, having come no closer to fixing it. I gotta stop making bad assumptions in my haste to get her fixed and smogged.
Next week I get to go back to the junkyard and hear the guy say "I told you so" when I ask for the downpipe too. Will have to drill out that seized stud. The extra holes I drilled shouldn't be an issue, I'll just chase the original threads and use bolts instead of the original studs so that there's an actual bolt head taking the load instead of the partially-mangled threads.
Definitely the most interesting night of fixing so far.
First on the list - to get my AC (or at least the heater) back. I'd tried troubleshooting a couple days back with no joy, then snooped around under my dash and realized I didn't even have an effing blower. :not funny: So I got one from the junkyard when I went to get the exhaust header. I knew the fan connector wasn't seeing voltage so I had to figure that part out first. Stepped through the various connections in the electrical troubleshooting manual, that I found online:
1) Wasn't the 40A under hood fuse;
2) Wasn't the 7.5A under dash fuse;
3) Wasn't the under-dash relay connections;
4) Wasn't the relay itself;
5) Probably wasn't the resistor unit since even the highest setting didn't work;
And when I followed the rest of the connections to the blower, I realized the culprit had been staring out at me from the double-DIN hole all this while - the brown connector had been unplugged for some unknown reason. So I just had to plug it back in (as shown) and voila - she blows! Good thing I don't even have a radio to remove.
The tricky part was snaking the blower into position in the passenger footwell. Had to unscrew the ABS control unit and shift the kick plate to get enough room, and it was nasty under the carpet - but well worth having cabin airflow again. Not sure what the status of my AC really is (like do I even have the actual bits) but not a priority for now.
Part Two of the post to come shortly.
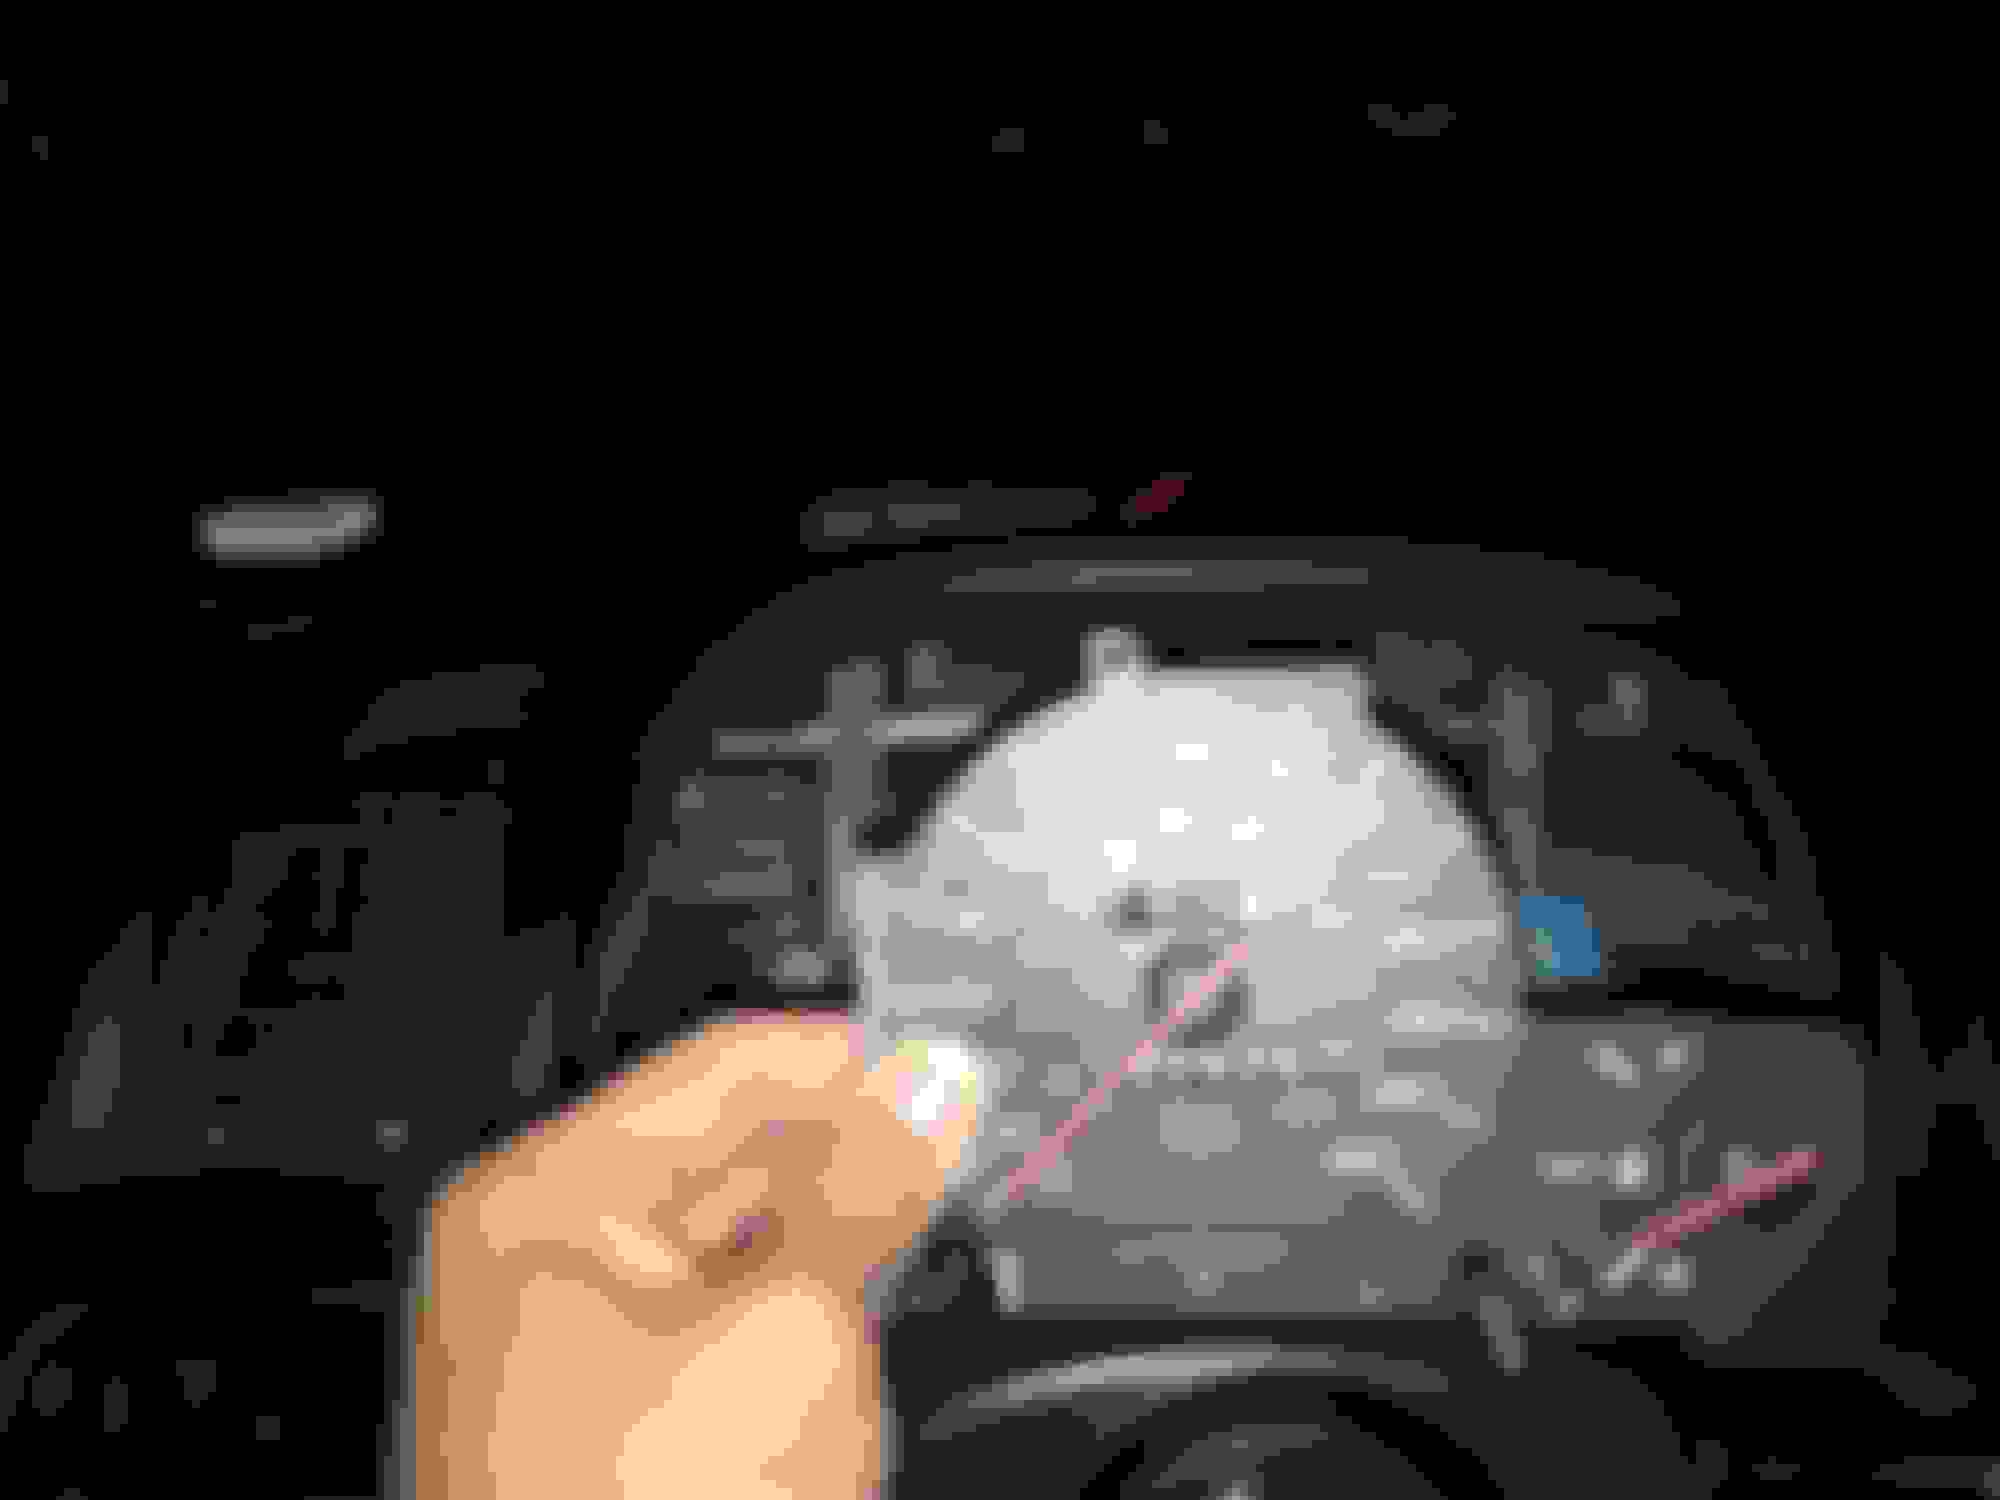
Part two was to tackle the speedometer offset problem - once I turned the ignition on, the speedometer would read ~27mph and maintain that offset as speed rose.
Read on Honda-Tech that it could be a problem with the IC chip connection, so I proceeded to dismantle the cluster:
After undoing two screws for the shroud, four screws for the cluster, and seven screws for the circuit board, the speedo and fuel gauge popped out easily.
Next step was to fashion a 12V battery pack for testing the board (I don't have a proper bench power supply at home). One 9V and two 'C' size batteries connected in series did the trick. Not the best pics, but I was doing all this while seated in the driver's seat balancing stuff on my lap.
Then connected the battery pack to IGN and GND on the circuit board. Using painter's tape of course.
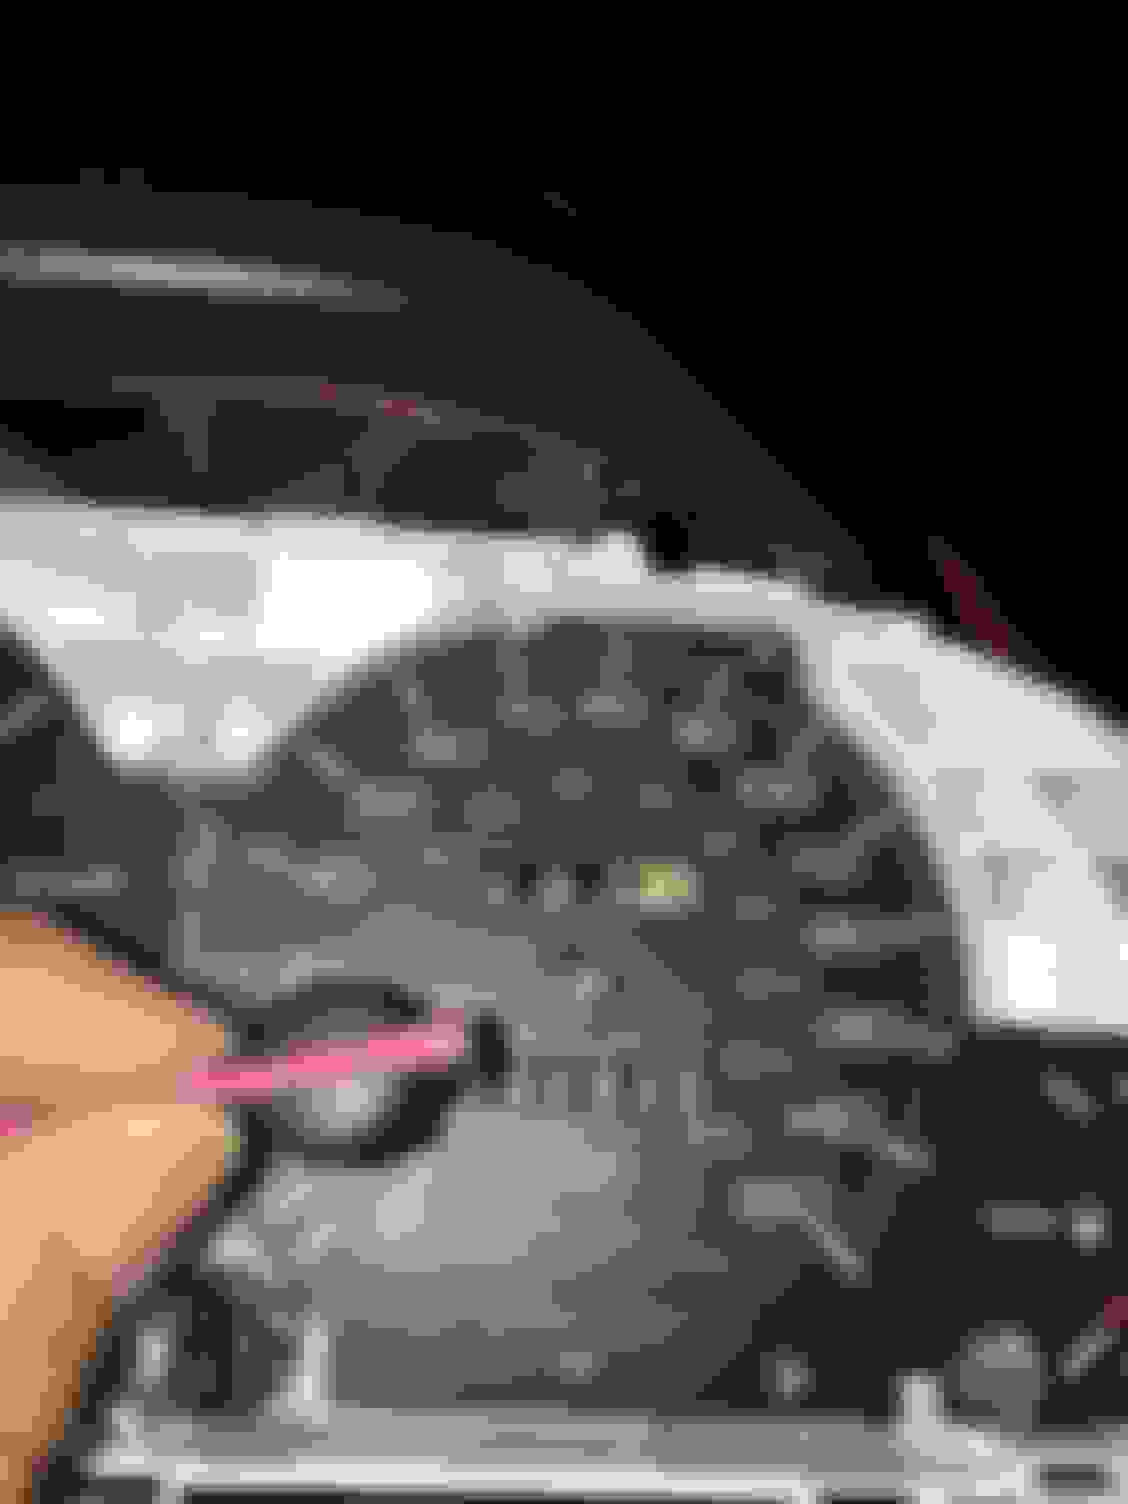
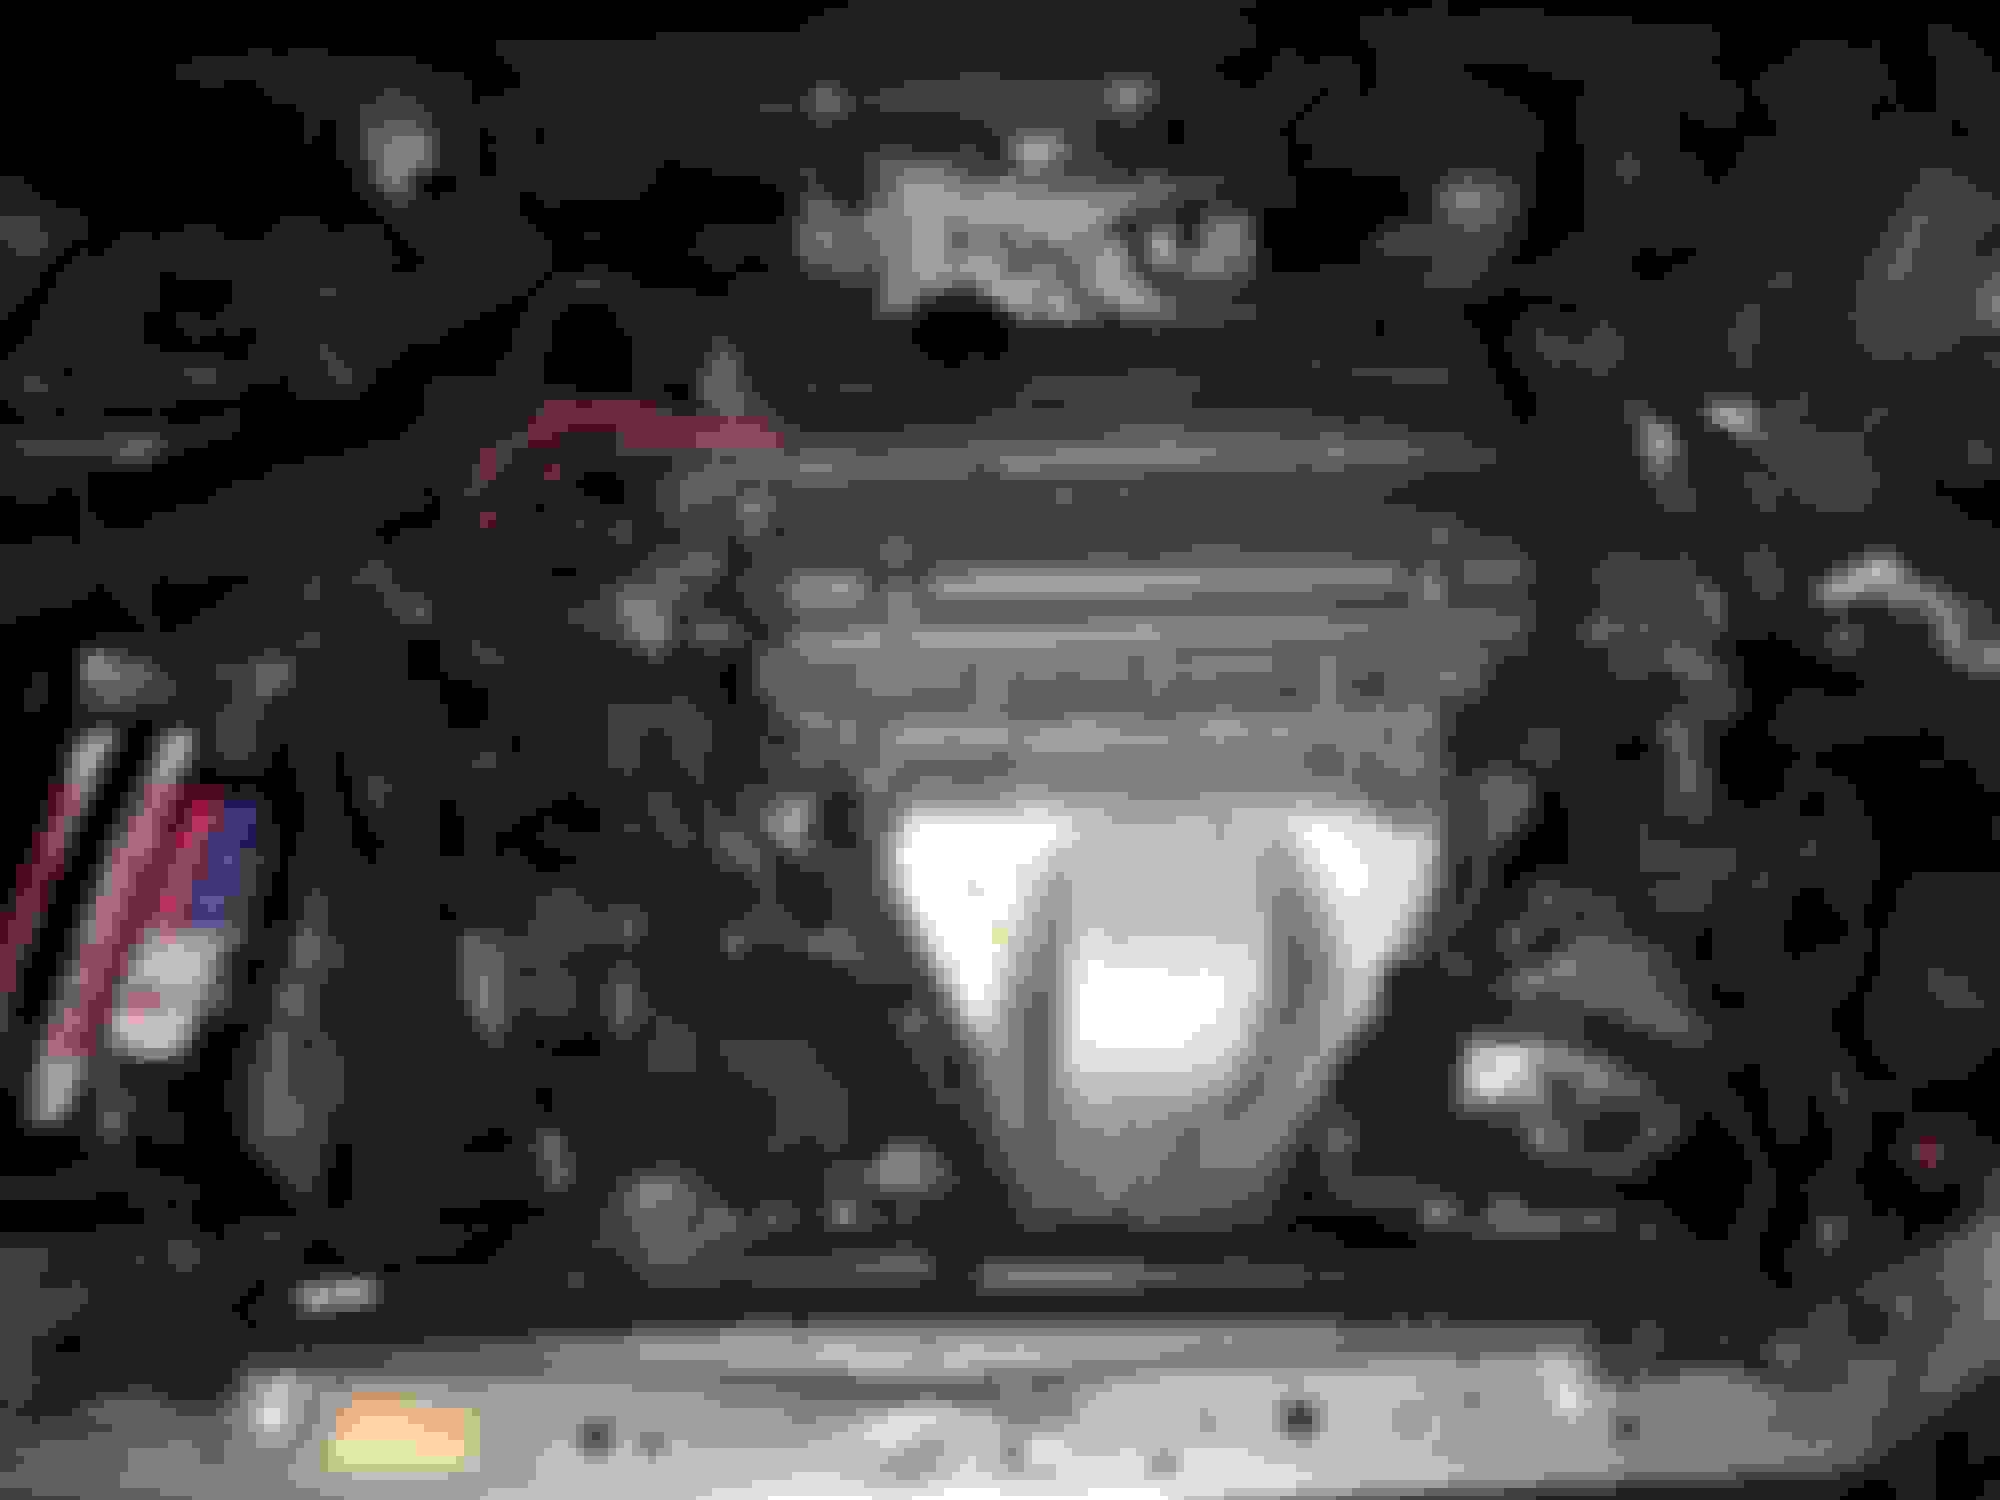
The COS voltage read 5.05V and SIN read 0.26V. Which meant the board was probably working fine, but I had wanted to check anyway. After reassembly and plugging in again, the offset persisted. So the last option that remained - repositioning the needle itself. It's a non-clocked light press fit that comes off easily:
Switched ignition on to "prime" it, pressed it back in with the pointer just below the zero limiting post, then lifted it back over the post. Terrible pic but it was getting pretty late and I wanted to be done with it.
A quick test drive with GPS showed that I was still 5mph too high, but good enough for now. I'll probably adjust it again when I go back in to customize the gauge faces way down the road.
I don't remember which online article i followed but I took a power supply out of an old Dell 1U server and desoldered all the non 12V leads. Also got rid of the large ATX 24-pin cable that led to the motherboard and just left a good 4-5 12V leads and crimped on some 3M spade terminals
Guy at the smog shop complimented me on my handiwork... for installing a stock heat shield on a non-stock header haha
(for those not following the previous posts - I got the stock header only to realize it didn't fit my aftermarket downpipe)
Needless to say I didn't pass the visual part of the inspection... did good on the actual tailpipe emissions though. Thought it was worth a shot since two week vacation begins today so I can't do anything about it for a while... but I'll get this done and dusted (the right way) by early July. Then it's off with the C-pillar!
Though I foresee another obstacle - I think my B-pipe is aftermarket too and I'm not sure it's the right length for a base lude, yet seems too long for a Type SH. So I might have to fit check and alter the bends in the B-pipe so that it can reach the cat flange.
Couldn't you find a complete stock exhaust either from a prelude forum or a junkyard?
Put it down to my noobness when I started this 'restoration' - initially I thought I just needed a new cat, so buying just that seemed like the right move. Then I found out about the header and bought that... then I found out about the downpipe. That said, even though I've been trawling craigslist and eBay for various parts since getting the car, I remember only seeing a single post where the entire OEM exhaust system was being offered, and even that was way out beyond east bay. I know of two Honda-specific junkyards in the bay area, one of which has no prelude parts, and the other only had the header (that I bought) but no downpipe. No time to sort through the randomness of all-makes junkyards and pick and pulls.
Probably should have looked harder on the prelude-specific forums, but a quick look a couple days back turned up nothing on preludepower and preludeonline. The frontrunner right now is a downpipe on eBay in Iowa, which I'll probably press the button on toward the end of my vacation. Just want to get the smog over with and start the real mods in July.
After 3 weeks of sweat, blood and tears, I finally have my CA smog cert. Here's a quick recap and after-action review:
Diagnostic Trouble Codes:
1. P0135 and P0141 - O2 sensors. Replaced with 2x Bosch sensors (~$60) as selected on RockAuto. Some warned that they wouldn't place nice with the ECU, but so far so good.
2. P0500 - VSS. Replaced with a generic VSS ($10). Also needed to physically reset the speedo needle, but that was a separate issue.
3. P1491 (pending) - EGR valve. Cleaned out the valve and it hasn't returned since.
4. P1459 - Evap Purge Flow Switch. Was randomly coming back, but seems like if I periodically manually vent the gas cap, it doesn't surface. Will eventually replace when the right car comes to the scrapyard - it appears the '97s have different hardware in this regard so it's hard to find. The 4th gen part possibly works.
5. P0325 - Knock Sensor. Randomly comes back but stayed off long enough to smog. Will replace when the occasion arises to remove my intake manifold.
Besides the DTCs:
1. Gutted cat welded directly to B-pipe. Bought a new cat ($260 + $10 in gaskets), cut off the old one and sanded the mating interface before bolting on.
2. Aftermarket header and downpipe. Bought a scrapyard stock header ($60 - ouch), eBay stock downpipe ($99 - ouch!!) and new gaskets ($6), bolted on.
3. Aftermarket short ram intake. Bought an eBay stock intake tube ($57 shipped - ouch) and filter ($10), installed the stock airbox that I still had.
All in it was nearly $600 (in parts only) to fix a $1100 car for CA smog. If I had taken my time and had more experience I could probably have done it for around $900+$400... but well, live and learn.
The non-essentials:
1. New battery and alternator ($260 total). Battery had less than half its life left; I thought the alternator was the source of electrical issues but it turned out to be the fuse. But probably not a bad idea to change it.
2. Heater blower ($37). Was completely missing.
3. Driver's side visor + rear view mirror ($20). Also missing.
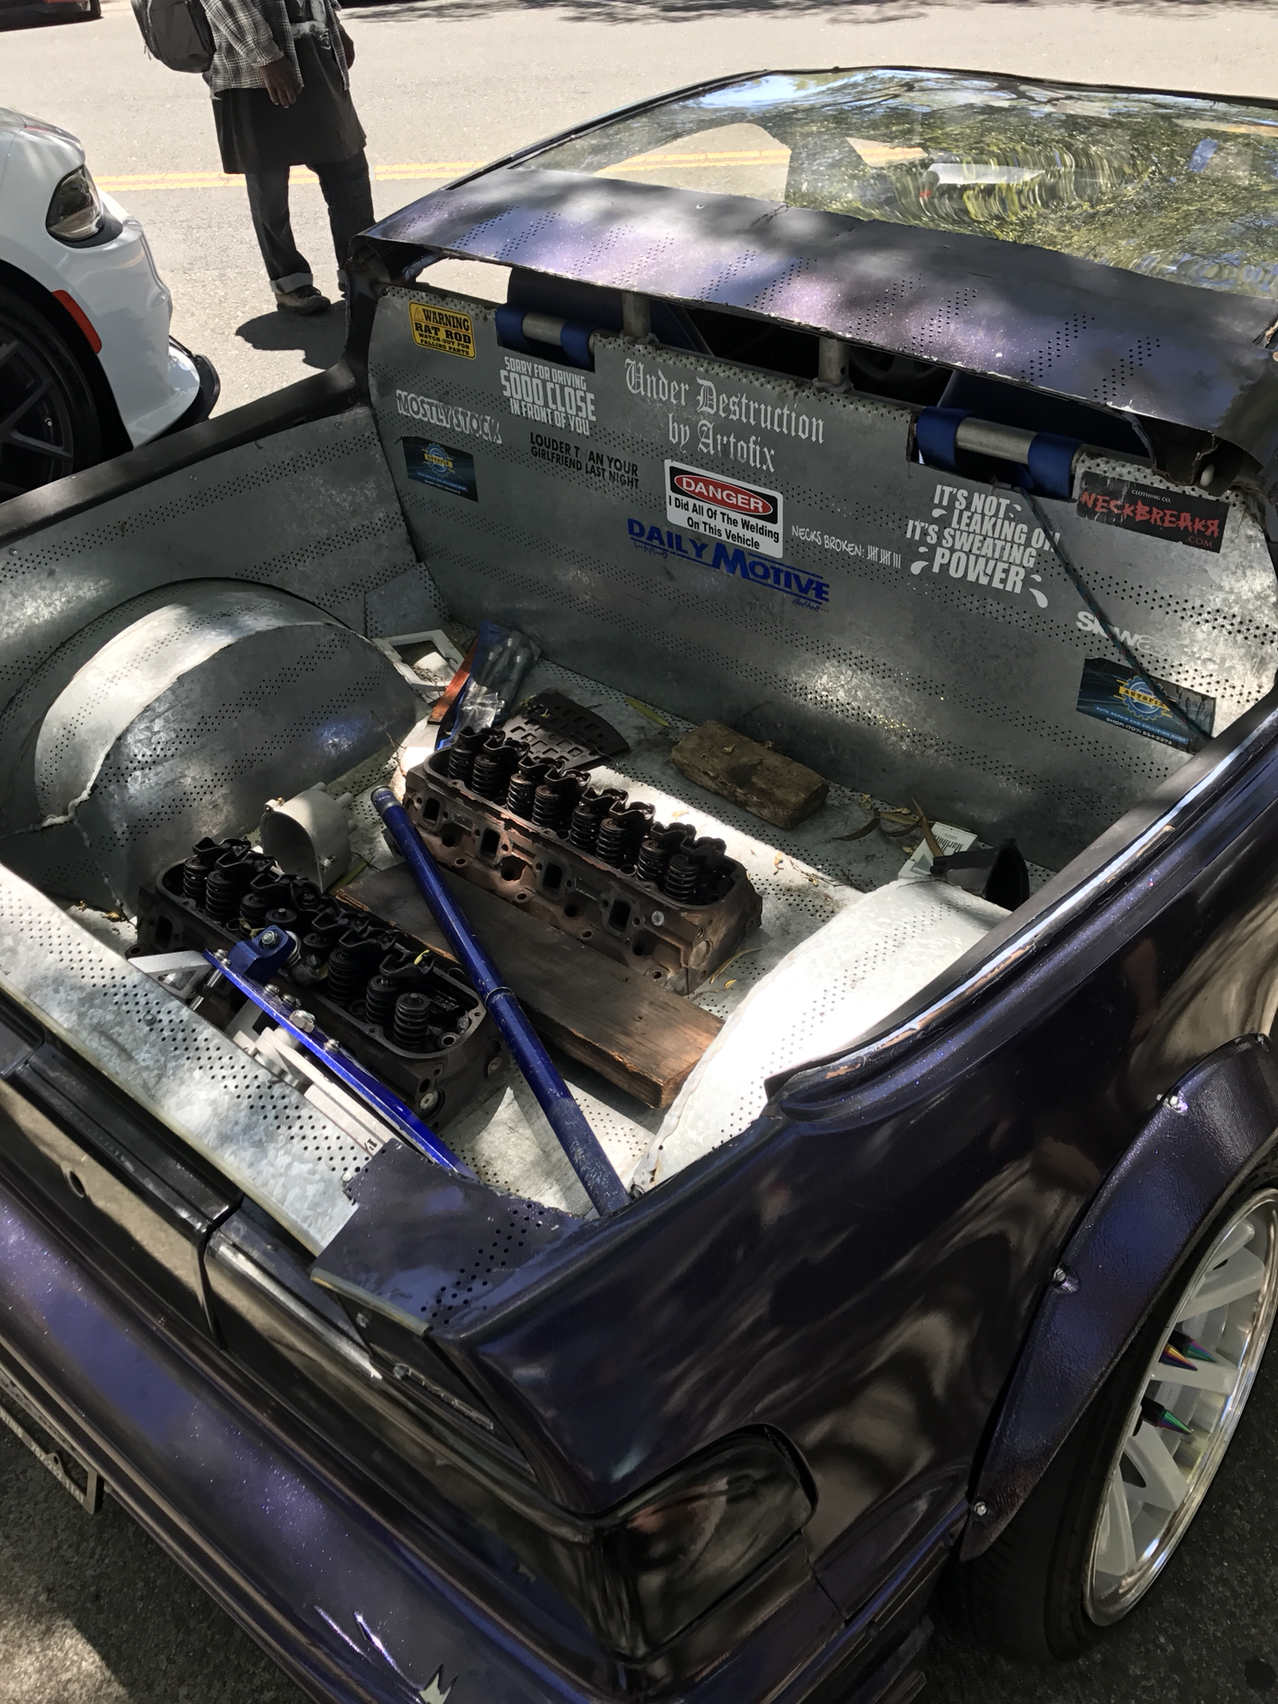
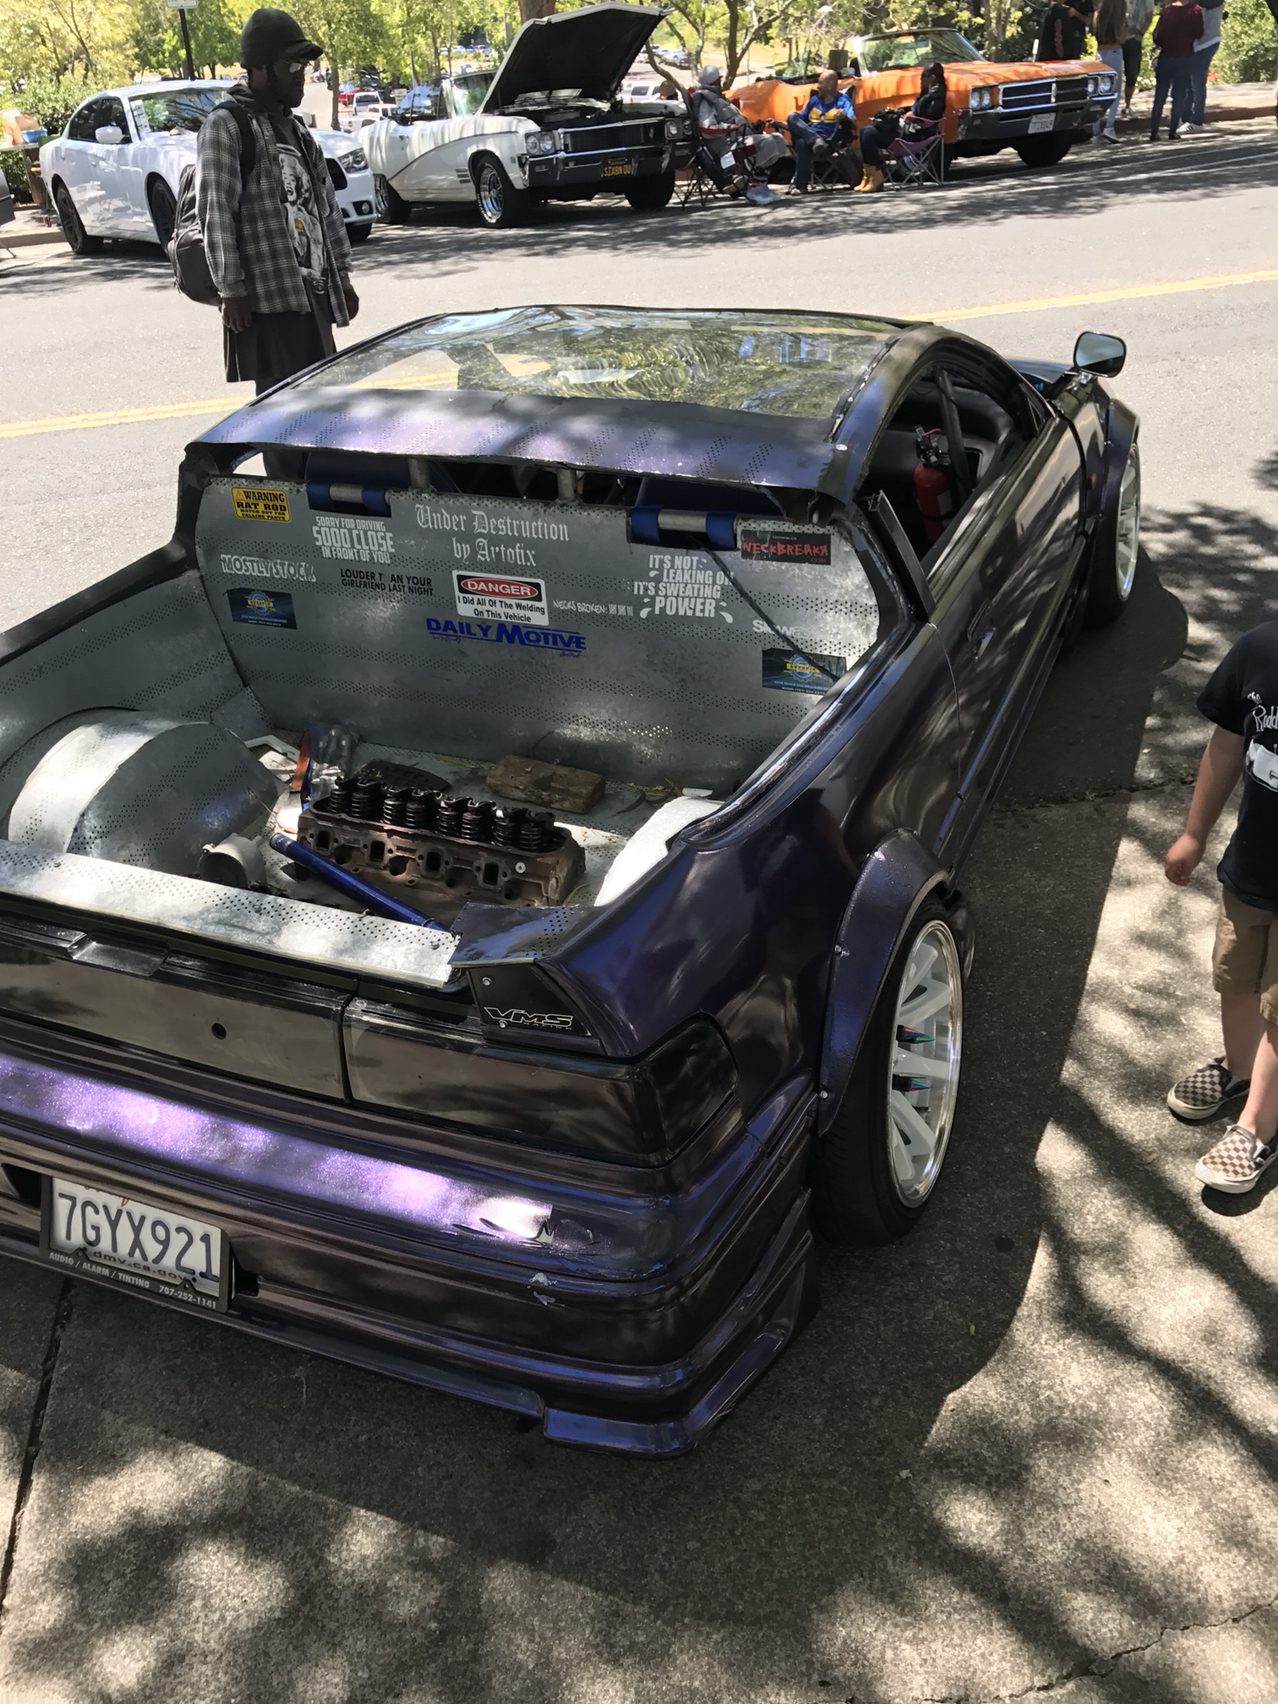
Project Prelute officially starts tomorrow, aiming to remove the rear interior and cut out the rear window + parcel shelf to assess how to proceed next.
I'll eventually be posting under deviant_customs on youtube... stay tuned.
Be sure to measure with the seat in the furthest back position. When my dad made his '53 Ford 4 door into a caruck he measured with the seat forward. Big oooppps.
Rear interior has been stripped!
Was easier than I thought, Honda did their design for assembly right. Found out that I'll probably lose my sunroof in the conversion process because the mechanisms all live in the roof behind the sunroof *duh* also the new rear bulkhead will be constrained by the front seatbelt, so I'll end up with a 4-ft bed. No big surprises though.
And then I had me a laser dance party:
Figured using a laser level to mark out the rear bulkhead would keep it as planar as possible - a well aligned planar tube frame would make it easier to tack on a piece of sheet metal to form the exterior wall.
Plan for this weekend is to fabricate the lower bulkhead internal bracing. Thought I should brace the structure internally before cutting the C-pillars to minimize the chance of warping the body... otherwise an uneven shop floor could result in a twisted car!
Considered it briefly after reading about it, but given the limited time I have to get the structure finished (this month while the family is away) I punted it.
Pulled many hours this weekend (probably around 24h over 2.5 days) including learning how to weld again after a 4-year hiatus:
The strategy behind welding to plates that bolt into the body, instead of directly to the body - in case something happens to the car, it presents the possibility of reusing the cage with partial deconstruction. Also welding dissimilar thicknesses is challenging particularly when you don't know exactly how thick one of them is.
Lower bulkhead brace 50% done. Need to join up the top and bottom crossbars before cutting the roof and parcel shelf off, which will give me more room to finish up the shock tower areas and the upper bulkhead area. Next weekend!


 good luck!


 I gotta stop making bad assumptions in my haste to get her fixed and smogged.