Teach a Technique...
 06-11-2008, 10:59 PM
#1
now with four rings
Thread Starter
Join Date: May 2006
Location: Bixby, OK
Age: 42
Posts: 1,745
Likes: 0
Received 0 Likes
on
0 Posts
Teach a Technique...
with all the great photographers (and many aspiring) on here, why not post a technique or explanation of a picture you took so others can learn a thing or two...i'm sure we're all up for learning something new and though there are threads with pictures and a detail or two, i figured why not keep them together in one thread for easier finding...
if you like the idea then please post something...it can be about lighting, getting the right angle, composition...whatever! besides the how-to, maybe give a few details about the lens used and whatnot...i'll start things off with one of the most basic things about a camera: aperture...
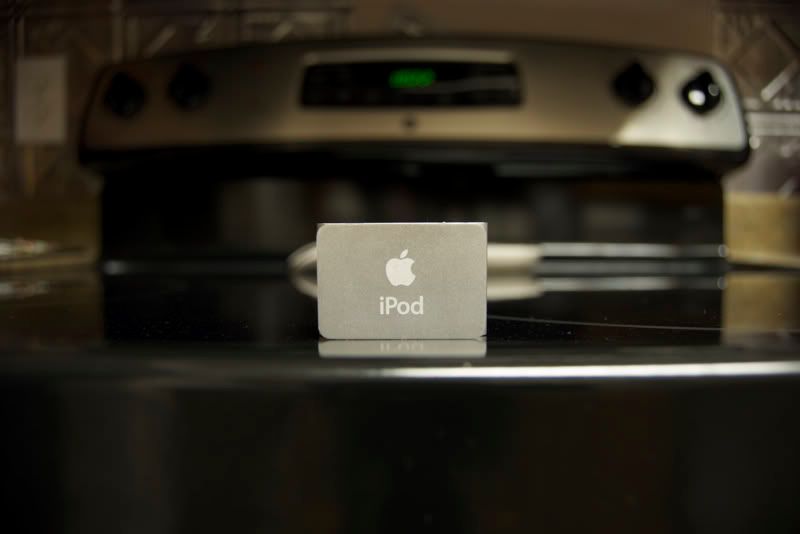
camera: nikon d80, focal length: 18mm, f-stop: 3.5, exposure time: 2.2 seconds
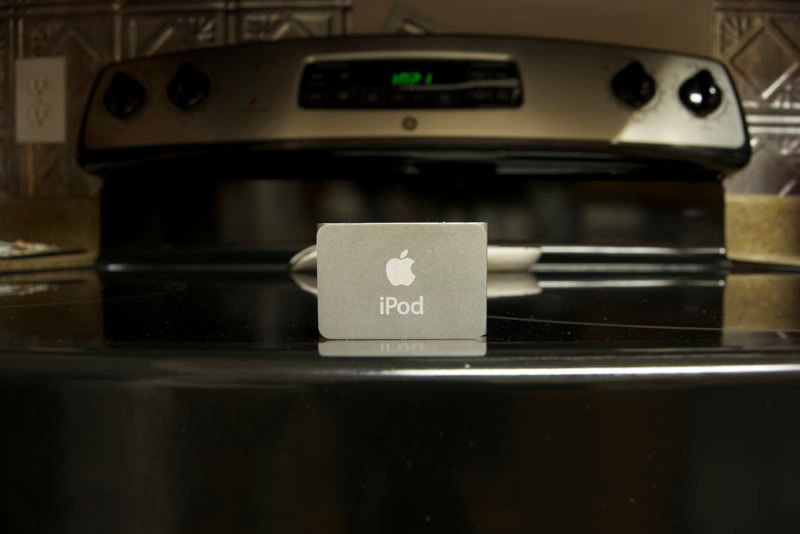
camera: nikon d80, focal length: 18mm, f-stop: 8, exposure time: 10 seconds
camera: nikon d80, focal length: 18mm, f-stop: 16, exposure time: 30 seconds
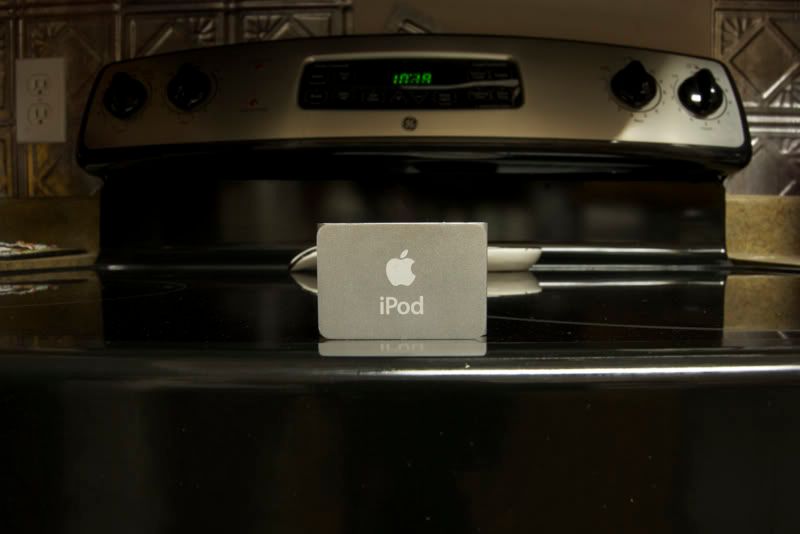
as you can see above, the higher the f-number (smaller aperture), the more objects come into focus...so vice-versa, the lower the f-number (larger aperture), the less objects are in focus...
with higher f-stops come longer exposures (because there are more objects in focus)...your exposure time will vary depending on your lighting, but will always be greater than a lower f-stop...this is why lenses with a 1.4, 1.8 and 2.8 f-stop can shoot so fast in just about any type of light - they don't need to focus on as many objects...
recap: higher f-stops, more objects in focus...lower f-stops, less objects in focus...lower f-stops shoot faster than higher f-stops
for those who had some confusion about aperture, i hope you found this useful...now keep the posts coming...
if you like the idea then please post something...it can be about lighting, getting the right angle, composition...whatever! besides the how-to, maybe give a few details about the lens used and whatnot...i'll start things off with one of the most basic things about a camera: aperture...
aperture is what controls how much light is let in through the lens, allowing it to hit the camera's image sensor. think of the aperture like an iris in your eye -- the smaller the opening, the less light will be let in.
camera: nikon d80, focal length: 18mm, f-stop: 8, exposure time: 10 seconds
camera: nikon d80, focal length: 18mm, f-stop: 16, exposure time: 30 seconds
as you can see above, the higher the f-number (smaller aperture), the more objects come into focus...so vice-versa, the lower the f-number (larger aperture), the less objects are in focus...
with higher f-stops come longer exposures (because there are more objects in focus)...your exposure time will vary depending on your lighting, but will always be greater than a lower f-stop...this is why lenses with a 1.4, 1.8 and 2.8 f-stop can shoot so fast in just about any type of light - they don't need to focus on as many objects...
recap: higher f-stops, more objects in focus...lower f-stops, less objects in focus...lower f-stops shoot faster than higher f-stops
for those who had some confusion about aperture, i hope you found this useful...now keep the posts coming...
 06-13-2008, 07:10 AM
#4
Racer
Join Date: Apr 2007
Location: Hoffman Estates, IL
Age: 50
Posts: 278
Likes: 0
Received 1 Like
on
1 Post
I'd like to just add to what Rimz said.
The primary usage for aperture is to control DOF (depth of field) by adjusting how wide open (lower f/stop) or closed/stopped down (higher f/stop) the lens is.
Open / Lower = Smaller f/stop number = DOF is narrow/shallow so focus is more concentrated
Close / Stopped down = Larger f/stop number = DOF is wide or everything is more in focus
The side effect of adjusting the aperture is the exposure changes due to the change of the amount of light coming through the lens. The smaller f/stop number allows more light to come through the lens.
I hope I've confused more people.
06-13-2008, 07:35 AM
#5
now with four rings
Thread Starter
Join Date: May 2006
Location: Bixby, OK
Age: 42
Posts: 1,745
Likes: 0
Received 0 Likes
on
0 Posts
thanks for the additional info, Conrad...
i was typing off the top of my head...and it was late...so i knew i would leave out some good stuff...
looking forward to other's teaching us something...
i was typing off the top of my head...and it was late...so i knew i would leave out some good stuff...
looking forward to other's teaching us something...
06-13-2008, 02:40 PM
#7
I have Lucy tied up in
Join Date: Jan 2006
Location: Chicago, Illinois
Age: 43
Posts: 495
Likes: 0
Received 0 Likes
on
0 Posts
I was also under the impression that many times the more stopped down the lense is the sharper the pictures it produces... 
Last edited by MisterLinus; 06-13-2008 at 02:43 PM.
Trending Topics
06-13-2008, 03:37 PM
#8
Senior Moderator
Join Date: Jul 2002
Location: Bay Area, CA
Age: 39
Posts: 12,005
Likes: 0
Received 9 Likes
on
8 Posts
Originally Posted by MisterLinus
I was also under the impression that many times the more stopped down the lense is the sharper the pictures it produces...
06-13-2008, 03:41 PM
#9
Senior Moderator
I posted this in another thread but in case you missed it, this is my technique for panning freeze shots. This could be used for motorsports, or any other situation that involves a moving object on a horizontal plane.
Some of this may be obvious, I'm gonna write it all just to be clear. And, this is from my experience, you may choose to do certain things differently, based on preference. Or, some of it may be the wrong way to do it - this is just what gets me the results I want. Ultimately, "your mileage may vary". You have to actually try it yourself to find out what works best for you.
1. Switch to manual mode.
2. Set "burst" shutter release mode - this is what lets your camera take multiple pictures when you keep the button held down. You want to hold the camera as steady as possible as the car is driving by - and if you have to keep pressing the shutter, that's not going to help.
3. Set your AF to an "adaptive" mode. You want the mode that doesn't lock the AF once it has focused on the subject - you want the mode where the AF continually focuses while the subject is in view. This is because when you are panning for these shots, the distance of the subject is going to vary. If you have AF on lock, you would get one or two sharp shots and the rest would be soft/blurry. On Canon this is called "AI Servo" mode. On the D70 (and probably other Nikons) it's called "Closest Subject" AF-Area mode.
4. Set aperture to f/20-30 or so. This lets you leave the shutter open for longer while you are panning, and that's what makes the blurred background and sense of speed. If you use a smaller aperture you would have to use a faster shutter speed and that would freeze the background as well as the details of the car. This ties in with the next:
4. Set shutter speed depending on lighting conditions. It's a balance you have to find by playing with it and zooming in on the captured pic to see what the details look like (what a luxury). It depends on lighting conditions so there is no set value to use. For most of my shots I was between 180-250 or so. It also depends on how fast the cars are going.
5. Stand at a good location that gives you room to move around while at the same time allows you to stay balanced well. You are going to be rotating your body, possibly very quickly. This is obviously going to depend on how close you are and how fast the cars are moving. A monopod would be very helpful but I've never used one for this before.
6. As the car(s) come by, stand with steady footing and pan the camera in a smooth horizontal motion, keeping the car as centered as you can (or however else you want it to look). Adjust zoom as needed thereof. Rotate your upper body, using your waist as a pivotpoint - this will help keep the shots as stable as possible.
Some more tips -
- don't stand where you have the potential to distract drivers. i.e. at the end of a straight (and going into a turn), and other tricky parts of the track. I guess you can do this if you really want to, I just choose not to, because I'd hate to have a driver wipeout and blame me for it. :P You should blend in with the environment as best as you can and be as inconspicuous as you can.
The midpoint of a straightaway is a great place to position yourself - the cars are going fast so you get a great sense of speed, and they are going straight so there is not much thought involved - they may even look over for a glance or give you some hand signal for effect.
- don't stand where you may be putting your well-being at risk - this is obvious, but sometimes you really have to think about where you are standing, you may not realize its a precarious spot until its too late. Accidents aren't common but that's why they're called accidents.
06-13-2008, 03:46 PM
#10
Needs more Lemon Pledge
Timely request for a how to:
Fireworks??
Fireworks??
06-13-2008, 06:48 PM
#11
now with four rings
Thread Starter
Join Date: May 2006
Location: Bixby, OK
Age: 42
Posts: 1,745
Likes: 0
Received 0 Likes
on
0 Posts
awesome panning tutorial srika!
2 things i haven't done that you pointed out were switching to manual mode and stopping down my aperture (i kept shooting in Program mode)...
i haven't had too many panning opportunities, but the hardest thing for me is keeping my lens pointed at the moving object while the shutter is open...since i can't see through the viewfinder during that time, it's kinda tricky...
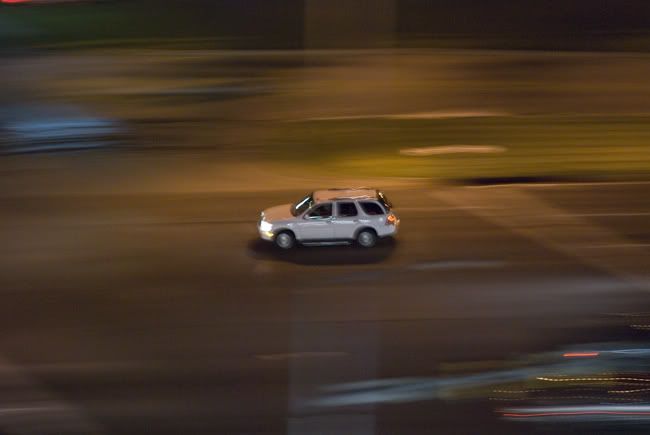
here's three shots i took as my first panning experiment....at night nonetheless...these were taken 12 stories up from our hotel balcony...
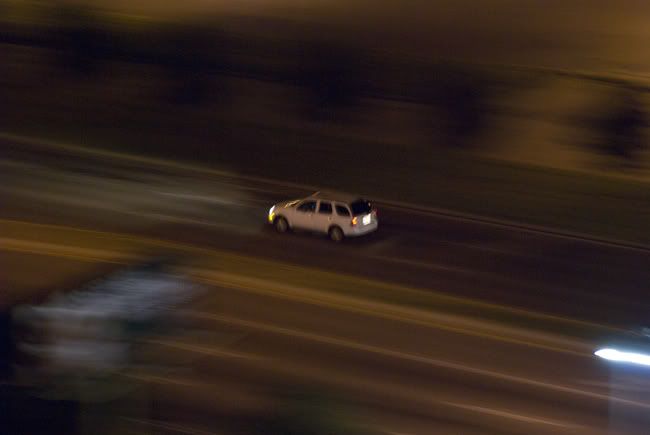
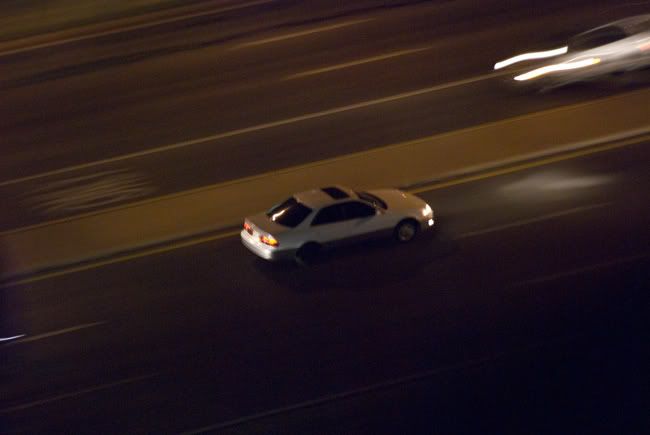
FYI: the Nikon D80 'adaptive' mode is called Auto Focus Continuous (AF-C)...and the Auto Focus Area can be changed from Normal to Wide...maybe i'll try that next time...
stogie...i agree, definitely need a fireworks tutorial...i have a general idea on what to do, but could use a lot more input from experiences...
2 things i haven't done that you pointed out were switching to manual mode and stopping down my aperture (i kept shooting in Program mode)...
i haven't had too many panning opportunities, but the hardest thing for me is keeping my lens pointed at the moving object while the shutter is open...since i can't see through the viewfinder during that time, it's kinda tricky...
here's three shots i took as my first panning experiment....at night nonetheless...these were taken 12 stories up from our hotel balcony...
FYI: the Nikon D80 'adaptive' mode is called Auto Focus Continuous (AF-C)...and the Auto Focus Area can be changed from Normal to Wide...maybe i'll try that next time...
stogie...i agree, definitely need a fireworks tutorial...i have a general idea on what to do, but could use a lot more input from experiences...
06-13-2008, 09:58 PM
#12
Moderator Alumnus

I think perhaps a more effective tool is to have people ask questions.
We can start threads based on certain topics to discuss.
For example, I'm a total flash retard, and I'd be interested in some flash basics.
Like, for example, why is this flash time so long: http://lishutterbug.com/08-05-04-chu...G_6239-md.html
The room isn't THAT big. I have the freakin EX580, and it's ISO 1600 for crying out loud.
- Frank
Either questions of: how do I avoid XXXXXX
06-13-2008, 10:31 PM
#13
Needs more Lemon Pledge
Chod, Did you notice bottom right in this pick is the Asian version of the hot chick with D-Bag dude? Wow.
http://lishutterbug.com/08-05-04-chu...G_6242-md.html
http://lishutterbug.com/08-05-04-chu...G_6242-md.html
06-13-2008, 10:42 PM
#14
Drifting
Fireworks... by themselves mostly, I have never done it with the background lit from the fireworks.
I think a tripod is a must, I have balanced on walls and guard rails before but being able to aim the camera and leave it in a fixed spot is awfully nice.
I use a wired remote but long exposures work too. I think it's easier to get ready for a oncoming volley when you can stop the last picture you were taking immediately and start a new exposure. Rather then waiting for the timer to run down. Also you can choose how many explosions go in the frame.
I wait for the fireworks to start so I can see where they are aiming them, then spend a couple minutes framing till I have it where I think multiple explosions will show up.
Right at the end of a volley I start the exposure. Unless the city has allot of lights, or there are allot of clouds in the sky the shutter speed shouldn't matter too much. I wait for 3 or 4 explosions to go off, then close the shutter.
The aperture I usually end up having set at 5.6 or so, but it depends on how far I am away from them, and how big they are. I adjust from the first two or three pictures to make sure I'm getting colors instead of a bunch of white streaks. During this time I also do my best to focus it if they are close enough for it to matter, also I stick the lens on manual focus and leave it there.
http://farm1.static.flickr.com/30/94...730a09a5_b.jpg
Lastly, just because you can't see the power lines against a pitch black sky doesn't mean they aren't there.
I would like to do the lighting up the ground bit though. Pictures of just the firework going off against the black sky all kind of en up looking the same. The composition of the ground and people viewing the show lit by the fireworks captures the place and feeling much better. Does anybody have input on that?
Last edited by Stapler; 06-13-2008 at 10:46 PM.
06-13-2008, 10:50 PM
#15
Racer
Join Date: Apr 2007
Location: Hoffman Estates, IL
Age: 50
Posts: 278
Likes: 0
Received 1 Like
on
1 Post
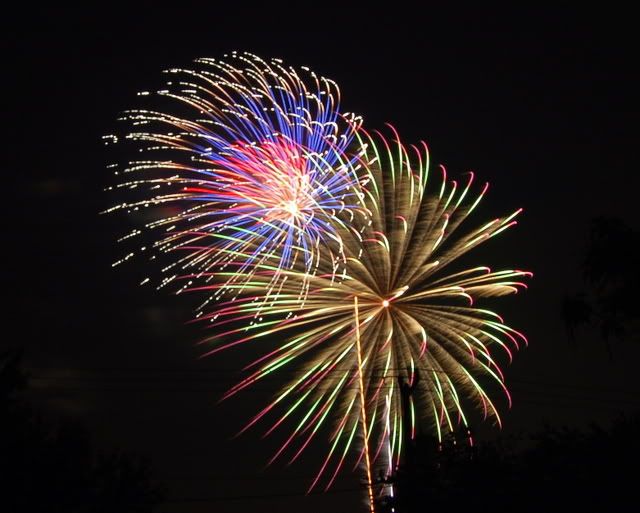
^ I totally agree with the last line. That's because I do that myself. You get a better perspective of the event.
<a href="http://www.flickr.com/photos/haycon/723315478/" title="DSC_8405 by haycon, on Flickr"><img src="http://farm2.static.flickr.com/1391/723315478_d833d48c5b_o.jpg" width="669" height="1000" alt="DSC_8405" /></a>
<a href="http://www.flickr.com/photos/haycon/723315478/" title="DSC_8405 by haycon, on Flickr"><img src="http://farm2.static.flickr.com/1391/723315478_d833d48c5b_o.jpg" width="669" height="1000" alt="DSC_8405" /></a>
06-13-2008, 11:05 PM
#16
The Third Ball
Join Date: Sep 2002
Location: Los Angeles, Ca
Age: 45
Posts: 49,265
Received 4,937 Likes
on
2,627 Posts
you dont need a tripod for fireworks...i cant find any of my examples....but you can also do some real cool effects with a longer shutter.
06-14-2008, 01:00 AM
#17
now with four rings
Thread Starter
Join Date: May 2006
Location: Bixby, OK
Age: 42
Posts: 1,745
Likes: 0
Received 0 Likes
on
0 Posts
awesome picture conrad...
that's the stuff i'm looking for!
Chod, i to am a flash retard and have reading up religiously on flash everything....still could use some help, though...
that's the stuff i'm looking for!
Chod, i to am a flash retard and have reading up religiously on flash everything....still could use some help, though...
06-14-2008, 12:26 PM
#19
Have camera, will travel
Join Date: Jan 2004
Location: Federal Way, WA
Age: 62
Posts: 7,783
Likes: 0
Received 0 Likes
on
0 Posts
Shooting fireworks is actually pretty easy. The one thing I like to do is include some foreground elements to give a greater sense of the scene and of scale. Mostly it involves some trial and error, but it's pretty hard to muck it up. Here's an online tutorial:
http://digital-photography-school.co...aph-fireworks/
http://digital-photography-school.co...aph-fireworks/
06-14-2008, 12:37 PM
#20
Needs more Lemon Pledge
^ nice link! Thanks.
06-16-2008, 08:58 AM
#21
Here's a few I did from last year. Go full manual mode, aperture set to f10 and shutter set to bulb so I can fully control opening and closing, and focus set to infinity. Don't forget to turn auto focus off!
Also, the focus ring on my 18-55 lens is very loose so once it's set to infinity I put a small piece of tape there to hold it. Otherwise the action from the shutter and mirror can vibrate it out of place.
I used a tripod and IR remote, which works well (Nikon) with the bulb setting. Pressing it opens the shutter, pressing it again closes it. (Don't get the sequence out of whack!) If you just set a long exposure you may get too many elements to the shot, like another burst beginning just as a long trail from the previous one ends.
And yeah, power lines do show up. Sucks.
06-19-2008, 02:44 PM
#22
Senior Moderator
Originally Posted by ChodTheWacko
I think perhaps a more effective tool is to have people ask questions.
We can start threads based on certain topics to discuss.
For example, I'm a total flash retard, and I'd be interested in some flash basics.
Like, for example, why is this flash time so long: http://lishutterbug.com/08-05-04-chu...G_6239-md.html
The room isn't THAT big. I have the freakin EX580, and it's ISO 1600 for crying out loud.
- Frank
Either questions of: how do I avoid XXXXXX
We can start threads based on certain topics to discuss.
For example, I'm a total flash retard, and I'd be interested in some flash basics.
Like, for example, why is this flash time so long: http://lishutterbug.com/08-05-04-chu...G_6239-md.html
The room isn't THAT big. I have the freakin EX580, and it's ISO 1600 for crying out loud.
- Frank
Either questions of: how do I avoid XXXXXX
I have a question for you, just to be clear - what mode are you using? [strikethrough]I am guessing shutter-priority?[/strikethrough]
edit: sorry, I meant aperture priority.
06-20-2008, 12:43 PM
#23
Senior Moderator
@ Chod:

06-29-2008, 09:05 PM
#25
Needs more Lemon Pledge
OK, once again I come to the fountain of knowledge.
Any tips or suggestions for photographing inclement weather?
Arizona is fast approaching storm season, and I would love to try to capture some of the intense storms as they approach.
Storms rolling in, dark and ominous skies, etc... What is the best way to meter for these situations? How does one do an HDR of moving clouds? Any other tips or suggestions?
06-30-2008, 10:50 AM
#26
Originally Posted by stogie1020
OK, once again I come to the fountain of knowledge.
Any tips or suggestions for photographing inclement weather?
Arizona is fast approaching storm season, and I would love to try to capture some of the intense storms as they approach.
Storms rolling in, dark and ominous skies, etc... What is the best way to meter for these situations? How does one do an HDR of moving clouds? Any other tips or suggestions?
Any tips or suggestions for photographing inclement weather?
Arizona is fast approaching storm season, and I would love to try to capture some of the intense storms as they approach.
Storms rolling in, dark and ominous skies, etc... What is the best way to meter for these situations? How does one do an HDR of moving clouds? Any other tips or suggestions?
To your HDR question, I know that with Photomatix you can generate an HDR image from a single RAW file. I have had mixed results with this (sometimes you get noise in very dark spots), but it can come out well sometimes. here is an example.
Also, it helps (generally) for clouds/sky when you have a polarizing filter
06-30-2008, 10:54 AM
#27
Originally Posted by stogie1020
OK, once again I come to the fountain of knowledge.
Any tips or suggestions for photographing inclement weather?
Arizona is fast approaching storm season, and I would love to try to capture some of the intense storms as they approach.
Storms rolling in, dark and ominous skies, etc... What is the best way to meter for these situations? How does one do an HDR of moving clouds? Any other tips or suggestions?
Any tips or suggestions for photographing inclement weather?
Arizona is fast approaching storm season, and I would love to try to capture some of the intense storms as they approach.
Storms rolling in, dark and ominous skies, etc... What is the best way to meter for these situations? How does one do an HDR of moving clouds? Any other tips or suggestions?
Most of the time there not moving too fast. Just put on a tripod shoot two down and two up after normal exposure, maybe one up and down as well, if time allows. Also if you have Lightroom you can adjust images before you use photomatrix or Dynamic Photo HDR.
06-30-2008, 09:29 PM
#28
now with four rings
Thread Starter
Join Date: May 2006
Location: Bixby, OK
Age: 42
Posts: 1,745
Likes: 0
Received 0 Likes
on
0 Posts
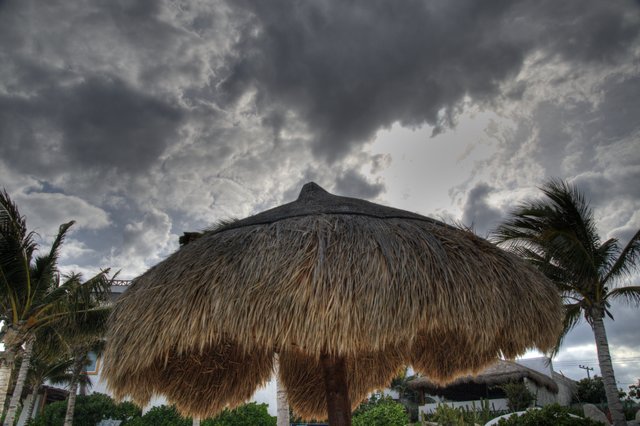
and FYI, you can turn most clouds into stormy looking...this was taken on an overcast day with the sun peeping through at times...

i don't know how 'stormy' those look to you, but you get the idea...it's a mixture of photomatix and photoshop with two different layers from a single RAW file...
i look forward to your storm pics as i have been wanting to take some of my own...
i don't know how 'stormy' those look to you, but you get the idea...it's a mixture of photomatix and photoshop with two different layers from a single RAW file...
i look forward to your storm pics as i have been wanting to take some of my own...
07-02-2008, 10:36 PM
#29
Big Block go VROOOM!
Hi my name is Bill, I suck at making screencasts, and I sound like a dork.
Well here's the first video. I'm still learning the screencasting software I'm using so hopefully I'll be able to better hit an adequate volume level and shrink the file size some in the future.
It's about 13 minutes long and in H.264 Quicktime format. At 45 MB it's not exactly tiny, but it should be setup to stream so don't bother to download it. Just click on the link.
A walkthrough of the adjustments I made in Photoshop on a specific image.
http://homepage.mac.com/billiam30/.P...alkthrough.mov
07-02-2008, 11:36 PM
#31
Earth-bound misfit
 Very nice, Billiam! Thanks!
07-03-2008, 12:50 AM
Very nice, Billiam! Thanks!
07-03-2008, 12:50 AM
#32
Senior Moderator
whoa B thanks!
07-03-2008, 09:20 AM
#33
Originally Posted by wndrlst
Very nice, Billiam! Thanks!
09-25-2008, 11:36 PM
#34
Big Block go VROOOM!
Alright, the talk about instruction got me going so I made another tutorial. This one is actually about graphics and doesn't have much of anything to do with photography. You could use it to make decorations for your image gallery or slide shows though so that's the excuse I'm sticking with.
As before, this is an H.264 Quicktime movie. It's about 22 minutes long and pretty big file but it should be setup to stream so the download shouldn't seem that bad.
http://homepage.mac.com/billiam30/.P...t-tutorial.mov
As before, this is an H.264 Quicktime movie. It's about 22 minutes long and pretty big file but it should be setup to stream so the download shouldn't seem that bad.
http://homepage.mac.com/billiam30/.P...t-tutorial.mov
09-25-2008, 11:47 PM
#35
Safety Car
I think perhaps a more effective tool is to have people ask questions.
We can start threads based on certain topics to discuss.
For example, I'm a total flash retard, and I'd be interested in some flash basics.
Like, for example, why is this flash time so long: http://lishutterbug.com/08-05-04-chu...G_6239-md.html
The room isn't THAT big. I have the freakin EX580, and it's ISO 1600 for crying out loud.
- Frank
Either questions of: how do I avoid XXXXXX
We can start threads based on certain topics to discuss.
For example, I'm a total flash retard, and I'd be interested in some flash basics.
Like, for example, why is this flash time so long: http://lishutterbug.com/08-05-04-chu...G_6239-md.html
The room isn't THAT big. I have the freakin EX580, and it's ISO 1600 for crying out loud.
- Frank
Either questions of: how do I avoid XXXXXX
If you mean why is the shutter speed so slow (1/13), that is because the camera was metering for available light. Normally, flash is so fast that subjects lit entirely by flash are sharp despite a long shutter.
In this situation, the room was well lit enough that the subjects were lit at 1/13. So the flash froze the action, but camera shake blurred the subjects for the rest of the duration.
No reason to crank up ISO to 1600 if you're using a flash, unless you are trying to extend the reach of your flash. Set your camera to manual and get a combination of settings that will let in some ambient lighting. Then, let the flash do the work since you have TTL.
09-26-2008, 10:15 AM
#36
Moderator Alumnus
1) slight camera shake at 1/13s (due to focal length)
2) If I lower ISO, then shutter starts increasing exponentially.
At ISO 100, shutter was probably a completely unholdable 1 second
And that's with flash on.
What I would like, with flash on, is a short handholdable shutter speed,
that is exposed reasonably. Basically what you'd get from any point and
shoot. For some reason, I'm doing something stupid and not getting it.

I usually shoot in Aperture priority. So the technique is to go full manual
and crank down the shutter speed? Is that how you shoot you flash
pictures in the clubs, srika?
- Frank
09-26-2008, 12:13 PM
#37
Drifting
"Cotton Candy" Water


It's super easy and people love the way it looks.
There's not much to it, but it's highly recommended that you get some ND (neutral density) filters to make it easier and get better results. ND's will take out a certain amount of stops, how much light is coming into the camera, so you can use a longer shutter. In those two I had didn't have any on hand, so they didn't come out as well.
All you have to do is set the camera in Manual, put it on a tripod, get a good composition, put the f stop at something reasonable (try to stay away from the smallest or largest apertures, it will compromise image sharpness), slap on your ND's and play around with some long shutter speeds to get the look you want and the correct exposure.
If you don't have any ND's, you'll have to do what I did. All the same steps as above, except I shot in the shade, with 100ISO, and had the camera set at f/22. I used my remote to trigger the shutter with less chance of vibration.
Last edited by zguy95135; 09-26-2008 at 12:16 PM.
09-26-2008, 01:47 PM
#38
Safety Car
Note the contradiction there
1) slight camera shake at 1/13s (due to focal length)
2) If I lower ISO, then shutter starts increasing exponentially.
At ISO 100, shutter was probably a completely unholdable 1 second
And that's with flash on.
What I would like, with flash on, is a short handholdable shutter speed,
that is exposed reasonably. Basically what you'd get from any point and
shoot. For some reason, I'm doing something stupid and not getting it.
I usually shoot in Aperture priority. So the technique is to go full manual
and crank down the shutter speed? Is that how you shoot you flash
pictures in the clubs, srika?
- Frank
Exposure for flash photography is different from exposure for a normal picture. Let's walk through what is going on with your current technique:
Aperture priority: The camera is going to expose for the settings. A very dark room means it will have to open the shutter longer to let in more light (this is basic exposure principals). So you are getting blur.
The camera then fires the flash, using TTL metering to cut off the flash output when the picture is exposed. But it's already been well exposed from the AV settings. So the flash is not the primary lighting in this picture.
This is how you correctly expose for flash photography in a dark situation:
You meter for the ambient lighting and get a compromise setting. This is so that when the flash fires, your few subjects closest to the flash are not just standing there in a dark cave. But you are not metering so that the entire photo is exposed by ambient lighting.
The flash becomes the primary light source and a little bit of ambiance bleeds in to color the rest of the photo. You fine tune the flash based on flash exposure compensation, letting TTL do the heavy lifting of determining flash output. You have to be in manual to lock down the camera's settings.
Incidentally, if you were in ISO 100, you probably would not have gotten any camera shake, even with 1/13 shutter.
This is because the flash would have froze the motion, and there would not have been enough ambient lighting to clearly light the subjects.
09-26-2008, 04:21 PM
#39
Moderator Alumnus
No contradiction.
Exposure for flash photography is different from exposure for a normal picture. Let's walk through what is going on with your current technique:
Aperture priority: The camera is going to expose for the settings. A very dark room means it will have to open the shutter longer to let in more light (this is basic exposure principals). So you are getting blur.
The camera then fires the flash, using TTL metering to cut off the flash output when the picture is exposed. But it's already been well exposed from the AV settings. So the flash is not the primary lighting in this picture.
This is how you correctly expose for flash photography in a dark situation:
You meter for the ambient lighting and get a compromise setting. This is so that when the flash fires, your few subjects closest to the flash are not just standing there in a dark cave. But you are not metering so that the entire photo is exposed by ambient lighting.
The flash becomes the primary light source and a little bit of ambiance bleeds in to color the rest of the photo. You fine tune the flash based on flash exposure compensation, letting TTL do the heavy lifting of determining flash output. You have to be in manual to lock down the camera's settings.
Incidentally, if you were in ISO 100, you probably would not have gotten any camera shake, even with 1/13 shutter.
This is because the flash would have froze the motion, and there would not have been enough ambient lighting to clearly light the subjects.
Thanks!
- Frank