
***Acurazine Photo Contest #31: Life After People***


 07-08-2009 | 01:09 PM
#47
nnInn
Joined: Mar 2006
Posts: 37,670
Likes: 1,084
-While post processing in Photoshop is allowed, adding or removing parts of the picture is not. In the event a photo is suspected to be "photo-chopped," the contestant will be asked to provide the original picture.
07-08-2009 | 01:30 PM
#48
CL9 ABP
iTrader: (1)
Joined: Feb 2005
Posts: 4,528
Likes: 245
From: Commack, Long Island -> Queens NY
Coney Island Parachute jump
<a href="http://www.flickr.com/photos/lcrazyaznl/3702068636/" title="coney island tower-2 azine size by lcrazyaznl, on Flickr"><img src="http://farm4.static.flickr.com/3466/3702068636_2c151f1658_o.jpg" width="594" height="900" alt="coney island tower-2 azine size" /></a>
larger http://www.flickr.com/photos/lcrazyaznl/3702047536/
I think it fits in since this was once used and now is a landmark. Here is some background info. http://history.amusement-parks.com/parachute.htm
The Parachute Jump was bought by Edward Tilyou from the 1939 New York World's Fair. The ride was run at the Lifesavers exhibit and opened for the 1941 season. It stood 262 feet at its tallest point and had twelve chutes, each with a seat that held two passengers. Although tame by the standards of today's rides, the experience of sitting 250 feet in the air on a small seat was unnerving. Just step on the modern-day versions built by Intamin, A.G. at Six Flags over Georgia, Six Flags over Texas and Six Flags Great Adventure (New Jersey).
The Parachute Jump was declared a Landmark on July 10, 1977, so the wrecking ball cannot touch it. The tower, painted a deep red, is known by many as Brooklyn's Eiffel Tower. Be sure to stop by and take a gander while strolling down the boardwalk.
The base of the parachute drop during 1999. It is an interesting combination of art deco and militarism. The ride was originally built to help train troops, but the creator had so many civilian requests to ride his prototype that he converted the idea to an amusement ride. Steeplechase Park was to the left of the tower. The Thunderbolt is barely visible to the right.
Young riders enjoy the thrills of the Parachute Jump during the 1950's.
07-10-2009 | 04:28 PM
#50
Oil Temperature taken at Henryton State Hospital
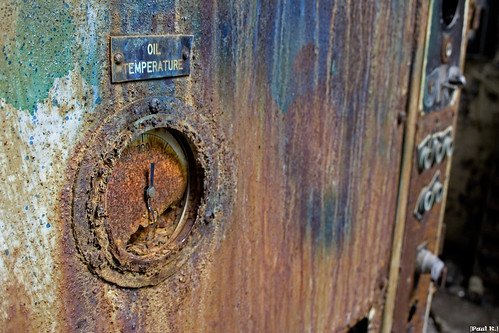
Larger:
http://farm4.static.flickr.com/3587/...7a01faf6_b.jpg
Larger:
http://farm4.static.flickr.com/3587/...7a01faf6_b.jpg

 07-19-2009 | 12:19 AM
#53
Needs more Lemon Pledge
Joined: Mar 2005
Posts: 52,768
Likes: 2,000
From: Phoenix, AZ
Ruins
<a href="http://www.flickr.com/photos/jefford_e/3731526280/" title="IMG_7872 by Jefford_E, on Flickr"><img src="http://farm3.static.flickr.com/2359/3731526280_66a614ae55_b.jpg" width="1024" height="683" alt="IMG_7872" /></a>
<a href="http://www.flickr.com/photos/jefford_e/3731526280/" title="IMG_7872 by Jefford_E, on Flickr"><img src="http://farm3.static.flickr.com/2359/3731526280_66a614ae55_b.jpg" width="1024" height="683" alt="IMG_7872" /></a>


 08-11-2009 | 09:31 AM
#65
Senior Moderator
Joined: Mar 2002
Posts: 59,060
Likes: 11,057
From: Chicago
saw this today, thought it was of note -
http://digital-photography-school.co...andoned-places
http://digital-photography-school.co...andoned-places
Abandoned buildings have become one of my favorite subjects to photograph. Over time, I have collected a handful of useful tips to get the most out of shooting in these environments.
Bring a Flashlight
The single most important tip I can provide anyone planning on visiting an abandoned building is to bring a flashlight. Most of these locations are without electricity and will have limited natural light. As such, you�ll need a flashlight to help navigate the dark rooms and corridors that you will encounter.
Beyond its more obvious application, a flashlight can also provide an interesting source of off-camera lighting. I have a small LED flashlight that I carry on my camera bag and it is often used to light up an area of a room during a long exposure shot. While a strobe can certainly be effective for many of these situations, a flashlight allows for a high degree of precision with the light. You can directly control exactly what is lit and for how long. A flashlight can also add an element of movement to the lighting that will result in an unusual combination of shadows that a flash otherwise may not.
It takes some practice to get a feel for how much light is enough, but with some work the results can be very satisfying.
 Stairwell by Chris Folsom
Tripod not Optional
Because of the aforementioned lighting conditions, it goes without saying that you will need a tripod. More than half of the photos I take at these locales are shot on a tripod with a long exposure of anywhere from a couple of seconds to as much as 20 or 30 seconds.
For those instances when I don�t have my camera on a tripod, image stabilization and fast lenses help as well. My favorite lens is a 17-50mm f/2.8 paired with my camera�s in-body stabilized sensor. Wide open, I can usually get a relatively sharp image at 1/10th of a second. More often than not though, the best results will come from shooting on a tripod.
Control the Exposure
I am not one who believes all serious photographers should shoot in manual 100% of the time. There are plenty of instances where I am confident that the camera will properly meter the lighting and autopilot mode is fine. Unfortunately, that tactic will not work in most abandoned buildings.
Because of the extreme lighting conditions of these spaces, you�ll need to control all aspects of the shot. In the photo shown here, for example, I needed to control the aperture (I wanted this fairly sharp from front to back) and I needed to control the shutter speed to ensure proper lighting. So, in this case I shot for 30 seconds at f/8. This particular image is also another example of the flashlight technique described above� I used it to highlight and bring attention to the chairs while leaving the walls to be lit by the little bit of light coming from the window.
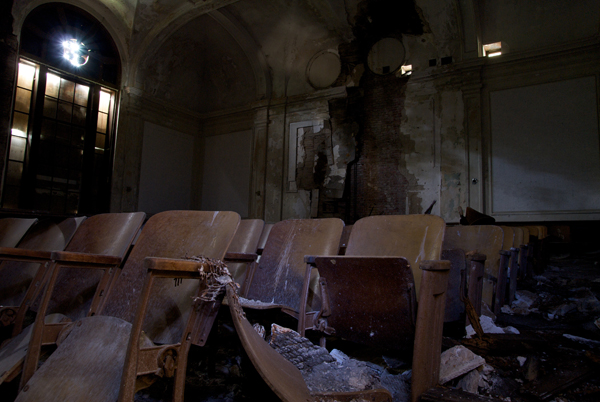 Auditorium by Chris Folsom
Go Wide
A wide angle lens can really add to the sense of emptiness and foreboding in these buildings. The photo shown below was taken by a friend of mine with a 10-22mm lens at 10mm. Having something that can go wide in the small areas you�ll be photographing can be a huge benefit.
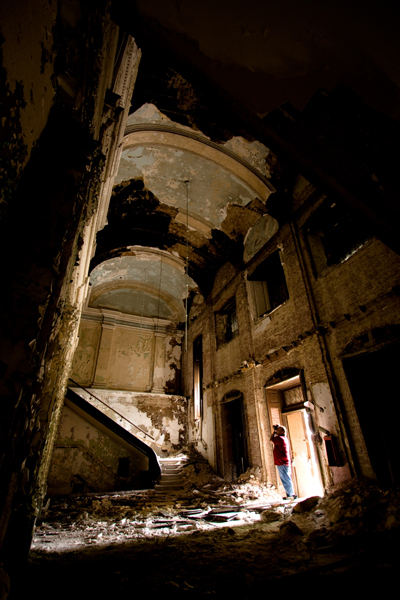 The Lobby by Jonathan Mowry
Emphasize the Mood
Use creative angles and perspectives to play up the natural character of the buildings. Get your camera low to the ground and shoot upwards to emphasize the vastness of a room, or shoot an angle to heighten the sense of disorientation. As a photographer you are telling the story of the place you are in and even a subtle shift of the camera�s perspective can make a huge impact on the mood of the photo.
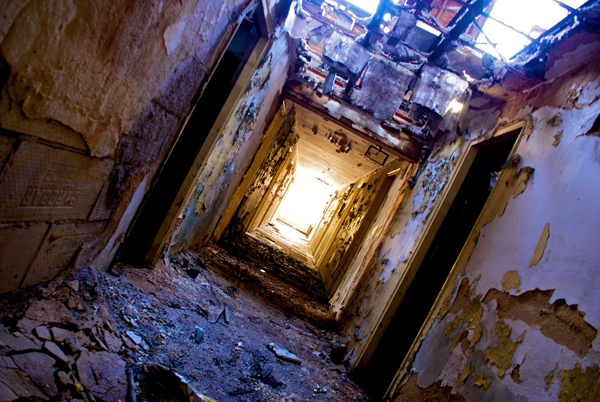 Mouth of Madness by Chris Folsom
Focus on the Details
While it is easy to get caught up in the architecture, try to also pay attention to the discarded items and details in the area as well. Chairs, books, phones and other remnants from days gone by can provide a powerful centerpiece to the image. Focusing on a single object can also act as an anchor in an otherwise chaotic environment.
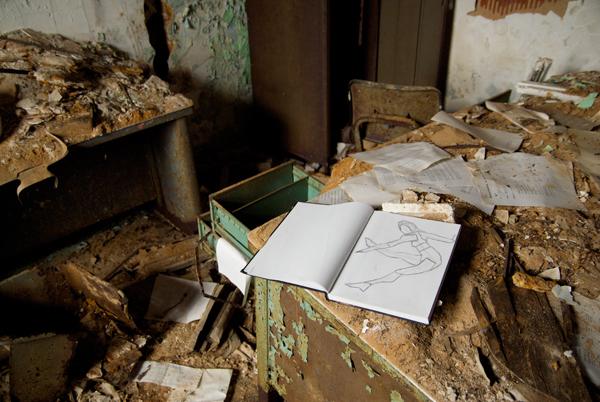 Lost Art by Chris Folsom
My final tip is for you to be careful while exploring these buildings. No photograph is worth endangering yourself, so take extreme precaution whenever you enter an unfamiliar location. Be safe and happy shooting!
 Chris Folsom is a hobbyist photographer who spends much of his time photographing buildings that are no longer in use. You can view his site at studiotempura.com or see more of his photos at Flickr. His photos have been published on numerous websites and newspapers.
<!-- post-meta --> Read more from our Featured: Tips and Tutorials, Other Photography Tips Category
Bring a Flashlight
The single most important tip I can provide anyone planning on visiting an abandoned building is to bring a flashlight. Most of these locations are without electricity and will have limited natural light. As such, you�ll need a flashlight to help navigate the dark rooms and corridors that you will encounter.
Beyond its more obvious application, a flashlight can also provide an interesting source of off-camera lighting. I have a small LED flashlight that I carry on my camera bag and it is often used to light up an area of a room during a long exposure shot. While a strobe can certainly be effective for many of these situations, a flashlight allows for a high degree of precision with the light. You can directly control exactly what is lit and for how long. A flashlight can also add an element of movement to the lighting that will result in an unusual combination of shadows that a flash otherwise may not.
It takes some practice to get a feel for how much light is enough, but with some work the results can be very satisfying.
Stairwell by Chris FolsomTripod not Optional
Because of the aforementioned lighting conditions, it goes without saying that you will need a tripod. More than half of the photos I take at these locales are shot on a tripod with a long exposure of anywhere from a couple of seconds to as much as 20 or 30 seconds.
For those instances when I don�t have my camera on a tripod, image stabilization and fast lenses help as well. My favorite lens is a 17-50mm f/2.8 paired with my camera�s in-body stabilized sensor. Wide open, I can usually get a relatively sharp image at 1/10th of a second. More often than not though, the best results will come from shooting on a tripod.
Control the Exposure
I am not one who believes all serious photographers should shoot in manual 100% of the time. There are plenty of instances where I am confident that the camera will properly meter the lighting and autopilot mode is fine. Unfortunately, that tactic will not work in most abandoned buildings.
Because of the extreme lighting conditions of these spaces, you�ll need to control all aspects of the shot. In the photo shown here, for example, I needed to control the aperture (I wanted this fairly sharp from front to back) and I needed to control the shutter speed to ensure proper lighting. So, in this case I shot for 30 seconds at f/8. This particular image is also another example of the flashlight technique described above� I used it to highlight and bring attention to the chairs while leaving the walls to be lit by the little bit of light coming from the window.
Auditorium by Chris FolsomGo Wide
A wide angle lens can really add to the sense of emptiness and foreboding in these buildings. The photo shown below was taken by a friend of mine with a 10-22mm lens at 10mm. Having something that can go wide in the small areas you�ll be photographing can be a huge benefit.
The Lobby by Jonathan MowryEmphasize the Mood
Use creative angles and perspectives to play up the natural character of the buildings. Get your camera low to the ground and shoot upwards to emphasize the vastness of a room, or shoot an angle to heighten the sense of disorientation. As a photographer you are telling the story of the place you are in and even a subtle shift of the camera�s perspective can make a huge impact on the mood of the photo.
Mouth of Madness by Chris FolsomFocus on the Details
While it is easy to get caught up in the architecture, try to also pay attention to the discarded items and details in the area as well. Chairs, books, phones and other remnants from days gone by can provide a powerful centerpiece to the image. Focusing on a single object can also act as an anchor in an otherwise chaotic environment.
Lost Art by Chris FolsomMy final tip is for you to be careful while exploring these buildings. No photograph is worth endangering yourself, so take extreme precaution whenever you enter an unfamiliar location. Be safe and happy shooting!
Chris Folsom is a hobbyist photographer who spends much of his time photographing buildings that are no longer in use. You can view his site at studiotempura.com or see more of his photos at Flickr. His photos have been published on numerous websites and newspapers.<!-- post-meta --> Read more from our Featured: Tips and Tutorials, Other Photography Tips Category

Thread
Thread Starter
Forum
Replies
Last Post