
My iPod Installation - 2005 TSX w/ Navi


Thread Starter
3rd Gear
Joined: Nov 2005
Posts: 3
Likes: 0
My iPod Installation - 2005 TSX w/ Navi
After various false starts, I just completed an iPod installation that works great. Here are the details, along with some photos:
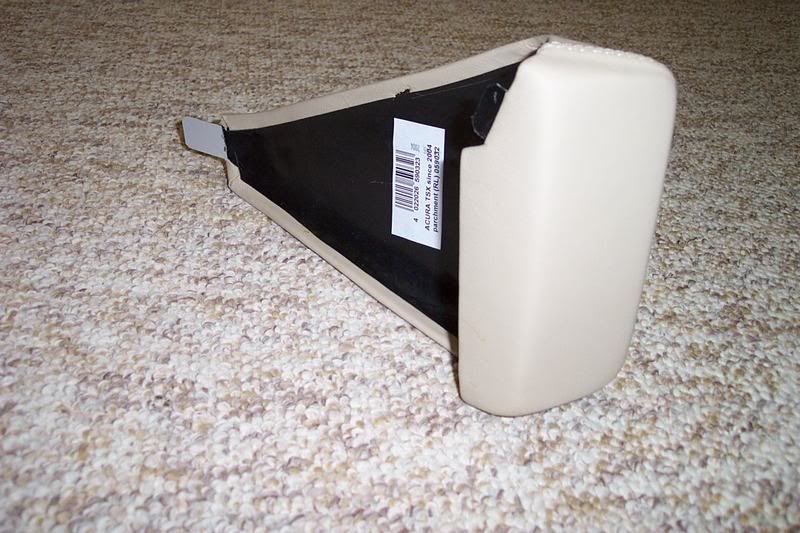
Mounting
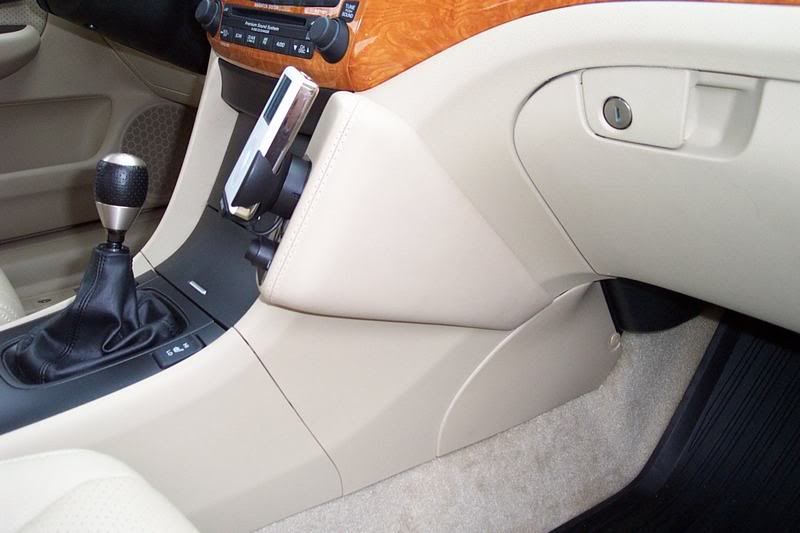
I wanted to be able to see the iPod user interface from the driver�s position, so this ruled out mounting the iPod in the glovebox or other hidden location. I looked at the Panavise mount, but I saw a couple of drawbacks. First, the Panavise is a simple metal bracket that sticks out from the cubby area, and looks like it could do a number on the leg of a passenger. Also, I didn�t see a way that the cable from the iPod could be hidden for a clean installation. I discovered a mount made by a German company called Kuda that solved both of these problems. The Kuda mount attaches between the cubby area and a mounting slot for the kick panel in the passenger footwell area. The mount is made of fiberglass covered by leather, and is available in parchment, quartz or black from http://www.kudausa.com/. Here is a picture of the Kuda mount in parchment:
Interface
It took me three tries to get an interface I was happy with. My first attempt was a Dension Ice Link. In my last car (a VW Passat), I had an Ice Link installation that I was very happy with. I wasn�t completely thrilled with having to disconnect my XM receiver to make the Ice Link work in the TSX, but would have been willing to make this sacrifice if the Ice Link would have worked properly. Unfortunately, I wasn�t able to get the Ice Link working properly. My subsequent attempts were based on the simple approach of tapping into the audio lines between the XM receiver and the head unit. I first noticed this idea in CJams� post here:
https://acurazine.com/forums/audio-video-electronics-navigation-22/finally-i-have-xm-my-auxillary-input-my-05tsexw-navi-312281/
To go from the iPod to RCA contacts into the aux input selector, I used the BlitzSafe Universal iPod Interface (UII). I wanted to reuse the cradle mount from my Ice Link, and by happy coincidence, the UII uses the same 8-pin mini-DIN connector with the same pinout as the Ice Link. The UII also provides charging for the iPod when the car is on, and for 20 minutes after the car is shut off. As in CJams' post referenced above, I used the Soundgate AUX3 as my aux input selector. Everything worked, except that there seemed to be an excessive amount of signal loss going through the AUX3. For my third and final attempt, I built my own aux input selector to replace the AUX3. Details on my final successful installation are as follows:
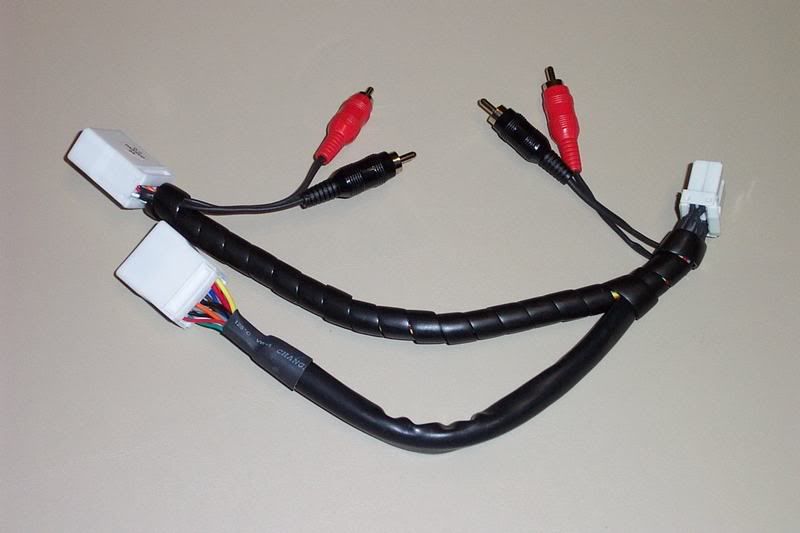
Cable Harness
I didn�t want to cut into the audio harness on the car, so I used a separate harness to do the wiring modification. If I were to do the installation over again, I would use a standard audio harness from Honda (P/N 08A31-0E1-010, approx. $30). As it was, I had already purchased a Y-connector harness (P.I.E. P/N HON03-F/MM) for $40 for my attempted Ice Link installation, so I just used that instead. Details on the wires to cut and attach to the RCA connectors are provided in CJams� post, so I won�t repeat them. Here is a picture of the completed cable harness:
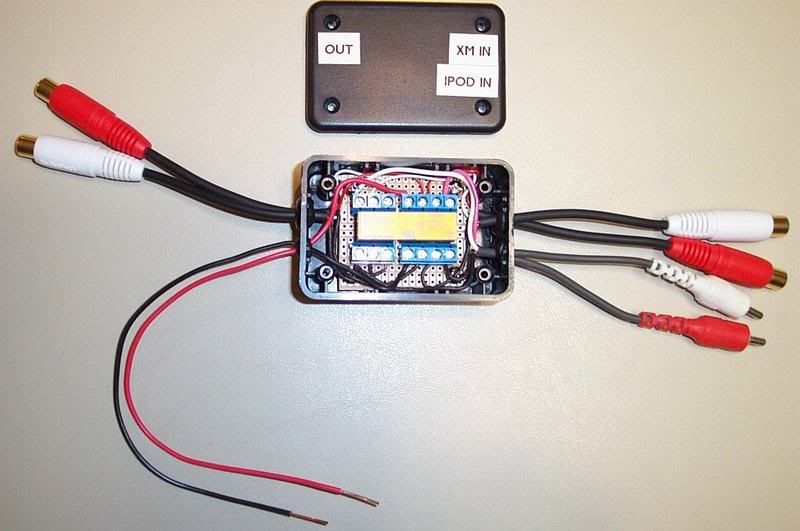
Aux Input Selector
My aux input selector uses a single 4PDT DIP relay (Aromat P/N DS4E-M-DC12V), purchased from Jameco Electronics (Jameco P/N 176313) for about $7. I soldered a socket for the relay, and some terminal blocks, to a PCB. I mounted the PCB in a small project box and ran the leads from three sets of RCA connectors to the terminals. Here is the completed aux input selector:
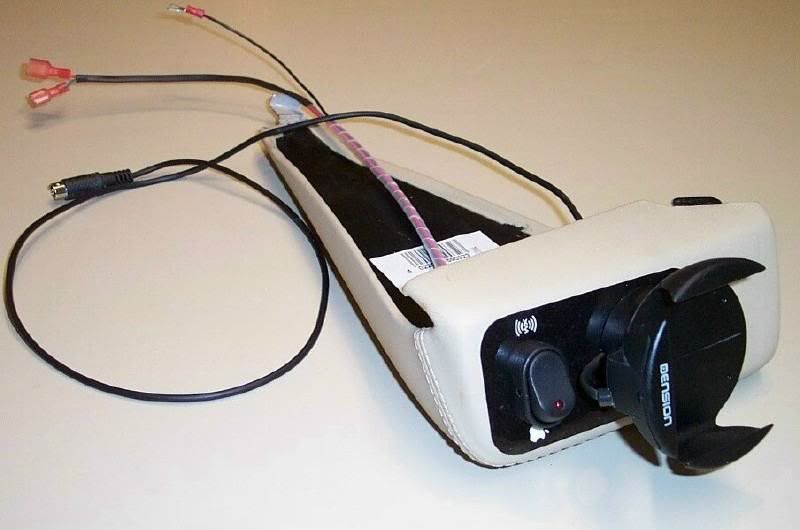
Kuda Mount
The Ice Link cradle is attached to the face of the Kuda mount by drilling holes through the Kuda for mounting screws. A larger hole was drilled for the mini-DIN connector from the cradle. This hole was drilled in a location that would be covered by the cradle base when the cradle is mounted to the Kuda. I ground a small notch in the bottom of the Ice Link cradle base so the cable can pass under the base and through this hole. Unfortunately, I initially mounted the cradle near the bottom of the Kuda for my Ice Link installation. When the Ice Link didn�t work, I needed to add a selector switch. I decided to add this to the Kuda, just below the iPod cradle. This required me to move the cradle to a position further up on the face of the Kuda, exposing the screw and cable holes. I covered these up by making a �faceplate� for the Kuda. The faceplate is a black background, with white XM and Apple logos to indicate the selector switch positions for the XM receiver and the iPod. I made the faceplate using an inkjet printer and heavy card stock. I then laminated the card stock, cut it to size and attached it to the Kuda using rubber cement. The selector switch is a SPST automotive switch. The switch has an LED that lights in the �on� position (or, in my case, the �iPod� position). This way, I can tell at night that the iPod has been selected when the LED is lighted. Here is a picture of the Kuda with the faceplate, Ice Link cradle and selector switch installed:
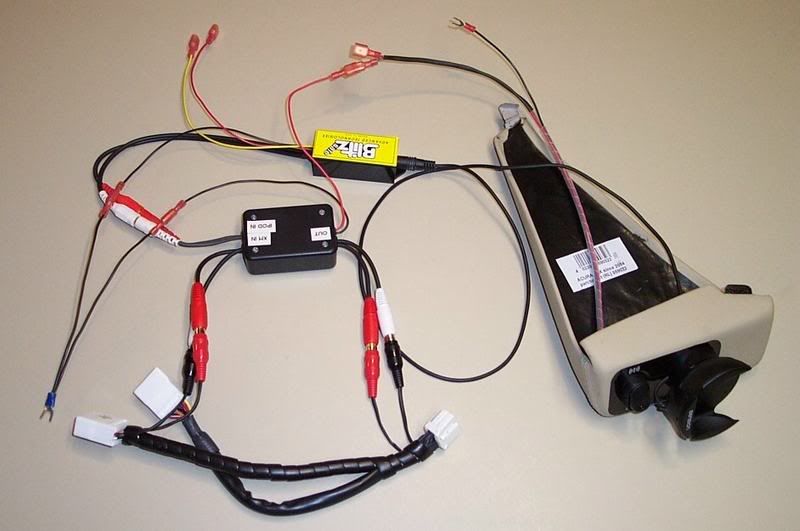
Here is a picture of the complete setup, with all components ready for car installation:
Car Installation
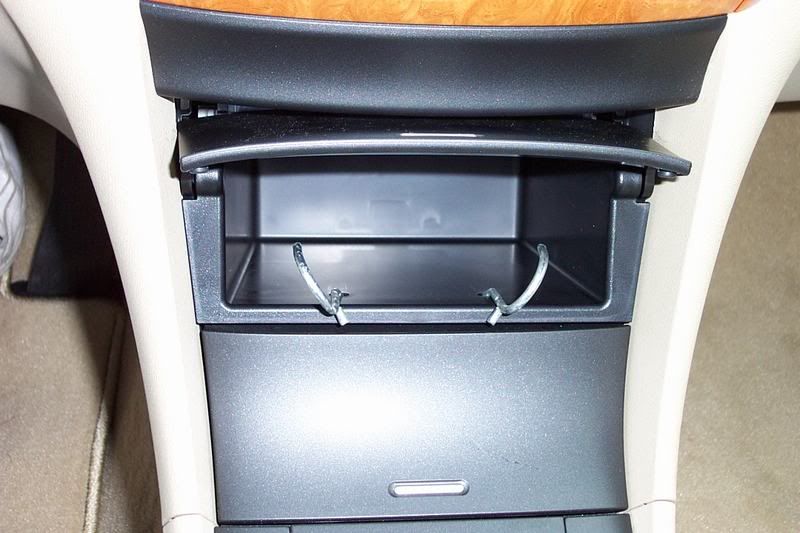
I discovered an easy way to remove the cubby to do the installation. I used two pegboard hooks in the holes in the bottom of the cubby:
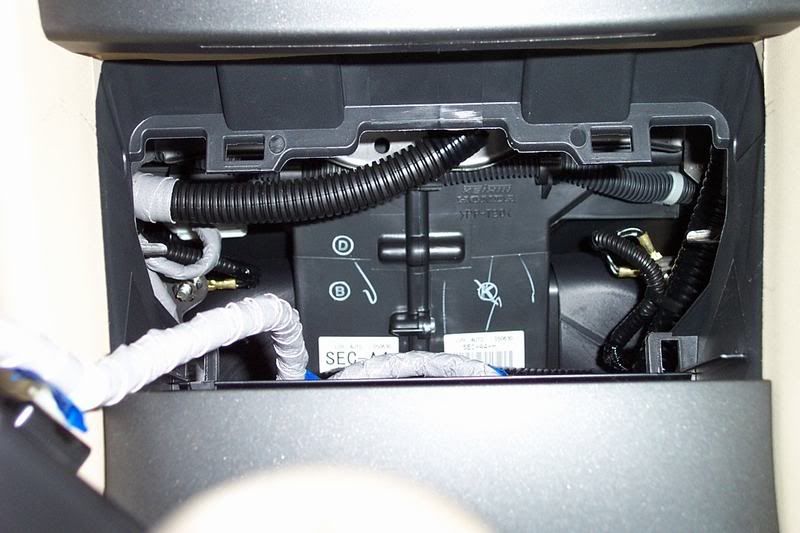
With the cubby removed, it�s easy to get at the audio harness connector on the bottom of the head unit, and to a point for attaching the ground leads:
For power, I used Add a Circuit units (manufactured by Littelfuse, available at AutoZone and other auto parts stores). Since the BlitzSafe UII needs both switched and unswitched power, I needed two of these. Fuse position 32 provides switched power (on in �accessory� and �run� positions) and fuse position 6 provides unswitched power:

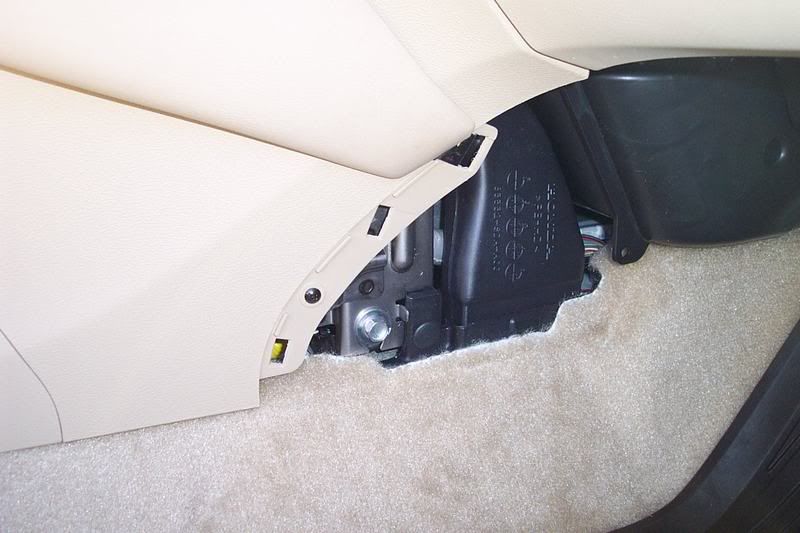
The only permanent damage I needed to do to the car for the installation was to grind out an area for the cables from the Ice Link cradle and selector switch on the Kuda notch in the passenger footwell area:
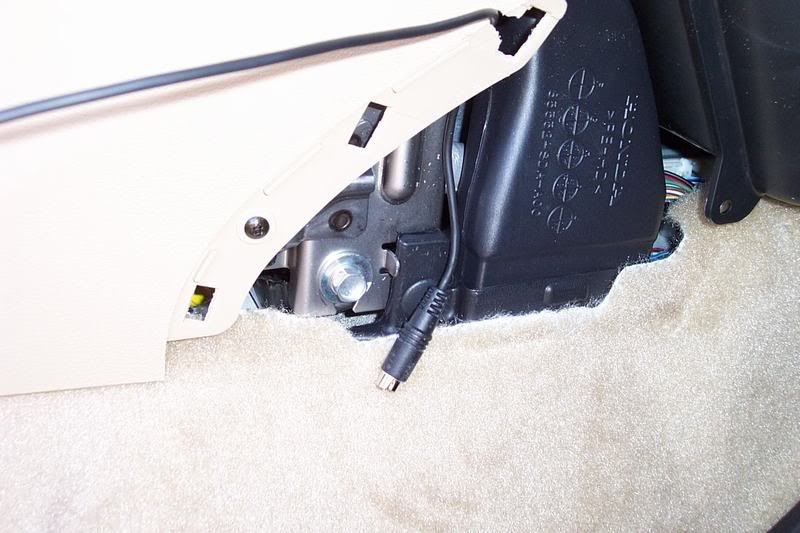
With the cables in place, the Kuda is attached by bending a metal tab into the footwell panel mounting slot:
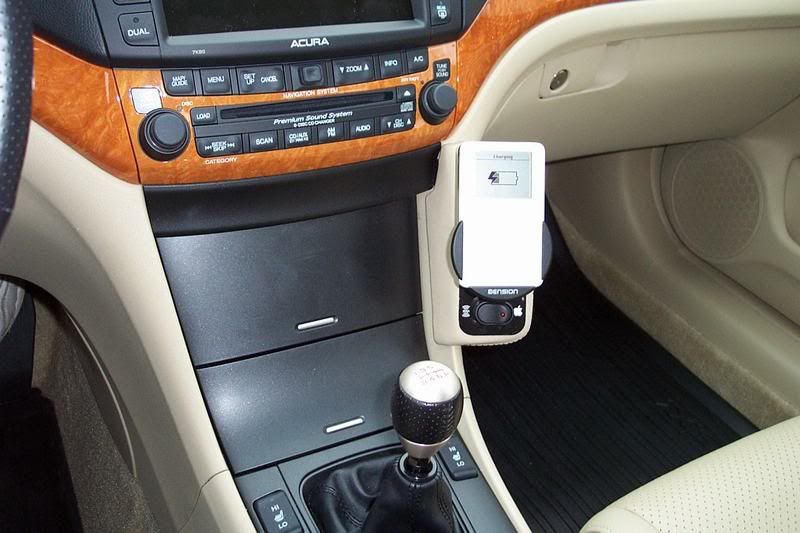
Here are some photos of the completed installation:
Mounting
I wanted to be able to see the iPod user interface from the driver�s position, so this ruled out mounting the iPod in the glovebox or other hidden location. I looked at the Panavise mount, but I saw a couple of drawbacks. First, the Panavise is a simple metal bracket that sticks out from the cubby area, and looks like it could do a number on the leg of a passenger. Also, I didn�t see a way that the cable from the iPod could be hidden for a clean installation. I discovered a mount made by a German company called Kuda that solved both of these problems. The Kuda mount attaches between the cubby area and a mounting slot for the kick panel in the passenger footwell area. The mount is made of fiberglass covered by leather, and is available in parchment, quartz or black from http://www.kudausa.com/. Here is a picture of the Kuda mount in parchment:
Interface
It took me three tries to get an interface I was happy with. My first attempt was a Dension Ice Link. In my last car (a VW Passat), I had an Ice Link installation that I was very happy with. I wasn�t completely thrilled with having to disconnect my XM receiver to make the Ice Link work in the TSX, but would have been willing to make this sacrifice if the Ice Link would have worked properly. Unfortunately, I wasn�t able to get the Ice Link working properly. My subsequent attempts were based on the simple approach of tapping into the audio lines between the XM receiver and the head unit. I first noticed this idea in CJams� post here:
https://acurazine.com/forums/audio-video-electronics-navigation-22/finally-i-have-xm-my-auxillary-input-my-05tsexw-navi-312281/
To go from the iPod to RCA contacts into the aux input selector, I used the BlitzSafe Universal iPod Interface (UII). I wanted to reuse the cradle mount from my Ice Link, and by happy coincidence, the UII uses the same 8-pin mini-DIN connector with the same pinout as the Ice Link. The UII also provides charging for the iPod when the car is on, and for 20 minutes after the car is shut off. As in CJams' post referenced above, I used the Soundgate AUX3 as my aux input selector. Everything worked, except that there seemed to be an excessive amount of signal loss going through the AUX3. For my third and final attempt, I built my own aux input selector to replace the AUX3. Details on my final successful installation are as follows:
Cable Harness
I didn�t want to cut into the audio harness on the car, so I used a separate harness to do the wiring modification. If I were to do the installation over again, I would use a standard audio harness from Honda (P/N 08A31-0E1-010, approx. $30). As it was, I had already purchased a Y-connector harness (P.I.E. P/N HON03-F/MM) for $40 for my attempted Ice Link installation, so I just used that instead. Details on the wires to cut and attach to the RCA connectors are provided in CJams� post, so I won�t repeat them. Here is a picture of the completed cable harness:
Aux Input Selector
My aux input selector uses a single 4PDT DIP relay (Aromat P/N DS4E-M-DC12V), purchased from Jameco Electronics (Jameco P/N 176313) for about $7. I soldered a socket for the relay, and some terminal blocks, to a PCB. I mounted the PCB in a small project box and ran the leads from three sets of RCA connectors to the terminals. Here is the completed aux input selector:
Kuda Mount
The Ice Link cradle is attached to the face of the Kuda mount by drilling holes through the Kuda for mounting screws. A larger hole was drilled for the mini-DIN connector from the cradle. This hole was drilled in a location that would be covered by the cradle base when the cradle is mounted to the Kuda. I ground a small notch in the bottom of the Ice Link cradle base so the cable can pass under the base and through this hole. Unfortunately, I initially mounted the cradle near the bottom of the Kuda for my Ice Link installation. When the Ice Link didn�t work, I needed to add a selector switch. I decided to add this to the Kuda, just below the iPod cradle. This required me to move the cradle to a position further up on the face of the Kuda, exposing the screw and cable holes. I covered these up by making a �faceplate� for the Kuda. The faceplate is a black background, with white XM and Apple logos to indicate the selector switch positions for the XM receiver and the iPod. I made the faceplate using an inkjet printer and heavy card stock. I then laminated the card stock, cut it to size and attached it to the Kuda using rubber cement. The selector switch is a SPST automotive switch. The switch has an LED that lights in the �on� position (or, in my case, the �iPod� position). This way, I can tell at night that the iPod has been selected when the LED is lighted. Here is a picture of the Kuda with the faceplate, Ice Link cradle and selector switch installed:
Here is a picture of the complete setup, with all components ready for car installation:
Car Installation
I discovered an easy way to remove the cubby to do the installation. I used two pegboard hooks in the holes in the bottom of the cubby:
With the cubby removed, it�s easy to get at the audio harness connector on the bottom of the head unit, and to a point for attaching the ground leads:
For power, I used Add a Circuit units (manufactured by Littelfuse, available at AutoZone and other auto parts stores). Since the BlitzSafe UII needs both switched and unswitched power, I needed two of these. Fuse position 32 provides switched power (on in �accessory� and �run� positions) and fuse position 6 provides unswitched power:
The only permanent damage I needed to do to the car for the installation was to grind out an area for the cables from the Ice Link cradle and selector switch on the Kuda notch in the passenger footwell area:
With the cables in place, the Kuda is attached by bending a metal tab into the footwell panel mounting slot:
Here are some photos of the completed installation:


Trending Topics


Thread Starter
3rd Gear
Joined: Nov 2005
Posts: 3
Likes: 0
Good question about the costs. Here are the costs for the major components, along with links to where you can get them:
Kuda Mount
$56.10 in black, $62.70 in quartz or parchment:
http://www.kudausa.com/mount.php?mod...o_options_id=7
Cable Harness
$29.40 from cheaphondaparts.com:
http://www.cheaphondaparts.com/shop/...&Product_ID=88
Blitzsafe Universal iPod Interface
$59.95 from Logjam Electronics:
http://www.logjamelectronics.com/blitzuii.html
Ice Link Cradle
I had the cradle left over from an Ice Link installation on my old car, so I didn�t need to buy it for this installation. Dension�s web site doesn�t list the cradle as something you can buy separately from the Ice Link, but I understand they will sell you one for about $40:
http://www.densionusa.com/
Relay Box
The relay is $6.95 from Jameco Electronics:
http://www.jameco.com/webapp/wcs/sto...oductId=176313
I got all of the miscellaneous components from Radio Shack and AutoZone for a total of about $25.
Added up, you could proably do the complete installation for about $225.
Guinea Pig
Joined: Apr 2005
Posts: 4,104
Likes: 2
From: At home
I forgot to ask..... Does the glove box hit it when you open it up? Are there any other functional problems? I like it.....alot! Might be #1 on Santa's list!
BTW-I like the peg board hook idea to remove the storage bin!
BTW-I like the peg board hook idea to remove the storage bin!
'05 TSX CG W/NAV
Joined: Oct 2005
Posts: 204
Likes: 0
Sweet install. That mount seems like a bargain at that price. When I saw the leather, I was thinking well over $100. $62 or whtever it is seems great. I have the soungate aux3 device and just ordered the Honda harness so I do not have to cut/solder in the car. If it sounds good, I will be buying that mount as well.


Thread
Thread Starter
Forum
Replies
Last Post
handsom-hustla
Car Parts for Sale
70
Nov 13, 2015 05:04 PM
Vejey Gandier
3G TL Audio, Bluetooth, Electronics & Navigation
4
Sep 12, 2015 08:59 PM
ivegotthenav
1G TSX Performance Parts & Modifications
0
Sep 11, 2015 07:51 PM
nuldabz
3G TL Tires, Wheels & Suspension
3
Sep 3, 2015 05:49 PM
2005, acura, area, auxillarry, coral, install, installation, integration, ipod, navi, navigation, play, springs, tsx, video